Setting up a Python Coding Environment

Welcome back folks!

Like many of my fellow veteran men and women in tech, I’ve been putting in the effort to evolve my skill set and embrace the industry’s shift to a more code focused world.  Those of us who came from the “rack and stack” generation did some scripting here and there where it workable using VB, Bash, Batch, Perl, or the many other languages who have had their time in the limelight.  The concept of a development lifecycle and code repository typically consisted of a few permanently open Notepad instances or if you were really fancy, scripts saved to a file share with files labeled v1, v2, and so on.  Times have changed we must change with them.

Over the past two years I’ve done significantly more coding.  These efforts ranged from creating infrastructure using Microsoft ARM (Azure Resource Manager) and AWS CloudFormation templates to embracing serverless with Azure Functions and AWS Lambdas.  Through this process I’ve quickly realized that the toolsets available to manage code and its lifecycle have evolved and gotten more accessible to us “non-developers”.

I’m confident there are others like myself out there who are coming from a similar background and I wanted to put together a post that might help others begin or move forward with their own journeys.  So for this post I’m going to cover how to setup a Visual Studio Code environment on a Mac for developing code using Python.

With the introduction done, let’s get to it!

First up you’ll need to get Python installed.  The Windows installation is pretty straightforward and can be downloaded here.  Macs are a bit tricker because OS X ships with Python 2.7 by default.  You can validate this by running python –version from the terminal.  What this means is you’ll need to install Python 3.7 in parallel.  Thankfully the process is documented heavily by others who are far more knowledgable than me.  William Vincent some wonderful instructions.

Once Python 3.7 is installed, we’ll want to setup our IDE (integrated development environment).  I’m partial to VSC (Visual Studio Code) because it’s free, cross platform, and simple to use.  Installation is straightforward so I won’t be covering those steps.

Well you have your interpreter and your IDE but you need a good solution to store and track changes to the code you’re going to put together.  Gone are the days of managing it by saving copies (if you even got that far) to your desktop and arrived are the days of Git.  You can roll your own Git service or use a managed service.  Since I’m a newbie, I’ve opted to go mainstream and simple with Github.  A free account should more than suffice unless you’re planning on doing something that requires a ton of collaboration.

Now that your account is setup, let’s go through the process of creating a simple Python script, creating a new repository, committing the code, and pushing it up to Github.  We’ll first want to create a new workspace in VSC.  One of the benefits of a workspace is you can configure settings on a per project basis vs modifying the settings of the VSC as a whole.

To do this open VSC and create a new empty file using the New file shortcut as seen below.

Screen Shot 2019-06-18 at 9.11.34 PM.png

Once the new window is opened, you can then choose Save Workspace as from the File context menu.  Create a new directory for the project (I’ll refer to this as the project directory) and save the workspace to that folder.  Create a subfolder under the workspace (I’ll refer to this as the working directory).

We’ll now want to initialize the local repository.  We can do this by using the shortcut Command+Shift+P which will open the command pallet in VSC.  Search for Git, choose Git: Initialize Repository, and select the working directory.   You’ll be prompted to add the folder to the workspace which you’ll want to do.

Screen Shot 2019-06-18 at 9.26.11 PM.png

VSC will begin tracking changes to files you put in the folder and the Source Control icon will now be active.

Screen Shot 2019-06-18 at 9.27.28 PM.png

Let’s now save the new file we created as hello-world.py.  The py extension tells VSC that this is Python code and you’ll yield a number of benefits such as IntelliSense.  If you navigate back to the Source Control you’ll see there are uncommitted changes from the new hello-world.py file.  Let’s add the classic line of code to print Hello World.  To execute the code we’ll choose the Start Without Debugging option from the Debug context menu.

Screen Shot 2019-06-18 at 9.35.45 PM.png

The built in Python libraries will serve you well, but there are a TON of great libraries out there you’ll most certainly want to use.  Wouldn’t it be wonderful if you could have separate instances of the interpreter with specific libraries?  It comes the awesomeness of virtual environments.  Using them isn’t required but it is best practice in the Python world and will make your life a lot easier.

Creating a new virtual environment is easy.

  1. Open a new terminal in Visual Studio Code, navigate to your working directory, and create a new folder named envs.
  2. Create the new virtual environment using the command below.
    python3 -m venv ./envs

You’ll now be able select the virtual environment for use in the bottom left hand corner of VSC as seen below.

Screen Shot 2019-06-14 at 9.31.43 PM.png

After you select it, close out the terminal window and open a new one in VSC by selecting New Terminal from the Terminal context menu.  You’ll notice the source command is run to select the virtual environment.  You can now add new libraries using pip (Python’s package manager) as needed and they will be added to the virtual environment you created.

If you go back to the source control menu you’ll notice there a whole bunch of new files.  Essentially Git is trying to track all of the files within the virtual environment.  You’ll want to have Git ignore it by creating a file name .gitignore file.  Within the file we’ll add two entries, one for the ignore file and one for the virtual environment directory (and a few others if you have some hidden files like Mac’s .DS_Store).

Screen Shot 2019-06-18 at 10.21.13 PM

Let’s now commit the new file hello-world.py to the local repository.  Accompanying the changes, you’ll also add a message about what has changed in the code.  There is a whole art around good commit messages which you can research on the web.  Most of my stuff is done solo, so it’s simple short messages to remind me of what I’ve done.   You can make your Git workflows more sophisticated as outlined here, but for very basic development purposes a straight commit to the master works.

Now that we have the changes committed to our local repository, let’s push them up to a new remote repository in Github.  First you’ll want to create an empty repository.  To add data to the repo, you’ll need to authenticate.  I’ve added two-factor authentication to my Github account, which it doesn’t look like Visual Studio Code supports at this time.  To work around the limitation you can create personal access tokens.  Not a great solution, but it will suffice as long as you practice good key management and create the tokens with a limited authorization scope and limit their lifetime.

Once your repository is set and you’ve created your access token, you can push to the remote repository.  In Visual Studio Code run Command+Shift+P to open the command pallet and find Git: Add Remote command to add the repository.  Provide a name (I simply used origin, seems like the common name) as the name and provide the URL of your repository.  You’ll then be prompted to authentication.  Provide your Github username and the personal access token for the password.   Your changes will be pushed to the repository.

There you have it folks!  I’m sure there are better ways to orchestrate this process, but this is what’s working for me.  If you have alternative methods and shortcuts, I’d love to hear about them.

Have a great week!

Integrating Azure AD and G-Suite – Google API Integration Part 2

Integrating Azure AD and G-Suite – Google API Integration Part 2

Welcome back.

We’ve had an interesting journey so far in this series exploring the Azure Active Directory (Azure AD) and Google G-Suite (G-Suite) integration.  In the first entry I covered how the single sign-on integration works.  The second entry covered explored the process of registering an application with the Google Cloud Platform (GCP) for API access and GCP’s relationship to G-Suite.  Today I demonstrate interaction with Google’s API through the use of some very basic .NET console applications I’ve put together.

As you’ll recall from the second entry, I created a new project with GCP and created a service account identity for my sample application and the Google Admin API has been enabled for the project.  The application has been granted domain-wide delegation rights to my G-Suite domain at geekintheweeds.com.  Finally, the application’s client ID added to my G-Suite domain and has been granted access to the https://www.googleapis.com/auth/admin.directory.user.readonly scope.  The application has an identity, credentials to authenticate, and has been authorized with appropriate access.  Let’s get to some coding (or the mess of garbled logic that accounts for my coding ability 🙂 ).

Google provides API client libraries for a number of languages.  For the purposes of this demonstration, I’ll be using the .NET client library.  Play it smart and leverage the libraries vendors provide for ease of integration as well as avoiding critical mistakes that could impact the security of your API calls.  Now using libraries doesn’t mean you get to ignore what goes on behind the curtains.  It’s critical to understand what the libraries are doing to ensure they’re doing things securely and for the purposes of working out bugs.  APIs in the cloud are changing on a daily basis, don’t count on the libraries keeping up with the vendor pace.  The last thing you want to run into is an situation where your application kicks the bucket due to an API change that isn’t reflected in the library and you’re stuck with a broken production application.

With that lecture out of the way, let’s get into the code for the demo application.

My first step is to open a new project in Visual Studio creating a Visual C# Console App using the .NET Framework.  Before I jump into using Google’s libraries I’m going to do the exact opposite of what I advised you to do above.  Yes folks, I’m going to make a call to the API without using Google’s libraries for the purposes of demonstrating the steps involved in acquiring an access token and sending that access token to the API to retrieve data.  I’ll then demonstrate how much simpler it is to use the library so you’ll appreciate the value of them.

As I explained in my last post, Google APIs use OAuth 2.0 for delegated access to data.  Google does a good job explaining the basic steps in obtaining an access token in this article so I won’t go too deeply into detail.  Instead I’m going to walk through putting these steps into code.  Fair warning, this code is meant for demo purposes only.  This means I’m not going to do any data validation, exception catching, or exercise secure coding practices.  Please please please don’t use my terrible coding practices in any real applications you develop.

Ready?  Let’s begin.

The article above first instructs you to obtain OAuth 2.0 credential which I did in my last entry.  The second step is to obtain an access token from the Google Authorization Server.  I’ll be following the instructions for the OAuth 2.0 for Service Accounts since I’m building a console application for simplicity purposes.

The first thing we need to is collect a few pieces of information.  In the service account scenario we need to know the unique identifier of the service account and the scopes we want to access.  For that I pop open a browser and go to the my project in the console for GCP.  From there I navigate to the APIs & Services section and select the credentials option.

google2int1

On the Credentials page I click on my service account to bring up the relevant information.  The service account field contains the unique identifier (or email address as Google refers to it) of the service account I setup.

google2int2.png
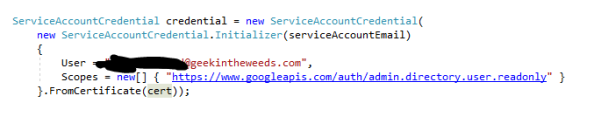
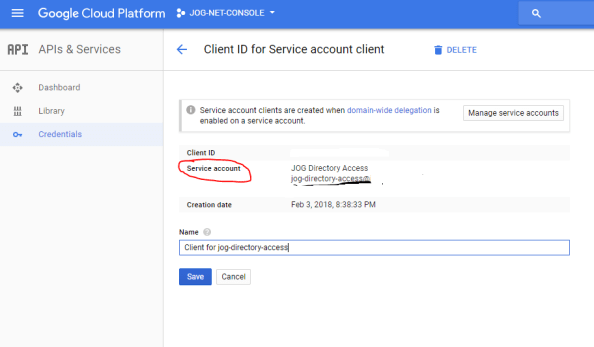
This identifier is one of the pieces of information I’ll need to include in the JSON Web Token (JWT) I’m going to send to Google’s API to obtain an access token.  In addition to the service account identifier, I also need the scopes I want to access, Google Authorization Server endpoint, G-Suite user I’m impersonating, the expiration time I want for the access token (maximum of one hour), and the time the assertion was issued.

google2int3

Now that I’ve collected the information I need for my claim set, I need to grab the private key from the PKCS#12 (.p12) certificate I was issued when I setup my service account.

google2int4.png
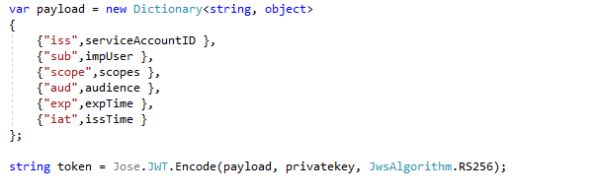
At this point I have all the components I need to assemble my JWT.  For that I’m going to add the jose-jwt library to my application and leverage it to simplify the creation of the JWT.

google2int5.png

Once the library is added I create the JWT.  Google requires it include a base64 encoded header, base64 encoded claim set, and the signature providing my application’s identity and ensuring the integrity of the JWT.  The signature is creating using the RSA-SHA256 signing algorithm, which is the only algorithm Google supports at this time.

google2int6.png
I quickly debug the app, dump the token variable to a string, copy it into Fiddler’s Text Wizard and Base64 decode it, we see the JWT we’ll be passing to Google.

google2int7.pngI now have my JWT assembled and am ready to deliver to Google for an access token request.  The next step is to submit it to Google’s authorization server.  For that I need to a do a few things.  The first thing I need to is create a new class that will act as the data model for JSON response Google will return to me after I submit my authorization request.  I’ll deserialize the JWT I receive back using this data model.

google2int8.png

Next I create a new task that will accept a base web address, uri, and a JWT.  The task then uses an instance of the HttpClient class to post it to Google’s authorization server and to capture the JSON response.

google2int9
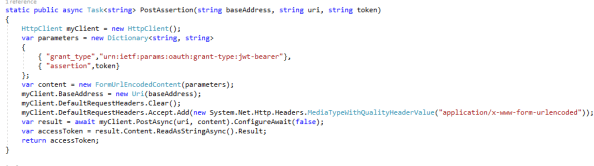
I then call the new task, pass the appropriate parameters, deserialize the JSON response using the data model I created earlier, and dump the bearer access token into a string variable.

google2int10So I have my bearer access token that allows me to impersonate the user within my G-Suite domain for the purposes of hitting the Google Directory API. I whip up another task that will deliver the bearer access token to the Google Directory API and the JSON response which will include details about the user.

google2int11Finally I call the task and dump the JSON response to the console.

google2int12.pngThe results look like the below.

google2int13.png

Victory!  Whew a lot of work there to pull a small amount of data from an API.   I had to create models for the data (you’ll notice I got lazy at the end and didn’t create a user model), properly secure the JWT for the access token request, manage my own http clients, and handle the JSON responses.  It ended up being a fair amount of code for a relatively simple process.

How much easier is it using Google’s .NET library?  Let’s take a look at it.

In the code below I create a service account credential which handles the process of creating the appropriate JWT access token.

google2int14.png

Next up I create a new instance of the DirectoryService class which will represent the connection to the Google Directory API.  This class the assembly of the eventual POST to obtain the bearer access token.

google2int15.png

Last but not least I submit a request for user information for marge.simpson@geekinthweeds.com using the instance of the DirectoryService class I created and placing the JSON response into instance of the User class included in the Directory API which will serve as the data model for the response.

google2int16
Just a tad bit easier using the library right? If we break out Fiddler we see that four sessions have been created.

google2int17
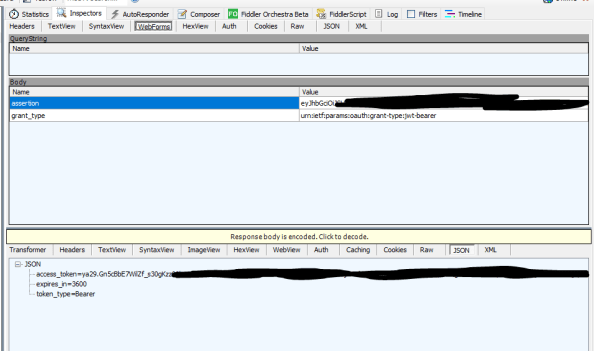
Session 1 and 2 display the submission of the JWT and acquisition of the bearer token.

google2int18.png

Sessions 3 and 4 display the delivery of the bearer token to the API and the JSON response received back.

google2int19.png

What did we learn from these past two posts (besides the fact I’m a terrible developer)?  We saw programmatic access to G-Suite is very dependent on foundational components of GCP.  Application identities are provisioned in the Google’s IAM Service instance associated with the GCP Project.  The appropriate APIs must be enabled for the GCP project that the application needs to use.  The application must then be granted access to the appropriate authorization scopes within the G-Suite domain and Google provides an option for the application to impersonate users within the G-Suite domain rather than relying upon the user’s consent.

My hope is the biggest lesson you took from these two posts is how valuable it is to understand the inner workings of how a vendor leverages a technology.  Vendor-provided libraries are wonderful and make our lives far easier and our code potentially more simple and secure, but nothing is ever more powerful than understanding the inner workings of the foundational technology.  The knowledge you take at the technology level will translate across all vendors you encounter making grasping that new product all that much easier.  Take your time, dig deep into the weeds, and enjoy the journey into the technology.

See you in the next post where I’ll wrap up this series and break down the Microsoft Azure AD identity provisioning integration with G-Suite.  Have a great week!


Azure AD ASP .NET Web Application

Hi all. Before I complete my series on Azure AD Provisioning with a look at how provisioning works with the Graph API, I want to take a detour and cover some Microsoft Visual Studio. Over the past month I’ve been spending some time building very basic applications.

As I’ve covered previously in my blog, integration is going to the primary responsibility of IT Professionals as more infrastructure shifts to the cloud. Our success at integration will largely depend on how well we understand the technologies, our ability to communicate what business problems these technologies can solve, and our understanding of how to help developers build applications to consume these technologies. In my own career, I’ve spent a significant time on all of the above except the last piece. That is where I’m focusing now.

Recently I built a small.NET forms application that integrated with the new Azure AD B2B API. Over the past few days I’ve been spending time diving with to ASP .NET Web Applications built with an MVC architecture. I decided to build an small MVC application that performed queries against the Graph API, and wow was it easy. There was little to no code that I had to provide myself and “it just worked”. You can follow these instructions if you’d like to play with it as well. If you’ve read this blog, you know I don’t do well with things that just work. I need to know how it works.

If you follow the instructions in the above link you will have a ASP .NET Web Application that is integrated with your Azure AD tenant, uses Azure AD for authentication via the Open ID Connect protocol, and is capable of reading directory data from the Graph API uses OAuth 2.0. So how is all this accomplished? What actually happened? What protocol is being used for authentication, how does the application query for directory data? Those are the questions I’ll focus on answering in this blog post.

Let’s first answer the question as to what Visual Studio did behind the scenes to integrate the application with Azure AD. In the explanation below I’ll be using the technology terms (OAuth 2.0 and Open ID Connect) in parentheses to translate the Microsoft lingo. During the initialization process Visual Studio communicated with Azure AD (Authorization Server) and registered (registration) the application (confidential client) with Azure AD as a Web App and gave it the delegated permissions (scopes) of “Sign in and read user profile” and “Read directory data”.

In addition to the registration of the application in Azure AD, a number of libraries and code have been added to the project that make the authentication and queries to the Graph API “out of the box”. All of the variables specific to the application such as Client ID, Azure AD Instance GUID, application secret key are stored in the web.config. The Startup.cs has the simple code that adds Open ID Connect authentication. Microsoft does a great job explaining the Open ID Connect code here. In addition to the code to request the Open ID Connect authentication, there is code to exchange the authorization code for an access token and refresh token for the Graph API as seen below with my comments.

AuthorizationCodeReceived = (context) =>
{
var code = context.Code;
// MF -> Create a client credential object with the Client ID and Application key
ClientCredential credential = new ClientCredential(clientId, appKey);
// MF -> Extract the access token from cache and generate an authentication context from it
string signedInUserID = context.AuthenticationTicket.Identity.FindFirst(ClaimTypes.NameIdentifier).Value;
AuthenticationContext authContext = new AuthenticationContext(Authority, new ADALTokenCache(signedInUserID));
// MF -> Acquire a token by submitting the authorization code, providing the URI that is registered for the application, the application secret key, and the resource (in this scenario the Graph API)
AuthenticationResult result = authContext.AcquireTokenByAuthorizationCode(
code, new Uri(HttpContext.Current.Request.Url.GetLeftPart(UriPartial.Path)), credential, graphResourceId);
return Task.FromResult(0);
}

Now that the user has authenticated and the application has a Graph API access token, I’ll hop over to the UserProfileController.cs. The code we’re concerned about in here is below with my comments.


{
Uri servicePointUri = new Uri(graphResourceID);
Uri serviceRoot = new Uri(servicePointUri, tenantID);
ActiveDirectoryClient activeDirectoryClient = new ActiveDirectoryClient(serviceRoot, async () => await GetTokenForApplication());
// MF -> Use the access token previous obtained to query the Graph API
var result = await activeDirectoryClient.Users.Where(u => u.ObjectId.Equals(userObjectID)).ExecuteAsync();
IUser user = result.CurrentPage.ToList().First();
return View(user);
}

Next I’ll hop over to the UserProfile view to look at the Index.cshtml. In this file a simple table is constructed that returns information about the user from the Graph API. I’ve removed some of the pesky HTML and replaced it with the actions.


@using Microsoft.Azure.ActiveDirectory.GraphClient
@model User
@{
ViewBag.Title = "User Profile";
}
"CREATE TABLE"
"TABLE ROW"
Display Name
@Model.DisplayName
"TABLE ROW"
First Name
@Model.GivenName
"TABLE ROW"
Last Name
@Model.Surname
"TABLE ROW"
Email Address
@Model.Mail

Simple right? I can expand that table to include any attribute exposed via the Graph API. As you can see in the above, I’ve added email address to the display. Now that we’ve reviewed the code, let’s cover the steps the application takes and what happens in each step:

  1. App accesses https://login.microsoftonline.com//.well-known/openid-configuration
    • Get OpenID configuration for Azure AD
  2. App accesses https://login.microsoftonine.com/common/discovery/keys
    • Retrieve public-keys used to verify signature of open id connect tokens
  3. User’s browser directed to https://login.microsoftonline.com//oauth2/authorize
    • Request an open id connect id token and authorization code for user’s profile information
  4. User’s browser directed to https://login.microsoftonline.com//login
    • User provides credentials to AAD and receives back
      1. id token
      2. access code for graph API with Directory.Read, User.Read scope
  5. User’s browser directed back to application
    • Return id token and access code to application
      1. id token authenticates user to application
      2. Access code for graph API with Directory.Read, User.Read scope temporarily stored
  6. Application accesses https://login.microsftonine.com//oauth2/token
    • Exchanges access code for bearer token
  7. Application sends OData query to Graph API and attaches bearer token.

That’s it folks! In my next post I will complete the Azure AD Provisioning series with a simple ASP .NET Web app that provisions new users into Azure AD.