Entra ID – Deep Dive – Entra ID Authentication – Part 3

Entra ID – Deep Dive – Entra ID Authentication – Part 3

This is part of my series on Microsoft Entra ID:

  1. Entra ID – Deep Dive – The Basics – Part 1
  2. Entra ID – Deep Dive – Protocol Primer – Part 2
  3. Entra ID – Deep Dive – Entra ID Authentication – Part 3

Back for more are ya? Today we’re gonna chat about how you could add Entra ID authentication into your custom-built web application. I’ll be digging into the Entra ID application registration process and examining the requests and responses for the whole authentication process via a local proxy using HTTP Toolkit. The goal here is not to give you coding best practices (god save you if you use any of my code in production) but instead to help you understand how all this stuff works and how products are (and are not) exercising the OIDC and OAuth protocols under the hood.

If you haven’t read my first and second post in the series, stop what you’re doing right now and read them. I’m going into this post assuming you have and thus assuming knowledge and understanding basic Entra ID concepts like applications vs service principals and a foundational understanding of OIDC and OAuth.

The solution design I’m building towards this in this series of posts is a simple frontend web application and backend API that are using Entra ID for authentication and authorization. The end design will look something like the below. This post will focus on the frontend web application.
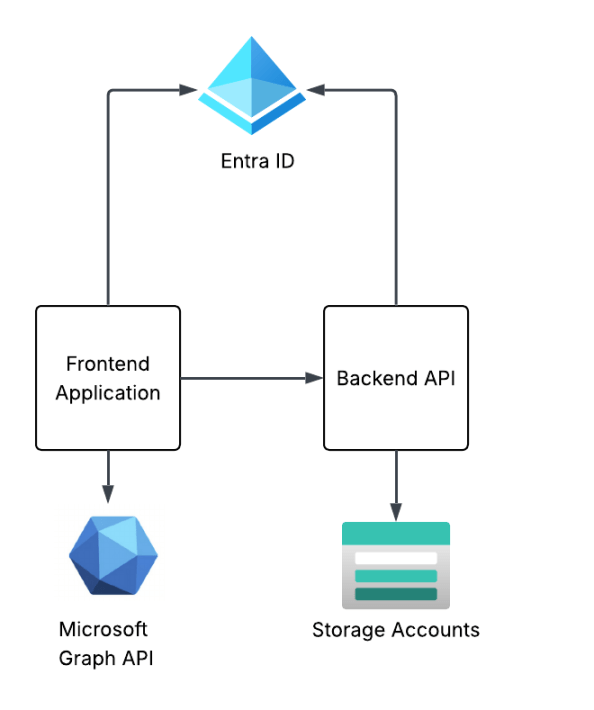
Series solution design

Creating the frontend application registration

As I covered in my first post, the application registration (or application object) is the globally unique representation of the application across Entra ID. There can only be one application registration for an application across all of Entra. An application registration can be single tenant (used only in your Entra ID tenant) or multi-tenant (can be used across Entra ID tenants). I like to think of the process of creating the application process similar to the manual client registration process mentioned in the OAuth spec. The result is the same as we’ll configure a bunch of information required for OAuth such as the redirect URI, the grant types it supports, and whether the client will be public or confidential client. Once registered, Entra will return a unique client_id and client_secret if a confidential application. There are additional Entra-specific properties we can populate, but the manual client registration explanation makes the most sense in my brain at least.

Creating an application registration can be done through the Portal, CLI/PowerShell, REST, Terraform, etc. I’m going to create it direct through the Microsoft Graph REST API because I want to walk through all the gory properties. To create an app registration, your user account needs to be at least hold the Entra ID Application Developer role. To keep things simple and address my laziness, my user will be setup as a global admin.

# Set the properties for the application
app_display_name = "Demo frontend app for Entra authentication"
description = "This app is used to demonstrate a frontend application where a user authenticates using Entra ID authentication via OIDC"
contact = "business_unit1@jogcloud.com"
........
# Create an app registration
def create_app_registration(display_name: str, contact: str):
"""This function creates a new application registration in Microsoft Graph API if it doesn't already exist
Args:
display_name (str): The display name for the new application registration.
contact (str): The contact information to associate with the application registration.
Returns:
dict: The details of the created application registration.
"""
check_app = get_app_registration_by_display_name(display_name)
if check_app is not None:
print(f"Application {check_app['displayName']} already exists and its id is {check_app['id']}")
return check_app
else:
print("Creating new application registration...")
body = {
"displayName": display_name,
"description": description,
# Setting to false means this is a confidential client application vs a public client
"isFallbackPublicClient": False,
# Set a service management reference which can be the contact associated with the application
"serviceManagementReference": contact,
# Create the app as multi tenant; single tenant would use AzureADMyOrg
"signInAudience": "AzureADMultipleOrgs",
# Add a redirect URI to support OIDC authentication
"web": {
"redirectUris": [
"http://localhost:8100/callback"
]
}
}
response = requests.post(
'https://graph.microsoft.com/v1.0/applications',
headers={
'Content-Type': 'application/json',
'Authorization': f'Bearer {user_token.token}'
},
json=body
)
return response.json()
app_frontend = create_app_registration(app_display_name, contact)
print(json.dumps(app_frontend, indent=2))

The application registration I’m creating above is being created as a multi-tenant application instead of a single tenant application and is determined by the signInAudience being set to a value of AzureADMultipleOrgs. I’m doing this because I may do an additional post in this series walking through multi-tenant applications. Most of the application registrations you create will be single tenant and would have this property set to AzureADMyOrg.

Since I’m building a web application, I’m going to be configuring it as a confidential client (which means it will have a credential) and I’m going to use the authorization code flow. I don’t want my application registration to ever support being used as a public client so I set isFallbackPublicClient to false. This will force my client to provide a credential when attempting to obtain a token. If you were building an application that would live direct on the user’s desktop or mobile device, you’d need to set to that true because at that point your application would be a public client.

Under the web property, I’m setting the redirectUri property to the endpoint in my application I want the user redirected to after the user successfully authenticates to Entra and consents to whatever access I’m requesting (if consent is required). In this case, my application runs directly on my machine so this is set to localhost.

You’ll also see I’m setting the serviceManagementReference property. Best practice is for you to set this property with a contact within the business unit for that owns the application. This can be helpful if the application registration becomes stale at this point and you detect that during your regular audits (which OF COURSE you’re doing!)

Once complete, I get the response below.

Creating new application registration...
{
"@odata.context": "https://graph.microsoft.com/v1.0/$metadata#applications/$entity",
"id": "be0af053-faf4-44b3-b071-XXXXXXXX",
"deletedDateTime": null,
"appId": "fc815c55-d456-4d38-be76-XXXXXXXX",
"applicationTemplateId": null,
"disabledByMicrosoftStatus": null,
"createdByAppId": "04b07795-8ddb-461a-XXXXXXXXXXXX",
"createdDateTime": "2026-06-25T01:19:12.1150491Z",
"displayName": "Demo frontend app for Entra authentication",
"description": "This app is used to demonstrate a frontend application where a user authenticates using Entra ID authentication via OIDC",
"groupMembershipClaims": null,
"identifierUris": [],
"isDeviceOnlyAuthSupported": null,
"isDisabled": null,
"isFallbackPublicClient": false,
"nativeAuthenticationApisEnabled": null,
"notes": null,
"publisherDomain": "XXXXXXXX.onmicrosoft.com",
"serviceManagementReference": "business_unit1@jogcloud.com",
"signInAudience": "AzureADMultipleOrgs",
"tags": [],
"tokenEncryptionKeyId": null,
"uniqueName": null,
"samlMetadataUrl": null,
"defaultRedirectUri": null,
"certification": null,
"optionalClaims": null,
"servicePrincipalLockConfiguration": null,
"requestSignatureVerification": null,
"addIns": [],
"api": {
"acceptMappedClaims": null,
"knownClientApplications": [],
"requestedAccessTokenVersion": null,
"oauth2PermissionScopes": [],
"preAuthorizedApplications": []
},
"appRoles": [],
"info": {
"logoUrl": null,
"marketingUrl": null,
"privacyStatementUrl": null,
"supportUrl": null,
"termsOfServiceUrl": null
},
"keyCredentials": [],
"parentalControlSettings": {
"countriesBlockedForMinors": [],
"legalAgeGroupRule": "Allow"
},
"passwordCredentials": [],
"publicClient": {
"redirectUris": []
},
"requiredResourceAccess": [],
"verifiedPublisher": {
"displayName": null,
"verifiedPublisherId": null,
"addedDateTime": null
},
"web": {
"homePageUrl": null,
"logoutUrl": null,
"redirectUris": [
"http://localhost:8100/callback"
],
"implicitGrantSettings": {
"enableAccessTokenIssuance": false,
"enableIdTokenIssuance": false
},
"redirectUriSettings": [
{
"uri": "http://localhost:8100/callback",
"index": null
}
]
},
"spa": {
"redirectUris": []
}
}

Next up, I want to set an owner. Every application registration should have an owner and this is a child object of the application. Now don’t go willy-nilly throwing any business unit person into that field (the owner cannot be a group as of the date of this post). When a user is an owner of an application registration, they can modify the application registration. The owner should be set to some privileged user account in Entra where access to that privileged account is tightly controlled.

import requests
import json
# Set the owners of the application using their Entra ID user object id
owners = [
"2e69d9f2-b5b3-482b-9c15-XXXXXXXXXXXX"
]
........
# Add owners to the application registration
def add_owners_app_registration(owners: list, app_id: str):
"""This function adds owners to an application registration in Microsoft Graph API
Args:
owners (list): A list of Entra ID user object IDs to add as owners.
app_id (str): The object ID of the application registration to add owners to.
Returns:
list: The updated list of owners for the application registration.
"""
# Check the current owners to see if the owner is already listed
check_owners = get_app_registration_owner(app_id)
if check_owners is not None:
for owner in owners:
if owner in [o['id'] for o in check_owners]:
print(f"Owner {owner} is already an owner of the application.")
# Since owner isn't there, add it
else:
print(f"Adding owner {owner} to the application...")
response = requests.post(
f'https://graph.microsoft.com/v1.0/applications/{app_id}/owners/$ref',
headers={
'Content-Type': 'application/json',
'Authorization': f'Bearer {user_token.token}'
},
json={
"@odata.id": f"https://graph.microsoft.com/v1.0/directoryObjects/{owner}"
}
)
if response.status_code == 204:
print(f"Owner {owner} added successfully.")
else:
print(f"Failed to add owner {owner}. Response: {response.status_code} - {response.text}")
else:
print("No current owners found for the application.")
for owner in owners:
print(f"Adding owner {owner} to the application...")
response = requests.post(
f'https://graph.microsoft.com/v1.0/applications/{app_id}/owners/$ref',
headers={
'Content-Type': 'application/json',
'Authorization': f'Bearer {user_token.token}'
},
json={
"@odata.id": f"https://graph.microsoft.com/v1.0/directoryObjects/{owner}"
}
)
if response.status_code == 204:
print(f"Owner {owner} added successfully.")
else:
print(f"Failed to add owner {owner}. Response: {response.status_code} - {response.text}")
new_owners = get_app_registration_owner(app_id)
return new_owners
new_owners = add_owners_app_registration(owners = owners, app_id=app_frontend['id'])
print(json.dumps(new_owners, indent=2))

Next up I need to create a client credential for my application. This will act as its client_secret to support its confidential client status. Entra supports multiple types of credentials including a basic client secret, client certificate, and federated credential. Of the three, the federated credential is the sweet spot if you can make it work. This is where you can use something like a managed identity which means the actual secret is automatically managed and rotated by Microsoft. Way easier lifecycle. Federated credentials can also use external identity providers, like GCP, GitHub and others neat integrations via the workload identity federation. A client certificate should be your next preferred credential since it has higher assurance and avoids having to worry about secret rotation and leakage. Since I’m lazy, I’ll be using a client secret.

Below I create a client secret that will be valid for a year.

# Create a date one year from now that will be used to expire the app registration credential
start_date = datetime.now(timezone.utc)
end_date = (datetime.now(timezone.utc) + relativedelta(years=1)).replace(hour=23, minute=59, second=59, microsecond=0)
formatted_start_date = start_date.strftime('%Y-%m-%dT%H:%M:%SZ')
formatted_end_date = end_date.strftime('%Y-%m-%dT%H:%M:%SZ')
.........
# Create a client secret
def create_password_credential(app_id, end_date, start_date, override=False):
"""This function creates a password credential for an application registration in Microsoft Graph API. It will delete existing
credentials if override is set to True, otherwise it will return a message that a credential already exists.
Args:
app_id (str): The object ID of the application registration to create a password credential for.
end_date (str): The end date and time for the password credential in ISO 8601 format.
start_date (str): The start date and time for the password credential in ISO 8601 format.
override (bool): Whether to override existing password credentials. Defaults to False.
Returns:
dict: The deatils of the created password credential or a blank dict if a credential already exists and override is False.
"""
# Check to see if the app already has a password credential
app = get_app_registration(app_id)
if app['passwordCredentials'] == []:
# Create a new credential
body = {
"displayName": "primary",
"endDateTime": end_date,
"startDateTime": start_date
}
response = requests.post(
f'https://graph.microsoft.com/beta/applications/{app_id}/addPassword',
headers={
'Content-Type': 'application/json',
'Authorization': f'Bearer {user_token.token}'
},
json=body
)
if response.status_code != 200:
print(f"Error creating password credential: {response.status_code}: {response.text}")
else:
print("Created new password credential.")
return response.json()
elif override:
# Delete existing credentials
for cred in app['passwordCredentials']:
print("Deleting existing password credential...")
response = requests.post(
f'https://graph.microsoft.com/beta/applications/{app_id}/removePassword',
headers={
'Content-Type': 'application/json',
'Authorization': f'Bearer {user_token.token}'
},
json={
"keyId": cred['keyId']
}
)
if response.status_code != 204:
print(f"Error deleting password credential: {response.status_code}: {response.text}")
# Create a new credential
body = {
"displayName": "primary",
"endDateTime": end_date,
"startDateTime": start_date
}
response = requests.post(
f'https://graph.microsoft.com/beta/applications/{app_id}/addPassword',
headers={
'Content-Type': 'application/json',
'Authorization': f'Bearer {user_token.token}'
},
json=body
)
if response.status_code != 200:
print(f"Error creating password credential: {response.status_code}: {response.text}")
else:
print("Created new password credential after deleting existing one.")
return response.json()
else:
print("A secret already exists. You can delete it and create a new one by setting override=True")
return app['passwordCredentials'][0]
password_credential_frontend = create_password_credential(app_frontend['id'], formatted_end_date, formatted_start_date, override=False)

Alright, at this point we have an application registration and client credential, which essentially means we have manually registered the application as an OAuth client to the authorization server (Entra ID). I now have a client_id (appId property) and client_secret. What next?

Creating the frontend service principal

I now need a security principal (or identity) to represent my application in my Entra ID tenant. In comes the service principal. There are many types of service principals as I mentioned previously, for this use case I’ll be creating an application service principal. Manual creation of this is only required because I’m creating it programmatically through REST. If I created this app registration in Azure Portal a service principal would automatically be created.

Creating the service principal is very straightforward and there’s not much need you to pass beyond the appId (or client id) of the application registration.

def create_service_principal(app_id: str):
"""This function creates a service principal for an application registration in Microsoft Graph API if it doesn't already exist
Args:
app_id (str): The application ID of the service principal to create.
Returns:
dict or None: The details of the created service principal if successful, otherwise None.
"""
# Check to see if the service principal already exists
service_principal = get_service_principal_by_app_id(app_id)
if service_principal is not None:
print(f"Service principal already exists: {service_principal['id']}")
return service_principal
else:
body = {
"appId": app_id
}
response = requests.post(
'https://graph.microsoft.com/v1.0/servicePrincipals',
headers={
'Content-Type': 'application/json',
'Authorization': f'Bearer {user_token.token}'
},
json=body
)
if response.status_code == 201:
return response.json()
else:
print(f"Error creating service principal: {response.status_code}: {response.text}")
return None
# Get or create the service principal
service_principal_frontend = create_service_principal(app_frontend['appId'])
print(json.dumps(service_principal_frontend, indent=2))

This spits out a new service principal object seen below. You’ll notice the schema is somewhat similar to the application registration schema. The service principal will be the object the application uses to exercise permissions it is delegated across the platform.

{
"@odata.context": "https://graph.microsoft.com/v1.0/$metadata#servicePrincipals/$entity",
"id": "ce341fd2-fd6b-4dab-9beb-XXXXXXXXXXXX",
"deletedDateTime": null,
"accountEnabled": true,
"alternativeNames": [],
"appDisplayName": "Demo frontend app for Entra authentication",
"appDescription": "This app is used to demonstrate a frontend application where a user authenticates using Entra ID authentication via OIDC",
"appId": "fc815c55-d456-4d38-be76-XXXXXXXXXXX",
"applicationTemplateId": null,
"appOwnerOrganizationId": "6c80de31-d5e4-4029-93e4-XXXXXXXXXXXX",
"appRoleAssignmentRequired": false,
"createdByAppId": "04b07795-8ddb-461a-bbee-XXXXXXXXXXXX",
"createdDateTime": "2026-06-25T01:41:05Z",
"description": null,
"disabledByMicrosoftStatus": null,
"displayName": "Demo frontend app for Entra authentication",
"homepage": null,
"isDisabled": null,
"loginUrl": null,
"logoutUrl": null,
"notes": null,
"notificationEmailAddresses": [],
"preferredSingleSignOnMode": null,
"preferredTokenSigningKeyThumbprint": null,
"replyUrls": [
"http://localhost:8100/callback"
],
"servicePrincipalNames": [
"fc815c55-d456-4d38-be76-XXXXXXXXXXX
],
"servicePrincipalType": "Application",
"signInAudience": "AzureADMultipleOrgs",
"tags": [],
"tokenEncryptionKeyId": null,
"samlSingleSignOnSettings": null,
"addIns": [],
"appRoles": [],
"info": {
"logoUrl": null,
"marketingUrl": null,
"privacyStatementUrl": null,
"supportUrl": null,
"termsOfServiceUrl": null
},
"keyCredentials": [],
"oauth2PermissionScopes": [],
"passwordCredentials": [],
"resourceSpecificApplicationPermissions": [],
"verifiedPublisher": {
"displayName": null,
"verifiedPublisherId": null,
"addedDateTime": null
}
}

Document your required permissions!

It’s best practice to document the permission your application will require versus being an asshole and forcing someone to guess, struggle, learn to hate you, and likely over permission. Permissions are divided into two categories which include role permissions and scope permissions. Role permissions are going to be the permissions the app exercises using its own identity context (we’ll see some of this in a future post) and scope permissions are going to be delegated permissions it requires. The permissions an application requires can be documented as part of the app registration by setting the requiredResourceAccess property of the application registration. This doesn’t grant any access, but simply informs the administrator what permissions will be required from the application. Remember, the app registration is the template for the application.

# Get the existing app permissions
def get_app_permissions(id: str):
"""This function retrieves the existing permissions required for an application registration from the Microsoft Graph API.
Args:
id (str): The object ID of the application registration to retrieve permissions for.
Returns:
list: A list of required resource permissions or else an empty list
"""
response = requests.get(
f'https://graph.microsoft.com/v1.0/applications/{id}',
headers={
'Content-Type': 'application/json',
'Authorization': f'Bearer {user_token.token}'
}
)
if response.status_code != 200:
print(f"Error getting app permissions: {response.status_code}: {response.text}")
return None
# Return the current permission set or a blank array if there are no permissions currently set
return response.json().get('requiredResourceAccess') or []
# Add the app permissions to the app registration. This is useful for multi-tenant apps to document required permissions. It does not grant any permissions.
def add_app_permissions(app_id: str, resource_access: list):
"""This function adds the required permissions to an application registration in Microsoft Graph API
Args:
app_id (str): The object ID of the application registration to add permissions to.
resource_access (list): A list of permissions to add to the application registration in the format of requiredResourceAccess.
Returns:
dict or None: The updated application registration details if successful, otherwise None.
"""
# Get the existing permissions in order to append to them
app_permissions = get_app_permissions(app_id)
# Append the new permissions to the existing ones
for permission in resource_access:
# Check if this resource already exists in the app permissions
existing_resource = None
for resource in app_permissions:
if resource['resourceAppId'] == permission['resourceAppId']:
existing_resource = resource
break
if existing_resource:
# Append the new permissions to the existing resource
for access in permission['resourceAccess']:
if access not in existing_resource['resourceAccess']:
existing_resource['resourceAccess'].append(access)
else:
# Add the new resource and its permissions
app_permissions.append(permission)
# Update the app registration with the new permissions
body = {
"requiredResourceAccess": app_permissions
}
response = requests.patch(
f'https://graph.microsoft.com/v1.0/applications/{app_id}',
headers={
'Content-Type': 'application/json',
'Authorization': f'Bearer {user_token.token}'
},
json=body
)
if response.status_code != 204:
print(f"Error adding app permissions: {response.status_code}: {response.text}")
return None
else:
print("App permissions documented as required successfully.")
return get_app_registration(app_id)
new_permissions = [
{
"resourceAppId": "00000003-0000-0000-c000-000000000000", # Microsoft Graph
"resourceAccess": [
{
"id": "e1fe6dd8-ba31-4d61-89e7-88639da4683d", # User.Read
"type": "Scope"
}
]
}
]
app_required_permissions = add_app_permissions(app_frontend['id'], new_permissions)['requiredResourceAccess']
print("\n=== App required permissions ===")
print(json.dumps(app_required_permissions, indent=2))

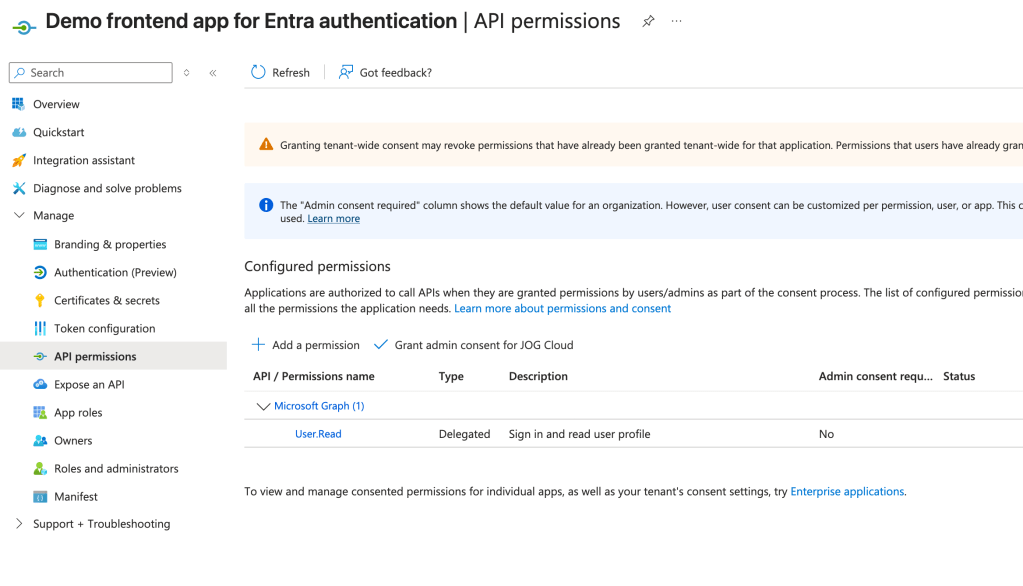
Once those are added they will appear in the API permissions section of the Application Registration inside of the Azure Portal as seen below. For my app I’m documenting that it requires the User.Read delegated permission on the Microsoft Graph API. For some of the built-in applications like the Microsoft Graph, some permissions will require admin consent and some will not like User.Read. If you add these things programmatically, it’s a bit more work because you need to dig up the resource’s appId and object ids of the permission. Something like Microsoft Graph is well documented.

Alright, at this point we’re ready to test our app!

Authenticating to the application

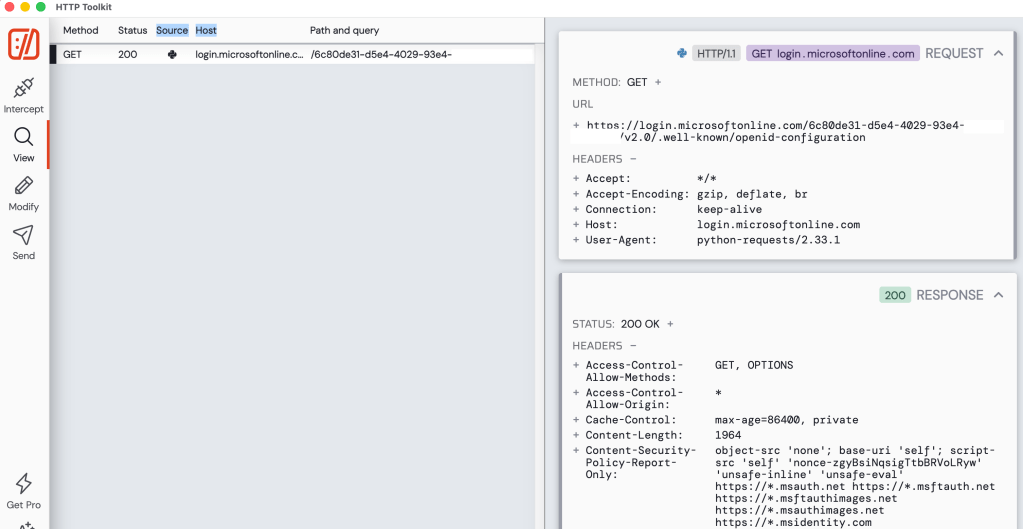
After starting the application I immediately see a lookup to metadata endpoint for the OIDC and OAuth endpoints. This is triggered an MSAL instance is started in the code. These endpoints will be used throughout the login process.
Opening my website I’m faced with a very simple login screen (simple setup for a simple man).
Once I click login with Entra ID, the underlining MSAL library redirects me to the /authorize endpoint of Entra where my user is prompted to authenticate. The request that is generated is below. In this request we see all the things we covered in the second post for the protocol primer. There is the redirect URI that the user will be redirected to after authenticating to Entra, the response_type indicating this is the authorization code grant type, the client id of my application, the state property used to mitigate CSRF attacks, the nonce to prevent replay attacks, and the code challenge and code challenge method for PKCE.

Now one thing to note is you’ll find a lot of samples on the wider Internet for MSAL (and likely generated by LLMs if you’re one of those vibe coders) that will use the acquire_token_for_client method (like this Microsoft sample here). This method WILL NOT use PKCE. If you want to include the code challenge and code verifier for PKCE you will need to use the initiate_auth_code_flow method.

The scopes query perimeter includes the Microsoft Graph User.Read permission, offline_access (for a refresh token), openid (for an id token), and profile (for access to the user’s basic profile for OIDC). The code in my app specifically requests User.Read, the remaining scopes are automatically added by MSAL for each request depending on the method you’re calling.

https://login.microsoftonline.com/6c80de31-d5e4-4029-93e4-XXXXXXXXXXXX/oauth2/v2.0/authorize?
client_id=afbd7539-a21f-4d11-93a3-XXXXXXXXXXXX&
response_type=code&
redirect_uri=http%3A%2F%2Flocalhost%3A8100%2Fcallback&
scope=User.Read+offline_access+openid+profile&
state=iuxzJhtpdQrWHKqG&code_challenge=L2KNF971_Izy0wWY4v_8GJ1XXXXXXXXXXXX&
code_challenge_method=S256&
nonce=b448a1420a781ac5f18bc2db7f74e06a42fbedca3dd04ebdXXXXXXXXXXXX&
client_info=1

My user completes the authentication process the user is prompted to consent to the application to be delegated the requested scopes. Once the user accepts, the user’s consent is saved in Entra and the user is no longer required to consent moving forward. You’ll notice my application says app is unverified because it’s using localhost. For anything remotely relating to production, you should configure a publishing domain and validate it.
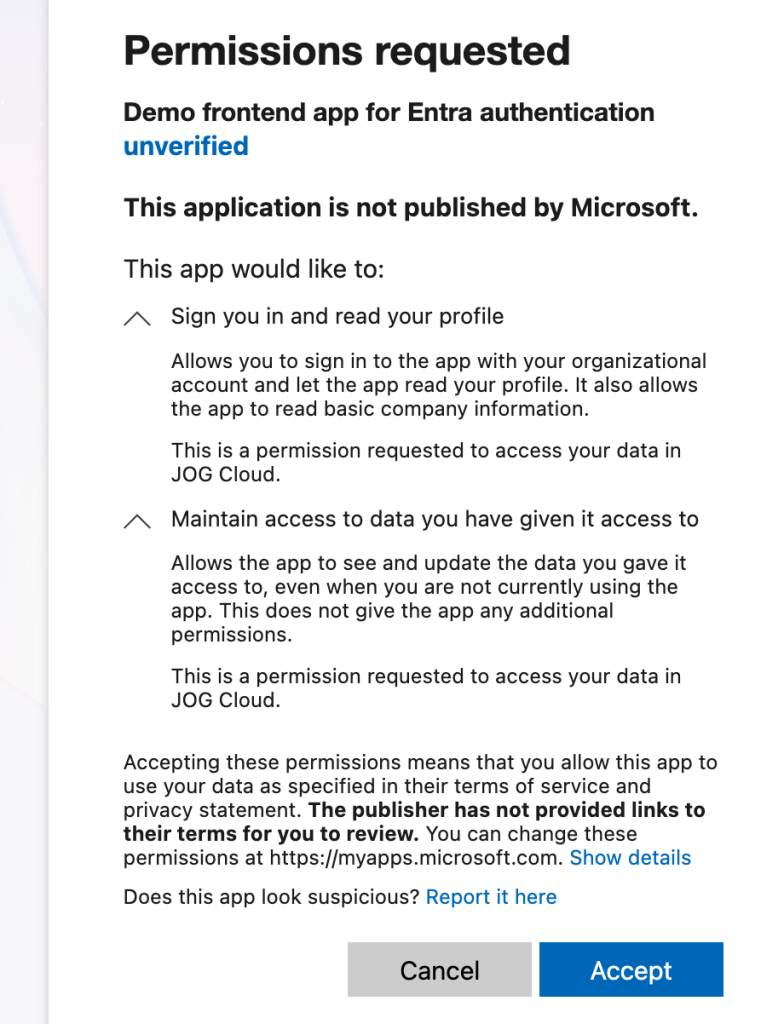
Once the user consents, the user is redirected to the redirect uri registered for the application with an authorization code generated by Entra. My application then makes a call to the /oauth2/v2.0/token endpoint in Entra to exchange the authorization code for an access token, identity token, and refresh token. It provides its client secret to authenticate itself to Entra and the code_verifier value allowing Entra to validate this is the original client who requested the access token (PKCE).
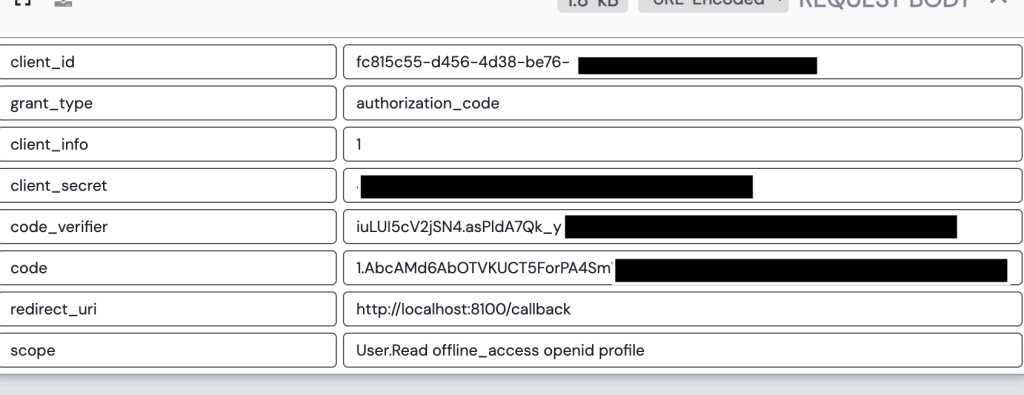
Entra validates the client secret and code verifier and if valid returns an access token, refresh token, and id token. My application can use the id token to authenticate the user and grant it access to the application.

Once logged in, I navigate to the profile page of the application. This page has basic profile information about the user collected from the get user endpoint in the Microsoft Graph.
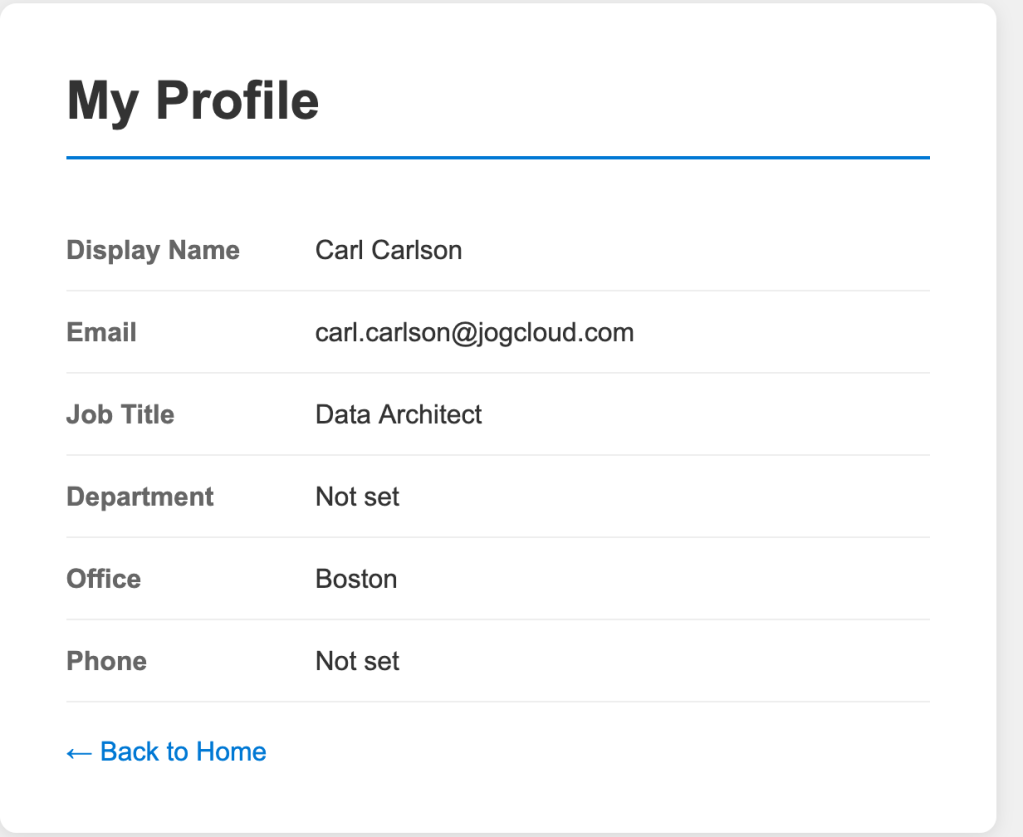
Navigating to the tokens page of the application displays the decoded access token and id token. In the payload of the id token we can see this id token is intended for the application (which you must validate in your code to ensure someone isn’t trying to pass you some rando token meant for another application) via the aud claim. We also get some basic information about the user. The full schema of the id token is in the official public docs. Some of the helpful properties are the user’s full name and their object id (oid). The object id could be used to pull additional information about the user (which we’ll see next post). We can also stuff additional claims in this id token if we wanted to. I’ll demonstrate this in a future post where I add a user’s group memberships into the id token.

{
"aud": "fc815c55-d456-4d38-be76-XXXXXXXXXXXX",
"exp": 1782358405,
"iat": 1782354505,
"iss": "https://login.microsoftonline.com/6c80de31-d5e4-4029-93e4-XXXXXXXXXXXX/v2.0",
"name": "Carl Carlson",
"nbf": 1782354505,
"nonce": "19297055204c96a487b701f62890cf1c867a7fac55814081f53cbe4XXXXXXXX",
"oid": "2e69d9f2-b5b3-482b-9c15-XXXXXXXXXXXX",
"preferred_username": "carl.carlson@jogcloud.com",
"rh": "1.AbcAMd6AbOTVKUCT5ForPA4SmVVcgfxW1XXXXXXXXXXXX",
"sid": "005f65fa-bad8-71a5-49eb-XXXXXXXXXXXX",
"sub": "p9RBIgpi113pdPH37Q50qylIbANwgMtDXXXXXXXXXXXX",
"tid": "6c80de31-d5e4-4029-93e4-XXXXXXXXXXXX",
"uti": "tL2-eu4OB0KFhXGl7j4UAA",
"ver": "2.0"
}

The end-to-end flow

So I’ve authenticated my user to the application using OIDC and gained delegated access to the Microsoft Graph API via OAuth all using Entra. Not too shabby. This is the most basic of basic use cases. In my next post I’ll walk you through how to add group information to the id or access token which you could use within your application to authorize the user within the application.

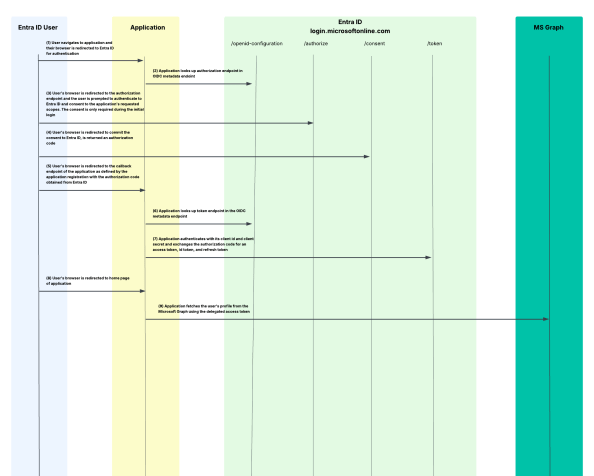
I’m a big fan of old school style protocol flow diagrams, so I threw one together that walks through the end-to-end process I’ve outlined today.
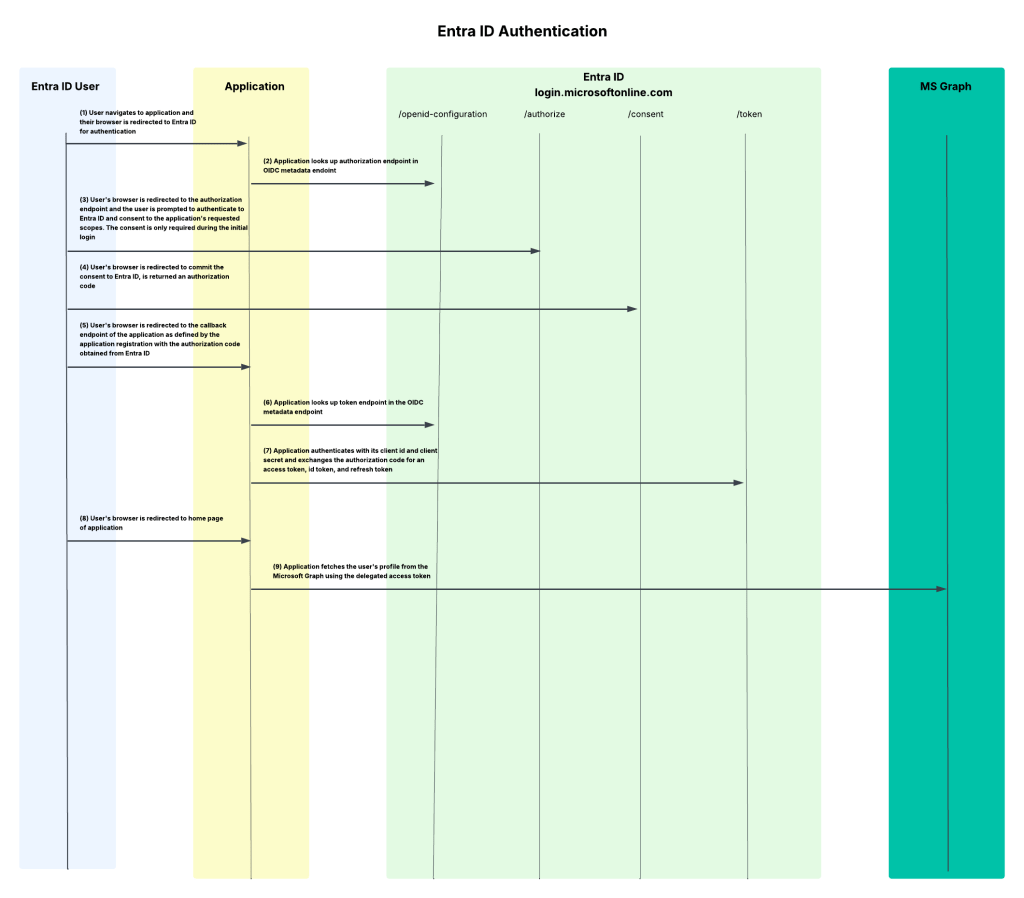
Summing It Up

Yeah, I know that was a lot. If all you take out of this post is a better understanding of what app registrations and service principals do and have a general understanding of how they’re structured, and what the protocol flow looks like when using Entra ID for OIDC/OAuth, that’s a win.

If you want to muck around with this stuff yourself in a personal or test tenant, I’ve published all the code I put together to run through these posts in this repository. It’s a work in progress which I’m fine-tuning as I write these posts but it does have the sample frontend app included in it if you want to take a glance at my application-level code and perhaps want to replicate what I walked through today. Please do not use any of this code in a production app. This is purely intended to demonstrate the concepts.

Some key takeaways for you:

  1. Every app registration should have an owner. Just be aware the owner can modify the app registration so don’t go nuts and give this to a non-privileged user.
  2. Set the servericeManagementReference property to some type of BU-level distribution list. This will cover you in case the owners are wiped out through someone accidentally removing them or them leaving the company.
  3. Make sure you’re using the correct methods in the MSAL library if your goal is to use PKCE to align with OAuth 2.1.
  4. If you setup an app registration, be a good human being and document the permissions the app is going to require.
  5. When configuring an app registration that will be a confidential client, try to use a federated identity credential. If your app is running in Azure, you can use a managed identity. This will both be more secure and make your app owner’s life a little less miserable having to rotate credentials.

See you next post!
Entra ID – Deep Dive – Protocol Primer – Part 2

This is part of my series on Microsoft Entra ID:

  1. Entra ID – Deep Dive – The Basics – Part 1
  2. Entra ID – Deep Dive – Protocol Primer – Part 2
  3. Entra ID – Deep Dive – Entra ID Authentication – Part 3

Welcome back folks. Today I’ll be continuing my deep dive series into Entra. In my last post I went over the basics of Entra ID covering what it is at a high level and how it handles human and non-human identities. One of the features of Entra ID that I highlighted in that post was that it provides authentication services. It is capable of providing authentication of a human or non-human through older protocols like Kerberos (don’t get me started on this feature or else I’ll spend the whole post ranting) and LDAP (through Entra ID Domain Services, another service I hate), but also more modern protocols such as SAML and OIDC (OpenID Connect). Before I dive into Microsoft’s implementation of OIDC and the protocol it’s built on top of, OAuth, I figured it was a good time to do a light protocol primer (primarily for my own benefit because I can only re-read the RFC so many times before it stops being fun. Yeah I find it fun to read a good RFC, so what?).

What is OAuth?

You are probably thinking, “Why the hell are we talking about OAuth?” We need to talk about OAuth (Open Authorization) because OIDC is built on top of the OAuth protocol. If you have a basic understanding of OAuth, then OIDC makes a lot more sense. I’m not going to try to make you an expert, because to make you an expert I’d need to expert which I am very far from. Instead, I’m going to give you the basics. If you want a better/smarter explanation, start with the RFC(s) and then take a read through Vittorio Bertocci’s (an absolute legend, RIP) many articles, ebook, and videos online.

There are a lot of misconceptions out there where folks will talk about OAuth authentication, which is not a real thing. OAuth itself exists as an authorization protocol to provide a framework (lots of SHOULDs/COULDs and not a ton of MUSTs in that RFC) for how applications can get limited access to a user’s data based around the user’s consent using delegation.

The protocol refers to this limited access as a scope. The assignment of a specific scope to an application gives you the ability to do delegation vs impersonation. In the latter, the application will typically act as you with your full permission set vs with delegation you grant consent for the application to access a subset of your data with a more restricted set of permissions. A good example would be delegating the application the read permission over your email vs the reading, writing new emails, and deleting child emails impersonation might give the application.

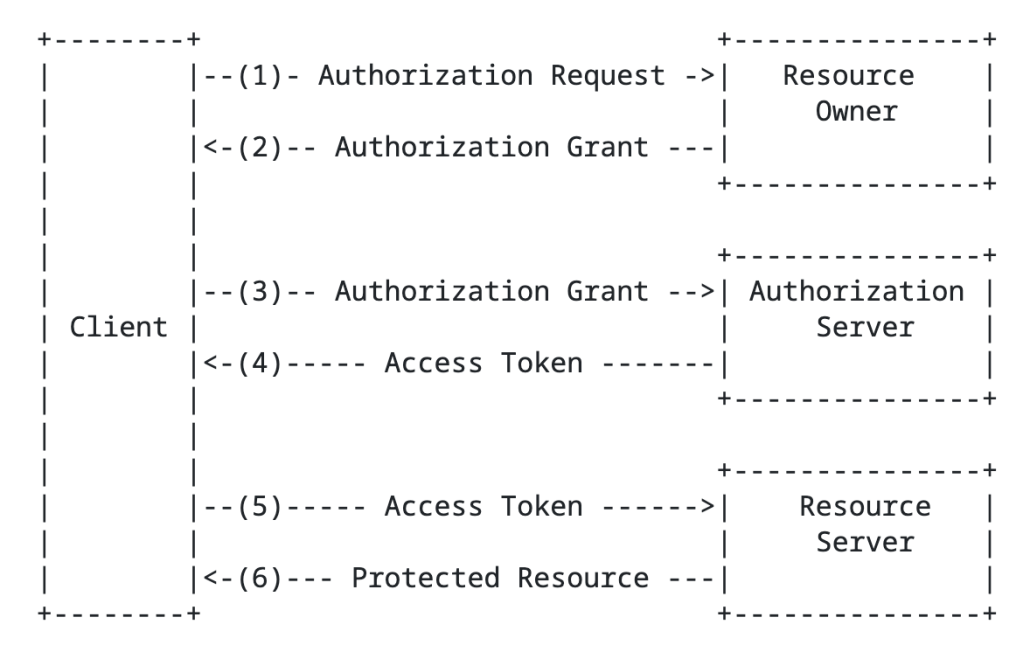
When it comes to the whole process of a user delegating a scope of access to an application, a number of different roles are involved. These roles include:

  • Client
  • Resource Owner
  • Authorization Server
  • Resource Server

The client is an application that needs to access some data. Within the protocol it’s important to divide applications into a few different buckets, because the protocol supports them in different ways as I’ll cover in a bit. The standard breaks them into three buckets: web applications, browser-based applications, and native applications. I’m going to keep it simple and consolidate those three buckets into two which will be web applications and non-web applications.

Clients can be either public clients (non-web apps) or confidential clients (web apps). Confidential clients have some type of credential they use to authenticate themselves to the authorization server where as public clients do not (because their code runs on the user’s machine so there is no way to secure the credential). Clients must register with the authorization server either through dynamic registration (which Entra ID does not support today) or through some other type of process. Registration, at a minimum, will include providing the authorization server with a redirectUri, which grant types it will use, and whether it’s a public or confidential client. The client is then issued a unique identifier called a client_id and optionally a client_secret if a confidential client. We’ll see an example of how Entra does it later on this series. Examples of clients could be applications you develop, third-party applications you integrate with, or Microsoft-native applications like Microsoft Teams.

The resource owner is the user or organization that owns the data the client wants to access and is the entity that is capable of granting access to that data through a consent process. Consent is a major focus in OAuth since it relies on delegation of a specific scope of access to the data. Consent is the process of the resource owner approving that delegation. Resource owners in the Entra ID world are going the enterprise at the top layer, business units underneath that layer, and finally its employees which are represented by user objects in Entra. Consent will either be granted for all users within the tenant by an administrator or by individual users to data they have permissions over.

The authorization server is the role that glues all other roles together. This is the server authenticates the user (OAuth doesn’t care how), gets the user’s consent for the client to access the data, and issues an access token to the client. Entra ID fulfills this role in the Microsoft cloud world.

The resource server hosts the resource owner’s data. It will consume the access token obtained by the client from the authorization server and allow or deny access to the data. Resource servers in the Microsoft world could be your custom built application or the Microsoft Graph API.

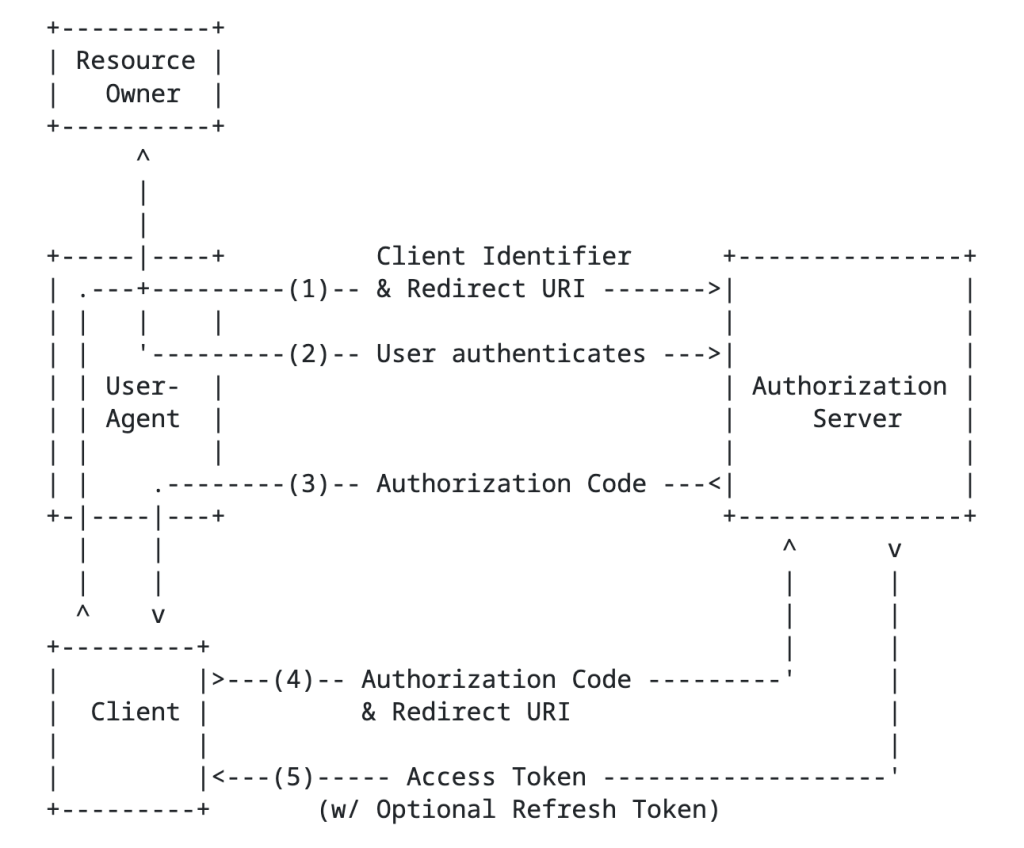
The RFC has a basic diagram which does a good job explaining the flow at a high level.

High level OAuth flow

You’ll notice the the term authorization grant in the above image. An authorization grant represents the resource owner’s authorization (delegation) of a specific scope of access to their data and is used by the client to get an access token which the resource server consumes and approves/denies access. In the base specification for OAuth 2.1, there are three types of grants (there are a ton of extension grants, some of which we’ll cover in this series) which include the authorization code grant, the refresh token grant, and the client credentials grant.

Before I describe the grant types, it’s worth calling out that I’m going to be talking specifically about OAuth 2.1 (which is still a draft RFC right now). OAuth 2.1 seeks to address a lot of the security issues with OAuth 2.0. In OAuth 2.0 there were a bunch more grant types including resource owner credentials flow and the implicit flow there are somewhat of security nightmares. OAuth 2.1 removes those grant types and the official spec sticks to the three I described above while adding an additional requirement for PKCE (Proof-Key for Code Exchange) for both public AND confidential clients. PKCE helps to address authorization code interception attacks. This Okta article does a great job describing the security benefit brings. I’ll demonstrate this with MSAL in a later post. Now back to the authorization grant types.

The authorization code grant type involves sending the resource owner to the authorization server to authenticate and consent to the client’s access of their data, returning an authorization code to the client, and the client exchanging that with the authorization server for an access token. This is going to be your go to grant type any delegation use case. An example of this would be an application accessing my data in a storage account that belongs to me.

Authorization Code Flow

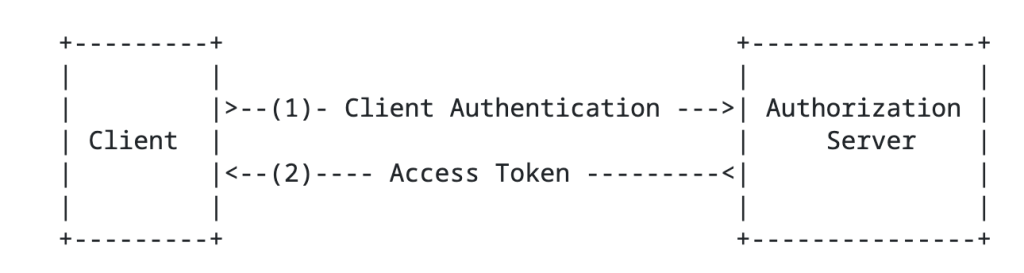
Next up is the client credentials flow grant type. In this flow there is no user consent because the data the client is trying to access is under its control. Essentially, the client uses its own identity context to access the data because it’s already been authorized to do so. An example here would be an application pulling Entra ID sign-in logs from the MS Graph API.

Client Credentials Flow

Lastly, we have the refresh token grant. This grant type is used by the client to exchange a refresh token for a fresh access token. Access tokens must be short lived (typically around an hour). Instead of having the resource owner go through the whole authentication and consent process again, the client can exchange its longer living refresh token (if it requested one) for a new access token of the same or lesser scope.

In addition to grant types above there are extension grant types. The one that will be relevant to this series is the jwt bearer type, or more formally the JSON Web Token (JWT) profile. In the Microsoft world, you’ll see this referred to as the on-behalf-of flow. This is the flow that Microsoft will use for any multi-hop OAuth. There is also another newer grant type to be aware of which is the token exchange flow. This has a similar use case as the jwt bearer flow for multi-hop OAuth but isn’t limited to JWTs and provides additional information in the access token which can be very helpful in identifying client (actor) vs the resource owner (subject) in the access token. Entra doesn’t support this flow to my understanding, so you’ll be using jwt-bearer instead for multi-hop flows as we’ll see in a future post.

In an authorization request will look something like the below:

GET /authorize?response_type=code&client_id=s6BhdRkqt3&state=xyz
&redirect_uri=https%3A%2F%2Fclient%2Eexample%2Ecom%2Fcb
&code_challenge=6fdkQaPm51l13DSukcAH3Mdx7_ntecHYd1vi3n0hMZY
&code_challenge_method=S256&scope=User.Read HTTP/1.1
Host: server.example.com

In the above example we see the client is requesting the authorization code grant type, is specifying its client id and its redirect_uri (which were established during client registration), a code challenge (for PKCE), and the scope of access it is requesting.

Access tokens come in a few flavors which you can read about in the RFC. The most common type of token is a bearer token. The bearer token is exactly what it sounds like, whoever bears the token holds the power! Bearer tokens are typically JWTs (JSON Web Tokens). While RFC doesn’t specifically require the access token to be cryptographically signed, the ones that Entra ID issues are. The public key used to verify the signature can be obtained for Entra ID from a public metadata endpoint we’ll see later.

Here is a sample access token issued by Entra:

{
"typ": "JWT",
"alg": "RS256",
"kid": "ABC123XYZ789KeyIdentifier"
}
{
"aud": "api://backend-app-client-id",
"iss": "https://login.microsoftonline.com/tenant-id/v2.0",
"iat": 1780963927,
"nbf": 1780963927,
"exp": 1780968246,
"aio": "AaQAW/8cAAAA...sessionData...",
"azp": "frontend-app-client-id",
"azpacr": "1",
"name": "John Doe",
"oid": "user-object-id-guid",
"preferred_username": "john.doe@example.com",
"rh": "1.AbcA...refreshTokenHash...",
"scp": "user_impersonation",
"sid": "session-id-guid",
"sub": "subject-claim-unique-identifier",
"tid": "tenant-id-guid",
"uti": "unique-token-identifier",
"ver": "2.0",
"xms_ftd": "xEyJj...federationMetadata..."
}

There are a few important endpoints the client needs to know about for the authorization server. This includes the authorization endpoint (where the resource owner is sent to authenticate and consent) and the token endpoint (where the client obtains an access token). These can be retrieved via a metadata endpoint. This is how Entra ID does it as we’ll see in a future post.

Ok, with that you should now have a high level understanding of OAuth and be aware of its role as an authorization protocol. Key in on that word, authorization. When I perform an OAuth flow I get an access token back to my app that I can use to access a resource owner’s data, but I would still need to authenticate the user to my application and get some basic profile information via another means. In comes OIDC.

What is OpenID Connect?

Like the prior section, my goal is give you a primer. If you want the gory details, take a read through the specification (another tolerable if not enjoyable read). Microsoft and Auth0 have solid one pagers if reading specifications isn’t your style.

The OIDC protocol is built on top of the OAuth (Open Authorization) protocol to provide an identity layer and authentication layer. It gives us the means get some assurance that the user is who they say they are and get some basic information about the user.

Within the OpenID protocol there are three roles that exist. These include:

  • End User
  • RP (Relying Party)
  • OP (OpenID Provider)

Since the protocol is built on top of the OAuth protocol, these roles will map nicely to the OAuth roles as we’ll see.

We first have the end user. The end user is the human participant that will be access our application. They are very often also the resource owner for any data we may want to access about them as we’ll see later.

Next, we have the RP. The RP is the application that is requesting end user authentication and claims (or data/attributes) about the user. This will be an OAuth client application.

Finally we have the OP. The OP is the server capable of authenticating the user and providing claims about the user’s identity. This role is fulfilled by the OAuth authorization server in all (I don’t believe their are exceptions, but feel free to correct me) instances.

The OP will issue a security token referred to as an id token with claims about the authentication of the end user, including claims about the user.

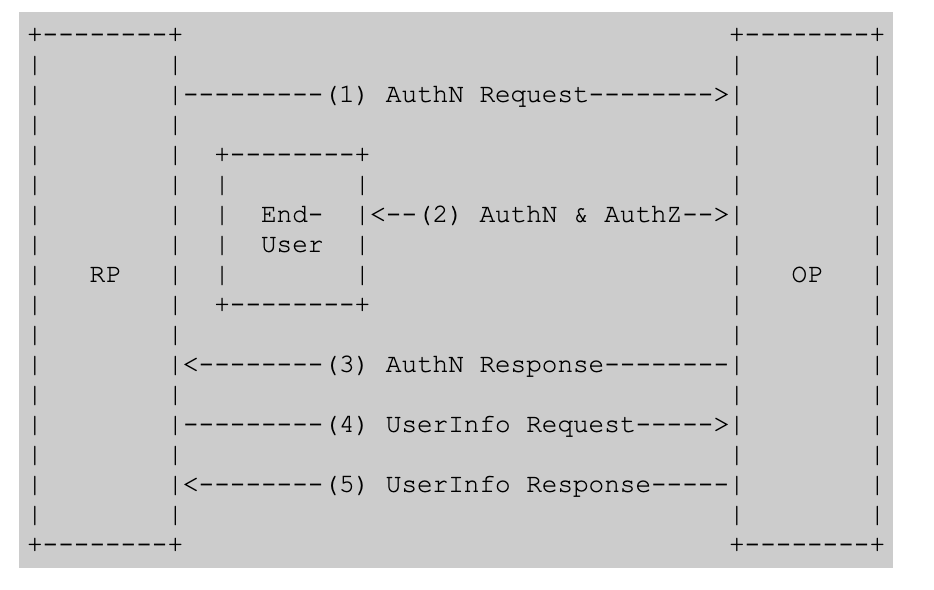
This is another instance where the specification did a great job with a high level flow diagram.

High-level OIDC Flow

The structure of the authentication request is almost identical to the structure of an authorization request in OAuth.

GET /authorize?response_type=code&client_id=s6BhdRkqt3
&redirect_uri=https%3A%2F%2Fclient%2Eexample%2Ecom%2Fcb
&scope=User.Read+openid+profile
&state=random-state-value
&nonce=random-nonce-value
&code_challenge=IFrWuREBBR_QJ39q5Ts4
&code_challenge_method=S256

Notice above that we have an added state and nonce. The state helps to provide CSRF (cross-site request forgery) attacks, such as fooling the victim into accessing an attacker’s account to get them to upload data or perhaps purchase things for the attacker’s account. The nonce helps to mitigate id token replay attacks (app validates the nonce in the id token matches what it expects for the user’s session). Now the major things to pay attention to is the additional scopes. Here we see the openid and profile scopes. The openid scope tells the OP the client is looking for an id token. The profile scope is an optional scope which tells the OP to include additional claims in the id token such as the user’s name, preferred_username, and the like.

Once the RP (client / application) exchanges its authorization code (think authorization code grant) to the OP/authorization server, it returns back the an OIDC id token in addition to the OAuth access token. The application can then use the claims in the id token to identify the user, get information into how the user authenticated, get group information, and anything else you can stuff into the claims. It gives the application context about the user.

Below is an example id token’s payload. ID tokens follow the JWT standard and are cryptographically signed by a private key held by the OP. Clients will need to verify the signature using the OPs public key which is usually published in the OIDC discovery endpoint which looks something like this https://{issuer}/.well-known/openid-configuration. We’ll see an example when we break down Entra’s implementation.

{
"iss": "http://exmaple.com.com",
"sub": "123456",
"aud": "myclientid",
"exp": 1311281970,
"iat": 1311280970,
"name": "Homer Simpson",
"given_name": "Homer",
"family_name": "Simpson",
"gender": "male",
"birthdate": "2025-10-31",
"email": "homersimpson@example.com",
"picture": "http://example.com/homersimpson/me.jpg"
}

Your takeaways

At this point you should have a reasonably decent high level understanding of OAuth/OIDC. If you are already an “expert” you likely snorted milk through you nose reading my shitty explanation. What I mainly want you to take away from this is that OAuth is an authorization protocol with OIDC providing an authentication layer nicely on top. I like to think of OAuth as the cake with OIDC as the frosting. That top layer doesn’t work without the bottom layer (you freaks that eat the frosting right out of the can shall remain silent) and the bottom layer is enriched by the frosting on top. It’s 7PM and I’m craving a sweet, lay off.

In my next post I’ll walk through building out the required components in Entra ID for the frontend application. You’ll read and recognize properties that translate directly back to these two protocols. Other properties may not have the same name, but you’ll understand why they exist.

Alright, my brain is fried. Enjoy the weekend!

The “Real” Root Management Group

2/11/2025 Update – This action is now captured in the Entra ID Audit Logs! I’d recommend putting an alert in ASAP to track this moving forward.

Hello fellow geek!

Today I’m going to cover a topic that isn’t well understood in the Azure community and can present significant risk to your Azure estate. Sit back, grab your Friday morning coffee, and prepare to learn about the “real” root management group.

Microsoft made an interesting identity-based choice when architecting Azure. That choice was to have all Azure subscriptions share a common identity management plane in what we have known as Azure AD (Azure Active Directory) and which has recently been renamed Entra ID. The shared identity management plane in Azure creates a single authority for identity data and authentication while maintaining separate authorization boundaries between Azure subscriptions. This concept may differ for those of you coming from AWS (Amazon Web Services) where every AWS account has a unique identity management plane that has its own identity data store, authentication boundary, and authorization boundary. Microsoft’s decision comes with benefits and considerations.

The atomic unit for resources in Microsoft Azure is the Azure subscription which acts as an authorization boundary, limits boundary, and compliance boundary. Each Azure subscription can be associated to a single Entra ID tenant. Once a subscription is associated to an Entra ID tenant the subscription will use tenant as a source of identity data and authentication provider. This dependency on Entra ID creates an interesting security risk around authorization.

Before I dive into the details of this, let me briefly explain the concept of management groups. A management group in Azure is a logical container for Azure Subscriptions which allow for you to enforce configuration “how a resource looks” (Azure Policy) and authorization “what a user can do” (Azure RBAC) across one or more subscriptions. Prior to management groups, these things had to be managed at the individual subscription level or below (resource group or individual resource). Every subscription added to an Entra ID tenant exists under the Tenant Root Management Group by default, but this can be changed. Customers can can create additional management groups underneath the Tenant Root Management Group as per their needs (great guidance on this here).

If you’ve used Azure for any length of time the above is likely all review for you. However, as Yoda said, “there is another”. Above the Tenant Root Management Group exists another management group called root or “/”. As seen in the visual below, the root management group is the glue that sticks Entra ID authorization to Azure authorization together. Let’s dig into how this works.

Entra ID and Microsoft Azure Authorization

In Entra ID there is a role called Global Administrator. For those of you unfamiliar with this role, it is the god role of Entra ID and all services associated with an Entra ID tenant such as M365 and, yes, Azure. Holding this role in Entra ID does not give you permissions in Azure, but there is a path to give yourself permissions and become the god of your Azure estate.

Users who hold the Global Administrator have the ability to grant themselves access on the root “/” management group. They can do this through an option in the Entra ID blade of the Azure Portal called Access Management for Azure Resources or Elevate Access. This is also available via the Azure REST API using the elevateAccess endpoint. The value of this toggle switch shown in the Portal is the value for the current user context (user logged into the Portal). You cannot view this toggle switch for other users, but we can tell if it’s been toggled on as I will show later.

Option for Global Admins to assert control over Azure

When a Global Administrator toggles this option either through the Portal or through the REST API an Azure RBAC Role Assignment for the User Access Administrator is created at the root “/” management group.

User Access Administrator role assignment as result of global administrator elevate access

The User Access Administrator is a highly privileged role granting the user full permissions over the Microsoft.Authorization resource provider (as seen below). These permissions allow the user to create additional role assignments on for any Azure RBAC Role on any Azure management, subscription, resource group, or resource within the Entra ID tenant. Yes… yikes.

{
    "id": "/providers/Microsoft.Authorization/roleDefinitions/18d7d88d-d35e-4fb5-a5c3-7773c20a72d9",
    "properties": {
        "roleName": "User Access Administrator",
        "description": "Lets you manage user access to Azure resources.",
        "assignableScopes": [
            "/"
        ],
        "permissions": [
            {
                "actions": [
                    "*/read",
                    "Microsoft.Authorization/*",
                    "Microsoft.Support/*"
                ],
                "notActions": [],
                "dataActions": [],
                "notDataActions": []
            }
        ]
    }
}

As I mentioned earlier, the Portal will only show you the value of the toggle switch for the ElevateAccess feature for the currently logged in user. You may now be thinking “How the heck can I enforce this if I can’t view it in the Portal?”. The good news is this toggle seems to be some backend orchestration where the platform checks whether the user has the User Access Administrator RBAC Role Assignment on the root “/” management group. This means you don’t need to care about that visual toggle switch, you only need to care about the actual permission. You can list out the the users that have the role assignment at root using the cli command below.

az role assignment list --scope "/" --query "[?roleDefinitionName=='User Access Administrator'].{Username:principalName, ObjectId:objectId}" --output table

Awesome, so you know who has it. Why should you care? Listen, I gonna be nice and assume you’re asking this because it’s a Friday and your brain is fried. The reason you should care is this gives your users who have access to the Entra ID Global Administrators Role the ability to make themselves god of your Azure estate. This includes owners over the resources for management plane operations which can, in almost every instance, lead to owner of the data contained within the resources within the data plane. You SHOULD NOT have a role assignment for User Access Administrator on the root “/” management group. There a few instances where you need this permission temporarily to grant other permissions, but I will cover that at the end of this post. For now, know that if you have that permission there you shouldn’t.

In most enterprises there is a separate team managing Entra ID from the team managing Azure in order to maintain separation of duties. Access to the Global Administrator role opens up the risk for the user to assert access and control over data that is outside of their roles and responsibilities. While there is no way to stop this from happening, you should be monitoring for when it occurs. So how might you do this?

If you’re used Azure, you should be familiar with Azure Activity Logs. The Activity Logs contain log entries for create, update, and delete operations on the Azure management plane. Activity Logs exist at a number of scopes including Subscription, Management Group, and Directory. While Subscription and Management Group Activity Logs supports integration with Azure Monitor Diagnostic Logs, Directory Activity Logs do not and those are the logs new role assignments to the root “/” management group are recorded in. This means you need to write custom code to manually pull down those logs via the REST API in order to capture and alert on them in your favorite SIEM. Yuck right? Well there is an easier way to alert on this.

Directory-level Azure Activity Logs

A while back Microsoft introduced support for Azure Monitor to make log queries against the Azure Resource Graph. I’m not going to do a deep dive into ARG (Azure Resource Graph). All you need to know for the purpose of this post is it’s a service you can tap into to pull down information about Azure resources, including role assignments.

Let me walk through how this works.

I can issue an Kusto query through Azure Monitor to query ARG to see what role assignments for User Access Administrator exist on the root “/” management group using the query below (note this will require you have appropriate read permissions at root “/”).

arg("").AuthorizationResources
| where properties.scope == "/"
| where properties.roleDefinitionId == "/providers/Microsoft.Authorization/RoleDefinitions/18d7d88d-d35e-4fb5-a5c3-7773c20a72d9"

This Kusto query will query the ARG authorizationresources category for any role assignments on the root “/” management group that have the role definition id for User Access Administrator. Each resulting log entry denotes a role assignment on root. Here we can see I have two role assignments on the root for User Access Administrator. Bad Matt.

Query to pull role assignments for User Access Administrator on root “/” management group

Back in October 2023 Microsoft introduced into public preview support to create Azure Alerts for Azure Monitor Log queries against ARG. This means you can create an Azure Alert based on this custom log query. If there is a role assignment for User Access Administrator on the root “/” management group, an alert will be fired. Let me walk through the setup of that alert, because it’s a little bit funky.

First thing you will need to do is create an action group and you can use this documentation to that. Once you have your action group you’ll want to navigate to the Alerts blade in the Azure Portal and then to the alert rules

Alert Rules in Azure Portal

Select the option to create a new Alert Rule. In the scope section you can select a subscription. If you are using a similar subscription design as to the Azure Cloud Adoption Framework, selecting the Management subscription would be a good choice. I don’t believe the choice matters much because the alert is on the root management group and not a resource within a subscription.

On the condition screen you will choose the Custom log search option for the Signal name. The query you’ll put in there is below.

arg("").AuthorizationResources
| where properties.scope == "/"
| where properties.roleDefinitionId == "/providers/Microsoft.Authorization/RoleDefinitions/18d7d88d-d35e-4fb5-a5c3-7773c20a72d9"

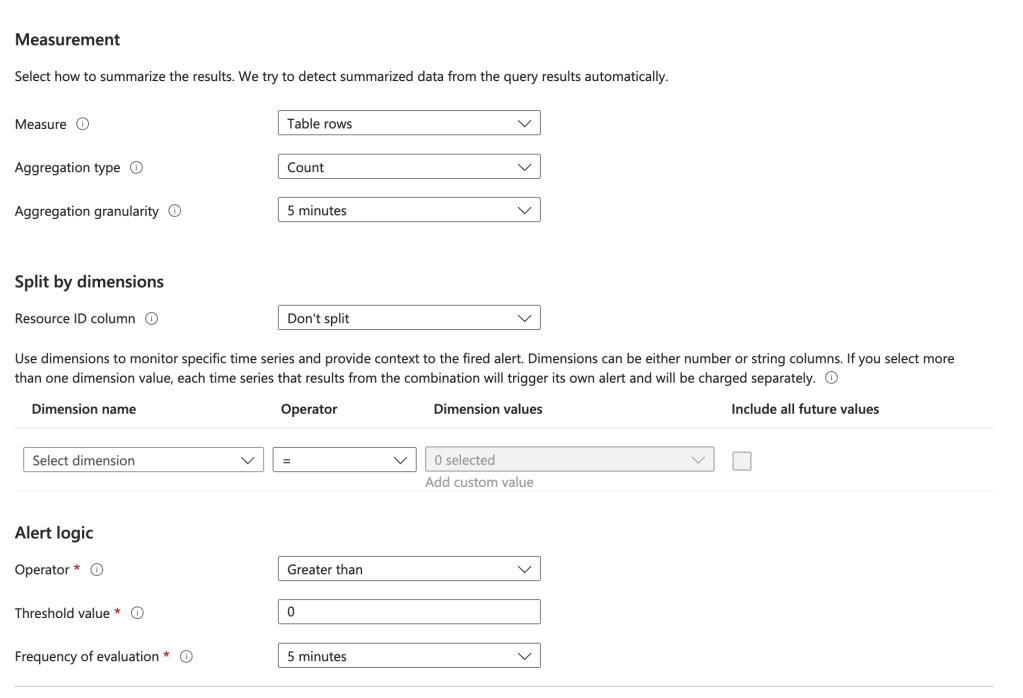
You will will also need to configure the measurements. You can use the settings I have below or customize it to your liking.

Measurements for alert

On the Actions screen choose Select action groups and select the action group you configured before.

On the Details screen you can set the severity to whatever you want. I’d recommend 0 since this is a significant escalation of privilege. You will also need to configure the alert with a managed identity. It will need an identity to authenticate and be authorized to ARG. Choose whichever managed identity type makes sense for your organization.

Adding a managed identity to the alert

Add whatever tags you want on the next screen and create the alert.

Done right? No, we now need to give the managed identity permissions on the root management group to read the role assignments.

I promised earlier I’d tell you the instance where you need to use this elevation. The are very few instances where you need to do this. One instance is when you are first building out your management group structure. In that scenario, no one has permission over the root or tenant root management group so no one can create new management groups. You will need to elevate a user with Global Administrator to the User Access Administrator role on the root “/” in that situation so that use can then grant another user account owned by the Azure team (ideally non-human, but vaulted is good too) User Access Administrator on the Tenant Root Management Group. When complete, the Global Administrator should toggle that switch back to off to remove the RBAC role assignment. This Microsoft article explains a few other scenarios you may need to temporary grant this role to grant permissions at the root “/”.

Now back to setting up the alert rule. Next up you need to grant the managed identity you assigned to the alert rule the permission at the root “/” management group so it can query the role assignments (see, a use case!). You can find the object id of the managed identity in the identity section of the Alert in the Portal. What role you assign it is up to you. I’m doing Reader because I’m lazy, but you could certainly craft a custom role if you’d like to (don’t forget to remove your permissions once you’ve completed this!).

az role assignment create --assignee-object-id "4f984694-b43c-4528-87e9-68aeab7478a3" --scope "/" --role "Reader"

You’re good to go! You now have an alert that will fire anytime there is any role assignment for User Access Administrator on the root “/” management group. Again, there should never be a role assignment for that role unless you’re temporarily using it for one of the use cases above.

The key things I want you to take away from this this post is the critical role Entra ID plays across all of the Microsoft Clouds. It’s important to understand how privilege in one product (Entra ID) can lead to privilege in another (Azure). Now you have a quick and easy security win you can crank out before Thanksgiving. Enjoy!

Authentication in Azure OpenAI Service

This is part of my series on the Azure OpenAI Service:

  1. Azure OpenAI Service – Infra and Security Stuff
  2. Azure OpenAI Service – Authentication
  3. Azure OpenAI Service – Authorization
  4. Azure OpenAI Service – Logging
  5. Azure OpenAI Service – Azure API Management and Entra ID
  6. Azure OpenAI Service – Granular Chargebacks
  7. Azure OpenAI Service – Load Balancing
  8. Azure OpenAI Service – Blocking API Key Access
  9. Azure OpenAI Service – Securing Azure OpenAI Studio
  10. Azure OpenAI Service – Challenge of Logging Streaming ChatCompletions
  11. Azure OpenAI Service – How To Get Insights By Collecting Logging Data
  12. Azure OpenAI Service – How To Handle Rate Limiting
  13. Azure OpenAI Service – Tracking Token Usage with APIM
  14. Azure AI Studio – Chat Playground and APIM
  15. Azure OpenAI Service – Streaming ChatCompletions and Token Consumption Tracking
  16. Azure OpenAI Service – Load Testing

Updates:

  • 1/18/2024 to reference considerable library changes with new API version. See below for details
  • 4/3/2023 with simpler way to authenticate with Azure AD via Python SDK

Hello again!

1/18/2024 Update – Hi folks! There were some considerable changes to the OpenAI Python SDK which offers an even simpler integration with the Azure OpenAI Service. While the code in this post is a bit dated, I feel the thought process is still important so I’m going to preserve it as is! If you’re looking for examples of how to authenticate with the Azure OpenAI Service using the Python SDK with different types of authentication (service principal vs managed identity) or using the REST API, I’ve placed a few examples in this GitHub repository. Hope it helps!

Days and nights have been busy diving deeper into the AI landscape. I’ve been reading a great book by Tom Taulli called Artificial Intelligence Basics: A Non-Technical Introduction. It’s been a huge help in getting down the vocabulary and understanding the background to the technology from the 1950s on. In combination with the book, I’ve been messing around a lot with Azure’s OpenAI Service and looking closely at the infrastructure and security aspects of the service.

In my last post I covered the controls available to customers to secure their specific instance of the service. I noted that authentication to the service could be accomplished using Azure Active Directory (AAD) authentication. In this post I’m going to take a deeper look at that. Be ready to put your geek hat on because this post will be getting down and dirty into the code and HTTP transactions. Let’s get to it!

Before I get into the details of how supports AAD authentication, I want to go over the concepts of management plane and data plane. Think of management plane for administration of the resource and data plane for administration of the data hosted within the resource. Many services in Azure have separate management planes and data planes. One such service is Azure Storage which just so happens to have similarities with authentication to the OpenAI Service.

When a customer creates an Azure Storage Account they do this through interaction with the management plane which is reached through the ARM API hosted behind management.azure.come endpoint. They must authenticate against AAD to get an access token to access the API. Authorization via Azure RBAC then takes place to validate the user, managed identity, or service principal has permissions on the resource. Once the storage account is created, the customer could modify the encryption key from a platform managed key (PMK aka key managed by Microsoft) to a customer managed key (CMK), enable soft delete, or enable network controls such as the storage firewall. These are all operations against the resource.

Once the customer is ready to upload blob data to the storage account, they will do this through a data plane operation. This is done through the Blob Service API. This API is hosted behind the blob.core.windows.net endpoint and operations include creation of a blob or deletion of a blob. To interact with this API the customer has two means of authentication. The first method is the older method of the two and involves the use of static keys called storage account access keys. Every storage account gets two of these keys when a storage account is provisioned. Used directly, these keys grant full access to all operations and all data hosted within the storage account (SAS tokens can be used to limit the operations, time, and scope of access but that won’t be relevant when we talk the OpenAI service). Not ideal right? The second method is the recommended method and that involves AAD authentication. Here the security principal authenticates to AAD, receives an access token, and is then authorized for the operation via Azure RBAC. Remember, these are operations against the data hosted within the resource.

Authentication in Management Plane vs Data Plane in Azure Storage

Now why did I give you a 101 on Azure Storage authentication? Well, because the Azure OpenAI Service works in a very similar way.

Let’s first talk about the management plane of the Azure OpenAI Service. Like Azure Storage (and the rest of Azure’s services) it is administered through the ARM API behind the management.azure.com endpoint. Customers will use the management plane when they want to create an instance of the Azure OpenAI Service, switch it from a PMK to CMK, or setup diagnostic settings to redirect logs (I’ll cover logging in a future post). All of these operations will require authentication to AAD and authorization via Azure RBAC (I’ll cover authorization in a future post).

Simple right? Now let’s move to the complexity of the data plane.

Two API keys are created whenever a customer creates an Azure OpenAI Service instance. These API keys allow the customer full access to all data plane operations. These operations include managing a deployment of a model, managing training data that has been uploaded to the service instance and used to fine tune a model, managing fine tuned models, and listing available models. These operations are performed against the Azure OpenAI Service API which lives behind a unique label with an FQDN of openai.azure.com (such as myservice.openai.azure.com). Pretty much all the stuff you would be doing through the Azure OpenAI Studio. If you opt to use these keys you’ll need to remember control access to these keys via securing management plane authorization aka Azure RBAC.

Azure OpenAI Service API Keys

In the above image I am given the option to regenerate the keys in the case of compromise or to comply with my organization’s key rotation process. Two keys are provided to allow for continued access to the service while other key is being rotated.

Here I have simple bit of code using the OpenAI Python SDK. In the code I provide a prompt to the model and ask it to complete it for me and use one of the API keys to authenticate to it.

import logging
import sys
import os
import openai

def main():
    # Setup logging
    try:
        logging.basicConfig(
            level=logging.ERROR,
            format='%asctime)s - %(name)s - %(levelname)s - %(message)s',
            handlers=[logging.StreamHandler(sys.stdout)]
        )
    except:
        logging.error('Failed to setup logging: ', exc_info=True)

    try:

        # Setup OpenAI Variables
        openai.api_type = "azure"
        openai.api_base = os.getenv('OPENAI_API_BASE')
        openai.api_version = "2022-12-01"
        openai.api_key = os.getenv('OPENAI_API_KEY')

        response = openai.Completion.create(
            engine=os.getenv('DEPLOYMENT_NAME'),
            prompt='Once upon a time'
        )

        print(response.choices[0].text)

    except:
        logging.error('Failed to respond to prompt: ', exc_info=True)


if __name__ == "__main__":
    main()

The model gets creative and provides me with the response below.

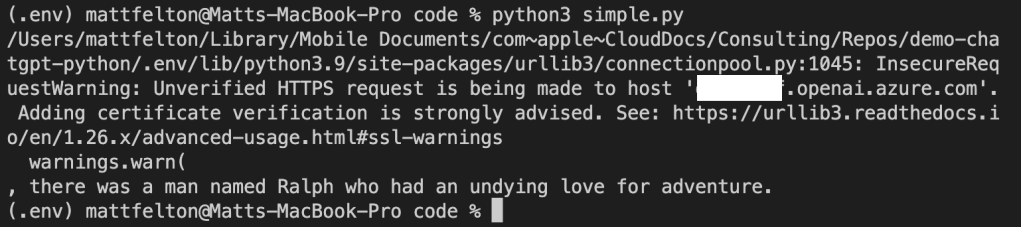
If you look closely you’ll notice an warning about the security of my session. The reason I’m getting that error is shut off certificate verification in the OpenAI library in order to intercept the calls with Fiddler. Now let me tell you, shutting off certificate verification was a pain in the ass because the developers of the SDK are trying to protect users from the bad guys. Long story short, the Azure Python SDK doesn’t provide an option to turn off certificate checking like say the Azure Python SDK (which you can pass a kwarg of verify=False to turn it off in the request library used underneath). While the developers do provide a property called verify_ssl_certs, it doesn’t actually do anything. Since most Python SDKs use the requests library underneath the hood, I went through the library on my machine and found the api_requestor.py file. Within this file I modified the _make_session function which is creating a requests Sessions object. Here I commented out the developers code and added the verify=False property to the Session object being created.

Turning off certificate verification in OpenAI Python SDK

Now don’t go and do this in any environment that matters. If you’re getting a certificate verification failure in your environment you should be notifying your information security team. Certificate verification is an absolute must to ensure the identity of the upstream server and to mitigate the risk of man-in-the-middle attacks.

Once I was able to place Fiddler in the middle of the HTTPS session I was able to capture the conversation. In the screenshot below, you can see the SDK passing the api-key header. Take note of that header name because it will become relevant when we talk AAD authentication. If you’re using OpenAI’s service already, then this should look very familiar to you. Microsoft was nice enough to support the existing SDKs when using one of the API keys.

At this point you’re probably thinking, “That’s all well and good Matt, but I want to use AAD authentication for all the security benefits AAD provides over a static key.” Yeah yeah, I’m getting there. You can’t blame me for nerding out a bit with Fiddler now can you?

Alright, so let’s now talk AAD authentication to the data plane of the Azure OpenAI Service. Possible? Yes, but with some caveats. The public documentation illustrates an example of how to do this using curl. However, curl is great for a demonstration of a concept, but much more likely you’ll be using an SDK for your preferred programming language. Since Python is really the only programming language I know (PowerShell doesn’t count and I don’t want to show my age by acknowledging I know some Perl) let me demonstrate this process using our favorite AAD SDK, MSAL.

For this example I’m going to use a service principal, but if your code is running in Azure you should be using a managed identity. When creating the service principal I granted it the Cognitive Services User RBAC role on the resource group containing the Azure OpenAI Service instance as suggested in the documentation. This is required to authorize the service principal access to data plane operations. There are a few other RBAC roles for the service, but as I said earlier, I’ll cover authorization in a future post. Once the service principal was created and assigned the appropriate RBAC role, I modified my code to include a function which calls MSAL to retrieve an access token with the access scope of Cognitive Services, which the Azure OpenAI Service falls under. I then pass that token as the API key in my call to the Azure OpenAI Service API.

import logging
import sys
import os
import openai
from msal import ConfidentialClientApplication

def get_sp_access_token(client_id, client_credential, tenant_name, scopes):
    logging.info('Attempting to obtain an access token...')
    result = None
    print(tenant_name)
    app = ConfidentialClientApplication(
        client_id=client_id,
        client_credential=client_credential,
        authority=f"https://login.microsoftonline.com/{tenant_name}",
    )
    result = app.acquire_token_for_client(scopes=scopes)

    if "access_token" in result:
        logging.info('Access token successfully acquired')
        return result['access_token']
    else:
        logging.error('Unable to obtain access token')
        logging.error(f"Error was: {result['error']}")
        logging.error(f"Error description was: {result['error_description']}")
        logging.error(f"Error correlation_id was: {result['correlation_id']}")
        raise Exception('Failed to obtain access token')

def main():
    # Setup logging
    try:
        logging.basicConfig(
            level=logging.ERROR,
            format='%asctime)s - %(name)s - %(levelname)s - %(message)s',
            handlers=[logging.StreamHandler(sys.stdout)]
        )
    except:
        logging.error('Failed to setup logging: ', exc_info=True)

    try:
        # Obtain an access token
        token = get_sp_access_token(
            client_id = os.getenv('CLIENT_ID'),
            client_credential = os.getenv('CLIENT_SECRET'),
            tenant_name = os.getenv('TENANT_ID'),
            scopes = "https://cognitiveservices.azure.com/.default"
        )
    except:
        logging.error('Failed to obtain access token: ', exc_info=True)

    try:
        # Setup OpenAI Variables
        openai.api_type = "azure"
        openai.api_base = os.getenv('OPENAI_API_BASE')
        openai.api_version = "2022-12-01"
        openai.api_key = token

        response = openai.Completion.create(
            engine=os.getenv('DEPLOYMENT_NAME'),
            prompt='Once upon a time'
        )

        print(response.choices[0].text)

    except:
        logging.error('Failed to summarize file: ', exc_info=True)


if __name__ == "__main__":
    main()

Let’s try executing that and see what happens.

Uh-oh! What happened? If you recall from earlier the API key is passed in the api-key header. However, to use the access token provided by AAD we have to pass it in the authorization header as seen in the example in Microsoft public documentation.

curl ${endpoint%/}/openai/deployments/YOUR_DEPLOYMENT_NAME/completions?api-version=2022-12-01 \
-H "Content-Type: application/json" \
-H "Authorization: Bearer $accessToken" \
-d '{ "prompt": "Once upon a time" }'

Thankfully there is a solution to this one without requiring you to modify the OpenAI SDK. If you take a look in the api_requestor.py file again in the library you will see it provides the ability to override the headers passed in the request.

With this in mind, I made a few small modifications. I removed the api_key property and added an Authorization header to the request to the Azure OpenAI Service API which includes the access token received back from AAD.

import logging
import sys
import os
import openai
from msal import ConfidentialClientApplication

def get_sp_access_token(client_id, client_credential, tenant_name, scopes):
    logging.info('Attempting to obtain an access token...')
    result = None
    print(tenant_name)
    app = ConfidentialClientApplication(
        client_id=client_id,
        client_credential=client_credential,
        authority=f"https://login.microsoftonline.com/{tenant_name}",
    )
    result = app.acquire_token_for_client(scopes=scopes)

    if "access_token" in result:
        logging.info('Access token successfully acquired')
        return result['access_token']
    else:
        logging.error('Unable to obtain access token')
        logging.error(f"Error was: {result['error']}")
        logging.error(f"Error description was: {result['error_description']}")
        logging.error(f"Error correlation_id was: {result['correlation_id']}")
        raise Exception('Failed to obtain access token')

def main():
    # Setup logging
    try:
        logging.basicConfig(
            level=logging.ERROR,
            format='%asctime)s - %(name)s - %(levelname)s - %(message)s',
            handlers=[logging.StreamHandler(sys.stdout)]
        )
    except:
        logging.error('Failed to setup logging: ', exc_info=True)

    try:
        # Obtain an access token
        token = get_sp_access_token(
            client_id = os.getenv('CLIENT_ID'),
            client_credential = os.getenv('CLIENT_SECRET'),
            tenant_name = os.getenv('TENANT_ID'),
            scopes = "https://cognitiveservices.azure.com/.default"
        )
    except:
        logging.error('Failed to obtain access token: ', exc_info=True)

    try:
        # Setup OpenAI Variables
        openai.api_type = "azure"
        openai.api_base = os.getenv('OPENAI_API_BASE')
        openai.api_version = "2022-12-01"

        response = openai.Completion.create(
            engine=os.getenv('DEPLOYMENT_NAME'),
            prompt='Once upon a time',
            headers={
                'Authorization': f'Bearer {token}'
            }
            

        )

        print(response.choices[0].text)

    except:
        logging.error('Failed to summarize file: ', exc_info=True)


if __name__ == "__main__":
    main()

Running the code results in success!

4/3/2023 Update – Poking around today looking at another aspect of the service, I came across this documentation on an even simpler way to authenticate with Azure AD without having to use an override. In the code below, I specify an openai.api_type of azure_ad which allows me to pass the token direct via the openai_api_key property versus having to pass a custom header. Definitely a bit easier!

import logging
import sys
import os
import openai
from msal import ConfidentialClientApplication

def get_sp_access_token(client_id, client_credential, tenant_name, scopes):
    logging.info('Attempting to obtain an access token...')
    result = None
    print(tenant_name)
    app = ConfidentialClientApplication(
        client_id=client_id,
        client_credential=client_credential,
        authority=f"https://login.microsoftonline.com/{tenant_name}",
    )
    result = app.acquire_token_for_client(scopes=scopes)

    if "access_token" in result:
        logging.info('Access token successfully acquired')
        return result['access_token']
    else:
        logging.error('Unable to obtain access token')
        logging.error(f"Error was: {result['error']}")
        logging.error(f"Error description was: {result['error_description']}")
        logging.error(f"Error correlation_id was: {result['correlation_id']}")
        raise Exception('Failed to obtain access token')

def main():
    # Setup logging
    try:
        logging.basicConfig(
            level=logging.ERROR,
            format='%asctime)s - %(name)s - %(levelname)s - %(message)s',
            handlers=[logging.StreamHandler(sys.stdout)]
        )
    except:
        logging.error('Failed to setup logging: ', exc_info=True)

    try:
        # Obtain an access token
        token = get_sp_access_token(
            client_id = os.getenv('CLIENT_ID'),
            client_credential = os.getenv('CLIENT_SECRET'),
            tenant_name = os.getenv('TENANT_ID'),
            scopes = "https://cognitiveservices.azure.com/.default"
        )
        print(token)
    except:
        logging.error('Failed to obtain access token: ', exc_info=True)

    try:
        # Setup OpenAI Variables
        openai.api_type = "azure_ad"
        openai.api_base = os.getenv('OPENAI_API_BASE')
        openai.api_key = token
        openai.api_version = "2022-12-01"

        response = openai.Completion.create(
            engine=os.getenv('DEPLOYMENT_NAME'),
            prompt='Once upon a time '
        )

        print(response.choices[0].text)

    except:
        logging.error('Failed to summarize file: ', exc_info=True)


if __name__ == "__main__":
    main()

Let me act like I’m ChatGPT and provide you a summary of what we learned today.

  • The Azure OpenAI Service has both a management plane and data plane.
  • The Azure OpenAI Service data plane supports two methods of authentication which include static API keys and Azure AD.
  • The static API keys provide full permissions on data plane operations. These keys should be rotated in compliance with organizational key rotation policies.
  • The OpenAI SDK for Python (and I’m going to assume the others) sends an api-key header by default. This behavior can be overridden to send an Authorization header which includes an access token obtained from Azure AD.
  • It’s recommended you use Azure AD authentication where possible to leverage all the bells and whistles of Azure AD including the usage of managed identities, improved logging, and conditional access for service principal-based access.

Well folks, that concludes this post. I’ll be uploading the code sample above to my GitHub later this week. In the next batch of posts I’ll cover the authorization and logging aspects of the service.

I hope you got some value and good luck in your AI journey!