Microsoft Foundry – Publish Agents to Microsoft Teams – Part 2 – The GUI Experience

Microsoft Foundry – Publish Agents to Microsoft Teams – Part 2 – The GUI Experience

This is part of my series on Microsoft Foundry:

  1. Microsoft Foundry’s Evolution
  2. Microsoft Foundry BYO AI Gateway (BYO Model) – Part 1
  3. Microsoft Foundry BYO AI Gateway (BYO Model) – Part 2
  4. Microsoft Foundry BYO AI Gateway (BYO Model) – Part 3
  5. Microsoft Foundry Publishing Agent to Microsoft Teams – Part 1 – Overview
  6. Microsoft Foundry Publishing Agent to Microsoft Teams – Part 2 – The GUI Experience
  7. Microsoft Foundry Publishing Agent to Microsoft Teams – Part 3 – The programmatic experience

Hello again fellow geeks. While I typically like to stick to one post every few weeks for sanity sake, I want to get this series down and recorded before I get distracted by something else and forget what is fresh in my mind. You know the feeling, right?

This post will continue my series on publishing agents built in the Microsoft Foundry Agent Service to Microsoft Teams. In my last post gave a brief over of the Foundry Agent Service, why you would publish an agent to Teams, and the role of the AI Bot Service in the process (at least as that role stands today). For this post my focus will be walking through the GUI-based experience for publishing an agent, where it works, where it doesn’t work, and the high level workflow of what happens when you hit the publish button.

Where the GUI process works

As it is today? Pretty much no where in my opinion. Sure muck around with it your lab, but any real enterprise environment it ain’t gonna work. Why? Well because of this big blue blurb in the documentation.
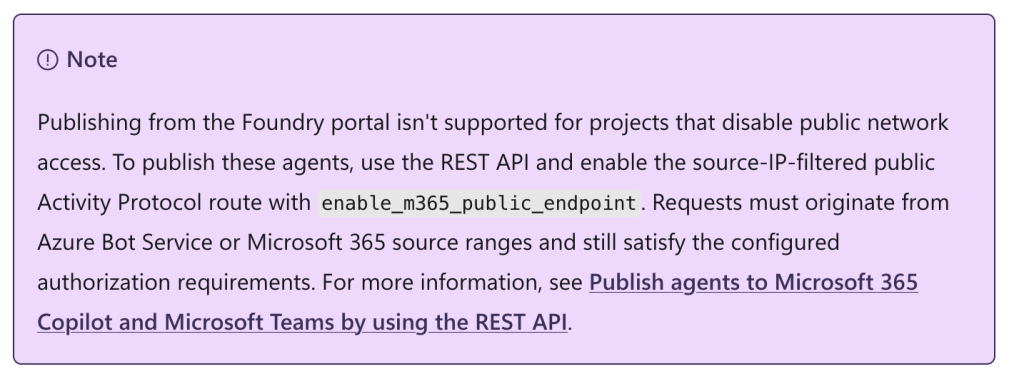
Let me dig in a bit into exactly what this blurb means. For any Azure-based PaaS service there is inbound traffic. Inbound traffic is when some endpoint initiates a connection to the Azure PaaS instance. For example, an inbound flow to Foundry might be an endpoint making a connection to a model endpoint to make an inference.

By default, every Microsoft PaaS service has a hostname in a public DNS zone that will resolve to a public IP (exempting some compute-based services where you can disable this) and every PaaS service allows inbound traffic to that endpoint by default. Whether or not traffic is accepted over the public endpoint is typically controlled by a property of the resource named publicNetworkAccess. In the case of Microsoft Foundry this setting is set at the Foundry account level. Below is an example of a Foundry account that has inbound public network access disabled.

{
"id": "/subscriptions/97515654-3331-440d-XXXXXXXXXXXX/resourceGroups/rgmsfcusg5b111/providers/Microsoft.CognitiveServices/accounts/msfcusg5b111",
"name": "msfcusg5b111",
"type": "Microsoft.CognitiveServices/accounts",
"location": "centralus",
"sku": {
"name": "S0"
},
"kind": "AIServices",
"tags": {
...
},
"properties": {
...
"publicNetworkAccess": "Disabled",
}

When the publicNetworkAccess property is set to disabled for Microsoft Foundry, all inbound traffic to the public endpoint will be denied by the service firewall. This means no IP exceptions and no exceptions for service endpoint traffic. It can still support inbound traffic to the public endpoint for its specific set of trusted Azure services. I go into the gory details of how the PaaS service firewall works, what the trusted service exception is, and the other types of exceptions you can use for the service firewall depending on the PaaS service and all that other fun nerd stuff in my series on Network Security Perimeters if you want to dig in. It’s worth a read if you’re a heavy service firewall user today, because Network Security Perimeters on are track to replace that functionality (and they do a WHOLE lot more).

For the purposes of this post, know the service firewall exists and it is the thing denying inbound traffic when we set publicNetworkAccess to disabled. If you attempt to publish a Foundry agent that has publicNetworkAccess (often referred to as PNA) set to disabled, you’ll receive this error:
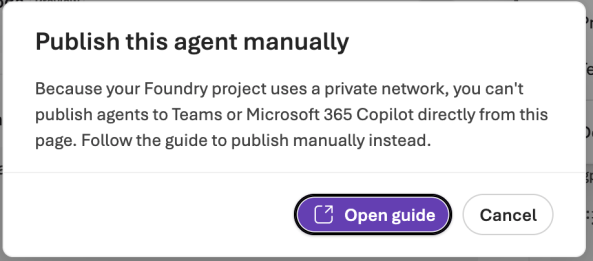
Error when using GUI-based publishing process if PNA is disabled

All of that was a long and overly wordy way of saying the GUI process as it is today will not work for any customer that disabled inbound public network access, which is pretty much every large enterprise customer. Where it may work is for sandbox-like environments where security controls are minimal or if your specific org isn’t subject to strict security controls and inbound PNA isn’t a problem.

How does the GUI process works

You may be saying, “Why should I care if I can’t use it?” Valid question, but for quick proof-of-concepts or sandbox like environments it has a role. It’s also helpful to get a feeling for the overall publishing workflow. While it may be more compact and simple via the GUI process, the programmatic steps don’t differ all too much. There simply are more and you have more configuration options.

Before you run these steps you’ll need to ensure you have the specific set of permissions over Bot Services or be granted the Azure Bot Services Contributor role, Contributor role, or Owner role at the resource group or subscription. Additionally, you’ll require the Foundry User role on the Foundry project.

Let’s assume we have a new Foundry account, PNA is enabled, we got the permissions mentioned above, we’ve created a project, and we’ve created a new prompt agent. In the top right hand corner we have pretty white button that says Publish. The option we’re interested in is the Teams & Microsoft 365 Copilot option as seen below highlighted in red.

If you’ve disabled inbound PNA on the Foundry account, you’d see the error I posted above when you click this.
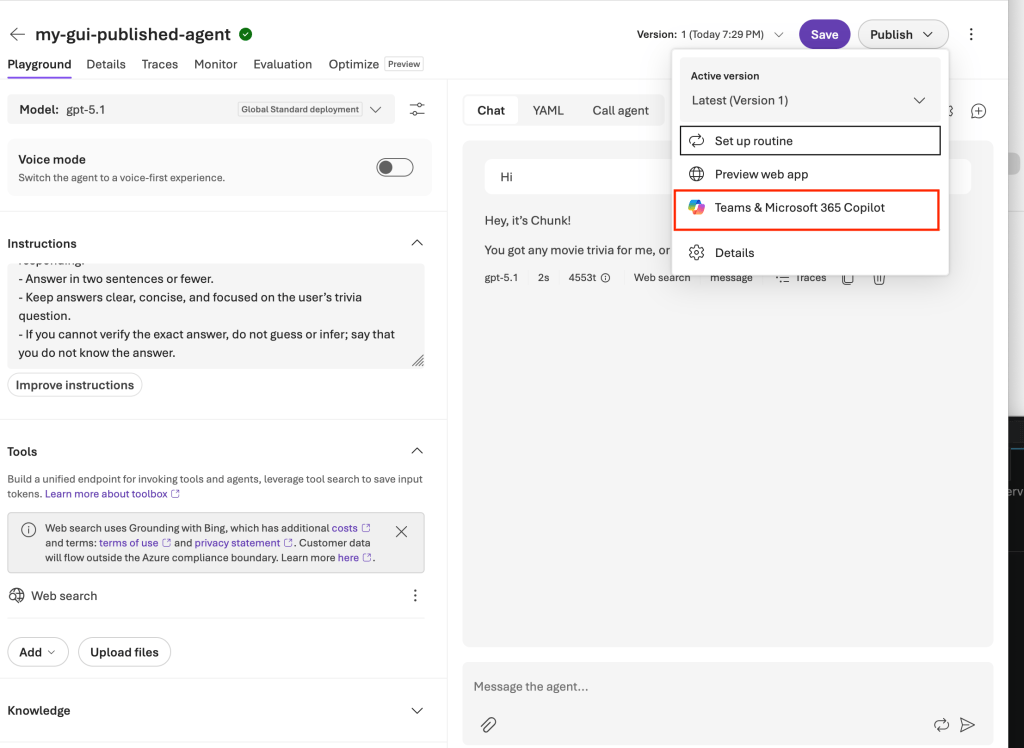
First step in publishing to teams

In the next Publish to Teams and Microsoft 365 window you’ll be prompted to enter some information. Many of these inputs will be used to populate properties in the Agent 365 Agent Registry for the agent and will be used for the manifest file that is created for sideloading into Teams or pushed to the organization’s Teams App Store.
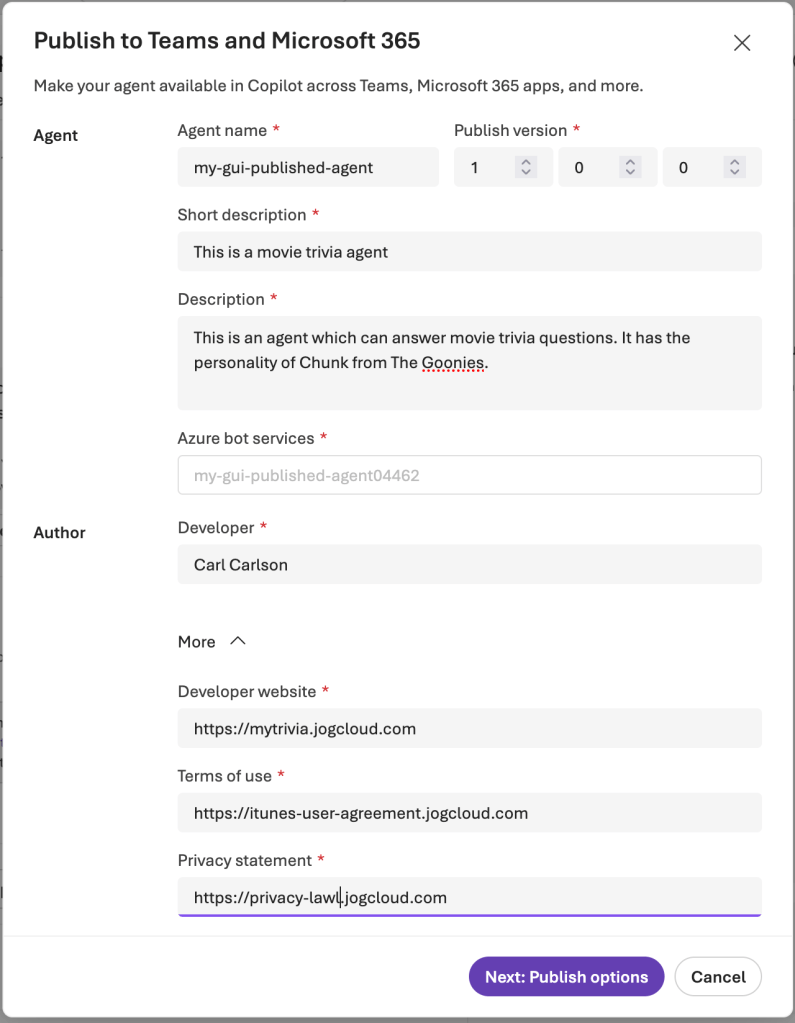
Populating information about agent

Notice that the Azure bot services field is populated automatically. This is because unbeknownst to you, clicking the Publish button created a Bot Services resource in the same resource group as the Foundry resource in the background. This is where the requirement for permissions over Bot Services comes into play. This behavior the requirement for a Bot Service resource may be going away (hooray) at some point in the near future.

Bot Service automatically created

You begin to see why this process isn’t very usable for an enterprise. This probably just triggered a crapload of Azure Policies you’ll now have to deal with around naming conventions, missing tags, PNA enabled for the Bot Service, and likely others.

Next, you’ll click on the Next: Publish options button. This will advance you to the Publish options screen. In the Direct Publish section you can choose to install this Teams app for yourself (essentially sideloads it from my understanding) or you can install it for the entire organization. The latter will trigger a request process in the Microsoft 365 Admin Portal in the Agent 365 Agent Registry window as we’ll see a bit later.

The Download & customize section allows you to download a ZIP file with the generated manifest in it if you need to further customize what the workflow has created.
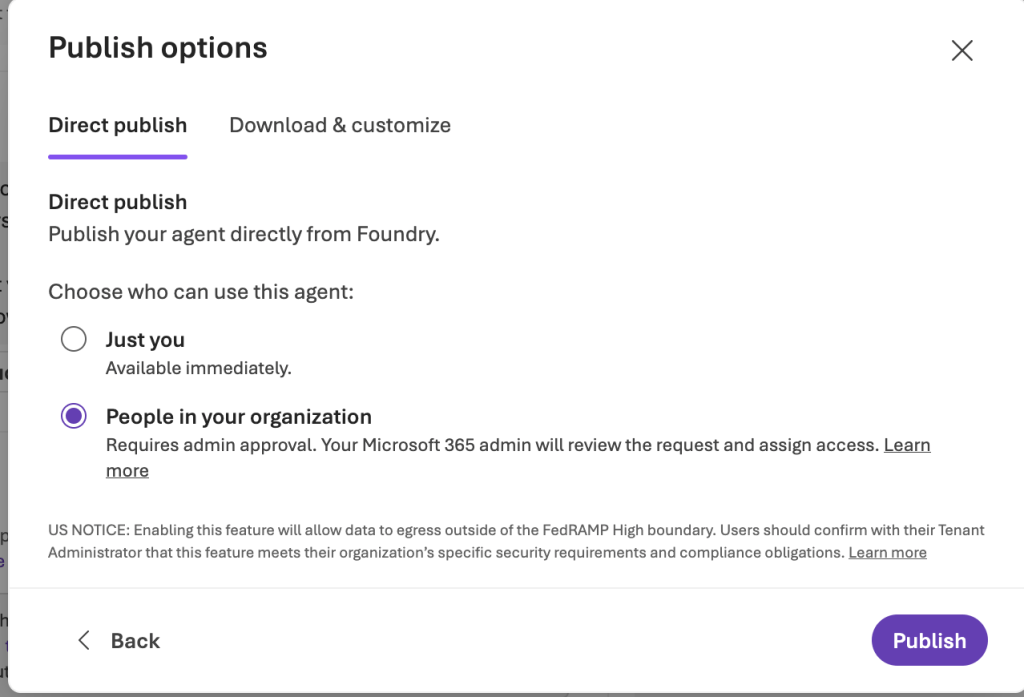
Publish to Teams for just you or the entire org

I complete the workflow by clicking Publish.

Before I jump to the next section, I decided to be nosey and see if I could determine the endpoints being called to process the various API operations. It turns out that there are specific API endpoints behind the Foundry Portal that trigger the backend orchestration of the various API calls we’ll perform when we do it programmatically in the next post. Some of the endpoints of note are:

  1. Press Publish to Teams and Microsoft 365 button
  2. Press Next: Publish Options
  3. Press Publish

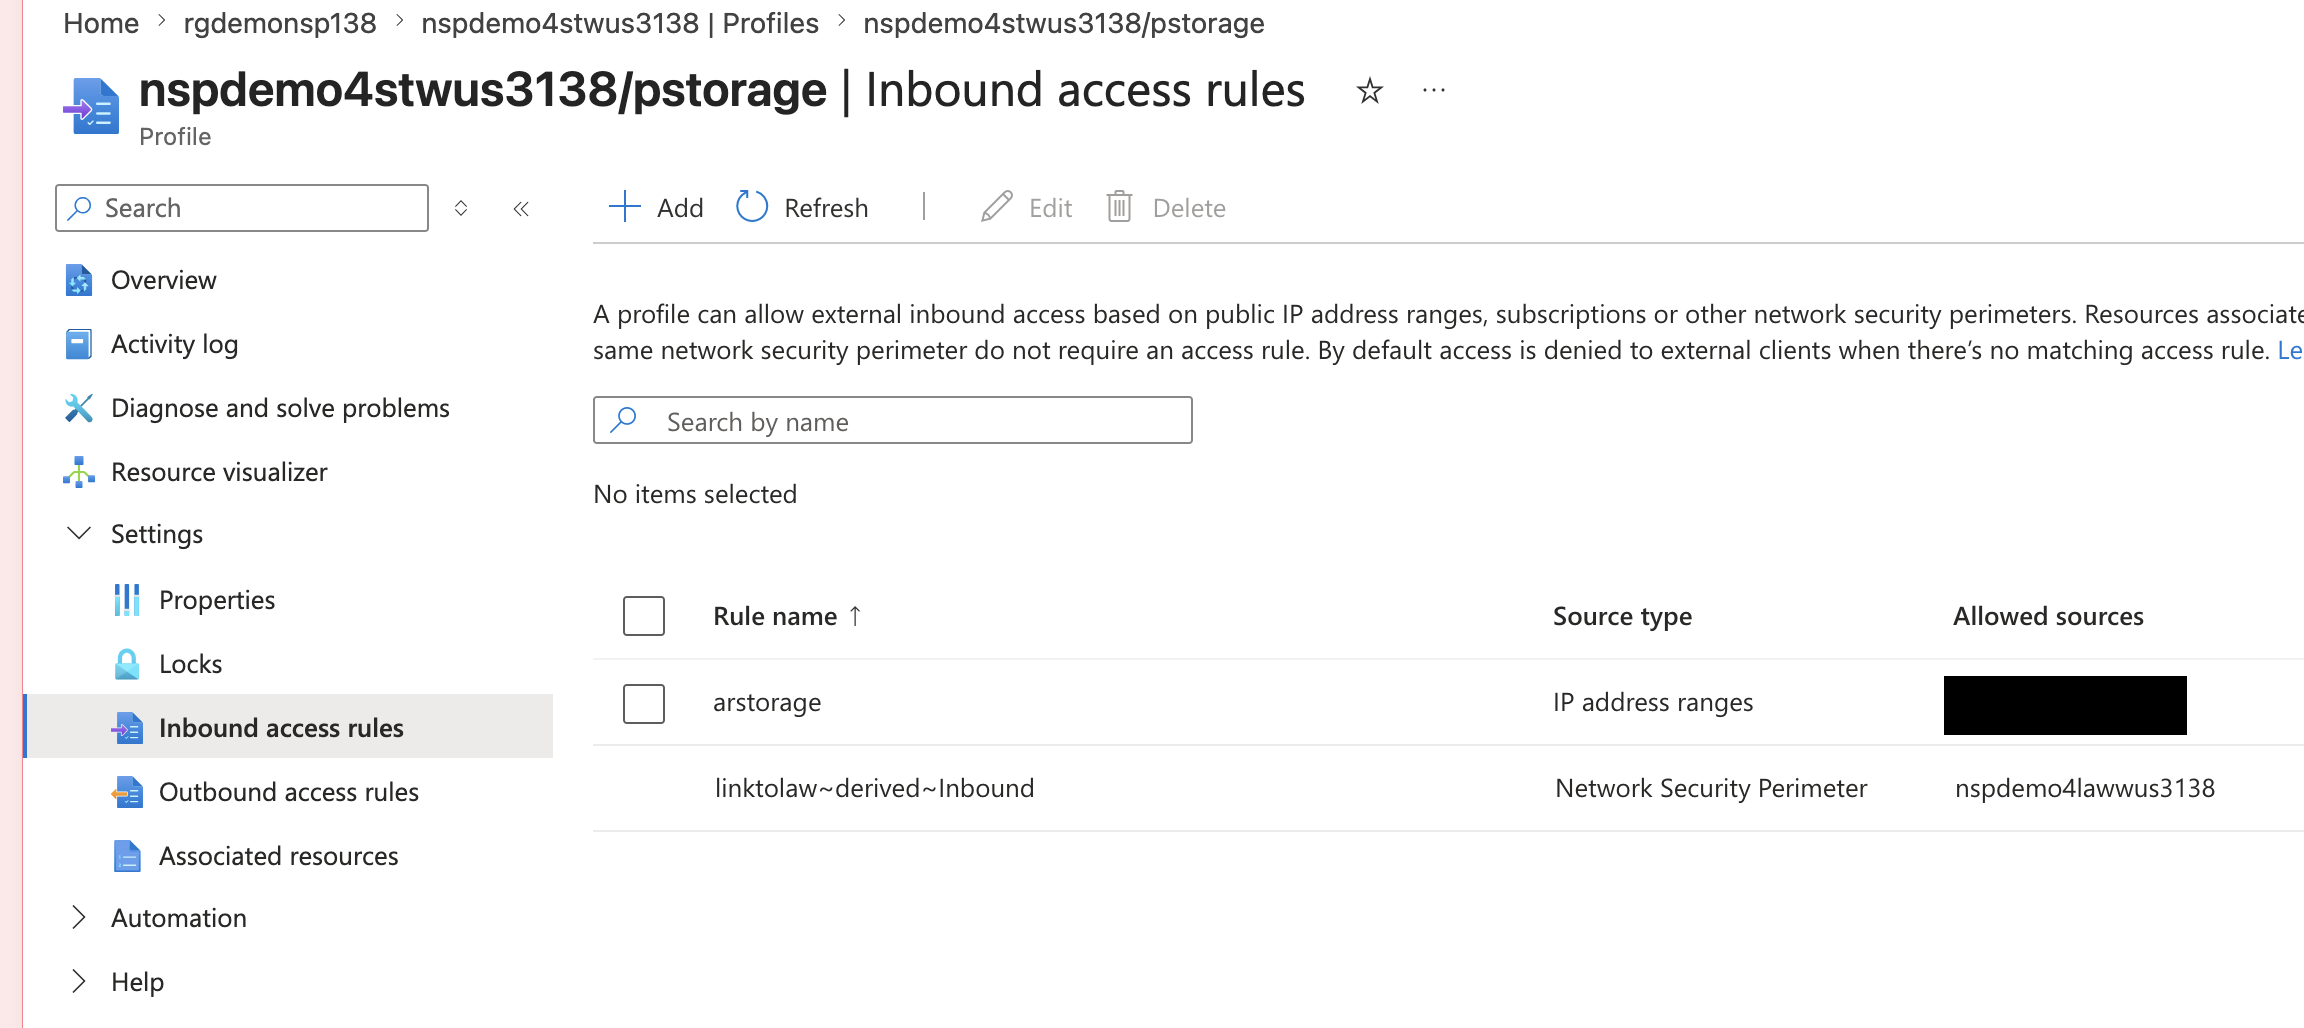
If I pop over to the Microsoft 365 Admin Portal I can see the agent is pending approval in the Agent 365 Agent Registry where I can publish it to the Teams store to make it available to the wider organization I can outright reject it.
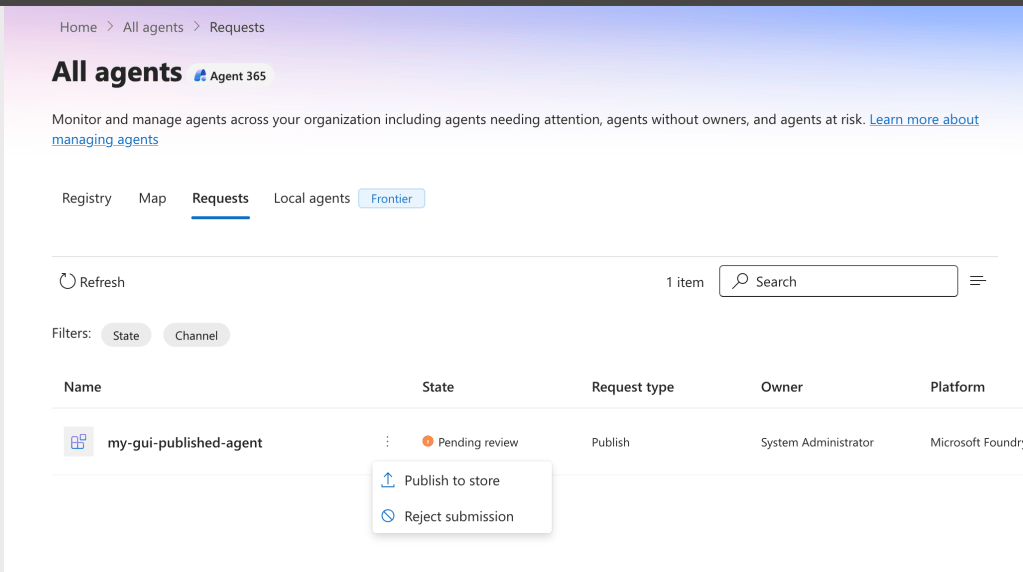
Before approving it, I can explore the information populated for the agent within the agent registry. I can see that the information I populated within the Foundry GUI populated the information in the registry. I also see that it has been assigned an Entra ID Agent Identity created from the Entra ID Agent Identity Blueprint created for the agent. I can also review permissions the agent requires (this will be primarily OAuth permissions via Entra as far as I can tell), any tools it has (haven’t messed with the Agent 365 Tools Registry yet), and information about the security of the agent consolidated from Purview.
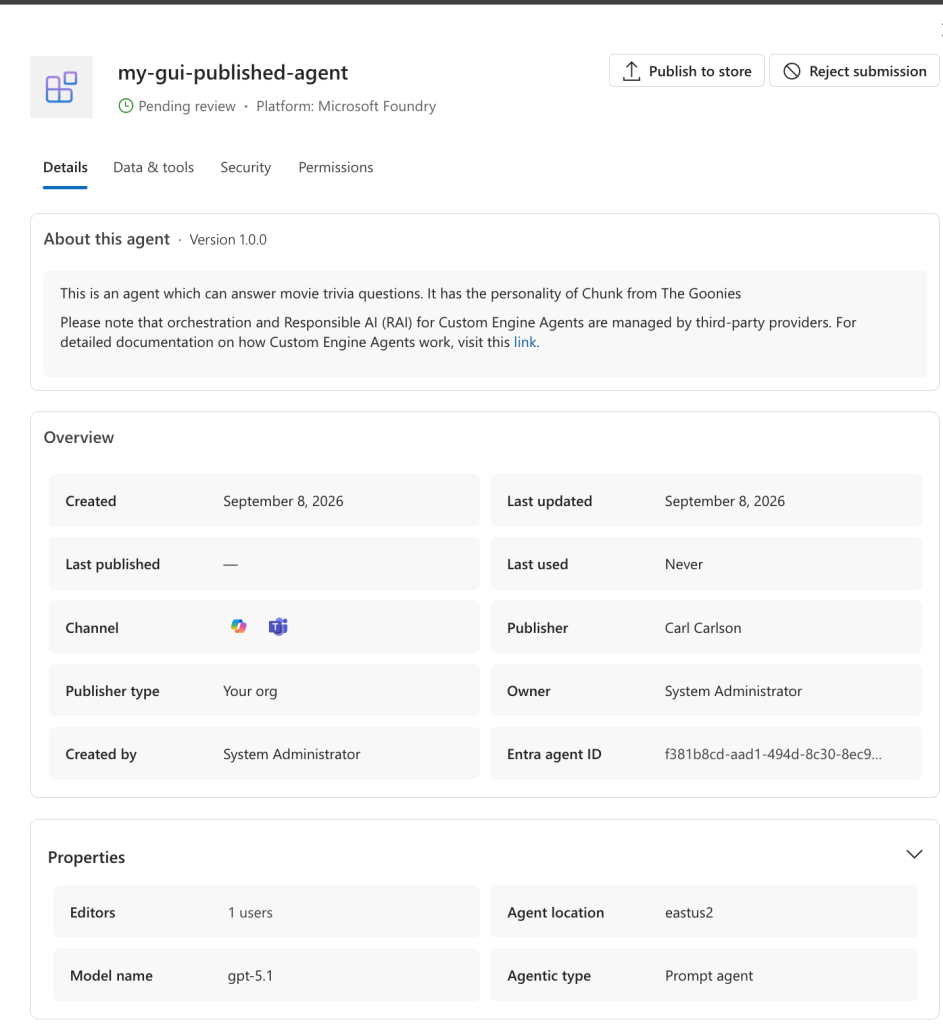
Registry details of agent awaiting publishing

When I hit the Publish to store button I trigger the final process. Here I can choose which users or groups can install the agent in Microsoft Teams and which have the agent pre-installed. I can apply an Agent 365 Policy Template (requires Agent 365 license) which can enforce specific conditional access policies, give it Entra ID access package, and assign custom security attributes (custom security attributes are an underused feature so I’ll dig more into this in future). Lastly, if the agent is requesting any permissions I’m able to accept them or deny the push to the store.

After I run through the workflow and publish it, I get the image below.
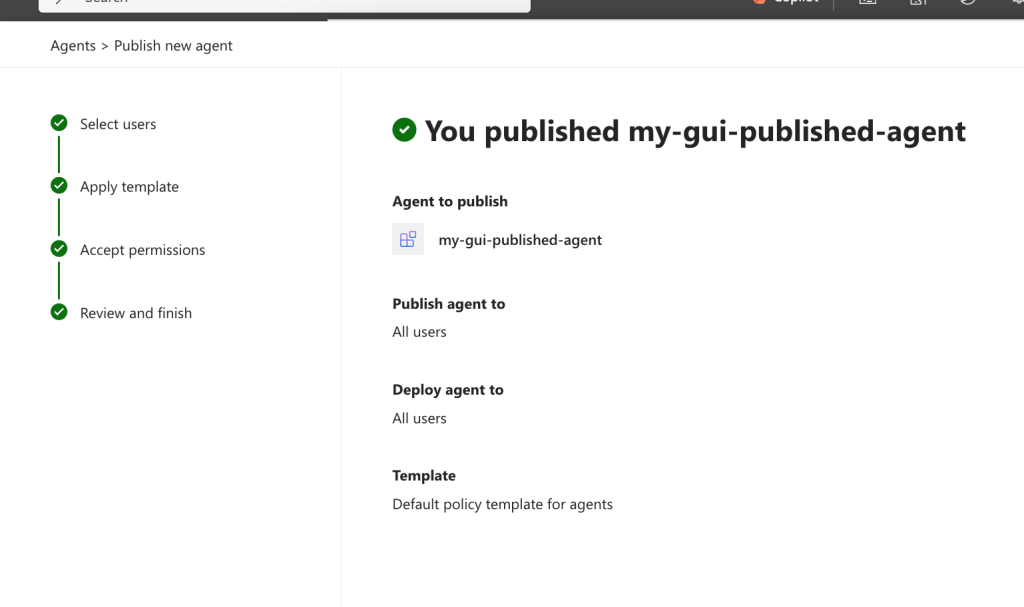
Agent publishing is complete

It can take a fair amount of time for the agent to appear for your users in the Teams store for your users to install. Sometimes it’s 15 minutes and sometimes it seems like forever. Typical joys of Teams caching and Microsoft’s seemingly random timers. Eventually the agent will appear as a Teams app your user can add.
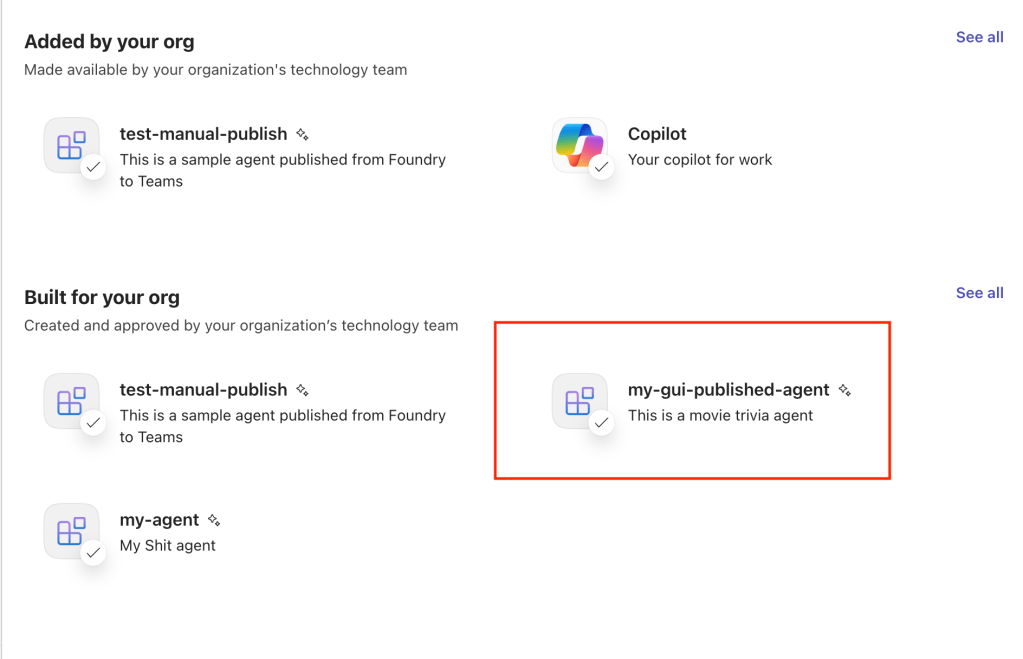
Agent available as app in Teams Store

Once the user adds the agent they can begin chatting with it. The first chat they send they’ll need be prompted to sign into Foundry. This sign in is required to validate the user has appropriate permissions to call the agent.
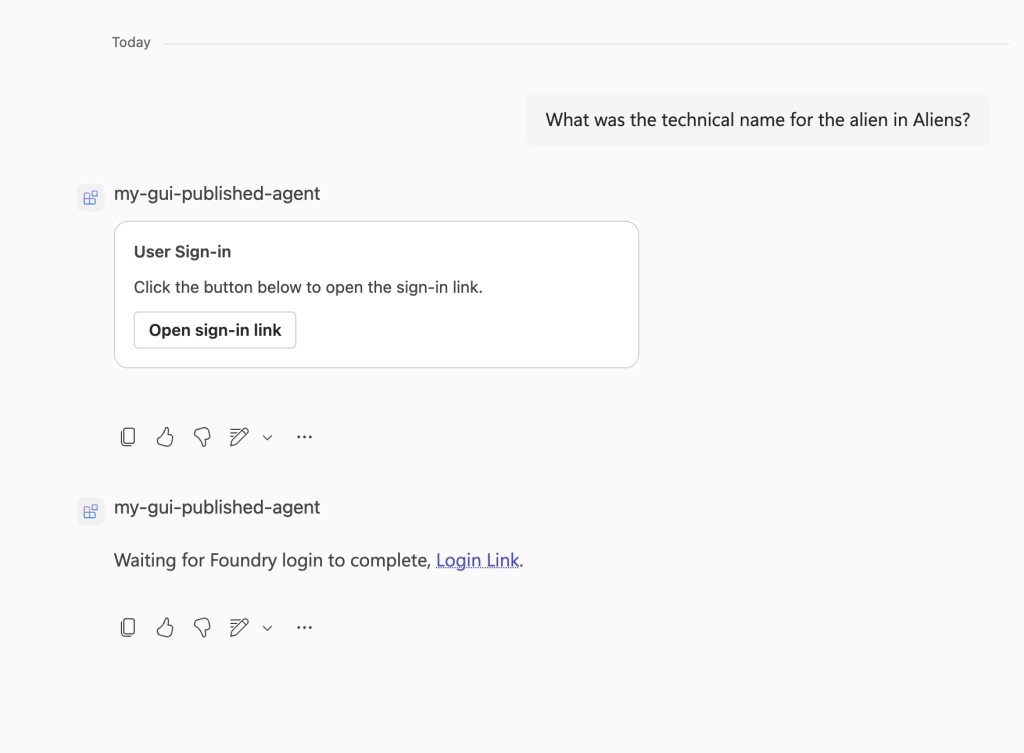
User prompted to sign-in to Foundry

If the user doesn’t have the Foundry Agent Consumer role or equivalent permissions on the Foundry project the agent is in the user will receive an authorization error like the below.
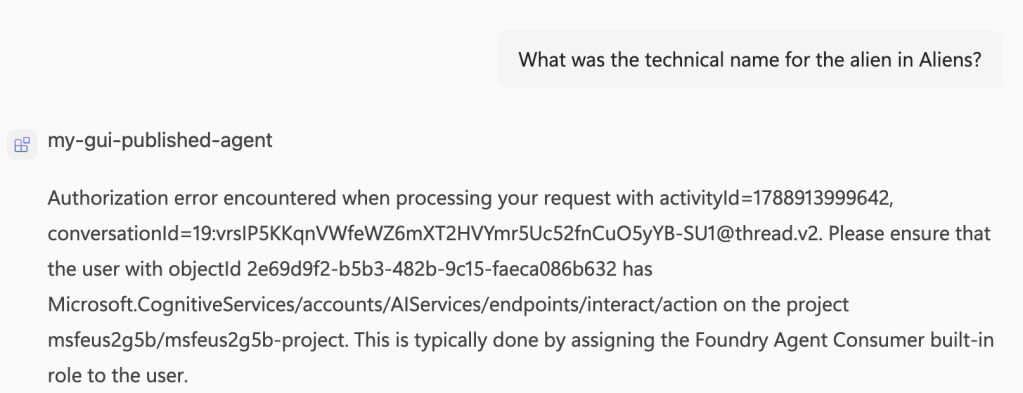
Once user is granted the role on the Foundry project, the user can now converse with the agent!
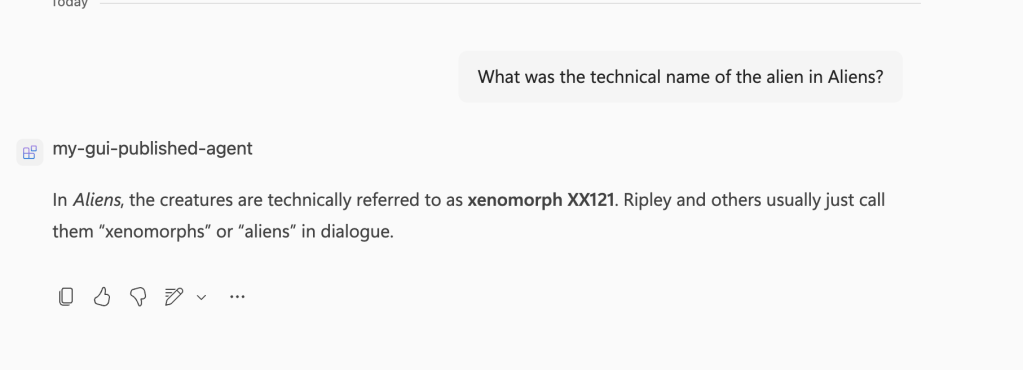
Authorized user conversing with the agent

At this point you’ve got an agent created in Foundry, which has an entry in the Agent 365 Agent Registry, and has been published as a Teams to the organization’s Teams store for authorized users to consume. Seems so simple right?

The reality

Now all of that went so perfect because the product group wrote some great orchestration that got executed automagically via calls to specific endpoints in the Foundry Portal. This only worked so perfectly because inbound PNA was enabled. While inbound is a big piece, there were also outbound network flows from the agent to a variety of endpoints I’ll walk through in my next post. In this setup we didn’t lock down outbound traffic so our traffic that is sent back to Teams (which is a separate initiated flow where the agent runtime initiates it) wasn’t blocked or filtered in any way. Effectively, we had something similar to the picture below. Public network access for inbound and outbound traffic is grand ain’t it?
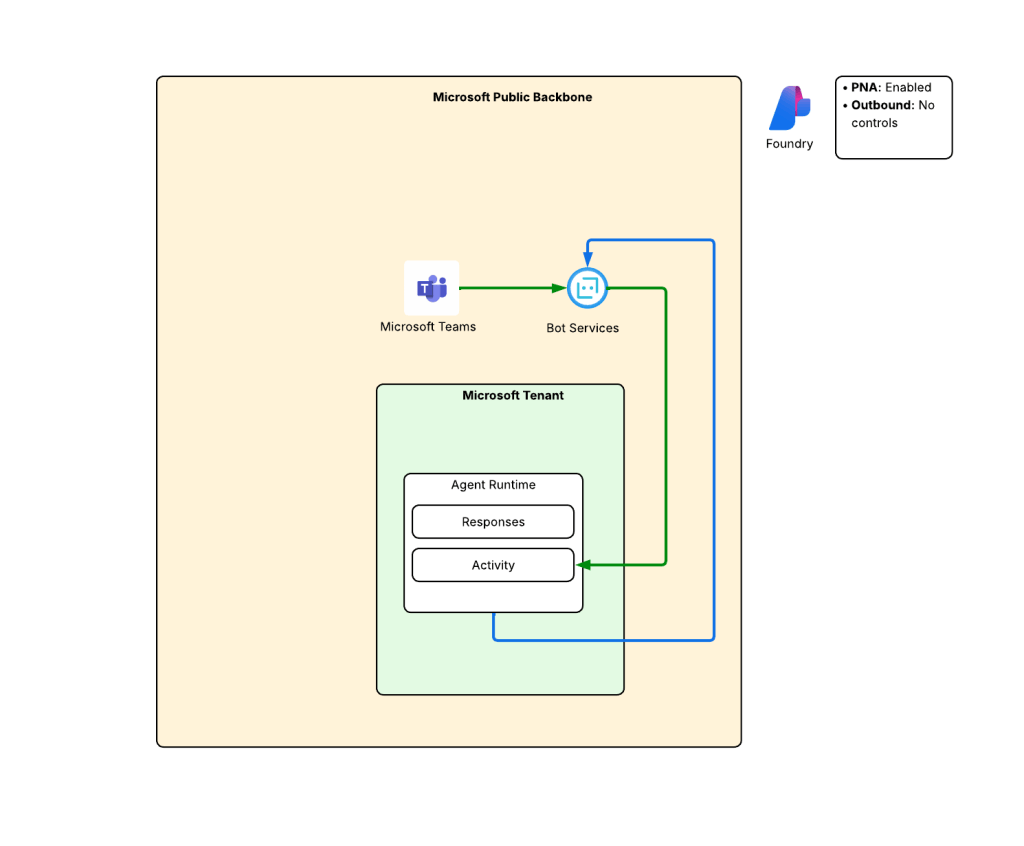
PNA enabled and no outbound traffic control for agent

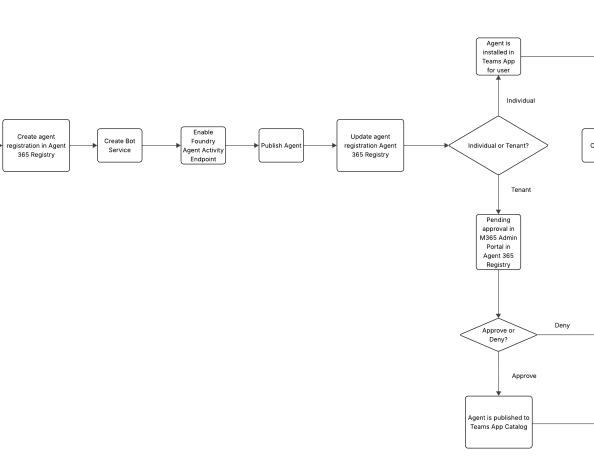
If we look at the end to end publishing flow, it looks something like this flow diagram.
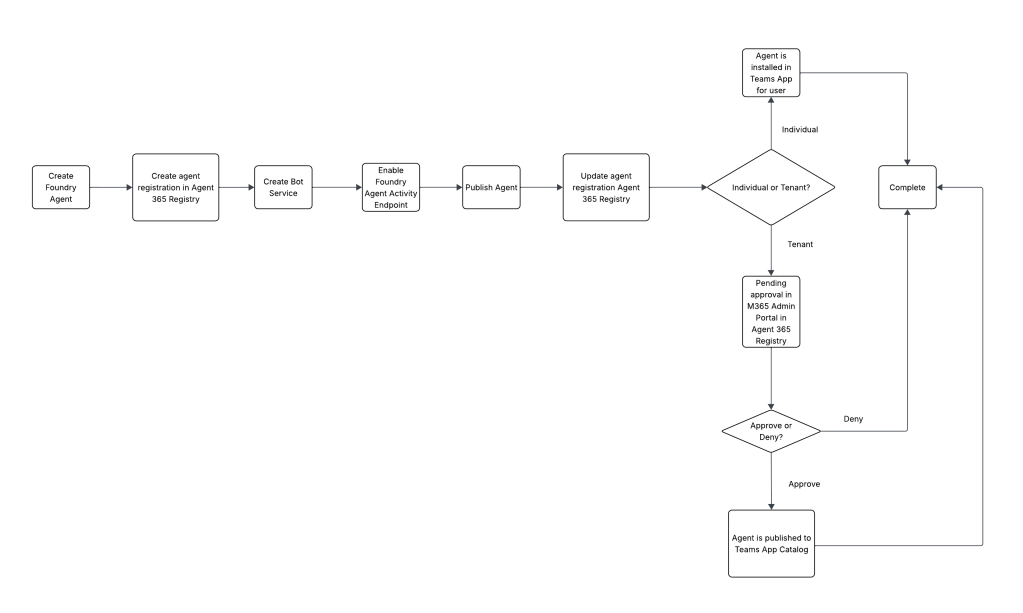
Workflow for publishing an agent

The harsh reality we face with this GUI experience is there are way too many show stoppers to ever use it in a real enterprise environment with even basic security controls. That will lead us to the more complex path of programmatic publishing which I’ll explore in the next post.

Summing it up

What I want you to take away today are GUIs are pretty, but GUIs rarely work in a real enterprise environment because GUIs tend to rely on simple environments with “less” restrictive security controls. There is a lot of complexity to this workflow today and unrestricted network access can be very effective at hiding those complexities and making a really clean GUI-based publishing experience.

There are other points worth paying attention to which will be relevant in the programmatic experience and are just good to let sink into your brain in general:

  1. Today, for prompt agents and hosted agents, a Bot Service is required. This may change in the very near future.
  2. Users calling the agents must have appropriate permissions to call the agent, even through Teams. Using the built-in Azure RBAC role of Foundry Agent Consumer can be an easy path to accomplish that.
  3. Get familiar with Agent 365. Whether you like it or not, you will be interacting with it if you’re building agents in Foundry or doing anything with any agent in the Microsoft clouds.
  4. When you see demos at Ignite or any other conference, it’s usually done in an environment where public network access for inbound and outbound traffic is completely unrestricted and the user has Owner or Admin-level privileges over the service they are interacting with. It will also look easy in those demos. Don’t expect that ease when you go and deploy it to your complex regulated environment.

Well, I’m burned out. Time to let the brain veg out with some classic Mr. Bean.

Entra ID – Deep Dive – Workload Identity Federation – Bonus

Entra ID – Deep Dive – Workload Identity Federation – Bonus

This is part of my series on Microsoft Entra ID:

  1. Entra ID – Deep Dive – The Basics – Part 1
  2. Entra ID – Deep Dive – Protocol Primer – Part 2
  3. Entra ID – Deep Dive – Entra ID Authentication – Part 3
  4. Entra ID – Deep Dive – Workload Identity Federation – Bonus

Hello again!

I’ve been on an identity kick lately given all the chatter around IAM (identity access management) that has popped up as the industry tries to figure out how the hell they’re going to handle the disruption to existing IAM systems with the introduction of AI agents in the enterprise. This has raised more conversation within my customer base, with cross cloud identity being a hot topic. Recently, a customer asked me about Entra ID’s Workload Identity Federation feature. I hadn’t mucked with the feature much beyond reading a bit of the documentation, but given the increase in cross-cloud conversations and the customer ask, it seemed like the perfect time to do it! Hence this blog post!

Let’s get to it, shall we?

What is the problem this feature solves?

It’s this old dude’s take that the high-level question Entra ID WIF (workload identity federation) seeks to answer is, “How do we effectively allow two systems in different organizational or trust boundaries to communicate while allowing each boundary to retain control of its identity system?” This is not a new problem. If you’ve been around the block for a few decades, you’ve likely built federated solutions like Windows Active Directory trusts or federated trusts with SAML (security assertion markup language). Each of those solutions had similar goals which included things like:

  1. Simplify security by letting each organization be the authority over its human and non-human identities.
  2. Make it easier for the user by not saddling them with 100 identities and passwords to remember.
  3. Reduce costs by keeping avoiding having to build complex systems to maintain all those duplicate identities and the support personnel to manage them.

So yeah, the obvious stuff, right?

As cloud was adopted the problem grew in scale as organizations integrated with CSPs (cloud service providers) and demand around B2B collaboration drastically increased. SAML and OIDC made the human identity problem a small bit easier (notice I said bit, so don’t flame me!) to solve, but the non-human, or the machine, identity problem caused bloat in identities. Systems needed to interact and sometimes these systems were in different boundaries. This could be on-premises, sometimes in AWS, GCP, or Azure. You might have a AWS Lambda pulling data from a Microsoft Cloud API, GCP BigQuery grabbing data from both clouds, Kubernetes cluster pulling data from an Azure Storage Account, or an Azure Data Factory ripping data down from an Amazon S3 bucket. All this cross cloud hoopla meant lots of machine identities and credentials floating around.

The classic way to solve this problem for the AWS to Azure looked something like this:

The classic way to handle cross cloud machine identity resource access

Here, the Lambda would obtain a temporary credential from the AWS STS based on an IAM role it was assigned, pass that credential to AWS Secrets Manager to grab a secret which contain a Entra ID service principal client secret. It would then use that secret to authenticate to Entra ID as the service principal to obtain an access token issued by Entra ID which it would pass to access a blob in Azure Storage.

The above pattern is still incredibly common in enterprises today. It works no doubt, but there is that credential you gotta manage. Its usage has to be monitored, its lifecycle has to be tracked, it has to be rotated in Entra ID and updated in AWS Secrets Manager, it could get compromised by an attacker and used to exfiltrate data from Azure Storage, etc etc. Now scale this by multiple clouds and thousands of applications and you quickly see the challenge.

Years ago some smart folks across the industry came up with the concept of WIF to help address this problem.

You’re on Matt Felton’s blog so you’ll suffer with a Matt Felton explanation. WIF is all about eliminating that static secret and letting the workload provide some type of token issued by a trusted party (identity provider) to prove its identity to the trusting party (relying party). If you’re familiar with federation for user identities this should sound very familiar. Elimination of that static secret is where the money is at. No more operational overhead of managing thousands of secrets which be expire or be compromised.

All of this likely makes sense to you. Let’s take a look at how Microsoft implemented it.

How does Entra ID Workload Identity Federation work?

Before we get into the guts of how this works, it’s important to understand some core Entra ID concepts.

In Entra ID there are three main categories of identity: user identities, device identities, and workload identities. Given the feature is called WIF, you can probably figure out that last category is what we’re concerned with. These are identities that will be associated to some application, script, container, agent, etc. In the Entra world all of these things are represented by the core object class of a service principal. There are many types of service principals in Entra, but the two most relevant to our conversation are the application and managed identity types.

Service principals of type application are machine identities associated with an application resource. If you’re unfamiliar with the differences between a service principal and application resource take a read through my first post in my Entra series for the gory details. The main thing to understand is the application is the “template” representation of an application across all of Entra ID while the service principal is the identity of the application in a specific Entra ID tenant. The application resource (you’ll almost always hear it referred to as the application registration) is responsible for authentication of the application to Entra while the service principal is the associated identity that is granted permissions to do stuff within the tenant.

A service principal of type managed identity is the identity associated with an Azure managed identity. Managed identities are Azure’s version of an AWS IAM Role. Like an AWS IAM Role, the credential for the identity is managed by the CSP (in this case Microsoft) and workloads associated with a managed identity obtain temporary credentials (called access tokens in the Azure world) to access Azure resources.

Entra WIF can be enabled for either of the application resource or the managed identity. My personal take is if your use case is to simply consume Azure resources, create a managed identity representing your app in the other cloud. This way you can slap it in a resource group in some Azure subscription alongside the resources it is consuming or other resources that may be pieces of that application in Azure. If your use case is consuming Azure in addition to other APIs (such as the MS Graph API) that are protected by Entra use an application resource. Using an application resource will give you more visibility across all of Entra that you have some application that is consuming multiple pieces of the Microsoft cloud. You can technically grant access to something like the MS Graph API to a managed identity, but it’s not as intuitive or visible.

Once you determine whether you’re going to use an application resource or managed identity you’ll need to configure Entra ID to trust the external IdP (identity provider) so that when it receives tokens from your workload that were issued by the external IdP it can validate them and issue an access token from Entra. The high level flow looks like the below.

The process works in the following way. The workload obtain an access token from its IdP. For example, this could be the AWS STS, GCP’s authorization server, or another IdP using the SPIFFE (Secure Production Identity Framework for Everyone) standard. Once the token is issued, the workload sends that token to Entra ID which verifies it cryptographically using keys pulled from an endpoint exposed by the IdP. Once verified, Entra ID issues an access token to the workload which it can use to call the Azure service.

If you’re like me, you probably want to see an example. Well lucky for you, I got one!

Entra ID Workload Identity Federation in Action

To demonstrate this feature I’m going to use a managed identity for my workload instead of an application resource because it’s a quicker setup. My use case is I have an EC2 instance in AWS that needs to pull data from a storage account in Azure. My architecture is super basic and pictured below.

Simple lab to demonstrate WIF

The first step in is to setup AWS outbound federation for my AWS account. This will activate the STS’s capability of issuing tokens to external relying parties.

Next, I’ll need to create an AWS IAM Policy which will grant permissions to obtain tokens from the STS for a specific relying party. For that, I crafted the super basic IAM policy below. This policy grants permission to the security principal the policy is associated with to request tokens from the STS with an audience of my Entra tenant. You’ll need the audience set as api://AzureADTokenExchange. For mine, I added my tenant ID to the path to further constrain it. While not required, I slapped some requirements around the token duration and signing algorithm. There are a number of condition keys you can choose from to further constrain the permissions.

{
"Version": "2012-10-17",
"Statement": [
{
"Effect": "Allow",
"Action": "sts:GetWebIdentityToken",
"Resource": "*",
"Condition": {
"ForAllValues:StringEquals": {
"sts:IdentityTokenAudience": "api://AzureADTokenExchange/6c80de31-d5e4-4029-XXXX-XXXXXXXXXXXX"
},
"NumericLessThanEquals": {
"sts:DurationSeconds": 300
},
"StringEquals": {
"sts:SigningAlgorithm": "RS256"
}
}
}
]
}

I then associated this IAM Policy to the IAM role used by my EC2 instance. Once complete, at this stage the AWS account is setup for outbound federation and my EC2 instance has permissions to request a token destined for the my Entra ID tenant.

On the Azure side I created a resource group, storage account with a sample blob, and an UMI (user-assigned managed identity).

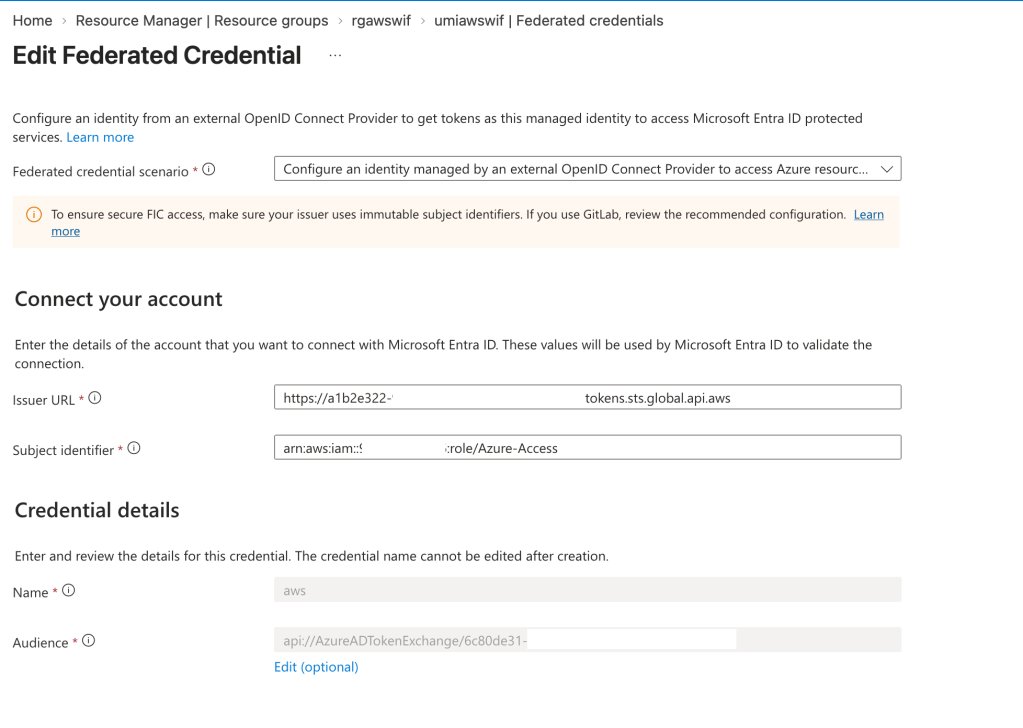
The UMI needs to be configured with a federated credential like you see below.

In the issuer URL I put my AWS account STS identifier I got when I setup the outbound federation. The subject identifier I set to the ARN of my IAM role and the audience I matched to the audience I put in the IAM policy.

One thing to note is that there are a maximum of 20 federated credentials per application resource or managed identity. If you have multiple workloads using the same identity on the Azure side, scale issues can come into play. There is a feature called flexible federated identity credentials which allow you to create an expression to match the incoming subject vs the specific subject itself. If you have those scale issues, you’ll want to look at this feature. It’s in preview as of the date of this blog.

Alright, at this point the plumbing is setup and now I need to toss together some code to make the magic happen.

For this I threw together a very basic Python snippet that requests an token from the AWS STS, exchanges it for an access token from Entra, and writes out the content of a blob stored in Azure Storage.

import boto3
import os
import base64
import json
import logging
import sys
from dotenv import load_dotenv
from azure.identity import ClientAssertionCredential
from azure.storage.blob import BlobServiceClient
load_dotenv(override=True)
TENANT_ID = os.getenv("ENTRA_TENANT_ID")
UMI_CLIENT_ID = os.getenv("AZURE_UMI_CLIENT_ID")
BLOB_ACCOUNT_URL = os.getenv("AZURE_BLOB_ACCOUNT_URL")
BLOB_CONTAINER_NAME = os.getenv("AZURE_BLOB_CONTAINER_NAME")
BLOB_NAME = os.getenv("AZURE_BLOB_NAME")
logging.basicConfig(
level=logging.DEBUG,
stream=sys.stdout,
format="%(asctime)s - %(name)s - %(levelname)s - %(message)s",
)
logger = logging.getLogger(__name__)
def print_jwt_claims(jwt: str) -> None:
print('Parsing AWS STS access token')
payload = jwt.split(".")[1]
payload += "=" * (-len(payload) % 4)
claims = json.loads(base64.urlsafe_b64decode(payload))
print(json.dumps(claims, indent=2))
def get_aws_sts_token() -> str:
print('Obtaining access token from AWS STS...')
sts_client = boto3.client('sts', region_name='us-east-1')
response = sts_client.get_web_identity_token(
Audience=[f"api://AzureADTokenExchange/{TENANT_ID}"],
DurationSeconds=300,
SigningAlgorithm='RS256'
)
token = response["WebIdentityToken"]
print_jwt_claims(token)
return token
try:
credential = ClientAssertionCredential(
tenant_id = TENANT_ID,
client_id = UMI_CLIENT_ID,
func = get_aws_sts_token
)
print(f"Contacting storage account {BLOB_ACCOUNT_URL}")
blob_service_client = BlobServiceClient(account_url=BLOB_ACCOUNT_URL,credential=credential)
blob_client = blob_service_client.get_blob_client(container=BLOB_CONTAINER_NAME,blob=BLOB_NAME)
blob_data = blob_client.download_blob().readall()
print(blob_data.decode("utf-8"))
except Exception as e:
print(f"Script failed: {e}")

Looking at the printed output of the script we first see the token generated by the AWS STS.

{
"aud": "api://AzureADTokenExchange/6c80de31-d5e4-4029-XXXX-XXXXXXXXXXXX",
"sub": "arn:aws:iam::XXXXXXXXXXXX:role/Azure-Access",
"https://sts.amazonaws.com/": {
"ec2_instance_source_vpc": "vpc-0a84fd0130401fcf9",
"ec2_role_delivery": "2.0",
"aws_account": "XXXXXXXXXXXX",
"original_session_exp": "2026-08-17T02:39:52Z",
"source_region": "us-east-1",
"ec2_source_instance_arn": "arn:aws:ec2:us-east-1:XXXXXXXXXXXX:instance/i-034a6ea7b8b83cba5",
"principal_id": "arn:aws:iam::XXXXXXXXXXXX:role/Azure-Access",
"ec2_instance_source_private_ipv4": "XX.XX.XX.XX"
},
"iss": "https://a1b2e322-9556-4319-XXXX-XXXXXXXXXXXX.tokens.sts.global.api.aws",
"exp": 1786912687,
"iat": 1786912387,
"jti": "7d6c05a6-10e8-46ab-8f15-6d4c595b55f0"
}

Here we see the audience set to my Entra tenant and the subject set to the ARN of the role associated to the EC2 instance.

The result of the exchange shows the content of the blob proving cross cloud authentication with no static secrets!

End to end the flow went something like this:

I covered the free pieces of WIF for this post. There are some pretty awesome Premium features that require licensing but extend Entra ID functionality like conditional access, identity protection, and privileged access review. The premium features will come with a cost per workload identity per month. My take is that functionality should be reserved for your high risk workloads unless you got cash to burn.

With those lessons learned, it’s a good time to review whether you’ve adopted WIF for your cross-cloud use cases. Less credentials = less pain. In the world that is tech today, I think we are all looking for a little less pain.

See you next post!

Network Security Perimeters – Part 6 – NSP Perimeter Links

Network Security Perimeters – Part 6 – NSP Perimeter Links

This is part of my series on Network Security Perimeters:

  1. Network Security Perimeters – Part 1 – The Problem They Solve
  2. Network Security Perimeters – Part 2- NSP Components
  3. Network Security Perimeters – Part 3- NSPs in Action – Key Vault Example
  4. Network Security Perimeters – Part 4 – NSPs in Action – AI Workload Example
  5. Network Security Perimeters – Part 5 – NSPs for Troubleshooting
  6. Network Security Perimeters – Part 6 – NSP Perimeter Links

Hello once again fellow geek. In this post I will be continuing my series of NSPs (Network Security Perimeters). Over the past few posts in this series I’ve explained the problem NSPs solve, the components that make up an NSP, demonstrated NSPs through a Key Vault use case and an AI workload use case, and even shown how they can used to troubleshoot the dreaded Private Endpoints and forward web proxy problem we all run into. After reading those posts you are probably wondering why you aren’t seeing them more talked about in the Azure world. Besides the fact it’s not called “Frontier Network Agentic Security AI Perimeter”, the reason NSPs haven’t been getting the love they should is due to a technical gap that is finally in the process of being lifted.

The Challenge

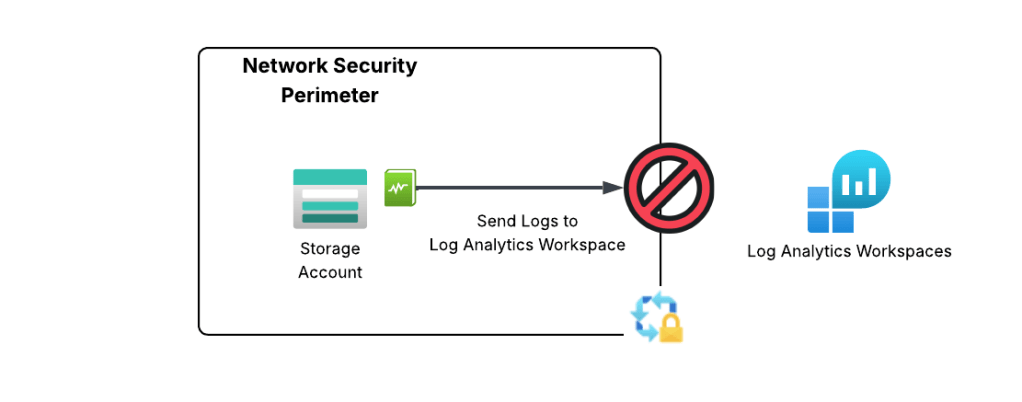
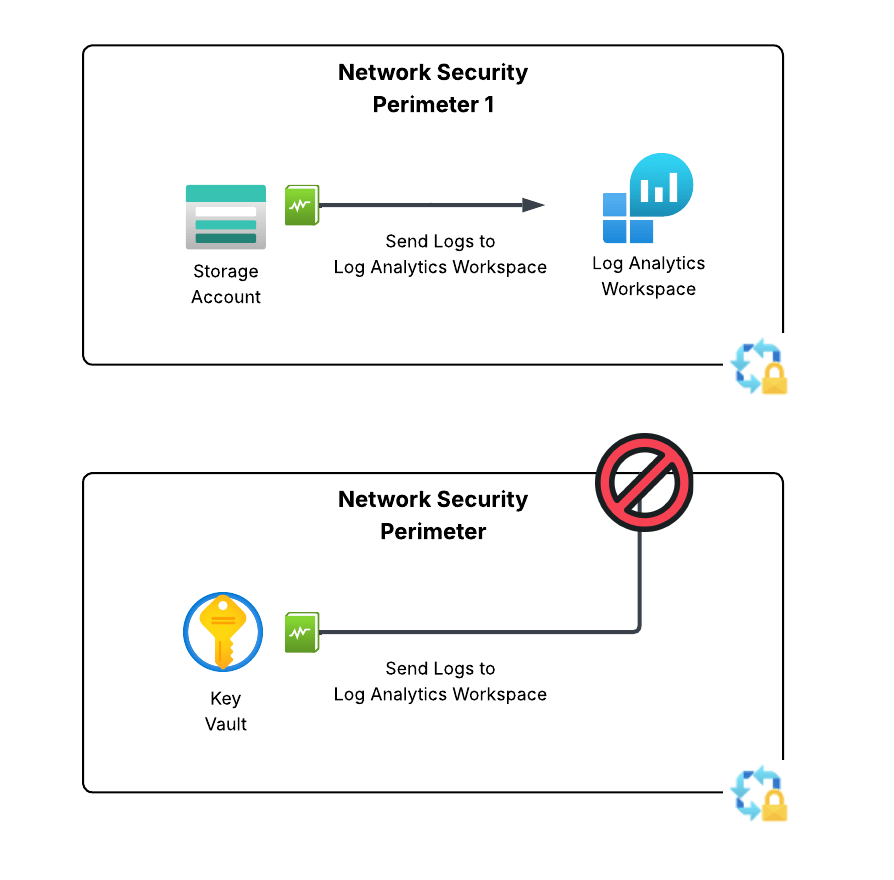
As I’ve covered throughout this series, NSPs exist to control inbound and outbound traffic through the public IP of a supported PaaS service. They have nothing to do nor do they care about (although they will log) inbound traffic through a Private Endpoint. They seek to standardize and modernize the old school PaaS service firewall that (depending on the service) supported limited IP whitelisting, service whitelisting, and resource whitelisting. Where NSPs really shine is egress control. The challenge with that shine is they shine a bit too bright in that space such that when you enforce NSPs it blocks all outbound traffic, including diagnostic log traffic being delivered to a Log Analytics Workspace, Storage Account, or Event Hub.

NSPs block delivery of diagnostic logs

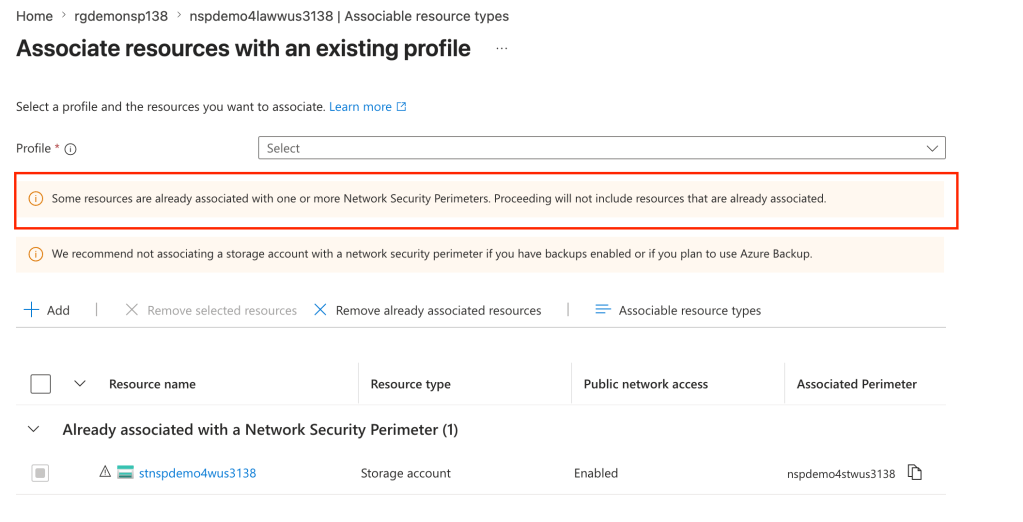
The only way to work around this limitation is to place the delivery destination (LAW, storage account, event hub) in the same NSP. While this sounds like a simple solution, a given resource can only belong to a single NSP. If you attempt to add a resource to an NSP when it’s already associated to another NSP it will fail as seen below.

Resources can only be associated to a single NSP

If you’ve ever done logging as scale in Azure, you already see the problem with this limitation. When logging at scale in Azure, it’s very common to send logs to a centralized Log Analytics Workspace, Event Hub, or Storage Account. There are a number of benefits to doing this beyond the scope of this post which you can read about in the CAF (Cloud Adoption Framework) documentation. These resource are typically managed by a security team or a platform team and live in subscriptions controlled by those teams.

If you’re like, your first instinct is to create an outbound rule to allow the access to the Log Analytics Workspace. Good instinct, but not possible because today NSPs only support outbound rules of type FQDN and there is no FQDN for platform diagnostic logs that Microsoft provide today. A service tag would be the best bet, but sadly it is not yet supported for NSP outbound rules.

Centralized logging problem with NSPs

Up until very recently, NSPs in enforcement mode have been pretty much a non-starter for enterprise customers due to this limitation. Notice I say “enforcement”. If you aren’t using NSPs in learning (or transition mode) you are losing out on insanely valuable egress visibility you can’t get using any other means as I describe in my troubleshooting post.

The PG (Product Group) for NSPs is one of those amazing product groups who listens to the customer, wants to see their product adopted, and works their butt off. Just a few weeks ago they introduced a new feature into public preview that begins to address this technical limitation

The Solution

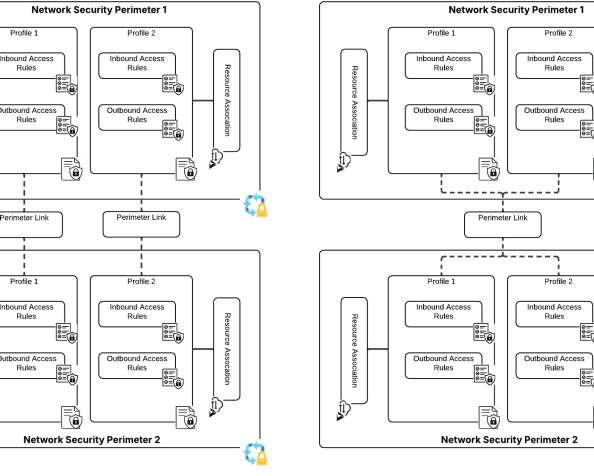
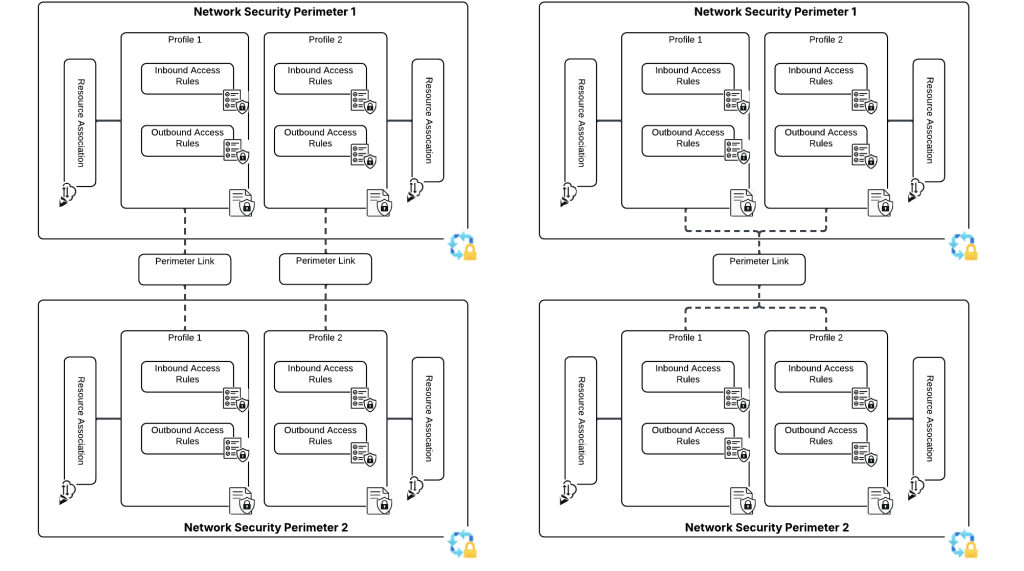
The solution for this technical problem is perimeter links. In the ARM (Azure Resource Manager) API, these are referred to as links and are a child resource of the Network Security Perimeter. Perimeter links allow traffic to flow between NSPs either per profile or for all profiles. This means we can slap a perimeter link between the NSP containing our resources that need to deliver our logs and the NSP containing the resource we’re delivering the logs to!

Perimeter links can be across a single profile or all profiles within an NSP

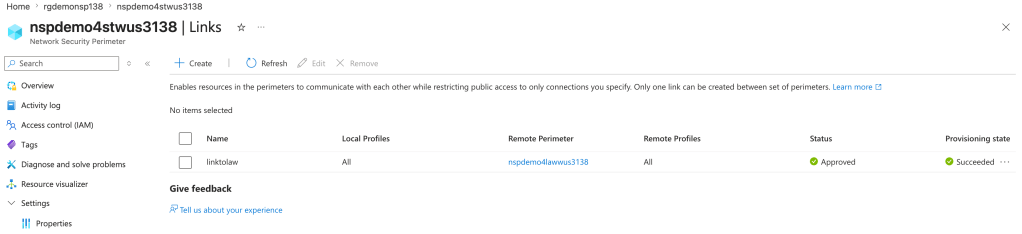
In the image below I’ve created a perimeter link between an NSP containing a storage account the NSP containing the log analytics workspace the storage account diagnostic log setting has been configured to deliver logs to. This link enables the traffic to flow freely between the two NSPs.

Perimeter link example

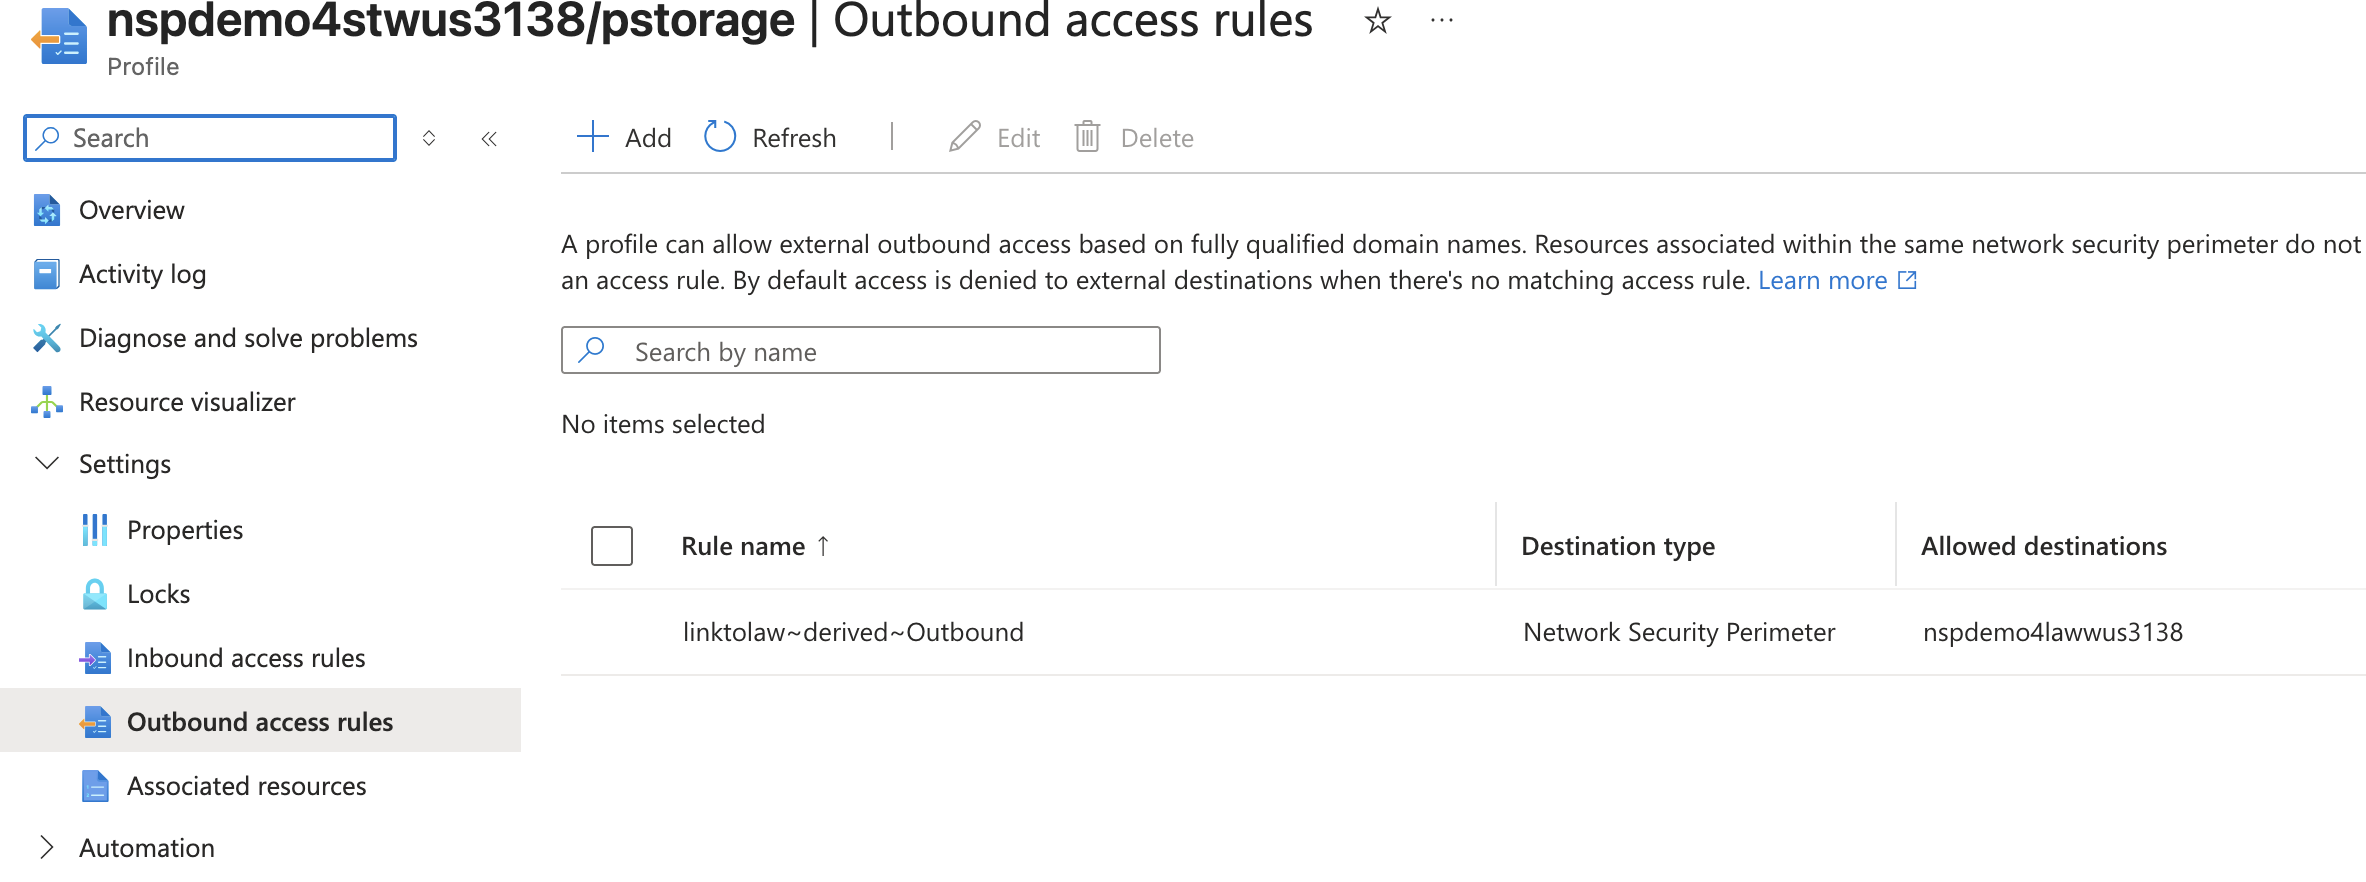
Once the perimeter link is created, new inbound and outbound access rules are created in each profile allowing the two NSPs to communicate with each other.

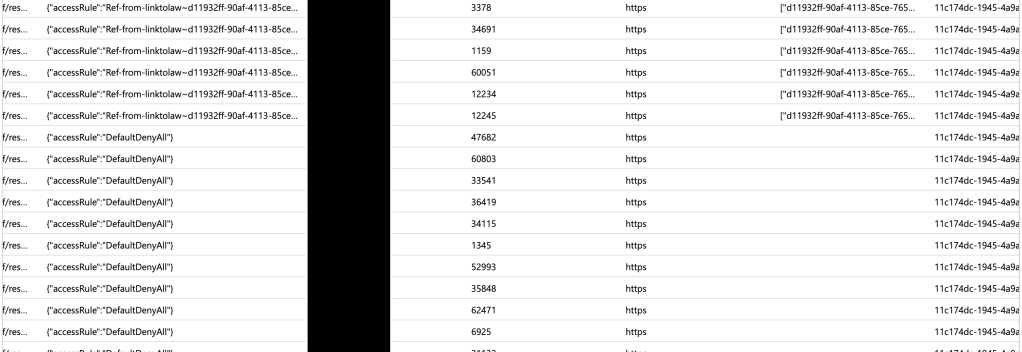
In the example above, once the perimeter link is in place and rules have been automatically created and taken affect (takes about 10-15 seconds) the spice will flow! Alright, logs will flow but I’ve been re-reading Dune so leave me alone in my nerdy world. In the screenshot below you can see the logs being blocked initially and then being allowed after the perimeter and its automatically created rules take affect.

The spice will flow!

The good and gotchas of perimeter links

So first some of the good things about perimeter links:

  1. You can now do cross perimeter communication.
  2. In my testing, terraform state doesn’t get botched up when the perimeter link triggers the automatic creation of the access rule. A reapply after didn’t complain and didn’t overwrite them.
  3. Perimeter links work across subscriptions. Note there is a (as there should be) to make that work.

As I mentioned in the beginning of this post, perimeter links are in public preview as of the date of this post (I’ll remove this when they go GA) so you’ll need to enable the preview feature in your subscription to muck around with them. Perimeter links also only affect a specific subset of resources (fewer than are supported for NSPs all up).

The biggest pain point of them right now is the maximum amount of perimeter links per NSP is 10. Obviously, this is no where near the scale needed for the centralized logging use case. However, this is still preview and I’m confident the PG will increase that limit (hopefully a shit ton) prior to GA.

Well folks, let me leave you with a few recommendations:

  1. If you’re not using NSPs as a detective control for data exfiltration you are missing out. You need to make this a priority, if only for the visibility into egress.
  2. This is preview, so muck around with it, but don’t go rolling this to prod.

Have a great night!

Entra ID – Deep Dive – Entra ID Authentication – Part 3

Entra ID – Deep Dive – Entra ID Authentication – Part 3

This is part of my series on Microsoft Entra ID:

  1. Entra ID – Deep Dive – The Basics – Part 1
  2. Entra ID – Deep Dive – Protocol Primer – Part 2
  3. Entra ID – Deep Dive – Entra ID Authentication – Part 3
  4. Entra ID – Deep Dive – Workload Identity Federation – Bonus

Back for more are ya? Today we’re gonna chat about how you could add Entra ID authentication into your custom-built web application. I’ll be digging into the Entra ID application registration process and examining the requests and responses for the whole authentication process via a local proxy using HTTP Toolkit. The goal here is not to give you coding best practices (god save you if you use any of my code in production) but instead to help you understand how all this stuff works and how products are (and are not) exercising the OIDC and OAuth protocols under the hood.

If you haven’t read my first and second post in the series, stop what you’re doing right now and read them. I’m going into this post assuming you have and thus assuming knowledge and understanding basic Entra ID concepts like applications vs service principals and a foundational understanding of OIDC and OAuth.

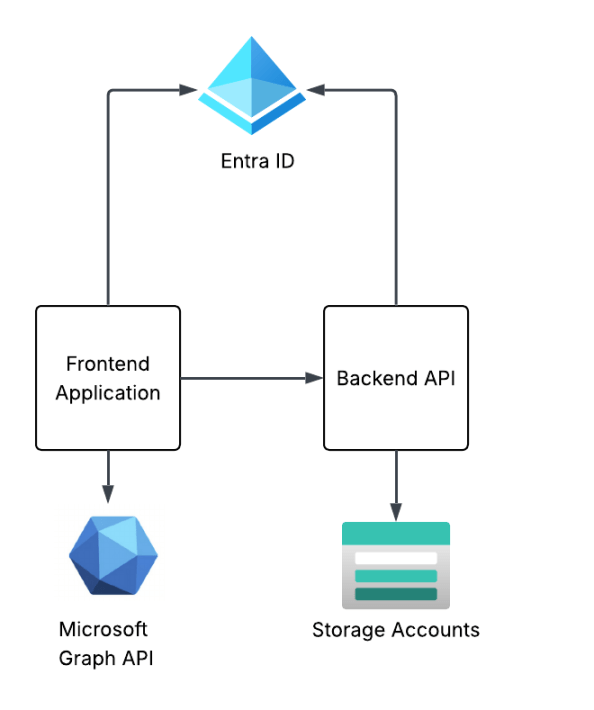
The solution design I’m building towards this in this series of posts is a simple frontend web application and backend API that are using Entra ID for authentication and authorization. The end design will look something like the below. This post will focus on the frontend web application.

Series solution design

Creating the frontend application registration

As I covered in my first post, the application registration (or application resource) is the globally unique representation of the application across Entra ID. There can only be one application registration for an application across all Entra ID tenants. An application registration can be single tenant (used only in your Entra ID tenant) or multi-tenant (can be used across Entra ID tenants). I like to think of the process of creating the application process similar to the manual client registration process mentioned in the OAuth spec. The result is the same as we’ll configure a bunch of information required for OAuth such as the redirect URI, the grant types it supports, and whether the client will be public or confidential client. Once registered, Entra will return a unique client_id and client_secret if a confidential application. There are additional Entra-specific properties we can populate, but the manual client registration explanation makes the most sense in my brain at least.

Creating an application registration can be done through the Portal, CLI/PowerShell, REST, Terraform, etc. I’m going to create it direct through the Microsoft Graph REST API because I want to walk through all the gory properties. To create an app registration, your user account needs to be at least hold the Entra ID Application Developer role. To keep things simple and address my laziness, my user will be setup as a global admin.

# Set the properties for the application
app_display_name = "Demo frontend app for Entra authentication"
description = "This app is used to demonstrate a frontend application where a user authenticates using Entra ID authentication via OIDC"
contact = "business_unit1@my.com"
........
# Create an app registration
def create_app_registration(display_name: str, contact: str):
"""This function creates a new application registration in Microsoft Graph API if it doesn't already exist
Args:
display_name (str): The display name for the new application registration.
contact (str): The contact information to associate with the application registration.
Returns:
dict: The details of the created application registration.
"""
check_app = get_app_registration_by_display_name(display_name)
if check_app is not None:
print(f"Application {check_app['displayName']} already exists and its id is {check_app['id']}")
return check_app
else:
print("Creating new application registration...")
body = {
"displayName": display_name,
"description": description,
# Setting to false means this is a confidential client application vs a public client
"isFallbackPublicClient": False,
# Set a service management reference which can be the contact associated with the application
"serviceManagementReference": contact,
# Create the app as multi tenant; single tenant would use AzureADMyOrg
"signInAudience": "AzureADMultipleOrgs",
# Add a redirect URI to support OIDC authentication
"web": {
"redirectUris": [
"http://localhost:8100/callback"
]
}
}
response = requests.post(
'https://graph.microsoft.com/v1.0/applications',
headers={
'Content-Type': 'application/json',
'Authorization': f'Bearer {user_token.token}'
},
json=body
)
return response.json()
app_frontend = create_app_registration(app_display_name, contact)
print(json.dumps(app_frontend, indent=2))

The application registration I’m creating above is being created as a multi-tenant application instead of a single tenant application and is determined by the signInAudience being set to a value of AzureADMultipleOrgs. I’m doing this because I may do an additional post in this series walking through multi-tenant applications. Most of the application registrations you create will be single tenant and would have this property set to AzureADMyOrg.

Since I’m building a web application, I’m going to be configuring it as a confidential client (which means it will have a credential) and I’m going to use the authorization code flow. I don’t want my application registration to ever support being used as a public client so I set isFallbackPublicClient to false. This will force my client to provide a credential when attempting to obtain a token. If you were building an application that would live direct on the user’s desktop or mobile device, you’d need to set to that true because at that point your application would be a public client.

Under the web property, I’m setting the redirectUri property to the endpoint in my application I want the user redirected to after the user successfully authenticates to Entra ID and consents to whatever scope the application (or OAuth client) is requesting. In this case, my application runs directly on my machine so this is set to localhost.

You’ll also see I’m setting the serviceManagementReference property. Best practice is for you to set this property with a contact within the business unit for that owns the application. This can be helpful if the application registration becomes stale at this point and you detect that during your regular audits (which OF COURSE you’re doing!)

Once complete, I get the response below.

Creating new application registration...
{
"@odata.context": "https://graph.microsoft.com/v1.0/$metadata#applications/$entity",
"id": "be0af053-faf4-44b3-b071-XXXXXXXX",
"deletedDateTime": null,
"appId": "fc815c55-d456-4d38-be76-XXXXXXXX",
"applicationTemplateId": null,
"disabledByMicrosoftStatus": null,
"createdByAppId": "04b07795-8ddb-461a-XXXXXXXXXXXX",
"createdDateTime": "2026-06-25T01:19:12.1150491Z",
"displayName": "Demo frontend app for Entra authentication",
"description": "This app is used to demonstrate a frontend application where a user authenticates using Entra ID authentication via OIDC",
"groupMembershipClaims": null,
"identifierUris": [],
"isDeviceOnlyAuthSupported": null,
"isDisabled": null,
"isFallbackPublicClient": false,
"nativeAuthenticationApisEnabled": null,
"notes": null,
"publisherDomain": "XXXXXXXX.onmicrosoft.com",
"serviceManagementReference": "business_unit1@jogcloud.com",
"signInAudience": "AzureADMultipleOrgs",
"tags": [],
"tokenEncryptionKeyId": null,
"uniqueName": null,
"samlMetadataUrl": null,
"defaultRedirectUri": null,
"certification": null,
"optionalClaims": null,
"servicePrincipalLockConfiguration": null,
"requestSignatureVerification": null,
"addIns": [],
"api": {
"acceptMappedClaims": null,
"knownClientApplications": [],
"requestedAccessTokenVersion": null,
"oauth2PermissionScopes": [],
"preAuthorizedApplications": []
},
"appRoles": [],
"info": {
"logoUrl": null,
"marketingUrl": null,
"privacyStatementUrl": null,
"supportUrl": null,
"termsOfServiceUrl": null
},
"keyCredentials": [],
"parentalControlSettings": {
"countriesBlockedForMinors": [],
"legalAgeGroupRule": "Allow"
},
"passwordCredentials": [],
"publicClient": {
"redirectUris": []
},
"requiredResourceAccess": [],
"verifiedPublisher": {
"displayName": null,
"verifiedPublisherId": null,
"addedDateTime": null
},
"web": {
"homePageUrl": null,
"logoutUrl": null,
"redirectUris": [
"http://localhost:8100/callback"
],
"implicitGrantSettings": {
"enableAccessTokenIssuance": false,
"enableIdTokenIssuance": false
},
"redirectUriSettings": [
{
"uri": "http://localhost:8100/callback",
"index": null
}
]
},
"spa": {
"redirectUris": []
}
}

Next up, I want to set an owner. Every application registration should have an owner and this is a child object of the application. Now don’t go willy-nilly throwing any business unit person into that field (the owner cannot be a group as of the date of this post). When a user is an owner of an application registration, they can modify the application registration. The owner should be set to some privileged user account in Entra where access to that privileged account is tightly controlled.

import requests
import json
# Set the owners of the application using their Entra ID user object id
owners = [
"2e69d9f2-b5b3-482b-9c15-XXXXXXXXXXXX"
]
........
# Add owners to the application registration
def add_owners_app_registration(owners: list, app_id: str):
"""This function adds owners to an application registration in Microsoft Graph API
Args:
owners (list): A list of Entra ID user object IDs to add as owners.
app_id (str): The object ID of the application registration to add owners to.
Returns:
list: The updated list of owners for the application registration.
"""
# Check the current owners to see if the owner is already listed
check_owners = get_app_registration_owner(app_id)
if check_owners is not None:
for owner in owners:
if owner in [o['id'] for o in check_owners]:
print(f"Owner {owner} is already an owner of the application.")
# Since owner isn't there, add it
else:
print(f"Adding owner {owner} to the application...")
response = requests.post(
f'https://graph.microsoft.com/v1.0/applications/{app_id}/owners/$ref',
headers={
'Content-Type': 'application/json',
'Authorization': f'Bearer {user_token.token}'
},
json={
"@odata.id": f"https://graph.microsoft.com/v1.0/directoryObjects/{owner}"
}
)
if response.status_code == 204:
print(f"Owner {owner} added successfully.")
else:
print(f"Failed to add owner {owner}. Response: {response.status_code} - {response.text}")
else:
print("No current owners found for the application.")
for owner in owners:
print(f"Adding owner {owner} to the application...")
response = requests.post(
f'https://graph.microsoft.com/v1.0/applications/{app_id}/owners/$ref',
headers={
'Content-Type': 'application/json',
'Authorization': f'Bearer {user_token.token}'
},
json={
"@odata.id": f"https://graph.microsoft.com/v1.0/directoryObjects/{owner}"
}
)
if response.status_code == 204:
print(f"Owner {owner} added successfully.")
else:
print(f"Failed to add owner {owner}. Response: {response.status_code} - {response.text}")
new_owners = get_app_registration_owner(app_id)
return new_owners
new_owners = add_owners_app_registration(owners = owners, app_id=app_frontend['id'])
print(json.dumps(new_owners, indent=2))

Next up I need to create a client credential for my application. This will act as its client_secret to support its confidential client status. Entra ID supports multiple types of credentials including a basic client secret, client certificate, and federated credential. Of the three, the federated credential is the sweet spot if you can make it work. This is where you can use something like a managed identity which means the actual secret is automatically managed and rotated by Microsoft. Way easier lifecycle. Federated credentials can also use external identity providers, like GCP, GitHub and others neat integrations via the workload identity federation. A client certificate should be your next preferred credential since it has higher assurance and avoids having to worry about secret rotation and leakage. Since I’m lazy, I’ll be using a client secret.

Below I create a client secret that will be valid for a year.

# Create a date one year from now that will be used to expire the app registration credential
start_date = datetime.now(timezone.utc)
end_date = (datetime.now(timezone.utc) + relativedelta(years=1)).replace(hour=23, minute=59, second=59, microsecond=0)
formatted_start_date = start_date.strftime('%Y-%m-%dT%H:%M:%SZ')
formatted_end_date = end_date.strftime('%Y-%m-%dT%H:%M:%SZ')
.........
# Create a client secret
def create_password_credential(app_id, end_date, start_date, override=False):
"""This function creates a password credential for an application registration in Microsoft Graph API. It will delete existing
credentials if override is set to True, otherwise it will return a message that a credential already exists.
Args:
app_id (str): The object ID of the application registration to create a password credential for.
end_date (str): The end date and time for the password credential in ISO 8601 format.
start_date (str): The start date and time for the password credential in ISO 8601 format.
override (bool): Whether to override existing password credentials. Defaults to False.
Returns:
dict: The deatils of the created password credential or a blank dict if a credential already exists and override is False.
"""
# Check to see if the app already has a password credential
app = get_app_registration(app_id)
if app['passwordCredentials'] == []:
# Create a new credential
body = {
"displayName": "primary",
"endDateTime": end_date,
"startDateTime": start_date
}
response = requests.post(
f'https://graph.microsoft.com/beta/applications/{app_id}/addPassword',
headers={
'Content-Type': 'application/json',
'Authorization': f'Bearer {user_token.token}'
},
json=body
)
if response.status_code != 200:
print(f"Error creating password credential: {response.status_code}: {response.text}")
else:
print("Created new password credential.")
return response.json()
elif override:
# Delete existing credentials
for cred in app['passwordCredentials']:
print("Deleting existing password credential...")
response = requests.post(
f'https://graph.microsoft.com/beta/applications/{app_id}/removePassword',
headers={
'Content-Type': 'application/json',
'Authorization': f'Bearer {user_token.token}'
},
json={
"keyId": cred['keyId']
}
)
if response.status_code != 204:
print(f"Error deleting password credential: {response.status_code}: {response.text}")
# Create a new credential
body = {
"displayName": "primary",
"endDateTime": end_date,
"startDateTime": start_date
}
response = requests.post(
f'https://graph.microsoft.com/beta/applications/{app_id}/addPassword',
headers={
'Content-Type': 'application/json',
'Authorization': f'Bearer {user_token.token}'
},
json=body
)
if response.status_code != 200:
print(f"Error creating password credential: {response.status_code}: {response.text}")
else:
print("Created new password credential after deleting existing one.")
return response.json()
else:
print("A secret already exists. You can delete it and create a new one by setting override=True")
return app['passwordCredentials'][0]
password_credential_frontend = create_password_credential(app_frontend['id'], formatted_end_date, formatted_start_date, override=False)

Alright, at this point we have an application registration and client credential, which essentially means we have manually registered the application as an OAuth client to the authorization server (Entra ID). I now have a client_id (appId property) and client_secret. What next?

Creating the frontend service principal

I now need a security principal (or identity) to act as an identity for this instance of my application in this Entra ID tenant. In comes the service principal. There are many types of service principals as I mentioned previously, for this use case I’ll be creating an application service principal. Manual creation of this is only required because I’m creating it programmatically through REST. If I created this app registration in Azure Portal a service principal would automatically be created.

Creating the service principal is very straightforward and there’s not much need you to pass beyond the appId (or client id) of the application registration. Most of the properties are synchronized from the application resource the service principal is being created for. You’ll reference the appId of the application resource which handles the mapping back to the application resource.

def create_service_principal(app_id: str):
"""This function creates a service principal for an application registration in Microsoft Graph API if it doesn't already exist
Args:
app_id (str): The application ID of the service principal to create.
Returns:
dict or None: The details of the created service principal if successful, otherwise None.
"""
# Check to see if the service principal already exists
service_principal = get_service_principal_by_app_id(app_id)
if service_principal is not None:
print(f"Service principal already exists: {service_principal['id']}")
return service_principal
else:
body = {
"appId": app_id
}
response = requests.post(
'https://graph.microsoft.com/v1.0/servicePrincipals',
headers={
'Content-Type': 'application/json',
'Authorization': f'Bearer {user_token.token}'
},
json=body
)
if response.status_code == 201:
return response.json()
else:
print(f"Error creating service principal: {response.status_code}: {response.text}")
return None
# Get or create the service principal
service_principal_frontend = create_service_principal(app_frontend['appId'])
print(json.dumps(service_principal_frontend, indent=2))

This spits out a new service principal object seen below. If we want the instance of the application to access any resources itself or in a delegated manner, the service principal will be the resource that is granted the permissions.

{
"@odata.context": "https://graph.microsoft.com/v1.0/$metadata#servicePrincipals/$entity",
"id": "ce341fd2-fd6b-4dab-9beb-XXXXXXXXXXXX",
"deletedDateTime": null,
"accountEnabled": true,
"alternativeNames": [],
"appDisplayName": "Demo frontend app for Entra authentication",
"appDescription": "This app is used to demonstrate a frontend application where a user authenticates using Entra ID authentication via OIDC",
"appId": "fc815c55-d456-4d38-be76-XXXXXXXXXXX",
"applicationTemplateId": null,
"appOwnerOrganizationId": "6c80de31-d5e4-4029-93e4-XXXXXXXXXXXX",
"appRoleAssignmentRequired": false,
"createdByAppId": "04b07795-8ddb-461a-bbee-XXXXXXXXXXXX",
"createdDateTime": "2026-06-25T01:41:05Z",
"description": null,
"disabledByMicrosoftStatus": null,
"displayName": "Demo frontend app for Entra authentication",
"homepage": null,
"isDisabled": null,
"loginUrl": null,
"logoutUrl": null,
"notes": null,
"notificationEmailAddresses": [],
"preferredSingleSignOnMode": null,
"preferredTokenSigningKeyThumbprint": null,
"replyUrls": [
"http://localhost:8100/callback"
],
"servicePrincipalNames": [
"fc815c55-d456-4d38-be76-XXXXXXXXXXX
],
"servicePrincipalType": "Application",
"signInAudience": "AzureADMultipleOrgs",
"tags": [],
"tokenEncryptionKeyId": null,
"samlSingleSignOnSettings": null,
"addIns": [],
"appRoles": [],
"info": {
"logoUrl": null,
"marketingUrl": null,
"privacyStatementUrl": null,
"supportUrl": null,
"termsOfServiceUrl": null
},
"keyCredentials": [],
"oauth2PermissionScopes": [],
"passwordCredentials": [],
"resourceSpecificApplicationPermissions": [],
"verifiedPublisher": {
"displayName": null,
"verifiedPublisherId": null,
"addedDateTime": null
}
}

Document your required permissions!

It’s best practice to document the permission your application will require versus being an asshole and forcing someone to guess, struggle, learn to hate you, and likely over permission. While this isn’t required for delegated permissions, it’s still best practice if possible. It should be possible in almost all instances (with some exceptions for agents if you’re brave enough). Permissions are divided into two categories which include role permissions and scope permissions. Role permissions are going to be the permissions the app exercises using its own identity context (we’ll see some of this in a future post) and scope permissions are going to be delegated permissions it requires. The permissions an application requires can be documented as part of the app registration (or application resource) by setting the requiredResourceAccess property of the application registration. This doesn’t grant any access, but simply informs the administrator what permissions will be required from the application. It doesn’t prohibit the administrator or user granting it additional permissions beyond what is required.

# Get the existing app permissions
def get_app_permissions(id: str):
"""This function retrieves the existing permissions required for an application registration from the Microsoft Graph API.
Args:
id (str): The object ID of the application registration to retrieve permissions for.
Returns:
list: A list of required resource permissions or else an empty list
"""
response = requests.get(
f'https://graph.microsoft.com/v1.0/applications/{id}',
headers={
'Content-Type': 'application/json',
'Authorization': f'Bearer {user_token.token}'
}
)
if response.status_code != 200:
print(f"Error getting app permissions: {response.status_code}: {response.text}")
return None
# Return the current permission set or a blank array if there are no permissions currently set
return response.json().get('requiredResourceAccess') or []
# Add the app permissions to the app registration. This is useful for multi-tenant apps to document required permissions. It does not grant any permissions.
def add_app_permissions(app_id: str, resource_access: list):
"""This function adds the required permissions to an application registration in Microsoft Graph API
Args:
app_id (str): The object ID of the application registration to add permissions to.
resource_access (list): A list of permissions to add to the application registration in the format of requiredResourceAccess.
Returns:
dict or None: The updated application registration details if successful, otherwise None.
"""
# Get the existing permissions in order to append to them
app_permissions = get_app_permissions(app_id)
# Append the new permissions to the existing ones
for permission in resource_access:
# Check if this resource already exists in the app permissions
existing_resource = None
for resource in app_permissions:
if resource['resourceAppId'] == permission['resourceAppId']:
existing_resource = resource
break
if existing_resource:
# Append the new permissions to the existing resource
for access in permission['resourceAccess']:
if access not in existing_resource['resourceAccess']:
existing_resource['resourceAccess'].append(access)
else:
# Add the new resource and its permissions
app_permissions.append(permission)
# Update the app registration with the new permissions
body = {
"requiredResourceAccess": app_permissions
}
response = requests.patch(
f'https://graph.microsoft.com/v1.0/applications/{app_id}',
headers={
'Content-Type': 'application/json',
'Authorization': f'Bearer {user_token.token}'
},
json=body
)
if response.status_code != 204:
print(f"Error adding app permissions: {response.status_code}: {response.text}")
return None
else:
print("App permissions documented as required successfully.")
return get_app_registration(app_id)
new_permissions = [
{
"resourceAppId": "00000003-0000-0000-c000-000000000000", # Microsoft Graph
"resourceAccess": [
{
"id": "e1fe6dd8-ba31-4d61-89e7-88639da4683d", # User.Read
"type": "Scope"
}
]
}
]
app_required_permissions = add_app_permissions(app_frontend['id'], new_permissions)['requiredResourceAccess']
print("\n=== App required permissions ===")
print(json.dumps(app_required_permissions, indent=2))

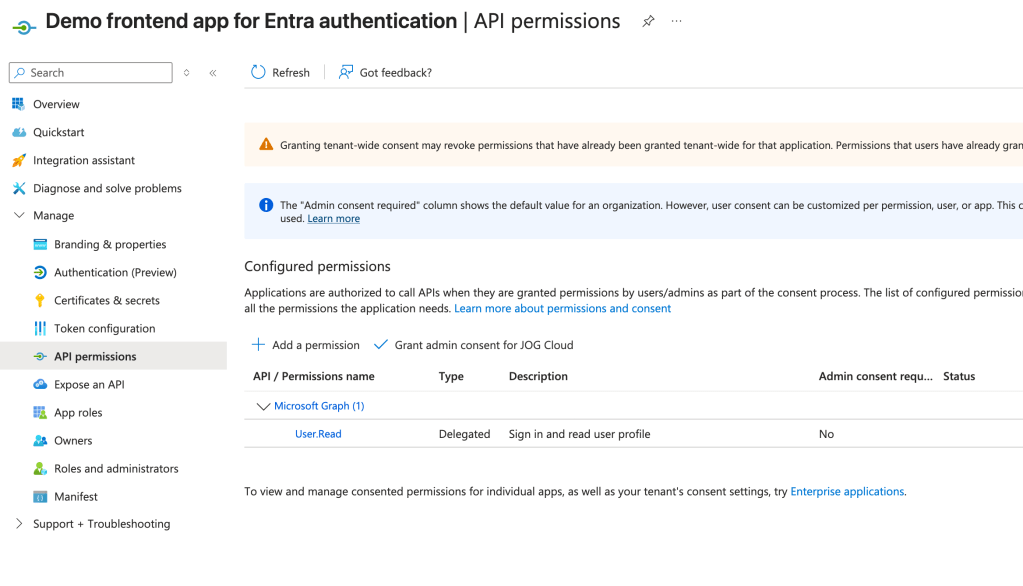
Once those are added they will appear in the API permissions section of the Application Registration inside of the Azure Portal as seen below. For my app I’m documenting that it requires the User.Read delegated permission on the Microsoft Graph API. For some of the built-in applications like the Microsoft Graph, some permissions will require admin consent and some will not like User.Read. Like I covered in my first post, this is determined by the creator of the application resource when they define the scopes. If you add these things programmatically it’s a bit more work because you need to dig up the resource’s appId and object ids of the permission. Something like Microsoft Graph is well documented. For other applications, you’ll need to do some digging via API calls.

Alright, at this point we’re ready to test our app!

Authenticating to the application

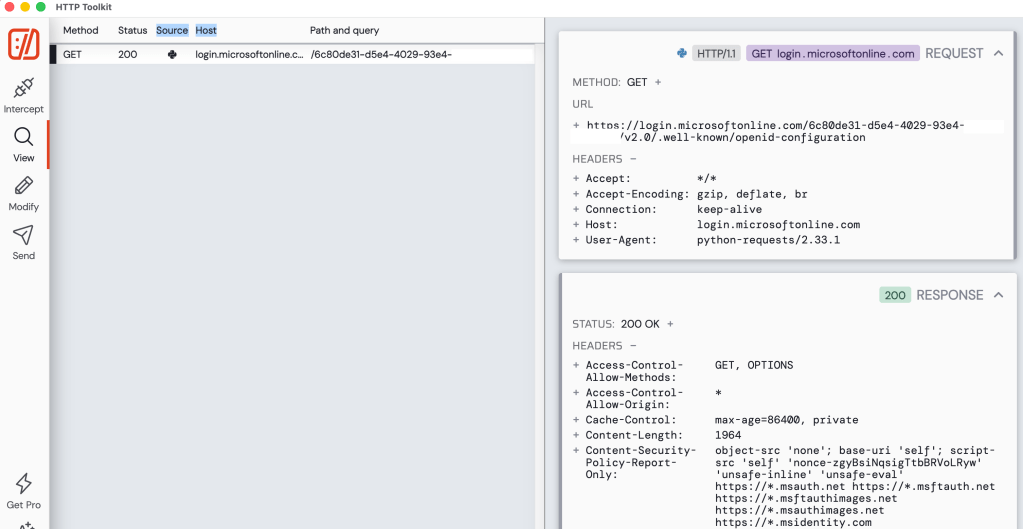
After starting the application I immediately see a lookup to metadata endpoint for the OIDC and OAuth endpoints. This is triggered an MSAL instance is started in the code. These endpoints will be used throughout the login process.

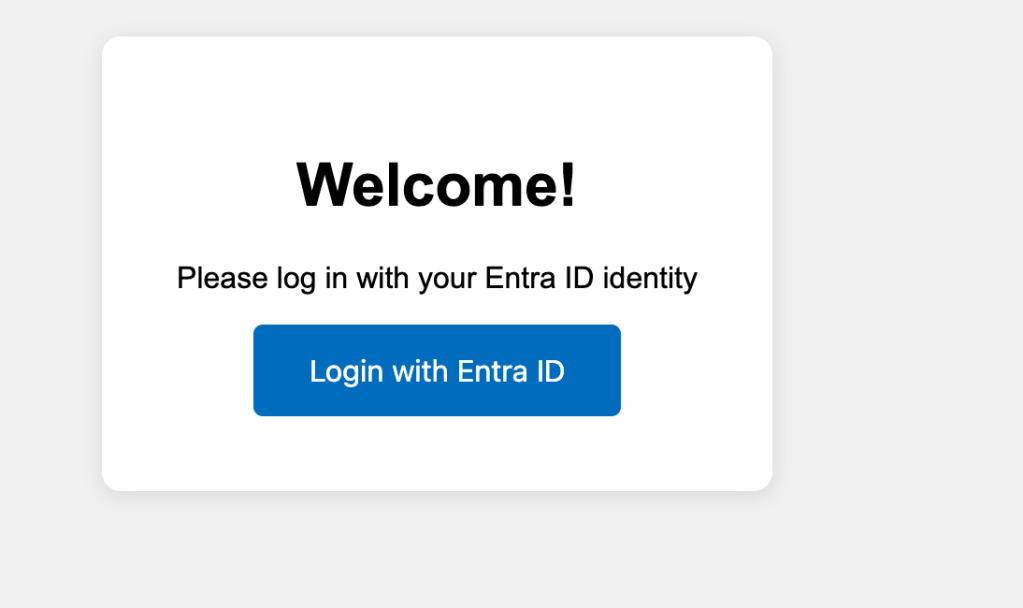
Opening my website I’m faced with a very simple login screen (simple setup for a simple man).

Once I click login with Entra ID, the underlining MSAL library redirects me to the /authorize endpoint of Entra where my user is prompted to authenticate. The request that is generated is below.

https://login.microsoftonline.com/6c80de31-d5e4-4029-93e4-XXXXXXXXXXXX/oauth2/v2.0/authorize?
client_id=afbd7539-a21f-4d11-93a3-XXXXXXXXXXXX&
response_type=code&
redirect_uri=http%3A%2F%2Flocalhost%3A8100%2Fcallback&
scope=User.Read+offline_access+openid+profile&
state=iuxzJhtpdQrWHKqG&code_challenge=L2KNF971_Izy0wWY4v_8GJ1XXXXXXXXXXXX&
code_challenge_method=S256&
nonce=b448a1420a781ac5f18bc2db7f74e06a42fbedca3dd04ebdXXXXXXXXXXXX&
client_info=1

In this request we see all the things we covered in the second post for the protocol primer. There is the redirect URI that the user will be redirected to after authenticating to Entra ID, the response_type indicating this is the authorization code grant type, the client id of my application, the state property used to mitigate CSRF attacks, the nonce to prevent replay attacks, and the code challenge and code challenge method for PKCE.

Now one thing to note is you’ll find a lot of samples on the wider Internet for MSAL (and likely generated by LLMs if you’re one of those vibe coders) that will use the acquire_token_for_client method (like this Microsoft sample here). This method WILL NOT use PKCE. If you want to include the code challenge and code verifier for PKCE you will need to use the initiate_auth_code_flow method.

The scopes query perimeter includes the Microsoft Graph User.Read permission, offline_access (for a refresh token), openid (for an id token), and profile (for access to the user’s basic profile for OIDC). The code in my app specifically requests User.Read, the remaining scopes are automatically added by MSAL for each request depending on the method you’re calling. Most documentation out there will tell you that you can’t exclude them, but you actually can using the exclude_scopes property.

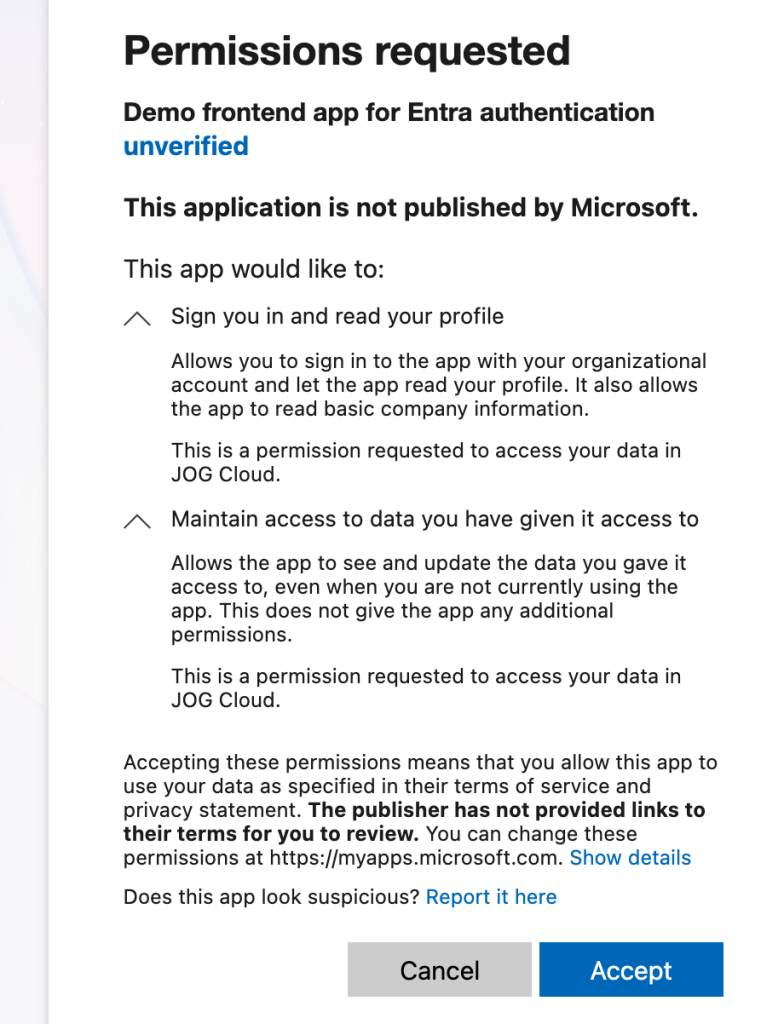
My user completes the authentication process and the user is then prompted to consent to the application’s service principal to be delegated the requested scopes. Once the user accepts, the user’s consent is saved in Entra ID and the user is no longer required to consent moving forward. You’ll notice my application says app is unverified because it’s using localhost. For anything remotely relating to production, you should configure a publishing domain and validate it.

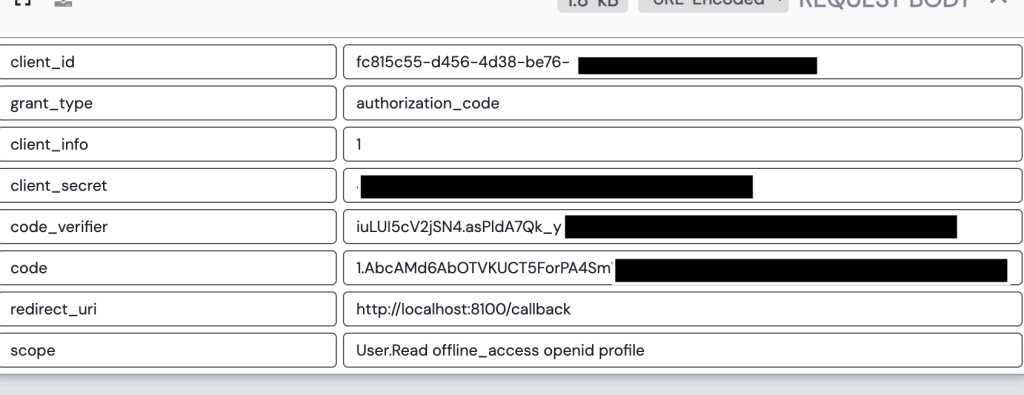
Once the user consents, the user is redirected to the redirect uri registered for the application with an authorization code generated by Entra ID. My application then makes a call to the /oauth2/v2.0/token endpoint in Entra to exchange the authorization code for an access token, identity token, and refresh token. It provides its client secret to authenticate itself to Entra and the code_verifier value allowing Entra to validate this is the original client who requested the access token (PKCE).

Entra validates the client secret and code verifier and if valid returns an access token, refresh token, and id token. My application can use the id token to authenticate the user and grant it access to the application.

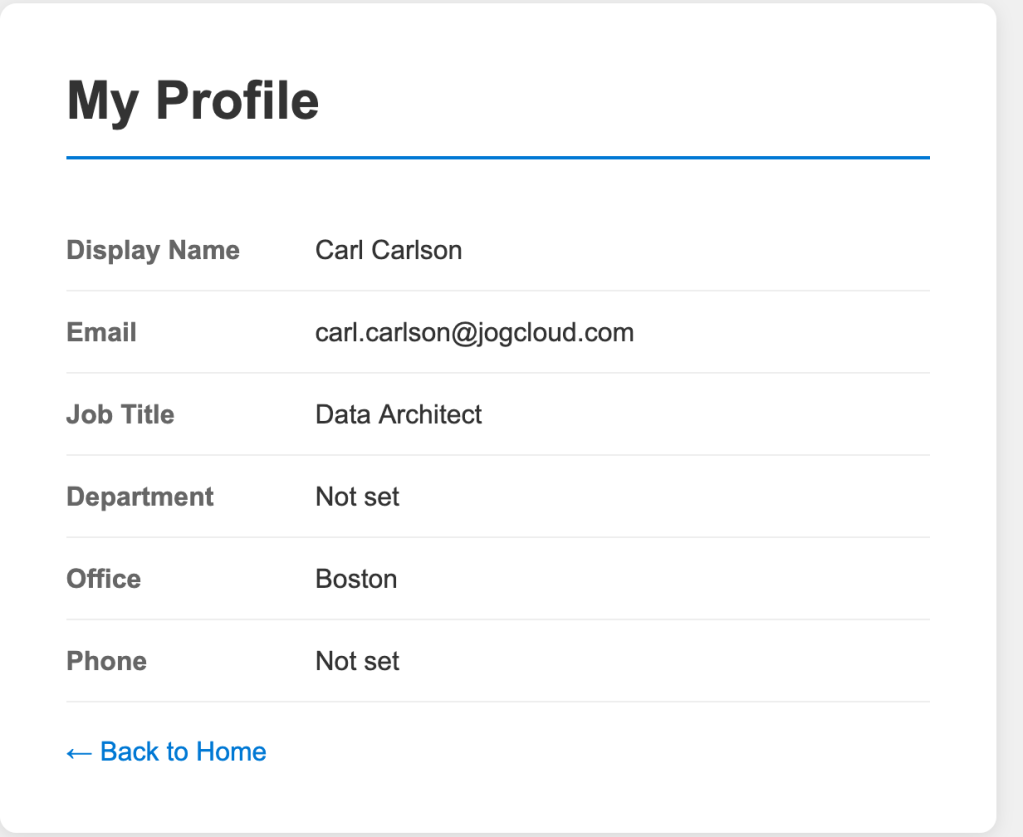
Once logged in, I navigate to the profile page of the application. This page has basic profile information about the user collected from the get user endpoint in the Microsoft Graph.

Navigating to the tokens page of the application displays the decoded access token and id token. In the payload of the id token we can see this id token is intended for the application (which you must validate in your code to ensure someone isn’t trying to pass you some rando token meant for another application) via the aud claim. We also get some basic information about the user. The full schema of the id token is in the official public docs. Some of the helpful properties are the user’s full name and their object id (oid). The object id could be used to pull additional information about the user (which we’ll see next post). We can also stuff additional claims in this id token if we wanted to. I’ll demonstrate this in a future post where I add a user’s group memberships into the id token.

{
"aud": "fc815c55-d456-4d38-be76-XXXXXXXXXXXX",
"exp": 1782358405,
"iat": 1782354505,
"iss": "https://login.microsoftonline.com/6c80de31-d5e4-4029-93e4-XXXXXXXXXXXX/v2.0",
"name": "Carl Carlson",
"nbf": 1782354505,
"nonce": "19297055204c96a487b701f62890cf1c867a7fac55814081f53cbe4XXXXXXXX",
"oid": "2e69d9f2-b5b3-482b-9c15-XXXXXXXXXXXX",
"preferred_username": "carl.carlson@jogcloud.com",
"rh": "1.AbcAMd6AbOTVKUCT5ForPA4SmVVcgfxW1XXXXXXXXXXXX",
"sid": "005f65fa-bad8-71a5-49eb-XXXXXXXXXXXX",
"sub": "p9RBIgpi113pdPH37Q50qylIbANwgMtDXXXXXXXXXXXX",
"tid": "6c80de31-d5e4-4029-93e4-XXXXXXXXXXXX",
"uti": "tL2-eu4OB0KFhXGl7j4UAA",
"ver": "2.0"
}

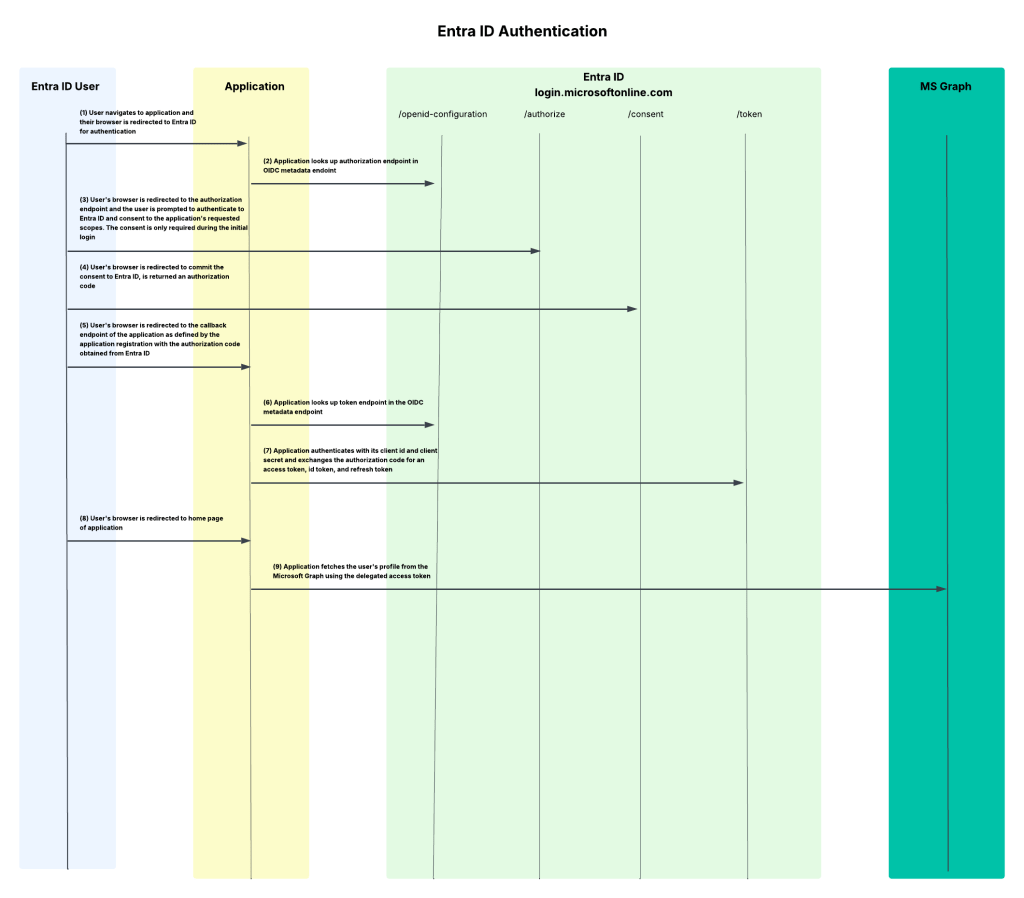
The end-to-end flow

So I’ve authenticated my user to the application using OIDC and gained delegated access to the Microsoft Graph API via OAuth all using Entra. Not too shabby. This is the most basic of basic use cases. In my next post I’ll walk you through how to add group information to the id or access token which you could use within your application to authorize the user within the application.

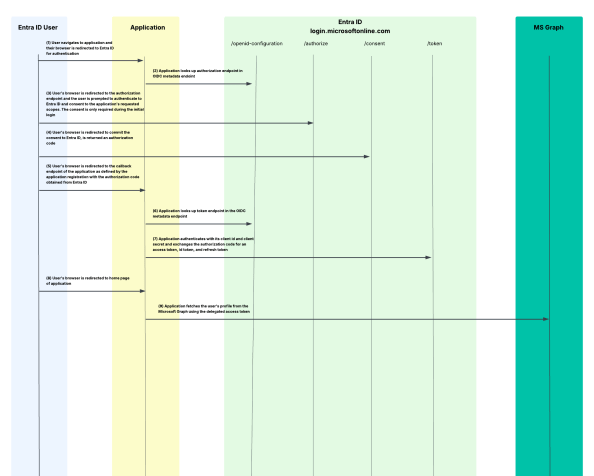
I’m a big fan of old school style protocol flow diagrams, so I threw one together that walks through the end-to-end process I’ve outlined today.

Summing It Up

Yeah, I know that was a lot. If all you take out of this post is a better understanding of what app registrations and service principals do and have a general understanding of how they’re structured, and what the protocol flow looks like when using Entra ID for OIDC/OAuth, that’s a win.

If you want to muck around with this stuff yourself in a personal or test tenant, I’ve published all the code I put together to run through these posts in this repository. It’s a work in progress which I’m fine-tuning as I write these posts but it does have the sample frontend app included in it if you want to take a glance at my application-level code and perhaps want to replicate what I walked through today. Please do not use any of this code in a production app. This is purely intended to demonstrate the concepts. I’m constantly modifying it, so YMMV if it works any given day.

Some key takeaways for you:

  1. Every app registration should have an owner. Just be aware the owner can modify the app registration so don’t go nuts and give this to a non-privileged user.
  2. Set the servericeManagementReference property to some type of BU-level distribution list. This will cover you in case the owners are wiped out through someone accidentally removing them or them leaving the company.
  3. Make sure you’re using the correct methods in the MSAL library if your goal is to use PKCE to align with OAuth 2.1.
  4. If you setup an app registration, be a good human being and document the permissions the app is going to require. You’re not required to, it should be a must for multi-tenant applications especially. It doesn’t limit what users and administrators can grant the application, but can act as minimum set of permissions to function.
  5. When configuring an app registration that will be a confidential client, try to use a federated identity credential. If your app is running in Azure, you can use a managed identity. This will both be more secure and make your app owner’s life a little less miserable having to rotate credentials.

See you next post!