APIM and Azure OpenAI Service – Azure AD

Hello folks!

I’m back with another entry on the Azure OpenAI Service (AOAI). In my previous posts, I’ve focused on the native security features that Microsoft provides to its customers to secure their instance of the service. However, in this post, I’ll be taking a slightly different approach. I’ll be walking you through a pattern that can be used to supplement those native features using Azure API Management (APIM)

For those who are unfamiliar with APIM, it is Azure’s API Gateway PaaS (platform-as-a-service) offering. Like any good API Gateway, it provides an abstraction layer away from backend APIs, which allows you to add additional authentication/authorization controls, throttling, transform requests, and log information from the requests and responses. In this post, I’ll be covering how the authentication/authorization controls can be used to supplement what is provided natively in AOAI. 

I’ve covered authentication in the AOAI in a previous post, refer to that post for the gory details. For the purposes of this post, you need to understand at the data plane it supports both Azure AD authentication/Azure RBAC authorization and authentication with two API keys created when the service is instantiated.

Azure OpenAI Service Authentication and Authorization

To my knowledge, there is no way to disable the usage of API keys. Moreover, as I’ve discussed in my logging post, it is extremely difficult to trace back to what is using the API keys because the source IP address is masked and the calls aren’t associated with specific API keys or Azure AD identities. This makes it critically important to control who has access to the API keys. In my post on authorization within the service, I cover this conversation in more detail, and yes, it can be done with Azure RBAC.

Sample log entry from Azure Open AI Service


Controlling access should be your first priority. However, wouldn’t it be great to restrict access to the service to Azure AD authentication only? This is where APIM comes in. APIM is placed between the application calling the AOAI service and the AOAI service. This establishes a man-in-the-middle scenario where APIM can analyze and modify the request and responses between the application and AOAI service.

APIM and AOAI Data Flow

The image above is an example of this pattern. Here, the calling application is provisioned with either a service principal (running outside of Azure) or a managed identity (running within Azure or integrated with Azure Arc). Instead of pointing the application directly to the Azure OpenAI Service, it is pointed to a custom domain configured on the APIM instance, and the APIM instance is configured to front the Azure OpenAI Service API. My peer Jake Wang put together some wonderful instructions on how to set this piece up in this repository.

Once APIM is set up to pass traffic along to the AOAI service, a custom APIM policy can be introduced to start controlling access. Since the goal is to limit access to the AOAI service to applications using an Azure AD identity, the validate-jwt policy can be used. This policy captures and extracts the JSON Web Token (bearer token) and parses the content within it to verify that the token was issued by the issuer specified in the policy. 

The policy would be structured as shown below. In this policy, any request made to the API must include a JWT issued by the Azure AD tenant (you can find your tenant ID here). Additionally, the policy filters to ensure that the token is intended for the Cognitive Services OAuth scope, which AOAI falls under. If the request doesn’t include the JWT issued by the tenant, the user receives a 403.

<!--
    This sample policy enforces Azure AD authentication and authorization to the Azure OpenAI Service. 
    It limits the authorization tokens issued by the organization's tenant for Cognitive Services.
    The authorization token is passed on to the Azure OpenAI Service ensuring authorization to the actions within
    the service are limited to the permissions defined in Azure RBAC.

    You must provide values for the AZURE_OAI_SERVICE_NAME and TENANT_ID parameters.
-->
<policies>
    <inbound>
        <base />
        <set-backend-service base-url="https://{{AZURE_OAI_SERVICE_NAME}}.openai.azure.com/openai" />
        <validate-jwt header-name="Authorization" failed-validation-httpcode="403" failed-validation-error-message="Forbidden">
            <openid-config url="https://login.microsoftonline.com/{{TENANT_ID}}/v2.0/.well-known/openid-configuration" />
            <issuers>
                <issuer>https://sts.windows.net/{{TENANT_ID}}/</issuer>
            </issuers>
            <required-claims>
                <claim name="aud">
                    <value>https://cognitiveservices.azure.com</value>
                </claim>
            </required-claims>
        </validate-jwt>
    </inbound>
    <backend>
        <base />
    </backend>
    <outbound>
        <base />
    </outbound>
    <on-error>
        <base />
    </on-error>
</policies>

If you followed the instructions in the repository I linked above, you can enforce this policy for the API you created as seen below.

APIM Policy In Place

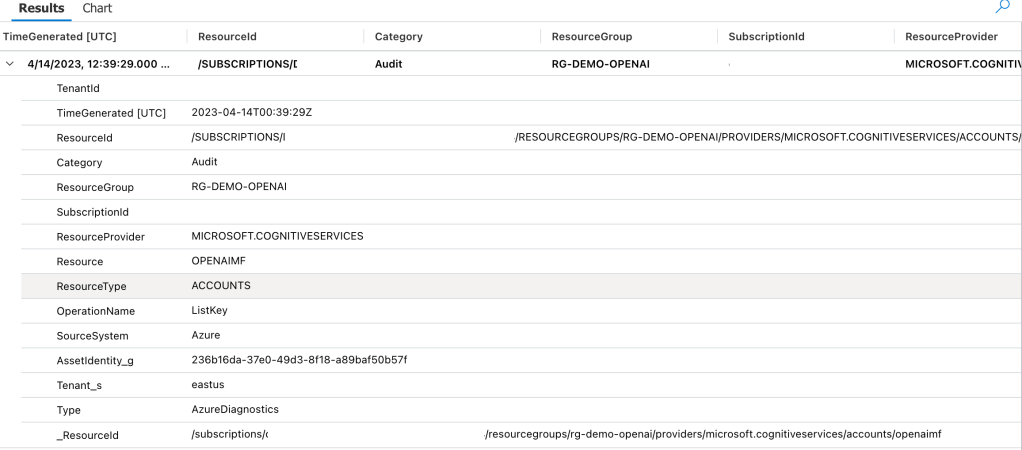
Once the policy is in place, you can test it by attempting to authenticate to the APIM API endpoint and specifying an AOAI API key. In the image below, an attempt is made to call the endpoint with an API key.

APIM Denying Request with API Keys

Success! Even though the API key is valid, APIM is rejecting the request before it ever reaches the AOAI instance, preventing the API keys from being used. 

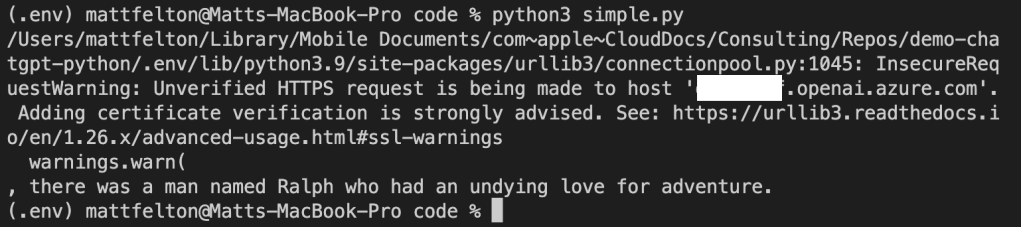
This pattern also passes the bearer token on to the AOAI service, so the RBAC you configure on your AOAI instance will be enforced. In my post on authorization, I provide some guidance on which built-in RBAC roles make since and which permissions you’ll want to carefully distribute.

What’s even cooler is that now that the application is forced to authenticate using Azure AD, the application ID can be extracted. If there are multiple applications hitting the same AOAI instance, different throttling can be applied on a per-application basis instead of having them share one big pool of request/token allowance at the AOAI service level

This can be achieved with a policy similar to the one shown below. This policy looks for specific app IDs in the bearer token and applies different throttling based on the application.

<!--
    This sample policy enforces Azure AD authentication and authorization to the Azure OpenAI Service. 
    It limits the authorization tokens issued by the organization's tenant for Cognitive Services.
    The authorization token is passed on to the Azure OpenAI Service ensuring authorization to the actions within
    the service are limited to the permissions defined in Azure RBAC.

    The sample policy also sets different throttling limits per application id. This is useful when an organization
    has multiple applications consuming the same instance of the Azure OpenAI Service. This sample shows throttling
    rules for two separate applications.

    You must provide values for the AZURE_OAI_SERVICE_NAME, TENANT_ID, and CLIENT_ID_APP parameters. You can add multiple
    lines for as many applications as you need to throttle.
-->
<policies>
    <inbound>
        <base />
        <set-backend-service base-url="https://{{AZURE_OAI_SERVICE_NAME}}.openai.azure.com/openai" />
        <validate-jwt header-name="Authorization" failed-validation-httpcode="403" failed-validation-error-message="Forbidden">
            <openid-config url="https://login.microsoftonline.com/{{TENANT_ID}}/v2.0/.well-known/openid-configuration" />
            <issuers>
                <issuer>https://sts.windows.net/{{TENANT_ID}}/</issuer>
            </issuers>
            <required-claims>
                <claim name="aud">
                    <value>https://cognitiveservices.azure.com</value>
                </claim>
            </required-claims>
        </validate-jwt>
        <choose>
            <when condition="@(context.Request.Headers.GetValueOrDefault("Authorization","").Split(' ').Last().AsJwt().Claims.GetValueOrDefault("appid", string.Empty).Equals("{{CLIENT_ID_APP1}}"))">
                <rate-limit-by-key calls="1" renewal-period="60" counter-key="@(context.Request.Headers.GetValueOrDefault("Authorization","").Split(' ').Last().AsJwt().Claims.GetValueOrDefault("appid", string.Empty))" increment-condition="@(context.Response.StatusCode == 200)" />
            </when>
        </choose>
        <choose>
            <when condition="@(context.Request.Headers.GetValueOrDefault("Authorization","").Split(' ').Last().AsJwt().Claims.GetValueOrDefault("appid", string.Empty).Equals("{{CLIENT_ID_APP2}}"))">
                <rate-limit-by-key calls="10" renewal-period="60" counter-key="@(context.Request.Headers.GetValueOrDefault("Authorization","").Split(' ').Last().AsJwt().Claims.GetValueOrDefault("appid", string.Empty))" increment-condition="@(context.Response.StatusCode == 200)" />
            </when>
        </choose>
    </inbound>
    <backend>
        <base />
    </backend>
    <outbound>
        <base />
    </outbound>
    <on-error>
        <base />
    </on-error>
</policies>

While the above is impressive, it only works if the application is restricted from direct access to the Azure OpenAI Service. To achieve this, I recommend creating a Private Endpoint for the AOAI service and wrapping a Network Security Group around the subnet (NSGs are now supported for private endpoints) to block access to the resources within the subnet to anything but the APIM instance. Keep in mind that the APIM instance needs to be able to access resources within the virtual network, which means that an APIM needs to be deployed in internal mode. The architecture could look similar to the image below.

APIM and Azure OpenAI Service with Private Networking

One thing to note is that if access is blocked as described above, it will break the AOAI studio feature within the Azure Portal. This is because calls to the data plane of the AOAI service are now blocked. A workaround could be to use a jump host or shared server if you need to continue supporting that feature. However, that opens up the risk that someone could write some code while on that machine and use the API keys. 

Let me sum up what we learned today:

  • APIM policies can be used to enforce Azure AD authentication and can block the use of API keys.
  • You must lock down the Azure OpenAI Service to just APIM to make this effective. Remember this will break access to the Studio within the Azure Portal.
  • Since you’re forcing Azure AD authentication, you can use the application id to add custom throttling.

That’s all for this post. The policy samples used in this blog have been uploaded to this repository on GitHub. Feel free to experiment with them and build upon them. If you end up building upon them and doing anything interesting, do reach out and let me know. I’m always interested in geeking out! In my next post, I’ll cover how to use an APIM policy to create custom logging that can be delivered to an Event Hub and consumed by the upstream service of your choice. Have a great week!

Logging in Azure OpenAI Service

Welcome back fellow geeks.

Over the past few weeks I’ve done a series of posts on the Azure OpenAI Service covering some of the security features of the service. In my first post I gave an overview of what security controls Microsoft makes available for customers to configure to secure their instance of the service. In the second and third posts I did deep dives into the authentication and authorization capabilities of the service. Tonight I’m going to cover the logging capabilities of the service.

Let’s jump right in!

The Azure OpenAI Service emits both logs and metrics. For the purposes of this post I’ll be covering logs. I’ll cover the metrics and monitoring of the service in another post if there is a community interest. Logs emitted by the service have been integrated with the diagnostic setting feature. For those unfamiliar with the diagnostic settings feature, it provides a very simple way to deliver logs and metrics emitted by an Azure service to an Azure Storage Account, Log Analytics Workspace, or to an Event Hub (common use case for passing on to a SIEM like Splunk). In the image below, you can see I’m sending all of the logs and metrics emitted from the service to a Log Analytics Workspace.

Diagnostic Settings

In the image above you can see that the Azure OpenAI Service emits three types of logs which include audit logs, request and response logs, and trace logs. As of the date of this blog all of these logs are sent to the AzureDiagnostics table if you opt to send this logs to a Log Analytics Workspace, so dust off your Kusto skills.

Let’s first take a look at the audit logs, because I know that’s where your security focused eyes darted to. I want to remind you this is a very new service and lots of improvements are coming. Yeah, I did that. I pulled a sales dude move. Seriously though, the audit logging is very limited and likely not what you’d hope for as of the date of this blog. The only events that seem to be logged to the Audit Log for the service are when a ListKeys operation is performed. The operation means a security principal accessed the API Keys. The API keys are used to authenticate to the data plane of the service and do not allow for granular authorization at that plane. Check out my last two posts on authentication and authorization if that sentence doesn’t make sense. Unfortunately, the identity that accessed the API key isn’t listed in the log entry which makes it pretty useless in its current state. Below is a sample entry.

Azure OpenAI Service Audit Log Entry Example

Making this even more useless, this operation is also logged in the Azure Activity Log. The log entry within the Activity Log does include the security principal that performed the action so you’ll want to watch for that activity there. I imagine over time the audit log will be improved to capture more operations and associate those operations to a security principal.

Activity Log Entry Showing List Keys Operation

Next I’m going to cover the Request and Response Logs. This log set is really interesting because likely your expectation is the same as mine was that these would include details around prompts sent to the models and information on the response such as the number of tokens consumed. While it does operations around requests for things such a completions or summarizations, it also captures a ton of other events that would likely be more suited for the audit log. Additionally, the data it captures about these actions is extremely limited.

Let’s take a look at a log entry where I requested the model complete a sentence for me. In my code I’m calling the API using an Azure AD service principal NOT an API key with the shattered hope that the log entry would capture the service principal I’m using.

Prompt and Response Log Entry

In the above log entry we don’t get any information to correlate the operation back an entity even when using Azure AD authentication. All we can see is the completion action occurred at a specific time and resulted in a success status code. You’ll also see there is a CallerIPAddress field. This will include the first three octets of the IP address called the service but not the last octet. Kinda weird it’s being masked like this, but I guess that’s better than nothing? (Not really, but hey it’s a new service).

Before you ask, no, the content of the prompts and responses are not logged in any of these logs.

There is one additional field of relevance I couldn’t fit within the above screenshot and that’s properties_s. The only real useful information on this is total response time the service took to return an answer to the user. I hoped this would have had some information around tokens used, but sadly it does not.

properties_s field of a Prompt and Response Log Entry

Besides prompts and responses, this log seems to capture other data plane operations. This includes everything from activities users have performed around uploading files to the service to train fine-tuned models, activities around fine-tuned models (listing, creation, deletion), creation of embeddings, and management of models deployed to the service. Most of these operations should be in the Audit Log in my opinion. I’m not sure why they’re included in this log, but they are. No, none of these operations include details as to who performed these actions beyond the first three octets of the IP address.

Lastly, there is the trace log. I have no idea what’s logged in there because I have yet generate any trace log data. If you know what gets logged in there, let me know in the comments.

So yes folks, there are some serious gaps in the logging for the service today. However, the service is new and the underlining technology is still pretty new as well so we can’t expect perfection out of the gates. My advice to customers has been to build the logging they need into whatever application is fronting the user access and to lock the service down from an authorization perspective so that the only access to the service comes through that application.

My peer Jake Wang has come up with a creative solution to address some of the logging gaps in the service by placing an API Management instance in front of it. With this design anything communicating with the Azure OpenAI Service instance has to go through APIM. Within APIM you can do whatever fancy logging you want to do, toss in some additional throttling to specific user requests, and lots of other cool stuff. It’s a great workaround while the Product Group improves the native logging. If you have a different API Gateway like Mulesoft you could use this same pattern with that instead of APIM.

Well folks that wraps things up. I hope you got some value out of this post and I’d encourage you to make your voices heard by submitting feedback to the product group on how you’d like to see the logging improved for the service.

Thanks for reading!

Authorization in Azure OpenAI Service

Hello folks!

The fun with the new Azure OpenAI Service continues! I’ve been lucky enough to have been tapped to help a number of Microsoft financial services customers with getting the Azure OpenAI Service in place with the appropriate infrastructure and security controls. In the process, I get to learn from a ton of smart people in the AI space. It’s truly been one of the highlights of my 20-year career.

Over the past few weeks I’ve been posting about what I’ve learned, and today I’m going to continue with that. In my first post on the service I gave a high level overview of the security controls Microsoft makes available to the customer to secure their instance of Azure OpenAI Service. In my second post I dove deep into how the service handles authentication and how Azure Active Directory (Azure AD) can be used to improve over the built-in API key-based authentication. Today I’m going to cover authorization and demonstrate how using Azure AD authentication lets you take advantage of granular authorization with Azure RBAC.

Let’s dig in!

As I covered in my last post, the Azure OpenAI Service has both a management plane and data plane. Each plane supports different types of authentication (process of verifying the identity of a user, process, or device, often as a prerequisite to allowing access to resources in an information system) and authorization (The right or a permission that is granted to a system entity to access a system resource). Operations such as swapping to a customer-managed key, enabling a private endpoint, or assigning a managed identity to the service occur within the management plane. Activities such as uploading training data or issuing a prompt to a model occur at the data plane. Each plane uses a different API endpoint. The image below will help you visualize the different planes.

Azure OpenAI Service Management and Data Planes

As illustrated above, authorization within the management plane is handled using Azure RBAC because authentication to that plane requires Azure AD-based authentication. Here we can limit the operations occurring at the management plane a security principal (user, service principal, managed identity, Azure Active Directory group (local or synchronized from on-premises) can perform by using Azure RBAC. For those of you coming from the AWS world, and where the Azure OpenAI Service may be your first venture into Azure, Azure RBAC is Azure’s authorization solution. It’s similar to an AWS IAM Policy. Let’s take a look at a built-in RBAC role that a customer might grant a data scientist who will be using the Azure OpenAI Service.

{
    "id": "/subscriptions/de90ea7d-a9c3-4957-8c96-XXXXXXXXXXXX/providers/Microsoft.Authorization/roleDefinitions/a97b65f3-24c7-4388-baec-2e87135dc908",
    "properties": {
        "roleName": "Cognitive Services User",
        "description": "Lets you read and list keys of Cognitive Services.",
        "assignableScopes": [
            "/"
        ],
        "permissions": [
            {
                "actions": [
                    "Microsoft.CognitiveServices/*/read",
                    "Microsoft.CognitiveServices/accounts/listkeys/action",
                    "Microsoft.Insights/alertRules/read",
                    "Microsoft.Insights/diagnosticSettings/read",
                    "Microsoft.Insights/logDefinitions/read",
                    "Microsoft.Insights/metricdefinitions/read",
                    "Microsoft.Insights/metrics/read",
                    "Microsoft.ResourceHealth/availabilityStatuses/read",
                    "Microsoft.Resources/deployments/operations/read",
                    "Microsoft.Resources/subscriptions/operationresults/read",
                    "Microsoft.Resources/subscriptions/read",
                    "Microsoft.Resources/subscriptions/resourceGroups/read",
                    "Microsoft.Support/*"
                ],
                "notActions": [],
                "dataActions": [
                    "Microsoft.CognitiveServices/*"
                ],
                "notDataActions": []
            }
        ]
    }
}

Let’s briefly walkthrough each property. The id property is the unique resource name assigned to this role definition. Next up we have the name property and description properties which need no explanations. The assignableScopes property determines at which scope an RBAC role can be assigned. Typical scopes include management groups, subscriptions, resource groups, and resources. Built-in roles will always have an assignable scope of “/” which denotes the RBAC role can be assigned to any management group, subscription, resource group, or role.

I’ll spend a bit of time on the permissions property. The permissions property contains a few different child properties including actions, notActions, dataActions, and notDataActions. The actions property lists the management plane operations allowed by the role while the dataActions lists the data plane operations allowed by the role. The notActions and notDataActions are interesting in that they are used to strip permissions out of the actions or dataActions. For example, say you granted a user full data plane operations to an Azure Key Vault but didn’t want them to have the ability to delete keys. You could to this by giving the user the dataAction of Microsoft.KeyVaults/* and notDataAction of Microsoft.KeyVaults/keys/purge/action. Take note this is NOT an explicit deny. If the user gets this permission in another way through assignment of a different RBAC role the user will be able to perform the action. At this time, Azure does not have a generally available feature that allows for an explicit deny like AWS IAM and what does exist in preview has an extremely narrow scope such that it isn’t very useful.

When you’re ready to assign a role to a security principal (user, service principal, managed identity, Azure Active Directory group (local or synchronized from on-premises) you create what is called a role assignment. A role assignment associates an Azure RBAC Role Definition to a security principal and scope. For example, in the below image I’ve created an RBAC Role Assignment for the Cognitive Services User Role at the resource group scope for the user Carl Carlson. This grants Carl the permission to perform the operations listed in the role definition above to any resource within the resource group, including the Azure OpenAI Resource.

Azure RBAC Role Assignment

Scroll back and take a look at the role definition, notice any risky permission? If you noticed the permission Microsoft.CognitiveServices/accounts/listkeys/action (remember that the Azure OpenAI Service falls under the Cognitive Services umbrella), grab yourself a cookie. As I’ve covered previously, every instance of the Azure OpenAI Service comes with two API keys. These API keys allow for authentication to the instance at the data plane level, can’t be limited in what they can do, and are very difficult to ever track back to who used them. You will want to very tightly control access to those API keys so be wary of who you give this role out to and may want to instead create a similar custom role but without this permission.

The are two other roles which are specific two the Azure OpenAI Service are the Cognitive Services OpenAI Contributor and Cognitive Services OpenAI User. Let’s look at the contributor role first.

{
    "id": "/providers/Microsoft.Authorization/roleDefinitions/a001fd3d-188f-4b5d-821b-XXXXXXXXXXXX",
    "properties": {
        "roleName": "Cognitive Services OpenAI Contributor",
        "description": "Full access including the ability to fine-tune, deploy and generate text",
        "assignableScopes": [
            "/"
        ],
        "permissions": [
            {
                "actions": [
                    "Microsoft.CognitiveServices/*/read",
                    "Microsoft.Authorization/roleAssignments/read",
                    "Microsoft.Authorization/roleDefinitions/read"
                ],
                "notActions": [],
                "dataActions": [
                    "Microsoft.CognitiveServices/accounts/OpenAI/*"
                ],
                "notDataActions": []
            }
        ]
    }
}

The big difference here is this role doesn’t grant much at the management plane. While this role may seem appealing to give to a data scientist because it doesn’t allow access to the API keys, it also doesn’t allow access to the instance metrics. I’ll talk about this more when I do a post on logging and monitoring in the service, but access to the metrics are important for the data scientists. These metrics allow them to see how much volume they’re doing with the service which can help them estimate costs and avoid hitting API limits.

Under the dataActions you can see this role allows all data plane operations. These operations include uploading training data for the creation of fine-tuned models. If you don’t want your users to have this access, then you can either strip the permissions Microsoft.CognitiveServices/accounts/OpenAI/files/import/action or grant the user the next role I’ll talk about.

One interesting thing to note is that while this role grants all data actions, which include data plane permissions around deployments, users with this role cannot deploy models to the instance. An error will be thrown that the user does not have the Microsoft.CognitiveServices/accounts/deployments/write permission. I’m not sure if this by design, but if anyone has a workaround for it, let me know in the comments. It would seem like if you want the user to deploy a model, you’ll need to model a custom role after this role and add that permissions.

The last role I’m going to cover is the Cognitive Services OpenAI User role. Let’s look at the permissions for this one.

{
    "id": "/providers/Microsoft.Authorization/roleDefinitions/5e0bd9bd-7b93-4f28-af87-XXXXXXXXXXXX",
    "properties": {
        "roleName": "Cognitive Services OpenAI User",
        "description": "Ability to view files, models, deployments. Readers can't make any changes They can inference",
        "assignableScopes": [
            "/"
        ],
        "permissions": [
            {
                "actions": [
                    "Microsoft.CognitiveServices/*/read",
                    "Microsoft.Authorization/roleAssignments/read",
                    "Microsoft.Authorization/roleDefinitions/read"
                ],
                "notActions": [],
                "dataActions": [
                    "Microsoft.CognitiveServices/accounts/OpenAI/*/read",
                    "Microsoft.CognitiveServices/accounts/OpenAI/engines/completions/action",
                    "Microsoft.CognitiveServices/accounts/OpenAI/engines/search/action",
                    "Microsoft.CognitiveServices/accounts/OpenAI/engines/generate/action",
                    "Microsoft.CognitiveServices/accounts/OpenAI/engines/completions/write",
                    "Microsoft.CognitiveServices/accounts/OpenAI/deployments/search/action",
                    "Microsoft.CognitiveServices/accounts/OpenAI/deployments/completions/action",
                    "Microsoft.CognitiveServices/accounts/OpenAI/deployments/embeddings/action",
                    "Microsoft.CognitiveServices/accounts/OpenAI/deployments/completions/write"
                ],
                "notDataActions": []
            }
        ]
    }
}

Like the contributor role, this role is very limited with management plane permissions. At the data plane level, this role really allows for issuing prompts and not much else. This role is great a non-human application role assigned via service principal or managed identity. It will allow the application to issue prompts and not much else. You don’t have to worry about a user exploiting this role to access training data you may have uploaded or making any modification to the Azure OpenAI Service instance.

Well folks that wraps this up. Let’s sum up what we’ve learned:

  • The Azure OpenAI Service supports fine-grained authorization through Azure RBAC at both the management plane and data plane when the security principal is authenticated through Azure AD.
  • Avoid using API keys where possible and leverage Azure RBAC for authorization. You can make it much more fine-grained, layer in the controls provided by Azure AD on top of it, and associate the usage of the service back to user (kinda as we’ll see in my post on logging).
  • Tightly control access to the API keys. I’d recommend any role you give to a data scientist or an application that you strip out the listkeys permissions.
  • I’d recommend creating a custom role for human users modeled after the Cognitive Services User role but without the listkeys permission. This will grant the user access to the full data plane and allow access to management plane pieces such as metrics. You can optionally be granular with your dataActions and leave out the files permissions to prevent human users from uploading training data.
  • I’d recommend using the built-in Cognitive Services OpenAI User role for service principals and managed identities assigned to applications. It grants only the permissions these applications are likely going to need and nothing more.
  • I’d avoid using notActions and notDataActions since it’s not an explicit deny and it’s very difficult to determine an effective user’s access in Azure without another tool like Entra Permissions Management.

Well folks, I hope this post has helped you better understand authorization in the service and how you could potentially craft it to align with least privilege.

Next post up will be around logging.

Have a great night!

Authentication in Azure OpenAI Service

Updated 4/3/2023 with simpler way to authenticate with Azure AD via Python SDK

Hello again!

Days and nights have been busy diving deeper into the AI landscape. I’ve been reading a great book by Tom Taulli called Artificial Intelligence Basics: A Non-Technical Introduction. It’s been a huge help in getting down the vocabulary and understanding the background to the technology from the 1950s on. In combination with the book, I’ve been messing around a lot with Azure’s OpenAI Service and looking closely at the infrastructure and security aspects of the service.

In my last post I covered the controls available to customers to secure their specific instance of the service. I noted that authentication to the service could be accomplished using Azure Active Directory (AAD) authentication. In this post I’m going to take a deeper look at that. Be ready to put your geek hat on because this post will be getting down and dirty into the code and HTTP transactions. Let’s get to it!

Before I get into the details of how supports AAD authentication, I want to go over the concepts of management plane and data plane. Think of management plane for administration of the resource and data plane for administration of the data hosted within the resource. Many services in Azure have separate management planes and data planes. One such service is Azure Storage which just so happens to have similarities with authentication to the OpenAI Service.

When a customer creates an Azure Storage Account they do this through interaction with the management plane which is reached through the ARM API hosted behind management.azure.come endpoint. They must authenticate against AAD to get an access token to access the API. Authorization via Azure RBAC then takes place to validate the user, managed identity, or service principal has permissions on the resource. Once the storage account is created, the customer could modify the encryption key from a platform managed key (PMK aka key managed by Microsoft) to a customer managed key (CMK), enable soft delete, or enable network controls such as the storage firewall. These are all operations against the resource.

Once the customer is ready to upload blob data to the storage account, they will do this through a data plane operation. This is done through the Blob Service API. This API is hosted behind the blob.core.windows.net endpoint and operations include creation of a blob or deletion of a blob. To interact with this API the customer has two means of authentication. The first method is the older method of the two and involves the use of static keys called storage account access keys. Every storage account gets two of these keys when a storage account is provisioned. Used directly, these keys grant full access to all operations and all data hosted within the storage account (SAS tokens can be used to limit the operations, time, and scope of access but that won’t be relevant when we talk the OpenAI service). Not ideal right? The second method is the recommended method and that involves AAD authentication. Here the security principal authenticates to AAD, receives an access token, and is then authorized for the operation via Azure RBAC. Remember, these are operations against the data hosted within the resource.

Authentication in Management Plane vs Data Plane in Azure Storage

Now why did I give you a 101 on Azure Storage authentication? Well, because the Azure OpenAI Service works in a very similar way.

Let’s first talk about the management plane of the Azure OpenAI Service. Like Azure Storage (and the rest of Azure’s services) it is administered through the ARM API behind the management.azure.com endpoint. Customers will use the management plane when they want to create an instance of the Azure OpenAI Service, switch it from a PMK to CMK, or setup diagnostic settings to redirect logs (I’ll cover logging in a future post). All of these operations will require authentication to AAD and authorization via Azure RBAC (I’ll cover authorization in a future post).

Simple right? Now let’s move to the complexity of the data plane.

Two API keys are created whenever a customer creates an Azure OpenAI Service instance. These API keys allow the customer full access to all data plane operations. These operations include managing a deployment of a model, managing training data that has been uploaded to the service instance and used to fine tune a model, managing fine tuned models, and listing available models. These operations are performed against the Azure OpenAI Service API which lives behind a unique label with an FQDN of openai.azure.com (such as myservice.openai.azure.com). Pretty much all the stuff you would be doing through the Azure OpenAI Studio. If you opt to use these keys you’ll need to remember control access to these keys via securing management plane authorization aka Azure RBAC.

Azure OpenAI Service API Keys

In the above image I am given the option to regenerate the keys in the case of compromise or to comply with my organization’s key rotation process. Two keys are provided to allow for continued access to the service while other key is being rotated.

Here I have simple bit of code using the OpenAI Python SDK. In the code I provide a prompt to the model and ask it to complete it for me and use one of the API keys to authenticate to it.

import logging
import sys
import os
import openai

def main():
    # Setup logging
    try:
        logging.basicConfig(
            level=logging.ERROR,
            format='%asctime)s - %(name)s - %(levelname)s - %(message)s',
            handlers=[logging.StreamHandler(sys.stdout)]
        )
    except:
        logging.error('Failed to setup logging: ', exc_info=True)

    try:

        # Setup OpenAI Variables
        openai.api_type = "azure"
        openai.api_base = os.getenv('OPENAI_API_BASE')
        openai.api_version = "2022-12-01"
        openai.api_key = os.getenv('OPENAI_API_KEY')

        response = openai.Completion.create(
            engine=os.getenv('DEPLOYMENT_NAME'),
            prompt='Once upon a time'
        )

        print(response.choices[0].text)

    except:
        logging.error('Failed to respond to prompt: ', exc_info=True)


if __name__ == "__main__":
    main()

The model gets creative and provides me with the response below.

If you look closely you’ll notice an warning about the security of my session. The reason I’m getting that error is shut off certificate verification in the OpenAI library in order to intercept the calls with Fiddler. Now let me tell you, shutting off certificate verification was a pain in the ass because the developers of the SDK are trying to protect users from the bad guys. Long story short, the Azure Python SDK doesn’t provide an option to turn off certificate checking like say the Azure Python SDK (which you can pass a kwarg of verify=False to turn it off in the request library used underneath). While the developers do provide a property called verify_ssl_certs, it doesn’t actually do anything. Since most Python SDKs use the requests library underneath the hood, I went through the library on my machine and found the api_requestor.py file. Within this file I modified the _make_session function which is creating a requests Sessions object. Here I commented out the developers code and added the verify=False property to the Session object being created.

Turning off certificate verification in OpenAI Python SDK

Now don’t go and do this in any environment that matters. If you’re getting a certificate verification failure in your environment you should be notifying your information security team. Certificate verification is an absolute must to ensure the identity of the upstream server and to mitigate the risk of man-in-the-middle attacks.

Once I was able to place Fiddler in the middle of the HTTPS session I was able to capture the conversation. In the screenshot below, you can see the SDK passing the api-key header. Take note of that header name because it will become relevant when we talk AAD authentication. If you’re using OpenAI’s service already, then this should look very familiar to you. Microsoft was nice enough to support the existing SDKs when using one of the API keys.

At this point you’re probably thinking, “That’s all well and good Matt, but I want to use AAD authentication for all the security benefits AAD provides over a static key.” Yeah yeah, I’m getting there. You can’t blame me for nerding out a bit with Fiddler now can you?

Alright, so let’s now talk AAD authentication to the data plane of the Azure OpenAI Service. Possible? Yes, but with some caveats. The public documentation illustrates an example of how to do this using curl. However, curl is great for a demonstration of a concept, but much more likely you’ll be using an SDK for your preferred programming language. Since Python is really the only programming language I know (PowerShell doesn’t count and I don’t want to show my age by acknowledging I know some Perl) let me demonstrate this process using our favorite AAD SDK, MSAL.

For this example I’m going to use a service principal, but if your code is running in Azure you should be using a managed identity. When creating the service principal I granted it the Cognitive Services User RBAC role on the resource group containing the Azure OpenAI Service instance as suggested in the documentation. This is required to authorize the service principal access to data plane operations. There are a few other RBAC roles for the service, but as I said earlier, I’ll cover authorization in a future post. Once the service principal was created and assigned the appropriate RBAC role, I modified my code to include a function which calls MSAL to retrieve an access token with the access scope of Cognitive Services, which the Azure OpenAI Service falls under. I then pass that token as the API key in my call to the Azure OpenAI Service API.

import logging
import sys
import os
import openai
from msal import ConfidentialClientApplication

def get_sp_access_token(client_id, client_credential, tenant_name, scopes):
    logging.info('Attempting to obtain an access token...')
    result = None
    print(tenant_name)
    app = ConfidentialClientApplication(
        client_id=client_id,
        client_credential=client_credential,
        authority=f"https://login.microsoftonline.com/{tenant_name}",
    )
    result = app.acquire_token_for_client(scopes=scopes)

    if "access_token" in result:
        logging.info('Access token successfully acquired')
        return result['access_token']
    else:
        logging.error('Unable to obtain access token')
        logging.error(f"Error was: {result['error']}")
        logging.error(f"Error description was: {result['error_description']}")
        logging.error(f"Error correlation_id was: {result['correlation_id']}")
        raise Exception('Failed to obtain access token')

def main():
    # Setup logging
    try:
        logging.basicConfig(
            level=logging.ERROR,
            format='%asctime)s - %(name)s - %(levelname)s - %(message)s',
            handlers=[logging.StreamHandler(sys.stdout)]
        )
    except:
        logging.error('Failed to setup logging: ', exc_info=True)

    try:
        # Obtain an access token
        token = get_sp_access_token(
            client_id = os.getenv('CLIENT_ID'),
            client_credential = os.getenv('CLIENT_SECRET'),
            tenant_name = os.getenv('TENANT_ID'),
            scopes = "https://cognitiveservices.azure.com/.default"
        )
    except:
        logging.error('Failed to obtain access token: ', exc_info=True)

    try:
        # Setup OpenAI Variables
        openai.api_type = "azure"
        openai.api_base = os.getenv('OPENAI_API_BASE')
        openai.api_version = "2022-12-01"
        openai.api_key = token

        response = openai.Completion.create(
            engine=os.getenv('DEPLOYMENT_NAME'),
            prompt='Once upon a time'
        )

        print(response.choices[0].text)

    except:
        logging.error('Failed to summarize file: ', exc_info=True)


if __name__ == "__main__":
    main()

Let’s try executing that and see what happens.

Uh-oh! What happened? If you recall from earlier the API key is passed in the api-key header. However, to use the access token provided by AAD we have to pass it in the authorization header as seen in the example in Microsoft public documentation.

curl ${endpoint%/}/openai/deployments/YOUR_DEPLOYMENT_NAME/completions?api-version=2022-12-01 \
-H "Content-Type: application/json" \
-H "Authorization: Bearer $accessToken" \
-d '{ "prompt": "Once upon a time" }'

Thankfully there is a solution to this one without requiring you to modify the OpenAI SDK. If you take a look in the api_requestor.py file again in the library you will see it provides the ability to override the headers passed in the request.

With this in mind, I made a few small modifications. I removed the api_key property and added an Authorization header to the request to the Azure OpenAI Service API which includes the access token received back from AAD.

import logging
import sys
import os
import openai
from msal import ConfidentialClientApplication

def get_sp_access_token(client_id, client_credential, tenant_name, scopes):
    logging.info('Attempting to obtain an access token...')
    result = None
    print(tenant_name)
    app = ConfidentialClientApplication(
        client_id=client_id,
        client_credential=client_credential,
        authority=f"https://login.microsoftonline.com/{tenant_name}",
    )
    result = app.acquire_token_for_client(scopes=scopes)

    if "access_token" in result:
        logging.info('Access token successfully acquired')
        return result['access_token']
    else:
        logging.error('Unable to obtain access token')
        logging.error(f"Error was: {result['error']}")
        logging.error(f"Error description was: {result['error_description']}")
        logging.error(f"Error correlation_id was: {result['correlation_id']}")
        raise Exception('Failed to obtain access token')

def main():
    # Setup logging
    try:
        logging.basicConfig(
            level=logging.ERROR,
            format='%asctime)s - %(name)s - %(levelname)s - %(message)s',
            handlers=[logging.StreamHandler(sys.stdout)]
        )
    except:
        logging.error('Failed to setup logging: ', exc_info=True)

    try:
        # Obtain an access token
        token = get_sp_access_token(
            client_id = os.getenv('CLIENT_ID'),
            client_credential = os.getenv('CLIENT_SECRET'),
            tenant_name = os.getenv('TENANT_ID'),
            scopes = "https://cognitiveservices.azure.com/.default"
        )
    except:
        logging.error('Failed to obtain access token: ', exc_info=True)

    try:
        # Setup OpenAI Variables
        openai.api_type = "azure"
        openai.api_base = os.getenv('OPENAI_API_BASE')
        openai.api_version = "2022-12-01"

        response = openai.Completion.create(
            engine=os.getenv('DEPLOYMENT_NAME'),
            prompt='Once upon a time',
            headers={
                'Authorization': f'Bearer {token}'
            }
            

        )

        print(response.choices[0].text)

    except:
        logging.error('Failed to summarize file: ', exc_info=True)


if __name__ == "__main__":
    main()

Running the code results in success!

4/3/2023 Update – Poking around today looking at another aspect of the service, I came across this documentation on an even simpler way to authenticate with Azure AD without having to use an override. In the code below, I specify an openai.api_type of azure_ad which allows me to pass the token direct via the openai_api_key property versus having to pass a custom header. Definitely a bit easier!

import logging
import sys
import os
import openai
from msal import ConfidentialClientApplication

def get_sp_access_token(client_id, client_credential, tenant_name, scopes):
    logging.info('Attempting to obtain an access token...')
    result = None
    print(tenant_name)
    app = ConfidentialClientApplication(
        client_id=client_id,
        client_credential=client_credential,
        authority=f"https://login.microsoftonline.com/{tenant_name}",
    )
    result = app.acquire_token_for_client(scopes=scopes)

    if "access_token" in result:
        logging.info('Access token successfully acquired')
        return result['access_token']
    else:
        logging.error('Unable to obtain access token')
        logging.error(f"Error was: {result['error']}")
        logging.error(f"Error description was: {result['error_description']}")
        logging.error(f"Error correlation_id was: {result['correlation_id']}")
        raise Exception('Failed to obtain access token')

def main():
    # Setup logging
    try:
        logging.basicConfig(
            level=logging.ERROR,
            format='%asctime)s - %(name)s - %(levelname)s - %(message)s',
            handlers=[logging.StreamHandler(sys.stdout)]
        )
    except:
        logging.error('Failed to setup logging: ', exc_info=True)

    try:
        # Obtain an access token
        token = get_sp_access_token(
            client_id = os.getenv('CLIENT_ID'),
            client_credential = os.getenv('CLIENT_SECRET'),
            tenant_name = os.getenv('TENANT_ID'),
            scopes = "https://cognitiveservices.azure.com/.default"
        )
        print(token)
    except:
        logging.error('Failed to obtain access token: ', exc_info=True)

    try:
        # Setup OpenAI Variables
        openai.api_type = "azure_ad"
        openai.api_base = os.getenv('OPENAI_API_BASE')
        openai.api_key = token
        openai.api_version = "2022-12-01"

        response = openai.Completion.create(
            engine=os.getenv('DEPLOYMENT_NAME'),
            prompt='Once upon a time '
        )

        print(response.choices[0].text)

    except:
        logging.error('Failed to summarize file: ', exc_info=True)


if __name__ == "__main__":
    main()

Let me act like I’m ChatGPT and provide you a summary of what we learned today.

  • The Azure OpenAI Service has both a management plane and data plane.
  • The Azure OpenAI Service data plane supports two methods of authentication which include static API keys and Azure AD.
  • The static API keys provide full permissions on data plane operations. These keys should be rotated in compliance with organizational key rotation policies.
  • The OpenAI SDK for Python (and I’m going to assume the others) sends an api-key header by default. This behavior can be overridden to send an Authorization header which includes an access token obtained from Azure AD.
  • It’s recommended you use Azure AD authentication where possible to leverage all the bells and whistles of Azure AD including the usage of managed identities, improved logging, and conditional access for service principal-based access.

Well folks, that concludes this post. I’ll be uploading the code sample above to my GitHub later this week. In the next batch of posts I’ll cover the authorization and logging aspects of the service.

I hope you got some value and good luck in your AI journey!