
This is part of my series on Microsoft Foundry:
- Microsoft Foundry’s Evolution
- Microsoft Foundry BYO AI Gateway (BYO Model) – Part 1
- Microsoft Foundry BYO AI Gateway (BYO Model) – Part 2
- Microsoft Foundry BYO AI Gateway (BYO Model) – Part 3
- Microsoft Foundry Publishing Foundry Agents to Microsoft Teams – Part 1
- Microsoft Foundry Publishing Foundry Agents to Microsoft Teams – Part 2
With Memorial Day weekend coming quickly, I wanted to get the second post to this series out before the knowledge my late nights with Red Eye coffee brought leaks from my brain. In my last post I did a walkthrough of the Publishing Agents To Teams feature of the Foundry Agent Service within Microsoft Foundry. In that post I covered the Portal experience, broke open some of the black box as to my understanding of the workflow that happens underneath when you push the publish button, and talked through the AI Bot Service’s role in the feature. For this post I’m going to cover a possible network architecture to support this feature when security controls are required around inbound and outbound network access (I mentioned a few last post), the network flow for that architecture, and some of the switches and knobs you can turn to add additional security beyond the basic layer 4 network controls. After that, I’m going to walk through a Jupyter Notebook I put together than shows you how to perform the steps behind the publish button programmatically. If you haven’t read my last post, Graeme’s blog post on this topic, and Moim’s blog post on reverse engineering Bot services you should do that before you try to tackle this one.
A Possible Architecture
As I covered in my last post, when we want to make an agent available in Teams we need Teams to be capable of reaching it. In this design, with Teams interacting with the AI Bot Service which relays the information to our agent, this means we need to make the agent’s messaging endpoint available to the Microsoft public backbone (i.e. it needs to be exposed via a public IP address). Graeme provided one architecture to accomplish this which will work for a number of folks. I foresee a few different architectural options:
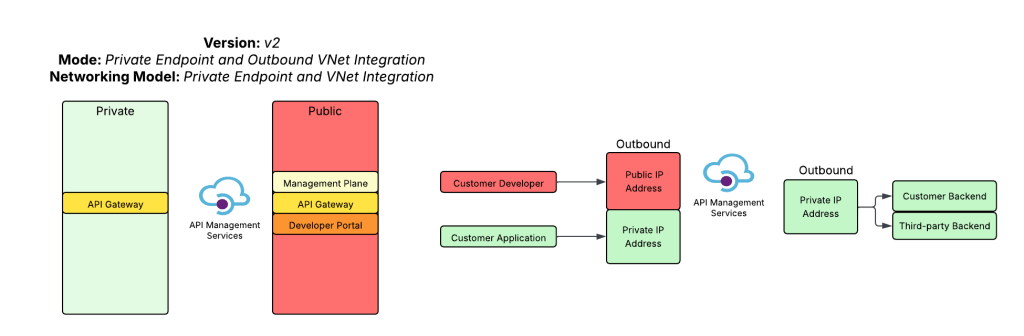
- APIM v2 configured for public inbound and regional vnet integration
- APIM classic configured for external mode
- App Gateway with a public listener with APIM v2 VNet Injected or PE + regional vnet integration behind it
- App Gateway with a public listener with APIM classic VNet injection behind it
- Firewall DNAT + APIM v2 VNet Injected or PE + regional vnet integration behind it
- Firewall DNAT + APIM classic VNet injection behind it
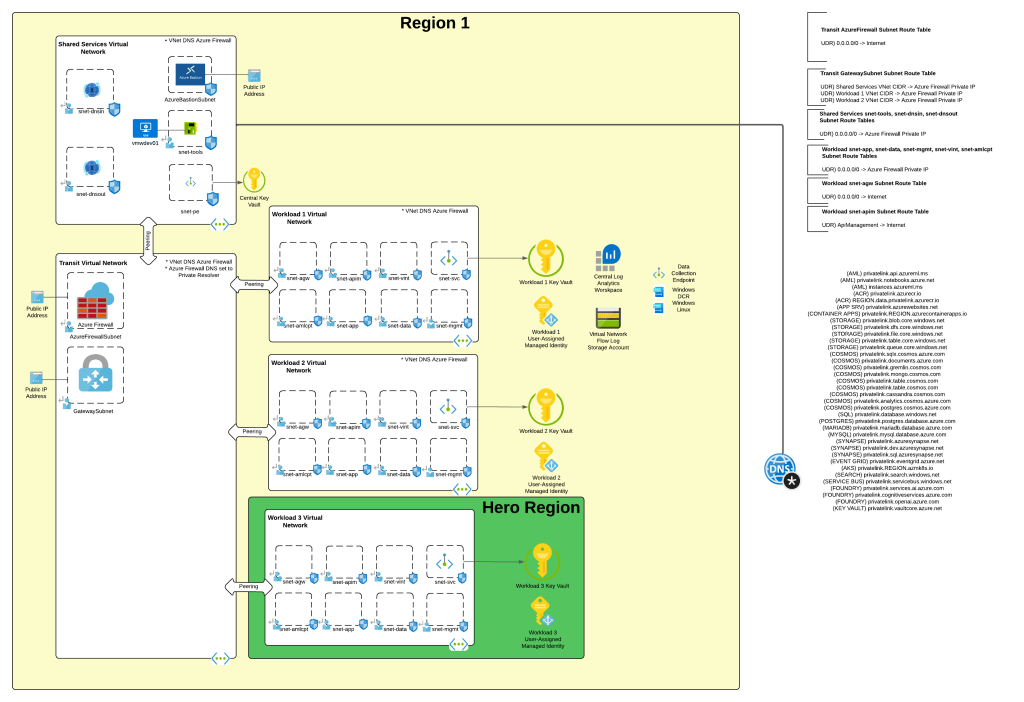
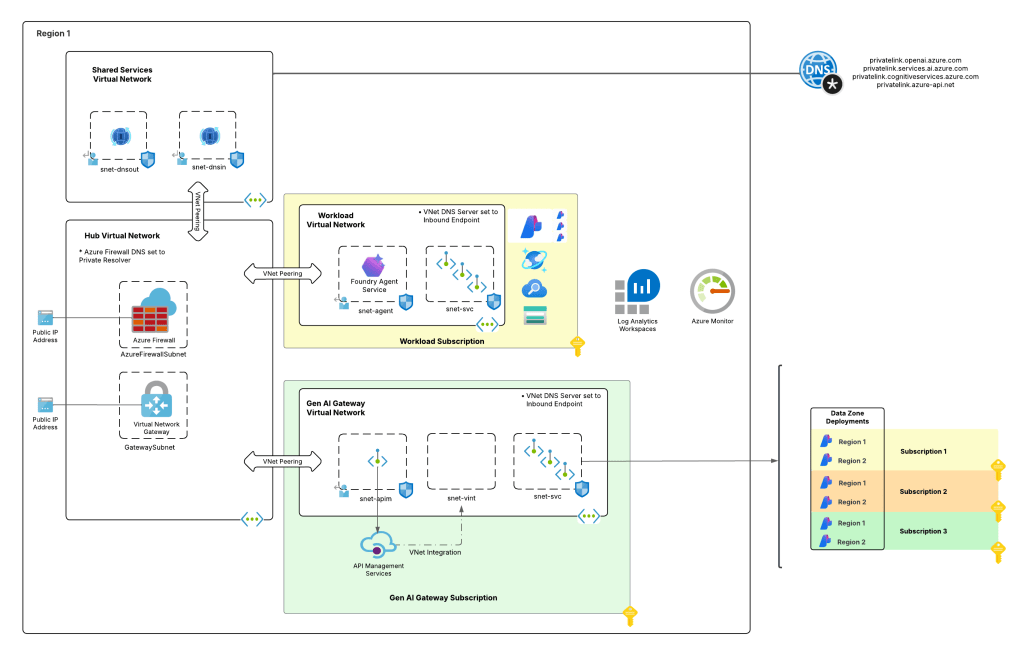
For this post I’m going to focus on the 3rd option which has Application Gateway sitting in front of an v2 tier API Management. I like this pattern because I get the WAF, SNI, host-based routing, and path-based routing benefits of an App Gw (Application Gateway) and avoid slapping a public IP on my APIM (API Management). There is more complexity to this pattern, but more security and flexibility always comes with more complexity, right?
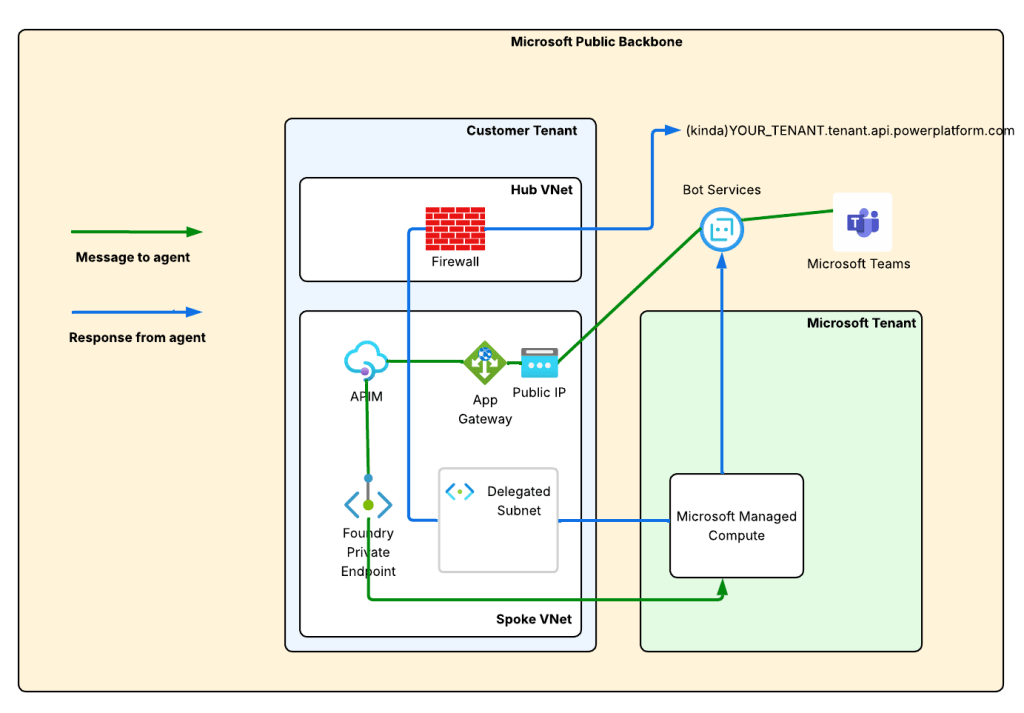
Generally my traffic will look something like the image you seen down below.
The green line is the incoming message from the Microsoft Teams. We see it is relayed from the Teams Service to the public IP address of the AppGw via the Bot Service. From there, we send it through the APIM and finally on to the Private Endpoint for Foundry which tunnels it on to the Microsoft-managed compute behind the Foundry Agent Service.
The blue line is the response from the agent. You’ll notice there are two blue lines. Based on the logs in my firewall when I tested this, I did not see the response traffic back to the Bot Service (this would be the endpoint in the serviceurl in the JWT received from the Bot Service which should be something like smba.trafficmanager.net). I’m making the assumption that this traffic isn’t egressed through the customer virtual network and instead flows out whatever path Microsoft is providing in the network where the managed compute lives that hosts the agent runtimes. Additionally, you’ll notice a blue line flowing through my virtual network and headed to an FQDN at tenant.api.powerplatform.com. I’m still trying to get clarification on if this flow is truly required and what it’s for.
The first instinct of us old networking farts is to look at this diagram and think this is asymmetric routing. However, in this situation it isn’t because the green and blue flows are separate TCP sessions because the message and response sequence is asynchronous.
Execution of the Architecture
Alright, you now have an understanding of the flow with this architecture. Let’s talk about the cool shit we can do with it. I’ve set the messaging endpoint in my Bot Service resource to https://agent.agw.jogcloud.com/agents/api/projects/sampleproject1/agents/test-manual-publish/endpoint/protocols/activityProtocol?api-version=2025-05-15-preview. What I’ve done is replace my FQDN with my AppGw’s FQDN and I appended /agents after the FQDN to ensure it routes to the proper API on my APIM.
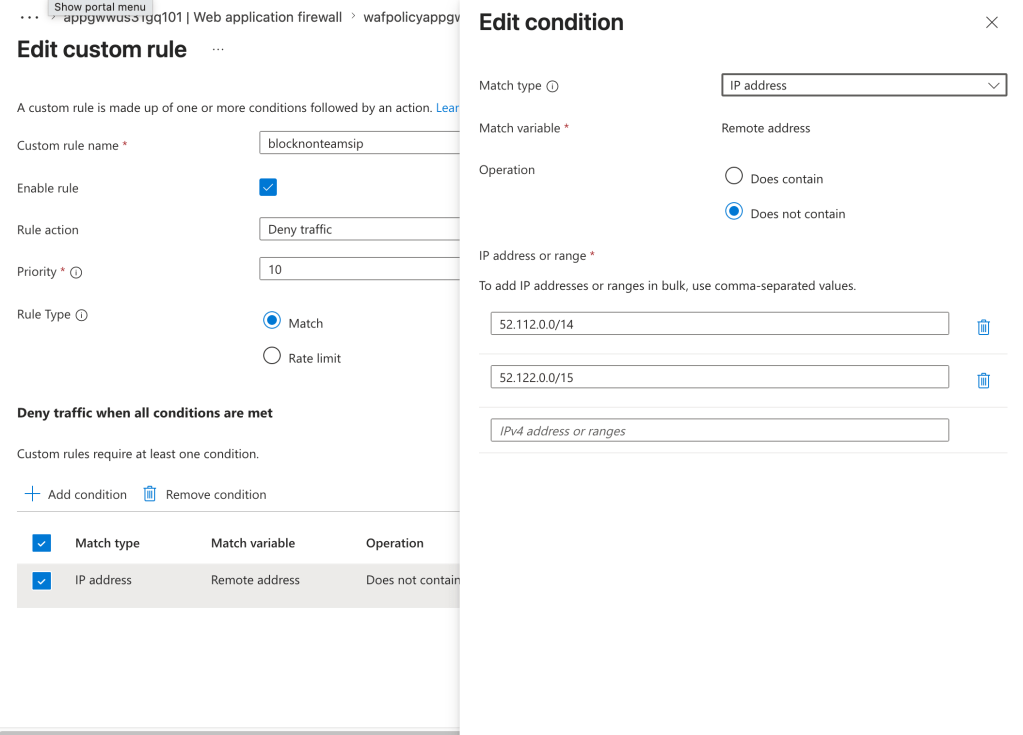
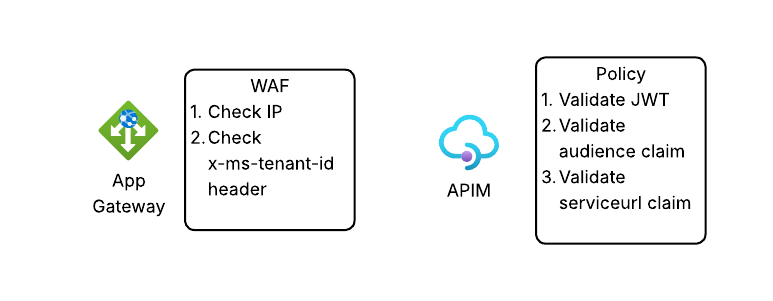
Given we’re starting with AppGw we can use the WAF functionality to validate the source IP address is coming from the Teams service. A simple rule like the below will do that check.
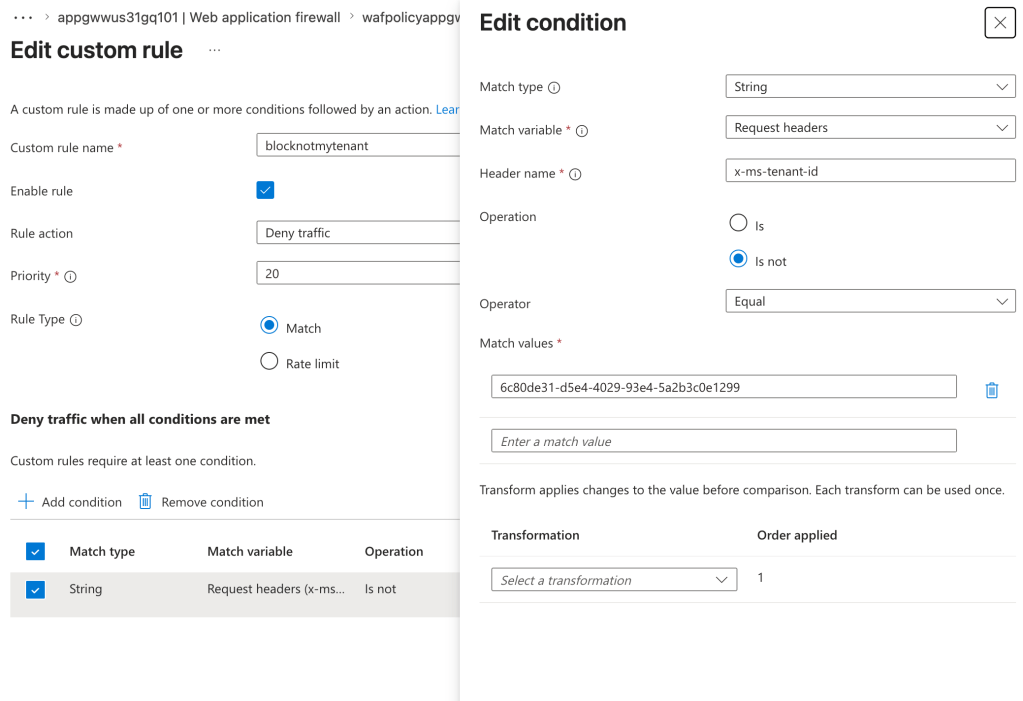
Next, I want to validate the request header of x-ms-tenant-id to validate that the header is present and contains my tenant id.
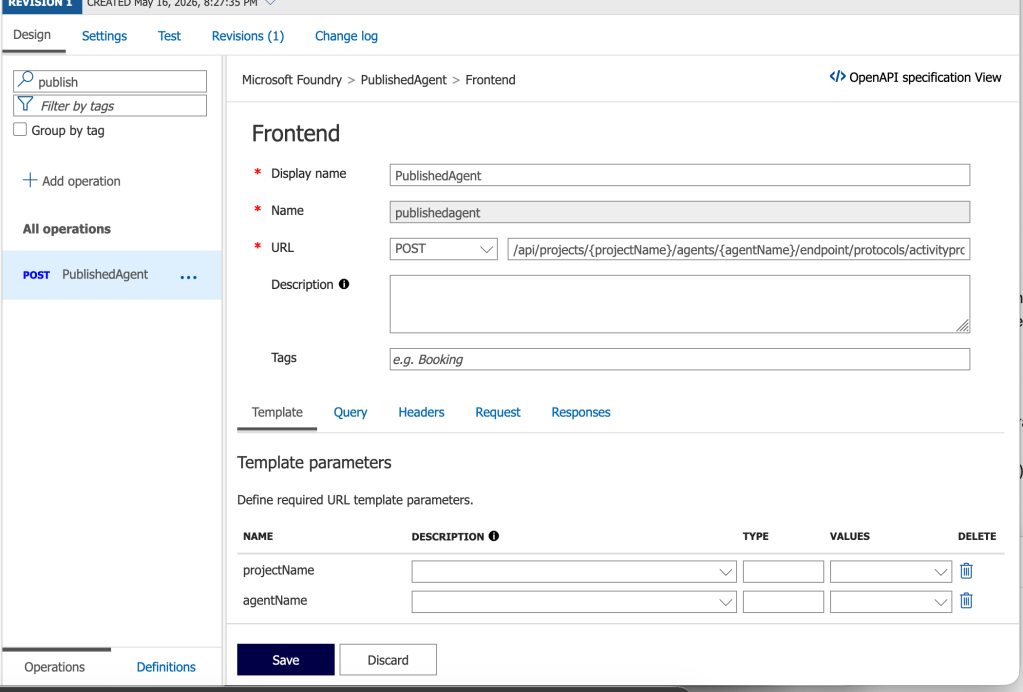
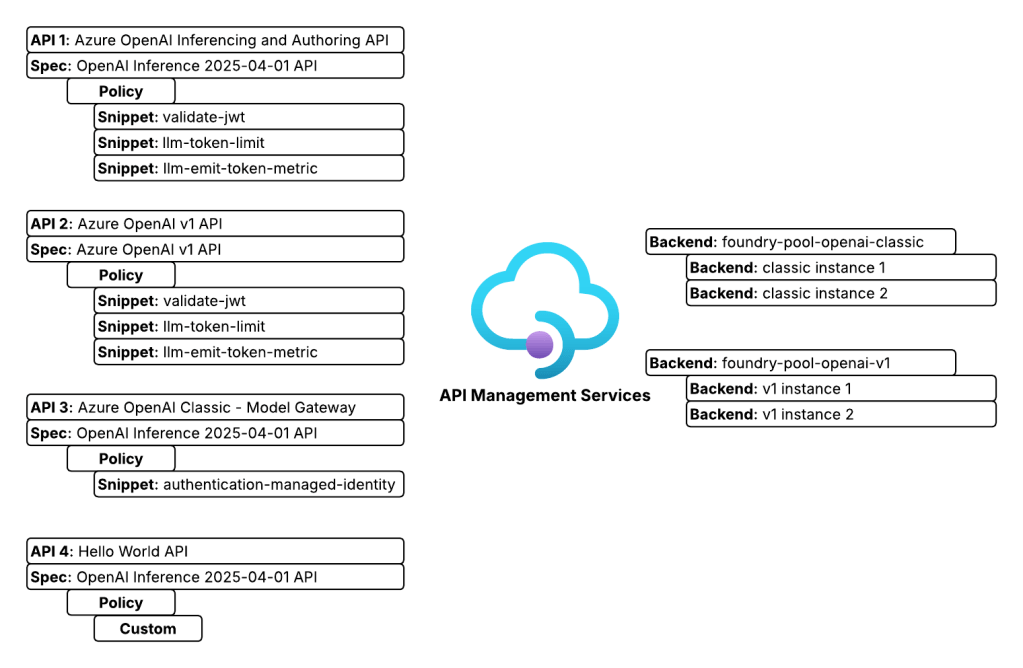
Next up I have APIM. Here I’ve created an API with an operation named PublishedAgent. The operation is defined as you see below.
Within the operation, I’ve taken Graeme’s policy and made a small tweak to it to validate the serviceurl claim in the JWT and ensure it contains my tenant id.
<policies> <inbound> <base /> <validate-jwt header-name="Authorization" require-scheme="Bearer"> <openid-config url="https://login.botframework.com/v1/.well-known/openidconfiguration" /> <audiences> <audience>8fd8ec07-ae24-4038-8771-6d4b85a4b19a</audience> </audiences> <issuers> <issuer>https://api.botframework.com</issuer> </issuers> <required-claims> <claim name="serviceurl" match="all"> <value>https://smba.trafficmanager.net/amer/6c80de31-d5e4-4029-93e4-5a2b3c0e1299/</value> </claim> </required-claims> </validate-jwt> </inbound> <backend> <base /> </backend> <outbound> <base /> </outbound> <on-error> <base /> </on-error></policies>
If we bring it back up out of the weeds and to the high level, here is what we’re doing at each component in the flow.
So there you have it folks, that’s an architecture you could use and some of the details of getting it up and running. Now let’s bounce over and take a look at how to avoid the manual action of “pushing the pretty blue button” and look at how we’d publish a Foundry Agent programmatically.
Programmatic Setup
The kind folks over at the Foundry Agents PG (product group) put together a sample of the steps needed to do this programmatically with PowerShell and Bicep. Since I prefer good ole bash shell, Python, and Terraform I reworked their steps into a Jupyter Notebook which you can find here. There is a sample env file in the repository. You don’t need to populate the client id and client secret unless you want to play around with the commands in the appendix. Those are not required.
The first step in the process is creation of the Bot Service resource in Azure. As I covered in my last post, this resource mainly exists to store metadata about your bot (or agent in this scenario) that the AI Bot Service uses to relay data back and forth between Teams and the agent. You’ll want to create a new Bot Service which will require you have the specific permissions to do that (if you want to go the custom role) or something more generic like Contributor. You’ll also want to make sure the Bot.Service resource provider is registered in your subscription (pretty sure this requires Owner).
I’ve crafted a Terraform template for this step. Before you can create the Bot Service with the template, you need to collect some Entra ID-related information. First, you’ll need to fetch your Entra ID tenant ID. You can do this programmatically by running after logging into az cli using the command below.
az account show --query tenantId -o tsv
Now that you have you’re logged into az cli and you’ve grabbed the tenant id, your next step is to fetch the principal id (or appId) of the Entra ID Agent Identity associated with the Foundry Agent. You’ll associate this identity with the Bot Service resource. Before you do that, you’ll need to get fetch an access token with the appropriate scope.
from azure.identity import DefaultAzureCredential
from dotenv import load_dotenv

# Get a token for Foundry scope
credential = DefaultAzureCredential()
scopes = ["https://ai.azure.com"]

user_token = credential.get_token(*scopes)
Next you can use this function to grab the principal_id property.
import osimport jsonimport requestsfrom dotenv import load_dotenv# Load environmental variablesload_dotenv(override=True)# Function that gets the agent objectdef get_foundry_agent(account_name: str, project_name: str, agent_name: str, token: str): """This function retrieves a Foundry agent by name from a Foundry project Args: account_name (str): The name of the Foundry account project_name (str): The name of the Foundry project agent_name (str): The name of the Foundry agent to retrieve token (str): The authentication token to use for the API request Returns: dict: The Foundry agent details if found, otherwise None """ response = requests.get( f"https://{account_name}.services.ai.azure.com/api/projects/{project_name}/agents/{agent_name}?api-version=v1", headers={ "Content-Type": "application/json", "Authorization": f"Bearer {token}" } ) if response.status_code == 200: return response.json() else: logging.error(f"Failed to retrieve agent: {response.status_code} - {response.text}") return None# Grab the principal_id of the Entra ID Agent Identity associated with the Foundry Agent foundry_account_name = os.getenv("FOUNDRY_ACCOUNT_NAME")project_name = os.getenv("FOUNDRY_PROJECT_NAME")agent_name = os.getenv("FOUNDRY_AGENT_NAME")agent = get_foundry_agent(foundry_account_name, project_name, agent_name, user_token.token)agent_principal_id = agent.get("instance_identity", {}).get("principal_id")print(f"Foundry Agent Principal ID: {agent_principal_id}")print(json.dumps(agent, indent=2))
Once you have the tenant id and principal id of the agent identity associated with your Foundry Agent, you are almost ready to create the Bot Service. The last step is formulating your messaging endpoint. It will look something like this:
https://FOUNDRY_ACCOUNT_NAME.services.ai.azure.com/api/projects/PROJECT_NAME/agents/AGENT_NAME/endpoint/protocols/activityProtocol?api-version=2025-05-15-preview
As I showed earlier, you can modify this to change the FQDN to point to your preferred ingress infrastructure and add pathing to the beginning to ensure proper routing through an API Gateway.
Now that you have everything ready to go you can run a Terraform template like the one located here. This will create the Bot Service and Teams channel child object and configure diagnostic settings with delivery to the specified (Log Analytics Workspace).
Once that is complete, you need enable the activity protocol support for your agent. You can do this using the code below:
import osimport jsonimport requestsfrom dotenv import load_dotenv# Load environmental variablesload_dotenv(override=True)# Function that enables the activity protocol for the agent and configures the required Bot Service authorization schemedef enable_agent_activity_protocol(account_name: str, project_name: str, agent_name: str, token: str): """This function enables the activity protocol for a Foundry agent and configures the required Bot Service authorization scheme Args: account_name (str): The name of the Foundry account project_name (str): The name of the Foundry project agent_name (str): The name of the Foundry agent to retrieve token (str): The authentication token to use for the API request Returns: dict: The updated Foundry agent details if the update was successful, otherwise None """ # body = { "agent_endpoint": { "protocols": [ "responses", "activity" ], "authorization_schemes": [ { "type": "Entra", "isolation_key_source": { "kind": "Entra" } }, { "type": "BotServiceRbac" } ] } } response = requests.patch( f"https://{account_name}.services.ai.azure.com/api/projects/{project_name}/agents/{agent_name}?api-version=v1", headers={ "Content-Type": "application/merge-patch+json", "Authorization": f"Bearer {token}", "Foundry-Features": "AgentEndpoints=V1Preview" }, json=body ) if response.status_code == 200: return response.json() else: logging.error(f"Failed to enable agent activity protocol: {response.status_code} - {response.text}") return None# Grab the principal_id of the Entra ID Agent Identity associated with the Foundry Agent foundry_account_name = os.getenv("FOUNDRY_ACCOUNT_NAME")project_name = os.getenv("FOUNDRY_PROJECT_NAME")agent_name = os.getenv("FOUNDRY_AGENT_NAME")enabled_agent = enable_agent_activity_protocol(foundry_account_name, project_name, agent_name, user_token.token)enabled_agent_guid = enabled_agent.get('versions', {}).get("latest", {}).get("agent_guid", {})print(f"Enabled Agent GUID: {enabled_agent_guid}")updated_agent_endpoint = enabled_agent.get('agent_endpoint', {})print(f"Updated Agent Endpoint: {json.dumps(updated_agent_endpoint, indent=2)}")
At this point, you have the Bot Service setup and you’ve activated the activity protocol for the agent so its now listening for requests at the messaging endpoint. The last step in the process is to use the publish operation and you will need the Foundry User role for this (as far as I can tell).
What exactly this does is still a bit of a black box for me, but it seems like it’s creating some type of API object to represent the agent in M365 Agent Registry (soon to be rebranded to Agent 365 I’m sure). Some of the APIs I need to poke around with require an Agents 365 license. Once I get that, I’ll update this section with more detail if I find exactly what it’s doing.
import os
import json
import requests
from dotenv import load_dotenv

# Load environmental variables
load_dotenv(override=True)

def publish_agent_teams(
    subscription_id: str,
    resource_group: str,
    account_name: str,
    project_name: str,
    location: str,
    agent_name: str,
    agent_guid: str,
    bot_id: str,
    app_publish_scope: str,
    publish_as_digital_worker: bool,
    app_version: str,
    short_description: str,
    full_description: str,
    developer_name: str,
    developer_website_url: str,
    privacy_url: str,
    terms_of_use_url: str,
    token: str
    ):
    """This function uses the Foundry API to publish a Foundry agent to Microsoft Teams
    Args:
        subscription_id (str): The Azure subscription ID where the Foundry account is provisioned
        resource_group (str): The name of the resource group where the Foundry account is provisioned
        account_name (str): The name of the Foundry account
        project_name (str): The name of the Foundry project
        location (str): The Azure region where the Foundry account is provisioned
        agent_name (str): The name of the Foundry agent to publish
        agent_guid (str): The GUID of the Foundry agent to publish
        bot_id (str): The Microsoft App ID of the Bot registered in Entra ID for this agent
        app_publish_scope (str): The scope to publish the Teams app to, either "Individual" or "Tenant"
        publish_as_digital_worker (bool): Whether to publish the agent as a Digital Worker in Teams, which surfaces it in the Power Virtual Agents app in addition to allowing it to be installed as a standard Teams app
        app_version (str): The version of the Teams app to publish
        short_description (str): A short description of the agent to display in Teams
        full_description (str): A full description of the agent to display in Teams
        developer_name (str): The name of the developer or organization that created the agent, to display in Teams
        developer_website_url (str): The URL for the developer's website, to display in Teams
        privacy_url (str): The URL for the privacy policy for this agent, to display in Teams
        terms_of_use_url (str): The URL for the terms of use for this agent, to display in Teams
        token (str): The Entra ID access token with the scope of https://ai.azure.com/.default to authenticate the API request
    Returns:
        dict: The response from the Foundry API if the publish was successful, otherwise None
    """

    body = {
        "subscriptionId": subscription_id,
        "agentGuid": agent_guid,
        "agentName": agent_name,
        "appRegistrationId": appRegistrationId,
        "botId": bot_id,
        "appPublishScope": app_publish_scope,
        "publishAsDigitalWorker": publish_as_digital_worker,
        "appVersion": app_version,
        "shortDescription": short_description,
        "fullDescription": full_description,
        "developerName": developer_name,
        "developerWebsiteUrl": developer_website_url,
        "privacyUrl": privacy_url,
        "termsOfUseUrl": terms_of_use_url
    }

    response = requests.post(
        url = f"https://{location}.api.azureml.ms/agent-asset/v2.0/subscriptions/{subscription_id}/resourceGroups/{resource_group}/providers/Microsoft.MachineLearningServices/workspaces/{account_name}@{project_name}@AML/microsoft365/publish",
        headers={
            "Content-Type": "application/json",
            "Accept": "application/json",
            "Authorization": f"Bearer {token}",
        },
        json=body
    )

    if response.status_code == 200:
        print("Agent published successfully! Status code: 200")
    else:
        logging.error(f"Failed to publish agent: {response.status_code} - {response.text}")
        return None

publish_response = publish_agent_teams(
    subscription_id = os.getenv("FOUNDRY_SUBSCRIPTION_ID"),
    resource_group = os.getenv("FOUNDRY_RESOURCE_GROUP"),
    account_name = os.getenv("FOUNDRY_ACCOUNT_NAME"),
    project_name = os.getenv("FOUNDRY_PROJECT_NAME"),
    location = os.getenv("FOUNDRY_LOCATION"),
    agent_name = os.getenv("FOUNDRY_AGENT_NAME"),
    agent_guid = enabled_agent_guid,
    bot_id = enabled_agent_guid,
    app_publish_scope = "Tenant",
    publish_as_digital_worker = False,
    app_version = "1.0.0",
    short_description = "This is a sample agent published from Foundry to Teams",
    full_description = "This agent was created in Foundry and published to Microsoft Teams using the Foundry API.",
    developer_name = "Carl Carlson",
    developer_website_url = "https://www.example.com",
    privacy_url = "https://www.example.com/privacy",
    terms_of_use_url = "https://www.example.com/terms",
    token = user_token.token
)
This step is effectively the last step in the Foundry Portal publishing experience. If you installed it for an individual it will be immediately available for that user. If you publish it to the Teams App Catalog (tenant option) it will be put in a pending state until approved via the M365 Admin Portal.
And like magic, you have a programmatic way to emulate the magical blue button in the Foundry portal. If you’re curious as to what that API call is going to an AML (Azure Machine Learning) endpoint, that is because (today at least) Foundry is built on top of AML.
Summing it up
What I’ve hoped you gathered from here is publishing an agent to Teams isn’t as simple as pushing a button. Requirements needs to be gathered, a design needs to be worked out, services chosen, service properties chosen for security and scale, services load tested, and security controls properly implemented and any risks accepted.
You have a ton of flexibility with this design and my take is there is no optimal design. The optimal design is the one that provides you with the user experience you require aligned with the risks your org is willing to accept. If you’re building an agent that is hitting some public data source, maybe you don’t care about any of this infrastructure. Either way, do not just hit the publish button, group up with your peers across security, networking, operations, collaboration, and AI engineering and put your heads together to come up with a design you’re all happy with.
With that, I’m out for Memorial Day weekend. See you next time!


