Entra ID – Deep Dive – Workload Identity Federation – Bonus

Entra ID – Deep Dive – Workload Identity Federation – Bonus

This is part of my series on Microsoft Entra ID:

  1. Entra ID – Deep Dive – The Basics – Part 1
  2. Entra ID – Deep Dive – Protocol Primer – Part 2
  3. Entra ID – Deep Dive – Entra ID Authentication – Part 3
  4. Entra ID – Deep Dive – Workload Identity Federation – Bonus

Hello again!

I’ve been on an identity kick lately given all the chatter around IAM (identity access management) that has popped up as the industry tries to figure out how the hell they’re going to handle the disruption to existing IAM systems with the introduction of AI agents in the enterprise. This has raised more conversation within my customer base, with cross cloud identity being a hot topic. Recently, a customer asked me about Entra ID’s Workload Identity Federation feature. I hadn’t mucked with the feature much beyond reading a bit of the documentation, but given the increase in cross-cloud conversations and the customer ask, it seemed like the perfect time to do it! Hence this blog post!

Let’s get to it, shall we?

What is the problem this feature solves?

It’s this old dude’s take that the high-level question Entra ID WIF (workload identity federation) seeks to answer is, “How do we effectively allow two systems in different organizational or trust boundaries to communicate while allowing each boundary to retain control of its identity system?” This is not a new problem. If you’ve been around the block for a few decades, you’ve likely built federated solutions like Windows Active Directory trusts or federated trusts with SAML (security assertion markup language). Each of those solutions had similar goals which included things like:

  1. Simplify security by letting each organization be the authority over its human and non-human identities.
  2. Make it easier for the user by not saddling them with 100 identities and passwords to remember.
  3. Reduce costs by keeping avoiding having to build complex systems to maintain all those duplicate identities and the support personnel to manage them.

So yeah, the obvious stuff, right?

As cloud was adopted the problem grew in scale as organizations integrated with CSPs (cloud service providers) and demand around B2B collaboration drastically increased. SAML and OIDC made the human identity problem a small bit easier (notice I said bit, so don’t flame me!) to solve, but the non-human, or the machine, identity problem caused bloat in identities. Systems needed to interact and sometimes these systems were in different boundaries. This could be on-premises, sometimes in AWS, GCP, or Azure. You might have a AWS Lambda pulling data from a Microsoft Cloud API, GCP BigQuery grabbing data from both clouds, Kubernetes cluster pulling data from an Azure Storage Account, or an Azure Data Factory ripping data down from an Amazon S3 bucket. All this cross cloud hoopla meant lots of machine identities and credentials floating around.

The classic way to solve this problem for the AWS to Azure looked something like this:

The classic way to handle cross cloud machine identity resource access

Here, the Lambda would obtain a temporary credential from the AWS STS based on an IAM role it was assigned, pass that credential to AWS Secrets Manager to grab a secret which contain a Entra ID service principal client secret. It would then use that secret to authenticate to Entra ID as the service principal to obtain an access token issued by Entra ID which it would pass to access a blob in Azure Storage.

The above pattern is still incredibly common in enterprises today. It works no doubt, but there is that credential you gotta manage. Its usage has to be monitored, its lifecycle has to be tracked, it has to be rotated in Entra ID and updated in AWS Secrets Manager, it could get compromised by an attacker and used to exfiltrate data from Azure Storage, etc etc. Now scale this by multiple clouds and thousands of applications and you quickly see the challenge.

Years ago some smart folks across the industry came up with the concept of WIF to help address this problem.

You’re on Matt Felton’s blog so you’ll suffer with a Matt Felton explanation. WIF is all about eliminating that static secret and letting the workload provide some type of token issued by a trusted party (identity provider) to prove its identity to the trusting party (relying party). If you’re familiar with federation for user identities this should sound very familiar. Elimination of that static secret is where the money is at. No more operational overhead of managing thousands of secrets which be expire or be compromised.

All of this likely makes sense to you. Let’s take a look at how Microsoft implemented it.

How does Entra ID Workload Identity Federation work?

Before we get into the guts of how this works, it’s important to understand some core Entra ID concepts.

In Entra ID there are three main categories of identity: user identities, device identities, and workload identities. Given the feature is called WIF, you can probably figure out that last category is what we’re concerned with. These are identities that will be associated to some application, script, container, agent, etc. In the Entra world all of these things are represented by the core object class of a service principal. There are many types of service principals in Entra, but the two most relevant to our conversation are the application and managed identity types.

Service principals of type application are machine identities associated with an application resource. If you’re unfamiliar with the differences between a service principal and application resource take a read through my first post in my Entra series for the gory details. The main thing to understand is the application is the “template” representation of an application across all of Entra ID while the service principal is the identity of the application in a specific Entra ID tenant. The application resource (you’ll almost always hear it referred to as the application registration) is responsible for authentication of the application to Entra while the service principal is the associated identity that is granted permissions to do stuff within the tenant.

A service principal of type managed identity is the identity associated with an Azure managed identity. Managed identities are Azure’s version of an AWS IAM Role. Like an AWS IAM Role, the credential for the identity is managed by the CSP (in this case Microsoft) and workloads associated with a managed identity obtain temporary credentials (called access tokens in the Azure world) to access Azure resources.

Entra WIF can be enabled for either of the application resource or the managed identity. My personal take is if your use case is to simply consume Azure resources, create a managed identity representing your app in the other cloud. This way you can slap it in a resource group in some Azure subscription alongside the resources it is consuming or other resources that may be pieces of that application in Azure. If your use case is consuming Azure in addition to other APIs (such as the MS Graph API) that are protected by Entra use an application resource. Using an application resource will give you more visibility across all of Entra that you have some application that is consuming multiple pieces of the Microsoft cloud. You can technically grant access to something like the MS Graph API to a managed identity, but it’s not as intuitive or visible.

Once you determine whether you’re going to use an application resource or managed identity you’ll need to configure Entra ID to trust the external IdP (identity provider) so that when it receives tokens from your workload that were issued by the external IdP it can validate them and issue an access token from Entra. The high level flow looks like the below.

The process works in the following way. The workload obtain an access token from its IdP. For example, this could be the AWS STS, GCP’s authorization server, or another IdP using the SPIFFE (Secure Production Identity Framework for Everyone) standard. Once the token is issued, the workload sends that token to Entra ID which verifies it cryptographically using keys pulled from an endpoint exposed by the IdP. Once verified, Entra ID issues an access token to the workload which it can use to call the Azure service.

If you’re like me, you probably want to see an example. Well lucky for you, I got one!

Entra ID Workload Identity Federation in Action

To demonstrate this feature I’m going to use a managed identity for my workload instead of an application resource because it’s a quicker setup. My use case is I have an EC2 instance in AWS that needs to pull data from a storage account in Azure. My architecture is super basic and pictured below.

Simple lab to demonstrate WIF

The first step in is to setup AWS outbound federation for my AWS account. This will activate the STS’s capability of issuing tokens to external relying parties.

Next, I’ll need to create an AWS IAM Policy which will grant permissions to obtain tokens from the STS for a specific relying party. For that, I crafted the super basic IAM policy below. This policy grants permission to the security principal the policy is associated with to request tokens from the STS with an audience of my Entra tenant. You’ll need the audience set as api://AzureADTokenExchange. For mine, I added my tenant ID to the path to further constrain it. While not required, I slapped some requirements around the token duration and signing algorithm. There are a number of condition keys you can choose from to further constrain the permissions.

{
"Version": "2012-10-17",
"Statement": [
{
"Effect": "Allow",
"Action": "sts:GetWebIdentityToken",
"Resource": "*",
"Condition": {
"ForAllValues:StringEquals": {
"sts:IdentityTokenAudience": "api://AzureADTokenExchange/6c80de31-d5e4-4029-XXXX-XXXXXXXXXXXX"
},
"NumericLessThanEquals": {
"sts:DurationSeconds": 300
},
"StringEquals": {
"sts:SigningAlgorithm": "RS256"
}
}
}
]
}

I then associated this IAM Policy to the IAM role used by my EC2 instance. Once complete, at this stage the AWS account is setup for outbound federation and my EC2 instance has permissions to request a token destined for the my Entra ID tenant.

On the Azure side I created a resource group, storage account with a sample blob, and an UMI (user-assigned managed identity).

The UMI needs to be configured with a federated credential like you see below.
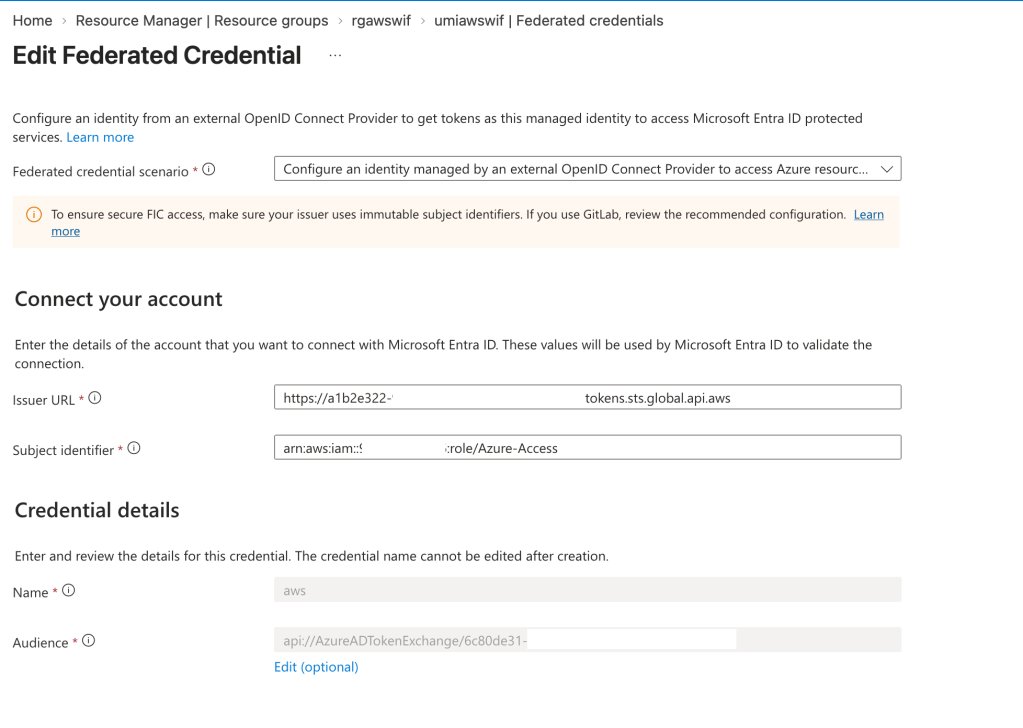
In the issuer URL I put my AWS account STS identifier I got when I setup the outbound federation. The subject identifier I set to the ARN of my IAM role and the audience I matched to the audience I put in the IAM policy.

One thing to note is that there are a maximum of 20 federated credentials per application resource or managed identity. If you have multiple workloads using the same identity on the Azure side, scale issues can come into play. There is a feature called flexible federated identity credentials which allow you to create an expression to match the incoming subject vs the specific subject itself. If you have those scale issues, you’ll want to look at this feature. It’s in preview as of the date of this blog.

Alright, at this point the plumbing is setup and now I need to toss together some code to make the magic happen.

For this I threw together a very basic Python snippet that requests an token from the AWS STS, exchanges it for an access token from Entra, and writes out the content of a blob stored in Azure Storage.

import boto3
import os
import base64
import json
import logging
import sys
from dotenv import load_dotenv
from azure.identity import ClientAssertionCredential
from azure.storage.blob import BlobServiceClient
load_dotenv(override=True)
TENANT_ID = os.getenv("ENTRA_TENANT_ID")
UMI_CLIENT_ID = os.getenv("AZURE_UMI_CLIENT_ID")
BLOB_ACCOUNT_URL = os.getenv("AZURE_BLOB_ACCOUNT_URL")
BLOB_CONTAINER_NAME = os.getenv("AZURE_BLOB_CONTAINER_NAME")
BLOB_NAME = os.getenv("AZURE_BLOB_NAME")
logging.basicConfig(
level=logging.DEBUG,
stream=sys.stdout,
format="%(asctime)s - %(name)s - %(levelname)s - %(message)s",
)
logger = logging.getLogger(__name__)
def print_jwt_claims(jwt: str) -> None:
print('Parsing AWS STS access token')
payload = jwt.split(".")[1]
payload += "=" * (-len(payload) % 4)
claims = json.loads(base64.urlsafe_b64decode(payload))
print(json.dumps(claims, indent=2))
def get_aws_sts_token() -> str:
print('Obtaining access token from AWS STS...')
sts_client = boto3.client('sts', region_name='us-east-1')
response = sts_client.get_web_identity_token(
Audience=[f"api://AzureADTokenExchange/{TENANT_ID}"],
DurationSeconds=300,
SigningAlgorithm='RS256'
)
token = response["WebIdentityToken"]
print_jwt_claims(token)
return token
try:
credential = ClientAssertionCredential(
tenant_id = TENANT_ID,
client_id = UMI_CLIENT_ID,
func = get_aws_sts_token
)
print(f"Contacting storage account {BLOB_ACCOUNT_URL}")
blob_service_client = BlobServiceClient(account_url=BLOB_ACCOUNT_URL,credential=credential)
blob_client = blob_service_client.get_blob_client(container=BLOB_CONTAINER_NAME,blob=BLOB_NAME)
blob_data = blob_client.download_blob().readall()
print(blob_data.decode("utf-8"))
except Exception as e:
print(f"Script failed: {e}")

Looking at the printed output of the script we first see the token generated by the AWS STS.

{
"aud": "api://AzureADTokenExchange/6c80de31-d5e4-4029-XXXX-XXXXXXXXXXXX",
"sub": "arn:aws:iam::XXXXXXXXXXXX:role/Azure-Access",
"https://sts.amazonaws.com/": {
"ec2_instance_source_vpc": "vpc-0a84fd0130401fcf9",
"ec2_role_delivery": "2.0",
"aws_account": "XXXXXXXXXXXX",
"original_session_exp": "2026-08-17T02:39:52Z",
"source_region": "us-east-1",
"ec2_source_instance_arn": "arn:aws:ec2:us-east-1:XXXXXXXXXXXX:instance/i-034a6ea7b8b83cba5",
"principal_id": "arn:aws:iam::XXXXXXXXXXXX:role/Azure-Access",
"ec2_instance_source_private_ipv4": "XX.XX.XX.XX"
},
"iss": "https://a1b2e322-9556-4319-XXXX-XXXXXXXXXXXX.tokens.sts.global.api.aws",
"exp": 1786912687,
"iat": 1786912387,
"jti": "7d6c05a6-10e8-46ab-8f15-6d4c595b55f0"
}

Here we see the audience set to my Entra tenant and the subject set to the ARN of the role associated to the EC2 instance.

The result of the exchange shows the content of the blob proving cross cloud authentication with no static secrets!

End to end the flow went something like this:

I covered the free pieces of WIF for this post. There are some pretty awesome Premium features that require licensing but extend Entra ID functionality like conditional access, identity protection, and privileged access review. The premium features will come with a cost per workload identity per month. My take is that functionality should be reserved for your high risk workloads unless you got cash to burn.

With those lessons learned, it’s a good time to review whether you’ve adopted WIF for your cross-cloud use cases. Less credentials = less pain. In the world that is tech today, I think we are all looking for a little less pain.

See you next post!
Azure Authorization – Azure ABAC (Attribute-based Access Control)

This is part of my series on Azure Authorization.

  1. Azure Authorization – The Basics
  2. Azure Authorization – Azure RBAC Basics
  3. Azure Authorization – actions and notActions
  4. Azure Authorization – Resource Locks and Azure Policy denyActions
  5. Azure Authorization – Azure RBAC Delegation
  6. Azure Authorization – Azure ABAC (Attribute-based Access Control)

Welcome back fellow geeks.

I do a lot of learning and educational sessions with my customer base. The volume pretty much demands reusable content which means I gotta build decks and code samples… and worse maintain them. The maintenance piece typically consists of me mentally promising myself to update the content and kicking the can down the road for a few months. Eventually, I get around to updating the content.

This month I was doing some updates to my content around Azure Authorization and decided to spend a bit more time with Azure ABAC (Attribute-based access control). For those of you unfamiliar with Azure ABAC, well it’s no surprise because the use cases are so very limited as of today. Limited as the use cases are, it’s a worthwhile functionality to understand because Microsoft does use it in its products and you may have use cases where it makes sense.

The Dream of ABAC

Let’s first touch briefly on the differences between (RBAC) role-based access control and (ABAC) attribute-based access control. Attribute-based access control has been the dream for the security industry for as long as I can remember. RBAC has been the predominant authorization mechanism in a majority of applications over the years. The challenge with RBAC is it has typically translated to basic group membership where an application authorizes a user solely on whether or not the user is in a group. Access to these groups would typically come through some type of request for membership and implementation by a central governance team. Those processes have tended to be not super user friendly and the access has tended to be very course-grained.

ABAC meanwhile promised more fine-grained access based upon attributes of the security principal, resource, or whatever your mind can dream up. Sounds awesome right? Well it is, but it largely remained a dream in the mainstream world with a few attempts such as Windows Dynamic Access Control (Before you comment, yeah I get you may have had some cool apps doing this stuff years ago and that is awesome, but let’s stick with the majority). This began to change when cloud came around with the introduction of more modern protocols and standards such as SAML, OIDC, and OAuth. These protocols provide more flexibility with how the identity provider packages attributes about the user in the token delivered to the service provider/resource provider/what have you.

When it came to the Azure cloud, Microsoft went the traditional RBAC path for much of the platform. User or group gets placed in Azure RBAC role and user(s) gets access. I explain Azure RBAC in my other posts on RBAC. There is a bit of flexibility on the Entra ID side for the initial access token via Entra ID Conditional Access, but RBAC in the Azure realm. This was the story for many years of Azure.

In 2021 Microsoft decided something more flexible was needed and introduced Azure ABAC. The world rejoiced… right? Nah, not really. While the introduction of ABAC was awesome, its scope of use was and still is extremely limited. As of the date of this blog, ABAC is only usable for Azure Storage blob and queue operations. All is not lost though, there are some great use cases for this feature so it’s important to understand how it works.

How does ABAC work?

Alright, history lesson and complaining about limited scope aside, let’s now explore how the feature works.

ABAC is facilitated through an additional property on Azure RBAC Role Assignment resources. I’m going to assume you understand the ins and out of role assignments. If you don’t, check out my prior post on the topic. In its most simple sense, an Azure RBAC role assignment is the association of a role to a security principal granting that principal the permissions defined in the role over a particular scope of resources. As I’ve covered previously, role assignments are an Azure resource that have defined sets of properties. The properties we care about for the scope of this discussion are the conditionVersion and condition properties. The conditionVersion property will always have a value of 2.0 for now. The condition property is where we work our ABAC magic.

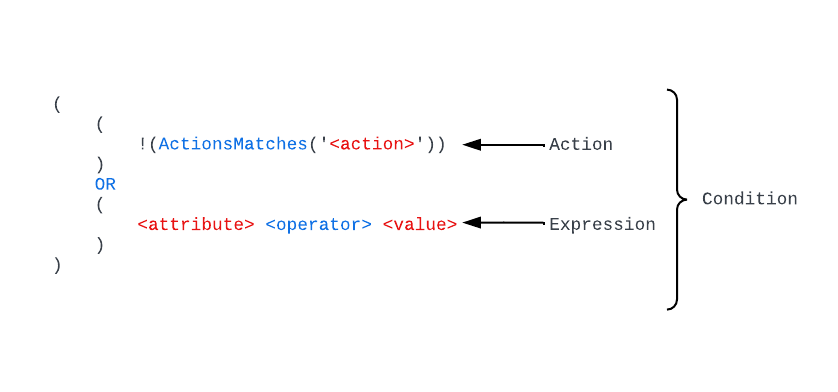
The condition property is made up of a series of conditions which each consist of an action and one or more expressions. The logic for conditions is kinda weird, so I’m walk you through it using some of the examples from documentation as well as complex condition I throw together. First, let’s look at the general structure.

Structure of conditions used in ABAC

In the above image you can see the basic building blocks of a condition. Looks super confusing and complicated right? I know it did to me at first. Thankfully, the kind souls who write the public documentation broke this down in a more friendly programming-like way.

Far more simple explanation of conditions

In each condition property we first have the action line where the logic looks to see if the action being performed by the security principal doesn’t (note the exclamation point which negates whats in the parentheses) match the action we’re applying the conditions to. You’ll commonly see a line like:

!(ActionMatches{'Microsoft.Storage/storageAccounts/blobServices/containers/blobs/read'} AND !SubOperationMatches{'Blob.List'})

This line is saying if the action isn’t blobs/read (which would be data plane call to read the contents of the blob) then the line should evaluate to true. If it evaluates to true, then the access is allowed and the expressions are not evaluated any further.

After this line we have the expression which is only evaluated when the first line evaluates to false (which in the example I just covered would mean the security principal is trying to read the content of a blob). The expressions support four categories of what Microsoft refers to as condition features. There are currently four features in various states of GA (general availability) and preview (refer to the documentation for those details). These four categories include:

  • Requests
  • Environment
  • Resource
  • Principal (security principal)

These four categories give you a ton of flexibility. Requests covers the details of the request to storage, for example such as limiting a user to specific blob prefixes based on the prefix within the request. Environment can be used to limit the user to accessing the resource from a specific Private Link Private Endpoint over Private Link in general (think defense-in-depth here). The resource feature exposes properties of the resource being accessed, which I find the most flexible thing to be blob index tags. Lastly, we have security principal and this is where you can muck around with custom security attributes in Entra ID (very cool feature if you haven’t touched it).

In a given condition we can have multiple expressions and within the condition property we can string together multiple conditions with AND and OR logic. I’m a big believer in going big or going home, so let’s take a look at a complex condition.

Diving into the Deep End

Let’s say I have a whole bunch of data I need to make available via a blobs in an Azure Storage Account. I have a strict requirement to use a single storage account and the blobs I’m going to store have different data classifications denoted by a blob index tag key named access_level. Blobs without this key are accessible by everyone while blobs classified high, medium, or low are only accessible by users with approval for the same or higher access levels (example: user with high access level can access high, medium, low, and data with no access level). Lastly, I have a requirement that data at the high access level can only be accessed during business hours.

I use a custom security attribute in Entra ID called accesslevel under an attribute set named organization to denote a user’s approved access level.

Here is how that policy would break down.

My first condition is built to allow users to read any blobs that don’t have the access_level tag.

# Condition that allows users within scope of the assignment access to documents that do not have an access level tag
(
  (
    # If the action being performed doesn't match blobs/read then result in true and allow access
    !(ActionMatches{'Microsoft.Storage/storageAccounts/blobServices/containers/blobs/read'} AND !SubOperationMatches{'Blob.List'})
  )
  OR 
  (
    # If the blob doesn't have a blob index tag with a key of access_level then allow access
    NOT @Resource[Microsoft.Storage/storageAccounts/blobServices/containers/blobs/tags&$keys$&] ForAnyOfAnyValues:StringEquals {'access_level'}
  )
)

If the blob does have an access tag, I want to start incorporating my logic. The next condition I include allows users with the accesslevel security attribute set to high to read blobs with a blob index tag of access_level equal to low or medium. I also also allow them to read blobs tagged with high if it’s between 9AM and 5PM EST.

# Condition that allows users within scope of the assignment to access medium and low tagged data if they have a custom 
# security attribute of accesslevel set to high. High data can also be read within working hours
OR
(
 (
   # If the action being performed doesn't match blobs/read then result in true and allow access
   !(ActionMatches{'Microsoft.Storage/storageAccounts/blobServices/containers/blobs/read'} AND !SubOperationMatches{'Blob.List'})
 )
 OR 
 (
   # If the blob has an index tag of access_level with a value of medium or low allow the user access if they have a custom security
   # attribute of organization_accesslevel set to high
   @Resource[Microsoft.Storage/storageAccounts/blobServices/containers/blobs/tags:access_level<$key_case_sensitive$>] ForAnyOfAnyValues:StringEquals {'medium', 'low'}
   AND
   @Principal[Microsoft.Directory/CustomSecurityAttributes/Id:organization_accesslevel] StringEquals 'high'
 )
 OR
 (
   # If the blob has an index tag of access_level with a value of high allow the user access if they have a custom security
   # attribute of organization_accesslevel set to high and it's within working hours
   @Resource[Microsoft.Storage/storageAccounts/blobServices/containers/blobs/tags:access_level<$key_case_sensitive$>] ForAnyOfAnyValues:StringEquals {'high'}
   AND
   @Principal[Microsoft.Directory/CustomSecurityAttributes/Id:organization_accesslevel] StringEquals 'high'
   AND
   @Environment[UtcNow] DateTimeGreaterThan '2025-06-09T12:00:00.0Z'
   AND
   @Environment[UtcNow] DateTimeLessThan '2045-06-09T21:00:00.0Z'
 )
)

Next up is users with medium access level. These users are granted access to data tagged medium or low.

# Condition that allows users within scope of the assignment to access medium and low tagged data if they have a custom 
# security attribute of accesslevel set to medium
OR
(
  (
    # If the action being performed doesn't match blobs/read then result in true and allow access
    !(ActionMatches{'Microsoft.Storage/storageAccounts/blobServices/containers/blobs/read'} AND !SubOperationMatches{'Blob.List'})
  )
  OR 
  (
    # If the blob has an index tag of access_level with a value of medium or low allow the user access if they have a custom security
    # attribute of organization_accesslevel set to medium
    @Resource[Microsoft.Storage/storageAccounts/blobServices/containers/blobs/tags:access_level<$key_case_sensitive$>] ForAnyOfAnyValues:StringEquals {'medium', 'low'}
    AND
    @Principal[Microsoft.Directory/CustomSecurityAttributes/Id:organization_accesslevel] StringEquals 'medium'
 )
)

Finally, I allow users with low access level to access data tagged as low.

# Condition that allows users within scope of the assignment to access low tagged data if they have a custom 
# security attribute of accesslevel set to low
OR
(
 (
   # If the action being performed doesn't match blobs/read then result in true and allow access
   !(ActionMatches{'Microsoft.Storage/storageAccounts/blobServices/containers/blobs/read'} AND !SubOperationMatches{'Blob.List'})
 )
 OR 
 (
   # If the blob has an index tag of access_level with a value of low allow the user access if they have a custom security
   # attribute of organization_accesslevel set to low
   @Resource[Microsoft.Storage/storageAccounts/blobServices/containers/blobs/tags:access_level<$key_case_sensitive$>] ForAnyOfAnyValues:StringEquals {'low'}
   AND
   @Principal[Microsoft.Directory/CustomSecurityAttributes/Id:organization_accesslevel] StringEquals 'low'
 )
)

Notice how I separated each condition using OR. If the first condition resolves to false, then the next condition is evaluated until all access is granted or all conditions are exhausted. Neat right?

Summing it up

So why should you care about this if its use case is so limited? Well, you should care because that is ABAC’s use case today, and it would be expanded in the future. Furthermore, ABAC allows you to be more granular in how you grant access to data in Azure Storage (again, blob or queue only). You likely have use cases where this can provide another layer of security to further constrain a security principal’s access. You’ll also see these conditions used in Microsoft’s products such as AI Foundry.

The other reason it’s helpful to understand this language used for the condition, is conditions are expanding into other services such as Azure RBAC Delegation (which if you aren’t using you should be). While the language can be complex, it does make sense if you muck around with it a bit.

A final bit of guidance here, don’t try to write conditions by hand. Use the visual builder in the Azure Portal as seen below. It will help you get some basic conditions in place that you can further modify directly via the code view.

Azure Portal Condition Builder

Next time you’re locking down an Azure storage account, think about whether or not you can further restrict humans and non-humans alike based on the attributes discussed today. The main places I’ve seen this used are for user profiles, further restricting user access to specific subsets of data (similar to the one I walked through above), or even adding an additional layer of network security baked directly into the role assignment itself.

See you next post!

Simple Patterns for Chatting with Your Data – Using the Microsoft public backbone

Hello again folks! Recently, I’ve been working with some far more intelligent peers (such as my buddy Jose Medina Gomez, you should definitely check out his repos because he has some awesome stuff there) on getting some new-to-Azure customers up and running in the GenAI (generative AI) space. Specifically, these customers had some custom data they wanted to use the LLMs (large language models) to reason on and answer questions about. This called for using a RAG (retrieval-augmented generation) pattern to provide an LLM access to an external knowledge base. I thought it would be helpful to other folks out there like myself that are new to this world to document some simple patterns to do this type of stuff that keep security in mind. I’ll cover these over a few posts with this being the first.

The Pattern

The first pattern I want to cover is what I call the “Microsoft public backbone” pattern. This pattern is ideal for customers to minimal to no Azure presence who need something up and running quickly with some basic security guardrails. The pattern looks like what you see below:

Microsoft-backbone Pattern

The key benefits of this pattern are:

  • All traffic between Microsoft PaaS (platform-as-a-service) services flows over the Microsoft public backbone and the organization’s application communicates with the services over the Microsoft public backbone.
  • All Microsoft PaaS services use the built-in service firewall to control inbound traffic.
  • Microsoft PaaS services that support outbound network controls use those controls to mitigate the risk of data exfiltration.
  • Authentication between each component uses Entra ID based authentication and Azure RBAC authorization.
  • Minimizes costs by choosing more affordable SKUs where possible.
  • Captures logs where available.

What I like about this pattern is it is super simple to get up and running (can take less than one hour) and provides decent security controls with minimal headache. It’s by no means production-ready pattern for reasons I’ll discuss further in this post, but for a quick proof-of-concept or for getting your feet wet with RAG-like patterns, this is a great choice.

I’ll now spend a few moments providing detail to each of the benefits I outlined above.

The Benefits and Considerations

Benefit 1: All traffic between Microsoft PaaS (platform-as-a-service) services flows over the Microsoft public backbone and the organization’s application communicates with the services over the Microsoft public backbone

Simplicity is the name of the game here folks. By keeping keeping all communication to the Microsoft public backbone you avoid the complexities of Private Link integration. For organizations that are new to Azure and don’t have a platform landing zone (hybrid connectivity, network inspection, Internet egress support for Azure resources, DNS forwarding for Private Link) this pattern can be done without much effort. As an added benefit, PaaS to PaaS stays over the Microsoft public backbone providing you with the the security controls Microsoft provides across their public backbone.

Benefit 2: All Microsoft PaaS services use the built-in service firewall to control inbound traffic

Almost all (I’m sure there are some exceptions that aren’t top of mind) Microsoft PaaS services provide a basic built-in firewall I refer to as the service firewall. The service firewall is off by default, but can be toggled on to restrict inbound traffic to the public endpoint for the PaaS (which ever PaaS has). Most commonly (every PaaS service seems to work a bit differently) you can create exceptions to the firewall based on IP address or allow “trusted” Microsoft services to bypass the firewall. Additionally, Azure Storage has is its capability which allows to configure specific resource instances to bypass the firewall based on the resource instance identifier and its managed identity.

The “trusted” Microsoft service exception needs a bit more explaining. Most Azure PaaS (again, there are always exceptions because Microsoft loves its snowflakes) has a checkbox in the Portal with text like seen in the screenshot below. This checkbox allows traffic from a specific set of Azure services (identified by their public IP addresses) to bypass the service firewall. Today, this will be a box you will often need to check whenever you are doing PaaS to PaaS. The key thing to understand about this checkbox is it’s all public IPs associated with whatever the “trusted” services are the specific product group identifies. This means instances not owned by you could be allowed to bypass the service firewall (making authentication and authorization critical). Thankfully, the upcoming Network Security Perimeters feature will likely address this gap and make this box something of the past.

Trusted services bypass option

Benefit 3: Microsoft PaaS services that support outbound network controls use those controls to mitigate the risk of data exfiltration

While controlling inbound traffic for a PaaS is typically a Private Endpoint or service firewall (or eventually Network Security Perimeters) use case, controlling outbound traffic tends a bit a bit more tricky. For many compute-based services (AKS, App Services, Azure Container Services, etc) you are able to force outbound traffic through your virtual network allowing you to get visibility into the traffic and control what that service can make outbound network connections to.

With PaaS services like the ones used in this architecture, these types of virtual network integration aren’t an option. For most non-compute-based PaaS you are essentially SOL (I’ll let you figure out this acronym yourself). The services that fall under the Cognitive Services framework (such as Azure OpenAI Service and AI Services) support outbound traffic controls. You can check out my prior post for the details on those controls. In this architecture we use Azure OpenAI Services so we can take advantage of those outbound controls.

Restricting outbound access in Cognitive Services

Controlling outbound access from a PaaS will be another place Network Security Perimeters will become the predominant control mechanism.

Benefit 4: Authentication between each component uses Entra ID based authentication and Azure RBAC authorization

In this pattern Entra ID-based authentication and Azure RBAC authorization is used at each hop for human-to-service and service-to-service communication. Users interacting with these service will use their Entra ID user identities which are typically synchronized from an on-premises Windows Active Directory. Non-humans (applications and services) will use Entra ID service principals to authenticate to each other. This will either be a standard service principal, identified by a client id and client secret (for you AWS folks this is essentially your IAM User), or a special type of service principal called a managed identity (for those of you coming from AWS, this is as close to an IAM Role as Azure gets).

Azure RBAC roles are assigned with least privilege in mind. Users (or groups) are assigned the minimal permissions they need to upload data to the storage account and perform needed functions with the PaaS to load and query the data. Services are provided the necessary permissions they need to interact.

Benefit 5: Minimizes costs by choosing more affordable SKUs where possible

Costs are already pretty cheap with this pattern. This pattern minimizes costs further by sacrificing the Shared Private Access feature of AI Search. Yeah, you lose on the fuzzy feeling of the communication between AI Search and Azure Storage or Azure OpenAI Service happening over Private Link, but you save some money with the more basic SKU and still get the security of the Microsoft public backbone and the service firewalls.

Note that this design choice is made to optimize costs. Performance within the Basic SKU may not be sufficient for your use case.

Benefit 6: Captures logs where available

Finally, let’s look at logging. In this pattern you’ll get your management plane activities (actions on the resources) via Azure Activity Logs and you’ll get data plane (actions on the data held by the resources) activities via diagnostic settings delivering logs to a Log Analytics Workspace.

Each of these resources has a selection of logs available. Some are “ok” (Azure OpenAI Service) and some are “meh” (Azure AI Search). However, you will want all of these logs for both security and operational use.

The Considerations

There can’t only be benefits, right? The major considerations of this pattern is it’s very much built for proof-of-concept. You get basic network security controls with the service firewall, but no inspection of traffic unless you have an inspection point on-premises in front of the developer. Additionally, before communication from the developer gets to Azure it will have to traverse the public Internet before it gets to the Microsoft public backbone. While all of your communication will happen over TLS, you don’t get the security benefits of wrapping that encrypted session with an IPSec tunnel or funneling it over a known path and operational benefits of consistent latency with ExpressRoute.

Scalability of AI Search is another consideration. The Basic SKU will offer you a limited amount of scale.

On the LLM front, this pattern only allows you to deploy models available within an Azure OpenAI Service (or AI Services) instance (thanks to Jose for highlighting this consideration). There are options to adjust this pattern to use other LLMs, but it will require the introduction of AI Foundry which is quite the beast.

There are likely others I’m missing, but this is still a great little pattern to see what the LLMs can do that comes wrapped with decent security controls and requires minimal coding.

Loading Data

So you’ve decided that the benefits and considerations make sense to you and you want to move ahead, or maybe you’re just dipping your toes into this world and you want to muck around with things. Now you’re left wondering, “Ok I set this thing up like you documented above, how the heck do I use it?”

Alrighty, I’m going to show you the the quick and dirty way. Do not assume the way I’m going to show you is the only way to do this pattern. There are lots of variations, especially on how you chunk and load the data into AI Search. My advice to you in that department would be to work with the data folks at your organization or engage a Microsoft solutions architect on the optimal way to chunk and load your data. Do it wrong, and the responses from the LLMs will be crappy. After watching my buddy Jose and many of his peers, it’s very much an art form that requires experience and experimentation.

For the less experienced folks like myself, there is a built-in wizard within AI Search that helps to chunk and vectorize the data. If you open the Azure Portal you’ll see an option called Import and Vectorize as seen in the screenshot below.

The easy button

Clicking that option will open up the wizard (yes Microsoft still loves its wizards). On the first screen you’ll select the Azure Blob Storage option. On the next screen you’ll configure the options below. If you’ve set things up as I’ve outlined them in the initial pattern diagram (RBAC and network controls) this will work like a champ (don’t forget to deploy a chat model like gpt-4o and embedding model like text-embedding-3-large to the AOAI (Azure OpenAI Service) instance). I’m assuming you already created a container in the Azure Storage account and uploaded data (like some PDFs). I’ve found this useful when referencing and consuming RFCs to confirm my understanding.

Here you’re specifying that the AI Search instance grab the data you’ve uploaded to the blob container using its system-assigned managed identity.

Connect to your data

The next screen provides us with the options to vectorize (or create embeddings) for our data. We can then use AI Search to query both the text-based chunks and vectors to optimize the results we return to the LLM. Here I’m selecting to use an embedding model deployed to an Azure OpenAI instance. More advanced scenarios you may choose to incorporate other embeddings you’ve built yourself or sourced from the model marketplace and deployed to AI Foundry (thanks to Jose for mentioning this).

I also select to use the deployed text-embedding-3-large embedding model and am again using the AI Search managed identity to call the Azure OpenAI service to create the embeddings.

Vectorize your text

The data I’m using (10K financial reports) doesn’t have any images so I ignore the Vectorize and enrich your images option.

Finally, I opt to use the semantic ranker (great article on this) to improve the results of my queries to AI Search and leave the other options as the default since this is a one time operation. If you are doing this regularly, getting a good data pipeline in place (either push or pull) is mission critical (another learning from my buddy Jose). Someone smarter than me can help you with that.

Review the settings and opt to create the indexer. The full run will only take a few minutes if you don’t have a ton of content. For larger data volume, get yourself some coffee and work on something else while you wait. If you have any failures at this step, it will likely be you don’t have the networking controls setup correctly. Review the image I posted at the beginning of this post and get busy with the resource logs (it’s good experience!).

Indexer in progress

Once it’s complete, you’ll see a screen like this if you select the indexer that was created. It will will show you how many of the docs it pulled from the container and how many were successfully imaged.

Successful run. Yay!

Next you can navigate to the index and run a test search. Here you’ll get back the relevant records and you can muck around with direct searches against the index to get a feel for the structure of the chunked data. If you don’t get an responses it’s likely an RBAC or networking issue. For RBAC, ensure you granted yourself both management plane (Search Service Contributor) and data plane (Search Data Index Reader or Contributor).

Directly searching chunked data

Chatting with your data

Alright, your data has been pulled into AI Search. How do you go about extending this knowledge base to the LLM? There are a ton of ways to do it, but for something quick and dirty, I’m a fan of either writing some simple Python code or using the Chat Playground via your Azure OpenAI Services or AI Services instance. For this blog, I’m going to be lazy and focus on the latter.

For this you’ll want to navigate to the AOAI instance and select the “Explore Azure AI Foundry portal” link. No this isn’t actually AI Foundry and is instead the rebranded (and standardized) Azure OpenAI Playground incorporated into a Foundry-like interface.

Entering the Azure AI Foundry portal

Once entering the new portal you’ll be dropped into the Chat playground. Here you’ll want to use the Add your data link and then Add a data source link as seen below.

Importing index to Chat Playground

On the next screen I choose to add the index I created earlier during my data import also choosing to use vector-based searches to improve the quality of the search results returned to the LLM. This is where the embedding model I deployed earlier comes into play as seen in the image below.

Adding data source

On the next screen I opt to do a hybrid + semantic search to ensure I get the best results out of a typical keyword search, vector search, and semantic search. A default semantic search configuration was created for you when you imported the data into AI Search.

Data management screen

Lastly, I choose to use the system-assigned managed identity of the AOAI instances when calls are made from the AOAI instance to AI Search. This is where the Azure RBAC assignments I show in the original diagram come into play. Any missing permissions on the managed identity will pop up for you here during the validation stage.

Data Connection screen

After saving and closing I’m good to go! In the chat window I can ask a question such as “How many shares did Microsoft buy back in 2024?” The LLM optimizes my query for AI Search, creates vector-based embeddings of my question, performs the hybrid and semantic search against the AI Search instance, summarizes the results, and returns them to the Chat Playground.

Chat with your data process

Below you see the answer to my question with citations back to the original chunked data in AI Search. Cool shit right?

LLM results

If you’re just dipping your toes into this world or you’re an organization validating that the Azure platform’s AI Services can do what you need them to do before you invest heavily into the platform, this is a great pattern to mess around with. It’s super easy to get up and running, doesn’t require a deep understanding of Azure, and still provides foundational security controls that every organization should have in place. All this in a quick few hours of work.

In upcoming posts I’ll showcase some variations of this pattern such as the incorporation of Private Link and using CoPilot Studio as a frontend to build a quick and simple Teams bot using a small variation of this pattern (this was a really fun one Denis Rougeau, Aga Shirazi, Jose and I have been rolling out to a few customers. Super excited to talk more about that one!).

Until next time!

Deploying Resources Across Multiple Azure tenants

Hello fellow geeks! Today I’m going to take a break from my AI Foundry series and save your future self some time by walking you through a process I had to piece together from disparate links, outdated documentation, and experimentation. Despite what you hear, I’m a nice guy like that!

The Problem

Recently, I’ve been experimenting with AVNM (Azure Virtual Network Manager) IPAM (IP address management) solution which is currently in public preview. In the future I’ll do a blog series on the product, but today I’m going to focus on some of the processes I went through to get a POC (proof-of-concept) working with this feature across two tenants. The scenario was a management and managed tenant concept where the management tenant is the authority for the pools of IP addresses the managed tenant can draw upon for the virtual networks it creates.

Let’s first level set on terminology. When I say Azure tenant, what I’m really talking about is the Entra ID tenant the Microsoft Azure subscriptions are associated with. Every subscription in Azure can be associated with only one Entra ID tenant. Entra ID provides identity and authentication services to associated Azure subscriptions. Note that I excluded authorization, because Azure has its own authorization engine in Azure RBAC (role-based access control).

Relationship between Entra ID tenant and Azure resources

Without deep diving into AVNM, its IPAM feature uses the concepts of “pools” which are collections of IP CIDR blocks. Pools can have a parent and child relationship where one large pool can be carved into smaller pools. Virtual networks in the same regions as the pool can be associated with these pools (either before or after creation of the virtual network) to draw down upon the CIDR block associated with the range. You also have the option of creating an object called a Static CIDR which can be used to represent the consumption of IP space on-premises or another cloud. For virtual networks, as resources are provisioned into the virtual networks IPAM will report how many of the allocated IP addresses in a specific pool are being used. This allows you to track how much IP space you’ve consumed across your Azure estate.

AVNM IPAM Resources

My primary goal in this scenario was to create a virtual network in TenantB that would draw down on an AVNM address pool in TenantA. This way I could emulate a parent company managing the IP allocation and usage across its many child companies which could be spread across multiple Azure tenants. To this I needed to

  1. Create an AVNM instance in TenantA
  2. Setup the cross-tenant AVNM feature in both tenants.
  3. Create a multi-tenant service principal in TenantB.
  4. Create a stub service principal in TenantA representing the service principal in TenantB.
  5. Grant the stub service principal the IPAM Pool User Azure RBAC role.
  6. Create a new virtual network in TenantB and reference the IPAM pool in TenantA.

My architecture would similar to image below.

Multi-Tenant AVNM IPAM Architecture

With all that said, I’m now going to get into the purpose of this post which is focusing steps 3, 4, and 6.

Multi-Tenant Service Principals

Service principals are objects in Entra ID used to represent non-human identities. They are similar to an AWS IAM user but cannot be used for interactive login. The whole purpose is non-interactive login by a non-human. Yes, even the Azure Managed Identity you’ve been using is a service principal under the hood.

Unlike Entra ID users, service principals can’t be added to another tenant through the Entra B2B feature. To make a service principal available across multiple tenants you need to create what is referred to as a multi-tenant service principal. A multi-tenant service principal exist has an authoritative tenant (I’ll refer to this as the trusted tenant) where the service principal exists as an object with a credential. The service principal has an attribute named appid which is a unique GUID representing the app across all of Entra. Other tenants (I’ll refer to these as trusting tenants) can then create a stub service principal in their tenant by specifying this appid at creation. Entra ID will represent this stub service principal in the trusted tenant as an Enterprise Application within Entra.

Multi-Tenant Service Principal in Trusted Tenant

For my use case I wanted to have my multi-tenant service principal stored authoritatively TenantB (the managed tenant) because that is where I would be deploying my virtual network via Terraform. I had an existing service principal I was already using so I ran the command below to update the existing service principal to support multi-tenancy. The signInAudience attribute is what dictates whether a service principal is single-tenant (AzureADMyOrg) or multi-tenant (AzureADMultipleOrgs).

az login --tenant <TENANTB_ID>
az ad app update --id "d34d51b2-34b4-45d9-b6a8-XXXXXXXXXXXX" --set signInAudience=AzureADMultipleOrgs

Once my service principal was updated to a multi-tenant service principal I next had to provision it into TenantA (management tenant) using the command below.

az login --tenant <TENANTA_ID>
az ad sp create --id "d34d51b2-34b4-45d9-b6a8-XXXXXXXXXXXX"

The id parameter in each command is the appId property of the service principal. By creating a new service principal in TenantA with the same appId I am creating the stub service principal for my service principal in TenantB.

Many of the guides you’ll find online will tell you that you need to grant Admin Consent. I did not find this necessary. I’m fairly certain it’s not necessary because the service principal does not need any tenant-wide permissions and won’t be acting on behalf of any user. Instead, it will exercise its direct permissions against the ARM API (Azure Resource Manager) based on the Azure RBAC role assignments created for it.

Once these commands were run, the service principal appeared as an Enterprise Application in TenantA. From there I was able to log into TenantA and create an RBAC role assignment associating the IPAM Pool user role to the service principal.

Creating The New VNet in TenantB with Terraform… and Failing

At this point I was ready to create the new virtual network in TenantB with an address space allocated from an IPAM pool in TenantA. Like any sane human being writing Terraform code, my first stop was to the reference document for the AzureRm provider. Sadly my spirits were quickly crushed (as often happens with that provider) the provider module (4.21.1) for virtual networks does not yet support the ipamPoolPrefixAllocations property. I chatted with the product group and support for it will be coming soon.

When the AzureRm provider fails (as it feels like it often does with any new feature), my fallback was to AzApi provider. Given that the AzApi is a very light overlay on top of the ARM REST API, I was confident I’d be able to use it with the proper ARM REST API version to create my virtual network. I wrote my code and ran my terraform apply only to run into an error.

Forbidden({"error":{"code":"LinkedAuthorizationFailed","message":"The client has permission to perform action 'Microsoft.Network/networkManagers/ipamPools/associateResourcesToPool/action' on scope '/subscriptions/97515654-3331-440d-8cdf-XXXXXXXXXXXX/resourceGroups/rg-demo-avnm/providers/Microsoft.Network/virtualNetworks/vnettesting', however the current tenant '6c80de31-d5e4-4029-93e4-XXXXXXXXXXXX' is not authorized to access linked subscription '11487ac1-b0f2-4b3a-84fa-XXXXXXXXXXXX'."}})

When performing cross-tenant activities via the ARM API, the platform needs to authenticate the security principal to both Entra tenants. From a raw REST API call this can be accomplished by adding the x-ms-authorization-auxiliary header to the headers in the API call. In this header you include a bearer token for the second Entra ID tenant that you need to authenticate to.

Both the AzureRm and AzApi providers support this feature through the auxiliary_tenant_ids property of the provider. Passing that property will cause REST calls to be made to the Entra ID login points for each tenant to obtain an access token. The tenant specified in the auxiliary_tenant_ids has its bearer token passed in the API calls in the x-ms-authorization-auxiliary header. Well, that’s the way it’s supposed to work. However, after some Fiddler captured I noticed it was not happening with AzApi v2.1.0 and 2.2.0. After some Googling I turned up this Github repository issue where someone was reporting this as far back as February 2024. It was supposed resolved in v1.13.1, but I noticed a person posting just a few weeks ago that it was still broken. My testing also seemed to indicate it is still busted.

What to do now? My next thought was to use the AzureRm provider and pass an ARM template using the azurerm_resource_group_deployment module. I dug deep into the recesses of my brain to surface my ARM template skills and I whipped up a template. I typed in terraform apply and crossed my fingers. My Fiddler capture showed both access tokens being retrieved (YAY!) and being passed in the underlining API call, but sadly I was foiled again. I had forgotten that ARM templates to not support referencing resources outside the Entra ID tenant the deployment is being pushed to. Foiled again.

My only avenue left was a REST API call. For that I used the az rest command (greatest thing since sliced bread to hit ARM endpoints). Unlike PowerShell, the az CLI does not support any special option for auxiliary tenants. Instead, I need to run az login to each tenant and store the second tenant’s bearer token in a variable.

az login --service-principal --username "d34d51b2-34b4-45d9-b6a8-XXXXXXXXXXXX" --password "CLIENT_SECRET" --tenant "<TENANTB_ID>"

az login --service-principal --username "d34d51b2-34b4-45d9-b6a8-XXXXXXXXXXXX" --password "CLIENT_SECRET" --tenant "<TENANTA_ID>"

auxiliaryToken=$(az account get-access-token \
--resource=https://management.azure.com/ \
--tenant "<TENANTA_ID>" \
--query accessToken -o tsv)

Once I had my bearer tokens, the next step was to pass my REST API call.

az rest --method put \
--uri "https://management.azure.com/subscriptions/97515654-3331-440d-8cdf-XXXXXXXXXXXX/resourceGroups/rg-demo-avnm/providers/Microsoft.Network/virtualNetworks/vnettesting?api-version=2022-07-01" \
--headers "x-ms-authorization-auxiliary=Bearer ${auxiliaryToken}" \
--body '{
"location": "centralus",
"properties": {
"addressSpace": {
"ipamPoolPrefixAllocations": [
{
"numberOfIpAddresses": "100",
"pool": {
"id": "/subscriptions/11487ac1-b0f2-4b3a-84fa-XXXXXXXXXXXX/resourceGroups/rg-avnm-test/providers/Microsoft.Network/networkManagers/test/ipamPools/main"
}
}
]
}
}
}'

I received a 200 status code which meant my virtual network was created successfully. Sure enough the new virtual network in TenantB and in TenantA I saw the virtual network associated to the IPAM pool.

Summing It Up

Hopefully the content above saves someone from wasting far too much time trying to get cross tenant stuff to work in a non-interactive manner. While my end solution isn’t what I’d prefer to do, it was my only option due to the issues with the Terraform providers. Hopefully, the issue with the Az Api provider is remediated soon. For AVNM IPAM specifically, AzureRm providers will be here soon so the usage of Az Api will likely not be necessary.

What I hope you took out of this is a better understanding of how cross tenant actions like this work under the hood from an identity, authentication, and authorization perspective. You should also have a better understanding of what is happening (or not happening) under the hood of those Terraform providers we hold so dear.

TLDR;

When performing cross tenant deployments here is your general sequence of events:

  1. Create a multi-tenant service principal in Tenant A.
  2. Create a stub service principal in Tenant B.
  3. Grant the stub service principal in Tenant B the appropriate Azure RBAC permissions.
  4. Obtain an access token from both Tenant A and Tenant B.
  5. Package one of the access tokens in the x-ms-authorization-auxiliary header in your request and make your request. You can use the az rest command like I did above or use another tool. Key thing is to make sure you pass it in addition to the standard Authorization header.
  6. ???
  7. Profit!

Thanks for reading!