Experimenting with Azure B2C – Sign-in Policies

Hi everyone,

Today we continue to explore the Azure B2C feature set and spend time on sign-in policies. Up to this point we have been using PowerShell to emulate a native client application. Unfortunately B2C is still in public preview and Microsoft hasn’t implemented support for sign-in, edit profile, and password reset profiles for native apps. To work around this, we need to be a bit creative.

To continue testing out these features we’re going to use PowerShell to construct our URI. We’ll then start up Fiddler, enter the URI into Internet Explorer, and observe the behavior from there. Before we begin, ensure you’ve setup your application according to the instructions from my first B2C post.

We need to do a bit more setup now that we’re going to emulate a web application. Run through the following steps.

  1. Configure the application to support Web App / Web API
    Navigate to the Azure Management Portal and log in. Change your directory instance to the B2C directory you created by right clicking the person icon in the top right hand corner. Search for the B2C blade and hit the settings button. Navigate to the applications blade, select your application, and ensure that the Web App / Web API option is set to yes. Register a redirect URI of https://powershell. Refer to the image below.

    webapp.png

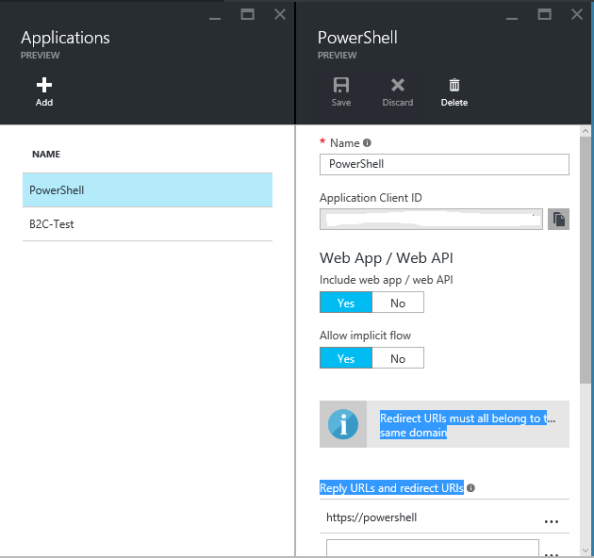
  2. Create a Sign-In Policy
    Next up we’ll create a sign-in policy. From within the settings section of the B2C blade, select the Sign-In policy blade and hit the Add button. Configure the following settings:

    1. Name: B2C_1_Signin
    2. Identity Providers: LinkedIn, Local Account Signin
    3. Application Claims: Select all claims
    4. Multifactor authentication: Off
    5. Page UI Customization: Default

    Save the policy.

Now that we’ve configured our application with a web app redirect URI and added our sign-in policy we can begin testing. Download the PowerShell script linked below. We will use this script to generate our authorization request.

B2C Signin Demo

Once you have downloaded the ZIP, pull out the PowerShell script and fill in the appropriate fields with your tenant’s information. Run the script and copy the resulting URI.

Open Fiddler and ensure it is set to capture HTTPS traffic. You can double-check by going to to the Tools drop down menu, selecting Fiddler Options, navigating to the HTTPS tab and ensuring that both the Capture HTTPS CONNECTs and Decrypt HTTPS traffic are checked. Check out the screenshot below.

Fiddler-Settings.png

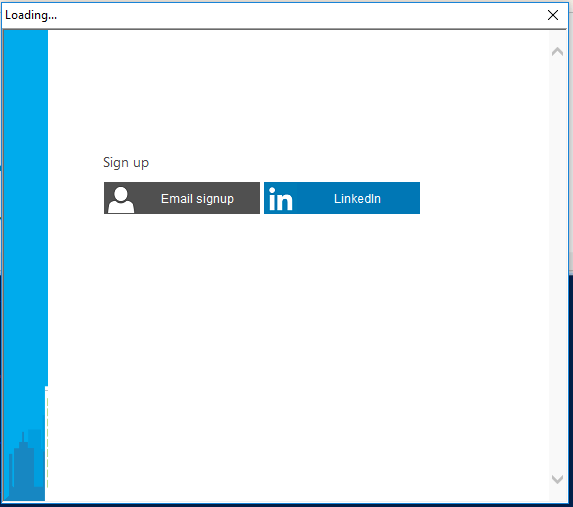
Now that Fiddler is capturing, open up your browser of choice and place the URI you generated from the script into the address bar. You browser will be redirected to Microsoft where you will need to choose your identity provider. For this example we will be choosing LinkedIn. You will be prompted to authenticate and give the application permissions to access your LinkedIn information.

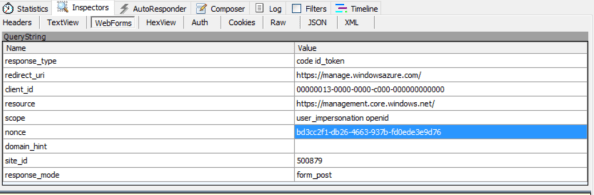
After you have authenticated to LinkedIn your browser will be redirected to Microsoft to pickup the identity token and authorization code, then redirected once again to the redirect URI we configured in our earlier steps. The redirect will timeout and fail, but we don’t need to be concerned about that. Stop Fiddler from capturing and let’s examine the results. You’ll want to select the last captured session as seen in the screenshot below.

FiddlerCapture.png

If we examine the XML in the page we received back from Microsoft, we see we received back both an id token and a code. Let’s tackle the code first. The code you receive back can be exchanged for a bearer access token from Microsoft. Right now that access token has limited purpose in that it can only be used within your application. You can’t use that token to access other resources like the Graph endpoint for the B2C directory. MS plans on adding more functionality to that token in the future.

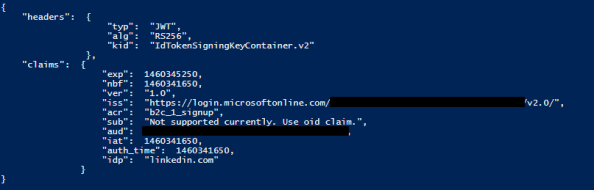
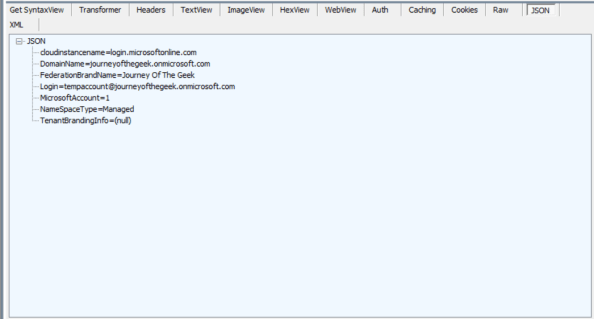
Back to the id token. Copy the id token line from Fiddler, remove the XML, and paste the remained into a JWT decoder. I’m partial to Calebb. The result is something similar to the screenshot below.

idtoken.png

Here we see again our IdP is LinkedIn and we receive some information from our LinkedIn profile including the job title and email address. Notice how we also received the values for the claims we had the user setup during sign-up. We could then take these claims and use them to customize the user’s experience to our application. Also notice the user’s OID, which we could be used to query for information about the user in the B2C Azure AD instance.

As you have seen through this example, the possibilities with B2C are many while the code to interact with it is simple enough for a non-developer to grasp and interact with. B2C represents an excellent way to demonstrate the power of modern identity standards and protocols like OAuth 2.0 and Open ID Connect 1.0 to your developer community.

In the next post we’ll play with both the edit profile and password reset portal. See you then!

Experimenting with Azure B2C – Signup Policies

Hi Everyone,

Before we do a deep dive into Azure Active Directory Connect, I want to spend some time on Microsoft’s Azure Business-To-Consumer (B2C) feature. Behind all the marketing hype, B2C is essentially an external security token service (on steroids) that is integrated with Azure Active Directory. In addition to the standard role of producing security tokens, the service provides self-service provisioning, self-service password reset, and profile editing. All of these features are packaged into an easy solution that can be integrated into native and web apps. If you’d like to learn more, please check out the Microsoft documentation. With the short intro out of the way, let’s start digging in.

So you aren’t a developer but you’d like to understand how these features work and what business problems they could solve for your customers or clients. In comes PowerShell. For those of us who have limited to no developer experience, PowerShell provides a means to experiment with these features. With a few simple lines of code, we can test out the self-provisioning feature of B2C.

In this scenario, we will be running a sign-up policy, emulating a native app, and using LinkedIn as our IdP. Follow the steps below to setup the sample application:

  1. Create a B2C Directory

    Our first step is to create a B2C directory in Microsoft Azure. This is done through the classic management portal within Azure. Go through the standard process of creating a directory instance and ensure you check the box This is a B2C directory.

  2. Register B2C at Linkedin

    Before Microsoft’s B2C feature can obtain information from LinkedIn, it must be registered. Applications can be registered with LinkedIn at https://www.linkedin.com/secure/developer. During the first portion of the registration you’ll be prompted to enter some information about the application name, description, and the like. Enter whatever you’d like, it’s not important.On the next screen, you’ll be given your client ID and client secret. This information should be treated the same way you treat any of your credentials. Don’t accidentally post it to the Internet like so many developers do. You also need to add an authorized redirect URL. This will be in the format of https://login.microsoftonline.com/te/<tenantID>/oauth2/authresp. See the screenshot below for an example.

    LinkedIn.png

  3. Add LinkedIn as an IdP in Azure

    Your next step will be to configure LinkedIn as an IdP within Microsoft Azure. This is done through the new management portal in Azure. After you login, you’ll want to change your directory instance by clicking the user icon in the top right hand corner of the screen and selecting your new B2C directory. From there, search for the B2C blade and hit the settings button (the gear icon).Select the Identity Providers node and click the Add button. Enter the name LinkedIn, select LinkedIn from Identity provider type, and from the Set up this identity provider enter the client ID and client secret obtained from LinkedIn. Hit the save button and move to the next step.

  4. Register your application with Azure B2C

    Now it is time to register our imaginary application with Azure B2C. From within the B2C settings blade, select the Applications node and click the add button. Enter a name for the application, ensure the Native client option is set to Yes and copy the redirect URI. Click the save button.After your application is registered, select it and copy the redirect URI and Application Client ID. You’ll need this information once we setup the script.

  5. Create a custom attribute

    Here we take an optional step to create a customer attribute. We do this because we’ll examine how the attribute is presented in the access token when we cover a SignIn policy at a later date. Developers may use custom attributes to gather additional information to make decisions within their application. For example, during provisioning, the developer may ask the user to select the industry in which they work in. This information could then be used to customize content within the application.To create the attribute select the User attributes node and follow the prompts. I created a custom attribute named Function that users are required to populate during provisioning.

  6. Create a Sign-Up Policy

    Now we will create our first sign-up policy. Select the Sign-Up policies node and hit the add button. Enter a policy name of B2C-1-Signup. Enter the following information for the settings listed below. Leave the rest at the defaults.

    • Identity Providers – LinkedIn, Email Signup
    • Sign-up attributes – Select all attributes

At this point we have registered our instance of B2C with LinkedIn, registered our application with B2C, and configured our signup policy. We’re almost ready to do some PowerShell scripting. Before we can get into the scripting, we need to download the beta ADAL .NET libraries from nuget.

You’ll want to download the nuget command line utility 3x. It’s a simple standalone executable we will use to download the appropriate the ADAL library from Nuget gallery. Once the command line utility is downloaded, open a Windows command prompt and run the command belong where destination is the directory you want to store the libraries.

nuget install Microsoft.Experimental.IdentityModel.Clients.ActiveDirectory -pre -OutputDirectory destination

We’re now ready to see just how simple and powerful the B2C features are. Download the ZIP file below and extract the PowerShell script. You’ll want to open the script up and fill the necessary variables per the instructions above.

B2C Signup Demo

A big thanks to Shriram over at MSFT for the portion of the script that decodes the JWTs returned after the sign-up policy is successfully processes. His full script is located here.

After filling in the appropriate variables per the instructions in the script, you’ll be good to go. Remember to modify the section where the ADAL libraries are loaded with the location you saved the libraries to. When the script is run the sign-up policy will initiate and the user will be prompted to select from either an email signup (creation of a managed Azure Active Directory account) or use their LinkedIn account. See the screenshot below:

SelectIdP.png

After the user opts to select their LinkedIn account, they will be prompted to log into LinkedIn and consent to B2C accessing portions of their profile information as seen in the screenshot below.

authorize.png

After the user authenticates to LinkedIn and consents, they will be prompted to fill in the information you configured as being required in the sign-up policy as seen in the screenshot below. Look closely and you’ll see some information has been pre-populated from information in my LinkedIn profile.

Attributes.png

After the user fills in the required information, an OAuth bearer access token will be returned to our application (in this case our PowerShell instance). The function written by Shriram will parse the token and return the claims in the JWT similar to the screenshot below.

JWT.png

Within the token we see that the IdP that created the token was LinkedIn. To round it out, open up your B2C Directory in the classic management portal and you’ll see a new user object has been provisioned for the user.

What you’ve seen here is a quick and dirty way to demo the B2C functionality. Over the next few days, we’ll explore the other features including sign-in and password reset. We’ll spend more time looking at the access tokens generated with those policies.

A few things to note:

  1. Be careful with what Application Claims you configure in your sign-up policies. If you configure claims that aren’t provided by the IdP, Microsoft throws a really cryptic error. I ended up having to debug the issue in Fiddler. The problem that pops up is the B2C feature will make a call to the B2C directory looking for the user object to pull the additional claims. Well, that user object doesn’t exist, so instead an error is thrown.
  2. The experimental ADAL .NET libraries are not currently documented anywhere that I could find in the MSDN website. Thankfully I came across a link at symbolsource.org which had a nice breakdown of each function and an explanation of the parameters. You can find that link here.Enjoy!

Behind the curtains: Microsoft Live Accounts versus Managed Azure Active Directory Accounts

Today I continue my series of blog posts where I take a look behind the curtains at the Microsoft “magic” behind Azure Active Directory. In the previous posts I broke down the authentication process with a Microsoft Live account and a managed Azure Active Directory account. In this post, we will take a look at the differences between the two processes.

Both processes start off with an OAuth authorization request initiated by Azure for an authorization code and an id token. The request does not differ between the two account types.

The processes continues with home realm discovery using the same query string. The results of the query give us the first differences between the process for a Microsoft Live and managed Azure Active Directory account.

Screen-Shot-2016-04-02-at-9.08.13-PM.png

Screen-Shot-2016-04-03-at-11.31.27-AM

Take a minute and look at the differences between the two responses in the screenshots above. These are key to why the managed Azure Active Directory authentication didn’t require a redirect to another entity like the Microsoft Live account did.

You’ll notice that the managed Azure Active Directory authentication is lacking the AuthURI and federation_protocol attributes. These two attributes are required for the Microsoft Live account because Azure Active Directory doesn’t have the necessary information to authenticate the Microsoft Live account and has had a trust established where it now trusts Microsoft Live to authenticate the user. After Microsoft Live authenticates the user, it delivers the user a security token containing claims about the user. Azure Active Directory trusts the security token because it has been digitally signed by Microsoft Live’s security token service. What does this mean? It means Microsoft Live has been federated with the security token service behind Microsoft Azure.

With a managed account, Azure Active Directory has the necessary information to authenticate the user. The additional redirect is not necessary.

Some other small but interesting differences are the lack of the ConsumerDomain attribute in the managed Azure AD flow and the different values present in the MicrosoftAccount and NameSpaceType attributes. We see that when we use a Microsoft Live account, the MicrosoftAccount has a value of 0. Now we understand what that attribute and value mean.

Let’s move on to the identity token. There are a number of claims present in the managed Azure AD identity token that are not present in the Microsoft Live identity token. The family_name, given_name, name, oid, and upn claims are pulled from the Azure AD instance and included within the token. The altsecid seems to be unique to Microsoft Live, but I will be curious to see if that claim appears when an alternate login ID is used with a non-managed Azure AD account. Additionally, the idp claim is lacking from the managed Azure AD token since Azure AD directly authenticated the user.

I’ve included a Visio below which outlines the two processes and how they differ. I hope this post helps and I will be back with some more deep dives and helpful tips for your Azure Active Directory needs.

Drawing2

Behind the curtains: Authentication to Azure with a Managed Azure Active Directory Account

Welcome back. Last post we took a look at how Microsoft handles the authentication of a Microsoft Live account to a Microsoft Azure resource. Today we are going to look at the authentication of an Azure Active Directory identity to a Microsoft Azure resource. We’ll follow it up with a post comparing the two authentications. From there, we’ll go into some more advanced scenarios such as synchronized Azure Active Directory identities, both federated and with password synchronization.

For this scenario we will be using an Azure Active Directory account with a username of tempaccount@journeyofthegeek.onmicrosoft.com that is not configured with MFA. The resource at Microsoft Azure we will be attempting to access is the Microsoft Azure Management Portal.

The first step is to navigate the browser to https://manage.windowsazure.com/ which will redirect us to https://login.microsoft.com with an OAuth 2.0 authorization request included in the header. Let’s take a closer look at the authorization request:

  • The response_type parameter is set to code id_token which is requesting the response from the authorization server contain an authorization code and id token for the user after the user authenticates. The id token will be an Open ID Connect 1.0 identity token that will be returned from Open ID Connect Provider.
  • The redirect_uri parameter is set to https://manage.windowsazure.com/ which indicates the endpoint the code and id token should be returned to.
  • The client_id parameter is set to 00000013-0000-0000-c000-000000000000. This is the unique value that will identify the client to the authorization server.
  • The resource parameter is set to https://management.core.windows.net/ . This is used by Microsoft Azure to determine what Azure API the access token will be used for.
  • The scope parameter is set to user_impersonation openid which indicates the client wishes to impersonate the user and be returned an Open ID Connect id token.
  • The nounce parameter is set to bd3cc2f1-db26-4663-937b-fd0ede3e9d76. It is a unique value used to help prevent replay attacks.
  • The site_id is set to 500879 is an identifier which will be used in later authentication and authorization calls.
  • The response_mode is set to form_post which instructs the browser to post back the response in form encoded format.

Screen-Shot-2016-04-03-at-11.23.37-AM (1)

We are then redirected to the home realm discovery URI at https://login.microsoft.com with some queries attached to the URI. Let’s break down the query strings:

  • The user parameter is set to tempaccount@journeyofthegeek.onmicrosoft.com which is the username of the account we are attempting to authenticate with.
  • The api-version is set to 2.1.
    · The stsRequest is set to rQIIAYWQsUvDQBSHvaYW6tIiKurUIZNwSS5pk7a4uFrQXZByyb3YILkLyZVC_4y6uQiOWYRO0qmzU1d1c1Bnp4KCJpYK4uBv-N7jveXjt6cQjbRV4zvEwvlYwFtuyxyWGobRdFrx-lr16qJ7Ot3CnfFNRdv_-KxeopUU1XpSRklb10PK6Rlog4AzMUjosB-D5olQv0VohtArQmlBdZnleaZPMHNNG9dt28Ity3GxzwxgYEGLOfZDoXJ80Jc9M4eIgyE8_bm8Fcq-iMNuJBI5UiqC5l8tpycYjJRNEQEPmCc4B09qAZPiHHiqqL9lQ-Ayc4x_rDUOUh8rpcw7FHyiqE2DgeGSBjYblpUJmwRT4tuYMMpspw7EbNh3yk4_gbgbhBHEieBUBoLXFgazIpoX0fVq1t7J7vyFHk076eNs4_l–31S_re6Lw2.
  • The checkForMicrosoftAccount is set to True. See my previous post on this parameter.

Screen-Shot-2016-04-03-at-12.26.03-PM.png

We are returned the results of the home realm discover in JSON format. Here is a breakdown:

  • The cloudinstancename attribute has a value of login.microsoftonline.com.
  • The DomainName attribute has a value of journeyofthegeek.onmicrosoft.com which is the domain associated to the Azure Active Directory instance in the Journey of the Geek tenant.
  • The FederationBrandName attribute has a value of Journey Of The Geek.
  • The Login attribute has a value of tempaccount@journeyofthegeek.onmicrosoft.com and is the username of the account that needs to authenticate.
  • The MicrosoftAccount has a value of 1.
  • The NameSpaceType has a value of managed.
  • The TenantBrandingInfo has a value of (null)

Screen-Shot-2016-04-03-at-11.31.27-AM (1).png

After home realm discovery our browser’s next step is another URI at Microsoft: https://login.microsoftonline.com/common/login. Here we provide our user name and password and authenticate via forms-based authentication. We are returned an authorization code and id token which are posted to a hidden form which is submitted to https://manage.windowsazure.com/
The browser then posts the authorization code and id token to a hidden form which is submitted to https://manage.windowsazure.com/.

Let’s take a closer look to the id token after translating it through an online JWT decoder.

{
typ: “JWT”,
alg: “RS256”,
x5t: “MnC_VZcATfM5pOYiJHMba9goEKY”,
kid: “MnC_VZcATfM5pOYiJHMba9goEKY”
}.
{
aud: “00000013-0000-0000-c000-000000000000”,
iss: “https://sts.windows.net/80b0dae2-f20b-4799-8f5b-3edea102c1b9/&#8221;,
iat: 1459696162,
nbf: 1459696162,
exp: 1459700062,
amr: [  “pwd” ],
c_hash: “4O-PWHH6DWDpynoLAfZONQ”,
family_name: “User”,
given_name: “Temp”,
ipaddr: *IP ADDRESS*,
name: “Temp User”
nonce: “bd3cc2f1-db26-4663-937b-fd0ede3e9d76”,
oid: “4079133e-7ead-4dd7-873c-f9474546b3fd”,
puid: “10033FFF971B6997”,
sub: “k5yesp1huTThDmvsK5D8bn-LPm4EecL3mofBXr20R_Q”,
tid: “80b0dae2-f20b-4799-8f5b-3edea102c1b9″,
unique_name:”TempAccount@journeyofthegeek.onmicrosoft.com”,
upn: “TempAccount@journeyofthegeek.onmicrosoft.com”,
ver: “1.0”
}.
[signature]

Here are the interesting claims:

  • The audience (aud) claim has a value of 00000013-0000-0000-c000-000000000000. This is the clientID of the application.
  • The issuer (iss) claim has a value of https://sts.windows.net/f8cdef31-a31e-4b4a-93e4-5f571e91255a/ which is the STS for the Journey Of The Geek tenant.
  • The authentication methods reference (arm) claim has a value of pwd which indicates the user authenticated with a password.
  • The family_name claim has a value of user which was configured in Azure Active Directory as the user’s last name when the account was setup.
  • The given_name claim has a value of Temp which was configured in Azure Active Directory as the user’s first name when the account was setup.
  • The name claim has a value of Temp User which was configured in Azure Active Directory as the user’s display name when the account was setup.
  • The unique_name claim shows TempAccount@journeyofthegeek.onmicrosoft.com.
  • The upn claim shows TempAccount@journeyofthegeek.onmicrosoft.com.

We are then directed to another URI at https://manage.windowsazure.com, for our Journey Of The Geek tenant. The redirect URI then redirects the browser to an error page at https://manage.windowsazure.com which notes the account is not associated with a Microsoft Azure subscription.

Let’s sum up what we learned:

  1. Azure Active Directory managed accounts authenticate to Azure Active Directory using forms-based authentication.
  2. The identity token for an Azure Active Directory managed account contains additional attributes not present in an identity token created for a Microsoft Live account.

In the next post we spend more time looking at the differences in this authentication in comparison to the authentication of the Microsoft Live account. Moving on from there, we’ll spend some time taking a deeper look at federated Azure Active Directory identities.