Azure AD Password Protection – Hybrid Deep Dive

Azure AD Password Protection – Hybrid Deep Dive

Welcome back fellow geeks.  Today I’m going to be looking at a brand new capability Microsoft announced entered public preview this week.  With the introduction of Hybrid Azure Active Directory Password Protection Microsoft continues to extend the protection it has based into its Identity-as-a-Service (IDaaS) offering Azure Active  Directory (AAD).

If you’ve administered Windows Active Directory (AD) in an environment with a high security posture, you’re very familiar with the challenges of ensuring the use of “good” passwords.  In the on-premises world we’ve typically used the classic Password Policies that come out of the box with AD which provide the bare minimum.  Some of you may even have leveraged third-party password filters to restrict the usage of commonly used passwords such as the classic “P@$$w0rd”.  While the third-party add-ins filled a gap they also introduce additional operational complexity (Ever tried to troubleshoot a misbehaving password filter?  Not fun) and compatibility issues.  Additionally the filters that block “bad” passwords tend to use a static data set or a data set that has to be manually updated and distributed.

In comes Microsoft’s Hybrid Azure Active Directory Password Protection to save the day.  Here we have a solution that comes directly from the vendor (no more third-party nightmares) that uses the power of telemetry and security data collected from Microsoft’s cloud to block the use of some of the most commonly used passwords (extending that even further with the use of fuzzy logic) as well as custom passwords you can provide to the service yourself.  In a refreshing turn of events, Microsoft has finally stepped back from the insanity (yes I’m sorry it’s insanity for most organizations) of requiring Internet access on your domain controllers.

After I finished reading the announcement this week I was immediately interested in taking a peek behind the curtains on how the solution worked.  Custom password filters have been around for a long time, so I’m not going to focus on that piece of the solution.  Instead I’m going to look more closely at two areas, deployment and operation of the solution.  Since I hate re-creating existing documentation (and let’s face it, I’m not going to do it nearly as well as those who do it for a living) I’ll be referencing back to Microsoft documentation heavily during this post so get your dual monitors powered up.

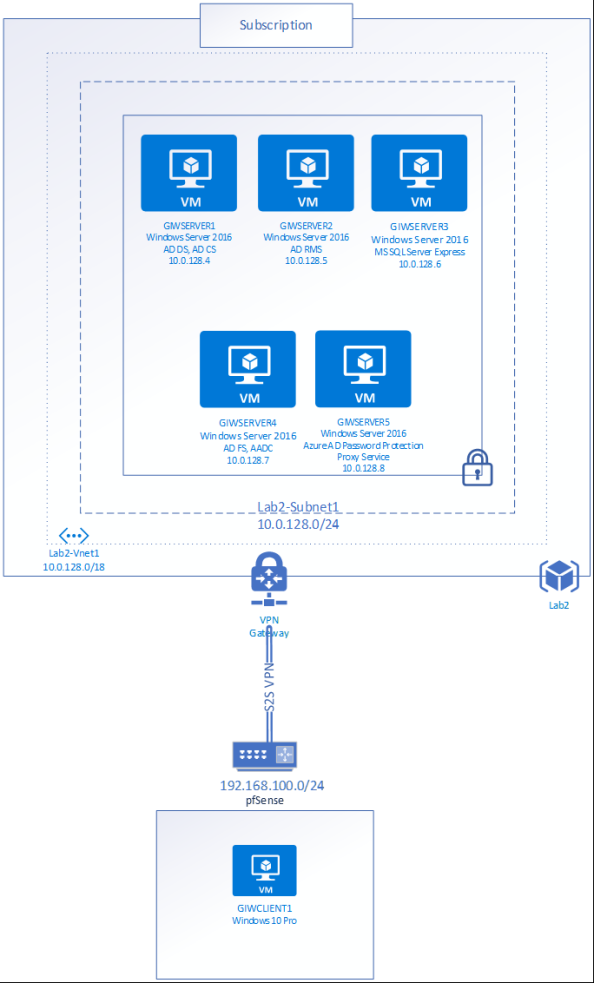
I’ll be using my Geek In The Weeds tenant for this demonstration.  The tenant is synchronized and federated with AAD with Azure Active Directory Connect (AADC) and Active Directory Federation Services (AD FS).  The tenant is equipped with some Office 365 E5 and Enterprise Mobility+Security E5 licenses.  Since I’ll need some Windows Servers for this, I’ll be using the lab seen in the diagram below.

1aadpp1.png

The first thing I needed to do was verify that my AAD tenant was configured for Azure Active Directory Password Protection.  For that I logged into the portal as a global administrator and selected the Azure Active Directory blade.  Scrolling down to the Security section of the menu shows an option named Authentication Methods.

1aadpp2.png

After selecting the option a new blade opens with only one menu item, Password Protection.  Since it’s the option there, it opens right up.  Here we can see the configuration options available for Azure Active Directory Password Protection and Smart Lockout.  Smart Lockout is at this time a feature specific to AAD so I’m not going to cover it.  You can read more about that feature in the Microsoft announcement.  The three options that we’re interested in for this post are within the Custom Banned Passwords and Password protection for Windows Server Active Directory.

1aadpp3.png

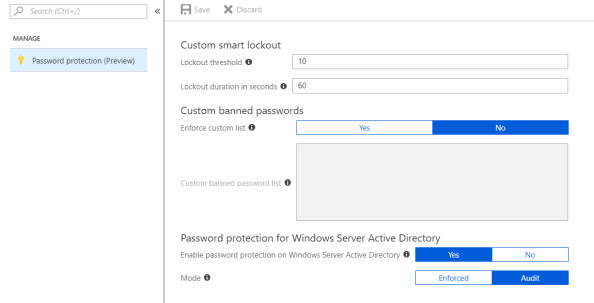
The custom banned passwords section allows organizations to add additional blocked passwords beyond the ones Microsoft provides.  This is helpful if organizations have a good grasp on their user’s behavior and have some common words they want to block to keep users from creating passwords using those words.  Right now it’s limited to 1000 words with one word per line.  You can copy and paste from a another document as long as what you paste is a single word per line.

I’d like to see Microsoft lift the cap of 1000 words as well as allowing for programmatic updating of this list.  I can see some real cool opportunities if this is combined with telemetry obtained from on-premises.  Let’s say the organization has some publicly facing endpoints that use a username and password for authentication.  That organization could capture the passwords used during password spray and brute force attacks, record the number of instances of their use, and add them to this list as the number of instances of those passwords reach certain thresholds.  Yes, I’m aware Microsoft is doing practically the same thing (but better) in Azure AD, but not everything within an organization uses Azure AD for authentication.  I’d like to see Microsoft allow for programmatic updates to this list to allow for such a use case.

Let’s enter two terms in the custom banned password list for this demonstration.  Let’s use geekintheweeds and journeyofthegeek.  We’ll do some testing later to see if the fuzzy matching capabilities extend to the custom banned list.

Next up we configuration options have Password protection for Windows Server Active Directory.  This is will be my focus.  Notice that the Enable password protection on Windows Server Active Directory option is set to Yes by default.  This option is going to control whether or not I can register the Azure AD Password Protection proxy service to Azure AD as you’ll see later in the post.  For now let’s set to that to No because it’s always interesting to see how things fail.

I’m going to leave Mode option at Audit for now.  This is Microsoft’s recommendation out of the gates.  It will give you time to get a handle on user behavior to determine how disruptive this will be to the user experience, give you an idea as to how big of a security issue this is for your organization, as well as giving you an idea as to the scope of communication and education you’ll need to do within your organization.

1aadpp4

There are two components we’ll need to install within on-premises infrastructure.  On the domain controllers we’ll be installing the Azure AD Password Protection DC Agent Service and the DC Agent Password Filter dynamic-link library (DLL).  On the member server we’ll be installing the Azure AD Password Protection Proxy Service.  The Microsoft documentation explains what these two services do at a high level.  In short, the DC Agent Password Filter functions like any other password filter and captures the clear text password as it is being changed.  It sends the password to the DC Agent Service which validates the password according to the locally cached copy of password policy that it has gotten from Azure AD.  The DC Agent Service also makes requests for new copies of the password policy by sending the request to the Proxy Service running on the member server which reaches out to Azure AD on the Agent Service’s behalf.  The new policies are stored in the SYSVOL folder so all domain controllers have access to them.  I sourced this diagram directly from Microsoft, so full credit goes to the product team for producing a wonderful visual representation of the process.

1aadpp5

The necessary installation files are sourced from the Microsoft Download Center.  After downloading the two files I distributed the DC Agent to my sole domain controller and the Proxy Service file to the member server.

Per Microsoft instructions we’ll be installing the Proxy Service first.  I’d recommend installing multiple instances of the Proxy Service in a production environment to provide for failover.  During the public preview stage you can deploy a maximum of two proxy agents.

The agent installation could be pushed by your favorite management tool if you so choose.  For the purposes of the blog I’ll be installing it manually.  Double-clicking the MSI file initiates the installation as seen below.

1aadpp6.png

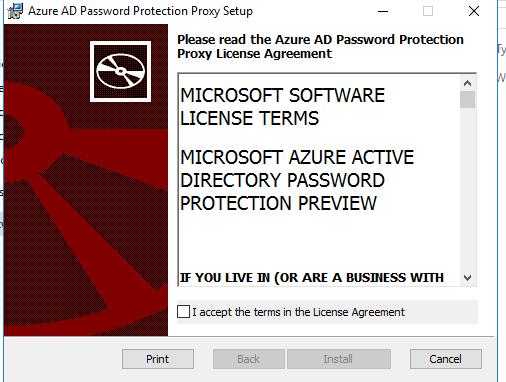
The installation takes under a minute and then we receive confirmation the installation was successful.

1aadpp7.png

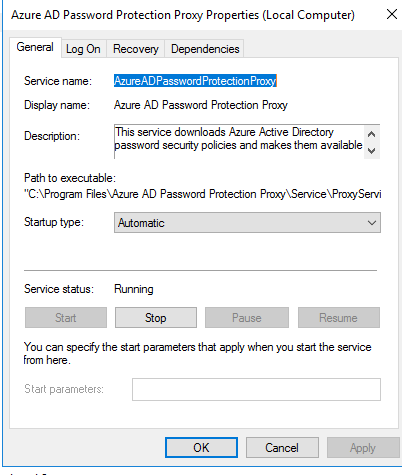
Opening up the Services Microsoft Management Console (MMC) shows the new service having been registered and that it is running. The service runs as Local System.

1aadpp8.png

Before I proceed further with the installation I’m going to startup Fiddler under the Local System security context using PSEXEC.  For that we open an elevated command prompt and run the command below.  The -s parameter opens the application under the LOCAL SYSTEM user context and the -i parameter makes the window interactive.

1aadpp9.png

Additionally we’ll setup another instance of Fiddler that will run under the user’s security context that will be performing the PowerShell cmdlets below.  When running multiple instances of Fiddler different ports needs to be used so agree to the default port suggested by Fiddler and proceed.

Now we need to configure the agent.  To do that we’ll use the PowerShell module that is installed when the proxy agent is installed.  We’ll use a cmdlet from the module to register the proxy with Azure Active Directory.  We’ll need a non-MFA enforced (public preview doesn’t support MFA-enforced global admins for registration) global admin account for this.  The account running the command also needs to be a domain administrator in the Active Directory domain (we’ll see why in a few minutes).

The cmdlet successfully runs.  This tells us the Enable password protection on Windows Server Active Directory option doesn’t prevent registration of the proxy service.   If we bounce back to the Fiddler capture we can see a few different web transactions.

1aadpp10

First we see a non-authenticated HTTP GET sent to https://enterpriseregistration.windows.net/geekintheweeds.com/discover?api-version=1.6.  For those of you familiar with device registration, this endpoint will be familiar.  The endpoint returns a JSON response with a variety of endpoint information.  The data we care about is seen in the screenshot below.  I’m not going to bother hiding any of it since it’s a publicly accessible endpoint.

1aadpp11.png

Breaking this down we can see a security principal identifier, a resource identifier indicating the device registration service, and a service endpoint which indicates the Azure Active Directory Password Protection service.  What this tells us is Microsoft is piggybacking off the existing Azure Active Directory Device Registration Service for onboarding of the proxy agents.

Next up an authenticated HTTP POST is made to https://enterpriseregistration.windows.net/aadpasswordpolicy/<tenantID>/proxy?api-version=1.0.  The bearer token for the global admin is used to authenticate to the endpoint.  Here we have the Proxy Service posting a certificate signing request (CSR) and providing its fully qualified domain name (FQDN).  The request for a CSR tells us the machine must have provisioned a new private/public key pair and once this transaction is complete we should have a signed certificate identifying the proxy.

1aadpp12

The endpoint responds with a JSON response.

1aadpp13.png

If we open up and base64 decode the value in the SignedProxyCertificateChain we see another signed JSON response. Decoding the response and dropping it into Visual Studio shows us three attributes of note, TenantID, CreationTime, and the CertificateChain.

1aadpp14.png

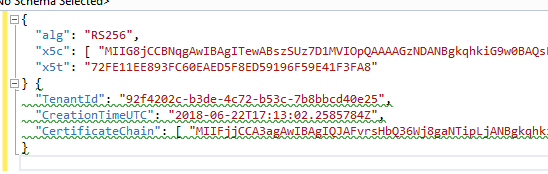
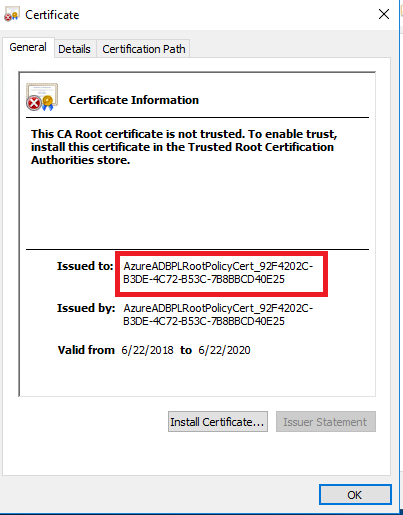
Dropping the value of the CertificateChain attribute into Notepad and saving it as a certificate yields the result below. Note the alphanumeric string after the AzureADBPLRootPolicyCert in the issued to section below.

1aadpp15.png

My first inclination after receiving the certificate was to look into the machine certificate stores. I did that and they were empty. After a few minutes of confusion I remembered the documentation stating the registration of the proxy is a onetime activity and that it was mentioned it requires domain admin in the forest root domain and a quick blurb about a service connection point (SCP) and that it needed to be done once for a forest. That was indication enough for me to pop open ADSIEDIT and check out the Configuration directory partition. Sure enough we see that a new container has been added to the CN=Services container named Azure AD Password Protection.

1aadpp16.png

Within the container there is a container named Forest Certs and a service connection point named Proxy Presence. At this point the Forest Certs container is empty and the object itself doesn’t have any interesting attributes set. The Proxy Presence service connection point equally doesn’t have any interesting attributes set beyond the keywords attribute which is set to an alphanumeric string of 636652933655882150_5EFEAA87-0B7C-44E9-B25C-4F665F2E0807. Notice the bolded part of the string has the same pattern as the what was in the certificate included in the CertificateChain attribute. I tried deleting the Azure AD Password Protection container and re-registering to see if these two strings would match, but they didn’t. So I’m not sure what the purpose of that string is yet, just that it probably has some relationship to the certificate referenced above.

The next step in the Proxy Service configuration process is to run the Register-AzureADPasswordProtectionForest cmdlet. This cmdlet again requires the Azure identity being used is a member of the global admins role and that the security principal running the cmdlet has membership in the domain administrators group. The cmdlet takes a few seconds to run and completes successfully.

Opening up Fiddler shows additional conversation with Azure AD.

1aadpp17.png

Session 12 is the same unauthenticated HTTP GET to the discovery endpoint that we saw above.  Session 13 is another authenticated HTTP POST using the global admin’s bearer token to same endpoint we saw after running the last cmdlet.  What differs is the information posted to the endpoint.  Here we see another CSR being posted as well as providing the DNS name, however the attributes are now named ForestCertificateCSR and ForestFQDN.

1aadpp18.png

The endpoint again returns a certificate chain but instead using the attribute SignedForestCertificateChain.

1aadpp19.png

The contents of the attribute look very similar to what we saw during the last cmdlet.

1aadpp20.png

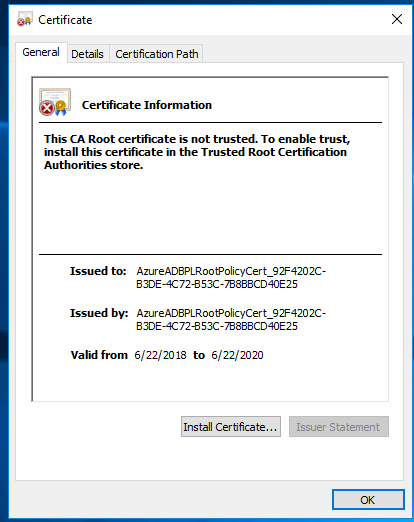
Grabbing the certificate out of the CertificateChain attribute, pasting it into Notepad, and saving as a certificate yields a similar certificate.

1aadpp21.png

Bouncing back to ADSIEDIT and refreshing the view I saw that the Proxy Presence SCP didn’t change.  We do see a new SCP was created under the Forest Certs container.  Opening up the SCP we have a keywords attribute of {DC7F004B-6D59-46BD-81D3-BFAC1AB75DDB}.  I’m not sure what the purpose of that is yet.  The other attribute we now have set is the msDS-Settings attribute.

1aadpp22.png

Editing the msDS-Settings attribute within the GUI shows that it has no values which obviously isn’t true.  A quick Google search on the attribute shows it’s up to the object to store what it wants in there.

1aadpp23.png

Because I’m nosey I wanted to see the entirety of the attribute so in comes PowerShell.  Using a simple Get-ADObject query I dumped the contents of the attribute to a text file.

1aadpp26.png

The result is a 21,000+ character string.  We’ll come back to that later.

At this point I was convinced there was something I was missing.  I started up WireShark, put a filter on to capture LDAP and LDAPS traffic and I restarted the proxy service.  LDAP traffic was there alright over port 389 but it was encrypted via Kerberos (Microsoft’s typical habit).  This meant a packet capture wouldn’t give me what I wanted so I needed to be a bit more creative.  To get around the encryption I needed to capture the LDAP queries on the domain controller as they were processed.  To do that I used a script. The script is quite simple in that it enables LDAP debug logging for a specific period of time with settings that capture every query made to the device.  It then parses the event log entries created in the Directory Services Event Log and creates a pipe-delimited file.

1aadpp25

The query highlighted in red is what caught my eye.  Here we can see the service for performing an LDAP query against Active Directory for any objects one level under the GIWSERVER5 computer object and requesting the properties of objectClass, msds-settings, and keywords attributes.  Let’s replicate that query in PowerShell and see what the results look like.

1aadpp26.png

The results, which are too lengthy to paste here are there the computer object has two service connection point objects.  Here is a screenshot from the Active Directory Users and Computers MMC that makes it a bit easier to see.

1aadpp27.png

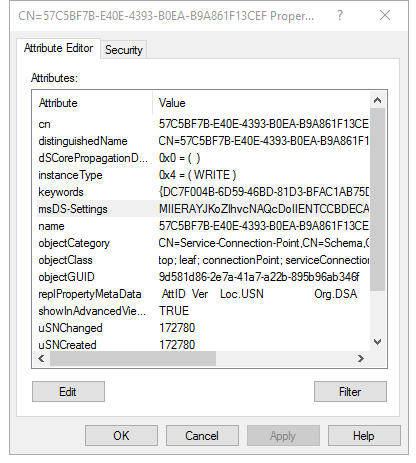
In the keywords attribute we have a value of {EBEFB703-6113-413D-9167-9F8DD4D24468};Domain=geekintheweeds.com.  Again, I’m not sure what the purpose of the keyword attribute value is.  The msDS-Settings value is again far too large to paste.  However, when I dump the value into the TextWizard in Fiddler and base64 decode it, and dump it into Visual Studio I have a pretty signed JSON web token.

1aadpp28.png

If we grab the value in the x509 Certificate (x5c) header and save it to a certificate, we see it’s the signed using the same certificate we received when we registered the proxy using the PowerShell cmdlets mentioned earlier.

1aadpp29.png

Based upon what I’ve found in the directory, at this point I’m fairly confident the private key for the public private key pair isn’t saved within the directory.  So my next step was to poke around the proxy agent installation directory of

C:\Program Files\Azure AD Password Protection Proxy\.  I went directly to the logs directory and saw the following logs.

1aadpp30.png

Opening up the most recent RegisterProxy log shows a line towards the bottom which was of interest. We can see that the encrypted proxy cert is saved to a folder on the computer running the proxy agent.

1aadpp31.png

Opening the \Data directory shows the following three ppfxe files. I’ve never come across a ppfxe file extension before so I didn’t have a way of even attempting to open it. A Google search on the file extension comes up with nothing. I can only some it is some type of modified PFX file.

1aadpp32.png

Did you notice the RegisterForest log file in the screenshot above? I was curious on that one so I popped it open. Here were the lines that caught my eye.

1aadpp33.png

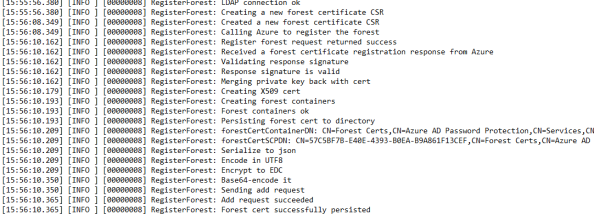
Here we can see the certificate requested during the Register-AzureADPasswordProtectForest cmdlet had the private key merged back into the certificate, then it was serialized to JSON, encoded in UTF8, encrypted, base64 encoded, and written to the directory to the msDS-Settings attribute.  That jives with what we observed earlier in that dumping that attribute and base-64 decoding it gave us nothing decipherable.

Let’s summarize what we’ve done and what we’ve learned at this point.

  • The Azure Active Directory Password Protection Proxy Service has been installed in GIWSERVER5.
  • The cmdlet Register-AzureADPasswordProtectionProxy was run successfully.
  • When the Register-AzureADPasswordProtectionProxy was run the following actions took place:
    • GIWSERVER5 created a new public/private keypair
    • Proxy service performs discovery against Azure AD to discover the Password Protection endpoints for the tenant
    • Proxy service opened a connection to the Password Protection endpoints for the tenant leveraging the capabilities of the Azure AD Device Registration Service and submits a CSR which includes the public key it generated
    • The endpoint generates a certificate using the public key the proxy service provided and returns this to the proxy service computer
    • The proxy service combines the private key with the public key certificate and saves it to the C:\Program Files\Azure AD Password Protection Proxy\Data directory as a PPFXE file type
    • The proxy service connects to Windows Active Directory domain controller over LDAP port 389 using Kerberos for encryption and creates the following containers and service connection points:
      • CN=Azure AD Password Protection,CN=Configuration,DC=XXX,DC=XXX
      • CN=Forest Certs,CN=Azure AD Password Protection,CN=Configuration,DC=XXX,DC=XXX
        • Writes keyword attribute
      • CN=Proxy Presence,CN=Azure AD Password Protection,CN=Configuration,DC=XXX,DC=XXX
      • CN=AzureADPasswordProtectionProxy,CN=GIWSERVER5,CN=Computers,DC=XXX,DC=XXX
        • Writes signed JSON Web Token to msDS-Settings attribute for
        • Writes keyword attribute (can’t figure out what this does yet)
  • The cmdlet Register-AzureADPasswordProtectionForest was run successfully
  • When the Register-AzureADPasswordProtectionForest was run the following actions took place:
    • GIWSERVER5 created a new public/private keypair
    • Proxy service performs discovery against Azure AD to discover the Password Protection endpoints for the tenant
    • Proxy service opened a connection to the Password Protection endpoints for the tenant leveraging the capabilities of the Azure AD Device Registration Service and submits a CSR which includes the public key it generated
    • The endpoint generates a certificate using the public key the proxy service provided and returns this to the proxy service computer
    • The proxy service combines the private key with the public key certificate and saves it to the C:\Program Files\Azure AD Password Protection Proxy\Data directory as a PPFXE file type
    • The proxy service connects to Windows Active Directory domain controller over LDAP port 389 using Kerberos for encryption and creates the following containers:
      • CN=<UNIQUE IDENTIFIER>,CN=Forest Certs,CN=Azure AD Password Protection,CN=Configuration,DC=XXX,DC=XXX
        • Writes to msDS-Settings the encoded and encrypted certificate it received back from Azure AD including the private key
        • Writes to keyword attribute (not sure on this one either)

Based upon observation and review of the logs the proxy service creates when registering, I’m fairly certain the private key and certificate provisioned during the Register-AzureADPasswordProtectionProxy cmdlet is used by the proxy to make queries to Azure AD for updates on the banned passwords list.  Instead of storing the private key and certificate in the machine’s certificate store like most applications do, it stores them in a PPFXE file format.  I’m going to assume there is some symmetric key stored someone on the machine that is used to unlock the use of that information, but I couldn’t determine it with Rohitab API Monitor or Sysinternal Procmon.

I’m going to theorize the private key and certificate provisioned during the Register-AzureADPasswordProtectionForest cmdlet is going to be used by the DC agents to communicate with the proxy service.  This would make sense because the private key and certificate are stored in the directory and it would make for easy access by the domain controllers.  In my next post I’ll do a deep dive into the DC agent so I’ll have a chance to get more evidence to determine if the theory holds.

On a side note, I attempted to capture the web traffic between the proxy service and Azure AD once the service was installed and registered.  Unfortunately the proxy service doesn’t honor the system proxy even when it’s configured in the global machine.config.  I confirmed that the public preview of the proxy service doesn’t support the usage of a web proxy.  Hopefully we’ll see that when it goes general availability.

Have a great week.

Exploring Azure AD Privileged Identity Management (PIM) – Part 4 – Access Review and Azure RBAC

Exploring Azure AD Privileged Identity Management (PIM) – Part 4 – Access Review and Azure RBAC

Access Reviews

Welcome to my final post on Azure Active Directory Privileged Identity Management (AAD PIM).  Over this series of posts I’ve provided an overview of the service, guidance on how to set the service up, and a deep dive and look at the user and approver experience.  We’ll wrap up the series by looking at the Access Review feature, take an intermission to look at a new feature, and wrap up with reviewing the Azure RBAC integration.

We have a lot to cover, so let’s jump into it.

As a quick refresher, I’ll be using my Journey Of the Geek tenant.  Within the tenant I have some Office 365 E5 and EMS E5 licenses provisioned.  Our admin user will be initiating the access review and Homer Simpson will acting as a reviewer.

I first log into the Azure Portal as the admin user and open up the AAD PIM shortcut from my dashboard.  Once the application opens, I’m going to navigate to the Azure AD directory roles option.

4aadpim1

After selecting the option my main menu is refreshed to show the management options for the various AAD PIM features.  As a quick refresher, let’s look at the settings I’ve configured for Access Reviews in my tenant.  We navigate to those Settings by clicking the Settings option as seen below and selecting Access Reviews.

4aadpim2

As you can see from the settings in the screenshot below, my tenant is set to send mail notifications to reviewers when a review is started and to admins when it finishes.  It’s also configured for reminders to be sent out to reviewers who haven’t yet completed their review.  I’ve configured reviewers to provider a reason as to why continued access to a privileged role needs to be maintained.  This is a great little option to capture the business requirements behind the access.  Finally, my access reviews are configured to run a total of 30 days.

4aadpim3

Let’s navigate back to the Access Review blade under the management menu.

4aadpim4

On the Access Reviews blade we see a listing of the access reviews in progress.  You can see I setup an access review for users that are members of the Global Admins role.  On the top we have the menu options to start a new access review, filter what access reviews are displayed, change the way they are grouped, and go back to the Access Review settings I showed earlier.

4aadpim5

et’s spin up a new access review for users who are permanent or eligible members of the User Administrators Azure AD role.  We click the Add link and a new blade opens where we can configure a number of options.  We have the basic options of naming the access review, providing a description, and a start and end date.

I’ve selected the User Administrator role as the role being reviewed during this access review.  Notice the Scope option with the Everyone radio button.  Perhaps that’s a placeholder for functionality that will be introduced in the future to limit the users within a role that the access review will cover.  I’ve selected Homer Simpson to be the reviewer for the role.  The advanced settings have inherited the global settings for my tenant for access reviews I covered previously.  Once the information is filled in, I hit the start button to kick off the access review.

4aadpim6

It takes a few minutes for the access review to be created and then it’s displayed in the listing of access reviews with a status of active.

4aadpim7

If we navigate over to Homer Simpson’s Outlook inbox, we see he has received an email informing him an access review has been kicked off and he has been designated as a reviewer and must approve or reject other members’ continued eligibility for the role.

4aadpim8

If we delay acting on the access review for a day we receive another reminder email per our settings.  The email can be seen below.

4aadpim9

If the approvers do not respond to the access review, the review completes but records that none of the users have been reviewed.

4aadpim10.png

Let’s spin up another review and complete this one.

4aadpim11

Homer Simpson again receives the notice that an Access Review has been kicked off.  Clicking the Start Review button in the email opens up the Azure Portal and the AAD PIM blade.  Here Homer gets an overview of the access review including the user who created the review, the length of the review, the description of the review, and the users who are members (permanent or eligible) for the role.

The filter option allows us to filter on the listing of users based upon whether they still need to be reviewed or have been approved or denied.

4aadpim12

We first check off Bart Simpson and see that we are required to input a reason for Bart’s approval or denial.  I input a reason and choose the deny button.  Bart disappears from the menu.  If I use the filter option to show all three categories of users, Bart now reappears under the denied category.

4aadpim13

I check off both Homer and Marge and provide a reason for both users and hit the approve button. All users have been reviewed by Homer Simpson. After refreshing the page the review now shows 0 users remaining to be reviewed.

4aadpim14

Switching over to the browser for the admin user we see that the access review is still open.

4aadpim15

If we open the access review we can see that all users have been reviewed even though the review is still active.  We have the option to Reset the access review to force the approvers to perform the access review activities again or we can stop it.  We’re going to choose end the access review early now that all the reviews have been completed.

4aadpim16

Re-opening the access review, we now have the option to apply the results of it.  After clicking he Apply button the changes are applied and we’re notified via the Portal notification system.

4aadpim17

Navigating to the roles blade under the Manage section now shows only Homer and Marge as being eligible for the User Administrator role verifying that the changes made during the access review have taken effect.

The access review feature is a wonderful addition by Microsoft.  Back in the olden days of Windows Active Directory, managing the entire lifecycle of an identity and its entitlements often involved complex third-party identity management solutions in combination with request management system.  By including this feature out of the gates, Microsoft is showing a real maturity in its identity offerings.

A Brief Intermission

Before I get into what AAD PIM can do for Azure RBAC, I want to touch on a new feature that went into public preview while I was working on this post.  Notice in the Manage section the Roles blade now has a (Preview) notation after it.

4aadpim18

Navigating into the blade shows an entirely new interface with far more useful information.  We now have a complete list of the roles AAD PIM can manage including descriptions.  If we select a role we go a level deeper and can add users to the role as we would expect.

4aadpim19

We also have two new menu options for Description and Definition.  The Description blade opens up and gives us a link to the Microsoft documentation on the role as well as every permissions the role has (AWESOME!).  The Definition blade gives us a JSON view of the role information.  Perhaps we’ll be able to create custom AAD / O365 roles in the future and we’ll be able to use these JSON views as ARM templates?  Time will tell.

4aadpim20

The introduction of this new feature is a great demonstration of how quickly things change in the cloud.

AAD PIM and Azure RBAC

Most organizations consuming Microsoft cloud services don’t just consume Office 365.  These organizations want to yield the benefits of the infrastructure-as-a-Service (IaaS) and platform-as-a-Service (PaaS) services provide by Microsoft’s Azure offering.  Managing authorization in Azure is handled through Azure Role-Based Access Control (RBAC).  In short, Azure RBAC provides a method of authorizing a security principal (user, group, or service principal) to perform an action on a resource (VM, storage account, Azure SQL, etc) based upon membership in a role.  Out of the box Microsoft provides a few roles such as owner, reader, and contributor.  You can also create custom roles to fit your business needs.


Similar to Office 365 prior to AAD PIM, preventing standing access of security principals in Azure RBAC roles was left to custom scripts and third-party solutions.  Last year it was announcedthat AAD PIM capabilities were being extended to Azure RBAC.  The integration of AAD PIM and Azure RBAC become generally available in the commercial offering of Azure AD in May of 2018.

For this demonstration I’m going to switch over to my Geek In The Weeds tenant.  Recall that the tenant is a synchronized and federated tenant using Azure AD Connect and Active Directory Federation Services.  I’ve already activated AAD PIM for the tenant so I’ll be jumping right into its integration with Azure RBAC.

After logging into the portal as a user who has permanent membership in the Privileged Role Administrator role I’m faced with the standard admin view of AAD PIM.  In the Manage menu I’m going to select the Azure resources option.

4aadpim21

If this is your first time using AAD PIM with Azure RBAC you’ll need to go through the discovery stage.  This will discover Azure Resources that you have write permissions to and thus have the ability to manage privileged access to.  After discovery is complete you’ll see a screen similar to the below.  You can see that my user is a member of the owners role for the Visual Studio Enterprise Azure subscription and that there are 77 roles defined for the subscription with three security principals holding one or more roles.

4aadpim22

Selecting the subscription resource gives us a dashboard displaying key metrics about PIM activity within the subscription.

4aadpim23.png

One of the metrics that caught my eye was the single user in the User Access Administrator role.  Selecting that area of the dashboard opens a new blade which lists out the members of the role.  We can see the service principal for PIM has been added to the User Access Administrator role to grant the service permissions to administer the roles within the resource (in this case a subscription).

4aadpim24

Notice also that the PIM menu for managing Azure AD/Office 365 differs for the menu for managing Azure RBAC.  We see that the new Role options I outlined above haven’t been migrated to the Azure RBAC integration yet.  Additionally we see that the request approval workflow is still in public preview in Azure RBAC.  In the Azure RBAC menu we also get a Resource Audit log which details PIM activity within the resource.

4aadpim25

Notice also that the general Settings option isn’t present in the Azure RBAC menu.  Instead we have a Role Settings option.  Selecting this option opens a new blade that lists out the Roles associated with the Resource.  Selecting any of the resources opens a new blade where we have the options of configuring a large selection of options for the role for both assignment (making the user eligible or a permanent member) as well as activation.  If you recall the configurable options for the Azure AD / Office 365 roles, these are far more granular.  The additional flexibility makes sense because these roles are going to managing IaaS and PaaS resources which are much more catered to programmatic access by non-humans.  The non-human access tends to be much more predictable than human access, so enforcing controls such as temporary eligibility for a role makes a lot of sense.

4aadpim26

Let’s take a look at what the experience is adding a user to one of the RBAC roles.  The process is very similar to AAD PIM with Azure AD / Office 365 in that we select the Roles option from the Manage section.  For this demonstration I’m going to add a user to the Virtual Machine Contributor role.

Clicking the Add Member option allows me to assign Ash Williams as an eligible member of the role.  Notice the additional option called Set membership settings.  Here I can set a timespan that Ash is eligible for the role.  This option isn’t available in AAD PIM for Azure AD / Office 365 that I could see.

4aadpim27

After hitting the add button Ash is successfully added as a Direct member to the role.  Notice that I can also add groups as members of the Role.  This is another capability unit to the Azure RBAC integration.

4aadpim28

Let’s go through the user experience for activating a role.  For the sake of simplicity I’m going to cover differences in the user experience.  You can reference my third post if you’re curious of the full user experience.

At this point I’ve logged into a virtual machine as Ash Williams and have authenticated to the Azure Portal.  I’ve entered the Azure resources blade.  Here we see the user being informed that no Azure resources are protected by PIM.  In this instance hitting the Discover resources permission will not update this menu because Ash Williams isn’t a member of any role that would grant him write permissions on an Azure Resource.  Instead I’m going to click the Activate Role button.

4aadpim29

After clicking the Activate role button I’m shown the roles Ash Williams is eligible to activate.  Notice Ash has the ability to activate the role due to both his direct membership and his membership in the GIW AIP Users group.  I’d recommend leveraging groups for this access where possible so you don’t get in the situation where you grant a security principal longer access to the role than you wanted due to a direct role assignment situation.

4aadpim30

he activation experience and approval experience is the same from this point forward so I’m going stop here.

Summing It Up

I really enjoyed this blog series.  I hadn’t done a deep dive into AAD PIM since it was in public preview and much has changed since then.  I really like how Microsoft is finally exposing capabilities which have historically been more Azure AD / Office 365 centric to Microsoft Azure.  It’s an excellent marketing tool for companies who may already be using Office 365 but are using another cloud provider for IaaS and PaaS. The product team has also done great job integrating much needed features such as approval workflows, access reviews, and metrics.

I’m not going to have the time to do a post about the AAD PIM PowerShell module but I recommend you check it out if you have some bandwidth.  There are some great opportunities there to integrate PIM functionality with third party workflow management tools to automate the entire user experience behind a GUI you users are already familiar with.

That wraps up my series on Azure AD Privileged Identity Management.  I hope you enjoyed it as much as I did.

See you next post!

Exploring Azure AD Privileged Identity Management (PIM) – Part 3 – Deep Dive

Exploring Azure AD Privileged Identity Management (PIM) – Part 3 – Deep Dive

Welcome back fellow geeks to my third post on my series covering Azure AD Privileged Identity Management (AAD PIM).  In my first post I provided an overview of the service and in my second post I covered the initial setup and configuration of PIM.  In this post we’re going to take a look at role activation and approval as well as looking behind the scenes to see if we can figure out makes the magic of AAD PIM work.

The lab I’ll be using consists of a non-domain joined Microsoft Windows 10 Professional version 1803 virtual machine (VM) running on Hyper V on my home lab.  The VM has a local user configured that is a member of the Administrators group.  I’ll be using Microsoft Edge and Google Chrome as my browsers and running Telerik’s Fiddler to capture the web conversation.  The users in this scenario will be sourced from the Journey Of The Geek tenant and one will be licensed with Office 365 E5 and EMS E5 and the other will be licensed with just EMS E5.  The tenant is not synchronized from an on-premises Windows Active Directory.  The user Homer Simpsons has been made eligible for the Security Administrators role.

With the intro squared away, let’s get to it.

First thing I will do is navigate to the Azure Portal and authenticate as Homer Simpson.  As expected, since the user is not Azure MFA enforced, he is allowed to authenticate to the Azure Portal with just a password.  Once I’m into the Azure Portal I need to go into AAD PIM which I do from the shortcut I added to the user’s dashboard.

3pim1.png

Navigating to the My roles section of the menu I can see that the user is eligible to for the Security Administrator Azure Active Directory (AAD) role.

3pim2

Selecting the Activate link opens up a new section where the user will complete the necessary steps to activate the role.  As you can see from my screenshot below, the Security Administrator role is one of the roles Microsoft considers high risk and enforces step-up authentication via Azure MFA.  Selecting the Verify your identity before proceeding link opens up another section that informs the user he or she needs to verify the identity with an MFA challenge.  If the user isn’t already configured for MFA, they will be setup for it at this stage.

3pim3.png

Homer Simpson is already configured for MFA so after the successful response to the MFA challenge the screen refreshes and the Activation button can now be clicked.

3pim4.png

After clicking the Activation button I enter a new section where I can configure a custom start time, configuration an activation duration (up to the maximum configured for the Role), provide ticketing information, and provide an activation reason..  As you can see I’ve adjusted the max duration for an activation from the default of one hour to three hours and have configured a requirement to provide a ticket number.  This could be mapped back to your internal incident or change management system.

3pim5.png

After filling in the required information I click the Activate button, the screen refreshes back to the main request screen, and I’m informed that activation for this role requires approval.  In addition to modifying the activation and requiring a ticket number, I also configured the role to require approval.

3pim6.png

At this point I opened an instance of Google Chrome and authenticated to Azure AD as a user who is in the privileged role administrator role.  Opening up AAD PIM with this user and navigating to the My roles section and looking at the Active roles shows the user is a permanent member of the Security Administrators, Global Administrators, and Privileged Role Administrators roles.

3pim7.png

I then navigate over to the Approve requests section.  Here I can see the pending request from Homer Simpson requesting activation of the Security Administrator role.  I’m also provided with the user’s reason and start and end time.  I’d like to see Microsoft add a column for the user’s ticket number.  My approving user may want to reference the ticket for more detail on why the user is requesting the role

3pim8.png

At this point I select the pending request and click the Approve button.  A new section opens where I need to provide the approval reason after which I hit the Approve button.

3pim9.png

After approving the blue synchronization-like image is refreshed to a green check box indicating the approval has been process and the user’s role is now active.

3pim10

If I navigate to My audit history section I can see the approval of Homer’s request has been logged as well as the reasoning I provided for my approval.

3pim11.png

If I bounce back to the Microsoft Edge browser instance that Homer Simpsons is logged into and navigate to the My requests and I can see that my activation has been approved and it’s now active.

3pim12.png

At this point I have requested the role and the role has been approved by a member of the Privileged Role Administrators role.  Let’s try modifying an AIP Policy.  Navigating back to Homer Simpsons dashboard I select the Azure Information Protection icon and receive the notification below.

3pim13.png

What happened?  Navigating to Homer Simpsons mailbox shows the email confirming the role has been activated.

3pim14.png

What gives?  To figure out the answer to that question, I’m going to check on the Fiddler capture I started before logging in as Homer Simpson.

In this capture I can see my browser sending my bearer token to various AIP endpoints and receiving a 401 return code with an error indicating the user isn’t a member of the Global Administrators or Security Administrators roles.

3pim15.png

I’ll export the bearer token, base64 decode it and stick it into Notepad. Let’s refresh the web page and try accessing AIP again. As we can see AIP opens without issues this time.

3pim16.png

At this point I dumped the bearer token from the failure and the bearer token from a success and compared the two as seen below.  The IAT, NBF, and EXP are simply speak to times specific to the claim.  I can’t find any documentation on the aio or uti claims.  If anyone has information on those two, I’d love to see it.

3pim17.png

I thought it would be interesting at this point to deactivate my access and see if I could still access AIP.  To deactivate a role the user simply accesses AAD PIM, goes to My Roles and looks the Active Roles section as seen below.

3pim18.png

After deactivation I went back to the dashboard and was still able to access AIP.  After refreshing the browser I was unable to access AIP.  Since I didn’t see any obvious cookies or access tokens being created or deleted.  My guess at this point is applications that use Azure AD or Office 365 Roles have some type of method of receiving data from AAD PIM.  A plausible scenario would be an application receives a bearer token, queries Azure AD to see if the user is in one a member of the relevant roles for the application.  Perhaps for eligible roles there is an additional piece of information indicating the timespan the user has the role activated and that time is checked against the time the bearer token was issued.  That would explain my experience above because the bearer token my browser sent to AIP was obtained prior to activating my role.  I verified this by comparing the bearer token issued from the delegation point at first login to the one sent to AIP after I tried accessing it after activation.  Only after a refresh did I obtain a new bearer token from the delegation endpoint.

Well folks that’s it for this blog entry.  If you happen to know the secret sauce behind how AAD PIM works and why it requires a refresh I’d love to hear it!  See you next post.