Azure Files and AD DS – Part 2

Azure Files and AD DS – Part 2

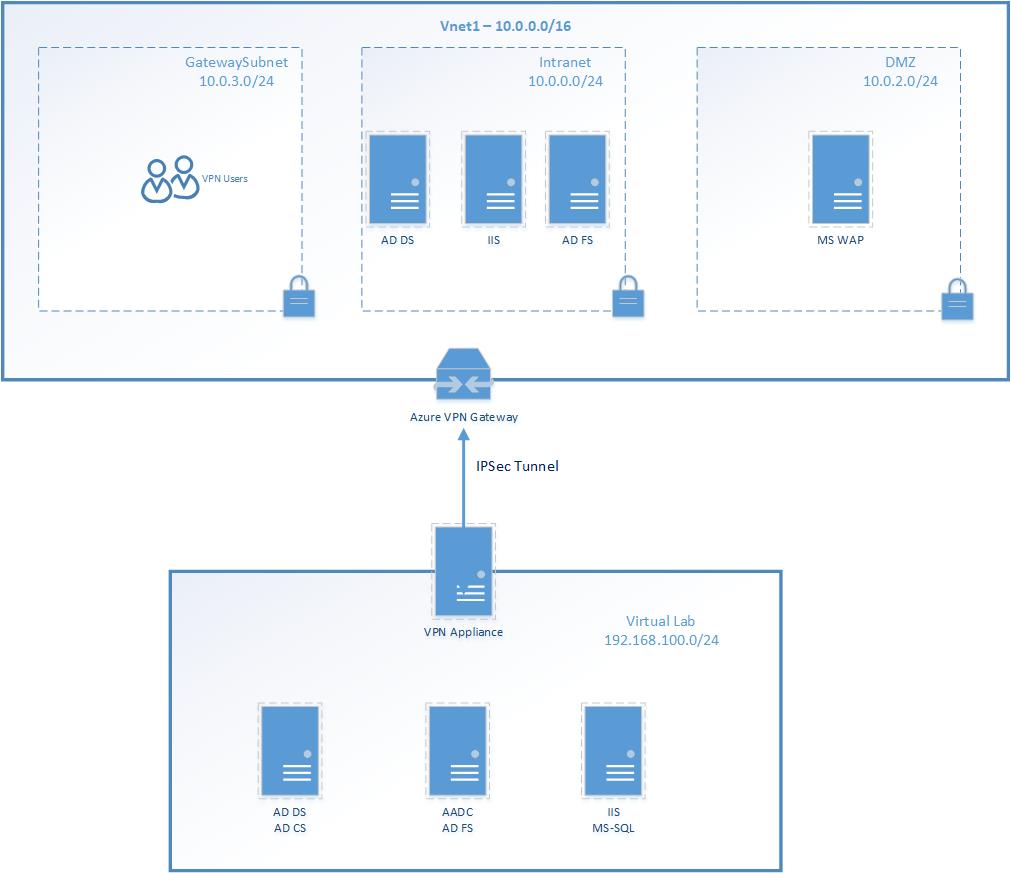
Hi there and welcome to the second post in my series about Azure Files integration with AD DS. In the first post I gave an overview of the service, the value proposition, its current limitations, and described the lab I’ll be using for this post. For this post I’ll be walking through the setup, examining some packet captures and Fiddler captures, and touching on a few of the gotchas I ran into.

Before I jump into the technical gooey goodness, I’m going to cover some prerequisites.

Prerequisites

One obvious factoid is you’ll need a Windows AD domain up and running and the machine you connect to the share from will need to be joined to that domain. One disclaimer to keep in mind is you have a multiple Windows AD forest scenario, such as an account and resource forest, you’ll need to be aware of which domain you’re integrating the Azure File share with. If you integrate it with a resource forest but have your user accounts in the account forest, you’ll need to use name suffix routing. I’m not going to go into the details of name suffix routing, but if you’re curious you can read through this article. The short of it is the service principal name associated with the computer or service account used to represent the Azure Storage account the file share is created on uses the domain of files.core.windows.net. When performing the Kerberos authentication, the domain controller in the account forest wouldn’t know how to to direct the request to the resource forest because that domain will not be associated with your resource forest. For this lab I created a Windows AD domain with the namespace jogcloud.local

You will also need to ensure that you are synchronizing the users and groups from your Windows AD domain you want to be able to access the Azure File share to Azure AD. The tenant you synchronize to must be the same tenant the Azure subscription containing the Azure Storage account is associated with. Don’t worry about why right now, I’ll cover that later. For this lab I’ll be using my jogcloud.com tenant.

Logical Layout

To store those wonderful files you’ll need an Azure Storage account. The storage account should be created in the same region (or closest region if on-premises) to the clients that will access the file share. This will ensure optimal performance and avoid cross region costs if your clients are in Azure. You can use either a storage account with the standard GPv2 (General Purpose v2) SKU or Premium FileStorage SKU if you need better performance and scale. For this lab I’ll be using the GPv2 SKU.

Lastly, networking requirements. Like all Azure PaaS offerings, Azure Storage is by default available over the public Internet. Since no sane human being wants to send SMB traffic over the public Internet, you have the option of using a private endpoint. For this lab I’ll be going the private endpoint route.

So prerequisites are now set, let’s jump into the setup.

Integrating Azure Storage account with Windows AD

The first step in the process to get this integration working is to get the Azure Storage account you’ll be using setup with an identity in Windows AD. A kind human being over at Microsoft wrote a wonderful Azure PowerShell module that makes what I’m about to do a hundred times easier and is the recommended way to go about this. I’m not going to use it for this demonstration because I want to walk through each of the steps in the process to better your understanding of the magic within the module.

Before you run any commands you’ll need to ensure you have the PowerShell modules below installed. You can validate this by running Get-Module -ListAvailable to display the PowerShell modules installed on the machine.

Now we need to create the security principal that is going to represent the Azure Storage account in Windows AD. You have the option of either using a traditional service account (user account) or a computer account. As of August 28th 2020, there are some limitations you’ll run into if you use a service account over a computer account. My recommendation is use a computer account for now. I’ll cover the limitation later on in this entry. For the purposes of this blog post, I’ll be using a service account.

One important thing to note here is you need to treat this just like you would a traditional service account. By this I mean you will want to create the account with a non-expiring password and put in appropriate controls to perform a controlled rotation of the credential to avoid service disruption.

Here I’ve created a service account with the name azurestorage and have set it with a non-expiring password.

Service account for Azure Storage account

Next up I’m going create a SPN (service principal name) for the service account. The SPN is going to identify the Azure Storage account to Windows AD and instruct the user’s system which service it needs to obtain a Kerberos ticket for. The SPN is going to use the CIFS service class and include the FQDN of the Azure Files endpoint on your storage account. It will look like cifs/stjogfileshare.file.core.windows.net. You can register the SPN using the setspn -S <SPN> <ACCOUNT_NAME>. The -S switch will validate there the SPN is not already registered to another security principal in the domain.

Setting the SPN

So you have a service account and an SPN. Now you need to create a credential in Azure Storage and associate that credential with the service account. To create that credential you’ll need to hop over to PowerShell and connect to Azure. Once connected you’ll use the New-AzStorageAccountKey and Get-AzStorageAccountKey cmdlets to create and retrieve the storage account key used for the integration. It’s important to note that this key (named kerb1 or kerb2) is only used to setup this integration and can’t be used for any control or data plane operations against the storage account.

Configure the service account with this key as its password.

Creating the account key

The last piece in this step of the process is to enable the AD DS feature support for the storage account. To do this you’ll use the Set-AzStorageAccount cmdlet using the syntax below.

Set-AzStorageAccount syntax

All of the inputs between Name and ActiveDirectoryAzureStorageSid can be obtained by using the Get-ADDomain cmdlet as seen below.

Get-ADDomain Output

The ActiveDirectoryAzureStorageSid parameter can be obtain by using the Get-ADUser cmdlet as seen below.

Get-ADUser Output

Once you have the inputs, you’ll plug them in Set-AzStorageAccount cmdlet. If successful you’ll get a return similar to below.

Set-AzStorageAccount Output

If you’d like you can confirm the feature is enabled you can do that with the steps documented here. The AzFilesHybrid module I mentioned earlier also has some great debugging tools as outlined here.

Now that the integration is complete, I need to create a file share and configure authorization at the management plane. There are two separate layers of authorization occurring, one for access to the file share itself and the other for access to the files and folders within the file share. Access to the share itself is controlled by Azure RBAC and thus controlled by the Azure management plane. There are three roles built in roles provided that should service most use cases and these are:

  1. Storage File Data SMB Share Read which allows read access to the file share over SMB
  2. Storage File Data SMB Share Contributor which allows read, write, and delete access over the file share over SMB
  3. Storage File Data SMB Share Elevated Contributor which allows read, write, delete, and modify of Windows ACLs of the file share over SMB

You are free to design your own custom roles, but those three built in roles are pretty much spot on as to what you’d see in your typical Windows File share-level permissions.

The second layer of authorization is controlled by the Windows ACLs (access control lists) associated with the share, files, and folders. These are your classic Windows ACLs you know and love and will be enforced by the Windows OS.

Just like on a traditional Windows file share, the most restrictive of controls will apply. This means if you’ve only been granted the Storage File Data SMB Share Read role, it won’t matter if you have full permissions in the Windows ACLs, you will only be able to read and will not be able to write.

Let me demonstrate this.

Here I have assigned the Bob Gray user the Storage File Data SMB Share Reader role on the stjogfileshare storage account. Bob Gray is Domain administrator on the jogcloud.local Windows AD domain and is a local administrator on the member server.

Role Assignment on Storage Account

As seen below I’m able to successfully map the shared folder, but I’m unable to create folder on it because the management plane is restricting my access.

Unable to created a folder when holding Read RBAC role

Running the klist command on the machine shows I successfully obtained a Kerberos ticket for file share.

klist Output

The packet capture I ran when I mapped the share shows in the SMB conversation that the client and server are using the negotiate protocol (which includes the Kerberos protocol).

Session Negotiation

After the Kerberos ticket is obtained from the domain controller the client sets up the session with the storage account.

Session Setup

From this point forward, the encryption capabilities of SMB 3 are used to encrypt the session between the client and Azure storage account.

Remember the limitation around using a service account as the security principal representing Azure Files I mentioned earlier? Well that limitation is around the encryption algorithm used to encrypt the Kerberos tickets passed to Azure Files. Out of the gates, the Azure Files with AD DS feature only supported the RC4-HMAC encryption algorithm. This is a deprecated algorithm according to the IETF (Internet Engineering Task Force) and should not be used. Many organizations in regulated environments have disabled this encryption algorithm in Active Directory due to its deprecation.

As of August 28th, 2020, the integration now supports AES256 encryption for Kerberos. However, this is only supported if you’re using a Computer account. This means that if you are already using the service with a service account and you want to move to AES256, you’ll need to migrate to using a Computer account. I expect support for a service account will be added sometime in the future, so check the official documentation for updates.

If you try to use a service account and attempt to enforce the use of AES256, your connection will fail. If you do a packet capture you’ll see the Azure Storage account throw a KRB Error: KRB5RB_AP_ERR_MODIFIED indicating the Azure Storage account was unable to validate the ticket that was passed because it doesn’t support the encryption algorithm used to secure it.

I went through and created a group in Windows AD named engineering and added Bob Gray to it. I then removed the Storage File Data SMB Share Read role assignment for Bob Gray and created a role assignment for the engineering group for the Storage File Data SMB Share Contributor role. I’m now able to create files and folders on the share as seen below.

Creating folder on share

Bringing up the permissions on the folders you’ll observe that that are a few default permissions which come out of the box. You can modify these default permission if you’d like (for example by removing Authenticated Users Read/Modify which is overly permissive). You do this by mounting the share as a super user using the standard storage keys. The process is outlined here.

Default permissions

That is pretty much all there is to it to the technical configuration.

So when you use this service what are some of the best practices that I would recommend?

  1. Use a computer account if you require an encryption algorithm better than RC-HMAC. At this time, computer accounts are the only type of security principal which supports AES256 encryption.
  2. Ensure you rotate the password at whatever interval aligns with your organizational security policy and any laws and regulations you may be subject to.
  3. When you create your Azure RBAC role assignments, use synchronized groups vs synchronized users. You do this for the same reason you would on-premises, granting access per user is not scalable.
  4. Dedicate the storage account you use for the file share to only file shares. Storage accounts have fixed limits that are shared across blobs, queues, tables, and files. You don’t want to get into a situation where you have to share those limits.
  5. Do your research to determine if Premium FileStorage makes more sense than GPv2. It’s more costly but provides better performance and scale.
  6. Try to deploy one file share per storage account if possible to ensure you get the maximum IOPS available for that file share. You can certainly put multiple file shares in the same storage account, but they will share the total IOPS available for the storage account.
  7. Ensure you are replicating files to another storage account. Unlike blobs, you can’t read from the second region if you’re using a RA-GRS storage account. If you’re using the Premium Files SKU, the storage account will only support LRS and ZRS which makes this replication to a storage account in another region so important. You could use AzCopy, PowerShell, or Azure Data Factory.

That’s it folks! Hope this post helped you understand feature that much better.

Thanks and see you next post!

Deep dive into AD FS and MS WAP – Overview

Hi everyone,

If you’ve followed my blog at all, you will notice I spend a fair amount of my time writing about the products and technologies powering the integration of on-premises and cloud solutions.  The industry refers to that integration using a variety of buzzwords from hybrid cloud to software defined data center/storage/networking/etc.  I prefer a more simple definition of legacy solutions versus modern solutions.

So what do I mean by a modern solution?  I’m speaking of solutions with the following most if not all of these characteristics:

  • Customer maintains only the layers of the technology that directly present business value
  • Short time to market for new features and features are introduced in a “toggle on and toggle off” manner
  • Supports modern authentication, authorization, and identity management standards and specifications such as Open ID Connect, OAuth, SAML, and SCIM
  • On-demand scaling
  • Provides a robust web-based API
  • Customer data can exist on-premises or off-premises

Since I love the identity realm, I’m going to focus on the bullet regarding modern authentication, authorization, and identity management.  For this series of posts I’m going to look at how Microsoft’s Active Directory Federation Service (AD FS)  and Microsoft’s Web Application Proxy (WAP) can be used to help facilitate the use of modern authentication and authorization.

So where does AD FS and the WAP come in?  AD FS provides us with a security token service producing the logical security tokens used in SAML, OAuth, and Open ID Connect.  Why do we care about the MS WAP?  The WAP acts a reverse proxy giving us the ability to securely expose AD FS to untrusted networks (like the Internet) so that devices outside our traditional firewalled security boundary can leverage our modern authentication and authorization solution.

Some real life business cases that can be solved with this solution are:

  1. Single sign-on (SSO) experience to a SaaS application such as SharePoint online from both an Active Directory domain-joined endpoint or a non-domain joined endpoint such as a mobile phone.
  2. Limit the number of passwords a user needs to remember to access both internal and cloud applications.
  3. Provide authentication or authorization for modernized internal applications for endpoints outside the traditional firewalled security boundary.
  4. Authentication and authorization of devices prior to accessing an internal or cloud application.

As we can see from the above, there are some great benefits around SSO, limiting user credentials to improve security and user experience, and taking our authorization to the next step by doing contextual-based authorization (device information, user location, etc) versus relying upon just Active Directory group.

Microsoft does a relatively decent job describing how to design and implement your AD FS and WAP rollout, so I’m not going to cover much of that in this series.  Instead I’m going to focus on the “behind the scenes” conversations that occur with endpoints, WAP, AD FS, AD DS, and Azure AD. Before I begin delving into the weeds of the product, I’m going to spend this post giving an overview of what my lab looks like.

I recently put together a more permanent lab consisting of a mixture of on-premise VMs running on HyperV and Azure resources.  I manage to stay well within my $150.00 MSDN balance by keeping a majority of the VMs deallocated.   The layout of the lab is diagramed below.

HomeLab


On-premises I am running a small collection of Windows Server 2016 machines within HyperV running on top of Windows Server 2016.  I’m using a standard setup of an AD DS, AD CS, AADC, AD FS, and IIS/MS SQL server.  Running in Azure I have a single VNet with three subnets each separated by a network security group.  My core infrastructure of an AD DS, IIS/MS SQL, and AD FS server exist in my Intranet subnet with my DMZ subnet containing a single WAP.

The Active Directory configuration consists of a single Active Directory forest with an FQDN of journeyofthegeek.local.  The domain has been configured with an explicit UPN of journeyofthegeek.com which is assigned as the UPN suffix for all users synchronized to Azure Active Directory.  The domain is running in Windows Server 2016 domain and forest functional level.  The on-premises domain controller holds all FSMO roles and acts as the DC for the Active Directory site representing the on-premises physical location.  The domain controller in Azure acts as the sole DC for the Active Directory site representing Azure.  Both DCs host the split-brain DNS zone for journeyofthegeek.com.

The on-premises domain controller also runs Active Directory Certificate Services.  The CA is an enterprise CA that is used to distribute certificates to security principals in the environment.  I’ve removed the CDP from the certificate templates issued by the CA to eliminate complications with the CRL revocation checking.

The AD FS servers are members of an AD FS farm named sts.journeyofthegeek.com and use a MS SQL Server 2016 backend for storage of configuration information.  The SQL Server on-premises hosts the SQL instance that the AD FS users are using to store configuration information.

Azure Active Directory Connect is co-located on the AD FS server and uses the same SQL server as the AD FS uses.  It has been integrated with a lab Azure Active Directory tenant I use which has a few licenses of Office 365 Business Essentials.  The objectGUID attribute is used as the immutable ID and the Azure Active Directory tenant has the DNS namespaces of journeyofthegeek.onmicrosoft.com and journeyofthegeek.com associated with it.

The IIS server running in Azure runs a simple .NET application (https://blogs.technet.microsoft.com/tangent_thoughts/2015/02/20/install-and-configure-a-simple-net-4-5-sample-federated-application-samapp/) that is used for claims-based authentication.  I’ll be using that application for demonstrations with the Web Application Proxy and have used it in the past to demonstrate functionality of the Azure Application Proxy.

For the demonstrations throughout these series I’ll be using the following tools:

In my next post I’ll do a deep dive into what happens behind the scenes during the registration of the Web Application Proxy with an AD FS farm.  See you then!


Azure AD Pass-through Authentication – How does it work? Part 2

Welcome back. Today I will be wrapping up my deep dive into Azure AD Pass-through authentication. If you haven’t already, take a read through part 1 for a background into the feature. Now let’s get to the good stuff.

I used a variety of tools to dig into the feature. Many of you will be familiar with the Sysinternals tools, WireShark, and Fiddler. The Rohitab API Monitor. This tool is extremely fun if you enjoy digging into the weeds of the libraries a process uses, the methods it calls, and the inputs and outputs. It’s a bit buggy, but check it out and give it a go.

As per usual, I built up a small lab in Azure with two Windows Server 2016 servers, one running AD DS and one running Azure AD Connect. When I installed Azure AD Connect I configured it to use pass-through authentication and to not synchronize the password. The selection of this option will the MS Azure Active Directory Application Proxy. A client certificate will also be issued to the server and is stored in the Computer Certificate store.

In order to capture the conversations and the API calls from the MS Azure Active Directory Application Proxy (ApplicationProxyConnectorService.exe) I set the service to run as SYSTEM. I then used PSEXEC to start both Fiddler and the API Monitor as SYSTEM as well. Keep in mind there is mutual authentication occurring during some of these steps between the ApplicationProxyConnectorService.exe and Azure, so the public-key client certificate will need to be copied to the following directories:

  • C:WindowsSysWOW64configsystemprofileDocumentsFiddler2
  • C:WindowsSystem32configsystemprofileDocumentsFiddler2

So with the basics of the configuration outlined, let’s cover what happens when the ApplicationProxyConnectorService.exe process is started.

  1. Using WireShark I observed the following DNS queries looking for an IP in order to connect to an endpoint for the bootstrap process of the MS AAD Application Proxy.DNS Query for TENANT ID.bootstrap.msappproxy.net
    DNS Response with CNAME of cwap-nam1-runtime.msappproxy.net
    DNS Response with CNAME of cwap-nam1-runtime-main-new.trafficmanager.net
    DNS Response with CNAME of cwap-cu-2.cloudapp.net
    DNS Response with A record of an IP
  2. Within Fiddler I observed the MS AAD Application Proxy establishing a connection to TENANT_ID.bootstrap.msappproxy.net over port 8080. It sets up a TLS 1.0 (yes TLS 1.0, tsk tsk Microsoft) session with mutual authentication. The client certificate that is used for authentication of the MS AAD Application Proxy is the certificate I mentioned above.
  3. Fiddler next displayed the MS AAD Application Proxy doing an HTTP POST of the XML content below to the ConnectorBootstrap URI. The key pieces of information provided here are the ConnectorID, MachineName, and SubscriptionID information. My best guess MS consumes this information to determine which URI to redirect the connector to and consumes some of the response information for telemetry purposes.Screen Shot 2017-04-05 at 9.37.04 PM
  4. Fiddler continues to provide details into the bootstrapping process. The MS AAD Application Proxy receives back the XML content provided below and a HTTP 307 Redirect to bootstrap.his.msappproxy.net:8080. My guess here is the process consumes this information to configure itself in preparation for interaction with the Azure Service Bus.Screen Shot 2017-04-05 at 9.37.48 PM
  5. WireShark captured the DNS queries below resolving the IP for the host the process was redirected to in the previous step.DNS Query for bootstrap.his.msappproxy.net
    DNS Response with CNAME of his-nam1-runtime-main.trafficmanager.net
    DNS Response with CNAME of his-eus-1.cloudapp.net
    DNS Response with A record of 104.211.32.215
  6. Back to Fiddler I observed the connection to bootstrap.his.msappproxy.net over port 8080 and setup of a TLS 1.0 session with mutual authentication using the client certificate again. The process does an HTTP POST of the XML content  below to the URI of ConnectorBootstrap?his_su=NAM1. More than likely this his_su variable was determined from the initial bootstrap to the tenant ID endpoint. The key pieces of information here are the ConnectorID, SubscriptionID, and telemetry information.
    Screen-Shot-2017-04-05-at-9.35.52-PM
  7. The next session capture shows the process received back the XML response below. The key pieces of content relevant here are within the SignalingListenerEndpointSettings section.. Interesting pieces of information here are:
    • Name – his-nam1-eus1/TENANTID_CONNECTORID
    • Namespace – his-nam1-eus1
    • ServicePath – TENANTID_UNIQUEIDENTIFIER
    • SharedAccessKey

    This information is used by the MS AAD Application Proxy to establish listeners to two separate service endpoints at the Azure Service Bus. The proxy uses the SharedAccessKeys to authenticate to authenticate to the endpoints. It will eventually use the relay service offered by the Azure Service Bus.

    Screen Shot 2017-04-05 at 9.34.43 PM

  8. WireShark captured the DNS queries below resolving the IP for the service bus endpoint provided above. This query is performed twice in order to set up the two separate tunnels to receive relays.DNS Query for his-nam1-eus1.servicebus.windows.net
    DNS Response with CNAME of ns-sb2-prod-bl3-009.cloudapp.net
    DNS Response with IP

    DNS Query for his-nam1-eus1.servicebus.windows.net
    DNS Response with CNAME of ns-sb2-prod-dm2-009.cloudapp.net
    DNS Response with different IP

  9. The MS AAD Application Proxy establishes connections with the two IPs received from above. These connections are established to port 5671. These two connections establish the MS AAD Application Proxy as a listener service with the Azure Service Bus to consume the relay services.
  10. At this point the MS AAD Application Proxy has connected to the Azure Service Bus to the his-nam1-cus1 namespace as a listener and is in the listen state. It’s prepared to receive requests from Azure AD (the sender), for verifications of authentication. We’ll cover this conversation a bit in the next few steps.When a synchronized user in the journeyofthegeek.com tenant accesses the Azure login screen and plugs in a set of credentials, Azure AD (the sender) connects to the relay and submits the authentication request. Like the initial MS AAD Application Proxy connection to the Azure Relay service, I was unable to capture the transactions in Fiddler. However, I was able to some of the conversation with API Monitor.

    I pieced this conversation together by reviewing API calls to the ncryptsslp.dll and looking at the output for the BCryptDecrypt method and input for the BCryptEncrypt method. While the data is ugly and the listeners have already been setup, we’re able to observe some of the conversation that occurs when the sender (Azure AD) sends messages to the listener (MS AAD Application Proxy) via the service (Azure Relay). Based upon what I was able to decrypt, it seems like one-way asynchronous communication where the MS AAD Application Proxy listens receives messages from Azure AD.

    Screen Shot 2017-04-05 at 9.38.40 PM

  11. The LogonUserW method is called from CLR.DLL and the user’s user account name, domain, and password is plugged. Upon a successful return and the authentication is valided, the MS AAD Application Proxy initiates an HTTP POST to
    his-eus-1.connector.his.msappproxy.net:10101/subscriber/connection?requestId=UNIQUEREQUESTID. The post contains a base64 encoded JWT with the information below. Unfortunately I was unable to decode the bytestream, so I can only guess what’s contained in there.{“JsonBytes”:[bytestream],”PrimarySignature”:[bytestream],”SecondarySignature”:null}

So what did we learn? Well we know that the Azure AD Pass-through authentication uses multiple Microsoft components including the MS AAD Application Proxy, Azure Service Bus (Relay), Azure AD, and Active Directory Domain Services. The authentication request is exchanged between Azure AD and the ApplicationProxyConnectorService.exe process running on the on-premises server via relay function of the Azure Service Bus.

The ApplicationProxyConnectorService.exe process authenticates to the URI where the bootstrap process occurs using a client certificate. After bootstrap the ApplicationProxyConnectorService.exe process obtains the shared access keys it will use to establish itself as a listener to the appropriate namespace in the Azure Relay. The process then establishes connection with the relay as a listener and waits for messages from Azure AD. When these messages are received, at the least the user’s password is encrypted with the public key of the client certificate (other data may be as well but I didn’t observe that).

When the messages are decrypted, the username, domain, and password is extracted and used to authenticate against AD DS. If the authentication is successful, a message is delivered back to Azure AD via the MS AAD Application Proxy service running in Azure.

Neato right? There are lots of moving parts behind this solution, but the finesse in which they’re integrated and executed make them practically invisible to the consumer. This is a solid out of the box solution and I can see why Microsoft markets in the way it does. I do have concerns that the solution is a bit of a black box and that companies leveraging it may not understand how troubleshoot issues that occur with it, but I guess that’s what Premier Services and Consulting Service is for right Microsoft? 🙂

Azure AD Pass-through Authentication – How does it work? Part 1

Hi everyone. I decided to take a break from the legacy and jump back to modern. Today I’m going to do some digging into Microsoft’s Azure AD Pass-through Authentication solution. The feature was introduced into public preview in December of 2016 and was touted as the simple and easy alternative to AD FS. Before I jump into the weeds of pass-through authentication, let’s do a high level overview of each option.

I will first cover the AD FS (Active Directory Federation Services) solution. When AD FS is used a solution for authentication to Azure Active Directory, it’s important to remember that AD FS is simply a product that enables the use of a technology to solve a business problem. In this instance the technology we are using is modern authentication (sometimes referred to as claims-based authentication) to solve the business problem of obtaining some level of assurance that a user is who they say they are.

When Azure AD and AD FS are integrated to enable the use of modern authentication, the Windows Services Federation Language (WS-FED) standard is used. You are welcome to read the standard for details, but the gist of WS-FED is a security token service generates logical security tokens (referred to assertions) which contain claims. The claims are typically pulled from a data store (such as Active Directory) and contain information about the user’s identity such as logon ID or email address. The data included in claims has evolved significantly over the past few years to include other data about the context of the user’s device (such as a trusted or untrusted device) and user’s location (coming from a trusted or untrusted IP range). The assertions are signed by the security token service (STS) and delivered to an application (referred to as the relying party) which validates the signature on the assertion, consumes the claims from the assertion, and authorizes the user access to the application.

You may have noticed above that we never talked about a user’s credentials. The reason for that is the user’s credentials aren’t included in the assertion. Prior to the STS generating the assertion, the user needs to authenticate to the STS. When AD FS is used, it’s common for the user to authenticate to the STS using Kerberos. Those of you that are familiar with Active Directory authentication know that a user obtains a Kerberos ticket-granting-ticket during workstation authentication to a domain-joined machine. When the user accesses AD FS (in this scenario the STS) the user provides a Kerberos service ticket. The process to obtain that service ticket, pass it to AD FS, getting an assertion, and passing that assertion back to the Azure AD (relying party in this scenario) is all seamless to the user and results in a true single sign-on experience. Additionally, there is no need to synchronize a user’s Active Directory Domain Services password to Azure AD, which your security folk will surely love.

The challenge presented with using AD FS as a solution is you have yet another service which requires on-premises infrastructure, must be highly available, and requires an understanding of the concepts I have explained above. In addition, if the service needs to be exposed to the internet and be accessible by non-domain joined machines, a reverse proxy (often Microsoft Web Application Proxy in the Microsoft world) which also requires more highly available infrastructure and the understanding of concepts such as split-brain DNS.

Now imagine you’re Microsoft and companies want to limit their on-premises infrastructure and the wider technology mark is slim in professionals that grasp all the concepts I have outlined above. What do you do? Well, you introduce a simple lightweight solution that requires little to no configuration or much understanding of what is actually happening. In come Azure AD Pass-through authentication.

Azure AD Pass-through authentication doesn’t require an STS or a reverse proxy. Nor does it require synchronization of a user’s Active Directory Domain Service password to Azure AD. It also doesn’t require making changes to any incoming flows in your network firewall. Sounds glorious right? Microsoft thinks this as well, hence why they’ve been pushing it so hard.

The user experience is very straightforward where the user plugs in their Active Directory Domain Services username and password at the Azure AD login screen. After the user hits the login screen, the user is logged in and go about their user way. Pretty fancy right? So how does Microsoft work this magic? It’s actually quite complicated but ingeniously implemented to seem incredibly simplistic.

The suspense is building right? Well, you’ll need to wait until my next entry to dig into the delicious details. We’ll be using a variety of tools including a simple packet capturing tool, a web proxy debugging tool, and an incredibly awesome API monitoring tool.

See you next post!