Welcome back folks! I recently had a few customers ask me about using certificates with Azure Key Vault and switching from using a client secret to a client certificate for their Azure AD (Active Directory) service principals. The questions put me on a path of diving deeper around the topics which results in some great learning and opportunity to create some Python code samples.
Azure Key Vault is Microsoft’s solution for secure secret, key, and credential management. If you’re coming from the AWS (Amazon Web Services) realm, you can think of it as AWS KMS (Key Management Services) with a little bit of AWS Secrets Manager and AWS Certificate Manager thrown in there. The use cases for secrets and keys are fairly well known and straightforward, so I’m going instead focus time on the certificates use case.
In a world where passwordless is the newest buzzword, there is an increasing usage of secrets (or passwords) in the non-human world. These secrets are often used to programmatically interact with APIs. In the Microsoft world you have your service principals and client secrets, in the AWS world you have your IAM Users with secret access keys, and many more third-parties out there require similar patterns that require the use of an access key. Vendors like Microsoft and AWS have worked to mitigate this growing problem in the scope of their APIs by introducing features such as Azure Managed Identities and AWS IAM Roles which use short lived dynamic secrets. However, both of these solutions work only if your workload is running within the relevant public cloud and the service it’s running within supports the feature. What about third-party APIs, multi-cloud workloads, or on-premises workloads? In those instances you’re many of times forced to fall back to the secret keys.
There is a better option to secret keys, and that is client certificates. While a secret falls into the “something you know” category, client certificates fall into the “something you have” category. They provide an higher assurance of identity (assuming you exercise good key management practices) and can have more flexibility in their secure storage and usage. Azure Service Principals support certificate-based authentication in addition to client secrets and Azure Key Vault supports the secure storage certificates. Used in combination, it can yield some pretty cool patterns.
Before I get into those patterns, I want to cover some of the basics in how Azure Key Vault stores certificates. There are some nuances to how it’s designed that is incredibly useful to understand. I’m not going to provide a deep dive on the inner workings of Key Vault, the public documentation does a decent enough job of that, but I am going to cover some of the basics which will help get you up and running.
Certificates can be both imported into and generated within Azure Key Vault. These certificates generated can be self-signed, generated from a selection of public CAs (certificate authorities) it is integrated with, or can be used to generate a CSR (certificate signing request) you can full-fill with your own CA. These processes are well detailed in the documentation, so I won’t be touching further on them.
Once you’ve imported or generated a certificate and private key into Key Vault, we get into the interesting stuff. The components of the certificate and private key are exposed in different ways through different interfaces as seen below.
Key Vault and certificates
Metadata about the certificate and the certificate itself are accessible via the certificates interface. This information includes the certificate itself provided in DER (distinguished encoded rules) format, properties of the certificate such as the expiration date, and metadata about the private key. You’ll use this interface to get a copy of the certificate (minus private key) or pull specific properties of the certificate such as the thumbprint.
Operations using the private key such as sign, verify, encrypt, and decrypt, are made available through the key interface. Say you want to sign a JWT (JSON Web Token) to authenticate to an API, you would use this interface.
Lastly, the private key is available through the secret interface. This is where you could retrieve the private key in PEM (privacy enhanced mail) or PKCS#12 (public key cryptography standards) format if you’ve set the private key to be exportable. Maybe you’re using a library like MSAL (Microsoft Authentication Library) which requires the private key as an input when obtaining an OAuth access token using a confidential client.
Now that you understand those basics, let’s look at some patterns that you could leverage.
In the first pattern consider that you have a CI/CD (continuous integration / continuous delivery) running on-premises that you wish to use to provision resources in Azure. You have a strict requirement from your security team that the infrastructure remain on-premises. In this scenario you could provision a service principal that is configured for certificate authentication and use the MSAL libraries to authenticate to Azure AD to obtain the access tokens needed to access the ARM API (Azure Resource Manager). Here is Python sample code demonstrating this pattern.
On-premises certificate authentication with MSAL
In the next pattern let’s consider you have a workload running in the Azure AD tenant you dedicate to internal enterprise workloads. You have a separate Azure AD tenant used for customer workloads. Within an Azure subscription associated with the customer tenant, there is an instance of Azure Event Hub you need to access from a workload running in the enterprise tenant. For this scenario you could use a pattern where the workload running in the enterprise tenant uses an Azure Managed Identity to retrieve a client certificate and private key from Key Vault to use with the MSAL library to obtain an access token for a service principal in the customer tenant which it will use to access the Event Hub.
For the last pattern, let’s consider you have the same use case as above, but you are using the Premium SKU of Azure Key Vault because you have a regulatory requirement that the private key never leaves the HSM (hardware security module) and all cryptographic operations are performed on the HSM. This takes MSAL out of the picture because MSAL requires the private key be provided as a variable when using a client certificate for authentication of the OAuth client. In this scenario you can use the key interface of Key Vault to sign the JWT used to obtain the access token from Azure AD. This same pattern could be leveraged for other third-party APIs that support certificate-based authentication.
Well folks I’m going to keep it short and sweet. Hopefully this brief blog post has helped to show you the value of Key Vault and provide some options to you for moving away from secret-based credentials for your non-human access to APIs. Additionally, I really hope you get some value out of the Python code samples. I know there is a fairly significant gap in Python sample code for these types of operations, so hopefully this begins filling it.
I’ve recently had a number of inquiries on Microsoft’s AAD (Azure Active Directory) B2C (Business-To-Consumer) offering. For those infrastructure folks who have had to manage customer identities in the past, you know the pain of managing these identities with legacy solutions such as LDAP (Lighweight Directory Access Protocol) servers or even a collection of Windows AD (Active Directory) forests. Developers have suffered along with us carrying the burden of securely implementing the technologies into their code.
AAD B2C exists to make the process easier by providing a modern IDaaS (identity-as-a-service) offering complete with a modern directory accessible over a Restful API, support for modern authentication and authorization protocols such as SAML, Open ID Connect, and OAuth, advanced features such as step-up authentication, and a ton of other bells and whistles. Along with these features, Microsoft also provides a great library in the form of the Microsoft Authentication Library (MSAL).
It had been just about 4 years since I last experimented with AAD B2C, so I was due for a refresher. Like many people, I learn best from reading and doing. For the doing step I needed an application I could experiment with. My first stop was the samples Microsoft provides. The Python pickings are very slim. There is a basic web application Ray Lou put together which does a great job demonstrating basic authentication. However, I wanted to test additional features like step-up authentication and securing a custom-built API with AAD B2C so I decided to build on top of Ray’s solution.
I began my journey to create the web app and web API I’ll be walking through setting up with this post. Over the past few weeks I spent time diving into the Flask web framework and putting my subpar Python skills to work. After many late nights and long weekends spent reading documentation and troubleshooting with Fiddler, I finished the solution which costs of a web app and web API.
The solution is quite simple . It is intended to simulate a scenario where a financial services institution is providing a customer access the customer’s insurance policy information . The customer accesses a web frontend (python-b2c-web) which makes calls to a API (python-b2c-api) which then retrieves policy information from an accounts database (in this case a simple JSON file). The customer can use the self-service provisioning capability of Azure B2C to create an account with the insurance company, view their policy, and manage the beneficiary on the policy.
AAD B2C provides the authentication to the web front end (python-b2c-web) via Open ID Connect. Access to the user’s policy information is handled through the API (python-b2c-api) using OAuth. The python-b2c-web frontend uses OAuth to obtain an access token which is uses for delegated access to python-b2c-api to retrieve the user’s policy information. The claims included in the access token instruct the python-b2c-api which record to pull. If the user wishes to change the beneficiary on the policy, the user is prompted for step-up authentication requiring an MFA authentication.
The solution uses four Azure AD B2C UserFlows. It has a profile editing user flow which allows the user to change information stored in the AAD B2C directory about the user such as their name. A password reset flow allows the user to change the password for their local AAD B2C identity. Two sign-up/sign-in flows exist one with no MFA and one with MFA enforced and two sign-up / sign-in flows. The non-MFA enabled flow is the kicked off at login to python-b2c-web while the MFA enabled flow is used when the user attempts to change the beneficiary.
With the basics on the solution explained, let’s jump in to how to set it up. Keep in mind I’ll be referring to public documentation where it makes sense to avoid reinventing the wheel. At this I’m providing instructions as to how to run the code directly on your machine and additionally instructions for running it using Docker. Before we jump into how to get the code up and running, I’m going to walkthrough setting up Azure AD B2C.
Setting up Azure AD B2C
Before you go setting up Azure AD B2C, you’ll need a valid Azure AD Tenant and Azure Subscription. You can setup a free Azure account here. You will need at least contributor within the Azure Subscription you plan on using to contain the Azure AD B2C directory.
Follow the official documentation to setup your Azure B2C directory once you have your Azure Subscription setup and ready to go. Take note of the name of the single-label DNS name you use for your Azure B2C directory. This will be the unique name you set that prefixes .onmicrosoft.com (such as myb2c.onmicrosoft.com).
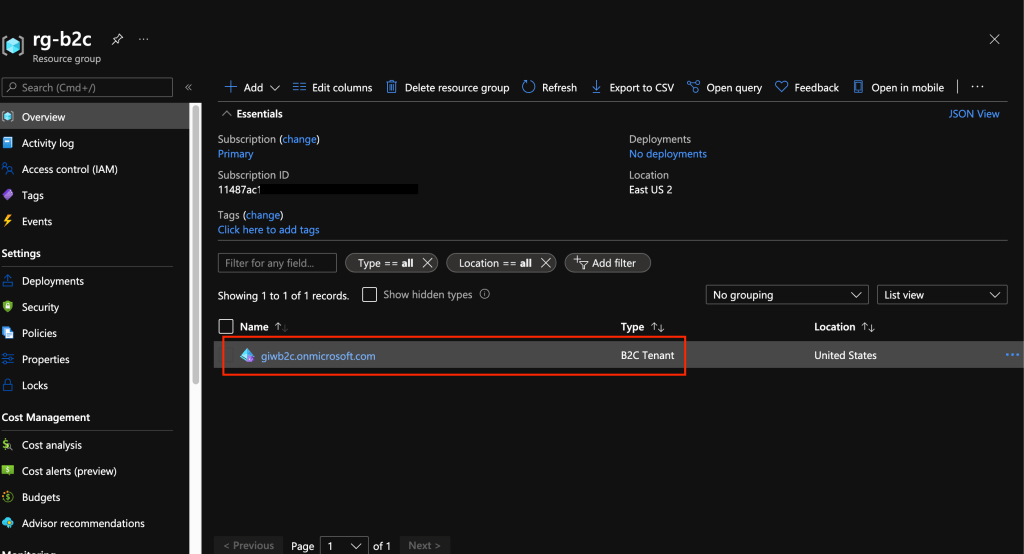
Creation of the Azure AD B2C directory will create a resource of type B2C Tenant in the resource group in the Azure Subscription you are using.
In addition to the single-label DNS name, you’ll also need the note down tenant ID assigned to the B2C directory for use in later steps. You can obtain the tenant ID by looking at the B2C Tenant resource in the Azure Portal. Make sure you’re in the Azure AD directory the Azure Subscription is associated with.
Screenshot of Azure AD B2C resource in Azure Resource Group
If you select this resource you’ll see some basic information about your B2C directory such as the name and tenant ID.
Screenshot of Overview of an Azure AD Tenant resource
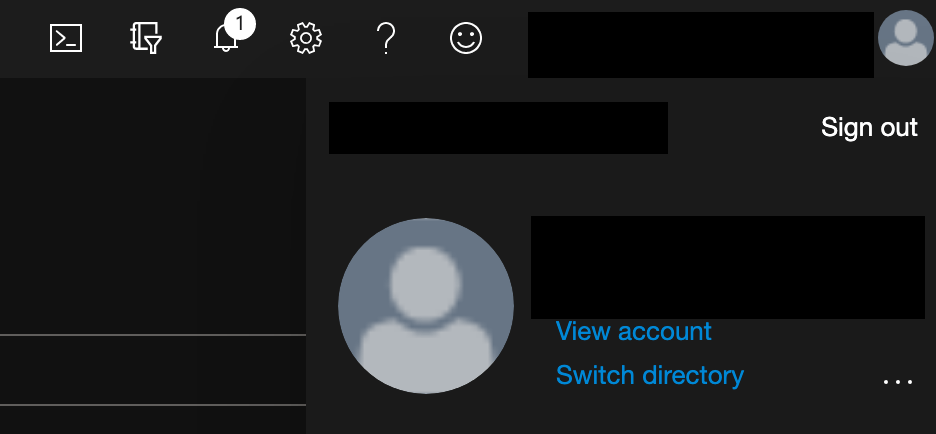
Once that is complete the next step is to register the web front end (python-b2c-web) and API (python-b2c-api). The process of registering the applications establishes identities, credentials, and authorization information the applications use to communicate with Azure B2C and each other. This is a step where things can get a bit confusing because when administering an Azure AD B2C directory you need to switch authentication contexts to be within the directory. You can do this by selecting your username in the top right-hand corner of the Azure Portal and selecting the Switch Directory link.
Screenshot of how to switch between Azure AD and Azure AD B2C directories
This will bring up a list of the directories your identity is authorized to access. In the screenshot below you’ll see my Azure AD B2C directory giwb2c.onmicrosoft.com is listed as an available directory. Selecting the directory will be me in the context of the B2C directory where I can then register applications and administer other aspects of the B2C directory.
Screenshot showing available directories
Once you’ve switched to the Azure AD B2C directory context you can search for Azure B2C in the Azure search bar and you’ll be able to fully administer the B2C directory. Select the App Registrations link to begin registering the python-b2c-web application.
Screenshot of Azure AD B2C administration options
In the next screen you’ll be see the applications currently registered with the B2C directory. Click the New registration button to begin a new registration.
In the Register an application screen you need to provide information about the application you are registering. You can name the application whatever you’d like as this is used as the display name when viewing registered applications. Leave the Who can use this application or access thisAPI set the Accountsin any identity provider or organizational directory (for authenticating users with user flows). Populate the Redirect URI with URI Azure B2C should redirect the user’s browser to after the user has authenticate. This needs to be an endpoint capable of processing the response from Azure AD B2C after the user has authenticated. For this demonstration application you can populate the URI with http://localhost:5000/getAToken. Within the application this URI will process the authorization code returned from B2C and use it to obtain the ID token of the user. Note that if you want to run this application in App Services or something similar you’ll need to adjust this value to whatever DNS name your application is using within that service.
Leave the Grant admin consent to openid and offline_access permissions option checked since the application requires permission to obtain an id token for user authentication to the application. Once complete hit the Register button. This process creates an identity for the application in the B2C directory and authorizes it to obtain ID tokens and access tokens from B2C.
Screenshot showing how to register the python-b2c-web application
Now that the python-b2c-web application is registered, you need to obtain some information about the application. Go back to the main menu for the B2C Directory, back into the App Registrations and select the newly registered application. On this page you’ll have the ability to administer a number of aspects of the application such as creating credentials for the application to support confidential client flows such as the authorization code flow which this application uses.
Before you do any configuration, take note of the Application (client) ID. You’ll ned this for later steps.
Screenshot of registered application configuration options
The client ID is used to identify the application to the Azure B2C directory, but you still need a credential to authenticate it. For that you’ll go to Certificates & secrets link. Click on the New client secret button to generate a new credential and save this for later.
You will need to register one additional redirect URI. This redirect URI is used when the user authenticates with MFA during the step-up process. Go back to the Overview and click on the Redirect URIs menu item on the top section as seen below.
Screenshot of overview menu and Redirect URIs link
Once the new page loads, add a redirect URI which is found under the web section. The URI you will need to add is http://localhost:5000/getATokenMFA. Save your changes by hitting the Save button. Again, note you will need to adjust this URI if you deploy this into a service such as App Services.
At this point the python-b2c-web (or web frontend) is registered, but you need to now register python-b2c-api (the API). Repeat the steps above to register the python-b2c-api. You’ll select the same except you do not need to provide a redirect URI since the API won’t be directly authenticating the user.
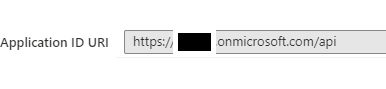
Once the python-b2c-api is registered, go into the application configuration via the App Registrations menu and record the Application (client) ID as you’ll use this to configuration the application later on. After you’ve recorded that information select the Expose anAPI link. Here you will register the two OAuth scopes I’ve configured in the application. These scopes will be included in the access token obtained by python-b2c-web when it makes calls to python-b2c-api to get policy information for the user.
Select the Add a scopebutton and you’ll be prompted to set an Application ID URI which you need to set to api. Once you’ve set it, hit the Save and continue button.
Screenshot of setting the Application ID URI for the python-b2c-api
The screen will refresh you’ll be able to add your first scope. I have defined two scopes within the pyton-b2c-api. One is called Accounts.Read which grants access to read policy information and one for Accounts.Write which grants access to edit policy information. Create the scope for the Accounts.Read and repeat the process for Accounts.Write.
As a side note, by default B2C grants application registered with it the offline_access and openid permissions for Microsoft Graph. Since python-b2c-api won’t be authenticating the user and will simply be verifying the access token passed by the python-b2c-web, you could remove those permissions if you want. You can do this through theAPI permissions link which is located on the application configuration settings of the python-b2c-api.
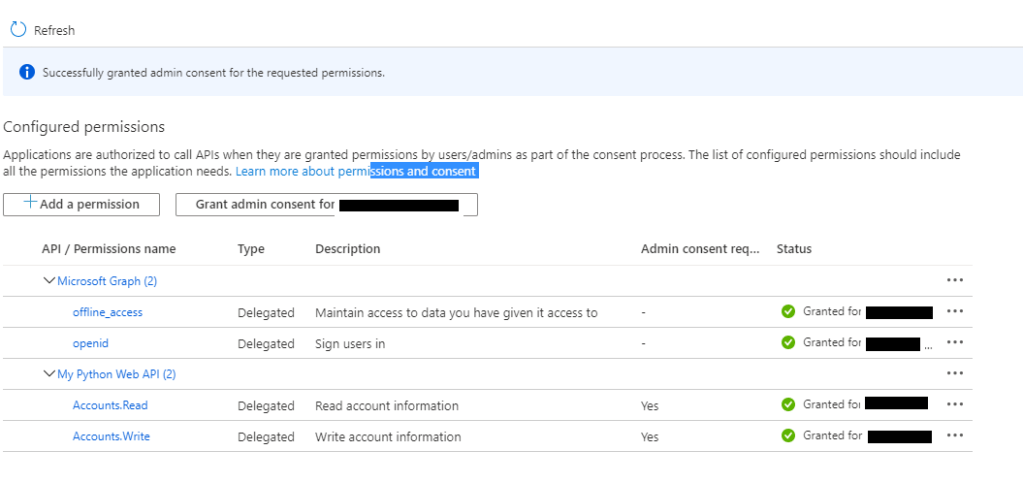
The last step you have in the B2C portion of Azure is to grant the python-b2c-web application permission to request an access token for the Accounts.Read and Accounts.Write scopes used by the python-b2c-api application To do this you need to go back into the application configuration for the python-b2c-web application and go to the API permissions link. Click the Add a permission link. In the Request API permissions window, select My APIs link and select the python-b2c-api application you registered. Select the two permissions (Accounts.Read and Accounts.Write) and click the Add permissions link.
Screenshot of granting permissions to the python-b2c-web application
To finish up with the permissions piece you’ll grant admin consent to permissions. At the API permissions window, click the Grant admin consent for YOUR_TENANT_NAME button.
Screenshot of granting admin consent to the new permissions
At this point we’ve registered the python-b2c-web and python-b2c-api applications with Azure B2C. We now need to enable some user flows. Azure B2C has an insanely powerful policy framework that powers the behavior of B2C behind the scenes that allow you to do pretty much whatever you can think of. With power comes complexity, so expect to engage professional services if you want to go to the custom policy route. Azure AD B2C also comes with predefined user flows that provide for common user journeys and experiences. Exhaust your ability to use before you go the custom policy route.
For this solution you’ll be using predefined user flows. You will need to create four predefined user flows named exactly as outlined below. You can use the instructions located here for creation of the user flows. When creating the sign-in and sign-up flows (both MFA and non-MFA) make sure to configure the user attributes and application claims to include the Display Name, Email Address, Given Name, and Surname attributes at a minimum. The solution will be expecting these claims and be using them throughout the application. You are free to include additional user attributes and claims if you wish.
Screenshot of user flows that must be created
At this point you’ve done everything you need to to configure Azure B2C. As a reminder make sure you’ve collected the Azure AD B2C single-label DNS name, Azure AD B2C Tenant ID, python-b2c-web application (client) ID and client secret, and python-b2c-api application (client) ID.
In the next section we’ll setup the solution where the code will run directly on your machine.
(Option 1) Running the code directly on your machine
With this option you’ll run the Python code directly on your machine. For prerequisites you’ll need to download and install Visual Studio Code and Python 3.x.
The python-b2c-web folder contains the web front end application and the python-b2c-api contains the API application. The accounts.json file in the python-b2c-api folder acts as the database containing the policy information. If a user does not have a policy, a policy is automatically created for the user by the python-b2c-api application the first time the user tries to look at the policy information. The app_config.py file in the python-b2c-web folder contains all the configuration options used by python-b2c-web application. It populates any key variables with environment variables you will set in a later step. The app.py files in both directories contain the code for each application. Each folder also contains a Dockerfile if you wish to deploy the solution as a set of containers. See the option 2 running as containers sectionfor steps on how to do this.
Once the repo has cloned you’ll want to open two Terminal instances in Visual Studio Code. You can do this with CTRL+SHIFT+` hotkey. In your first terminal navigate python-b2c-web directory and in the second navigate to the python-b2c-api directory.
In each terminal we’ll setup a Python virtual directory to ensure we don’t add a bunch of unneeded libraries into the operating system’s central Python instance.
Run the command in each terminal to create the virtual environments. Depending on your operating system you may use to specify python3 instead of python before the -m venv env. This is because operating systems like Mac OS X come preinstalled with Python2 which will not work for this solution.
python -m venv env
Once the virtual environments will need to activate the virtual environments. On a Windows machine you’ll use the command below. On a Mac this file will be in env/bin/ directory and you’ll need to run the command source env/bin/activate.
env\Scripts\activate
Next, load the required libraries using pip using the command below. Remember to do this for both terminals. If you run into any errors installing the dependencies for python-b2c-web ensure you update the version of pip used in the virtual environment using the command pip install –upgrade pip.
pip install -r requirements.txt
The environments are now ready to go. Next up you need to set some user variables. Within the terminal for the python-b2c-web create variables for the following:
CLIENT_ID – The application (client) id of the python-b2c-web application you recorded.
CLIENT_SECRET – The client secret of the python-b2c-web application you recorded.
B2C_DIR – The single-label DNS name of the B2C directory such as myb2c.
API_ENDPOINT – The URI of the python-b2c-api endpoint which must this to http://localhost:5001 when running the code directly on your machine. If running this solution on another platform such as Azure App Services you’ll need to set this to whatever the URI you’re using for App Services.
Within the terminal for the python-b2c-api create variables for the following:
CLIENT_ID – application (client) id of the python-b2c-api application you recorded earlier
TENANT_ID – tenant ID of the B2C directory you recorded earlier
B2C_DIR – single-label DNS name of the B2C directory such as myb2c
In Windows you can set these variables by using the command below. If using Mac OS X ensure you export the variables after creation after you set them. Remember to set all of these variables. If you miss one the application will fail to run.
set B2C_DIR=myb2c
Now you can start the python-b2c-web web front end application. To do this you’ll use the flask command. In the terminal you setup for the python-b2c-web application, run the following command:
flask run -h localhost -p 5000
Then in the terminal for the python-simple-web-api, run the following command:
flask run -h localhost -p 5001
You’re now ready to test the app! Open up a web browser and go to http://localhost:5000.
Navigate to the testing the application section <INSERT LINK> for instructions on how to test the application.
(Option 2) Running as containers
Included in the repository is the necessary Dockerfiles to build both applications as Docker images to run as containers in your preferred container runtime. I’m working on a Kubernetes deployment and will that in time. For the purposes of this article I’m going to assume you’ve installed Docker on your local machine.
The python-b2c-web folder contains the web front end application and the python-b2c-api contains the API application. The accounts.json file in the python-b2c-api folder acts as the database containing the policy information. If a user does not have a policy, a policy is automatically created for the user by the python-b2c-api application the first time the user tries to look at the policy information. The app_config.py file in the python-b2c-web folder contains all the configuration options used by python-b2c-web application. It populates any key variables with environment variables you will set in a later step. The app.py files in both directories contain the code for each application. Each folder also contains a Dockerfile that you will use to build the images.
Navigate to the python-b2c-web directory and run the following command to build the image.
docker build --tag=python-b2c-web:v1 .
Navigate to the python-b2c-api directory and run the following command to build the image.
docker build --tag=python-b2c-api:v1 .
Since we need the python-b2c-web and python-b2c-api applications to communicate, we’re going to create a custom bridged network. This will provide a network that will allow both containers to communicate, connect to the Internet to contact Azure B2C, and find each other using DNS. Note that you must use a custom bridged network to support the DNS feature as the default bridged network doesn’t support the containers finding each other by name.
docker network create b2c
Now that the images are built and the network is created you are ready to spin up the containers. When spinning up each container you’ll need to pass a series of environment variables to the containers. The environment variables are as follows:
CLIENT_ID – The application (client) id of the python-b2c-web application you recorded.
CLIENT_SECRET – The client secret of the python-b2c-web application you recorded.
B2C_DIR – The single-label DNS name of the B2C directory such as myb2c.
API_ENDPOINT – The URI of the python-b2c-api endpoint. As long as you name the container running the python-b2c-api with the name of python-b2c-api, you do not need to set this variable.
Within the terminal for the python-b2c-api create variables for the following:
CLIENT_ID – application (client) id of the python-b2c-api application you recorded earlier
TENANT_ID – tenant ID of the B2C directory you recorded earlier
B2C_DIR – single-label DNS name of the B2C directory such as myb2c
Start a container instance of the python-b2c-web application using the following command:
Once both containers are created proceed to the Testing the Application section of this post.
Testing the Application
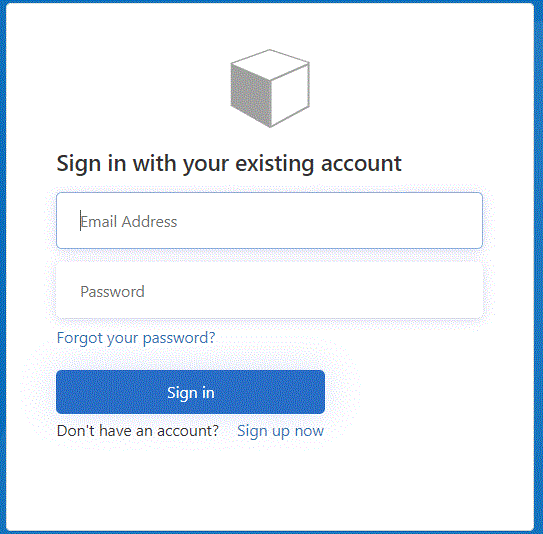
Open a web browser and navigate to http://localhost:5000. The login page below will appear.
Clicking the Sign-In button will open up the B2C sign-in page. Here you can sign-in with an existing B2C account or create a new one. You can also initialize a password reset.
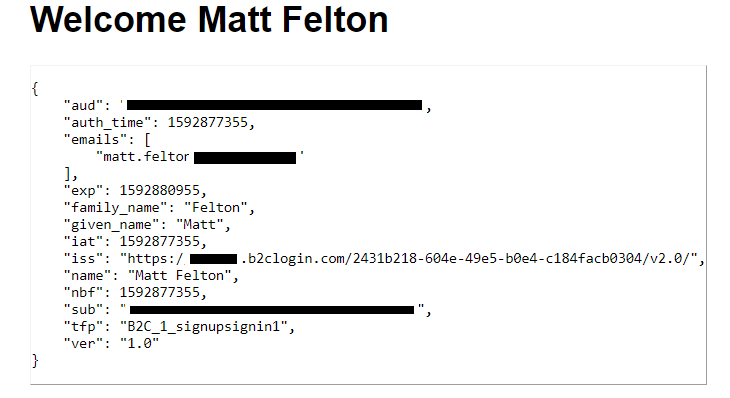
After successfully authenticating you’ll be presented with a simple home page. The Test API link will bring you to the public endpoint of the python-b2c-api application validating that the API is reachable and running. The Edit Profile link will redirect you to the B2C Edit Profile experience. Clicking the My Claims link will display the claims in your ID token as seen below.
Clicking the My Account link causes the python-b2c-web application to request an access token from Azure B2C to access the python-b2c-api and pull the policy information for the user.
Clicking on the Change Beneficiary button will kick off the second MFA-enabled sign-in and sign-up user flow prompting the user for MFA. After successful MFA, the user is redirected to a page where they make the change to the record. Clicking the submit button causes the python-b2c-web application to make a call to the python-b2c-api endpoint modifying the user’s beneficiary on their policy.
That’s about it. Hopefully this helps give you a simple base to mess with Azure AD B2C.