Entra ID – Deep Dive – The Basics – Part 1

Entra ID – Deep Dive – The Basics – Part 1

This is part of my series on Microsoft Entra ID:

  1. Entra ID – Deep Dive – The Basics – Part 1
  2. Entra ID – Deep Dive – Protocol Primer – Part 2

Yeah… You read that right. I’m finally biting the bullet and doing a series on Entra ID. There are some cobwebs there, but once upon a time I was a half-baked “identity guy”. Nah, I’m not returning to that place, but I have had to visit it more frequently over the past few months. With the growing use of agents, identity has one again become of those things that apparently everyone is a so called “expert in”. I aint no expert, but I have been digging into the chatter around the implications of agents into the identity world. Given my employer, that has been spending some time in the Entra ID Agent Identity space.

Digging into that demanded I go back to some of the basics of Entra ID such as the purpose of an application registration versus a service principal and the request flow when authenticating a user to an application using OIDC (OpenID Connect) or executing an on-behalf-of flow in OAuth. I had conceptual knowledge of the above, but it was too ivory tower. I needed to eat the dog food and do it. After spending a few weeks reading through the documentation, reviewing captured requests and responses, reviewing RFCs, and poorly coding some applications to exercise on the concepts I figured it was time to brain dump what I learned before I get distracted with some new shiny widget and forget 60% of it.

So yeah… that’s where this series is coming from. Hopefully some folks out there draw some value out of it beyond serving as a refresher for my neural pathways.

With that rambling out of the way, let’s get to it.

WTF is Entra ID?

Many years ago when Microsoft first introduced Azure Active Directory my peers and I scratched our heads with this question. Given the name, the initial assumption was it was the Windows Active Directory “killer” (stop trying to make that happen, it aint gonna happen). That seems to have been a pretty common assumption given what I’ve heard from customers over the years as I sat in the vendor space and is likely why the name was shifted a few years back to Entra ID. Either that or marketing needed to justify their existence with another product rename.

If you want the professional explanation as to what Entra ID is you can read the public documentation and bask in the marketing mumbo jumbo. Since you’re here, you’re going to get the less fancy and quick and dirty Matt Felton explanation. My take is that Entra ID does a lot of shit, but at its core it is:

  • An identity store for the identities of human and non-human security principals, their attributes, and their credentials.
  • An authentication service which can act as an OAuth Authorization Server, OIDC identity provider, SAML IdP / SP, and even Kerberos / LDAP provider (gross)

It provides these core services to Microsoft’s cloud services such as M365, Azure, Dynamics 365, and whatever other clouds Microsoft has that I’m missing. It can be extended to provide these services to other applications by integrating with it via one of the supported protocols like we’ll see in further posts in this series.

Entra ID is divided into separate tenants which represent unique identity boundaries. Services for a given customer (such as an Azure subscription) are associated to an Entra ID tenant which acts as the identity boundary for those resources. Tenants can trust other tenants to facilitate cross tenant accessing of resources through features like Entra ID External ID.

The identity store piece of the Entra ID service is where users, groups, many types of service principals, applications, and device identities are stored. Similar to an LDAP (hell may be LDAP under the hood, who the hell knows) each of these objects has a schema with specific properties that are consumed for the other services Entra provides (as we’ll see later).

That should be enough context to give you a very general idea of what Entra ID is. Like I mentioned above, it does a lot of shit (conditional access, privileged identity management, etc) that isn’t relevant to the point of this series and that I’m not going to discuss. If you can hammer it in your head those two core functions, it will be enough to get you through this series.

Humans vs Non-Humans

Within Entra ID we have two primary objects that represent humans and non-humans. For humans we have the user identity. For non-humans we have service principals. Service principals come in many flavors including the base service principal (consider legacy), applications, managed identities, Agent Identity Blueprints, and Agent Identities (likely others I’m missing), Agent Users. The way I like to think about the many types of service principals (probably incorrect but I don’t care) is that the base service principal is the parent object class and things like managed identities, agent identity blueprints, and agent identities are children of that object class which look a bit different. Agent Users are a bit weird and I haven’t delved into them much, however, I like to think of it as a child of the base user object class.

The other object type that’s important to understand is the application object (typically referred to as the app registration). The application object is interesting (and can be confusing). It exists to represent a globally unique representation of an application. For a given application, you only ever have a single application object which exists in the tenant it was registered. What’s helped me is to think of the application object as the OAuth client registration. That’s probably not completely correct, but it helps ground you in its purpose. The application object can have a credential (secret, certificate, federated) which allows it to authenticate to Entra ID (think OAuth confidential client). It also contains information critical to OAuth such as the client id (appid), the audience (identifierUris), the OAuth scopes it supports (oauth2PermissionScopes), and redirectUris (when using interactive OAuth flows).

Below you’ll see an example of an application object for an application that is acting as a backend API to the demo solution I put together for this series.

Application Demo backend app for Entra authentication already exists and its id is 23f7d0f0-85e6-453a-b0bb-723b65ac7958
{
"id": "23f7d0f0-85e6-453a-b0bb-723b65ac7958",
"deletedDateTime": null,
"appId": "22d2ff53-9442-404c-8da5-01c2e135532d",
"applicationTemplateId": null,
"disabledByMicrosoftStatus": null,
"createdByAppId": "04b07795-8ddb-461a-bbee-02f9e1bf7b46",
"createdDateTime": "2026-06-08T23:46:22Z",
"displayName": "Demo backend app for Entra authentication",
"description": "This app is used to demonstrate a backend API that uses the user's identity context to fetch a user's story'",
"groupMembershipClaims": null,
"identifierUris": [
"api://22d2ff53-9442-404c-8da5-01c2e135532d"
],
"isDeviceOnlyAuthSupported": null,
"isDisabled": null,
"isFallbackPublicClient": false,
"nativeAuthenticationApisEnabled": null,
"notes": null,
"publisherDomain": "XXXXXXXX.onmicrosoft.com",
"serviceManagementReference": null,
"signInAudience": "AzureADMultipleOrgs",
"tags": [],
"tokenEncryptionKeyId": null,
"uniqueName": null,
"samlMetadataUrl": null,
"defaultRedirectUri": null,
"certification": null,
"optionalClaims": null,
"servicePrincipalLockConfiguration": null,
"requestSignatureVerification": null,
"addIns": [],
"api": {
"acceptMappedClaims": null,
"knownClientApplications": [],
"requestedAccessTokenVersion": 2,
"oauth2PermissionScopes": [
{
"adminConsentDescription": "Allow the application to impersonate the signed-in user to access their user story.",
"adminConsentDisplayName": "Impersonate user",
"id": "00000000-0000-0000-0000-000000000001",
"isEnabled": true,
"type": "User",
"userConsentDescription": "Allow the application to impersonate you to access your user story.",
"userConsentDisplayName": "Impersonate user",
"value": "user_impersonation"
}
],
"preAuthorizedApplications": []
},
"appRoles": [],
"info": {
"logoUrl": null,
"marketingUrl": null,
"privacyStatementUrl": null,
"supportUrl": null,
"termsOfServiceUrl": null
},
"keyCredentials": [],
"parentalControlSettings": {
"countriesBlockedForMinors": [],
"legalAgeGroupRule": "Allow"
},
"passwordCredentials": [
{
"customKeyIdentifier": null,
"displayName": null,
"endDateTime": "2028-06-08T23:46:45.7547438Z",
"hint": "NnW",
"keyId": "XXXXXXXX-XXXX-XXXX-XXXX-XXXXXXXX",
"secretText": null,
"startDateTime": "2026-06-08T23:46:45.7547438Z"
}
],
"publicClient": {
"redirectUris": []
},
"requiredResourceAccess": [
{
"resourceAppId": "e406a681-f3d4-42a8-90b6-c2b029497af1",
"resourceAccess": [
{
"id": "03e0da56-190b-40ad-a80c-ea378c433f7f",
"type": "Scope"
}
]
}
],
"verifiedPublisher": {
"displayName": null,
"verifiedPublisherId": null,
"addedDateTime": null
},
"web": {
"homePageUrl": null,
"logoutUrl": null,
"redirectUris": [],
"implicitGrantSettings": {
"enableAccessTokenIssuance": false,
"enableIdTokenIssuance": false
},
"redirectUriSettings": []
},
"spa": {
"redirectUris": []
}
}

Now comes the importance of the service principal. An application object will typically have an associated service principal (not much use without it) which acts as the security principal for the application in the given Entra ID tenant. Applications have one application object (or app registration) but many service principals (if it’s multi-tenant). Think of the service principal as the “stub” identity representing the application in the Entra ID tenant. Permissions are granted to the service principal and the application uses the service principal to exercise those permissions to do things such as querying the Microsoft Graph API.

If you build a multi-tenant application like I’ve done here, other Entra ID tenants can create a service principal for the application in their tenant allowing the application to possibly authenticate those users and access resources in that Entra ID tenant.

The official documentation likes to refer to the application object as the template for the application and the service principal as the security principal. I think that’s a pretty damn good single sentence explanation.

Below is an example of the service principal for the frontend application I built for this series. You can see the type of service principal (servicePrincipalType) in this scenario is application because this service principal has an associated application object (app registration).

{
"id": "ece073e5-744e-4d70-b79d-4887e1dd008f",
"deletedDateTime": null,
"accountEnabled": true,
"alternativeNames": [],
"appDisplayName": "Demo frontend app for Entra authentication",
"appDescription": "This app is used to demonstrate a frontend application where a user authenticates using Entra ID authentication via OIDC",
"appId": "afbd7539-a21f-4d11-93a3-490017032fb7",
"applicationTemplateId": null,
"appOwnerOrganizationId": "6c80de31-d5e4-4029-93e4-5a2b3c0e1299",
"appRoleAssignmentRequired": false,
"createdByAppId": "04b07795-8ddb-461a-bbee-02f9e1bf7b46",
"createdDateTime": "2026-06-08T23:45:54Z",
"description": null,
"disabledByMicrosoftStatus": null,
"displayName": "Demo frontend app for Entra authentication",
"homepage": null,
"isDisabled": null,
"loginUrl": null,
"logoutUrl": null,
"notes": null,
"notificationEmailAddresses": [],
"preferredSingleSignOnMode": null,
"preferredTokenSigningKeyThumbprint": null,
"replyUrls": [
"http://localhost:8100/callback"
],
"servicePrincipalNames": [
"afbd7539-a21f-4d11-93a3-490017032fb7"
],
"servicePrincipalType": "Application",
"signInAudience": "AzureADMultipleOrgs",
"tags": [],
"tokenEncryptionKeyId": null,
"samlSingleSignOnSettings": null,
"addIns": [],
"appRoles": [],
"info": {
"logoUrl": null,
"marketingUrl": null,
"privacyStatementUrl": null,
"supportUrl": null,
"termsOfServiceUrl": null
},
"keyCredentials": [],
"oauth2PermissionScopes": [],
"passwordCredentials": [],
"resourceSpecificApplicationPermissions": [],
"verifiedPublisher": {
"displayName": null,
"verifiedPublisherId": null,
"addedDateTime": null
}
}

What are we going to build?

Now that you have the bare bones basics of Entra, you likely want to understand how an application would go about using it for authentication and authorization. While you might not be doing this now and it may not seem relevant, it will become very relevant to you if you begin building agents in Microsoft’s clouds through Microsoft Foundry, CoPilot Studio, or the 18 other random services Microsoft allows agents to be built. This will also be relevant to you if you’re going to consume Microsoft resources (such as Azure) from other clouds through an application or an agent. So yeah, you should understand what this looks like to do. The whole Entra ID Agent Identity feature builds on these foundational pieces.

To see these concepts in action I’m going to walk through a very simplistic solution with a frontend website and backend API in Python. The frontend website is built using the Flask Framework and the backend API is built with fastapi.

Demo application architecture

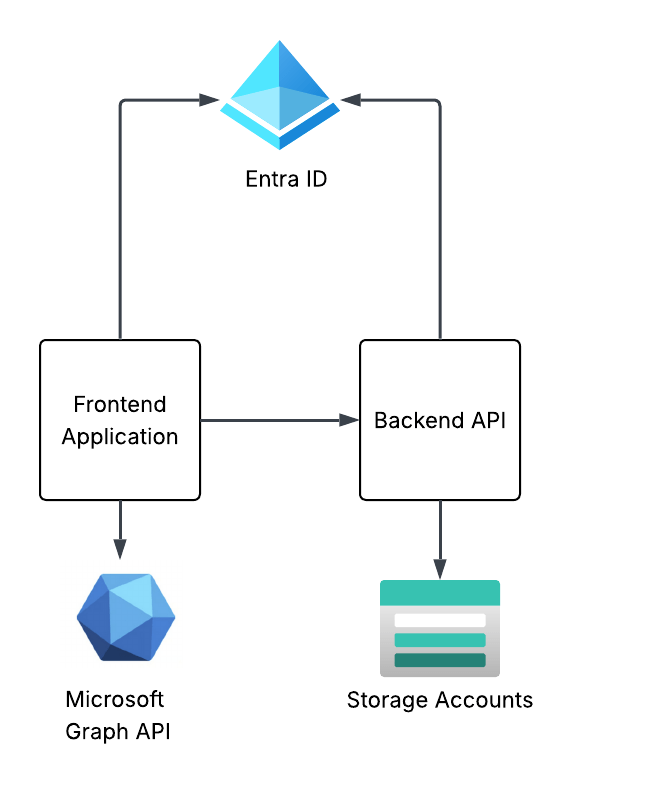
The frontend website will use Entra ID to authenticate the user and will be issued an OIDC id token to identify the user. The frontend will get some information from the user from the id token and access token it receives from Entra and will make additional calls to the Microsoft Graph API using the client credentials flow to grab other attributes of the user’s identity. I’ll also show how to include the user’s Entra ID group information in the id or access token and how to handle nested group membership.

The frontend will have a link on it to call the /story endpoint of the backend API. The story endpoint will pull a pre-built AI generated story about the user which has been uploaded toblob storage in an Azure Storage Account. The backend API will use the on-behalf-of flow to access the storage account as the user to pull the user’s specific story.

This will demonstrate some of the most common flows including authentication, OAuth client credentials flow, and OAuth on-behalf-of (or jwt bearer). I’ll show you how the id tokens and access tokens look in different scenarios pointing out the relevant claims and how they’re used upstream. I’ll even share some process flows so you understand what does what in a given flow.

My primary goal here is give you the basics so you can walk away with a more solid understanding of what’s happening under the hood and how Entra ID has decided to implement OIDC and OAuth. I can’t stress how helpful this will be for you once you start diving into the agent identity space (which I’ll be covering after this series).

Summing it up

Ok, so you know what you’re in for. This series is gonna be relatively deep in the weeds so bring your favorite caffeinated beverage for future posts. I’m doing everything direct with the REST APIs because I want to show you the gory details. No pretty SDKs for you. If you’ve had a “conceptual” idea of how this works without the implementation specifics (like I did before I went down this rabbit hole) this series should help to fill those gaps.

In the next post I’ll walk through setting up Entra for the frontend website, authenticating a user, and exploring the id token and access token. The post following that will walk through using the application’s identity context to get more information about the user from the Microsoft Graph API such as nested group membership, then I’ll finish up the series by walking through the on-behalf-of flow with the backend API to show you how to carry the user’s identity context through the application to the destination resource down the line.

See you next post!

Deploying Resources Across Multiple Azure tenants

Hello fellow geeks! Today I’m going to take a break from my AI Foundry series and save your future self some time by walking you through a process I had to piece together from disparate links, outdated documentation, and experimentation. Despite what you hear, I’m a nice guy like that!

The Problem

Recently, I’ve been experimenting with AVNM (Azure Virtual Network Manager) IPAM (IP address management) solution which is currently in public preview. In the future I’ll do a blog series on the product, but today I’m going to focus on some of the processes I went through to get a POC (proof-of-concept) working with this feature across two tenants. The scenario was a management and managed tenant concept where the management tenant is the authority for the pools of IP addresses the managed tenant can draw upon for the virtual networks it creates.

Let’s first level set on terminology. When I say Azure tenant, what I’m really talking about is the Entra ID tenant the Microsoft Azure subscriptions are associated with. Every subscription in Azure can be associated with only one Entra ID tenant. Entra ID provides identity and authentication services to associated Azure subscriptions. Note that I excluded authorization, because Azure has its own authorization engine in Azure RBAC (role-based access control).

Relationship between Entra ID tenant and Azure resources

Without deep diving into AVNM, its IPAM feature uses the concepts of “pools” which are collections of IP CIDR blocks. Pools can have a parent and child relationship where one large pool can be carved into smaller pools. Virtual networks in the same regions as the pool can be associated with these pools (either before or after creation of the virtual network) to draw down upon the CIDR block associated with the range. You also have the option of creating an object called a Static CIDR which can be used to represent the consumption of IP space on-premises or another cloud. For virtual networks, as resources are provisioned into the virtual networks IPAM will report how many of the allocated IP addresses in a specific pool are being used. This allows you to track how much IP space you’ve consumed across your Azure estate.

AVNM IPAM Resources

My primary goal in this scenario was to create a virtual network in TenantB that would draw down on an AVNM address pool in TenantA. This way I could emulate a parent company managing the IP allocation and usage across its many child companies which could be spread across multiple Azure tenants. To this I needed to

  1. Create an AVNM instance in TenantA
  2. Setup the cross-tenant AVNM feature in both tenants.
  3. Create a multi-tenant service principal in TenantB.
  4. Create a stub service principal in TenantA representing the service principal in TenantB.
  5. Grant the stub service principal the IPAM Pool User Azure RBAC role.
  6. Create a new virtual network in TenantB and reference the IPAM pool in TenantA.

My architecture would similar to image below.

Multi-Tenant AVNM IPAM Architecture

With all that said, I’m now going to get into the purpose of this post which is focusing steps 3, 4, and 6.

Multi-Tenant Service Principals

Service principals are objects in Entra ID used to represent non-human identities. They are similar to an AWS IAM user but cannot be used for interactive login. The whole purpose is non-interactive login by a non-human. Yes, even the Azure Managed Identity you’ve been using is a service principal under the hood.

Unlike Entra ID users, service principals can’t be added to another tenant through the Entra B2B feature. To make a service principal available across multiple tenants you need to create what is referred to as a multi-tenant service principal. A multi-tenant service principal exist has an authoritative tenant (I’ll refer to this as the trusted tenant) where the service principal exists as an object with a credential. The service principal has an attribute named appid which is a unique GUID representing the app across all of Entra. Other tenants (I’ll refer to these as trusting tenants) can then create a stub service principal in their tenant by specifying this appid at creation. Entra ID will represent this stub service principal in the trusted tenant as an Enterprise Application within Entra.

Multi-Tenant Service Principal in Trusted Tenant

For my use case I wanted to have my multi-tenant service principal stored authoritatively TenantB (the managed tenant) because that is where I would be deploying my virtual network via Terraform. I had an existing service principal I was already using so I ran the command below to update the existing service principal to support multi-tenancy. The signInAudience attribute is what dictates whether a service principal is single-tenant (AzureADMyOrg) or multi-tenant (AzureADMultipleOrgs).

az login --tenant <TENANTB_ID>
az ad app update --id "d34d51b2-34b4-45d9-b6a8-XXXXXXXXXXXX" --set signInAudience=AzureADMultipleOrgs

Once my service principal was updated to a multi-tenant service principal I next had to provision it into TenantA (management tenant) using the command below.

az login --tenant <TENANTA_ID>
az ad sp create --id "d34d51b2-34b4-45d9-b6a8-XXXXXXXXXXXX"

The id parameter in each command is the appId property of the service principal. By creating a new service principal in TenantA with the same appId I am creating the stub service principal for my service principal in TenantB.

Many of the guides you’ll find online will tell you that you need to grant Admin Consent. I did not find this necessary. I’m fairly certain it’s not necessary because the service principal does not need any tenant-wide permissions and won’t be acting on behalf of any user. Instead, it will exercise its direct permissions against the ARM API (Azure Resource Manager) based on the Azure RBAC role assignments created for it.

Once these commands were run, the service principal appeared as an Enterprise Application in TenantA. From there I was able to log into TenantA and create an RBAC role assignment associating the IPAM Pool user role to the service principal.

Creating The New VNet in TenantB with Terraform… and Failing

At this point I was ready to create the new virtual network in TenantB with an address space allocated from an IPAM pool in TenantA. Like any sane human being writing Terraform code, my first stop was to the reference document for the AzureRm provider. Sadly my spirits were quickly crushed (as often happens with that provider) the provider module (4.21.1) for virtual networks does not yet support the ipamPoolPrefixAllocations property. I chatted with the product group and support for it will be coming soon.

When the AzureRm provider fails (as it feels like it often does with any new feature), my fallback was to AzApi provider. Given that the AzApi is a very light overlay on top of the ARM REST API, I was confident I’d be able to use it with the proper ARM REST API version to create my virtual network. I wrote my code and ran my terraform apply only to run into an error.

Forbidden({"error":{"code":"LinkedAuthorizationFailed","message":"The client has permission to perform action 'Microsoft.Network/networkManagers/ipamPools/associateResourcesToPool/action' on scope '/subscriptions/97515654-3331-440d-8cdf-XXXXXXXXXXXX/resourceGroups/rg-demo-avnm/providers/Microsoft.Network/virtualNetworks/vnettesting', however the current tenant '6c80de31-d5e4-4029-93e4-XXXXXXXXXXXX' is not authorized to access linked subscription '11487ac1-b0f2-4b3a-84fa-XXXXXXXXXXXX'."}})

When performing cross-tenant activities via the ARM API, the platform needs to authenticate the security principal to both Entra tenants. From a raw REST API call this can be accomplished by adding the x-ms-authorization-auxiliary header to the headers in the API call. In this header you include a bearer token for the second Entra ID tenant that you need to authenticate to.

Both the AzureRm and AzApi providers support this feature through the auxiliary_tenant_ids property of the provider. Passing that property will cause REST calls to be made to the Entra ID login points for each tenant to obtain an access token. The tenant specified in the auxiliary_tenant_ids has its bearer token passed in the API calls in the x-ms-authorization-auxiliary header. Well, that’s the way it’s supposed to work. However, after some Fiddler captured I noticed it was not happening with AzApi v2.1.0 and 2.2.0. After some Googling I turned up this Github repository issue where someone was reporting this as far back as February 2024. It was supposed resolved in v1.13.1, but I noticed a person posting just a few weeks ago that it was still broken. My testing also seemed to indicate it is still busted.

What to do now? My next thought was to use the AzureRm provider and pass an ARM template using the azurerm_resource_group_deployment module. I dug deep into the recesses of my brain to surface my ARM template skills and I whipped up a template. I typed in terraform apply and crossed my fingers. My Fiddler capture showed both access tokens being retrieved (YAY!) and being passed in the underlining API call, but sadly I was foiled again. I had forgotten that ARM templates to not support referencing resources outside the Entra ID tenant the deployment is being pushed to. Foiled again.

My only avenue left was a REST API call. For that I used the az rest command (greatest thing since sliced bread to hit ARM endpoints). Unlike PowerShell, the az CLI does not support any special option for auxiliary tenants. Instead, I need to run az login to each tenant and store the second tenant’s bearer token in a variable.

az login --service-principal --username "d34d51b2-34b4-45d9-b6a8-XXXXXXXXXXXX" --password "CLIENT_SECRET" --tenant "<TENANTB_ID>"

az login --service-principal --username "d34d51b2-34b4-45d9-b6a8-XXXXXXXXXXXX" --password "CLIENT_SECRET" --tenant "<TENANTA_ID>"

auxiliaryToken=$(az account get-access-token \
--resource=https://management.azure.com/ \
--tenant "<TENANTA_ID>" \
--query accessToken -o tsv)

Once I had my bearer tokens, the next step was to pass my REST API call.

az rest --method put \
--uri "https://management.azure.com/subscriptions/97515654-3331-440d-8cdf-XXXXXXXXXXXX/resourceGroups/rg-demo-avnm/providers/Microsoft.Network/virtualNetworks/vnettesting?api-version=2022-07-01" \
--headers "x-ms-authorization-auxiliary=Bearer ${auxiliaryToken}" \
--body '{
"location": "centralus",
"properties": {
"addressSpace": {
"ipamPoolPrefixAllocations": [
{
"numberOfIpAddresses": "100",
"pool": {
"id": "/subscriptions/11487ac1-b0f2-4b3a-84fa-XXXXXXXXXXXX/resourceGroups/rg-avnm-test/providers/Microsoft.Network/networkManagers/test/ipamPools/main"
}
}
]
}
}
}'

I received a 200 status code which meant my virtual network was created successfully. Sure enough the new virtual network in TenantB and in TenantA I saw the virtual network associated to the IPAM pool.

Summing It Up

Hopefully the content above saves someone from wasting far too much time trying to get cross tenant stuff to work in a non-interactive manner. While my end solution isn’t what I’d prefer to do, it was my only option due to the issues with the Terraform providers. Hopefully, the issue with the Az Api provider is remediated soon. For AVNM IPAM specifically, AzureRm providers will be here soon so the usage of Az Api will likely not be necessary.

What I hope you took out of this is a better understanding of how cross tenant actions like this work under the hood from an identity, authentication, and authorization perspective. You should also have a better understanding of what is happening (or not happening) under the hood of those Terraform providers we hold so dear.

TLDR;

When performing cross tenant deployments here is your general sequence of events:

  1. Create a multi-tenant service principal in Tenant A.
  2. Create a stub service principal in Tenant B.
  3. Grant the stub service principal in Tenant B the appropriate Azure RBAC permissions.
  4. Obtain an access token from both Tenant A and Tenant B.
  5. Package one of the access tokens in the x-ms-authorization-auxiliary header in your request and make your request. You can use the az rest command like I did above or use another tool. Key thing is to make sure you pass it in addition to the standard Authorization header.
  6. ???
  7. Profit!

Thanks for reading!

Azure Authorization – The Basics

This is part of my series on Azure Authorization.

  1. This is part of my series on Azure Authorization.
  2. Azure Authorization – The Basics
  3. Azure Authorization – Azure RBAC Basics
  4. Azure Authorization – actions and notActions
  5. Azure Authorization – Resource Locks and Azure Policy denyActions
  6. Azure Authorization – Azure RBAC Delegation
  7. Azure Authorization – Azure ABAC (Attribute-based Access Control)

Hello again!

I’ve been wanting to put together a series on authorization in Azure for a while now. Over the past month I spent some time digging into the topic and figured I’d get it in written form while it is still fresh in my mind. I’ll be covering a lot of areas and features in these series, including some cool stuff that is in public preview. Before we get into the gooey details, let’s start with the basics.

When we talk identity I like to break it into three topics: identity, authentication, and authorization. Let me first define those terms using some wording from the NIST glossary. Identity is the attribute or attributes that describe the subject (in terms of Azure think of this as an Entra ID user or service principal). Authentication which is the process of verifying a user, process, or device. Authorization, which will be the topic of this series, is the rights or permissions granted to a subject. More simply, identity is the representation of the subject, authentication is the process of getting assurance that the subject is who they claim to be, and authorization is what the subject can do.

Identity in Azure is provided by the Entra ID directory (formerly Azure Active Directory, Microsoft marketing likes to rebrand stuff every few years). Like any good directory, it supports a variety of object types. The ones relevant to Azure are users, groups, service principals, and managed identities. Users and groups can exist authoritatively in the Entra ID tenant, they can be synchronized from an on-premises directory using something like Entra ID Connect Sync (marketing, please rebrand this), or they can represent federated users from other Entra ID tenants via the Entra ID B2B feature.

Azure Subscriptions (logical atomic unit for Azure whose parallel would be in AWS would be an AWS Account) are associated to a single Entra ID tenant. An Entra ID tenant can be associated to multiple Azure subscriptions. When configuring authorization in Azure you will be able to associate the permissions to security principals sourced from the associated Entra ID tenant.

Since multiple Azure Subscriptions can be associated to the same Entra ID tenant, this means all of those Azure Subscriptions share a common identity data store and authentication boundary. This differs from an AWS Account where each AWS Account has its own unique authentication boundary and directory of IAM Users and Roles. There are positive and negatives to this architectural decision by Microsoft that we can have fun banter with over a few tequilas, but we’ll save that for another day. The key thing I want you to remember is every Azure Subscription in the same Entra ID tenant shares that directory and authentication boundary but has a separate authorization boundary within each subscription. This means that getting authorization right is critical.

Boundaries in Azure

The above will always be true when talking about the management plane (sometimes referred to as the control plane), however there are exceptions when talking about the data plane. So what are the management plane and data planes? I like to define the management plane as the destination you interact with when you want to perform actions on a resource. Meanwhile the data plane is the destination you communicate with when you want to perform actions on data the resource is storing.

Management plane versus data plane

In the image above you’ll see an example of how the management plane and data plane differ when talking about Azure Storage. When you communicate with the management plane you interact with the management.azure.com which is the endpoint for the Azure Resource Manager REST API. The Azure Portal, Azure CLI, Azure PowerShell, ARM (Azure Resource Manager) templates, Bicep templates, and the Azure Terraform Provider are all different ways to interact with this API. Interaction with this API will use Entra ID authentication (which uses modern authentication protocols and standards such as Open ID Connect and SAML). Determining what actions you can perform on resources behind this management plane is then determined by the permissions defined in Azure RBAC (Role-based Access Control) roles you have been assigned (more on this in the next post).

As I mentioned earlier, the data plane can break the the rule of “one identity plane to rule them all”. Notice how interactions with the data plane use a separate endpoint, in this case blob.core.windows.net. This is the Azure Storage Blob REST API and is the API used to interact with the data plane of Azure Storage when using blob storage. As is common with Azure, many PaaS (platform-as-a-service) offerings support Entra ID authentication and Azure RBAC authorization for both the management plane and data plane. What should pop out to you is that there is also support for a service-specific authentication and authorization mechanism, in this case storage account keys and SAS (shared access signature) tokens. You’ll see this pattern often with Azure PaaS offerings and its important to understand that the service-specific authentication and authorization mechanism should only be used if the service doesn’t support Entra ID authentication or authorization, or your use case specifically requires some functionality of the service-specific mechanism that isn’t available in Entra ID. The reason for this is service-specific mechanisms rarely support granular authorization (SAS tokens being an exception) effectively making the person in possession of that key “god” of the data plane for the service. Additionally, there are security features which are specific to Entra ID (Entra ID Conditional Access, Privileged Identity Management, Identity Protection, etc) and, perhaps most critically, traceability and auditability is extremely difficult to impossible when these mechanisms are used.

Yet another interesting aspect of Azure authorization is there are a few ways for a security principal who is highly privileged in other places to navigate themselves into highly privileged roles across Azure resources. In the image below, you can see how a highly privileged user in Entra ID can leverage the Entra ID Global Admin role to obtain highly privileged permissions in Azure. I’ve covered how this works, how to mitigate it, and how to detect it in this post. The other way to do this is through holding a highly privileged role across the Enterprise Billing constructs. While a bit dated, this blog post does a good job explaining how it’s possible.

Azure Authorization Planes

The key things I want you to walk away with for this post are:

  • With a shared identity and authentication boundary, ensuring a solid authorization model is absolutely mission critical for security of your Azure estate.
  • Ensure you tightly control your Entra ID Global Admins and Enterprise Billing authorization because they provide a way to bypass even the best configured Azure RBAC.
  • Whenever possible use Entra ID identities and authentication so you can take advantage of Azure RBAC.
  • Avoid using service-specific authentication and authorization because it tends to be very course-grained and difficult to track.

Alright folks, you are prepped with the basics. In my next post I’ll begin diving into Azure RBAC.

Have a great weekend!

The “Real” Root Management Group

2/11/2025 Update – This action is now captured in the Entra ID Audit Logs! I’d recommend putting an alert in ASAP to track this moving forward.

Hello fellow geek!

Today I’m going to cover a topic that isn’t well understood in the Azure community and can present significant risk to your Azure estate. Sit back, grab your Friday morning coffee, and prepare to learn about the “real” root management group.

Microsoft made an interesting identity-based choice when architecting Azure. That choice was to have all Azure subscriptions share a common identity management plane in what we have known as Azure AD (Azure Active Directory) and which has recently been renamed Entra ID. The shared identity management plane in Azure creates a single authority for identity data and authentication while maintaining separate authorization boundaries between Azure subscriptions. This concept may differ for those of you coming from AWS (Amazon Web Services) where every AWS account has a unique identity management plane that has its own identity data store, authentication boundary, and authorization boundary. Microsoft’s decision comes with benefits and considerations.

The atomic unit for resources in Microsoft Azure is the Azure subscription which acts as an authorization boundary, limits boundary, and compliance boundary. Each Azure subscription can be associated to a single Entra ID tenant. Once a subscription is associated to an Entra ID tenant the subscription will use tenant as a source of identity data and authentication provider. This dependency on Entra ID creates an interesting security risk around authorization.

Before I dive into the details of this, let me briefly explain the concept of management groups. A management group in Azure is a logical container for Azure Subscriptions which allow for you to enforce configuration “how a resource looks” (Azure Policy) and authorization “what a user can do” (Azure RBAC) across one or more subscriptions. Prior to management groups, these things had to be managed at the individual subscription level or below (resource group or individual resource). Every subscription added to an Entra ID tenant exists under the Tenant Root Management Group by default, but this can be changed. Customers can can create additional management groups underneath the Tenant Root Management Group as per their needs (great guidance on this here).

If you’ve used Azure for any length of time the above is likely all review for you. However, as Yoda said, “there is another”. Above the Tenant Root Management Group exists another management group called root or “/”. As seen in the visual below, the root management group is the glue that sticks Entra ID authorization to Azure authorization together. Let’s dig into how this works.

Entra ID and Microsoft Azure Authorization

In Entra ID there is a role called Global Administrator. For those of you unfamiliar with this role, it is the god role of Entra ID and all services associated with an Entra ID tenant such as M365 and, yes, Azure. Holding this role in Entra ID does not give you permissions in Azure, but there is a path to give yourself permissions and become the god of your Azure estate.

Users who hold the Global Administrator have the ability to grant themselves access on the root “/” management group. They can do this through an option in the Entra ID blade of the Azure Portal called Access Management for Azure Resources or Elevate Access. This is also available via the Azure REST API using the elevateAccess endpoint. The value of this toggle switch shown in the Portal is the value for the current user context (user logged into the Portal). You cannot view this toggle switch for other users, but we can tell if it’s been toggled on as I will show later.

Option for Global Admins to assert control over Azure

When a Global Administrator toggles this option either through the Portal or through the REST API an Azure RBAC Role Assignment for the User Access Administrator is created at the root “/” management group.

User Access Administrator role assignment as result of global administrator elevate access

The User Access Administrator is a highly privileged role granting the user full permissions over the Microsoft.Authorization resource provider (as seen below). These permissions allow the user to create additional role assignments on for any Azure RBAC Role on any Azure management, subscription, resource group, or resource within the Entra ID tenant. Yes… yikes.

{
    "id": "/providers/Microsoft.Authorization/roleDefinitions/18d7d88d-d35e-4fb5-a5c3-7773c20a72d9",
    "properties": {
        "roleName": "User Access Administrator",
        "description": "Lets you manage user access to Azure resources.",
        "assignableScopes": [
            "/"
        ],
        "permissions": [
            {
                "actions": [
                    "*/read",
                    "Microsoft.Authorization/*",
                    "Microsoft.Support/*"
                ],
                "notActions": [],
                "dataActions": [],
                "notDataActions": []
            }
        ]
    }
}

As I mentioned earlier, the Portal will only show you the value of the toggle switch for the ElevateAccess feature for the currently logged in user. You may now be thinking “How the heck can I enforce this if I can’t view it in the Portal?”. The good news is this toggle seems to be some backend orchestration where the platform checks whether the user has the User Access Administrator RBAC Role Assignment on the root “/” management group. This means you don’t need to care about that visual toggle switch, you only need to care about the actual permission. You can list out the the users that have the role assignment at root using the cli command below.

az role assignment list --scope "/" --query "[?roleDefinitionName=='User Access Administrator'].{Username:principalName, ObjectId:objectId}" --output table

Awesome, so you know who has it. Why should you care? Listen, I gonna be nice and assume you’re asking this because it’s a Friday and your brain is fried. The reason you should care is this gives your users who have access to the Entra ID Global Administrators Role the ability to make themselves god of your Azure estate. This includes owners over the resources for management plane operations which can, in almost every instance, lead to owner of the data contained within the resources within the data plane. You SHOULD NOT have a role assignment for User Access Administrator on the root “/” management group. There a few instances where you need this permission temporarily to grant other permissions, but I will cover that at the end of this post. For now, know that if you have that permission there you shouldn’t.

In most enterprises there is a separate team managing Entra ID from the team managing Azure in order to maintain separation of duties. Access to the Global Administrator role opens up the risk for the user to assert access and control over data that is outside of their roles and responsibilities. While there is no way to stop this from happening, you should be monitoring for when it occurs. So how might you do this?

If you’re used Azure, you should be familiar with Azure Activity Logs. The Activity Logs contain log entries for create, update, and delete operations on the Azure management plane. Activity Logs exist at a number of scopes including Subscription, Management Group, and Directory. While Subscription and Management Group Activity Logs supports integration with Azure Monitor Diagnostic Logs, Directory Activity Logs do not and those are the logs new role assignments to the root “/” management group are recorded in. This means you need to write custom code to manually pull down those logs via the REST API in order to capture and alert on them in your favorite SIEM. Yuck right? Well there is an easier way to alert on this.

Directory-level Azure Activity Logs

A while back Microsoft introduced support for Azure Monitor to make log queries against the Azure Resource Graph. I’m not going to do a deep dive into ARG (Azure Resource Graph). All you need to know for the purpose of this post is it’s a service you can tap into to pull down information about Azure resources, including role assignments.

Let me walk through how this works.

I can issue an Kusto query through Azure Monitor to query ARG to see what role assignments for User Access Administrator exist on the root “/” management group using the query below (note this will require you have appropriate read permissions at root “/”).

arg("").AuthorizationResources
| where properties.scope == "/"
| where properties.roleDefinitionId == "/providers/Microsoft.Authorization/RoleDefinitions/18d7d88d-d35e-4fb5-a5c3-7773c20a72d9"

This Kusto query will query the ARG authorizationresources category for any role assignments on the root “/” management group that have the role definition id for User Access Administrator. Each resulting log entry denotes a role assignment on root. Here we can see I have two role assignments on the root for User Access Administrator. Bad Matt.

Query to pull role assignments for User Access Administrator on root “/” management group

Back in October 2023 Microsoft introduced into public preview support to create Azure Alerts for Azure Monitor Log queries against ARG. This means you can create an Azure Alert based on this custom log query. If there is a role assignment for User Access Administrator on the root “/” management group, an alert will be fired. Let me walk through the setup of that alert, because it’s a little bit funky.

First thing you will need to do is create an action group and you can use this documentation to that. Once you have your action group you’ll want to navigate to the Alerts blade in the Azure Portal and then to the alert rules

Alert Rules in Azure Portal

Select the option to create a new Alert Rule. In the scope section you can select a subscription. If you are using a similar subscription design as to the Azure Cloud Adoption Framework, selecting the Management subscription would be a good choice. I don’t believe the choice matters much because the alert is on the root management group and not a resource within a subscription.

On the condition screen you will choose the Custom log search option for the Signal name. The query you’ll put in there is below.

arg("").AuthorizationResources
| where properties.scope == "/"
| where properties.roleDefinitionId == "/providers/Microsoft.Authorization/RoleDefinitions/18d7d88d-d35e-4fb5-a5c3-7773c20a72d9"

You will will also need to configure the measurements. You can use the settings I have below or customize it to your liking.

Measurements for alert

On the Actions screen choose Select action groups and select the action group you configured before.

On the Details screen you can set the severity to whatever you want. I’d recommend 0 since this is a significant escalation of privilege. You will also need to configure the alert with a managed identity. It will need an identity to authenticate and be authorized to ARG. Choose whichever managed identity type makes sense for your organization.

Adding a managed identity to the alert

Add whatever tags you want on the next screen and create the alert.

Done right? No, we now need to give the managed identity permissions on the root management group to read the role assignments.

I promised earlier I’d tell you the instance where you need to use this elevation. The are very few instances where you need to do this. One instance is when you are first building out your management group structure. In that scenario, no one has permission over the root or tenant root management group so no one can create new management groups. You will need to elevate a user with Global Administrator to the User Access Administrator role on the root “/” in that situation so that use can then grant another user account owned by the Azure team (ideally non-human, but vaulted is good too) User Access Administrator on the Tenant Root Management Group. When complete, the Global Administrator should toggle that switch back to off to remove the RBAC role assignment. This Microsoft article explains a few other scenarios you may need to temporary grant this role to grant permissions at the root “/”.

Now back to setting up the alert rule. Next up you need to grant the managed identity you assigned to the alert rule the permission at the root “/” management group so it can query the role assignments (see, a use case!). You can find the object id of the managed identity in the identity section of the Alert in the Portal. What role you assign it is up to you. I’m doing Reader because I’m lazy, but you could certainly craft a custom role if you’d like to (don’t forget to remove your permissions once you’ve completed this!).

az role assignment create --assignee-object-id "4f984694-b43c-4528-87e9-68aeab7478a3" --scope "/" --role "Reader"

You’re good to go! You now have an alert that will fire anytime there is any role assignment for User Access Administrator on the root “/” management group. Again, there should never be a role assignment for that role unless you’re temporarily using it for one of the use cases above.

The key things I want you to take away from this this post is the critical role Entra ID plays across all of the Microsoft Clouds. It’s important to understand how privilege in one product (Entra ID) can lead to privilege in another (Azure). Now you have a quick and easy security win you can crank out before Thanksgiving. Enjoy!