Entra ID – Deep Dive – Workload Identity Federation – Bonus

Entra ID – Deep Dive – Workload Identity Federation – Bonus

This is part of my series on Microsoft Entra ID:

  1. Entra ID – Deep Dive – The Basics – Part 1
  2. Entra ID – Deep Dive – Protocol Primer – Part 2
  3. Entra ID – Deep Dive – Entra ID Authentication – Part 3
  4. Entra ID – Deep Dive – Workload Identity Federation – Bonus

Hello again!

I’ve been on an identity kick lately given all the chatter around IAM (identity access management) that has popped up as the industry tries to figure out how the hell they’re going to handle the disruption to existing IAM systems with the introduction of AI agents in the enterprise. This has raised more conversation within my customer base, with cross cloud identity being a hot topic. Recently, a customer asked me about Entra ID’s Workload Identity Federation feature. I hadn’t mucked with the feature much beyond reading a bit of the documentation, but given the increase in cross-cloud conversations and the customer ask, it seemed like the perfect time to do it! Hence this blog post!

Let’s get to it, shall we?

What is the problem this feature solves?

It’s this old dude’s take that the high-level question Entra ID WIF (workload identity federation) seeks to answer is, “How do we effectively allow two systems in different organizational or trust boundaries to communicate while allowing each boundary to retain control of its identity system?” This is not a new problem. If you’ve been around the block for a few decades, you’ve likely built federated solutions like Windows Active Directory trusts or federated trusts with SAML (security assertion markup language). Each of those solutions had similar goals which included things like:

  1. Simplify security by letting each organization be the authority over its human and non-human identities.
  2. Make it easier for the user by not saddling them with 100 identities and passwords to remember.
  3. Reduce costs by keeping avoiding having to build complex systems to maintain all those duplicate identities and the support personnel to manage them.

So yeah, the obvious stuff, right?

As cloud was adopted the problem grew in scale as organizations integrated with CSPs (cloud service providers) and demand around B2B collaboration drastically increased. SAML and OIDC made the human identity problem a small bit easier (notice I said bit, so don’t flame me!) to solve, but the non-human, or the machine, identity problem caused bloat in identities. Systems needed to interact and sometimes these systems were in different boundaries. This could be on-premises, sometimes in AWS, GCP, or Azure. You might have a AWS Lambda pulling data from a Microsoft Cloud API, GCP BigQuery grabbing data from both clouds, Kubernetes cluster pulling data from an Azure Storage Account, or an Azure Data Factory ripping data down from an Amazon S3 bucket. All this cross cloud hoopla meant lots of machine identities and credentials floating around.

The classic way to solve this problem for the AWS to Azure looked something like this:

The classic way to handle cross cloud machine identity resource access

Here, the Lambda would obtain a temporary credential from the AWS STS based on an IAM role it was assigned, pass that credential to AWS Secrets Manager to grab a secret which contain a Entra ID service principal client secret. It would then use that secret to authenticate to Entra ID as the service principal to obtain an access token issued by Entra ID which it would pass to access a blob in Azure Storage.

The above pattern is still incredibly common in enterprises today. It works no doubt, but there is that credential you gotta manage. Its usage has to be monitored, its lifecycle has to be tracked, it has to be rotated in Entra ID and updated in AWS Secrets Manager, it could get compromised by an attacker and used to exfiltrate data from Azure Storage, etc etc. Now scale this by multiple clouds and thousands of applications and you quickly see the challenge.

Years ago some smart folks across the industry came up with the concept of WIF to help address this problem.

You’re on Matt Felton’s blog so you’ll suffer with a Matt Felton explanation. WIF is all about eliminating that static secret and letting the workload provide some type of token issued by a trusted party (identity provider) to prove its identity to the trusting party (relying party). If you’re familiar with federation for user identities this should sound very familiar. Elimination of that static secret is where the money is at. No more operational overhead of managing thousands of secrets which be expire or be compromised.

All of this likely makes sense to you. Let’s take a look at how Microsoft implemented it.

How does Entra ID Workload Identity Federation work?

Before we get into the guts of how this works, it’s important to understand some core Entra ID concepts.

In Entra ID there are three main categories of identity: user identities, device identities, and workload identities. Given the feature is called WIF, you can probably figure out that last category is what we’re concerned with. These are identities that will be associated to some application, script, container, agent, etc. In the Entra world all of these things are represented by the core object class of a service principal. There are many types of service principals in Entra, but the two most relevant to our conversation are the application and managed identity types.

Service principals of type application are machine identities associated with an application resource. If you’re unfamiliar with the differences between a service principal and application resource take a read through my first post in my Entra series for the gory details. The main thing to understand is the application is the “template” representation of an application across all of Entra ID while the service principal is the identity of the application in a specific Entra ID tenant. The application resource (you’ll almost always hear it referred to as the application registration) is responsible for authentication of the application to Entra while the service principal is the associated identity that is granted permissions to do stuff within the tenant.

A service principal of type managed identity is the identity associated with an Azure managed identity. Managed identities are Azure’s version of an AWS IAM Role. Like an AWS IAM Role, the credential for the identity is managed by the CSP (in this case Microsoft) and workloads associated with a managed identity obtain temporary credentials (called access tokens in the Azure world) to access Azure resources.

Entra WIF can be enabled for either of the application resource or the managed identity. My personal take is if your use case is to simply consume Azure resources, create a managed identity representing your app in the other cloud. This way you can slap it in a resource group in some Azure subscription alongside the resources it is consuming or other resources that may be pieces of that application in Azure. If your use case is consuming Azure in addition to other APIs (such as the MS Graph API) that are protected by Entra use an application resource. Using an application resource will give you more visibility across all of Entra that you have some application that is consuming multiple pieces of the Microsoft cloud. You can technically grant access to something like the MS Graph API to a managed identity, but it’s not as intuitive or visible.

Once you determine whether you’re going to use an application resource or managed identity you’ll need to configure Entra ID to trust the external IdP (identity provider) so that when it receives tokens from your workload that were issued by the external IdP it can validate them and issue an access token from Entra. The high level flow looks like the below.

The process works in the following way. The workload obtain an access token from its IdP. For example, this could be the AWS STS, GCP’s authorization server, or another IdP using the SPIFFE (Secure Production Identity Framework for Everyone) standard. Once the token is issued, the workload sends that token to Entra ID which verifies it cryptographically using keys pulled from an endpoint exposed by the IdP. Once verified, Entra ID issues an access token to the workload which it can use to call the Azure service.

If you’re like me, you probably want to see an example. Well lucky for you, I got one!

Entra ID Workload Identity Federation in Action

To demonstrate this feature I’m going to use a managed identity for my workload instead of an application resource because it’s a quicker setup. My use case is I have an EC2 instance in AWS that needs to pull data from a storage account in Azure. My architecture is super basic and pictured below.

Simple lab to demonstrate WIF

The first step in is to setup AWS outbound federation for my AWS account. This will activate the STS’s capability of issuing tokens to external relying parties.

Next, I’ll need to create an AWS IAM Policy which will grant permissions to obtain tokens from the STS for a specific relying party. For that, I crafted the super basic IAM policy below. This policy grants permission to the security principal the policy is associated with to request tokens from the STS with an audience of my Entra tenant. You’ll need the audience set as api://AzureADTokenExchange. For mine, I added my tenant ID to the path to further constrain it. While not required, I slapped some requirements around the token duration and signing algorithm. There are a number of condition keys you can choose from to further constrain the permissions.

{
"Version": "2012-10-17",
"Statement": [
{
"Effect": "Allow",
"Action": "sts:GetWebIdentityToken",
"Resource": "*",
"Condition": {
"ForAllValues:StringEquals": {
"sts:IdentityTokenAudience": "api://AzureADTokenExchange/6c80de31-d5e4-4029-XXXX-XXXXXXXXXXXX"
},
"NumericLessThanEquals": {
"sts:DurationSeconds": 300
},
"StringEquals": {
"sts:SigningAlgorithm": "RS256"
}
}
}
]
}

I then associated this IAM Policy to the IAM role used by my EC2 instance. Once complete, at this stage the AWS account is setup for outbound federation and my EC2 instance has permissions to request a token destined for the my Entra ID tenant.

On the Azure side I created a resource group, storage account with a sample blob, and an UMI (user-assigned managed identity).

The UMI needs to be configured with a federated credential like you see below.
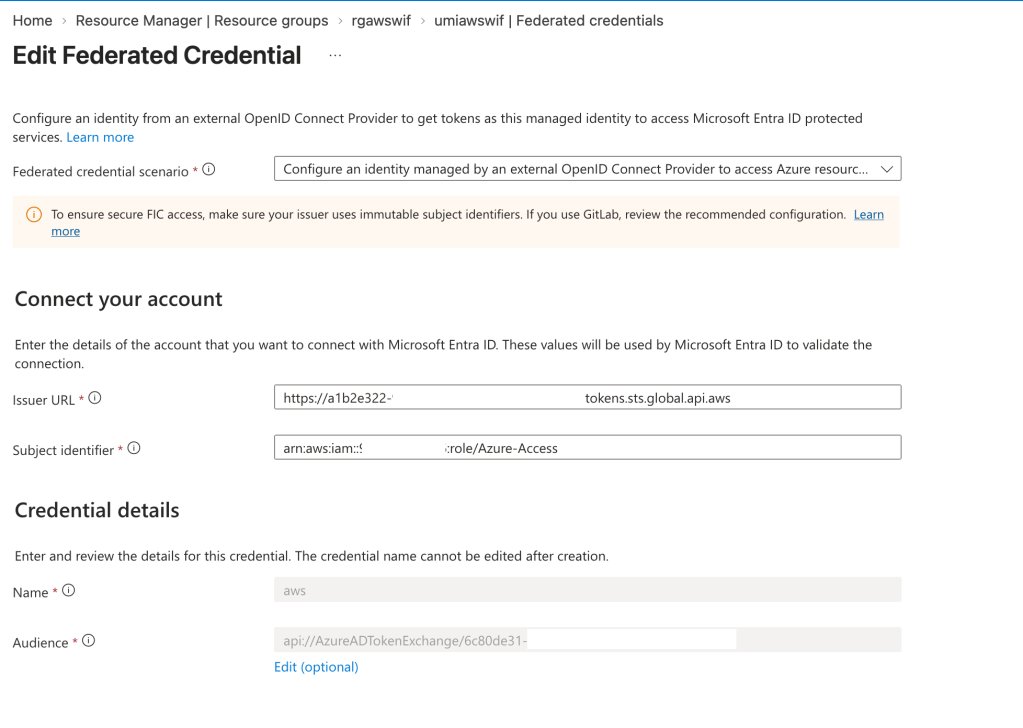
In the issuer URL I put my AWS account STS identifier I got when I setup the outbound federation. The subject identifier I set to the ARN of my IAM role and the audience I matched to the audience I put in the IAM policy.

One thing to note is that there are a maximum of 20 federated credentials per application resource or managed identity. If you have multiple workloads using the same identity on the Azure side, scale issues can come into play. There is a feature called flexible federated identity credentials which allow you to create an expression to match the incoming subject vs the specific subject itself. If you have those scale issues, you’ll want to look at this feature. It’s in preview as of the date of this blog.

Alright, at this point the plumbing is setup and now I need to toss together some code to make the magic happen.

For this I threw together a very basic Python snippet that requests an token from the AWS STS, exchanges it for an access token from Entra, and writes out the content of a blob stored in Azure Storage.

import boto3
import os
import base64
import json
import logging
import sys
from dotenv import load_dotenv
from azure.identity import ClientAssertionCredential
from azure.storage.blob import BlobServiceClient
load_dotenv(override=True)
TENANT_ID = os.getenv("ENTRA_TENANT_ID")
UMI_CLIENT_ID = os.getenv("AZURE_UMI_CLIENT_ID")
BLOB_ACCOUNT_URL = os.getenv("AZURE_BLOB_ACCOUNT_URL")
BLOB_CONTAINER_NAME = os.getenv("AZURE_BLOB_CONTAINER_NAME")
BLOB_NAME = os.getenv("AZURE_BLOB_NAME")
logging.basicConfig(
level=logging.DEBUG,
stream=sys.stdout,
format="%(asctime)s - %(name)s - %(levelname)s - %(message)s",
)
logger = logging.getLogger(__name__)
def print_jwt_claims(jwt: str) -> None:
print('Parsing AWS STS access token')
payload = jwt.split(".")[1]
payload += "=" * (-len(payload) % 4)
claims = json.loads(base64.urlsafe_b64decode(payload))
print(json.dumps(claims, indent=2))
def get_aws_sts_token() -> str:
print('Obtaining access token from AWS STS...')
sts_client = boto3.client('sts', region_name='us-east-1')
response = sts_client.get_web_identity_token(
Audience=[f"api://AzureADTokenExchange/{TENANT_ID}"],
DurationSeconds=300,
SigningAlgorithm='RS256'
)
token = response["WebIdentityToken"]
print_jwt_claims(token)
return token
try:
credential = ClientAssertionCredential(
tenant_id = TENANT_ID,
client_id = UMI_CLIENT_ID,
func = get_aws_sts_token
)
print(f"Contacting storage account {BLOB_ACCOUNT_URL}")
blob_service_client = BlobServiceClient(account_url=BLOB_ACCOUNT_URL,credential=credential)
blob_client = blob_service_client.get_blob_client(container=BLOB_CONTAINER_NAME,blob=BLOB_NAME)
blob_data = blob_client.download_blob().readall()
print(blob_data.decode("utf-8"))
except Exception as e:
print(f"Script failed: {e}")

Looking at the printed output of the script we first see the token generated by the AWS STS.

{
"aud": "api://AzureADTokenExchange/6c80de31-d5e4-4029-XXXX-XXXXXXXXXXXX",
"sub": "arn:aws:iam::XXXXXXXXXXXX:role/Azure-Access",
"https://sts.amazonaws.com/": {
"ec2_instance_source_vpc": "vpc-0a84fd0130401fcf9",
"ec2_role_delivery": "2.0",
"aws_account": "XXXXXXXXXXXX",
"original_session_exp": "2026-08-17T02:39:52Z",
"source_region": "us-east-1",
"ec2_source_instance_arn": "arn:aws:ec2:us-east-1:XXXXXXXXXXXX:instance/i-034a6ea7b8b83cba5",
"principal_id": "arn:aws:iam::XXXXXXXXXXXX:role/Azure-Access",
"ec2_instance_source_private_ipv4": "XX.XX.XX.XX"
},
"iss": "https://a1b2e322-9556-4319-XXXX-XXXXXXXXXXXX.tokens.sts.global.api.aws",
"exp": 1786912687,
"iat": 1786912387,
"jti": "7d6c05a6-10e8-46ab-8f15-6d4c595b55f0"
}

Here we see the audience set to my Entra tenant and the subject set to the ARN of the role associated to the EC2 instance.

The result of the exchange shows the content of the blob proving cross cloud authentication with no static secrets!

End to end the flow went something like this:

I covered the free pieces of WIF for this post. There are some pretty awesome Premium features that require licensing but extend Entra ID functionality like conditional access, identity protection, and privileged access review. The premium features will come with a cost per workload identity per month. My take is that functionality should be reserved for your high risk workloads unless you got cash to burn.

With those lessons learned, it’s a good time to review whether you’ve adopted WIF for your cross-cloud use cases. Less credentials = less pain. In the world that is tech today, I think we are all looking for a little less pain.

See you next post!
Azure Authorization – Azure ABAC (Attribute-based Access Control)

This is part of my series on Azure Authorization.

  1. Azure Authorization – The Basics
  2. Azure Authorization – Azure RBAC Basics
  3. Azure Authorization – actions and notActions
  4. Azure Authorization – Resource Locks and Azure Policy denyActions
  5. Azure Authorization – Azure RBAC Delegation
  6. Azure Authorization – Azure ABAC (Attribute-based Access Control)

Welcome back fellow geeks.

I do a lot of learning and educational sessions with my customer base. The volume pretty much demands reusable content which means I gotta build decks and code samples… and worse maintain them. The maintenance piece typically consists of me mentally promising myself to update the content and kicking the can down the road for a few months. Eventually, I get around to updating the content.

This month I was doing some updates to my content around Azure Authorization and decided to spend a bit more time with Azure ABAC (Attribute-based access control). For those of you unfamiliar with Azure ABAC, well it’s no surprise because the use cases are so very limited as of today. Limited as the use cases are, it’s a worthwhile functionality to understand because Microsoft does use it in its products and you may have use cases where it makes sense.

The Dream of ABAC

Let’s first touch briefly on the differences between (RBAC) role-based access control and (ABAC) attribute-based access control. Attribute-based access control has been the dream for the security industry for as long as I can remember. RBAC has been the predominant authorization mechanism in a majority of applications over the years. The challenge with RBAC is it has typically translated to basic group membership where an application authorizes a user solely on whether or not the user is in a group. Access to these groups would typically come through some type of request for membership and implementation by a central governance team. Those processes have tended to be not super user friendly and the access has tended to be very course-grained.

ABAC meanwhile promised more fine-grained access based upon attributes of the security principal, resource, or whatever your mind can dream up. Sounds awesome right? Well it is, but it largely remained a dream in the mainstream world with a few attempts such as Windows Dynamic Access Control (Before you comment, yeah I get you may have had some cool apps doing this stuff years ago and that is awesome, but let’s stick with the majority). This began to change when cloud came around with the introduction of more modern protocols and standards such as SAML, OIDC, and OAuth. These protocols provide more flexibility with how the identity provider packages attributes about the user in the token delivered to the service provider/resource provider/what have you.

When it came to the Azure cloud, Microsoft went the traditional RBAC path for much of the platform. User or group gets placed in Azure RBAC role and user(s) gets access. I explain Azure RBAC in my other posts on RBAC. There is a bit of flexibility on the Entra ID side for the initial access token via Entra ID Conditional Access, but RBAC in the Azure realm. This was the story for many years of Azure.

In 2021 Microsoft decided something more flexible was needed and introduced Azure ABAC. The world rejoiced… right? Nah, not really. While the introduction of ABAC was awesome, its scope of use was and still is extremely limited. As of the date of this blog, ABAC is only usable for Azure Storage blob and queue operations. All is not lost though, there are some great use cases for this feature so it’s important to understand how it works.

How does ABAC work?

Alright, history lesson and complaining about limited scope aside, let’s now explore how the feature works.

ABAC is facilitated through an additional property on Azure RBAC Role Assignment resources. I’m going to assume you understand the ins and out of role assignments. If you don’t, check out my prior post on the topic. In its most simple sense, an Azure RBAC role assignment is the association of a role to a security principal granting that principal the permissions defined in the role over a particular scope of resources. As I’ve covered previously, role assignments are an Azure resource that have defined sets of properties. The properties we care about for the scope of this discussion are the conditionVersion and condition properties. The conditionVersion property will always have a value of 2.0 for now. The condition property is where we work our ABAC magic.

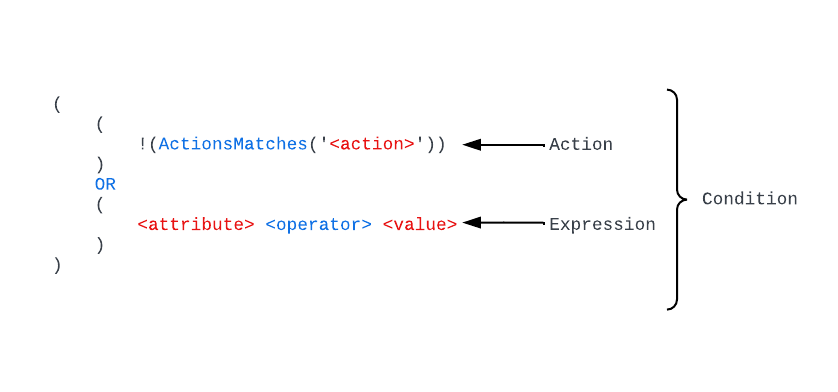
The condition property is made up of a series of conditions which each consist of an action and one or more expressions. The logic for conditions is kinda weird, so I’m walk you through it using some of the examples from documentation as well as complex condition I throw together. First, let’s look at the general structure.

Structure of conditions used in ABAC

In the above image you can see the basic building blocks of a condition. Looks super confusing and complicated right? I know it did to me at first. Thankfully, the kind souls who write the public documentation broke this down in a more friendly programming-like way.

Far more simple explanation of conditions

In each condition property we first have the action line where the logic looks to see if the action being performed by the security principal doesn’t (note the exclamation point which negates whats in the parentheses) match the action we’re applying the conditions to. You’ll commonly see a line like:

!(ActionMatches{'Microsoft.Storage/storageAccounts/blobServices/containers/blobs/read'} AND !SubOperationMatches{'Blob.List'})

This line is saying if the action isn’t blobs/read (which would be data plane call to read the contents of the blob) then the line should evaluate to true. If it evaluates to true, then the access is allowed and the expressions are not evaluated any further.

After this line we have the expression which is only evaluated when the first line evaluates to false (which in the example I just covered would mean the security principal is trying to read the content of a blob). The expressions support four categories of what Microsoft refers to as condition features. There are currently four features in various states of GA (general availability) and preview (refer to the documentation for those details). These four categories include:

  • Requests
  • Environment
  • Resource
  • Principal (security principal)

These four categories give you a ton of flexibility. Requests covers the details of the request to storage, for example such as limiting a user to specific blob prefixes based on the prefix within the request. Environment can be used to limit the user to accessing the resource from a specific Private Link Private Endpoint over Private Link in general (think defense-in-depth here). The resource feature exposes properties of the resource being accessed, which I find the most flexible thing to be blob index tags. Lastly, we have security principal and this is where you can muck around with custom security attributes in Entra ID (very cool feature if you haven’t touched it).

In a given condition we can have multiple expressions and within the condition property we can string together multiple conditions with AND and OR logic. I’m a big believer in going big or going home, so let’s take a look at a complex condition.

Diving into the Deep End

Let’s say I have a whole bunch of data I need to make available via a blobs in an Azure Storage Account. I have a strict requirement to use a single storage account and the blobs I’m going to store have different data classifications denoted by a blob index tag key named access_level. Blobs without this key are accessible by everyone while blobs classified high, medium, or low are only accessible by users with approval for the same or higher access levels (example: user with high access level can access high, medium, low, and data with no access level). Lastly, I have a requirement that data at the high access level can only be accessed during business hours.

I use a custom security attribute in Entra ID called accesslevel under an attribute set named organization to denote a user’s approved access level.

Here is how that policy would break down.

My first condition is built to allow users to read any blobs that don’t have the access_level tag.

# Condition that allows users within scope of the assignment access to documents that do not have an access level tag
(
  (
    # If the action being performed doesn't match blobs/read then result in true and allow access
    !(ActionMatches{'Microsoft.Storage/storageAccounts/blobServices/containers/blobs/read'} AND !SubOperationMatches{'Blob.List'})
  )
  OR 
  (
    # If the blob doesn't have a blob index tag with a key of access_level then allow access
    NOT @Resource[Microsoft.Storage/storageAccounts/blobServices/containers/blobs/tags&$keys$&] ForAnyOfAnyValues:StringEquals {'access_level'}
  )
)

If the blob does have an access tag, I want to start incorporating my logic. The next condition I include allows users with the accesslevel security attribute set to high to read blobs with a blob index tag of access_level equal to low or medium. I also also allow them to read blobs tagged with high if it’s between 9AM and 5PM EST.

# Condition that allows users within scope of the assignment to access medium and low tagged data if they have a custom 
# security attribute of accesslevel set to high. High data can also be read within working hours
OR
(
 (
   # If the action being performed doesn't match blobs/read then result in true and allow access
   !(ActionMatches{'Microsoft.Storage/storageAccounts/blobServices/containers/blobs/read'} AND !SubOperationMatches{'Blob.List'})
 )
 OR 
 (
   # If the blob has an index tag of access_level with a value of medium or low allow the user access if they have a custom security
   # attribute of organization_accesslevel set to high
   @Resource[Microsoft.Storage/storageAccounts/blobServices/containers/blobs/tags:access_level<$key_case_sensitive$>] ForAnyOfAnyValues:StringEquals {'medium', 'low'}
   AND
   @Principal[Microsoft.Directory/CustomSecurityAttributes/Id:organization_accesslevel] StringEquals 'high'
 )
 OR
 (
   # If the blob has an index tag of access_level with a value of high allow the user access if they have a custom security
   # attribute of organization_accesslevel set to high and it's within working hours
   @Resource[Microsoft.Storage/storageAccounts/blobServices/containers/blobs/tags:access_level<$key_case_sensitive$>] ForAnyOfAnyValues:StringEquals {'high'}
   AND
   @Principal[Microsoft.Directory/CustomSecurityAttributes/Id:organization_accesslevel] StringEquals 'high'
   AND
   @Environment[UtcNow] DateTimeGreaterThan '2025-06-09T12:00:00.0Z'
   AND
   @Environment[UtcNow] DateTimeLessThan '2045-06-09T21:00:00.0Z'
 )
)

Next up is users with medium access level. These users are granted access to data tagged medium or low.

# Condition that allows users within scope of the assignment to access medium and low tagged data if they have a custom 
# security attribute of accesslevel set to medium
OR
(
  (
    # If the action being performed doesn't match blobs/read then result in true and allow access
    !(ActionMatches{'Microsoft.Storage/storageAccounts/blobServices/containers/blobs/read'} AND !SubOperationMatches{'Blob.List'})
  )
  OR 
  (
    # If the blob has an index tag of access_level with a value of medium or low allow the user access if they have a custom security
    # attribute of organization_accesslevel set to medium
    @Resource[Microsoft.Storage/storageAccounts/blobServices/containers/blobs/tags:access_level<$key_case_sensitive$>] ForAnyOfAnyValues:StringEquals {'medium', 'low'}
    AND
    @Principal[Microsoft.Directory/CustomSecurityAttributes/Id:organization_accesslevel] StringEquals 'medium'
 )
)

Finally, I allow users with low access level to access data tagged as low.

# Condition that allows users within scope of the assignment to access low tagged data if they have a custom 
# security attribute of accesslevel set to low
OR
(
 (
   # If the action being performed doesn't match blobs/read then result in true and allow access
   !(ActionMatches{'Microsoft.Storage/storageAccounts/blobServices/containers/blobs/read'} AND !SubOperationMatches{'Blob.List'})
 )
 OR 
 (
   # If the blob has an index tag of access_level with a value of low allow the user access if they have a custom security
   # attribute of organization_accesslevel set to low
   @Resource[Microsoft.Storage/storageAccounts/blobServices/containers/blobs/tags:access_level<$key_case_sensitive$>] ForAnyOfAnyValues:StringEquals {'low'}
   AND
   @Principal[Microsoft.Directory/CustomSecurityAttributes/Id:organization_accesslevel] StringEquals 'low'
 )
)

Notice how I separated each condition using OR. If the first condition resolves to false, then the next condition is evaluated until all access is granted or all conditions are exhausted. Neat right?

Summing it up

So why should you care about this if its use case is so limited? Well, you should care because that is ABAC’s use case today, and it would be expanded in the future. Furthermore, ABAC allows you to be more granular in how you grant access to data in Azure Storage (again, blob or queue only). You likely have use cases where this can provide another layer of security to further constrain a security principal’s access. You’ll also see these conditions used in Microsoft’s products such as AI Foundry.

The other reason it’s helpful to understand this language used for the condition, is conditions are expanding into other services such as Azure RBAC Delegation (which if you aren’t using you should be). While the language can be complex, it does make sense if you muck around with it a bit.

A final bit of guidance here, don’t try to write conditions by hand. Use the visual builder in the Azure Portal as seen below. It will help you get some basic conditions in place that you can further modify directly via the code view.

Azure Portal Condition Builder

Next time you’re locking down an Azure storage account, think about whether or not you can further restrict humans and non-humans alike based on the attributes discussed today. The main places I’ve seen this used are for user profiles, further restricting user access to specific subsets of data (similar to the one I walked through above), or even adding an additional layer of network security baked directly into the role assignment itself.

See you next post!

AI Foundry – Identity, Authentication and Authorization

This is a part of my series on AI Foundry:

Updates:

  • 3/17/2025 – Updated diagrams to include new identities and RBAC roles that are recommended as a minimum

Yes, I’m going to re-use the outline from my Azure OpenAI series. You wanna fight about it? This means we’re going to now talk about one of the most important (as per usual) and complicated (oh so complicated) topic in AI Foundry: identity, authentication, and authorization. If you haven’t read my prior two posts, you should take a few minutes and read through them. They’ll give you the baseline you’ll need to get the most out of this post. So put on your coffee, break out the metal clips to keep your eyes open Clockwork Orange-style, and prepare for a dip into the many ways identity, authN, and authZ are handled within the service.

As I covered in my first post Foundry is made up of a ton of different services. Each of these services plays a part in features within Foundry, some may support multiple forms of authentication, and most will be accessed by the many types of identities used within the product. Understanding how each identity is used will be critical in getting authorization right. Missing Azure RBAC role assignments is the number one most common misconfiguration (right above networking, which is also complicated as we’ll see in a future post).

Azure AI Foundry Components

Let’s start first with identity. There will generally be four types of identities used in AI Foundry. These identities will be a combination of human identities and non-human identities. Your humans will be your AI Engineers, developers, and central IT and will use their Entra ID user identities. Your non-humans will include the AI Foundry hub, project, and compute you provision for different purposes. In general, identities are used in the following way (this is not inclusive of all things, just the ones I’ve noticed):

  • Humans
    • Entra ID Users
      • Actions within Azure Portal
      • Actions within AI Foundry Studio
        • Running a prompt flow from the GUI
        • Using the Chat Playground to send prompts to an LLM
        • Running the Chat-With-Your-Data workflow within the Chat Playground
        • Creating a new project within a hub
      • Actions using Azure CLI such as sending an inference to a managed online endpoint that supports Entra ID authentication
  • Non-Humans
    • AI Foundry Hub Managed Identity
      • Accessing the Azure Key Vault associated with the Foundry instance to create secrets or pull secrets when AI Foundry connections are created using credentials versus Entra ID
      • Modify properties of the default Azure Storage Account such as setting CORS policies
      • Creating managed private endpoints for hub resources if a managed virtual network is used
    • AI Foundry Project Managed Identity
      • Accessing the Azure Key Vault associated with the Foundry instance to create secrets or pull secrets when AI Foundry connections are created using credentials versus Entra ID
      • Creating blob containers for project where project artifacts such as logs and metrics are stored
      • Creating file share for project where project artifacts such as user-created Prompt Flow files are stored
    • Compute
      • Pulling container image from Azure Container Registry when deploying prompt flows that require custom environments
      • Accessing default storage account project blob container to pull data needed to boot
      • Much much more in this category. Really depends on what you’re doing

Alright, so you understand the identities that will be used and you have a general idea of how they’ll be used to perform different tasks within the Foundry ecosystem. Let’s now talk authentication.

The many identities of AI Foundry

Authentication in Foundry isn’t too complicated (in comparison to identity and authorization). Authenticating to the Azure Portal and the Foundry Studio is always going to be Entra ID-based authentication. Authentication to other Azure resources from the Foundry is where it can get interesting. As I covered in my prior post, Foundry will typically support two methods of authentication: Entra ID and API key based (or credentials as you’ll see it often referred to as in Foundry). If at all possible, you’ll want to lean into Entra ID-based authentication whenever you access a resource from Foundry. As we’ll see in the next section around authorization, this will have benefits. Besides authorization, you’ll also get auditability because the logs will show the actual security principal that accessed the resource.

If you opt to use credential-based authentication for your connections to Azure resources, you’ll lose out in a few different areas. When credential-based authentication is used, users will access connected resources within Foundry using the keys stored in the Foundry connection object. This means the user assumes whatever permissions the key has (which is typically all data-plane permissions but could be more restrictive in instances like a SAS token). Besides the authorization challenges, you’ll also lose out on traceability. AI Foundry (and the underlining Azure Machine Learning) has some authorization (via Azure RBAC roles) that is used to control access to connections, but very little in the way auditing who exercised what connection when. For these reasons, you should use Entra ID where possible.

Ready for authorization? Nah, not yet. Before we get into authorization, it’s important to understand that these identities can be used in generally two ways: direct or indirect (on-behalf-of). For example, let’s say you run a Prompt Flow from AI Foundry interface, while the code runs on a serverless compute provisioned in a Microsoft managed network (more on that in a future post), the identity context it uses to access downstream resources is actually yours. Now if you deploy that same prompt to a managed online-endpoint, the code will run on that endpoint and use the managed identity assigned to the compute instance. Not so simple is it?

So how do you know which identity will be used? Observe my general guidance from up above. If you’re running things from the GUI, likely your identity, if you’re deploying stuff to compute likely the identity associated with the compute. The are exceptions to the rule. For example, when you attempt to upload data for fine-tuning or using the on-your-own-data feature in the Chat Playground, and your default storage account is behind a private endpoint your identity will be used to access the data, but the managed identity associated with the project is used to access the private endpoint resource. Why it needs access to the Private Endpoint? I got no idea, it just does. If you don’t, good luck to you poor soul because you’re going to have hell of time troubleshooting it.

Another interesting deviation is when using the Chat Playground Chat With Your Data feature. If you opt to add your data and build the index directly within AI Foundry, there will be a mixed usage of the user identity, AI Search managed identity (which communicates with the embedding models deployed in the AI Services or Azure OpenAI instance to create the vector representations of the chunks in the index), and AI Services or Azure OpenAI managed identity (creates index and data sources in AI Search). It can get very complex.

The image below represents most of the flows you’ll come across.

The many AI Foundry authentication flows and identity patterns

Okay, now authorization? Yes, authorization. I’m not one for bullshitting, so I’ll just tell you up front authorization in Foundry can be hard. It gets even harder when you lock down networking because often the error messages you will receive are the same for blocked traffic and failed authorization. The complexities of authorization is exactly why I spent so much time explaining identity and authentication to you. I wish I could tell you every permission in every scenario, but it would take many, many, posts to do that. Instead, I’d advise you to do (sometimes I fail to do this) which is RTFM (go ahead and Google that). This particular product group has made strong efforts to document required permissions, so your first stop should always be the Foundry public documentation. In some instances, you will also need to access the Azure Machine Learning documentation (again, this is built on top of AML) because there are sometimes assumptions that you’ll do just that because you should know this is a feature its inheriting from AML (yeah, not fair but it’s reality).

In general, at an absolute minimum, the permissions assigned to the identities below will get you started as of the date of this post (updated 3/17/2025).

As I covered in my prior posts, the AI Foundry Hub can use either a system-assigned or user-assigned managed identity. You won’t hear me say this often, but just use the system-assigned managed identity if you can for the hub. The required permissions will be automatically assigned and it will be one less thing for you to worry about. Using the permissions listed above should work for a user-assigned managed identity as well (this is on my backburner to re-validate).

A project will always use a system assigned managed identity. The only permission listed above that you’ll need to manually grant is Reader over the Private Endpoint for the default storage account. This is only required if you’re using private endpoint for your default storage account. There may be additional permissions required by the project depending on the activities you are performing and data you are accessing.

On the user side the permissions above will put you in a good place for your typical developer or AI engineer to use most of the features within Foundry. If you’re interacting with other resources (such as an AI Search Index when using the on-your-own-data feature) you’ll need to ensure the user is granted appropriate permissions to those resources as well (typically Search Service Contributor – management plane to list indexes and create indexes and Search Index Data Contributor – data plane create and view records within an index. If your user is fine-tuning a model that is deployed within the Azure OpenAI or AI Service instance, they may additionally need the Azure OpenAI Service Contributor role (to upload the file via Foundry for fine-tuning). Yeah, lots of scenarios and lots of varying permissions for the user, but that covers the most common ones I’ve run into.

Lastly, we have the compute identities. There is no standard here. If you’ve deployed a prompt flow to a managed identity, the compute will need the permissions to connect to the resources behind the connections (again assuming Entra-ID is configured for the connection, if using credential Azure Machine Learning Workspace Secrets Reader on the project is likely sufficient). Using a prompt flow that requires a custom environment may require an image be pushed to the Azure Container Registry which the compute will pull so it will need the Acr Pull RBAC role assignment on the registry.

Complicated right? What happens when stuff doesn’t work? Well, in that scenario you need to look at the logs (both Azure Activity Log and diagnostic logging for the relevant service such as blob, Search, OpenAI and the like). That will tell you what the user is failing to do (again, only if you’re using Entra ID for your connections) and help you figure out what needs to be added from a permissions perspective. If you’re using credentials for your connections, the most common issue with them is with the default storage account where the storage account has had the storage access keys disabled.

Here are the key things I want you to take away from this:

  1. Know the identity being used. If you don’t know which identity is being used, you’ll never get authorization right. Use the of the downstream service logs if you’re unsure. Remember, management plane stuff in Azure Activity Log and data plane stuff in diagnostic logs.
  2. Use Entra ID authentication where possible. Yeah it will make your Azure RBAC a bit more challenging, but you can scope the access AND understand who the hell is doing what.
  3. RTFM where possible. Most of this is buried in the public documentation (sometimes you need to put on your Indiana Jones hat). Remember that if you don’t find it in Foundry documentation, look to Azure Machine Learning.
  4. Use the above information as general guide to get the basic environment setup. You’ll build from that basic foundation.

Alrighty folks, your eyes are likely heavy. I hope this helps a few souls out there who are struggling with getting this product up and running. If you know me, you know I’m no fan boy, but this particular product is pretty damn awesome to get us non-devs immediately getting value from generative AI. It may take some effort to get this product running, but it’s worth it!

Thanks and see you next post!

Azure Authorization – Azure RBAC Delegation

This is part of my series on Azure Authorization.

  1. Azure Authorization – The Basics
  2. Azure Authorization – Azure RBAC Basics
  3. Azure Authorization – actions and notActions
  4. Azure Authorization – Resource Locks and Azure Policy denyActions
  5. Azure Authorization – Azure RBAC Delegation
  6. Azure Authorization – Azure ABAC (Attribute-based Access Control)

Hello again fellow geeks!

I typically avoid doing multiple posts in a month for sanity purposes, but quite possibly one of the most awesome Azure RBAC features has gone generally available under the radar. Azure RBAC Delegation is going to be one of those features that after reading this post, you will immediately go and implement. For those of you coming from AWS, this is going to be your IAM Permissions Boundary-like feature. It addresses one of the major risks to Azure’s authorization model and fills a big gap the platform has had in the authorization space.

Alright, enough hype let’s get to it.

Before I dive into the new feature, I encourage you to read through the prior posts in my Azure Authorization series. These posts will help you better understand how this feature fits into the bigger picture.

As I covered in my Azure RBAC Basics post, only security principals with sufficient permissions in the Microsoft.Authorization resourced provider can create new Azure RBAC Role Assignments. By default, once a security principal is granted that permission it can then assign any Azure RBAC Role to itself or any other security principal within the Entra ID tenant to it’s immediate scope of access and all child scopes due to Azure RBAC’s inheritance model (tenant root -> management group -> subscription -> resource group -> resource). This means a human assigned a role with sufficient permissions (such as an IAM support team) could accidentally / maliciously assign another privileged role to themselves or someone else and wreak havoc. Makes for a not good late night for anyone on-call.

While the human risk exists, the greater risk is with non-human identities. When an organization passes beyond the click-ops and imperative (az cli, PowerShell, etc) stage and moves on to the declarative stage with IaC (infrastructure-as-code), delivery of those IaC templates (ARM, Bicep, Terraform) are put through a CI/CD (continuous integration / continuous delivery) pipeline. To deploy the code to the cloud platform, these pipeline’s compute need an identity to authenticate to the cloud management plane. In Azure, this is accomplished through a service principal or managed identity. That identity must be granted the specific permissions it needs which is done through Azure RBAC Role assignments.

In the ideal world, as much as can be is put through the pipeline, including role assignments. This means the pipeline needs to be able to create Azure RBAC Role assignments which means it needs permissions for the Microsoft.Authorization resource provider (or relevant built-in roles with Owner being common).

To mitigate the risk of one giant blast radius with one pipeline, organizations will often create multiple pipelines with separate pipelines for production and non-production, pipelines for platform components (networking, logging, etc) and others for the workload (possibly one for workload components such as an Event Hub and another separate pipeline for code). Pipelines will be given separate security principals with permissions at different scopes with Central IT typically owning pipelines at higher scopes (management groups) and business units owning pipelines at lower scopes (subscription or resource group).

Example of multiple pipelines and identities

At the end of the day you end up with lots of pipelines and lots of non-humans that hold the Owner role at a given scope. This multiplies the risk of any one of those pipeline identities being misused to grant someone or something permissions beyond what it needs. Organizations typically mitigate through this automated and manual gates which can get incredibly complex at scale.

This is where Azure RBAC Delegation really shines. It allows you to wrap restrictions around how a security principal can exercise its Microsoft.Authorization permissions. These restrictions can include:

  • Restricting to a specific set of Azure RBAC Roles
  • Restricting to a specific security principal type (user, service principal, group)
  • Restricting whether it can create new assignments, update existing assignments, or delete assignments
  • Restricting it to a specific set of security principals (specific set of groups, users, etc)

So how does it do it? Well if you read my prior post, you’ll remember I mentioned the new property included in Azure RBAC Role assignments called conditions. RBAC Delegation uses this new property to wrap those restrictions around the role. Let’s look at an example role using one of the new built-in role Microsoft has introduced called the Role Based Access Control Administrator.

Let’s take a look at the role definition first.

{
    "id": "/subscriptions/b3b7aae7-c6c1-4b3d-bf0f-5cd4ca6b190b/providers/Microsoft.Authorization/roleDefinitions/f58310d9-a9f6-439a-9e8d-f62e7b41a168",
    "properties": {
        "roleName": "Role Based Access Control Administrator",
        "description": "Manage access to Azure resources by assigning roles using Azure RBAC. This role does not allow you to manage access using other ways, such as Azure Policy.",
        "assignableScopes": [
            "/"
        ],
        "permissions": [
            {
                "actions": [
                    "Microsoft.Authorization/roleAssignments/write",
                    "Microsoft.Authorization/roleAssignments/delete",
                    "*/read",
                    "Microsoft.Support/*"
                ],
                "notActions": [],
                "dataActions": [],
                "notDataActions": []
            }
        ]
    }
}

In the above role definition, you can see that the role has been granted only permissions necessary to create, update, and delete role assignments. This is more restrictive than an Owner or User Access Administrator which have a broader set of permissions in the Microsoft.Authorization resource provider. It makes for a good candidate for a business unit pipeline role versus Owner since business units shouldn’t need to be managing Azure Policy or Azure RBAC Role Definitions. That responsibility should within Central IT’s scope.

You do not have to use this built-in role or can certainly design your own. For example, the role above does not include the permissions to manage a resource lock and this might be something you want the business unit to be able to manage. This feature is also supported for custom role. In the example below, I’ve cloned the Role Based Access Control Administrator but added additional permissions to manage resource locks.

{
    "id": "/subscriptions/b3b7aae7-c6c1-4b3d-bf0f-5cd4ca6b190b/providers/Microsoft.Authorization/roleDefinitions/dd681d1a-8358-4080-8a37-9ea46c90295c",
    "properties": {
        "roleName": "Privileged Test Role",
        "description": "This is a test role to demonstrate RBAC delegation",
        "assignableScopes": [
            "/subscriptions/b3b7aae7-c6c1-4b3d-bf0f-5cd4ca6b190b"
        ],
        "permissions": [
            {
                "actions": [
                    "Microsoft.Authorization/roleAssignments/write",
                    "Microsoft.Authorization/roleAssignments/delete",
                    "*/read",
                    "Microsoft.Support/*",
                    "Microsoft.Authorization/locks/read",
                    "Microsoft.Authorization/locks/write",
                    "Microsoft.Authorization/locks/delete"
                ],
                "notActions": [],
                "dataActions": [],
                "notDataActions": []
            }
        ]
    }
}

If I were to attempt to create a new role assignment for this custom role, I’ve given the ability to associate the role with a set of conditions.

Adding conditions to a custom role

Let’s take an example where I want a security principal to be able to create new role assignments but only for the built-in role of Virtual Machine Contributor. The condition in my role would like the below:

    (
        (
            !(ActionMatches{'Microsoft.Authorization/roleAssignments/write'})
        )
        OR 
        (
            @Request[Microsoft.Authorization/roleAssignments:RoleDefinitionId] ForAnyOfAnyValues:GuidEquals {9980e02c-c2be-4d73-94e8-173b1dc7cf3c}
            AND
            @Request[Microsoft.Authorization/roleAssignments:PrincipalType] StringEqualsIgnoreCase 'User'
        )
    )
    AND
    (
        (
            !(ActionMatches{'Microsoft.Authorization/roleAssignments/delete'})
        )
        OR 
        (
            @Request[Microsoft.Authorization/roleAssignments:PrincipalType] StringEqualsIgnoreCase 'User'
        )
    )

Yes, I know the conditional language is ugly as hell. Thankfully, you won’t have to write this yourself which I will demonstrate in a few. First, I want to walk you through the conditional language.

Azure RBAC conditional language

When using RBAC Delegation, you can associate one or more conditions to an Azure RBAC role assignment. Like most conditional logic in programming, you can combine conditions with AND and OR. Within each condition you have an action and expression. When the condition is evaluated the action is first checked for a match. In the example above I have !(ActionMatches{‘Microsoft.Authorization/roleAssignments/write’}) which will match any permission that isn’t write which will cause the condition to result in true and will allow the access without evaluating the expression below. If the action is write, then this evaluated to false and the expression is then evaluated. In the example above I have two expressions. The first expression checks whether the request I’m making to create a role assignment is for the role definition id for the Virtual Machine Contributor. The second expression checks to see if the principal type in the role assignment is of type user. If either of these evaluate to false, then access is denied. If it evaluates to true, it moves on to the next condition which limits the security principal to deleting role assignments assigned to users.

No, you do not need to learn this syntax. Microsoft has been kind enough to provide a GUI-based conditions tool which you can use to build your conditions and view as code you can include in your templates.

GUI-based condition builder

Pretty cool right? The public documentation walks through a number of different scenarios where you can use this, so I’d encourage you to read it to spur ideas beyond the pipeline example I have given in this post. However, the real value out of this feature is stricter control of what how those pipeline identities can affect authorization.

So what are you takeaways for this post?

  • Get this feature implemented YESTERDAY. This is minimal overhead with massive security return.
  • Use the GUI-based condition builder to build your conditions and then copy the JSON into your code.
  • Take some time to learn the conditional syntax. It’s used in other places in Azure RBAC and will likely continue to grow in usage.
  • Start off using the built-in Role Based Access Control Administrator role. If your business units need more than what is in there (such as managing resource locks) clone it and add those permissions.

Well folks, I hope you got some value out of this post. Add a to-do to get this in place in your Azure estate as soon as possible!