
Welcome back.
We’ve had an interesting journey so far in this series exploring the Azure Active Directory (Azure AD) and Google G-Suite (G-Suite) integration. In the first entry I covered how the single sign-on integration works. The second entry covered explored the process of registering an application with the Google Cloud Platform (GCP) for API access and GCP’s relationship to G-Suite. Today I demonstrate interaction with Google’s API through the use of some very basic .NET console applications I’ve put together.
As you’ll recall from the second entry, I created a new project with GCP and created a service account identity for my sample application and the Google Admin API has been enabled for the project. The application has been granted domain-wide delegation rights to my G-Suite domain at geekintheweeds.com. Finally, the application’s client ID added to my G-Suite domain and has been granted access to the https://www.googleapis.com/auth/admin.directory.user.readonly scope. The application has an identity, credentials to authenticate, and has been authorized with appropriate access. Let’s get to some coding (or the mess of garbled logic that accounts for my coding ability 🙂 ).
Google provides API client libraries for a number of languages. For the purposes of this demonstration, I’ll be using the .NET client library. Play it smart and leverage the libraries vendors provide for ease of integration as well as avoiding critical mistakes that could impact the security of your API calls. Now using libraries doesn’t mean you get to ignore what goes on behind the curtains. It’s critical to understand what the libraries are doing to ensure they’re doing things securely and for the purposes of working out bugs. APIs in the cloud are changing on a daily basis, don’t count on the libraries keeping up with the vendor pace. The last thing you want to run into is an situation where your application kicks the bucket due to an API change that isn’t reflected in the library and you’re stuck with a broken production application.
With that lecture out of the way, let’s get into the code for the demo application.
My first step is to open a new project in Visual Studio creating a Visual C# Console App using the .NET Framework. Before I jump into using Google’s libraries I’m going to do the exact opposite of what I advised you to do above. Yes folks, I’m going to make a call to the API without using Google’s libraries for the purposes of demonstrating the steps involved in acquiring an access token and sending that access token to the API to retrieve data. I’ll then demonstrate how much simpler it is to use the library so you’ll appreciate the value of them.
As I explained in my last post, Google APIs use OAuth 2.0 for delegated access to data. Google does a good job explaining the basic steps in obtaining an access token in this article so I won’t go too deeply into detail. Instead I’m going to walk through putting these steps into code. Fair warning, this code is meant for demo purposes only. This means I’m not going to do any data validation, exception catching, or exercise secure coding practices. Please please please don’t use my terrible coding practices in any real applications you develop.
Ready? Let’s begin.
The article above first instructs you to obtain OAuth 2.0 credential which I did in my last entry. The second step is to obtain an access token from the Google Authorization Server. I’ll be following the instructions for the OAuth 2.0 for Service Accounts since I’m building a console application for simplicity purposes.
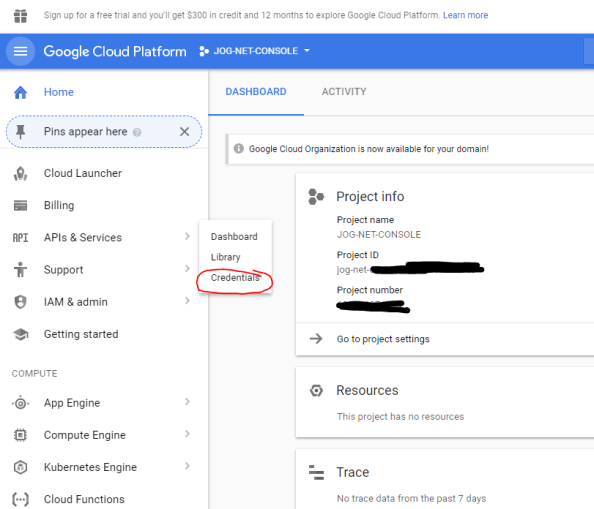
The first thing we need to is collect a few pieces of information. In the service account scenario we need to know the unique identifier of the service account and the scopes we want to access. For that I pop open a browser and go to the my project in the console for GCP. From there I navigate to the APIs & Services section and select the credentials option.
On the Credentials page I click on my service account to bring up the relevant information. The service account field contains the unique identifier (or email address as Google refers to it) of the service account I setup.
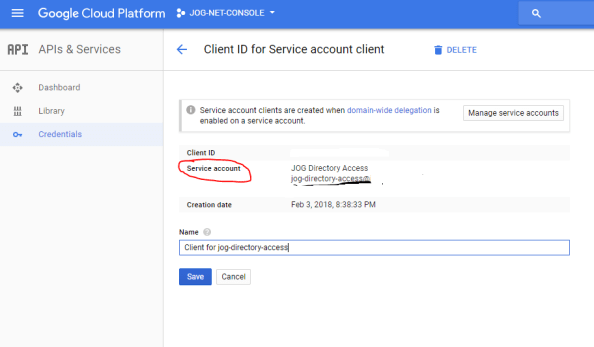 This identifier is one of the pieces of information I’ll need to include in the JSON Web Token (JWT) I’m going to send to Google’s API to obtain an access token. In addition to the service account identifier, I also need the scopes I want to access, Google Authorization Server endpoint, G-Suite user I’m impersonating, the expiration time I want for the access token (maximum of one hour), and the time the assertion was issued.

Now that I’ve collected the information I need for my claim set, I need to grab the private key from the PKCS#12 (.p12) certificate I was issued when I setup my service account.
 At this point I have all the components I need to assemble my JWT. For that I’m going to add the jose-jwt library to my application and leverage it to simplify the creation of the JWT.

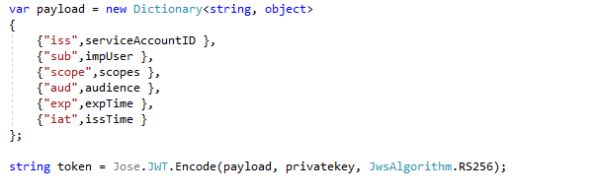
Once the library is added I create the JWT. Google requires it include a base64 encoded header, base64 encoded claim set, and the signature providing my application’s identity and ensuring the integrity of the JWT. The signature is creating using the RSA-SHA256 signing algorithm, which is the only algorithm Google supports at this time.
I quickly debug the app, dump the token variable to a string, copy it into Fiddler’s Text Wizard and Base64 decode it, we see the JWT we’ll be passing to Google.
 I now have my JWT assembled and am ready to deliver to Google for an access token request. The next step is to submit it to Google’s authorization server. For that I need to a do a few things. The first thing I need to is create a new class that will act as the data model for JSON response Google will return to me after I submit my authorization request. I’ll deserialize the JWT I receive back using this data model.

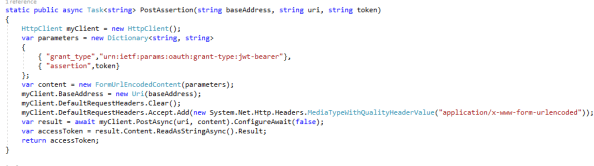
Next I create a new task that will accept a base web address, uri, and a JWT. The task then uses an instance of the HttpClient class to post it to Google’s authorization server and to capture the JSON response.
 I then call the new task, pass the appropriate parameters, deserialize the JSON response using the data model I created earlier, and dump the bearer access token into a string variable.
 So I have my bearer access token that allows me to impersonate the user within my G-Suite domain for the purposes of hitting the Google Directory API. I whip up another task that will deliver the bearer access token to the Google Directory API and the JSON response which will include details about the user.
 Finally I call the task and dump the JSON response to the console.
 The results look like the below.

Victory! Whew a lot of work there to pull a small amount of data from an API. I had to create models for the data (you’ll notice I got lazy at the end and didn’t create a user model), properly secure the JWT for the access token request, manage my own http clients, and handle the JSON responses. It ended up being a fair amount of code for a relatively simple process.
How much easier is it using Google’s .NET library? Let’s take a look at it.
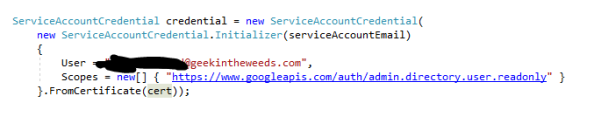
In the code below I create a service account credential which handles the process of creating the appropriate JWT access token.
Next up I create a new instance of the DirectoryService class which will represent the connection to the Google Directory API. This class the assembly of the eventual POST to obtain the bearer access token.

Last but not least I submit a request for user information for marge.simpson@geekinthweeds.com using the instance of the DirectoryService class I created and placing the JSON response into instance of the User class included in the Directory API which will serve as the data model for the response.

Just a tad bit easier using the library right? If we break out Fiddler we see that four sessions have been created.
 Session 1 and 2 display the submission of the JWT and acquisition of the bearer token.
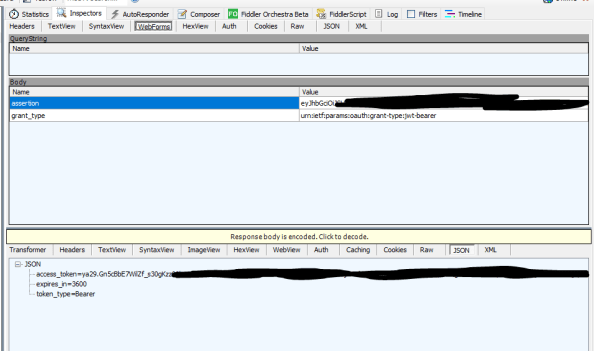
Sessions 3 and 4 display the delivery of the bearer token to the API and the JSON response received back.

What did we learn from these past two posts (besides the fact I’m a terrible developer)? We saw programmatic access to G-Suite is very dependent on foundational components of GCP. Application identities are provisioned in the Google’s IAM Service instance associated with the GCP Project. The appropriate APIs must be enabled for the GCP project that the application needs to use. The application must then be granted access to the appropriate authorization scopes within the G-Suite domain and Google provides an option for the application to impersonate users within the G-Suite domain rather than relying upon the user’s consent.
My hope is the biggest lesson you took from these two posts is how valuable it is to understand the inner workings of how a vendor leverages a technology. Vendor-provided libraries are wonderful and make our lives far easier and our code potentially more simple and secure, but nothing is ever more powerful than understanding the inner workings of the foundational technology. The knowledge you take at the technology level will translate across all vendors you encounter making grasping that new product all that much easier. Take your time, dig deep into the weeds, and enjoy the journey into the technology.
See you in the next post where I’ll wrap up this series and break down the Microsoft Azure AD identity provisioning integration with G-Suite. Have a great week!
