This is part of my series on Microsoft Entra ID:
- Entra ID – Deep Dive – The Basics – Part 1
- Entra ID – Deep Dive – Protocol Primer – Part 2
- Entra ID – Deep Dive – Entra ID Authentication – Part 3
Welcome back folks. Today I’ll be continuing my deep dive series into Entra. In my last post I went over the basics of Entra ID covering what it is at a high level and the important resources you’ll want to understand to grasp how human and non-humans identities are treated within the service. One of the features of Entra ID that I highlighted in that post was that it provides authentication services. It is capable of providing authentication of a human or non-human through older protocols like Kerberos (don’t get me started on this feature or else I’ll spend the whole post ranting) and LDAP (through Entra ID Domain Services, another service I’m no fan of), but also more modern protocols such as SAML and OIDC (OpenID Connect). Before I dive into Microsoft’s implementation of OIDC and the protocol it’s built on top of, OAuth, I figured it was a good time to do a light protocol primer (primarily for my own benefit because I can only re-read the RFC so many times before it stops being fun. Yeah I find it fun to read a good RFC, so what?).
What is OAuth?
You are probably thinking, “Why the hell are we talking about OAuth?” We need to talk about OAuth (Open Authorization) because OIDC is built on top of the OAuth protocol. If you have a basic understanding of OAuth, then OIDC makes a lot more sense. I’m not going to try to make you an expert, because to make you an expert I’d need to expert which I am very far from. Instead, I’m going to give you the basics. If you want a better/smarter explanation, start with the RFC(s) and then take a read through Vittorio Bertocci’s (an industry legend) many articles, ebook, and videos online.
There are a lot of misconceptions out there where folks will talk about OAuth authentication, which is not a real thing. OAuth itself exists as an authorization protocol to provide a framework (lots of SHOULDs/COULDs and not a ton of MUSTs in that RFC) for how applications can get limited access to a user’s data based around the user’s consent using delegation.
The protocol refers to this limited access as a scope. The assignment of a specific scope to an application gives you the ability to do delegation vs impersonation. In impersonation, the application will typically act as you with your full permission set vs with delegation you grant consent for the application to access a subset of your data with a more restricted set of permissions. A good example would be delegating the application the read permission over your email vs the reading, writing new emails, and deleting emails impersonation might give the application.
When it comes to the whole process of a user delegating a scope of access to an application, a number of different roles are involved. These roles include:
- Client
- Resource Owner
- Authorization Server
- Resource Server
Client
The client is an application that needs to access some data. Within the protocol it’s important to divide applications into a few different buckets, because the protocol supports them in different ways as I’ll cover in a bit. The standard breaks them into three buckets: web applications, browser-based applications, and native applications. I’m going to keep it simple and consolidate those three buckets into two which will be web applications and non-web applications.
Clients can be either public clients (non-web apps) or confidential clients (web apps). Confidential clients have some type of credential they use to authenticate themselves to the authorization server while public clients do not have a credential (because their code runs on the user’s machine so there is no way to secure the credential). Clients must register with the authorization server either through dynamic registration (which Entra ID does not support today) or through some other type of process. Registration, at a minimum, will include providing the authorization server with a redirectUri, which grant types it will use, and whether it’s a public or confidential client. The client is then issued a unique identifier called a client_id and optionally a client_secret if a confidential client. We’ll see an example of how Entra does it later on this series. Examples of clients could be applications you develop, third-party applications you integrate with, or Microsoft-native applications like Microsoft Teams.
Resource Owner
The resource owner is the user or organization that owns the data the client wants to access and is the entity that is capable of granting access to that data through a consent process. Consent is a major focus in OAuth since it relies on delegation of a specific scope of access to the data. Consent is the process of the resource owner approving that delegation. Resource owners in the Entra ID world are going to be the enterprise at the top layer, business units underneath that layer, and finally its employees which are represented by user objects in Entra. Consent will either be granted for all users within the tenant by an administrator or by individual users to data they have permissions over. In Entra, which consent is required is defined by the type property in the application resource’s permissionScope.
Authorization Server
The authorization server is the role that glues all other roles together. This is the server authenticates the user (OAuth doesn’t care how), gets the user’s consent for the client to access the data, and issues an access token to the client. Entra ID fulfills this role in the Microsoft cloud world.
Resource Server
The resource server hosts the resource owner’s data. It will consume the access token obtained by the client from the authorization server and allow or deny access to the data. Resource servers in the Microsoft world could be your custom built application or the Microsoft Graph API.
The RFC has a basic diagram which does a good job explaining the flow at a high level.
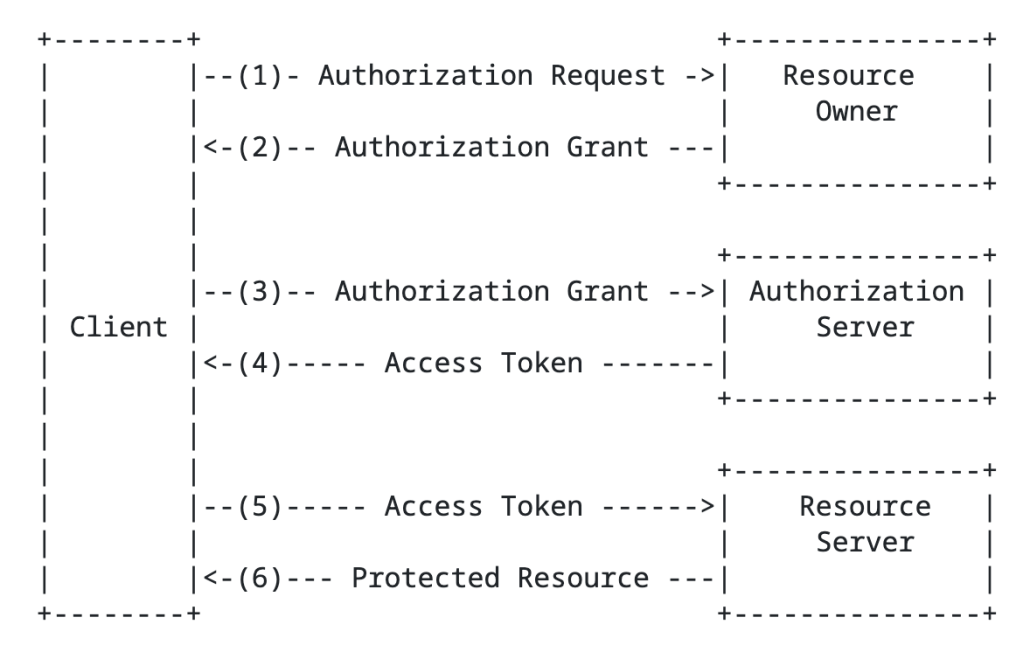
You’ll notice the the term authorization grant in the above image. An authorization grant represents the resource owner’s authorization (delegation) of a specific scope of access to their data and is used by the client to get an access token which the resource server consumes and approves/denies access. In the base specification for OAuth 2.1, there are three types of grants (there are a ton of extension grants, some of which we’ll cover in this series) which include the authorization code grant, the refresh token grant, and the client credentials grant.
Before I describe the grant types, it’s worth calling out that I’m going to be talking specifically about OAuth 2.1 (which is still a draft RFC right now). OAuth 2.1 seeks to address a lot of the security issues with OAuth 2.0. In OAuth 2.0 there were a bunch more grant types including resource owner credentials flow and the implicit flow there are somewhat of security nightmares. OAuth 2.1 removes those grant types and the official spec sticks to the three I described above while adding an additional requirement for PKCE (Proof-Key for Code Exchange) for both public AND confidential clients. PKCE helps to address authorization code interception attacks. This Okta article does a great job describing the security benefit brings. I’ll demonstrate this with MSAL in a later post. Now back to the authorization grant types.
The authorization code grant type involves sending the resource owner to the authorization server to authenticate and consent to the client’s access of their data, returning an authorization code to the client, and the client exchanging that with the authorization server for an access token. This is going to be your go to grant type any delegation use case. An example of this would be an application accessing my data in a storage account that belongs to me.
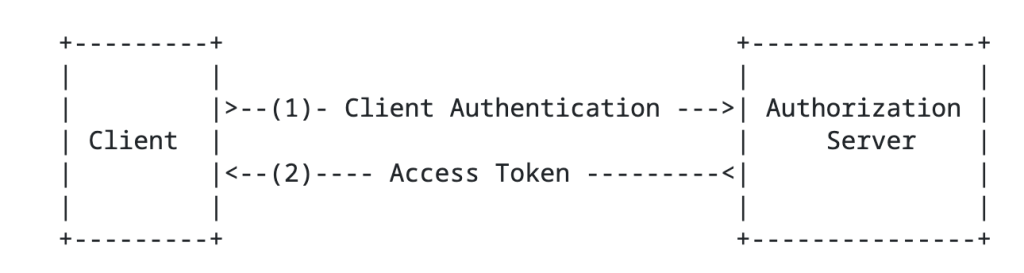
Next up is the client credentials flow grant type. In this flow there is no user consent because the data the client is trying to access is under its control. Essentially, the client uses its own identity context to access the data because it’s already been authorized to do so. An example here would be an application pulling Entra ID sign-in logs from the MS Graph API.
Lastly, we have the refresh token grant. This grant type is used by the client to exchange a refresh token for a fresh access token. Access tokens must be short lived (typically around an hour). Instead of having the resource owner go through the whole authentication and consent process again, the client can exchange its longer living refresh token (if it requested one) for a new access token of the same or lesser scope.
In addition to grant types above there are extension grant types. The one that will be relevant to this series is the jwt bearer type, or more formally the JSON Web Token (JWT) profile. In the Microsoft world, you’ll see this referred to as the on-behalf-of flow. This is the flow that Microsoft will use for any multi-hop OAuth. There is also another newer grant type to be aware of which is the token exchange flow. This has a similar use case as the jwt bearer flow for multi-hop OAuth but isn’t limited to JWTs and provides additional information in the access token which can be very helpful in identifying client (actor) vs the resource owner (subject) in the access token. Entra doesn’t support this flow to my understanding, so you’ll be using jwt-bearer instead for multi-hop flows as we’ll see in a future post.
In an authorization request will look something like the below:
GET /authorize?response_type=code&client_id=s6BhdRkqt3&state=xyz &redirect_uri=https%3A%2F%2Fclient%2Eexample%2Ecom%2Fcb &code_challenge=6fdkQaPm51l13DSukcAH3Mdx7_ntecHYd1vi3n0hMZY &code_challenge_method=S256&scope=User.Read HTTP/1.1Host: server.example.com
In the above example we see the client is requesting the authorization code grant type, is specifying its client id and its redirect_uri (which were established during client registration), a code challenge (for PKCE), and the scope of access it is requesting.
Access tokens come in a few flavors which you can read about in the RFC. The most common type of token is a bearer token within Entra’s implementation. The bearer token is exactly what it sounds like, whoever bears the token holds the power! Bearer tokens are typically JWTs (JSON Web Tokens). While RFC doesn’t specifically require the access token to be cryptographically signed, the ones that Entra ID issues are. The public key used to verify the signature can be obtained for Entra ID from a public metadata endpoint we’ll see later.
Here is a sample access token issued by Entra:
{ "typ": "JWT", "alg": "RS256", "kid": "ABC123XYZ789KeyIdentifier"}{ "aud": "api://backend-app-client-id", "iss": "https://login.microsoftonline.com/tenant-id/v2.0", "iat": 1780963927, "nbf": 1780963927, "exp": 1780968246, "aio": "AaQAW/8cAAAA...sessionData...", "azp": "frontend-app-client-id", "azpacr": "1", "name": "John Doe", "oid": "user-object-id-guid", "preferred_username": "john.doe@example.com", "rh": "1.AbcA...refreshTokenHash...", "scp": "user_impersonation", "sid": "session-id-guid", "sub": "subject-claim-unique-identifier", "tid": "tenant-id-guid", "uti": "unique-token-identifier", "ver": "2.0", "xms_ftd": "xEyJj...federationMetadata..."}
There are a few important endpoints the client needs to know about for the authorization server. This includes the authorization endpoint (where the resource owner is sent to authenticate and consent) and the token endpoint (where the client obtains an access token). These can be retrieved via a metadata endpoint. This is how Entra ID does it as we’ll see in a future post.
Ok, with that you should now have a high level understanding of OAuth and be aware of its role as an authorization protocol. Key in on that word, authorization. When I perform an OAuth flow I get an access token back to my app that I can use to access a resource owner’s data, but I would still need to authenticate the user to my application and get some basic profile information via another means. In comes OIDC.
What is OpenID Connect?
Like the prior section, my goal is give you a primer. If you want the gory details, take a read through the specification (another tolerable if not enjoyable read). Microsoft and Auth0 have solid one pagers if reading specifications isn’t your style.
The OIDC protocol is built on top of the OAuth (Open Authorization) protocol to provide an identity layer and authentication layer. It gives us the means get some assurance that the user is who they say they are and get some basic information about the user.
Within the OpenID protocol there are three roles that exist. These include:
- End User
- RP (Relying Party)
- OP (OpenID Provider)
Since the protocol is built on top of the OAuth protocol, these roles will map nicely to the OAuth roles as we’ll see.
We first have the end user. The end user is the human participant that will be access our application. They are very often also the resource owner for any data we may want to access about them as we’ll see later.
Next, we have the RP. The RP is the application that is requesting end user authentication and claims (or data/attributes) about the user. This will be an OAuth client application.
Finally we have the OP. The OP is the server capable of authenticating the user and providing claims about the user’s identity. This role is fulfilled by the OAuth authorization server in all instances (I don’t believe their are exceptions, but feel free to correct me) .
The OP will issue a security token referred to as an id token with claims about the authentication of the end user, including claims about the user.
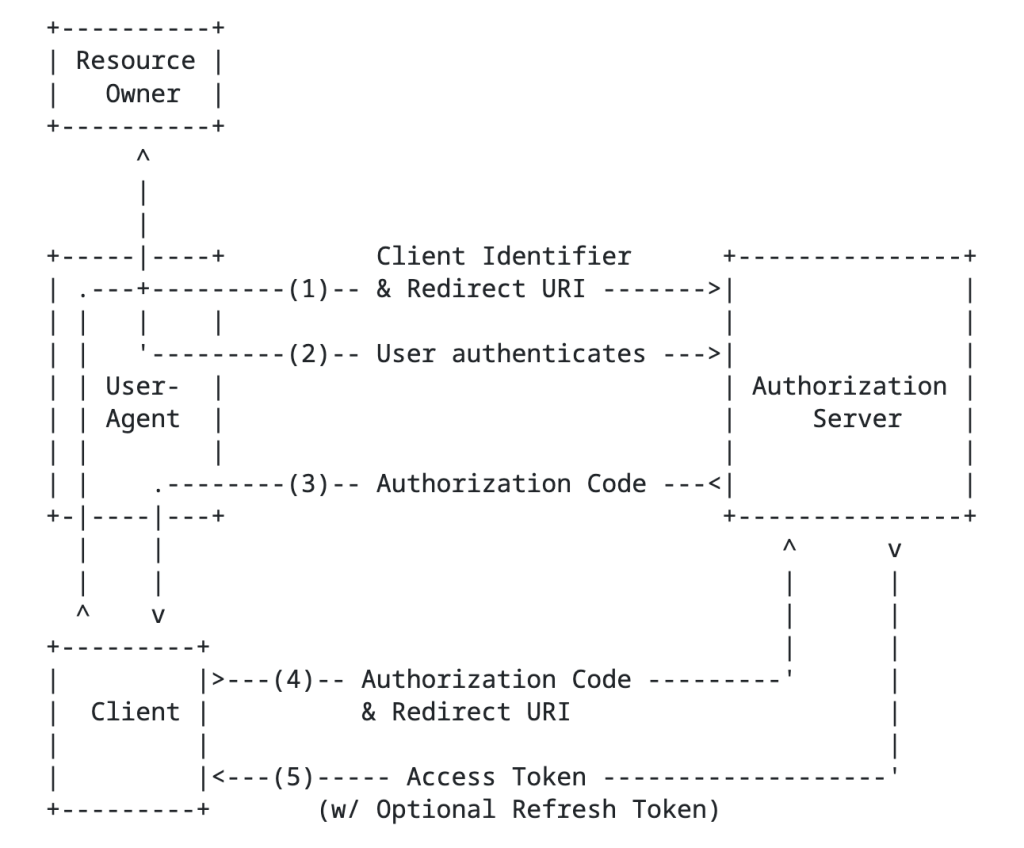
This is another instance where the specification did a great job with a high level flow diagram.
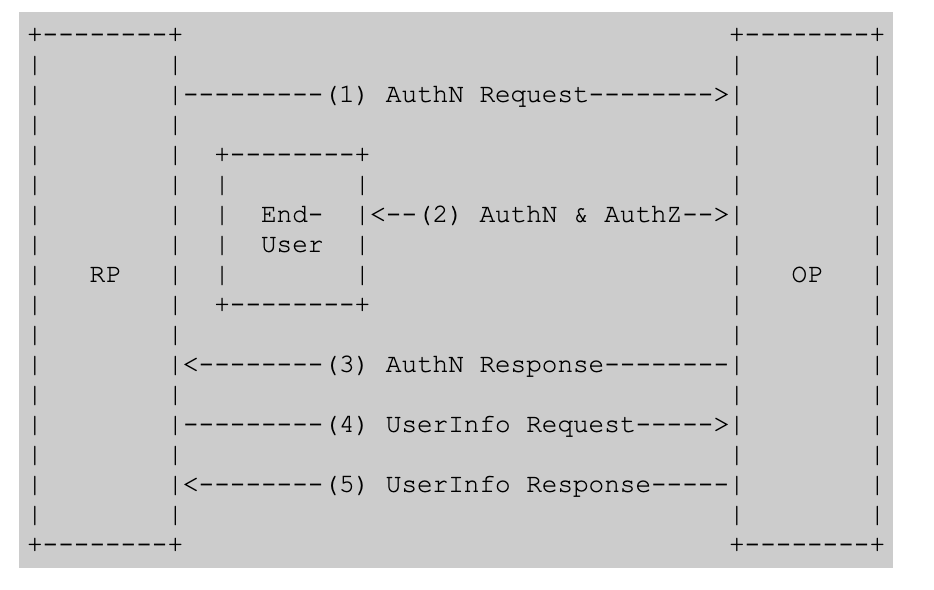
The structure of the authentication request is almost identical to the structure of an authorization request in OAuth.
GET /authorize?response_type=code&client_id=s6BhdRkqt3&redirect_uri=https%3A%2F%2Fclient%2Eexample%2Ecom%2Fcb&scope=User.Read+openid+profile&state=random-state-value&nonce=random-nonce-value &code_challenge=IFrWuREBBR_QJ39q5Ts4&code_challenge_method=S256
Notice above that we have an added state and nonce. The state helps to provide CSRF (cross-site request forgery) attacks, such as fooling the victim into accessing an attacker’s account to get them to upload data or perhaps purchase things for the attacker’s account. The nonce helps to mitigate id token replay attacks (app validates the nonce in the id token matches what it expects for the user’s session). Now the major things to pay attention to is the additional scopes. Here we see the openid and profile scopes. The openid scope tells the OP the client is looking for an id token. The profile scope is an optional scope which tells the OP to include additional claims in the id token such as the user’s name, preferred_username, and the like.
Once the RP (client / application) exchanges its authorization code (think authorization code grant) to the OP/authorization server, it returns back the an OIDC id token in addition to the OAuth access token. The application can then use the claims in the id token to identify the user, get information into how the user authenticated, get group information, and anything else you can stuff into the claims. It gives the application context about the user.
Below is an example id token’s payload. ID tokens follow the JWT standard and are cryptographically signed by a private key held by the OP. Clients will need to verify the signature using the OPs public key which is usually published in the OIDC discovery endpoint which looks something like this https://{issuer}/.well-known/openid-configuration. We’ll see an example when we break down Entra’s implementation.
{ "iss": "http://exmaple.com.com", "sub": "123456", "aud": "myclientid", "exp": 1311281970, "iat": 1311280970, "name": "Homer Simpson", "given_name": "Homer", "family_name": "Simpson", "gender": "male", "birthdate": "2025-10-31", "email": "homersimpson@example.com", "picture": "http://example.com/homersimpson/me.jpg"}
Your takeaways
At this point you should have a reasonably decent high level understanding of OAuth/OIDC. If you are already an “expert” you likely snorted milk through you nose reading my shitty explanation. What I mainly want you to take away from this is that OAuth is an authorization protocol with OIDC providing an authentication layer nicely on top. I like to think of OAuth as the cake with OIDC as the frosting. That top layer doesn’t work without the bottom layer (you freaks that eat the frosting right out of the can shall remain silent) and the bottom layer is enriched by the frosting on top. It’s 7PM and I’m craving a sweet, lay off.
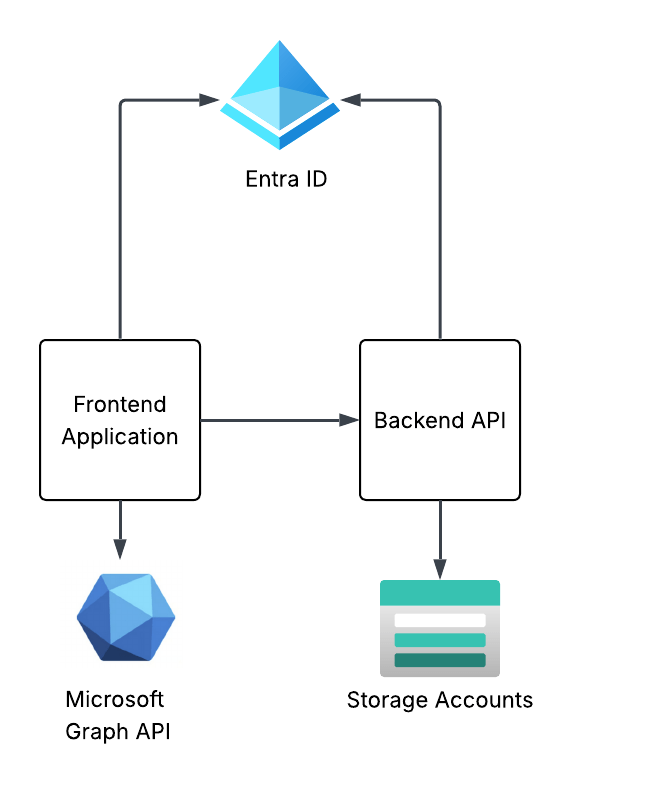
In my next post I’ll walk through building out the required components in Entra ID for the frontend application. You’ll read and recognize properties that translate directly back to these two protocols. Other properties may not have the same name, but you’ll understand why they exist.
Alright, my brain is fried. Enjoy the weekend!