Integrating Azure AD and AWS – Part 4

Integrating Azure AD and AWS – Part 4

Update: In November 2019 AWS introduced support for integration between Azure AD and AWS SSO.  The integration offers a ton more features, including out of the box support for multiple AWS accounts.  I highly recommend you go that route if you’re looking to integrate the two platforms.  Check out my series on the new integration here.

We’ve reached the end of the road for my series on integrating Azure Active Directory (Azure AD) and Amazon Web Services (AWS) for single sign-on and role management. In part 1 I walked through the many reasons the integration is worth looking at if your organization is consuming both clouds. In part 2 I described the lab I used to for this series, described the different way application identities (service accounts for those of you in the Microsoft space) are handled in Active Directory Domain Services versus Azure AD, and walked through what a typical application identity looks like in Azure AD. In part 3 I walked through a portion of the configuration steps, did a deep dive into the Azure AD and AWS federation metadata, examined a SAML assertion, and configured the AWS end of the federated trust through the AWS Management Console. This included creation of an identity provider representing the Azure AD tenant and creation of a new IAM role for users within the Azure AD tenant to assert.

In this final post I’ll cover the remainder of the configuration, describe the “provisioning” capabilities of Azure AD in this integration, and pointing out some of the issues with the recommended steps in the Microsoft tutorial.

Before I continue with the configuration, let me cover what I’ve done so far.

  • Part 2
    • Added the AWS application from the Azure AD Application Gallery through the Azure Portal.
  • Part 3
    • Assigned an Azure Active Directory user to the application through the Azure Portal.
    • Configured the Azure AD to pass the Role and RoleSessionName claims through the Azure Portal.
    • Created the SAML identity provider representing Azure AD in the AWS Management Console.
    • Created an AWS IAM Role and associated it with the identity provider representing Azure AD in the AWS Management Console.

At this point JoG users can assert their identity to their heart’s content but we don’t have a list of what AWS IAM roles stored in Azure AD for our users to assert.  So how do we assert a role from Azure AD if the listing of the roles exists in AWS?  The wonderful concept of application programmatic interfaces (APIs) swoops in and saves the day.  Don’t get me wrong, if you hate yourself you can certainly provision them manually by modifying the application manifest file every time a new role is created or deleted.  However, there is an easier route of having Azure AD pick up those roles directly from AWS on an automated schedule.  How does this work?  Well nothing works better than demonstrating how the roles can be queried from the AWS API.

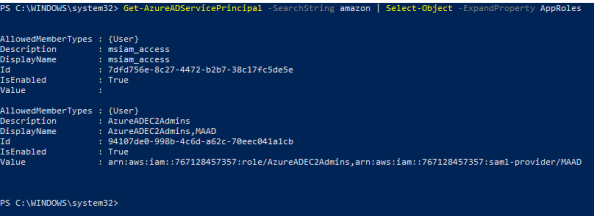
The AWS SDK for .NET makes querying the API incredibly easy.  We’re not stuck worrying about assembling the request and signing it.  As you can see below the script is six lines of code in PowerShell.

Script.png

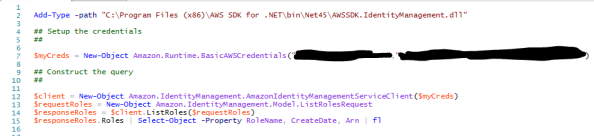
The result is a listing of the roles configured in AWS which includes the AzureADEC2Admins role I created earlier.  This example demonstrates the power a robust API brings to the table when integrating cloud services.

2

When Microsoft speaks of provisioning in regards to the AWS integration, they are talking about provisioning the roles defined in AWS to the the application manifest file in Azure AD.  This provides us with the ability to assign the roles from within the Azure Portal as we’ll see later.  This differs from many of the Azure AD integrations I’ve observed in the past where it will provision a record for the user into the software as a service (SaaS) offering.  Below is a simple diagram of the provisioning process.3

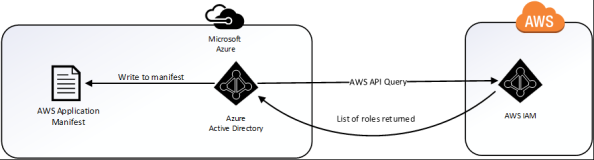
To do support provisioning we need to navigate to the AWS Management Console, open the Services Menu, and select IAM.  We then select Users and hit the Add User button.  I named the user AzureAD, gave it programmatic access type, and attached the IAMReadOnlyAccess policy.  AWS then presented me with the access key ID and secret access key I’ll need to provide to Azure AD.  Yes, we are going to follow security best practices and provide the account with the minimum rights and permissions it needs to provide the functionality.  The Microsoft tutorial instructs you to generate the credentials under the context of the AWS administrator effectively giving the application full rights to the AWS account.  No Microsoft, just no.

I next bounce back to the Azure portal and to the AWS application configuration.  From here I select the Provisioning option, switch the drop-down box to Automatic, and plug the access key ID into the clientsecret field and the secret access key into the secret token field.  A quick test connection shows success and I then save the configuration.  Note that you must first save the configuration before you can turn on the synchronization.

4

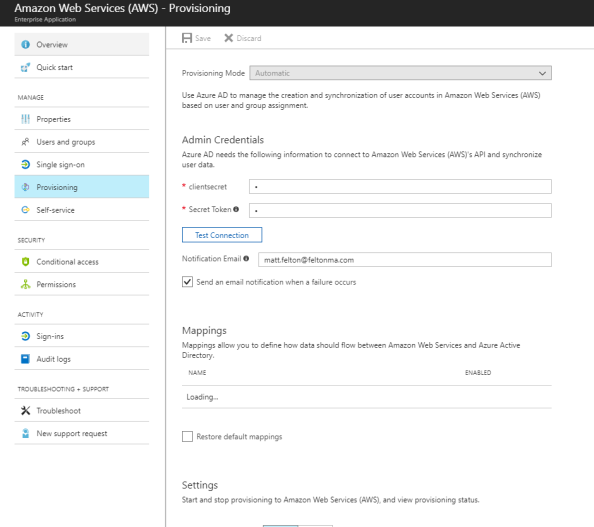
After the screen refreshes I move down to the Settings section and turn the Provisioning Status to On and set the Scope to Sync only assigned users and groups (kind of a moot point for this, but oh well).  I then Save the configuration once again and give it about 10 minutes to pull down the roles.

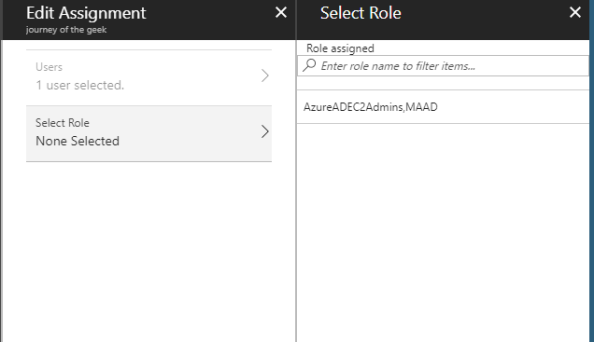
I then navigate back to the Users and Groups section and edit the Rick Sanchez assignment.  Hitting the role option now shows me the AzureADEC2Admins role I configured in AWS IAM.


5.png

Let’s take another look at the service principle representing the AWS application in PowerShell.  Using the Azure AD PowerShell cmdlets I referenced in entry 2 we connect to Azure AD and run the cmdlet Get-AzureADServicePrincipal which when run shows the manifest has been updated to include the newly synchronized application role.

6

We’ve configured the SAML trust on both ends, defined the necessary attributes, setup synchronization, and assigned Rick Sanchez an IAM role. In a moment we’ll demonstrate all of the pieces coming together.

Before I wrap it up, I want to quickly mention a few issues I ran into with this integration that seemed to resolve themselves without any intervention.

  1. Up to a few nights ago I was unable to get the Provisioning piece working.  I’m not putting it past user error (this is me we’re talking about) but I tried numerous times and failed but was successful a few nights ago.  I also noticed from some recent comments in the Microsoft tutorial people complaining of similar errors.  Maybe something broke for a bit?
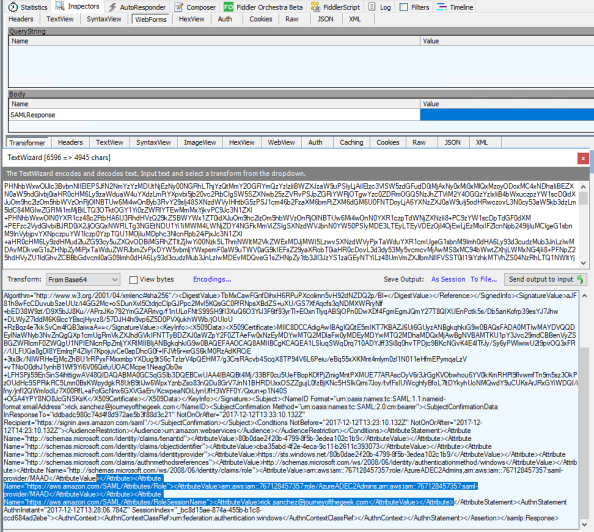
  2. The value of the audience attribute in the audienceRestriction section of the SAML assertion generated by Azure AD doesn’t match the identifier within the AWS federation metadata.  Azure AD inserts some garbage looking audience value by default which was causing the assertions to be rejected by AWS.  After setting the identifier to the value of urn:amazon:webservices as referenced in the AWS federation metadata the assertion was consumed without issue.  I saw similar complaints in the Microsoft tutorial so I’m fairly confident this wasn’t just my issue.The story gets a bit stranger.  I wanted to demonstrate the behavior for this series by removing the identifier I had previously added.  Oddly enough the assertion was consumed without issue by AWS.  I verified using Fiddler that the audience value was populated with that garbage entry.  Either way, I would err on the side of caution and would recommend populating the identifier with the entry referenced in the AWS metadata as seen below.7.png

The last thing I want to point out is the Microsoft tutorial states that you are required to create the users in AWS prior to asserting their identity.  This is inaccurate as AWS does not require a user record to be pre-created in AWS.  This is different from a majority (if not all) of the SaaS integrations I’ve done in the past so this surprised me as well.  Either way, it’s not required which is a nice benefit if you’ve ever had to deal with the challenging of managing the identify lifecycle across cloud offerings.

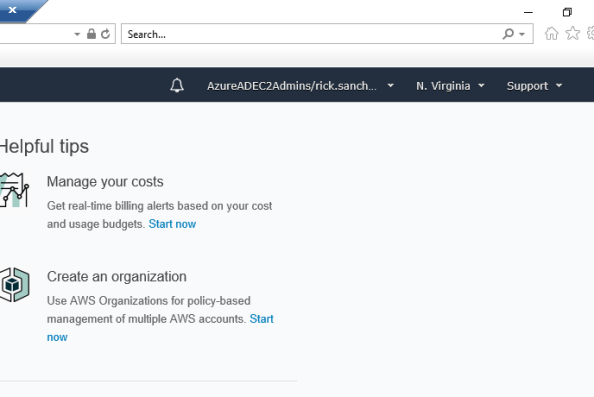
Let’s wrap up this series by having Rick Sanchez log into the AWS Management Console and shutdown an EC2 instance.  Here I have logged into the Windows 10 machine named CLIENT running in Azure.  We navigate to https://myapps.microsoft.com and log into Azure AD as Rick Sanchez.  We then hit the Amazon Web Services icon and are seamless logged into the AWS Management Console.

8.png

Examining the assertion in Fiddler shows  the Role and RoleSessionName claims in the assertion.

9.png

Navigating to the EC2 Dashboard displays the instance I prepared earlier using my primary account.  Rick has full rights over administration of the instance for activities such as starting and starting the instance.  After successfully terminating the instance I log into the AWS Management Console as my primary AWS account and go to CloudTrail and see the log entries recording the activities of Rick Sanchez.

10.png

With that let’s cover some key pieces of information to draw from the series.

  1. The Azure AD and AWS integration differs from most SaaS integrations I’ve done when it comes to user provisioning.  Most of the time a user record must exist prior to the user authenticating.  There are a growing number of SaaS providers provisioning upon successful authentication as provisioning challenges grow to further consumption of cloud services, but they are still few and far between.  AWS does a solid job with eliminating the pain of pre-provisioning users.
  2. The concept of associating roles with specific identity providers is really neat on Amazon’s part.  It allows the customer to manage permissions and associate those permissions with roles in AWS, but delegate the right on a per identity provider basis to assert a specific set of roles.
  3. Microsoft’s definition of provisioning in this integration is pulling a listing of roles from AWS and making them configurable in the Azure Portal.
  4. The AWS API is solid and quite easy to leverage when using the AWS SDKs. I would like to see AWS switch from what seems to be proprietary method of application access to OAuth to become more aligned with the rest of the industry.
  5. Don’t trust vendors to make everything point and click. Take the time to understand what’s going on in the background. In a SAML integration such as this, a quick review of the metadata can save you a lot of headaches when troubleshooting issues.

I learned a ton about AWS over these past few weeks and also got some good deep dive time into Azure AD which I haven’t had time for in a while.  Hopefully you found this series valuable and learned a thing or two yourself.

In my next series I plan on writing a simple application to consume the Cognito service offered by AWS.  For those of you more familiar with the Microsoft side of the fence, it’s similar to Azure AD B2C but with some unique features Microsoft hasn’t put in place yet making a great option to solve those B2C identity woes.

Thanks and have a wonderful holiday!

Integrating Azure AD and AWS – Part 1

Update: In November 2019 AWS introduced support for integration between Azure AD and AWS SSO.  The integration offers a ton more features, including out of the box support for multiple AWS accounts.  I highly recommend you go that route if you’re looking to integrate the two platforms.  Check out my series on the new integration here.

Hi everyone.  After being slammed with work from the real job over the past few months, I’m back with a new deep dive into the integration between Azure Active Directory (AAD) and Amazon Web Services (AWS).  I enjoyed the heck out of this one because I finally got some playtime in AWS and got to integrate two of the big cloud providers together to make some cool stuff happen.  There are a lot of blogs and articles out there (including Microsoft’s and Amazon’s *cough cough*) which provide the steps to accomplish this integration, but either the steps are incomplete, outdated, or wrong and none of them give a great explanation of the why or the how.  I can’t complain though, what else would I blog about?

Before we jump into the technologies that power the integration, let me first answer the question as to why we’d want to do the integration in the first place.

Let’s face it, managing digital identities is hard and it’s only getting harder with the introduction of cloud technology to the mix.  The tens of thousands of identities you’re managing for your users on-premises data center can quickly grow into the millions when SaaS comes into the mix. The operational overhead or supporting those millions of identities can eat up a large part of your IT budget and make your user experience miserable.  Beyond the cost issue, saddling your users with hundreds of credentials means users are going to re-use passwords and store them in whatever ways are convenient for them (under the keyboard anyone?) which introduces the risk of the credentials being compromised and sensitive data getting leaked.

Now more than ever you need to put a strong focus on centralized identity management and modern authentication and authorization.  Historically this was very challenging to do because of the lack of application programming interfaces (APIs) that allowed for create read update delete (CRUD) operations against the individual user records represented in an application database such as a SQL backend.  Beyond the lack of good APIs, you also were stuck using complicated and limiting legacy authentication and authorization protocols such as Kerberos, NTLM, LDAP, and the like.

Thankfully the industry has made a dramatic shift towards providing robust web-based APIs and support for modern authentication and authorization such as SAML, WS-Fed, Open ID Connect, and OAuth.  This presents a unique opportunity for organizations to shift towards a centralized identity management model where one authoritative store drives the lifecycle of an identity across all applications.  With the introduction of the modern protocols, users aren’t required to maintain thousands of credentials and can instead rely upon a singular trusted credential service provider (CSP) to act as the primary authentication point allowing users to then assert their identities to applications.  This frees the application from having to be saddled with storing and managing user credentials as well as improving the user experience, not to mention using these modern protocols is far simpler for your average developer.

Integrating AAD and AWS allow you to take advantage of centralized identity and modern authentication and authorization.  AAD specifically allows you to leverage all the cool features of a modern Identity-as-a-Service (IDaaS) offering such as behavioral analytics, multifactor authentication, adaptive authentication, and contextual-based authorization.  The short of it is you get a rock solid IDaaS to back the industry leading PaaS and IaaS offerings of AWS.  The best of both worlds right?

Now that you understand why you’d want to integrate the two solutions, let’s look at the technology powering the solution. In this integration the vendors are leveraging the concepts of modern APIs and modern authentication and authorization I touched upon above.  First up is authentication.

aws-signon

In this integration SAML, specifically the identity provider-initiated single sign-on POST binding, is being used to assert the user’s identity to the service provider (SP) after the user successfully authenticates with the identity provider (IdP).  Azure AD plays the role of IdP and AWS plays the role of SP.  The sequence of events plays out as follows:

  1. The user navigates to AAD and authenticates using either a credential or an asserted identity from a federated identity store.  The user then selects AWS from the listing of applications exposed through a method like the MyApps portal.  AAD generates an assertion containing a claim of the user’s identity and the AWS Identity and Access Management (IAM) role(s) the user is authorized to use and redirects the user to an endpoint at AWS.
  2. The user’s browser posts the assertion to the endpoint at AWS.
  3. The assertion is passed to the AWS security token service (STS) which checks the assertion to ensure it is from an identity provider that has been configured to be trusted for the AWS account, verifies the roles can be granted to a federated user, and completes the authentication process granting the user access to the AWS management console.(Don’t worry, we’ll dig into this process much more deeply using Fiddler in the next post.)

For provisioning, the AWS API is used.  AAD queries the AWS API using credentials for an AWS security principal that is associated with a role that has the IAMReadOnlyAccess permissions policy or greater.  It queries for the IAM roles configured for the account and synchronizes those roles back to AAD.  When the synchronization is complete, AAD users can then be added to the relevant roles from within AAD creating a one stop shop for doing your identity lifecycle management, authentication, and authorization.  Nice right?

At a high level that is the why and the what. In my upcoming posts in this series I’ll be digging deep into the how.  This will include how to do the integration, the pitfalls of the Microsoft tutorial, and of course Fiddler captures showing the conversations between the web browser, AAD, and AWS.

The journey continues in my second entry.

Deep dive into AD FS and MS WAP – User Certificate Authentication through a WAP

Hi everyone,

Today I continue my series of posts that cover a behind the scenes look at how Active Directory Federation Service (AD FS) and the Microsoft Web Application Proxy (WAP) interact.  In my first post  I explained the business cases that would call for the usage of a WAP.  In my second post I did a deep dive into the WAP registration process (MS refers to this as the trust establishment with AD FS and the WAP).  In this post I decided to cover how user certificate authentication is achieved when AD FS server is placed behind the WAP.

AD FS offers a few different options to authenticate users to the service including Integrated Windows Authentication (IWA), forms-based authentication, and certificate authentication.  Readers who work in environments with sensitive data where assurance of a user’s identity is important should be familiar with certificate authentication in the Microsoft world.  If you’re unfamiliar with it I recommend you take a read through this Microsoft article.

With the recent release of the National Institute of Standards and Technology (NIST) Digital Identity Guidelines 800-63 which reworks the authenticator assurance levels (AAL) and relegates passwords to AAL1 only, organizations will be looking for other authenticator options.  Given the maturity of authenticators that make use of certificates such as the traditional smart card it’s likely many organizations will look at opportunities for how the existing equipment and infrastructure can be further utilized.  So all the more important we understand how AD FS certificate authentication works.

I’ll be using the lab I described in my first post.  I made the following modifications/additions to the lab:

  • Configure Active Directory Certificate Services (AD CS) certificate authority (CA) to include certificate revocation list (CRL) distribution point (CDP).  The CRLs will be served up via an IIS instance with the address crl.journeyofthegeek.com.  This is the only CDP listed in the certificates.  Certificates created during my original lab setup that are installed within the infrastructure do not include a CDP.
  • Added a non-domain-joined Windows 10 computer which be used as the endpoint the test user accesses the federation service from.

Tool-wise I used ProcMon, Fiddler, API Monitor, and WireShark.

So what did I discover?

Prior to doing any type of user interaction, I setup the tools I would be using moving forward.  On the WAP I started ProcMon as an Administrator and configured my filters to capture only TCP Send and TCP Receive operations.  I also setup WireShark using a filter of ip.addr==192.168.100.10 && tcp.port==80.  The IP address is the IP of the web server hosting my CRLs.  This would ensure I’d see the name of the process making the connection to the CDP as well as the conversation between the two nodes.

pic1

** Note that the machine will cache the CRLs after they are successfully downloaded from the CDP.  It will not make any further calls until the CRLs expire.  To get around this behavior while I was testing I ran the command certutil -setreg chain\ChainCacheResyncFiletime @now as outlined in this article.   This forces the machine to pull the CRLs again from the CDP regardless of whether or not they are expired.  I ran the command as the LOCAL SYSTEM security principal using psexec.

The final step was to start Fiddler as the NETWORK SERVICE security principal using the command psexec -i -u “NT AUTHORITY\Network Service” “C:\Program Files (x86)\Fiddler2\Fiddler.exe”.  Remember that Fiddler needs the public key certificate in the appropriate file location as I outlined in my last post.  Recall that the Web Application Proxy Service and the Active Directory Federation Service running on the WAP both run as that security principal.

Once all the tools were in place I logged into the non-domain joined Windows 10 box and opened up Microsoft Edge and popped the username of my test user into the username field.

pic2.png

After home realm discovery occurred within Azure AD, I received the forms-based login page of my AD FS instance.


pic3.png

Let’s take a look at what’s happened on the WAP so far.

In the initial HTTP Connect session the WAP makes to the AD FS farm, we see that the ClientHello handshake occurs where the WAP authenticates to the AD FS server to authenticate itself as described in my last post.

pic4.png

Once the secure session is established the WAP passes the HTTP GET request to the AD FS server.  It adds a number of headers to the request which AD FS consumes to identify the client is coming from the WAP.  This information is used for a number of AD FS features such as enforcing additional authentication policies for Extranet access.

pic5.png

The WAP also passes a number of query strings.  There are a few interesting query strings here.  The first is the client-request-id which is a unique identifier for the session that AD FS uses to correlate event log errors with the session.  The username is obvious and shows the user’s user principal name that was inputted in the username field at the O365 login page.  The wa query string shows a value of wsignin1.0 indicating the usage of WS-Federation.  The wtrealm indicates the relying party identifier of the application, in this case Azure AD.

pic6

The wctx query string is quite interesting and needs to be parsed a bit on its own.  Breaking down the value in the parameter we come across three unique parameters.

LoginOptions=3 indicates that the user has not selected the “Keep me signed in” option.  If the user had selected that checkbox a value of 1 would have been passed and AD FS would create a persistent cookie which would exist even after the browser closes.  This option is sometimes preferable for customers when opening documents from SharePoint Online so the user does not have to authenticate over and over.

The estsredirect contains the encoded and signed authentication request from O365.  I stared at API monitor for a few hours going API call by API call trying to identify what this looks like once it’s decoded, but was unsuccessful.  If you know how to decode it, I’d love to know.  I’m very curious as to its contents.

The WAP next makes another HTTP GET to the AD FS server this time including the additional query string of pullStatus which is set equal to 0.  I’m clueless as to the function on of this, I couldn’t find anything.  The only other thing that changes is the referer.

My best guess on the above two sessions is the first session is where AD FS performs home realm discovery and maybe some processing on to determine if there are any special configurations for the WAP such as limited or expanded authentication options (device authN, certAuthN only).  The second session is simply the AD FS server presenting the authentication methods configured for Extranet users.

The user then chooses the “Sign in with an X.509 certificate” (I’m not using SNI to host both forms and cert authN on the same port) and the WAP then performs another HTTP CONNECT to port 49443 which is the certificate authentication endpoint on the AD FS server.  It again authenticates to the AD FS server with its client certificate prior to establishing the secure tunnel.

The third session we see a HTTP POST to the AD FS server with the same query parameters as our previous request but also providing a JSON object with a key of AuthMethod and the key value combination of AuthMethod=CertificateAuthentication in the body.

pic7

The next session is another HTTP POST with the same JSON object content and the key value pairs of AuthMethod=CertificateAuthentication and RetrieveCertificate=1 in the body.  The AD FS server sends a 307 Temporary Redirect to the /adfs/backendproxytls/ endpoint on the AD FS server.

Prior to the redirect completing successful we see the calls to the CDP endpoint for the full and delta CRLs.

pic8.png

pic9

I was curious as to which process was pulling the CRLs and identified it was LSASS.EXE from the ProcMon capture.

pic10

At the /adfs/backendproxytls/ endpoint the WAP performs another HTTP POST this time posting a JSON object with a number of key value combinations.

pic11.png

The interesting key value types included in the JSON object are the nested JSON object for Headers which contains all the WAP headers I covered earlier.  The query string JSON object which contains all the query strings I covered earlier.  The SeralizedClientCertificate contains the certificate the user provided after selecting to use certificate authentication.  The AD FS server then sends back a cookie to the WAP.  This cookie is the cookie the representing the user’s authentication to the AD FS server as detailed in this link.

pic12.png

The WAP then performs a final HTTP GET back at the /adfs/ls/ endpoint including the previously described headers and query strings as well as provided the cookie it just received.  The AD FS server responds by providing the assertion requested by Microsoft along with a MSISAuthenticated, MSISSignOut, and MSISLoopDetectionCookie cookies which are described in the link above.

What did we learn?

  1. The certificate is checked at both the WAP and the AD FS server to ensure it is valid and issued from a trusted certificate authority.  Remember to verify you trust the certificate chain of any user certificates on both the AD FS servers and WAPs.
  2. CRL Revocation checking is enabled by default and is performed on both the AD FS server and the WAP.  Remember to verify the locations in your CDP are available by both devices.
  3. The AD FS servers use the LSALogonUser function in the secur32.dll library to perform standard certificate authentication to Active Directory Domain Services.  I didn’t include this, but I captured this by running API monitor on the AD FS server.

In short, if you’re going to use device authentication or user certificate authentication make sure you have your PKI components in order.

See you next post!

Deep dive into AD FS and MS WAP – Overview

Hi everyone,

If you’ve followed my blog at all, you will notice I spend a fair amount of my time writing about the products and technologies powering the integration of on-premises and cloud solutions.  The industry refers to that integration using a variety of buzzwords from hybrid cloud to software defined data center/storage/networking/etc.  I prefer a more simple definition of legacy solutions versus modern solutions.

So what do I mean by a modern solution?  I’m speaking of solutions with the following most if not all of these characteristics:

  • Customer maintains only the layers of the technology that directly present business value
  • Short time to market for new features and features are introduced in a “toggle on and toggle off” manner
  • Supports modern authentication, authorization, and identity management standards and specifications such as Open ID Connect, OAuth, SAML, and SCIM
  • On-demand scaling
  • Provides a robust web-based API
  • Customer data can exist on-premises or off-premises

Since I love the identity realm, I’m going to focus on the bullet regarding modern authentication, authorization, and identity management.  For this series of posts I’m going to look at how Microsoft’s Active Directory Federation Service (AD FS)  and Microsoft’s Web Application Proxy (WAP) can be used to help facilitate the use of modern authentication and authorization.

So where does AD FS and the WAP come in?  AD FS provides us with a security token service producing the logical security tokens used in SAML, OAuth, and Open ID Connect.  Why do we care about the MS WAP?  The WAP acts a reverse proxy giving us the ability to securely expose AD FS to untrusted networks (like the Internet) so that devices outside our traditional firewalled security boundary can leverage our modern authentication and authorization solution.

Some real life business cases that can be solved with this solution are:

  1. Single sign-on (SSO) experience to a SaaS application such as SharePoint online from both an Active Directory domain-joined endpoint or a non-domain joined endpoint such as a mobile phone.
  2. Limit the number of passwords a user needs to remember to access both internal and cloud applications.
  3. Provide authentication or authorization for modernized internal applications for endpoints outside the traditional firewalled security boundary.
  4. Authentication and authorization of devices prior to accessing an internal or cloud application.

As we can see from the above, there are some great benefits around SSO, limiting user credentials to improve security and user experience, and taking our authorization to the next step by doing contextual-based authorization (device information, user location, etc) versus relying upon just Active Directory group.

Microsoft does a relatively decent job describing how to design and implement your AD FS and WAP rollout, so I’m not going to cover much of that in this series.  Instead I’m going to focus on the “behind the scenes” conversations that occur with endpoints, WAP, AD FS, AD DS, and Azure AD. Before I begin delving into the weeds of the product, I’m going to spend this post giving an overview of what my lab looks like.

I recently put together a more permanent lab consisting of a mixture of on-premise VMs running on HyperV and Azure resources.  I manage to stay well within my $150.00 MSDN balance by keeping a majority of the VMs deallocated.   The layout of the lab is diagramed below.

HomeLab


On-premises I am running a small collection of Windows Server 2016 machines within HyperV running on top of Windows Server 2016.  I’m using a standard setup of an AD DS, AD CS, AADC, AD FS, and IIS/MS SQL server.  Running in Azure I have a single VNet with three subnets each separated by a network security group.  My core infrastructure of an AD DS, IIS/MS SQL, and AD FS server exist in my Intranet subnet with my DMZ subnet containing a single WAP.

The Active Directory configuration consists of a single Active Directory forest with an FQDN of journeyofthegeek.local.  The domain has been configured with an explicit UPN of journeyofthegeek.com which is assigned as the UPN suffix for all users synchronized to Azure Active Directory.  The domain is running in Windows Server 2016 domain and forest functional level.  The on-premises domain controller holds all FSMO roles and acts as the DC for the Active Directory site representing the on-premises physical location.  The domain controller in Azure acts as the sole DC for the Active Directory site representing Azure.  Both DCs host the split-brain DNS zone for journeyofthegeek.com.

The on-premises domain controller also runs Active Directory Certificate Services.  The CA is an enterprise CA that is used to distribute certificates to security principals in the environment.  I’ve removed the CDP from the certificate templates issued by the CA to eliminate complications with the CRL revocation checking.

The AD FS servers are members of an AD FS farm named sts.journeyofthegeek.com and use a MS SQL Server 2016 backend for storage of configuration information.  The SQL Server on-premises hosts the SQL instance that the AD FS users are using to store configuration information.

Azure Active Directory Connect is co-located on the AD FS server and uses the same SQL server as the AD FS uses.  It has been integrated with a lab Azure Active Directory tenant I use which has a few licenses of Office 365 Business Essentials.  The objectGUID attribute is used as the immutable ID and the Azure Active Directory tenant has the DNS namespaces of journeyofthegeek.onmicrosoft.com and journeyofthegeek.com associated with it.

The IIS server running in Azure runs a simple .NET application (https://blogs.technet.microsoft.com/tangent_thoughts/2015/02/20/install-and-configure-a-simple-net-4-5-sample-federated-application-samapp/) that is used for claims-based authentication.  I’ll be using that application for demonstrations with the Web Application Proxy and have used it in the past to demonstrate functionality of the Azure Application Proxy.

For the demonstrations throughout these series I’ll be using the following tools:

In my next post I’ll do a deep dive into what happens behind the scenes during the registration of the Web Application Proxy with an AD FS farm.  See you then!