Integrating Azure AD and G-Suite – Automated Provisioning

Integrating Azure AD and G-Suite – Automated Provisioning

Today I’ll wrap up my series on Azure Active Directory’s (Azure AD) integration with Google’s G-Suite.  In my first entry I covered the single-sign on (SSO) integration and in my second and third posts I gave an overview of Google’s Cloud Platform (GCP) and demonstrated how to access a G-Suite domain’s resources through Google’s APIs.  In this post I’m going to cover how Microsoft provides automated provisioning of user, groups, and contacts .  If you haven’t read through my posts on Google’s API (part 1, part 2) take a read through so you’re more familiar with the concepts I’ll be covering throughout this post.

SSO using SAML or Open ID Connect is a common capability of most every cloud solutions these days.  While that solves the authentication problem, the provisioning of users, groups, and other identity-relates objects remains a challenge largely due to the lack of widely accepted standards (SCIM has a ways to go folks).  Vendors have a variety of workarounds including making LDAP calls back to a traditional on-premises directory (YUCK), supporting uploads of CSV files, or creating and updating identities in its local databases based upon the information contained in a SAML assertion or Open ID Connect id token.  A growing number of vendors are exposing these capabilities via a web-based API.  Google falls into this category and provides a robust selection of APIs to interact with its services from Gmail to resources within Google Cloud Platform, and yes even Google G-Suite.

If you’re a frequent user of Azure AD, you’ll have run into the automatic provisioning capabilities it brings to the table across a wide range of cloud services.  In a previous series I covered its provisioning capabilities with Amazon Web Services.  This is another use case where Microsoft leverages a third party’s robust API to simplify the identity management lifecycle.

In the SSO Quickstart Guide Microsoft provides for G-Suite it erroneously states:

“Google Apps supports auto provisioning, which is by default enabled. There is no action for you in this section. If a user doesn’t already exist in Google Apps Software, a new one is created when you attempt to access Google Apps Software.”

This simply isn’t true.  While auto provisioning via the API can be done, it is a feature you need to code to and isn’t enabled by default.  When you enable SSO to G-Suite and attempt to access it using an assertion containing the claim for a user that does not exist within a G-Suite domain you receive the error below.

google4int1

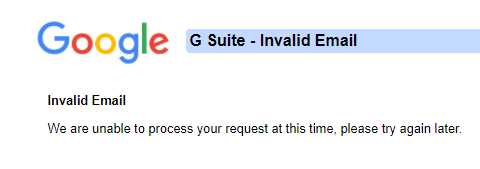
This establishes what we already knew in that identities representing our users attempting SSO to G-Suite need to be created before the users can authenticate.  Microsoft provides a Quickstart for auto provisioning into G-Suite.  The document does a good job telling you were to click and giving some basic advice but really lacks in the detail into what’s happening in the background and describing how it works.

Let’s take a deeper look shall we?

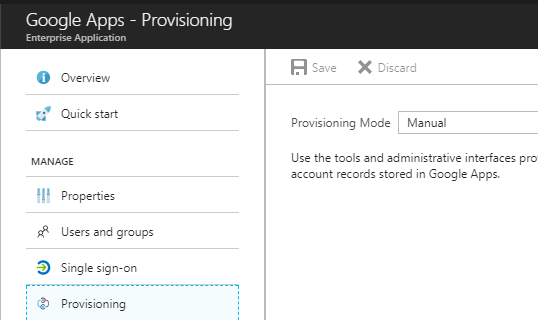
If you haven’t already, add the Google Apps application from the Azure AD Application Gallery.  Once the application is added navigate to the blade for the application and select the Provisioning page.  Switch the provisioning mode from manual to automatic.

google4int2.png

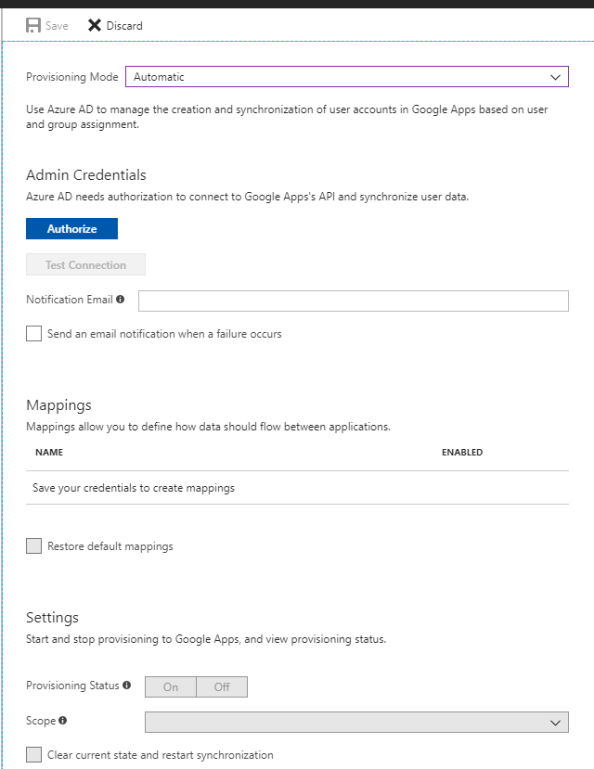
Right off the bat we see a big blue Authorize button which tells us that Microsoft is not using the service accounts pattern for accessing the Google API.  Google’s recommendation is to use the service account pattern when accessing project-based data rather than user specific data.  The argument can be made that G-Suite data doesn’t fall under project-based data and the service account credential doesn’t make sense.  Additionally using a service account would require granting the account domain-wide delegation for the G-Suite domain allowing the account to impersonate any user in the G-Suite domain.  Not really ideal, especially from an auditing perspective.

By using the Server-side Web Apps pattern a new user in G-Suite can be created and assigned as the “Azure AD account”. The downfall with of this means you’re stuck paying Google $10.00 a month for a non-human account. The price of good security practices I guess.

google4int3.png

Microsoft documentation states that the account must be granted the Super Admin role. I found this surprising since you’re effectively giving the account god rights to your G-Suite domain. It got me wondering what authorization scopes is Microsoft asking for? Let’s break out Fiddler and walk through the process that kicks off after clicking on the Authorization button.

A new window pops up from Google requesting me to authenticate. Here Azure AD, acting as the OAuth client, has made an authorization request and has sent me along with the request over to the Google which is acting as the authorization server to authenticate, consent to the access, and take the next step in the authorization flow.

google4int4

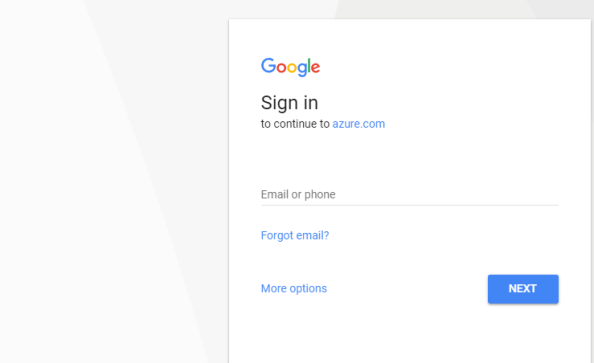
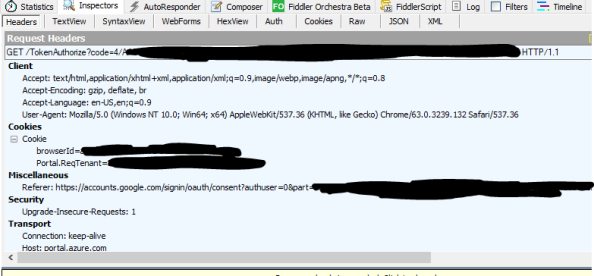
When I switch over to Fiddler I see a number of sessions have been captured.  Opening the WebForms window of the first session to accounts.google.com a number of parameters that were passed to Google.

google4int5

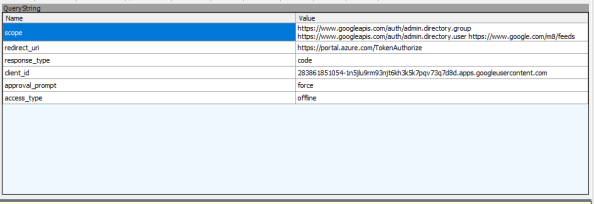
The first parameter gives us the three authorization scopes Azure AD is looking for.  The admin.directory.group and admin.directory.user are scopes are both related to the Google Directory API, which makes sense if it wants to manage users and groups.  The /m8/feeds scope grants it access to manage contacts via the Google Contacts API.  This is an older API that uses XML instead of JSON to exchange information and looks like it has been/is being replaced by the Google People API.

Management of contacts via this API is where the requirement for an account in the Super Admin role originates.  Google documentation states that management of domain shared contacts via the /m8/feeds API requires an administrator username and password for Google Apps.  I couldn’t find any privilege in G-Suite which could be added to a custom Admin role that mentioned contacts.  Given Google’s own documentation along the lack of an obvious privilege option, this may be a hard limitation of G-Suite.  Too bad too because there are options for both Users and Groups.  Either way, the request for this authorization scope drives the requirement for Super Admin for the account Azure AD will be using for delegated access.

The redirect_uri is the where Google sends the user after the authorization request is complete.  The response_type tells us Azure AD and Google are using the OAuth authorization code grant type flow.  The client_id is the unique identifier Google has assigned to Azure AD in whatever project Microsoft has it built in.  The approval_prompt setting of force tells Google to display the consent window and the data Azure AD wants to access.  Lastly, the access_type setting of offline allows Azure AD to access the APIs without the user being available to authenticate via a refresh token which will be issued along with the access token.  Let’s pay attention to that one once the consent screen pops up.

I plug in valid super user credentials to my G-Suite domain and authenticate and receive the warning below.  This indicates that Microsoft has been naughty and hasn’t had their application reviewed by Google.  This was made a requirement back in July of 2017… so yeah… Microsoft maybe get on that?

google4int6.png

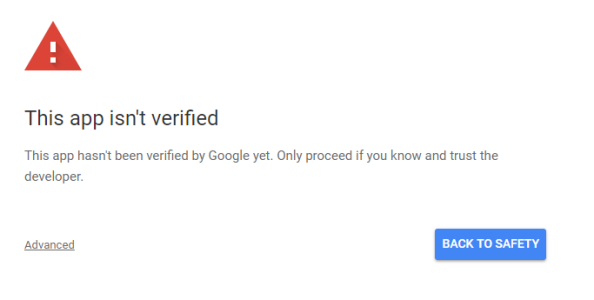
To progress to the consent screen I hit the Advanced link in the lower left and opt to continue.  The consent window then pops up.

google4int7.png

Here I see that Microsoft has registered their application with a friendly name of azure.com.  I’m also shown the scopes that the application wants to access which jive with the authorization scopes we saw in Fiddler.  Remember that offline access Microsoft asked for?  See it mentioned anywhere in this consent page that I’m delegating this access to Microsoft perpetually as long as they ask for a refresh token?  This is one of my problems with OAuth and consent windows like this.  It’s entirely too vague as to how long I’m granting the application access to my data or to do things as me.  Expect to see this OAuth consent attacks continue to grow in in use moving forward.  Why worry about compromising the user’s credentials when I can display a vague consent window and have them grant me access directly to their data?  Totally safe.

Hopping back to the window, I click the Allow button and the consent window closes.  Looking back at Fiddler I see that I received back an authorization code and posted it back to the reply_uri designated in the original authorization request.

google4int8.png

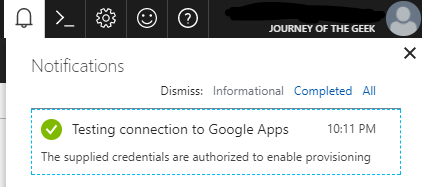
Switching back to the browser window for the Azure Portal the screen updates and the Test Connection button becomes available.  Clicking the button initiates a quick check where Azure AD obtains an access token for the scopes it requires unseen to the user.  After the successful test I hit the Save button.

google4int9.png

Switching to the browser window for the Google Admin Portal let’s take a look at the data that’s been updated for the user I used to authorize Microsoft its access.  For that I select the user, go to the Security section and I now see that the Azure Active Directory service is authorized to the contacts, user, and group management scopes.

google4int10.png

Switching back to the browser window for the Azure Portal I see some additional options are now available.

google4int11.png

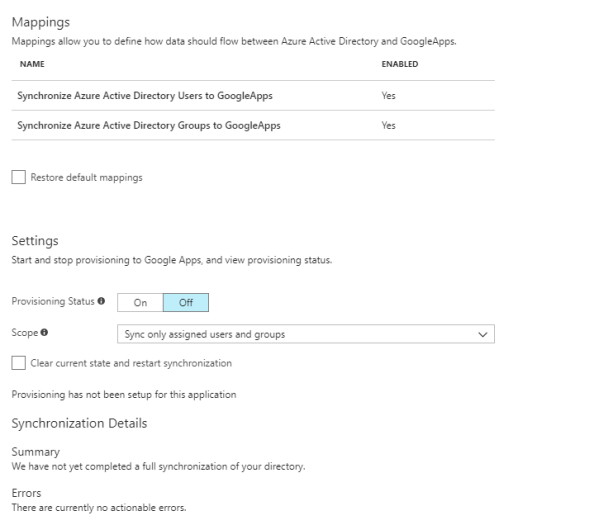
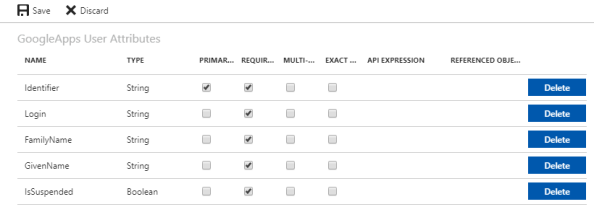
The mappings are really interesting and will look familiar to you if you’ve ever done anything with an identity management tool like Microsoft Identity Manager (MIM) or even Azure AD Sync.  The user mappings for example show which attributes in Azure AD are used to populate the attributes in G-Suite.

google4int12.png

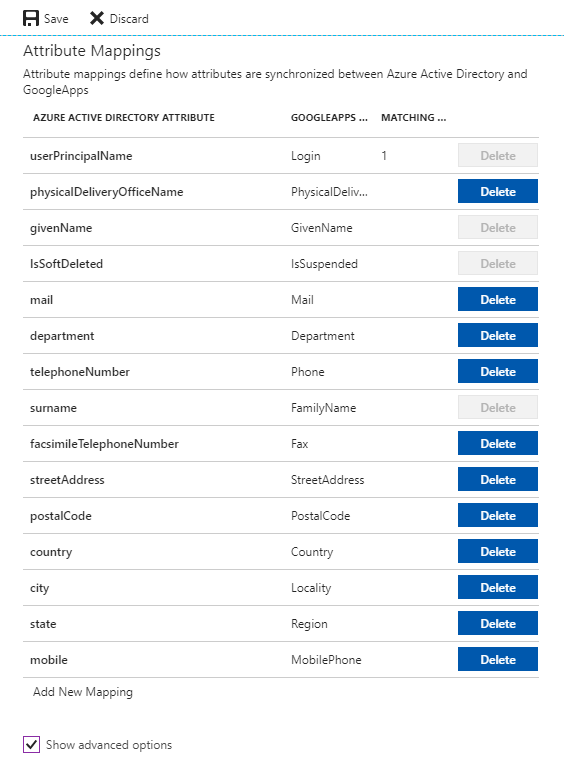
The attributes that have the Delete button grayed out are required by Google in order to provision new user accounts in a G-Suite domain.  The options available for deletion are additional data beyond what is required that Microsoft can populate on user accounts it provisions into G-Suite.  Selecting the Show advanced options button, allow you to play with the schema Microsoft is using for G-Suite.   What I found interesting about this schema is it doesn’t match the resource representation Google provides for the API.  It would have been nice to match the two to make it more consumable, but they’re probably working off values used in the old Google Provisioning API or they don’t envision many people being nerdy enough to poke around the schema.

Next up I move toggle the provisioning status from Off to On and leave the Scope option set to sync only the assigned users and groups.

google4int13.png

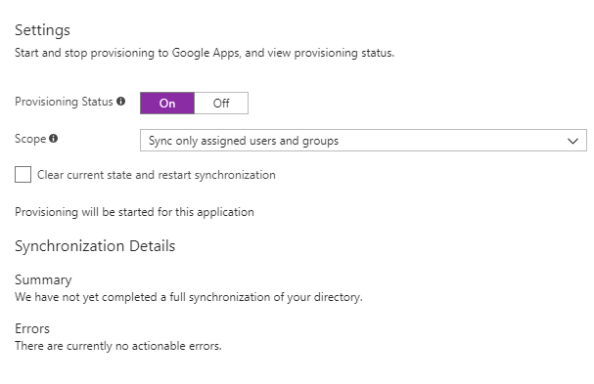
I then hit the Save button to save the new settings and after a minute my initial synchronization is successful.  Now nothing was synchronized, but it shows the credentials correctly allowed Azure AD to hit my G-Suite domain over the appropriate APIs with the appropriate access.

google4int14.png

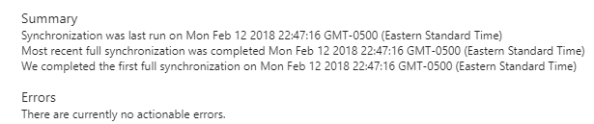
So an empty synchronization works, how about one with a user?  I created a new user named dutch.schaefer@geekintheweeds.com with only the required attributes of display name and user principal name populated, assigned the new user to the Google Apps application and give Azure AD a night to run another sync.  Earlier tonight I checked the provisioning summary and verified the sync grabbed the new user.

google4int15.png

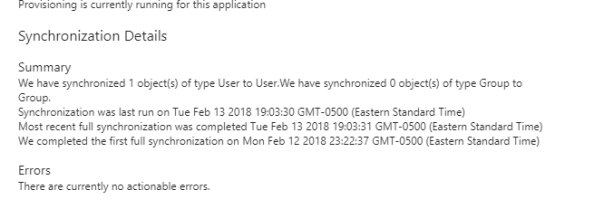
Review of the audit logs for the Google Apps application shows that the new user was exported around 11PM EST last night.  If you’re curious the synch between Azure AD and G-Suite occurs about every 20 minutes.

google4int16.png

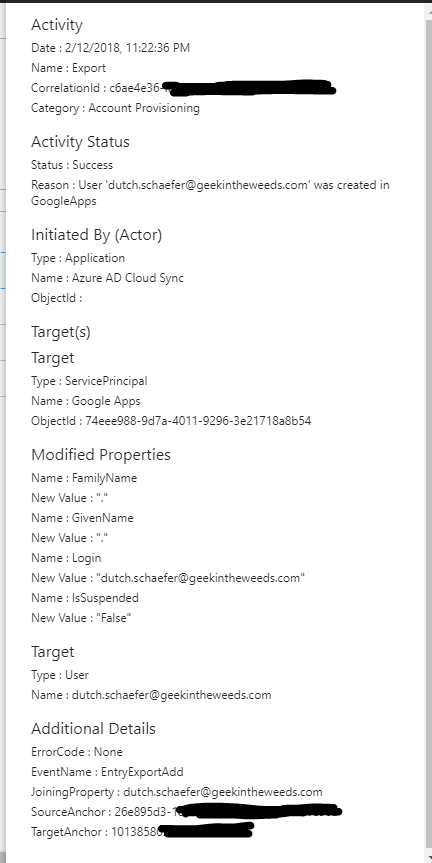
Notice that the FamilyName and GivenName attributes are set to a period.  I never set the first or last name attributes of the user in Azure AD, so both attributes are blank.  If we bounce back to the attribute mapping and look at the attributes for Google Apps, we see that FamilyName and GivenName are both required meaning Azure AD had to populate them with something.  Different schemas, different requirements.

google4int17

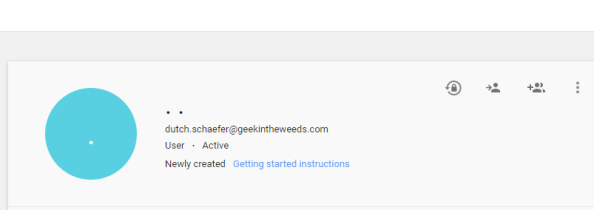
Switching over to the Google Admin Console I see that the new user was successfully provisioned into G-Suite.

google4int18.png

Pretty neat overall.  Let’s take a look at what we learned:

  • Azure AD supports single sign-on to G-Suite via SAML using a service provider-initiated flow where Azure AD acts as the identity provider and G-Suite acts as the service provider.
  • A user object with a login id matching the user’s login id in Azure Active Directory must be created in G-Suite before single sign-on will work.
  • Google provides a number of libraries for its API and the Google API Explorer should be used for experimentation with Google’s APIs.
  • Google’s Directory API is used by Azure AD to provision users and groups into a G-Suite domain.
  • Google’s Contacts API is used by Azure AD to provision contacts into a G-Suite domain.
  • A user holding the Super Admin role in the G-Suite domain must be used to authorize Azure AD to perform provisioning activities.  The Super Admin role is required due to the usage of the Google Contact API.
  • Azure AD’s authorization request includes offline access using refresh tokens to request additional access tokens to ensure the sync process can be run on a regular basis without requiring re-authorization.
  • Best practice is to dedicate a user account in your G-Suite domain to Azure AD.
  • Azure AD uses the Server-side Web pattern for accessing Google’s APIs.
  • The provisioning process will populate a period for any attribute that is required in G-Suite but does not have a value in the corresponding attribute in Azure AD.
  • The provisioning process runs a sync every 20 minutes.

Even though my coding is horrendous, I absolutely loved experimenting with the Google API.  It’s easy to realize why APIs are becoming so critical to a good solution.  With the increased usage of a wide variety of products in a business, being able to plug and play applications is a must.  The provisioning aspect Azure AD demonstrates here is a great example of the opportunities provided when critical functionality is exposed for programmatic access.

I hope you enjoyed the series, learned a bit more about both solutions, and got some insight into what’s going on behind the scenes.


Azure AD User Provisioning – Part 5

Hi everyone. I apologize for the delay in publishing the last post in this series. The past few months have been hectic. For this last post of the year I will be completing the series on provisioning in Azure AD.

As I’ve covered in earlier posts, there are a lot of options when provisioning to Azure AD including multiple GUIs and programmatic options. I’ve covered provisioning in the Azure Management Portal, Azure Portal, Office 365 Admin Center, and Azure Active Directory PowerShell v1 and v2. In this final post I will cover provisioning via the Graph API using a simple ASP .NET web application.

I was originally going to leverage the graph API directly via PowerShell using the .NET ADAL libraries and Invoke-WebRequest cmdlets. I’ve been playing around a lot with Visual Studio creating simple applications like the Azure B2B provisioning app. I decided to challenge myself by adding additional functionality to the ASP .NET web application I assembled in my previous post. I enjoyed the hell out of the process, learned a bunch more about .NET, C#, ASP .NET web apps, and applications built using the MVC architecture. Let’s get to it shall we?

Before we dive into the code and the methodologies I used to put together the application, let’s take a look at it in action. The application starts by requiring authentication to Azure AD.

1

After successful authentication, the main page for the website loads. You’ll notice from the interface that I used the sample ASP .NET MVC Web Application available in Visual Studio but added a new navigation link on the right hand side named Create User.

2

After clicking the Create User link, the user is redirected to a simple (i.e. ugly) web form where information about the new user is collected.

3

After the user hits submit, the new user is created in Azure AD and the information from the returned JWT is parsed and displayed in a table.

4

When we navigate to the Azure AD blade in the Azure Portal we see that Homer has been created and added to the system.

clearme

So you’re probably asking the question as to how complicated it was to put this application together? The answer may surprise you. It was incredibly simple. The most difficult part of the process was learning my away around C# and how MVC web apps are put together. For a skilled developer, this would have taken an hour versus the days it took me.

The first thing I did was do some reading into the Graph API, specifically around managing users. Microsoft has a number of great instructions located here and here. After getting familiar with the required inputs and the outputs, I built a new model in my application that would be used for the user form input.

6

Once I had my new model assembled, I then created two new views under a new folder named Create User. The view named Index is the view that takes the user input and the view named Results is the view that spits back some of the content from the JWT returned from Azure after the user is successfully created. Here is the code for the Index view.

7

And the code for the Results view.

8

After the new views were created, I then moved on to creating the guts of the new functionality with a new controller named CreateUserController. I was able to reuse some of the code from the UserProfileController to obtain the necessary OAuth access token to delegate the rights to the application to create the new user.

9

The remaining code in my controller came from a crash course in programming and MVC web apps. The first section of code calls the task to obtain the access token.

10

The next section of code creates a new instance of the user class and populates the properties with information collected from the form.

11.png

The final section of code attempts to create the new user and displays the results page with information about the user such as objectID and userPrincipalName. If the application is unable to create the user, the exception is caught, and an error page is displayed.

12

But wait… what is missing? I’ll give you a hint, it’s not code.

The answer is the appropriate delegated permissions. Even if the user is a global admin, the application can’t perform the actions of a global admin unless we allow it to. To make this happen, we’ll log into the Azure Portal, access the Azure AD blade, and grant the application the delegated permission to Access the directory as the signed-in user.

13

Simple right? The Azure Active Directory Graph Client libraries make the whole process incredibly easy doing a whole lot with very little code. Imagine integrating this functionality into an existing service catalog. Let’s say you have a business user who needs access to Dynamics CRM Online. The user could navigate to the service catalog and request access. After their manager approvers, the application powering the service catalog could provision the new user, assign the license for Dynamics CRM Online, and drop the user into the appropriate groups. All of this could happen without having to involve IT. This is the value of a simple API with a wonderful set of libraries.

Well folks that wraps up my last post the year. I’ll return next year with a series of deep dives exploring Microsoft’s newly announced Azure AD Pass-through authentication and SSO features. Have a happy holiday!

Azure AD User Provisioning – Part 3

In this entry I’m going to look at how provisioning users differs in the Azure Management Portal and the Azure Portal. The Azure Management portal was used heavily for all Azure administration prior to the introduction of the Azure Resource Manager deployment model a year or so ago. To my knowledge there isn’t much functionality that hasn’t been migrated to the Azure Portal exempting management of Azure Active Directory. This remaining piece is in the process of being moved to the Azure Portal and is currently in public preview with some limitations. This means that if you’re administering Azure AD you’re going to need to use the Management Portal for a while longer.

Unlike the Office 365 portal, the Management portal feels very dated. The initial dashboard that appears after authentication will list any classic deployment model resources and directories the authenticated user has control over.

pic10

First I will select one of the directories and dig into the interface. Immediately you’ll notice a number of configuration options available. Since I’m focused on user provisioning, I’ll very briefly describe the purpose of the other sections.

  • Groups – Used to manage the group lifecycle of Azure AD groups
  • Applications – Used to add new applications from the application gallery and register custom and third party applications
  • Domains – Used to manage additional DNS domains that have been associated with the tenant
  • Directory Integration – Used to configure support for synchronization using a tool such as Azure AD Connect
  • Configure – Used to manage the configuration of Azure AD including password reset policies, MFA, device authentication options, group management, who can invite guests, and the like
  • Reports – Used to run the many reports available with standard Azure AD and Azure AD Premium
  • Licenses – Used to assign Azure AD Premium licenses; not sure if any licenses beyond that, but does not seem capable of handling O365 licenses.

Now let’s get back to user provisioning. Next up I’ll head to the Users section. Here there is a listing of all members and guests within the directory.

pic11

To create a new user I’ll click the Add User icon at the bottom of the page which will bring up the window below where I can configure the user name.

pic12

In the next window I will add a first name, last name, display name, and pick a role. Notice anything different? Here the only options to configure the Azure AD roles as described here. There are no Office 365 roles to choose from here. Additionally the user can be enabled for Azure MFA (the checkbox is hidden under the listing of roles).

pic13

In the last window I’m prompted to create an auto-generated temporary password for the user. Notice the option to create a password and enforce password change at first sign in aren’t there like O365? After the create button is hit a password will be automatically generated and will need to be delivered to the user out of band. Quite basic when compared to the Office 365 Admin Center isn’t it?

pic14

After the user is created the user can be modified in the Profile and Work Info sections. Profile is for your basic information and configuration while Work Info is similar to the contact information section in the Office 365 Admin Center with some additional options to configure the users authentication phone number and email address. The Devices and Activity sections providing reporting on the user’s activities.

pic15

Let’s now ditch the old and embrace the new by examining provisioning in the Azure Portal. Prior to a few months back, the only some of the Azure AD functionality could be administered in the Azure Portal including Azure AD Privileged Identity Management, Azure AD Identity Protection, Azure AD Connect Health, Azure AD Cloud App Discovery and Azure AD B2C (which is even mixed with the Management Portal). Microsoft has recently begun to migrate the administration of Azure AD to the Azure Portal to centralize administration of Azure resources.

The Azure portal is accessible through by navigating to this link. After authentication the dashboard will load up displaying any resources that have been pinned. Click on the Azure Active Directory blade as highlighted in red in the screenshot below.

pic16

You’ll notice right off the bat that the interface is very slick, is intended for power users, and provides some useful summary analytics. I hadn’t poked around the new blade in a while and it looks like they’ve improved the functionality quite a bit. There doesn’t seem to be much missing beyond the ability to create new directories, assigning licenses, and reviewing the holistic audit logs. One item I did observe which is worth calling out is the app registration interface has been refined and made more slick. This is a big improvement from the similar interface in the Management Portal.

pic17.png

By navigating to the All Users blade and clicking the add button a new user can be created. This will bring up a new blade that allows for basic configuration of key pieces of information like user, first name, last name, job title, description, group membership, and Azure AD roles. The experience is quite similar to the Management Portal experience. Notice that the password again is pre-generated and does not allow setting a customer password or the option to turn off the enforcement of a password change at first login.

pic18

After the user is created it can be modified by clicking on the user which opens a new blade. This new blade allows for contact information about the user to be edited, assignment of Azure AD Roles, and assignment Azure AD group memberships. One neat feature is the Azure Resources option. This opens up a new blade that enumerates the user’s effective access to various Azure resources. Providing reporting on an effective user’s access is one thing Microsoft has never done effectively on-premises so a feature like this is nice to see, especially with the additional complexity the scale of cloud introduces. Finally, you’re provided some options to review the audit logs and sign in reports for the user (another neat feature). Like the Azure Management Portal, there is no quick and easy GUI-based functionality to restore deleted users in the Azure Portal at this time.

pic19

Well folks that is the overview of three out of four of the GUI provisioning methods. The fourth option is to provision natively through an on-premises Active Directory and synchronize those users to the cloud with a synchronization tool such as Azure AD Connect. There is plenty of documentation on what that process looks like already available. If you’re hungry for more, you can check out my previous series Azure Active Directory Connect – Behind the Scenes.

Let’s take a moment to summarize what we’ve learned:

Office 365 Admin Console

  • Simple and ideal for business users and Tier 1 support
  • Limited in its ability to administer Azure AD
  • Only GUI option for assigning Office 365 licenses
  • Only GUI option for assigning Office 365 roles
  • No B2B or B2C support
  • Bulk user creation capabilities
  • Best option for restoration of a deleted user

Azure Management Portal

  • Legacy portal being replace by Azure Portal
  • Only GUI option for creating additional standard and B2C directories
  • Only GUI option for adding B2B users
  • No support for bulk user creation or restoration of deleted users
  • Support of legacy Azure AD configuration items; no support for configuration of B2C policies, Identity Protection, Privileged Identity Management

Azure Portal

  • Future one-stop shop for Azure AD administration
  • Seems to supports all functionality of Azure Management Portal except creation of new directories
  • GUI options for B2C policies, management of Identity Protection, Privileged Identity Management, Azure AD Connect Health, and Azure AD Proxy
  • No GUI option for adding B2B users
  • No support for bulk user creation or restoration of deleted users
  • Analytics built into administrative tools
  • Robust application registration features

So what does this all mean? Well it means that if you need to administer identity functionality via the GUI, you’re going to need to use a combination of the Office 365 Admin Console, the Azure Management Portal, and the Azure Portal. I expect within the next 3-6 months the remaining functionality in Azure Management Portal will be completely migrated to the Azure Portal. Businesses should focus their Tier 1 and business staff on learning the Office 365 Admin Console while Tier 2 and Tier 3 staff should focus on learning the Azure Portal.

Now that I’ve dug into the GUI options, I’ll next explore how the APIs and PowerShell provide opportunities for automation and integration with 3rd party and custom identity management solutions that may already exist on premises. See you then!