In this entry I’m going to look at how provisioning users differs in the Azure Management Portal and the Azure Portal. The Azure Management portal was used heavily for all Azure administration prior to the introduction of the Azure Resource Manager deployment model a year or so ago. To my knowledge there isn’t much functionality that hasn’t been migrated to the Azure Portal exempting management of Azure Active Directory. This remaining piece is in the process of being moved to the Azure Portal and is currently in public preview with some limitations. This means that if you’re administering Azure AD you’re going to need to use the Management Portal for a while longer.
Unlike the Office 365 portal, the Management portal feels very dated. The initial dashboard that appears after authentication will list any classic deployment model resources and directories the authenticated user has control over.

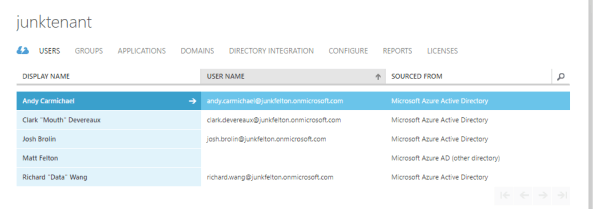
First I will select one of the directories and dig into the interface. Immediately you’ll notice a number of configuration options available. Since I’m focused on user provisioning, I’ll very briefly describe the purpose of the other sections.
- Groups – Used to manage the group lifecycle of Azure AD groups
- Applications – Used to add new applications from the application gallery and register custom and third party applications
- Domains – Used to manage additional DNS domains that have been associated with the tenant
- Directory Integration – Used to configure support for synchronization using a tool such as Azure AD Connect
- Configure – Used to manage the configuration of Azure AD including password reset policies, MFA, device authentication options, group management, who can invite guests, and the like
- Reports – Used to run the many reports available with standard Azure AD and Azure AD Premium
- Licenses – Used to assign Azure AD Premium licenses; not sure if any licenses beyond that, but does not seem capable of handling O365 licenses.
Now let’s get back to user provisioning. Next up I’ll head to the Users section. Here there is a listing of all members and guests within the directory.
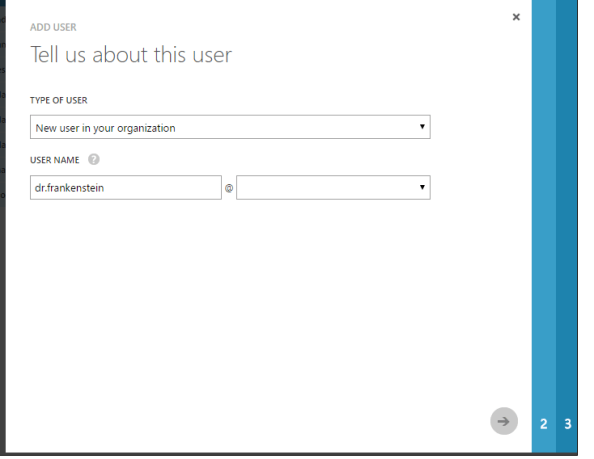
To create a new user I’ll click the Add User icon at the bottom of the page which will bring up the window below where I can configure the user name.
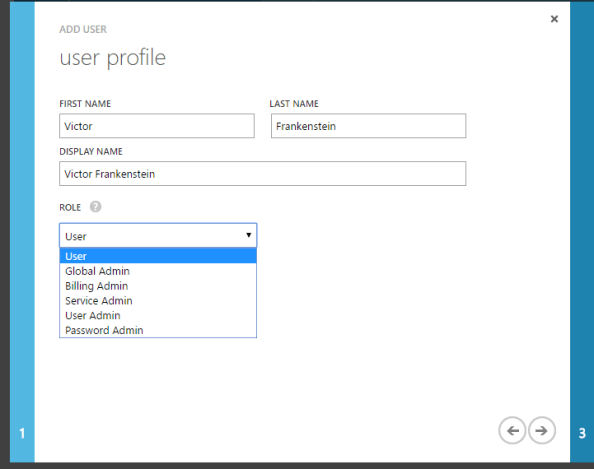
In the next window I will add a first name, last name, display name, and pick a role. Notice anything different? Here the only options to configure the Azure AD roles as described here. There are no Office 365 roles to choose from here. Additionally the user can be enabled for Azure MFA (the checkbox is hidden under the listing of roles).
In the last window I’m prompted to create an auto-generated temporary password for the user. Notice the option to create a password and enforce password change at first sign in aren’t there like O365? After the create button is hit a password will be automatically generated and will need to be delivered to the user out of band. Quite basic when compared to the Office 365 Admin Center isn’t it?

After the user is created the user can be modified in the Profile and Work Info sections. Profile is for your basic information and configuration while Work Info is similar to the contact information section in the Office 365 Admin Center with some additional options to configure the users authentication phone number and email address. The Devices and Activity sections providing reporting on the user’s activities.

Let’s now ditch the old and embrace the new by examining provisioning in the Azure Portal. Prior to a few months back, the only some of the Azure AD functionality could be administered in the Azure Portal including Azure AD Privileged Identity Management, Azure AD Identity Protection, Azure AD Connect Health, Azure AD Cloud App Discovery and Azure AD B2C (which is even mixed with the Management Portal). Microsoft has recently begun to migrate the administration of Azure AD to the Azure Portal to centralize administration of Azure resources.
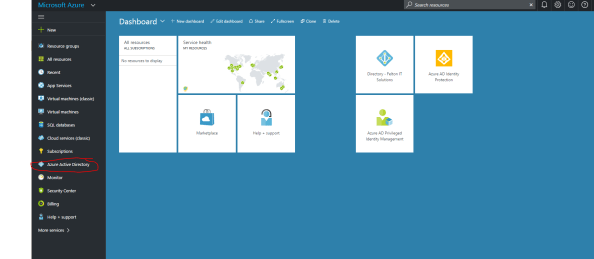
The Azure portal is accessible through by navigating to this link. After authentication the dashboard will load up displaying any resources that have been pinned. Click on the Azure Active Directory blade as highlighted in red in the screenshot below.
You’ll notice right off the bat that the interface is very slick, is intended for power users, and provides some useful summary analytics. I hadn’t poked around the new blade in a while and it looks like they’ve improved the functionality quite a bit. There doesn’t seem to be much missing beyond the ability to create new directories, assigning licenses, and reviewing the holistic audit logs. One item I did observe which is worth calling out is the app registration interface has been refined and made more slick. This is a big improvement from the similar interface in the Management Portal.

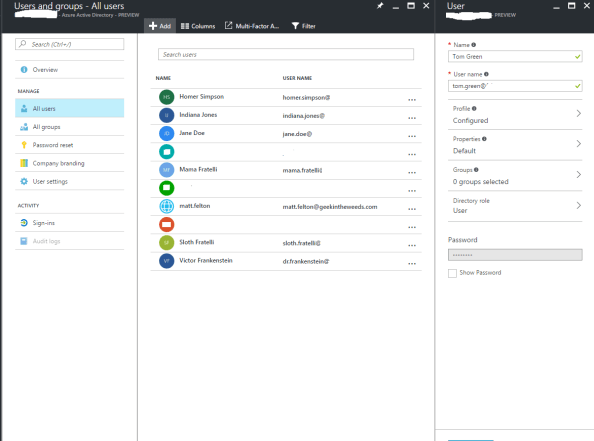
By navigating to the All Users blade and clicking the add button a new user can be created. This will bring up a new blade that allows for basic configuration of key pieces of information like user, first name, last name, job title, description, group membership, and Azure AD roles. The experience is quite similar to the Management Portal experience. Notice that the password again is pre-generated and does not allow setting a customer password or the option to turn off the enforcement of a password change at first login.
After the user is created it can be modified by clicking on the user which opens a new blade. This new blade allows for contact information about the user to be edited, assignment of Azure AD Roles, and assignment Azure AD group memberships. One neat feature is the Azure Resources option. This opens up a new blade that enumerates the user’s effective access to various Azure resources. Providing reporting on an effective user’s access is one thing Microsoft has never done effectively on-premises so a feature like this is nice to see, especially with the additional complexity the scale of cloud introduces. Finally, you’re provided some options to review the audit logs and sign in reports for the user (another neat feature). Like the Azure Management Portal, there is no quick and easy GUI-based functionality to restore deleted users in the Azure Portal at this time.

Well folks that is the overview of three out of four of the GUI provisioning methods. The fourth option is to provision natively through an on-premises Active Directory and synchronize those users to the cloud with a synchronization tool such as Azure AD Connect. There is plenty of documentation on what that process looks like already available. If you’re hungry for more, you can check out my previous series Azure Active Directory Connect – Behind the Scenes.
Let’s take a moment to summarize what we’ve learned:
Office 365 Admin Console
- Simple and ideal for business users and Tier 1 support
- Limited in its ability to administer Azure AD
- Only GUI option for assigning Office 365 licenses
- Only GUI option for assigning Office 365 roles
- No B2B or B2C support
- Bulk user creation capabilities
- Best option for restoration of a deleted user
Azure Management Portal
- Legacy portal being replace by Azure Portal
- Only GUI option for creating additional standard and B2C directories
- Only GUI option for adding B2B users
- No support for bulk user creation or restoration of deleted users
- Support of legacy Azure AD configuration items; no support for configuration of B2C policies, Identity Protection, Privileged Identity Management
Azure Portal
- Future one-stop shop for Azure AD administration
- Seems to supports all functionality of Azure Management Portal except creation of new directories
- GUI options for B2C policies, management of Identity Protection, Privileged Identity Management, Azure AD Connect Health, and Azure AD Proxy
- No GUI option for adding B2B users
- No support for bulk user creation or restoration of deleted users
- Analytics built into administrative tools
- Robust application registration features
So what does this all mean? Well it means that if you need to administer identity functionality via the GUI, you’re going to need to use a combination of the Office 365 Admin Console, the Azure Management Portal, and the Azure Portal. I expect within the next 3-6 months the remaining functionality in Azure Management Portal will be completely migrated to the Azure Portal. Businesses should focus their Tier 1 and business staff on learning the Office 365 Admin Console while Tier 2 and Tier 3 staff should focus on learning the Azure Portal.
Now that I’ve dug into the GUI options, I’ll next explore how the APIs and PowerShell provide opportunities for automation and integration with 3rd party and custom identity management solutions that may already exist on premises. See you then!
