Integrating Azure AD and G-Suite – Single Sign-On

Integrating Azure AD and G-Suite – Single Sign-On

Hi everyone,

After working through the Azure Active Directory (AD) and Amazon Web Services (AWS) integration I thought it’d be fun to do the same thing with Google Apps.  Google provides a generic tutorial for single sign-on that is severely lacking in details.  Microsoft again provides a reasonable tutorial for integrating Azure AD and Google Apps for single sign-on.  Neither gives much detail about what goes on behind the scenes or provides the geeky details us technology folk love.  Where there is a lack of detail there is a blogging opportunity for Journey Of The Geek.

In my previous post I covered the benefits of introducing Azure AD as an Identity-as-a-Service (IDaaS) component to Software-as-a-Service (SaaS) integrations.  Read the post for full details but the short of it is the integration gives you value-added features such as multifactor authentication with Azure Multifactor Authentication (MFA), adaptive authentication with Azure AD Identity Protection, contextual authorization with Azure AD Conditional Access, and cloud access security broker (CASB) functionality through Cloud App Security.  Supplementing Google Apps with these additional capabilities improves visibility, security, and user experience.  Wins across the board, right?

I’m going to break the integration into a series of posts with the first focusing on single sign-on (SSO).  I’ll follow up with a post exploring the provisioning capabilities Azure AD introduces as well as playing around with Google’s API.  In a future post I’ll demonstrate what Cloud App Security can bring to the picture.

Let’s move ahead with the post, shall we?

The first thing I did was to add the Google Apps application to Azure AD through the Azure AD blade in the Azure Portal. Once the application was added successfully I navigated to the Single sign-on section of the configuration. Navigate to the SAML Signing Certification section and click the link to download the certificate. This is the certificate Azure AD will be using to sign the SAML assertions it generates for the SAML trust. Save this file because we’ll need it for the next step.

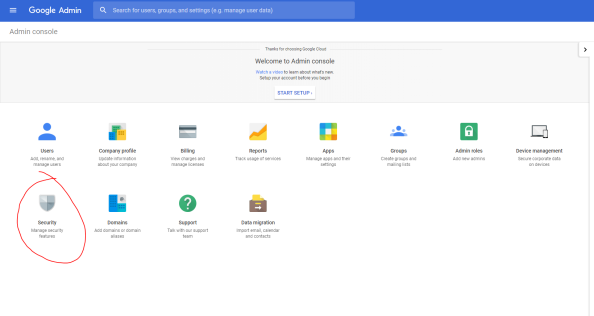
I next signed up for trial subscription of Google’s G Suite Business. This plan comes with a identity store, email, cloud storage, the Google productivity suite, and a variety of other tools and features. Sign up is straightforward so I won’t be covering it. After logging into the Google Admin Console as my newly minted administrator the main menu is displayed. From here I select the Security option.googlesso1
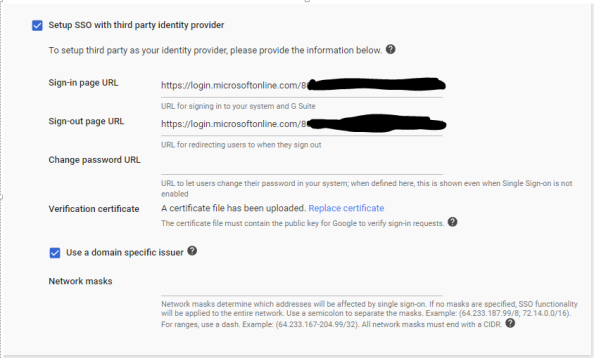
Once the Security page loads, I select the Set up single sign-on (SSO) menu to expand the option.  Google will be playing the role of the service provider, so I’ll be configuring the second section.  Check the box to choose to Setup SSO with third party identity provider.  Next up you’ll need to identify what your specific SAML2 endpoint is for your tenant.  The Microsoft article still references the endpoint used with the old login experience that was recently replaced.  You’ll instead want to use the endpoint https://login.microsoftonline.com/<tenantID>/saml2You’ll populate that endpoint for both the Sign-In and Sign-Out URLs.  I opted to choose the domain specific issuer option which sets the identifier Google identifies itself as in the SAML authentication request to include the domain name associated with the Google Apps account.  You would typically use this if you had multiple subscriptions of Google Apps using the same identity provider.  The final step is upload the certificate you downloaded from Azure AD.  At this point Google configured to redirect users accessing Google Apps (exempting the Admin Console) to Azure AD to authenticate.
googlesso2

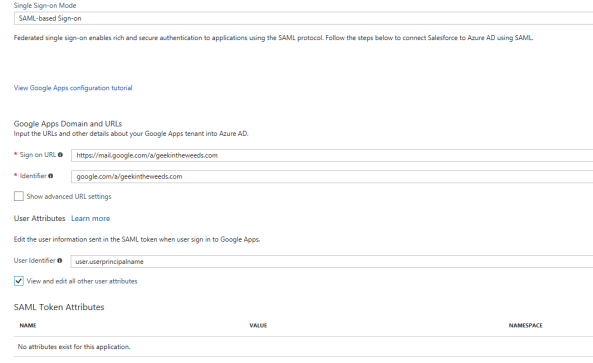
Now that Google is configured, we need to finish the configuration on Azure AD’s end.  If you follow the Microsoft tutorial at this point you’re going to run into some issues.  In the previous step I opted to use a domain specific issuer, so I’ll need to set the identifier to google.com/a/geekintheweeds.com.  For the user identifier I’ll leave the default as the user’s user principal name since it will match the user’s identifier in Google.  I also remove the additional attributes Azure AD sends by default since Google will discard them anyway.  Once the settings are configured hit the Save button.
googlesso3

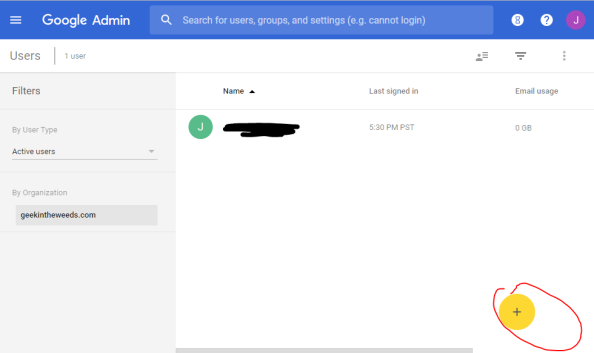
Now that both the IdP and SP have been created, it’s time to create a user in Google App to represent my user that will be coming from Azure AD.  I refer to this as a “stub user” as it is a record that represents my user who lives authoritatively in Azure Active Directory.    For that I switch back to the Google Admin console, click the User’s button, and click the button to create a new user.
googlesso4

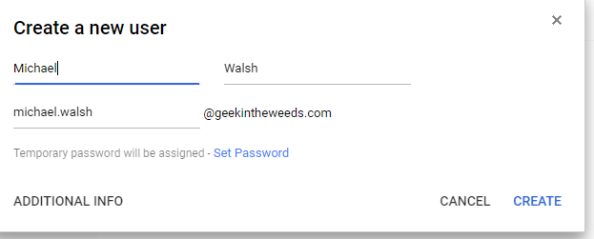
Earlier I created a new user in Azure AD named Michael Walsh that has a login ID of michael.walsh@geekintheweeds.com. Since I’ll be passing the user’s user principal name (UPN) from Azure AD, I’ll need to set the user’s Google login name to match the user’s UPN.
googlesso5

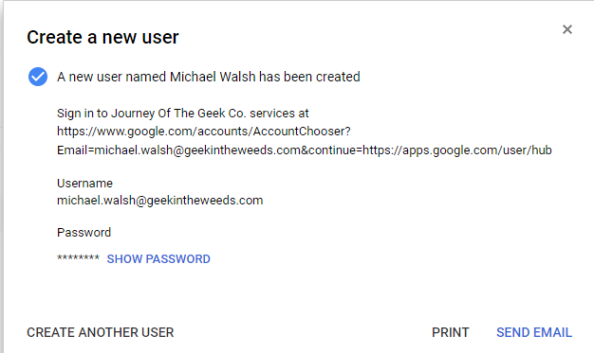
I then hit the Create button and my new user is created.  You’ll need that Google assigns the user a temporary password.  Like many SaaS solutions Google maintains a credential associated with the user even when the user is configured to use SSO via SAML.  Our SP and IdP are configured and the stub user is created in Google, so we’re good to test it out.
googlesso6

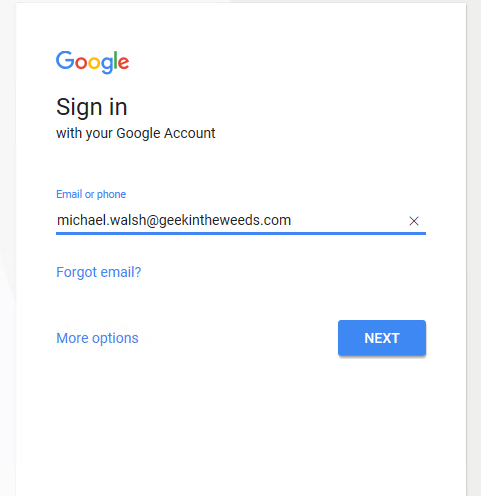
I open up Edge and navigate to the Google Apps login page, type in my username, and click the Next button.
googlesso7

I’m then redirect to the Microsoft login page where I authenticate using my Azure AD credentials and hit the sign in button.
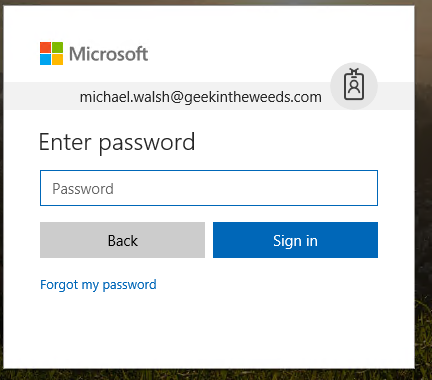
googlesso8

After successfully authenticating to Azure AD, I’m redirected back to Google and logged in to my newly created account.
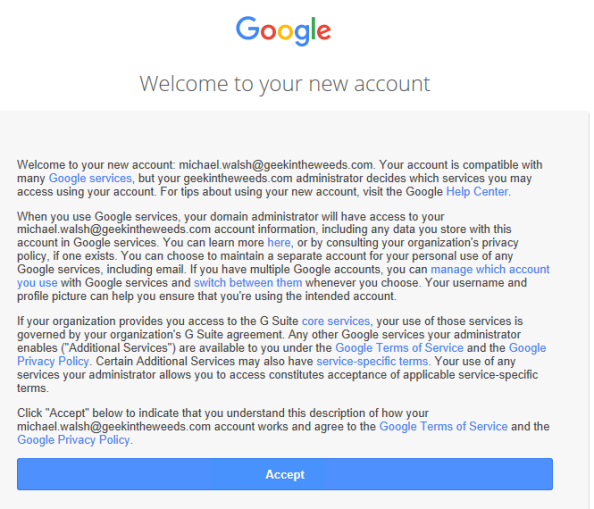
googlesso9

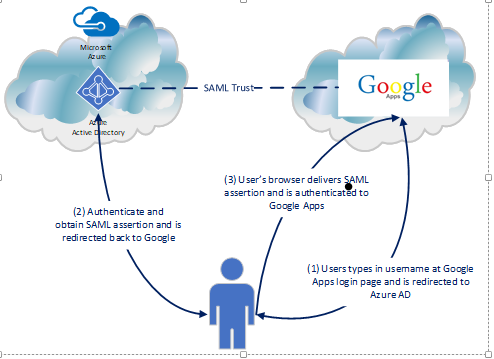
So what happened in the background to make the magic happen?  Let’s take a look at a diagram and break down the Fiddler conversation.
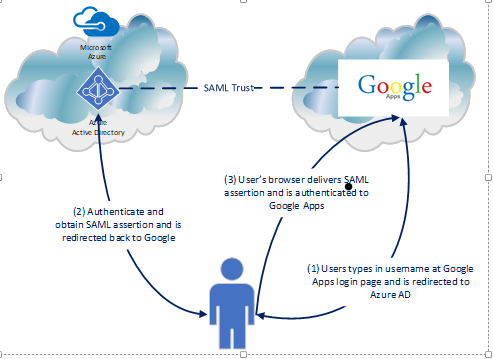
googlesso10

The diagram above outlines the simple steps used to achieve the user experience.  First the user navigates to the Google login page (remember SP-initiated SSO), enters his or her username, and is sent back an authentication request seen below extracted from Fiddler with instructs to deliver it back to the Azure AD endpoint for our tenant.


googlesso11

googlesso12.png

The user then authenticates to Azure AD and receives back a SAML response with instructions to deliver it back to Google. The user’s browser posts the SAML assertion to the Google endpoint and the user is successfully authenticated to Google.

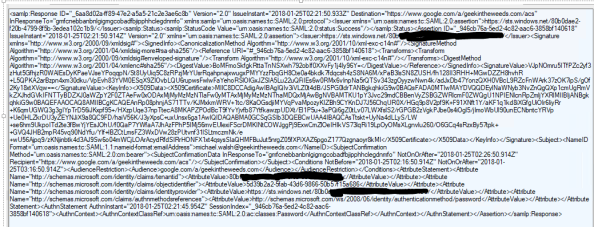
googlesso13.png

googlesso14.png

Simple right?  In comparison to the AWS integration from an SSO-perspective, this was much more straightforward.  Unlike the AWS integration, it is required to have a stub user for the user in Google Apps prior to using SSO.  This means there is some provisioning work to perform… or does it?  Azure AD’s integration again offers some degree of “provisioning”.  In my next post I’ll explore those capabilities and perform some simple actions inside Google’s API.

See you next post!

Office 365 Group Naming Policies – Part 2

Office 365 Group Naming Policies – Part 2

Welcome back.


In my first post I covered some of the methods organizations use to enforce a naming standard for groups, such as Active Directory groups, that are used to authorize access to data.  I also covered the challenges that are introduced when a mechanism for enforcing the naming standard doesn’t exist or isn’t effective and how this problem is becoming more prevalent with the increase in consumption of software-as-a-service applications.

Office 365 Groups are a core foundational component of Office 365 helping to enable simple, fast, and efficient collaboration within an organization.  For an organization to take full advantage of this, its end users need to be empowered to spin up Office 365 groups for mail-based collaboration or create new Teams for real-time collaboration. To make this work, IT can’t get in the way of the business and needs to let the business spin up and down Office 365 Groups as it needs them.  Microsoft has introduced a number of solutions to help with this including group expiration, integration with Office 365 retention policies, and the feature I’ll cover today, naming policies.

The naming policy feature is still in private preview but today I’m going to show you how to test the feature in your own tenant.  As a point of reference, I’m using a set of trial O365 E5 and Azure AD Premium P2 licenses within the commercial offering of Office 365 for my testing.  I can’t speak to whether or not the instructions below will work for Office 365 GCC or Office 365 Government.

The first thing I needed to do was install the Azure AD Preview module.  To do this I had to first remove the existing Azure AD module I had installed on my system and then install the Azure AD Preview module as seen below.

o365-1

Comparing the modules using a get-command shows that the preview module has the new cmdlets below.

Add-AzureADAdministrativeUnitMember
Add-AzureADApplicationPolicy
Add-AzureADMSLifecyclePolicyGroup
Add-AzureADScopedRoleMembership
Add-AzureADServicePrincipalPolicy
Get-AzureADAdministrativeUnit
Get-AzureADAdministrativeUnitMember
Get-AzureADApplicationPolicy
Get-AzureADDirectorySetting
Get-AzureADDirectorySettingTemplate
Get-AzureADMSDeletedDirectoryObject
Get-AzureADMSDeletedGroup
Get-AzureADMSGroup
Get-AzureADMSGroupLifecyclePolicy
Get-AzureADMSLifecyclePolicyGroup
Get-AzureADObjectSetting
Get-AzureADPolicy
Get-AzureADPolicyAppliedObject
Get-AzureADScopedRoleMembership
Get-AzureADServicePrincipalPolicy
New-AzureADAdministrativeUnit
New-AzureADDirectorySetting
New-AzureADMSGroup
New-AzureADMSGroupLifecyclePolicy
New-AzureADObjectSetting
New-AzureADPolicy
Remove-AzureADAdministrativeUnit
Remove-AzureADAdministrativeUnitMember
Remove-AzureADApplicationPolicy
Remove-AzureADDirectorySetting
Remove-AzureADMSDeletedDirectoryObject
Remove-AzureADMSGroup
Remove-AzureADMSGroupLifecyclePolicy
Remove-AzureADMSLifecyclePolicyGroup
Remove-AzureADObjectSetting
Remove-AzureADPolicy
Remove-AzureADScopedRoleMembership
Remove-AzureADServicePrincipalPolicy
Reset-AzureADMSLifeCycleGroup
Restore-AzureADMSDeletedDirectoryObject
Set-AzureADAdministrativeUnit
Set-AzureADDirectorySetting
Set-AzureADMSGroup
Set-AzureADMSGroupLifecyclePolicy
Set-AzureADObjectSetting
Set-AzureADPolicy

The cmdlets we’re interested in for this demonstration are the used to create and manage a new Graph API resource type called a directorySetting. The resource type is used to configure settings within Azure Active Directory. The directorySetting resource types are created from a template of configuration settings called a directorySettingTemplate resource type. Running the cmdlet Get-AzureADDirectorySettingTemplate displays the available to build a custom directorySetting from.

o365-2.png

After connection to Azure AD using the Connect-AzureAD cmdlet, I can take a look at the templates available. The template I’m interested in for this blog is the Group.Unified template because it contains the settings for the naming policy as seen below.

o365-3.png

Now that I’ve identified the template I want to draw from for a new directorySetting, I’m going to create a variable named $template and assign the Group.Unified template to it.  Running a quick Get-Member on the newly assigned displays a method named CreateDirectorySetting.  I’ll use this method to create a new instance of a directorySetting resource type based off the template and assign it to a variable named $setting.

o365-4.png

If I run a Get-Member on $setting I can see that I’ve created a new instance of the directorySetting resource type which has the settings inherited from the Group.Unified template with some of those settings being configured with default values.

o365-5.png

You’ll want to pay attention to these default values because once the settings become active for the tenant and seem to override settings configured within the GUI.  For example, if you are denying users the ability to create new Office 365 groups via the configuration setting in the Azure Active Directory blade in the Azure Portal, leaving the EnableGroupCreation setting as true will override that.  I’m not sure that is the intended behavior, but hey this is still preview right?

The next step is to configure the PrefixSuffixNamingRequirement setting with the naming convention I want enforced across my tenant.  This Microsoft article does a good job explaining your options and the syntax.  I went with a simple naming convention of including the fixed string “JOG” along with the value from the user’s department attribute in Azure Active Directory followed by the string value the user chooses for the group name.

o365-6.png

Checking the values property of the $setting shows that the PrefixSuffixNamingRequirement is now populated with the value I entered above.

o365-7.png

Now that the settings has been configured I make it active by using the New-AzureADDirectorySetting cmdlet and including the $setting directory object as input.

o365-8.png

I then log into the Office 365 portal as a standard user and navigate to Outlook Web App and attempt to create a new Office 365 group. All new groups are now created using the naming convention I defined and it’s displayed clearly to the end users.

o365-9.png

Hopefully Microsoft will refine the documentation as the feature moves out of preview and into general availability.  I also think this is a simple and static setting that would make sense to configurable from the GUI.  I’d also like to see the settings configurable with the directorySetting resource type be in sync with any corresponding settings in the GUI to avoid confusion.

That’s all there is to it.  Overall it’s a very simple yet elegant solution that solves naming convention woes while giving the business freedom to collaborate without having to go through IT.  You can’t beat that.

Thanks!

Office 365 Groups Naming Policies – Part 1

Office 365 Groups Naming Policies – Part 1

Groups…  It’s a term every business user consuming technology has heard at some point in time.  Most users only experience groups when they’re unable to access a specific application or file and the coworker sitting next to them informs them they need to call IT and get added to the department group.  Those of us who work on the technology side of the fence are very familiar with the benefits groups bring to the table when controlling access to data.  We are also quite familiar with the challenges they can bring when managing them at scale.

Something as simple as a lack of an enforced naming convention can create serious pain for an organization if it relies heavily upon the naming convention to determine the function and owner of a group.  The pain bleeds through IT and into the business as workers struggle with long wait times for on-boarding new employees due to IT trying to determine which groups the users need to be in.  When it comes time to perform an access review, business owners may waste valuable time trying to determine if removing an employee from a specific group will impact that employee’s ability to fulfill their job responsibilities.

In the on-premises world organizations deal with the challenge of naming conventions in different ways.  Most rely upon first or second level help desk to create groups according to the organization’s naming standard.  This method introduces the risk of human error and presents challenges when the group information for a particular application is sourced from a variety of different identity backends which force the staff to learning multiple tools.  Others make use of identity management (IDM) systems that automate the creation of groups and enforce the naming convention.  This method is very effective but also very costly due to high costs in implementing and operating an IDM.  A very small minority of organizations have evolved to the point where the naming conventions are no longer important due to robust reporting systems and entitlement databases.

Very few organizations are able to successfully execute the third method, which leaves them with the first or second.  The introduction of the software-as-a-service (SaaS) has made the first and second methods of enforcing a naming convention much more complicated.  Using the first method of leveraging help desk staff to create the groups manually is no longer scalable and the second method of using a centralized IDM system is often limited by the vendor’s ability to write connectors to the wide variety of APIs in use across the thousands of SaaS vendors.  All is not lost, as it seems some vendors have begun to recognize the challenge this can introduce to their customers.

If your organization is a consumer of Office 365, you’ve more than likely begun to use Office 365 Groups.  Office 365 groups offer a variety of features not found in the traditional security/distribution group or shared mailbox.  Take a look at this link for a comparison chart that documents the features.  One important thing to note is Office 365 Groups can only be only created in Azure Active Directory (AAD).  You cannot synchronize an on-premises Active Directory Domain Services security or distribution group to AAD and convert it to an Office 365 Group.  This means you can’t leverage an existing solution for enforcing naming conventions unless that solution has a connector into Azure AD.  Given features Office 365 provide and that they are the construct used by Microsoft Teams, you may make the decision to allow your users to create Office 365 Groups on the fly in order to allow them to take full advantage of collaboration tools available in Office 365.  To quote Peter Venkman, “Human sacrifice, dogs and cats living together… mass hysteria!”.

Calm down my friend.  Microsoft has a solution coming in the pipeline that will solve your Office 365 Groups naming convention woes.  In my next post I’ll demonstrate the feature and walkthrough how to test the feature out while it is in preview.

Integrating Azure AD and AWS – Part 3

Update: In November 2019 AWS introduced support for integration between Azure AD and AWS SSO.  The integration offers a ton more features, including out of the box support for multiple AWS accounts.  I highly recommend you go that route if you’re looking to integrate the two platforms.  Check out my series on the new integration here.

Welcome!  This entry continues my series in the integration of Azure AD and AWS.  In my first entry I covered what the advantages of the integration are.  In the second entry I walked through my lab configuration and went over what happens behind the scenes when an application is added to Azure AD from the application gallery.  In this post I’m going to walk through some of the configuration we need to do in both Azure AD and AWS.  I’ll also be breaking open the Azure AD and AWS metadata and examining the default assertion sent by Microsoft out of the box.

In my last entry I  added the AWS application to my Azure AD tenant from the Azure AD Application Gallery.  The application is now shown as added in the All Applications view of the Azure Active Directory blade for my tenant.

pic1.png

After selecting AWS from the listing of applications I’m presented with a variety of configuration options.  Starting with Properties we’re provided with some general information and configuration options.  We need to ensure that the application is enabled for users to sign-in and that it’s visible to users so we can select it from the access panel later on.  Notice also that that I’m configuring the application to require the user be assigned to the application.pic2

On the Users and groups page I’ve assigned Rick Sanchez to the application to allow the account access and display it on the access panel.

pic3

After waiting about 10 minutes (there is a delay in the time it takes for the application to appear in the application panel) I log into the Access Panel as Rick Sanchez and we can see that the AWS app has been added for Rick Sanchez.

pic4

Back to the properties page of the AWS application, my next stop is the Single sign-on page. Here I drop down the Single Sign-on Mode drop box and select SAML-based Sign-on option. Changing the mode to SAML-based Sign-on exposes a ton of options. The first option that caught my eye was the Amazon Web Services (AWS) Domain and URLs. Take notice of the note that says Amazon Web Services (AWS) is pre-integrated with Azure AD and requires no mandatory URL settings. Yeah, not exactly true as we progress through this series.

pic5.png

Further down we see the section that allows us to configure the unique user identifier and additional attributes.   By default Microsoft includes the name, givenName, surName, and emailAddress claims.  I’ll need to make some changes there to pass the claims Amazon requires, but let’s hold off on that for now.

pic6.png

Next up a copy of the Azure AD metadata (IdP metadata) is provided for download.  Additionally some advanced options are available which provide the capability to sign the SAML response, assertion, or both as well as switching the hash algorithm between SHA1 and SHA256.

pic7.png

Now like any nerd, I want to poke around the IdP metadata and see what the certificate Azure AD is using to sign looks like.  Opening up the metadata in a web browser parses the XML and makes the format look pretty.  From there I grab the contents X509Certificate tag (the base-64 encoded public-key certificate), dump it to Notepad, and renam it with a file extension of cer.  Low and behold, what do we see but a self-signed certificate.  This is a case where I can see the logic that the operational overhead is far greater than the potential security risk.  I mean really, does anyone want to deal with the challenge of hundreds of thousands of customers not understanding the basics of public key infrastructure and worrying about revocation, trust chains, and the like?  You get a pass Microsoft… This time anyway.

pic8.png

Before I proceed with the next step in the configuration, let’s take a look at what the assertion looks like without any of the necessary configuration.  For this I’ll use Fiddler to act as a man-in-the-middle between the client and the web.  In session 6 of the screenshot below we see that the SAML response was returned to the web browser from Azure.

pic9.png

Next up we extract that information with the Text Wizard, base-64 decode it, copy it to Notepad, save it as an XML file, and open it with IE.  The attributes containing values of interest are as follows:

  • Destination – The destination is the service provider assertion consumer URI

pic10.png

  • NameID – This is the unique identifier of the used by the service provider to identify the user accessing the service

pic11.png

  • Recipient– The recipient attribute references the service the assertion is intended for.  Oasis security best practices for SAML require the service provider to verify this attribute match the URI for the service provider assertion consumer URI

pic12.png

  • Audience – The audience attribute in the audienceRestriction section mitigates the threat of the assertion being stolen and used to impersonate a user.  Oasis security best practices require the service provider to verify this when the assertion is received to ensure it is recognizes the identifier.  The way in which this is accomplished is the value in the audience attribute is checked against the service provider EntityID attribute.

pic13.png

Additionally we have some interesting claims including tenantid, objectidentifier of the user object in Azure AD, name, surname, givenname, displayname, identityprovider, and authnmethosreferences.  I don’t think any of these need further explanation.

pic14.png

Let’s now take a look at the AWS (service provider in SAML terms) metadata.  The AWS metadata is available for download from here.  After it’s downloaded it can be opened with IE.

pic15.png

The fields of interest in this set of metadata is:

  • EntityID – The entityID is the unique identifier AWS will provide in its authentication requests.  Let’s note the value of urn:amazon:webservices for later as it will come in handy due to some issues with Microsoft’s default settings.

pic16

  • NameIDFormat – This tells me both transient and persistent are accepted.  I won’t go into details on Name ID format, you can review that for yourself in the Oasis standard.  Suffice to say the Name ID format required by the service provider can throw some wrenches into integrations when using a more basic security token service (STS) like AD FS.

pic17

  • AssertionConsumerService – This is where our browser will post back the SAML assertion after a successful authentication.  Note the URI in the location field.

pic18.png

  • RequestedAttributes – This provides us with a listing of all the attributes AWS will accept in an assertion.  Note that the only two required attributes are Role and RoleSessionName.

We’ve added the AWS application to Azure AD, granted a user access to the application, and have started the SAML setup within Azure AD (Identity Provider).  Let’s continue that setup by configuring which attributes Azure AD will include in the assertions delivered to AWS.  From review of the AWS metadata we know that we need to  send claims of Role and RoleSessionName.  The RoleE will match to an an AWS IAM Role handling authorization of what we can do within AWS and the RoleSessionName provides a unique identifier for the user asserting the entitlement.

Back in the Azure AD Portal I’m going to click the option to View and edit all other user attributes.  The exposes the attributes Microsoft sends by default.  These include givenName, suName, emailAddress, and name.  Since the AWS metadata only requires RoleSessionName and Role, I’m going to delete the other attributes.  No sense in exposing additional information that isn’t needed!

pic19.png

After the extra attributes are deleted I create the two required attributes as seen in the screenshot below.

pic20.png

I’m now going to bounce over to the AWS Management Console.  After logging in I navigate to the Services menu and choose IAM.

pic21.png

On the IAM menu I choose the Identity providers menu item and hit the Create Provider button.

pic22.png

On the next screen I’m required to configure the identity provider settings.  I choose SAML from the drop-down box enter a provider name of MAAD and upload the IdP metadata I downloaded from Azure AD referenced earlier in the blog entry and hit the Next Step button.

pic23.png

On the next page I verify the provider name and the type of identity provider and hit the Create button.  Once that is complete I see the new entry listed in identity providers list.  Easy right?

pic24.png

We have an identity provider, but that identity provider needs some IAM roles to be associated with the identity provider that my fictional users can assert.  For that I go to the Roles section and hit the Create Role button.

pic25.png

On the next screen I select the SAML button as the type of trusted entity since the role is going to be asserted via the SAML trust with Azure AD.  Here I select the MAAD provider and choose the option to allow the users to access both the AWS Management Console and the API and then hit the Next: Permissions button.

pic26.png

As I referenced in my first entry to this series, the role I’m going to create is going to be capable of managing all EC2 instances.  For that I choose the AmazonEC2FullAccess policy template and then hit the Next:Review button.

pic267.png

On the last screen I name the new role AzureADEC2Admins, write a short description, and hit the Create Role button.

pic28.png

The new role is created and can be seen associated to the identity provider representing the trust between AWS and Azure AD.

pic29.png

Let’s sum up what we did for this entry.  We examined the key settings Microsoft exposes for configuration with the AWS integration.  We examined the Azure AD (IdP) and AWS (SP) metadata to understand which settings are important to this integration and what those settings do.  We examined an assertion generated out of Azure AD prior to any of the necessary customization being completed to understand what a canned assertion looks like.  Finally, we completed a majority of the tasks we need to complete on the AWS side to create the SAML trust on the AWS end and to create a role JoG users can asserts.  Are your eyes bleeding yet?

In my last post in this series I’ll walk through the rest of the configuration needed on the Azure AD end.  This will include going over some of the mistakes the Microsoft tutorial makes as well as covering configuration of Azure AD’s provisioning integration as to what it means and how we can effectively configure it.  Finally, we’ll put all the pieces of the puzzle together, assert our identity, and review logs at AWS to see what they look like when a federated user performs actions in AWS.

The journey continues in my fourth entry.