Integrating Azure AD and AWS – Part 2

Update: In November 2019 AWS introduced support for integration between Azure AD and AWS SSO.  The integration offers a ton more features, including out of the box support for multiple AWS accounts.  I highly recommend you go that route if you’re looking to integrate the two platforms.  Check out my series on the new integration here.

Today I will continue the journey into the integration between Azure AD and Amazon Web Services.  In my first entry I covered the reasons why you’d want to integrate Azure AD with AWS and provided a high-level overview of how the solution works.  The remaining entries in this series will cover the steps involved in completing the integration including deep dives into the inner workings of the solution.

Let me start out by talking about the testing environment I’ll be using for this series.
lab.png

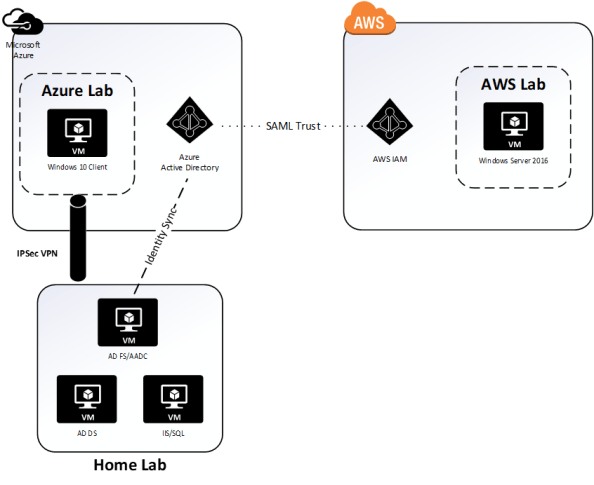
The environment includes three virtual machines (VMs) running on Windows Server 2016 Hyper V on a server at my house.  The virtual machines consists three servers running Windows Server 2016 with one server acting as a domain controller for the journeyofthegeek.local Active Directory (AD) forest, another server running Active Directory Federation Services (AD FS) and Azure AD Connect (AADC), and the third server running MS SQL Server and IIS.  The IIS instance hosts a .NET sample federated application published by Microsoft.

In Microsoft Azure I have a single Vnet configured for connectivity to my on-premises lab through a site-to-site IPSec virtual private network (VPN) I’ve setup with pfSense.  Within the Vnet exists a single VM running Windows 10 that is domain-joined to the journeyofthegeek.local AD domain.  The Azure AD tenant providing the identity backend for the Microsoft Azure subscription is synchronized with the journeyofthegeek.local AD domain using Azure AD Connect and is associated with the domain journeyofthegeek.com.  Authentication to the Azure AD tenant is federated using my instance of AD FS.  I’m not synchronizing passwords and am using an alternate login ID with the user principal name being synchronized to Azure AD being stored in the AD attribute msDS-CloudExtensionAttribute1.  The reason I’m still configured to use an alternate login ID was due to some testing I needed to do for a previous project.

I created a single test user in the journeyofthegeek.local Active Directory domain named Rick Sanchez with a user principal name (UPN) of rick.sanchez@journeyofthegeeklocal and msDS-CloudExtensionAttribute1 of  rick.sanchez@journeyofthegeek.com.  The only attribute to note that the user has populated is the mail attribute which has the value of rick.sanchez@journeyofthegeek.com.  The user is being synchronized to Azure AD via the Azure AD Connect instance.

In AWS I have a single elastic compute cloud (EC2) instance running Windows Server 2016 within a virtual private cloud (VPC).  I’ll be configuring Azure AD as an identity provider associated with the AWS account and will be associating an AWS IAM role named AzureADEC2Admins.  The role will grant full admin rights over the management of the EC2 instances associated to the account via the AmazonEC2FullAccess permissions policy.

Let’s begin shall we?

The first step I’ll be taking is to log into the Azure Portal as an account that is a member of the global admins and navigate to the Azure Active Directory blade.  From there I select Enterprise Applications blade and hit the New Application link.

entapps.png

I then search the application gallery for AWS, select the AWS application, accept the default name, and hit the Add button.  Azure AD will proceed to add the application and will then jump to a quick start page.  So what exactly does it mean to add an application to Azure AD?  Good question, for that we’ll want to use the Azure AD cmdlets.  You can reference this link.

Before we jump into running cmdlets, let’s talk very briefly about the concept of application identities in AAD.  If you’ve managed Active Directory Domain Services (AD DS), you’re very familiar with the concept of service accounts.  When you needed an application (let’s call it a non-human to be more in-line with industry terminology) to access AD-integrated resources directly or on-behalf of a user you would create a security principal to represent the non-human.  That security principal could be a user object, managed service account object, or group managed service account object.  You would then grant that security principal rights and permissions over the resource or grant it the right to impersonate a user and access the resource on the user’s behalf.  The part we want to focus in on is the impersonation or delegation to access a resource on the behalf of a user.  In AD DS that delegation is accomplished through the Kerberos protocol.

When we shift over to AAD the same basic concepts still exist of creating a security principal to represent the application and granting that application direct or delegated access to a resource.  The difference is the protocol handling the access shifts from Kerberos to OAuth 2.0.  One thing many people become confused about is thinking that OAuth handles authentication.  It doesn’t.  It has nothing do with authentication and everything to do with authorization, or more clearly delegation.  When we add an application the AAD a service principal object and sometimes application object (in AWS instance both are created) are created in the AAD tenant to represent the application.  I’m going to speak to the service principal object for the AWS integration, but you can read through this link for a good walkthrough on application and service principal objects and how they differ.

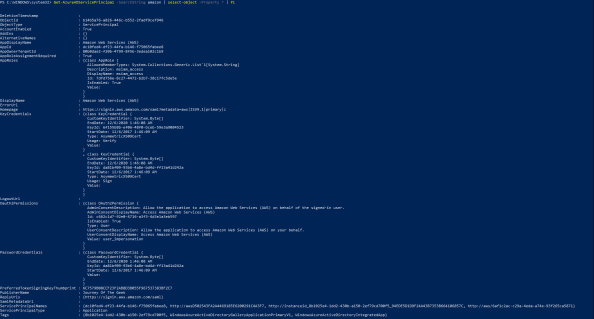
Now back to AWS.  So we added the application and we now have a service principal object in our tenant representing AWS.  Here is a few of the attributes for the object pulled via PowerShell.
awsservice.png

Review of the attributes for the object provide a few pieces of interesting information.   We’ll get to experiment more with what these mean when we start doing Fiddler captures, but let’s talk a bit about them now.  The AppRoles attribute provides a single default role of msiam_access.  Later on we’ll be adding additional roles that will map back to our AWS IAM roles.

Next up we have the KeyCredentials which contains two entries.  This attribute took me a while to work out.  In short, based upon the startDate, I think these two entries are referencing the self-signed certificate included in the IdP metadata that is created after the application is added to the directory.  I’ll cover the IdP metadata in the next entry.

The Oauth2Permissions are a bit funky for this use case since we’re not really allowing the application to access AWS on our behalf, but rather asking it to produce a SAML assertion asserting our identity.  Maybe the delegation can be thought of as delegating Azure AD the right to create logical security tokens representing our users that can be used to assert an identity to AWS.

The PasswordCredentials contains a single entry which shares the same KeyID as the KeyCredential.  As best I can figure from reading the documentation is this would normally contain entries for client keys when not using certificate authentication.  Given that it contains a single entry with the same KeyID as the KeyCredential for signing, I can only guess it will contain an entry even with a certificate is used to authenticate the application.

The last attributes of interest are the PreferredTokenSigningKeyThumbprint which references the certificate within the IdP metadata and the replyURLs which is the assertion consumer URI for AWS.

So yeah, that’s what happens in those 2 or 3 seconds the AWS application is registered with Azure AD.  I found it interesting how the service principal object is used to represent trust between Azure AD and AWS and all the configuration information attached to the object after the application is simply added.  It’s nice to have some of the configuration work done for us out of the box, but there is much more to do.

In the next entry I’ll walk through the Quick Start for the AWS application configuration and explore the metadata Azure AD creates.

The journey continues in my third entry.

Azure AD Pass-through Authentication – How does it work? Part 1

Hi everyone. I decided to take a break from the legacy and jump back to modern. Today I’m going to do some digging into Microsoft’s Azure AD Pass-through Authentication solution. The feature was introduced into public preview in December of 2016 and was touted as the simple and easy alternative to AD FS. Before I jump into the weeds of pass-through authentication, let’s do a high level overview of each option.

I will first cover the AD FS (Active Directory Federation Services) solution. When AD FS is used a solution for authentication to Azure Active Directory, it’s important to remember that AD FS is simply a product that enables the use of a technology to solve a business problem. In this instance the technology we are using is modern authentication (sometimes referred to as claims-based authentication) to solve the business problem of obtaining some level of assurance that a user is who they say they are.

When Azure AD and AD FS are integrated to enable the use of modern authentication, the Windows Services Federation Language (WS-FED) standard is used. You are welcome to read the standard for details, but the gist of WS-FED is a security token service generates logical security tokens (referred to assertions) which contain claims. The claims are typically pulled from a data store (such as Active Directory) and contain information about the user’s identity such as logon ID or email address. The data included in claims has evolved significantly over the past few years to include other data about the context of the user’s device (such as a trusted or untrusted device) and user’s location (coming from a trusted or untrusted IP range). The assertions are signed by the security token service (STS) and delivered to an application (referred to as the relying party) which validates the signature on the assertion, consumes the claims from the assertion, and authorizes the user access to the application.

You may have noticed above that we never talked about a user’s credentials. The reason for that is the user’s credentials aren’t included in the assertion. Prior to the STS generating the assertion, the user needs to authenticate to the STS. When AD FS is used, it’s common for the user to authenticate to the STS using Kerberos. Those of you that are familiar with Active Directory authentication know that a user obtains a Kerberos ticket-granting-ticket during workstation authentication to a domain-joined machine. When the user accesses AD FS (in this scenario the STS) the user provides a Kerberos service ticket. The process to obtain that service ticket, pass it to AD FS, getting an assertion, and passing that assertion back to the Azure AD (relying party in this scenario) is all seamless to the user and results in a true single sign-on experience. Additionally, there is no need to synchronize a user’s Active Directory Domain Services password to Azure AD, which your security folk will surely love.

The challenge presented with using AD FS as a solution is you have yet another service which requires on-premises infrastructure, must be highly available, and requires an understanding of the concepts I have explained above. In addition, if the service needs to be exposed to the internet and be accessible by non-domain joined machines, a reverse proxy (often Microsoft Web Application Proxy in the Microsoft world) which also requires more highly available infrastructure and the understanding of concepts such as split-brain DNS.

Now imagine you’re Microsoft and companies want to limit their on-premises infrastructure and the wider technology mark is slim in professionals that grasp all the concepts I have outlined above. What do you do? Well, you introduce a simple lightweight solution that requires little to no configuration or much understanding of what is actually happening. In come Azure AD Pass-through authentication.

Azure AD Pass-through authentication doesn’t require an STS or a reverse proxy. Nor does it require synchronization of a user’s Active Directory Domain Service password to Azure AD. It also doesn’t require making changes to any incoming flows in your network firewall. Sounds glorious right? Microsoft thinks this as well, hence why they’ve been pushing it so hard.

The user experience is very straightforward where the user plugs in their Active Directory Domain Services username and password at the Azure AD login screen. After the user hits the login screen, the user is logged in and go about their user way. Pretty fancy right? So how does Microsoft work this magic? It’s actually quite complicated but ingeniously implemented to seem incredibly simplistic.

The suspense is building right? Well, you’ll need to wait until my next entry to dig into the delicious details. We’ll be using a variety of tools including a simple packet capturing tool, a web proxy debugging tool, and an incredibly awesome API monitoring tool.

See you next post!

Azure AD User Provisioning – Part 5

Hi everyone. I apologize for the delay in publishing the last post in this series. The past few months have been hectic. For this last post of the year I will be completing the series on provisioning in Azure AD.

As I’ve covered in earlier posts, there are a lot of options when provisioning to Azure AD including multiple GUIs and programmatic options. I’ve covered provisioning in the Azure Management Portal, Azure Portal, Office 365 Admin Center, and Azure Active Directory PowerShell v1 and v2. In this final post I will cover provisioning via the Graph API using a simple ASP .NET web application.

I was originally going to leverage the graph API directly via PowerShell using the .NET ADAL libraries and Invoke-WebRequest cmdlets. I’ve been playing around a lot with Visual Studio creating simple applications like the Azure B2B provisioning app. I decided to challenge myself by adding additional functionality to the ASP .NET web application I assembled in my previous post. I enjoyed the hell out of the process, learned a bunch more about .NET, C#, ASP .NET web apps, and applications built using the MVC architecture. Let’s get to it shall we?

Before we dive into the code and the methodologies I used to put together the application, let’s take a look at it in action. The application starts by requiring authentication to Azure AD.

1

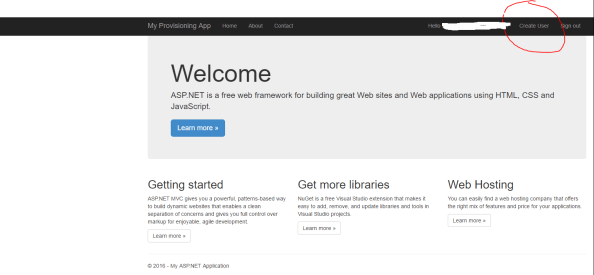
After successful authentication, the main page for the website loads. You’ll notice from the interface that I used the sample ASP .NET MVC Web Application available in Visual Studio but added a new navigation link on the right hand side named Create User.

2

After clicking the Create User link, the user is redirected to a simple (i.e. ugly) web form where information about the new user is collected.

3

After the user hits submit, the new user is created in Azure AD and the information from the returned JWT is parsed and displayed in a table.

4

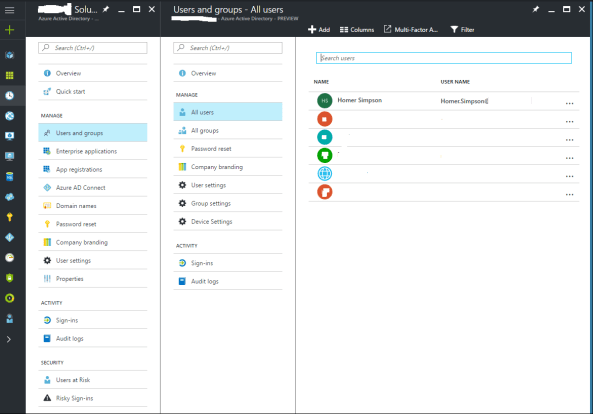
When we navigate to the Azure AD blade in the Azure Portal we see that Homer has been created and added to the system.

clearme

So you’re probably asking the question as to how complicated it was to put this application together? The answer may surprise you. It was incredibly simple. The most difficult part of the process was learning my away around C# and how MVC web apps are put together. For a skilled developer, this would have taken an hour versus the days it took me.

The first thing I did was do some reading into the Graph API, specifically around managing users. Microsoft has a number of great instructions located here and here. After getting familiar with the required inputs and the outputs, I built a new model in my application that would be used for the user form input.

6

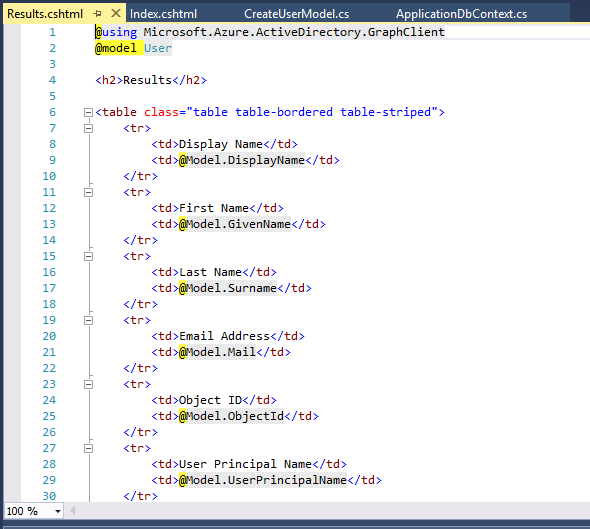
Once I had my new model assembled, I then created two new views under a new folder named Create User. The view named Index is the view that takes the user input and the view named Results is the view that spits back some of the content from the JWT returned from Azure after the user is successfully created. Here is the code for the Index view.

7

And the code for the Results view.

8

After the new views were created, I then moved on to creating the guts of the new functionality with a new controller named CreateUserController. I was able to reuse some of the code from the UserProfileController to obtain the necessary OAuth access token to delegate the rights to the application to create the new user.

9

The remaining code in my controller came from a crash course in programming and MVC web apps. The first section of code calls the task to obtain the access token.

10

The next section of code creates a new instance of the user class and populates the properties with information collected from the form.

11.png

The final section of code attempts to create the new user and displays the results page with information about the user such as objectID and userPrincipalName. If the application is unable to create the user, the exception is caught, and an error page is displayed.

12

But wait… what is missing? I’ll give you a hint, it’s not code.

The answer is the appropriate delegated permissions. Even if the user is a global admin, the application can’t perform the actions of a global admin unless we allow it to. To make this happen, we’ll log into the Azure Portal, access the Azure AD blade, and grant the application the delegated permission to Access the directory as the signed-in user.

13

Simple right? The Azure Active Directory Graph Client libraries make the whole process incredibly easy doing a whole lot with very little code. Imagine integrating this functionality into an existing service catalog. Let’s say you have a business user who needs access to Dynamics CRM Online. The user could navigate to the service catalog and request access. After their manager approvers, the application powering the service catalog could provision the new user, assign the license for Dynamics CRM Online, and drop the user into the appropriate groups. All of this could happen without having to involve IT. This is the value of a simple API with a wonderful set of libraries.

Well folks that wraps up my last post the year. I’ll return next year with a series of deep dives exploring Microsoft’s newly announced Azure AD Pass-through authentication and SSO features. Have a happy holiday!

Azure AD User Provisioning – Part 4

Today I will continue my series in Azure AD User Provisioning. In previous posts I looked at the GUI methods of provisioning users. I’ll now begin digging into the methods that provide opportunities for programmatic management of a user’s identity management lifecycle. For this post we’ll cover every IT Professional’s favorite Microsoft topic, PowerShell.

Microsoft has specific PowerShell modules for administration of Azure Active Directory. Microsoft is in the process of transitioning from the MSOnline (Azure Active Directory PowerShell v1) to the AzureAD module (Azure Active Directory PowerShell v2). At this time the AzureAD PowerShell module is in public preview with plans to migrate all the functionality from the MSOnline module to the AzureAD module. Until that point there will be some activities you’ll need to do in the MSOnline cmdlets.
Creating a new user using the MSOnline module (lovely referred to as the “msol” cmdlets) is a quick and easy simple line of code:

New-MsolUser -userPrincipalName user@sometenant.com -DisplayName "Some User"

The user can then be modified by using cmlets such as Set-MSolUser, Set-MsolUserLicense, Set-MsolUserPrincipalName, Set-MsolUserPassword, Remove-MsolUser. Using this set of cmdlets you can assign and un-assign user licenses and manage the identity lifecycle of the user account.

There are some subtle differences in the MSOnline and AzureAD cmdlets. These differences arise due to Microsoft’s drive to make the experience using PowerShell in the Azure AD module similar to the experience of using the Graph API. The AzureAD cmdlets are much more full featured in comparison to the MSOnline cmdlets. Close to every aspect of Azure AD can be managed across the board beyond just users. Here is an example of how you would create a user with the new cmdlets:

New-AzureADUser -UserPrincipalName user@sometenant.com -AccountEnabled $False -DisplayName "user" -PasswordProfile $UserPasswordProfile

You’ll notice a few differences when we compare the minimum options required when creating a user with the MSOnline cmdlets. As you’ll notice above, there are not just more required options, but one that make look unfamiliar called PasswordProfile. The Password profile option configures the user’s password and whether or not the user is going to be forced to change the password at next login. I struggled a bit with getting the cmdlet to accept the PasswordProfile, but the documentation on the Azure Graph API and a Microsoft blog that provided some information. It can be set with the following lines of code:

$UserPasswordProfile = "" | Select-Object password,forceChangePasswordNextLogin
$UserPasswordProfile.forceChangePasswordNextLogin $true
$UserPasswordProfile.password = "some password"

So what is the big difference between the MSOnline and AzureAD cmdlets? Well it comes down to the API each uses to interact with Azure AD. The MSOnline (aka Azure AD PowerShell v1) uses the old SOAP API. Oddly enough it uses the same SOAP API that Azure AD Connect uses. If you’ve read my Azure AD Connect – Behind the Scenes series, you’ll know notice the similarities in the Fiddler capture below.

pica-1

The AzureAD cmdlets (aka Azure AD PowerShell v2) uses the Graph API. In the Fiddler capture below you can see the authentication to Azure AD, obtaining of the authorization code, exchange for bearer token, and delivery of the bearer token to the graph API for the user information on Dr. Frakenstein. Check out the screenshot from Fiddler below:

picb

As you can see, PowerShell presents a powerful method of managing Azure AD and its resources. Given how familiar IT professionals are with PowerShell, it presents a ton of opportunities for automation and standardization without a significant learning curve. Microsoft’s move to having PowerShell leverage the power of the Graph API will help IT professionals leverage the power of the Graph API without having to break out Visual Studio.

In my next post I’ll write a simple application in Visual Studio to demonstrate the simplicity of integration with the Graph API and the opportunities that could be presented to integrating with existing toolsets.