
Hi folks! It’s been a while since my last post. This was due to spending a significant amount of cycles building out a new deployable lab environment for Azure that is a simplified version of the Enterprise-Scale Landing Zone. You can check it out the fruits of that labor here.
Recently I had two customers adopt the encryption at host feature of Azure VMs (virtual machines). The quick and dirty on this feature is it exists to mitigate the threat of an attacker accessing the data on the VHDs (virtual hard disks) belonging to your VM in the event that an attacker has compromised a physical host in an Azure datacenter which is running your VM. The VHDs backing your VM are temporarily cached on a physical host when the VM is running. Encryption at host encrypts the cached VHDs for the time they exist cached on that physical host. For more detail check out my peer and friend Sebastian Hooker’s blog post on the topic.
Both customers asked me if there was a simple and easy way to report on which VMs were enabled the feature and which were not. This sounded like the perfect use case for Azure Policy, so down that road I went and hence this blog post. I dove neck deep into Azure Policy about a year and a half ago when it was a newer addition to Azure and had written up a tips and tricks post. I was curious as to how relevant the content was given the state of the service today. Upon review of the content, I found many of the tips still relevant even though the technical means to use them had changed (for the better). Instead of walking through each tip in a generic way, I thought it would be more valuable to walk through the process I took to develop an Azure Policy for this use case.
Step 1 – Understand the properties of the Azure Resource
Before I could begin writing the policy I needed to understand what the data structure returned by ARM (Azure Resource Manager) for a VM enabled with encryption at host looks like. This meant I needed to create a VM and enable it for encryption at host using the process documented here. Once VM was created and configured, I then broke out Azure CLI and requested the properties of the virtual machine using the command below.
az vm show --name vmworkload1 --resource-group RG-WORKLOAD-36FCD6EC
This gave me back the properties of the VM which I then quickly searched through to find the block below indicating encryption at host was enabled for the VM.

When crafting an Azure Policy, always review the resource properties when the feature or property you want to check is both enabled and disabled.
Running the same command as above for a VM without encryption at host enabled yielded the following result.

Now if I had assumed the encryptionAtHost property had been set to false for VMs without the feature enabled and had written a searching for VMs with the encryptionAtHost property equal to False, my policy would not have yielded the correct result. I’d want to use conditional exists instead of equals. This is why it’s critical to always review a sample resource both with and without the feature enabled.
Step 2 – Determine if Azure Policy can evaluate this property
Wonderful, I know my property, I understand the structure, and I know what it looks like when the feature is enabled or disabled. Now I need to determine if Azure Policy can evaluate it. Azure Policy accesses the properties of resources using something something called an alias. A given alias maps back to the path of a specific property of a resource for a given API version. More than likely there is some type of logic behind an alias which makes an API call to get the value of a specific property for a given resource.
Now for the bad news, there isn’t always an alias for the property you want to evaluate. The good news is the number of aliases has dramatically increased since I last looked at them over a year ago. To validate whether the property you wish to validate has an alias you can use the methods outlined in this link. For my purposes I used the AZ CLI command and grepped for encryptionAtHost.
az provider show --namespace Microsoft.Compute --expand "resourceTypes/aliases" --query "resourceTypes[].aliases[].name" | grep encryptionAtHost
The return value displayed three separate aliases. One alias for the VM resource type and two aliases for the VMSS (virtual machine scale set) type.

Seeing these aliases validated that Azure Policy has the ability to query the property for both VM and VMSS resource types.
Always validate the property you want Azure Policy to validate has an alias present before spending cycles writing the policy.
Next up I needed to write the policy.
Step 3 – Writing the Azure Policy
The Azure Policy language isn’t the most initiative unfortunately. Writing complex Azure Policy is very similar to writing good AWS IAM policies in that it takes lots of practice and testing. I won’t spend cycles describing the Azure Policy structure as it’s very well documented here. However, I do have one link I use as a refresher whenever I return to writing policies. It does a great job describing the differences between the conditions.
You can write your policy using any editor that you wish, but Visual Studio Code has a nice add-in for Azure Policy. The add in can be used to examine the Azure Policies associated with a given Azure Subscription or optionally to view the aliases available for a given property (I didn’t find this to be as reliable as using querying via CLI).
Now that I understood the data structure of the properties and validated that the property had an alias, writing the policy wasn’t a big challenge.
{
    "mode": "All",
    "parameters": {},
    "displayName": "Audit - Azure Virtual Machines should have encryption at host enabled",
    "description": "Ensure end-to-end encryption of a Virtual Machines Managed Disks with encryption at host: https://docs.microsoft.com/en-us/azure/virtual-machines/disk-encryption#encryption-at-host---end-to-end-encryption-for-your-vm-data",
    "policyRule": {
        "if": {
            "anyOf": [
                {
                    "allOf": [
                        {
                            "field": "type",
                            "equals": "Microsoft.Compute/virtualMachines"
                        },
                        {
                            "field": "Microsoft.Compute/virtualMachines/securityProfile.encryptionAtHost",
                            "exists": false
                        }
                    ]
                },
                {
                    "allOf": [
                        {
                            "field": "type",
                            "equals": "Microsoft.Compute/virtualMachineScaleSets"
                        },
                        {
                            "field": "Microsoft.Compute/virtualMachineScaleSets/virtualMachineProfile.securityProfile.encryptionAtHost",
                            "exists": false
                        }
                    ]
                },
                {
                    "allOf": [
                        {
                            "field": "type",
                            "equals": "Microsoft.Compute/virtualMachineScaleSets/virtualMachines"
                        },
                        {
                            "field": "Microsoft.Compute/virtualMachineScaleSets/virtualmachines/securityProfile.encryptionAtHost",
                            "exists": false
                        }
                    ]
                }
            ]
        },
        "then": {
            "effect": "audit"
        }
    }
}
Let me walk through the relevant sections of the policy where I set the value to something for a reason. For the mode section I chose to use the “Full” mode since Microsoft recommends setting this to full unless you’re evaluating tags or locations. In the parameters section I left it blank since there was no relevant parameters that I wanted to add to the policy. You’ll often use parameters when you want to give the person assigning the policy the ability to determine the effect. Other use cases could be allowing the user to specify a list of tags you want applied or a list of allowed VM SKUs.
Finally we have the policyRule section which is the guts of the policy. In the policy I’ve written I have three rules which each include two conditions. The policy will fire the effect of Audit when any of the three rules evaluates as true. For a rule to evaluate as true both conditions must be true. For example, in the rule below I’m checking the resource type to validate it’s a virtual machine and then I’m using the encryption at host alias to check whether or not the property exists on the resource. If the resource is a virtual machine and the encryptionAtHost property doesn’t exist, the rule evaluates as true and the Azure Policy engine marks the resource as non-compliant.
Step 4 – Create the policy definition and assign the policy
Now that I’ve written my policy in my favorite editor, I’m ready to create the definition. Similar to Azure RBAC roles (role based access control) Azure Policies uses the concept of a definition and an assignment. Definitions can be created via the Portal, CLI, PowerShell, ARM templates, or ARM REST API like any Azure resource. For the purposes of simplicity, I’ll be creating the definition and assigning the policy through the Azure Portal.
Before I create the definition I need to plan where I create the definitions. Definitions can be created at the Management Group or Subscription scope. Creating a definition at the Management Group allows the policy to be assigned to the Management Group, child subscriptions of the Management Group, child resource groups of the subscriptions, or child resources of a resource group. I recommend creating the definitions as part of an initiative and create the definitions for the initiatives at a Management Group scope to minimize operational overhead. For this demonstration I’ll be creating a standalone definition at the subscription scope.
To do this you’ll want to search for Azure Policy in the Azure Portal. Once you’re in the Azure Policy blade you’ll want to Definitions under the Authoring section seen below. Click on the + Policy definition link.
On the next screen you’ll define some metadata about the policy and provide the policy logic. Make sure to use a useful display name and description when you’re doing this in a real environment.

Next we need to add our policy logic which you can copy and paste from your editor. The engine will validate that the policy is properly formatted. Once complete click the Save button as seen below.

Now that you’ve created the policy definition you can create the assignment. I’m not a fan of recreating documentation, so use the steps at this link to create the assignment.
Step 5 – Test the policy and review the results
Policy evaluations are performed under the following circumstances. When I first started using policy a year ago, triggering a manual evaluation required an API call. Thankfully Microsoft incorporated this functionality into CLI and PowerShell. In CLI you can use the command below to trigger a manual policy evaluation.
az policy state trigger-scan
Take note that after adding a new policy assignment, I’ve found that running a scan immediately after adding the assignment results in the new assignment not being evaluated. Since I’m impatient I didn’t test how long I needed to wait and instead ran another scan after the first one. Each scan can take up 10 minutes or longer depending on the number of resources being evaluated so prepare for some pain when doing your testing.
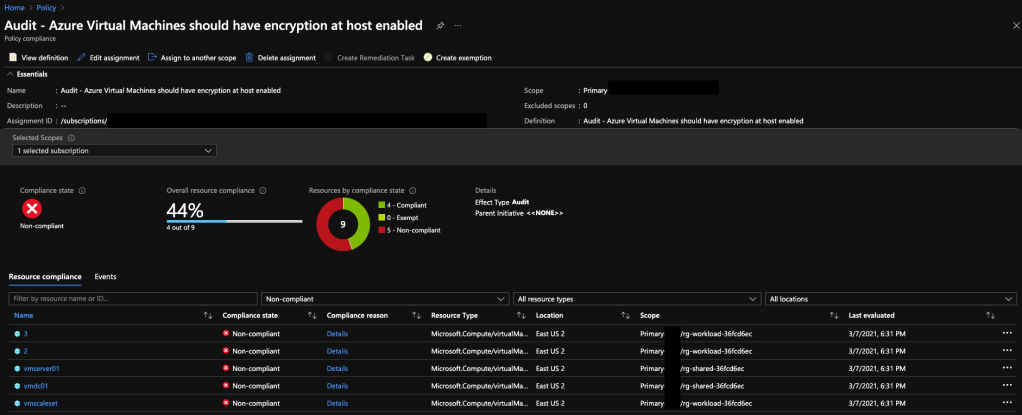
Once evaluation is complete I can go to the Azure Policy blade and the Overview section to see a summary of compliance of the resources.

Clicking into the policy shows me the details of the compliant and non-compliant resources. As expected the VMs, VMSS, and VMSS instances not enabled for encryption at host are reporting as non-compliant. The ones set for host-based encryption report to as compliant.
That’s all there is to it!
So to summarize the tips from the post:
- Before you create a new policy check to see if it already exists to save yourself some time. You can check the built-in policies in the Portal, the Microsoft samples, or the community repositories. Alternatively, take a crack it yourself then check your logic versus the logic someone else came up with to practice your policy skills.
- Always review the resource properties of a resource instance with that you would want to report on and one you wouldn’t want to report on. This will help make sure you make good use of equals vs exists.
- Validate that the properties you want to check are exposed to the Azure Policy engine. To do this check the aliases using CLI, PowerShell, or the Visual Studio add-in.
- Create your policy definitions at the management group scope to minimize operational overhead. Beware of tenant and subscription limits for Azure Policy.
- Perform significant testing on your policy to validate the policy is reporting on the resources you expect it to.
- When you’re new to Azure it’s fine to use the built-in policies directly. However, as your organization matures move away from using them directly and instead create a custom policy with the built-in policy logic. This will help to ensure the logic of your policies only change when you change it.
I hope this post helps you in your Azure Policy journey. The policy in this post and some others I’ve written in the past can be found in this repo. Don’t get discouraged if you struggle at first. It takes time and practice to whip up policies and even then some are a real challenge.
See you next post!
