Welcome back to part 2 of my series on Microsoft’s managed services offering of Azure Active Directory Domain Services (AAD DS). In my first post I covered so some of the basic configuration settings of the a default service instance. In this post I’m going to dig a bit deeper and look at network flows, what type of secure tunnels are available for LDAPS, and examine the authentication protocols and supporting cipher suites are configured for the service.
To perform these tests I leveraged a few different tools. For a port scanner I used Zenmap. To examine the protocols and cipher suites supported by the LDAPS service I used a custom openssl binary running on an Ubuntu VM in Azure. For examination of the authentication protocol support I used Samba’s smbclient running on the Ubuntu VM in combination with WinSCP for file transfer, tcpdump for packet capture, and WireShark for packet analysis.
Let’s start off with examining the open ports since it takes the least amount of effort. To do that I start up Zenmap and set the target to one of the domain controllers (DCs) IP addresses, choose the intense profile (why not?), and hit scan. Once the scan is complete the results are displayed.

Navigating to the Ports / Hosts tab displays the open ports. All but one of them are straight out of the standard required ports you’d see open on a Windows Server functioning as an Active Directory DC. An opened port 443 deserves more investigation.

Let’s start with the obvious and attempt to hit the IP over an HTTPS connection but no luck there.

Let’s break out Fiddler and hit it again. If we look at the first session where we build the secure tunnel to the website we see some of the details for the certificate being used to secure the session. Opening the TextView tab of the response shows a Subject of CN=DCaaS Fleet Dc Identity Cert – 0593c62a-e713-4e56-a1be-0ef78f1a2793. Domain Controller-as-a-Service, I like it Microsoft. Additionally Fiddler identifies the web platform as the Microsoft HTTP Server API (HTTP.SYS). Microsoft has been doing a lot more that API since it’s much more lightweight than IIS. I wanted to take a closer look at the certificate so I opened the website in Dev mode in Chrome and exported it. The EKUs are normal for a standard use certificate and it’s self-signed and untrusted on my system. The fact that the certificate is untrusted and Microsoft isn’t rolling it out to domain-joined members tells me whatever service is running on the port isn’t for my consumption.
So what’s running on that port? I have no idea. The use of the HTTP Server API and a self-signed certificate with a subject specific to the managed domain service tells me it’s providing access to some type of internal management service Microsoft is using to orchestrate the managed domain controllers. If anyone has more info on this, I’d love to hear it.

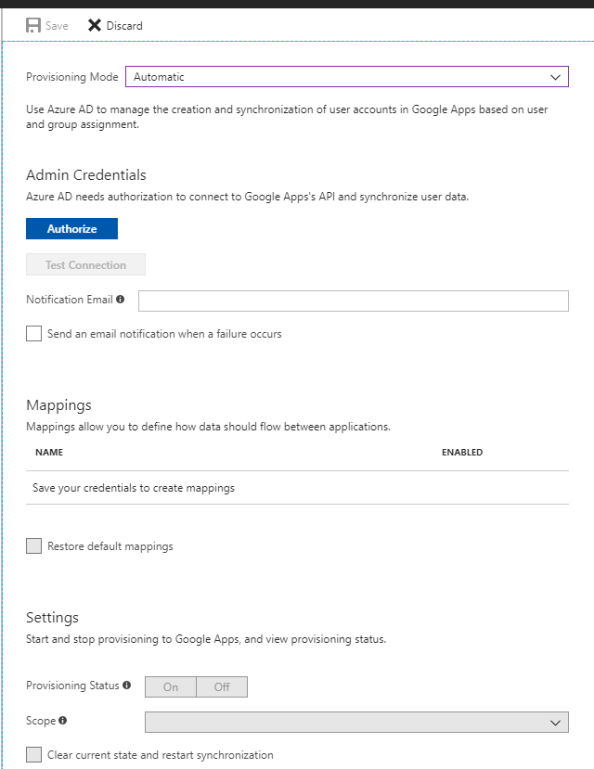
Let’s now take a look at how Microsoft did at securing LDAPS connectivity to the managed domain. LDAPS is not enabled by default in the managed domain and needs to be configured through the Azure AD Domain Services blade per these instructions. Oddly enough Microsoft provides an option to expose LDAPS over the Internet. Why any sane human being would ever do this, I don’t know but we’ll cover that in a later post.
I wanted to test SSLv3 and up and I didn’t want to spend time manipulating registry entries on a Windows client so I decided to spin up an Ubuntu Server 17.10 VM in Azure. While the Ubuntu VM was spinning up, I created a certificate to be used for LDAPS using the PowerShell command referenced in the Microsoft article and enabled LDAPS through the Azure AD Domain Services resource in the Azure Portal. I did not enable LDAPS for the Internet for these initial tests.
After adding the certificate used by LDAPS to the trusted certificate store on the Windows Server, I opened LDP.EXE and tried establishing LDAPS connection over port 636 and we get a successful connection.

Once I verified the managed domain was now supporting LDAPS connections I switched over to the Ubuntu box via an SSH session. Ubuntu removed SSLv3 support in the OpenSSL binary that comes pre-packaged with Ubuntu so to test it I needed to build another OpenSSL binary. Thankfully some kind soul out there on the Interwebz documented how to do exactly that without overwriting the existing version. Before I could build a new binary I had to add re-install the Make package and add the Gnu Compiler Collection (GCC) package using the two commands below.
- sudo apt-get install –reinstall make
- sudo apt-get install gcc
After the two packages were installed I built the new binary using the instructions in the link, tested the command, and validated the binary now includes SSLv3.

After Poodle hit the news back in 2014, Microsoft along with the rest of the tech industry advised SSLv3 be disabled. Thankfully this basic well known vulnerability has been covered and SSLv3 is disabled.

SSLv3 is disabled, but what about TLS 1.0, 1.1, and 1.2? How about the cipher suites? Are they aligned with NIST guidance? To test that I used a tool named TestSSLServer by Thomas Pornin. It’s a simple command line tool which makes cycling through the available cipher suites quick and easy.

The options I chose perform the following actions:
- -all -> Perform an “exhaustive” search across cipher suites
- -t 1 -> Space out the connections by one second
- -min tlsv1 -> Start with TLSv1
The command produces the output below.
TLSv1.0:
server selection: enforce server preferences
3f- (key: RSA) ECDHE_RSA_WITH_AES_256_CBC_SHA
3f- (key: RSA) ECDHE_RSA_WITH_AES_128_CBC_SHA
3f- (key: RSA) DHE_RSA_WITH_AES_256_CBC_SHA
3f- (key: RSA) DHE_RSA_WITH_AES_128_CBC_SHA
3– (key: RSA) RSA_WITH_AES_256_CBC_SHA
3– (key: RSA) RSA_WITH_AES_128_CBC_SHA
3– (key: RSA) RSA_WITH_3DES_EDE_CBC_SHA
3– (key: RSA) RSA_WITH_RC4_128_SHA
3– (key: RSA) RSA_WITH_RC4_128_MD5
TLSv1.1: idem
TLSv1.2:
server selection: enforce server preferences
3f- (key: RSA) ECDHE_RSA_WITH_AES_256_CBC_SHA384
3f- (key: RSA) ECDHE_RSA_WITH_AES_128_CBC_SHA256
3f- (key: RSA) ECDHE_RSA_WITH_AES_256_CBC_SHA
3f- (key: RSA) ECDHE_RSA_WITH_AES_128_CBC_SHA
3f- (key: RSA) DHE_RSA_WITH_AES_256_GCM_SHA384
3f- (key: RSA) DHE_RSA_WITH_AES_128_GCM_SHA256
3f- (key: RSA) DHE_RSA_WITH_AES_256_CBC_SHA
3f- (key: RSA) DHE_RSA_WITH_AES_128_CBC_SHA
3– (key: RSA) RSA_WITH_AES_256_GCM_SHA384
3– (key: RSA) RSA_WITH_AES_128_GCM_SHA256
3– (key: RSA) RSA_WITH_AES_256_CBC_SHA256
3– (key: RSA) RSA_WITH_AES_128_CBC_SHA256
3– (key: RSA) RSA_WITH_AES_256_CBC_SHA
3– (key: RSA) RSA_WITH_AES_128_CBC_SHA
3– (key: RSA) RSA_WITH_3DES_EDE_CBC_SHA
3– (key: RSA) RSA_WITH_RC4_128_SHA
3– (key: RSA) RSA_WITH_RC4_128_MD5
As can be seen from the bolded output above, Microsoft is still supporting the RC4 cipher suites in the managed domain. RC4 has been known to be a vulnerable algorithm for years now and it’s disappointing to see it still supported especially since I haven’t seen any options available to disable within the managed domain. While 3DES still has a fair amount of usage, there have been documented vulnerabilities and NIST plans to disallow it for TLS in the near future. While commercial customers may be more willing to deal with the continued use of these algorithms, government entities will not.
Let’s now jump over to Kerberos and check out what cipher suites are supported by the managed DC. For that we pull up ADUC and check the msDS-SupportedEncryptionTypes attribute of the DC’s computer object. The attribute is set to a value of 28, which is the default for Windows Server 2012 R2 DCs. In ADUC we can see that this value translates to support of the following algorithms:
• RC4_HMAC_MD5
• AES128_CTS_HMAC_SHA1
• AES256_CTS_HMAC_SHA1_96
Again we see more support for RC4 which should be a big no no in the year 2018. This is a risk that orgs using AAD DS will need to live with unless Microsoft adds some options to harden the managed DCs.
Last but not least I was curious if Microsoft had support for NTLMv1. By default Windows Server 2012 R2 supports NTLMv1 due to requirements for backwards compatibility. Microsoft has long recommended disabling NTLMv1 due to the documented issues with the security of the protocol. So has Microsoft followed their own advice in the AAD DS environment?
To check this I’m going use Samba’s smbclient package on the Ubuntu VM. I’ll use smbclient to connect to the DC’s share from the Ubuntu box using the NTLM protocol. Samba has enforced the use NTLMV2 in smbclient by default so I needed to make some modifications to the global section of the smb.conf file by adding client ntlmv2 auth = no. This option disables NTLMv2 on smbclient and will force it to use NTLMv1.

After saving the changes to smb.conf I exit back to the terminal and try opening a connection with smbclient. The options I used do the following:
- -L -> List the shares on my DC’s IP address
- -U -> My domain user name
- -m -> Use the SMB2 protocol

While I ran the command I also did a packet capture using tcpdump which I moved over to my Windows box using WinSCP. I then opened the capture with WireShark and navigated to the packet containing the Session Setup Request. In the parsed capture we don’t see an NTLMv2 Response which means NTLMv1 was used to authenticate to the domain controller indicating NTLMv1 is supported by the managed domain controllers.

Based upon what I’ve observed from poking around and running these tests I’m fairly confident Microsoft is using a very out-of-the-box configuration for the managed Windows Active Directory domain. There doesn’t seem to be much of an attempt to harden the domain against some of the older and well known risks. I don’t anticipate this offering being very appealing to organizations with strong security requirements. Microsoft should look to offer some hardening options that would be configurable through the Azure Portal. Those hardening options are going to need to include some type of access to the logs like I mentioned in my last post. Anyone who has tried to rid their network of insecure cipher suites or older authentication protocols knows the importance of access to the domain controller logs to the success of that type of effort.
My next post will be the final post in this series. I’ll cover the option Microsoft provides to expose LDAPS to the Internet (WHY OH WHY WOULD YOU DO THAT?), summarize my findings, and mention a few other interesting things I came across during the study for this series.
Thanks!


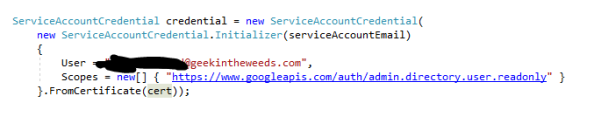
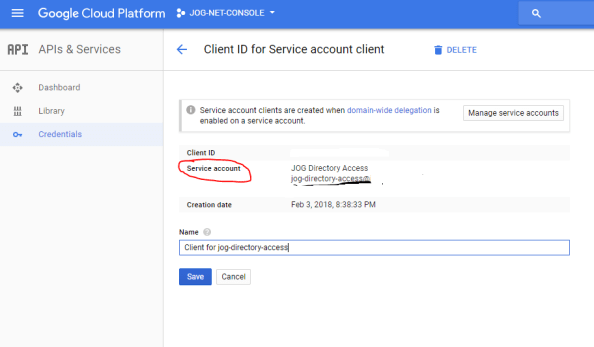 This identifier is one of the pieces of information I’ll need to include in the JSON Web Token (JWT) I’m going to send to Google’s API to obtain an access token. In addition to the service account identifier, I also need the scopes I want to access, Google Authorization Server endpoint, G-Suite user I’m impersonating, the expiration time I want for the access token (maximum of one hour), and the time the assertion was issued.
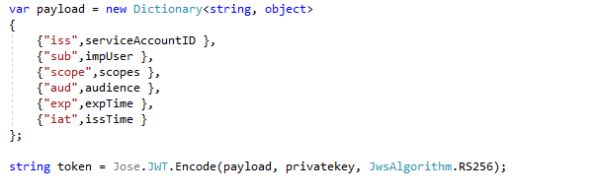
 At this point I have all the components I need to assemble my JWT. For that I’m going to add the
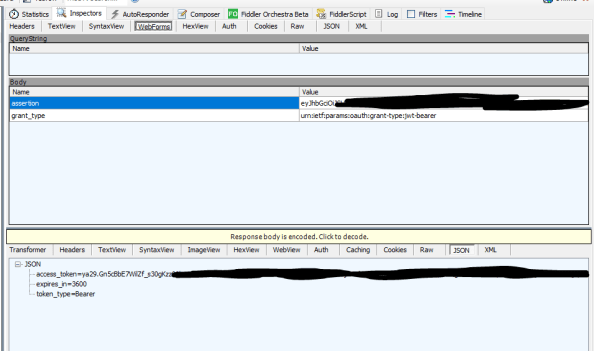
 I now have my JWT assembled and am ready to deliver to Google for an access token request. The next step is to submit it to Google’s authorization server. For that I need to a do a few things. The first thing I need to is create a new class that will act as the data model for JSON response Google will return to me after I submit my authorization request. I’ll deserialize the JWT I receive back using this data model.
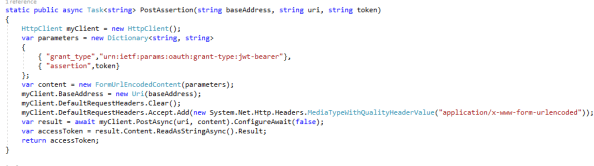 I then call the new task, pass the appropriate parameters, deserialize the JSON response using the data model I created earlier, and dump the bearer access token into a string variable.
 So I have my bearer access token that allows me to impersonate the user within my G-Suite domain for the purposes of hitting the Google Directory API. I whip up another task that will deliver the bearer access token to the Google Directory API and the JSON response which will include details about the user.
 Finally I call the task and dump the JSON response to the console.
 The results look like the below.


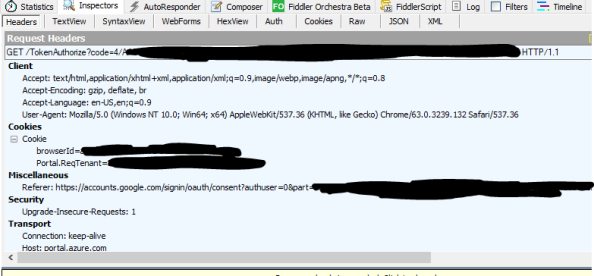
 Session 1 and 2 display the submission of the JWT and acquisition of the bearer token.