Integrating Azure AD and G-Suite – Single Sign-On

Integrating Azure AD and G-Suite – Single Sign-On

Hi everyone,

After working through the Azure Active Directory (AD) and Amazon Web Services (AWS) integration I thought it’d be fun to do the same thing with Google Apps.  Google provides a generic tutorial for single sign-on that is severely lacking in details.  Microsoft again provides a reasonable tutorial for integrating Azure AD and Google Apps for single sign-on.  Neither gives much detail about what goes on behind the scenes or provides the geeky details us technology folk love.  Where there is a lack of detail there is a blogging opportunity for Journey Of The Geek.

In my previous post I covered the benefits of introducing Azure AD as an Identity-as-a-Service (IDaaS) component to Software-as-a-Service (SaaS) integrations.  Read the post for full details but the short of it is the integration gives you value-added features such as multifactor authentication with Azure Multifactor Authentication (MFA), adaptive authentication with Azure AD Identity Protection, contextual authorization with Azure AD Conditional Access, and cloud access security broker (CASB) functionality through Cloud App Security.  Supplementing Google Apps with these additional capabilities improves visibility, security, and user experience.  Wins across the board, right?

I’m going to break the integration into a series of posts with the first focusing on single sign-on (SSO).  I’ll follow up with a post exploring the provisioning capabilities Azure AD introduces as well as playing around with Google’s API.  In a future post I’ll demonstrate what Cloud App Security can bring to the picture.

Let’s move ahead with the post, shall we?

The first thing I did was to add the Google Apps application to Azure AD through the Azure AD blade in the Azure Portal. Once the application was added successfully I navigated to the Single sign-on section of the configuration. Navigate to the SAML Signing Certification section and click the link to download the certificate. This is the certificate Azure AD will be using to sign the SAML assertions it generates for the SAML trust. Save this file because we’ll need it for the next step.

I next signed up for trial subscription of Google’s G Suite Business. This plan comes with a identity store, email, cloud storage, the Google productivity suite, and a variety of other tools and features. Sign up is straightforward so I won’t be covering it. After logging into the Google Admin Console as my newly minted administrator the main menu is displayed. From here I select the Security option.googlesso1

Once the Security page loads, I select the Set up single sign-on (SSO) menu to expand the option.  Google will be playing the role of the service provider, so I’ll be configuring the second section.  Check the box to choose to Setup SSO with third party identity provider.  Next up you’ll need to identify what your specific SAML2 endpoint is for your tenant.  The Microsoft article still references the endpoint used with the old login experience that was recently replaced.  You’ll instead want to use the endpoint https://login.microsoftonline.com/<tenantID>/saml2You’ll populate that endpoint for both the Sign-In and Sign-Out URLs.  I opted to choose the domain specific issuer option which sets the identifier Google identifies itself as in the SAML authentication request to include the domain name associated with the Google Apps account.  You would typically use this if you had multiple subscriptions of Google Apps using the same identity provider.  The final step is upload the certificate you downloaded from Azure AD.  At this point Google configured to redirect users accessing Google Apps (exempting the Admin Console) to Azure AD to authenticate.

googlesso2

Now that Google is configured, we need to finish the configuration on Azure AD’s end.  If you follow the Microsoft tutorial at this point you’re going to run into some issues.  In the previous step I opted to use a domain specific issuer, so I’ll need to set the identifier to google.com/a/geekintheweeds.com.  For the user identifier I’ll leave the default as the user’s user principal name since it will match the user’s identifier in Google.  I also remove the additional attributes Azure AD sends by default since Google will discard them anyway.  Once the settings are configured hit the Save button.

googlesso3

Now that both the IdP and SP have been created, it’s time to create a user in Google App to represent my user that will be coming from Azure AD.  I refer to this as a “stub user” as it is a record that represents my user who lives authoritatively in Azure Active Directory.    For that I switch back to the Google Admin console, click the User’s button, and click the button to create a new user.

googlesso4

Earlier I created a new user in Azure AD named Michael Walsh that has a login ID of michael.walsh@geekintheweeds.com. Since I’ll be passing the user’s user principal name (UPN) from Azure AD, I’ll need to set the user’s Google login name to match the user’s UPN.

googlesso5

I then hit the Create button and my new user is created.  You’ll need that Google assigns the user a temporary password.  Like many SaaS solutions Google maintains a credential associated with the user even when the user is configured to use SSO via SAML.  Our SP and IdP are configured and the stub user is created in Google, so we’re good to test it out.

googlesso6

I open up Edge and navigate to the Google Apps login page, type in my username, and click the Next button.

googlesso7

I’m then redirect to the Microsoft login page where I authenticate using my Azure AD credentials and hit the sign in button.

googlesso8

After successfully authenticating to Azure AD, I’m redirected back to Google and logged in to my newly created account.

googlesso9

So what happened in the background to make the magic happen?  Let’s take a look at a diagram and break down the Fiddler conversation.

googlesso10

The diagram above outlines the simple steps used to achieve the user experience.  First the user navigates to the Google login page (remember SP-initiated SSO), enters his or her username, and is sent back an authentication request seen below extracted from Fiddler with instructs to deliver it back to the Azure AD endpoint for our tenant.

googlesso11

googlesso12.png

The user then authenticates to Azure AD and receives back a SAML response with instructions to deliver it back to Google. The user’s browser posts the SAML assertion to the Google endpoint and the user is successfully authenticated to Google.

googlesso13.png

googlesso14.png

Simple right?  In comparison to the AWS integration from an SSO-perspective, this was much more straightforward.  Unlike the AWS integration, it is required to have a stub user for the user in Google Apps prior to using SSO.  This means there is some provisioning work to perform… or does it?  Azure AD’s integration again offers some degree of “provisioning”.  In my next post I’ll explore those capabilities and perform some simple actions inside Google’s API.

See you next post!

Office 365 Group Naming Policies – Part 2

Office 365 Group Naming Policies – Part 2

Welcome back.


In my first post I covered some of the methods organizations use to enforce a naming standard for groups, such as Active Directory groups, that are used to authorize access to data.  I also covered the challenges that are introduced when a mechanism for enforcing the naming standard doesn’t exist or isn’t effective and how this problem is becoming more prevalent with the increase in consumption of software-as-a-service applications.

Office 365 Groups are a core foundational component of Office 365 helping to enable simple, fast, and efficient collaboration within an organization.  For an organization to take full advantage of this, its end users need to be empowered to spin up Office 365 groups for mail-based collaboration or create new Teams for real-time collaboration. To make this work, IT can’t get in the way of the business and needs to let the business spin up and down Office 365 Groups as it needs them.  Microsoft has introduced a number of solutions to help with this including group expiration, integration with Office 365 retention policies, and the feature I’ll cover today, naming policies.

The naming policy feature is still in private preview but today I’m going to show you how to test the feature in your own tenant.  As a point of reference, I’m using a set of trial O365 E5 and Azure AD Premium P2 licenses within the commercial offering of Office 365 for my testing.  I can’t speak to whether or not the instructions below will work for Office 365 GCC or Office 365 Government.

The first thing I needed to do was install the Azure AD Preview module.  To do this I had to first remove the existing Azure AD module I had installed on my system and then install the Azure AD Preview module as seen below.

o365-1

Comparing the modules using a get-command shows that the preview module has the new cmdlets below.

Add-AzureADAdministrativeUnitMember
Add-AzureADApplicationPolicy
Add-AzureADMSLifecyclePolicyGroup
Add-AzureADScopedRoleMembership
Add-AzureADServicePrincipalPolicy
Get-AzureADAdministrativeUnit
Get-AzureADAdministrativeUnitMember
Get-AzureADApplicationPolicy
Get-AzureADDirectorySetting
Get-AzureADDirectorySettingTemplate
Get-AzureADMSDeletedDirectoryObject
Get-AzureADMSDeletedGroup
Get-AzureADMSGroup
Get-AzureADMSGroupLifecyclePolicy
Get-AzureADMSLifecyclePolicyGroup
Get-AzureADObjectSetting
Get-AzureADPolicy
Get-AzureADPolicyAppliedObject
Get-AzureADScopedRoleMembership
Get-AzureADServicePrincipalPolicy
New-AzureADAdministrativeUnit
New-AzureADDirectorySetting
New-AzureADMSGroup
New-AzureADMSGroupLifecyclePolicy
New-AzureADObjectSetting
New-AzureADPolicy
Remove-AzureADAdministrativeUnit
Remove-AzureADAdministrativeUnitMember
Remove-AzureADApplicationPolicy
Remove-AzureADDirectorySetting
Remove-AzureADMSDeletedDirectoryObject
Remove-AzureADMSGroup
Remove-AzureADMSGroupLifecyclePolicy
Remove-AzureADMSLifecyclePolicyGroup
Remove-AzureADObjectSetting
Remove-AzureADPolicy
Remove-AzureADScopedRoleMembership
Remove-AzureADServicePrincipalPolicy
Reset-AzureADMSLifeCycleGroup
Restore-AzureADMSDeletedDirectoryObject
Set-AzureADAdministrativeUnit
Set-AzureADDirectorySetting
Set-AzureADMSGroup
Set-AzureADMSGroupLifecyclePolicy
Set-AzureADObjectSetting
Set-AzureADPolicy

The cmdlets we’re interested in for this demonstration are the used to create and manage a new Graph API resource type called a directorySetting. The resource type is used to configure settings within Azure Active Directory. The directorySetting resource types are created from a template of configuration settings called a directorySettingTemplate resource type. Running the cmdlet Get-AzureADDirectorySettingTemplate displays the available to build a custom directorySetting from.

o365-2.png

After connection to Azure AD using the Connect-AzureAD cmdlet, I can take a look at the templates available. The template I’m interested in for this blog is the Group.Unified template because it contains the settings for the naming policy as seen below.

o365-3.png

Now that I’ve identified the template I want to draw from for a new directorySetting, I’m going to create a variable named $template and assign the Group.Unified template to it.  Running a quick Get-Member on the newly assigned displays a method named CreateDirectorySetting.  I’ll use this method to create a new instance of a directorySetting resource type based off the template and assign it to a variable named $setting.

o365-4.png

If I run a Get-Member on $setting I can see that I’ve created a new instance of the directorySetting resource type which has the settings inherited from the Group.Unified template with some of those settings being configured with default values.

o365-5.png

You’ll want to pay attention to these default values because once the settings become active for the tenant and seem to override settings configured within the GUI.  For example, if you are denying users the ability to create new Office 365 groups via the configuration setting in the Azure Active Directory blade in the Azure Portal, leaving the EnableGroupCreation setting as true will override that.  I’m not sure that is the intended behavior, but hey this is still preview right?

The next step is to configure the PrefixSuffixNamingRequirement setting with the naming convention I want enforced across my tenant.  This Microsoft article does a good job explaining your options and the syntax.  I went with a simple naming convention of including the fixed string “JOG” along with the value from the user’s department attribute in Azure Active Directory followed by the string value the user chooses for the group name.

o365-6.png

Checking the values property of the $setting shows that the PrefixSuffixNamingRequirement is now populated with the value I entered above.

o365-7.png

Now that the settings has been configured I make it active by using the New-AzureADDirectorySetting cmdlet and including the $setting directory object as input.

o365-8.png

I then log into the Office 365 portal as a standard user and navigate to Outlook Web App and attempt to create a new Office 365 group. All new groups are now created using the naming convention I defined and it’s displayed clearly to the end users.

o365-9.png

Hopefully Microsoft will refine the documentation as the feature moves out of preview and into general availability.  I also think this is a simple and static setting that would make sense to configurable from the GUI.  I’d also like to see the settings configurable with the directorySetting resource type be in sync with any corresponding settings in the GUI to avoid confusion.

That’s all there is to it.  Overall it’s a very simple yet elegant solution that solves naming convention woes while giving the business freedom to collaborate without having to go through IT.  You can’t beat that.

Thanks!

Office 365 Groups Naming Policies – Part 1

Office 365 Groups Naming Policies – Part 1

Groups…  It’s a term every business user consuming technology has heard at some point in time.  Most users only experience groups when they’re unable to access a specific application or file and the coworker sitting next to them informs them they need to call IT and get added to the department group.  Those of us who work on the technology side of the fence are very familiar with the benefits groups bring to the table when controlling access to data.  We are also quite familiar with the challenges they can bring when managing them at scale.

Something as simple as a lack of an enforced naming convention can create serious pain for an organization if it relies heavily upon the naming convention to determine the function and owner of a group.  The pain bleeds through IT and into the business as workers struggle with long wait times for on-boarding new employees due to IT trying to determine which groups the users need to be in.  When it comes time to perform an access review, business owners may waste valuable time trying to determine if removing an employee from a specific group will impact that employee’s ability to fulfill their job responsibilities.

In the on-premises world organizations deal with the challenge of naming conventions in different ways.  Most rely upon first or second level help desk to create groups according to the organization’s naming standard.  This method introduces the risk of human error and presents challenges when the group information for a particular application is sourced from a variety of different identity backends which force the staff to learning multiple tools.  Others make use of identity management (IDM) systems that automate the creation of groups and enforce the naming convention.  This method is very effective but also very costly due to high costs in implementing and operating an IDM.  A very small minority of organizations have evolved to the point where the naming conventions are no longer important due to robust reporting systems and entitlement databases.

Very few organizations are able to successfully execute the third method, which leaves them with the first or second.  The introduction of the software-as-a-service (SaaS) has made the first and second methods of enforcing a naming convention much more complicated.  Using the first method of leveraging help desk staff to create the groups manually is no longer scalable and the second method of using a centralized IDM system is often limited by the vendor’s ability to write connectors to the wide variety of APIs in use across the thousands of SaaS vendors.  All is not lost, as it seems some vendors have begun to recognize the challenge this can introduce to their customers.

If your organization is a consumer of Office 365, you’ve more than likely begun to use Office 365 Groups.  Office 365 groups offer a variety of features not found in the traditional security/distribution group or shared mailbox.  Take a look at this link for a comparison chart that documents the features.  One important thing to note is Office 365 Groups can only be only created in Azure Active Directory (AAD).  You cannot synchronize an on-premises Active Directory Domain Services security or distribution group to AAD and convert it to an Office 365 Group.  This means you can’t leverage an existing solution for enforcing naming conventions unless that solution has a connector into Azure AD.  Given features Office 365 provide and that they are the construct used by Microsoft Teams, you may make the decision to allow your users to create Office 365 Groups on the fly in order to allow them to take full advantage of collaboration tools available in Office 365.  To quote Peter Venkman, “Human sacrifice, dogs and cats living together… mass hysteria!”.

Calm down my friend.  Microsoft has a solution coming in the pipeline that will solve your Office 365 Groups naming convention woes.  In my next post I’ll demonstrate the feature and walkthrough how to test the feature out while it is in preview.

pfsense + squid + Kerberos

pfsense + squid + Kerberos

Hi everyone,

I hope all of you had an enjoyable holiday. I spent my week off from work spending time with the family and catching up on some reading. One area I decided to spend some time reading up on is Microsoft’s Cloud App Security. For those unfamiliar with the solution, it’s Microsoft’s entry into the cloud access security broker (CASB) (or Cloud Security Gateway (CSG) if you’re a Forrester reader) market. If you haven’t heard of “CASB” or “CSG”, don’t worry too much. While the terminology is new, many of the collection of technologies encompassing a typical CASB or CSG are not new, simply used together in new and creative ways. For a quick intro, take a read through this article and follow up with some Forrester and Gartner research for a deeper dive.

Since I haven’t had much experience with a product specifically marketing itself as a CASB, I thought it would be a great opportunity to play around with Microsoft’s solution. A good first step for any organization to grasp the value of a CASB is to explore what’s happening within the organization outside the view of IT, or as the marketers love to call it, shadow IT. The ease of consuming cloud technologies such as software as a service (SaaS) applications has been both a blessing and a curse. The new technology has been wonderful in cutting IT costs, bringing the technology closer to the business, providing for shorter time to market for new features, and providing simpler integration paths for different applications and services. On the negative side, the ease of use of these solutions means an average employee is using far more of them than is officially sanctioned by IT. This can lead to issues like loss of critical data, non-compliance with policy, or multiple business groups within an organization subscribing to the same service resulting in redundant licensing costs.

Wouldn’t it be great to get visibility into that shadow IT? Since a majority of cloud solutions work over standard HTTP(S) the services are readily accessible to the user without the user having to request additional ports be opened on the firewall. This means it’s much more challenging to track who is using what and what they’re doing with those services. Many organizations attempt to control these types of solutions with a traditional forward web proxy. However, too much focus is put on blocking the “bad” sites instead of analyzing the overall patterns of usage of services. Microsoft’s Azure AD Cloud Discovery is a feature of Azure Active Directory that can be used in conjunction with Cloud App Security’s catalog of app to provide visibility into what’s being accessed as well as providing information as to the risks the services being accessed present to the organization.

To simulate a typical medium to large organization and get some good testing done with Cloud App Discovery, I’m going to add a forward web proxy to my home lab. As I’ve mentioned in previous blog entries I have a small form factor computer running pfsense which I use as my lab networking security appliance. Out of the box, it supports a base install of Squid which can be added and configured to act as a forward web proxy with minimal effort. It gets a bit more challenging when you want to add authentication to the proxy because the built-in options for the pfsense implementation are limited to local, LDAP, and RADIUS authentication. I want authentication so I can identify users connecting to the proxy and associate the web connections with specific users but I want to use Kerberos so I get that seamless single sign on experience.

Like many open source products, the documentation on how to setup Squid running on pfsense and using Kerberos authentication is pretty terrible. Searching the all-powerful Google presents lots of forum posts with people asking how to do it, pieces of answers that don’t make much sense, and some Wikis on how to configure Squid to use Kerberos on a standard server. Given the lack of good documentation, I thought it would be fun to work my way through it and compile a walkthrough. I’m issuing the standard disclaimer that this is intended for lab purposes only. If you’re trying to deploy pfsense and Squid in a production environment, do more reading and spend time doing it safely and securely.

I won’t be covering the basic setup of pfsense as there are plenty of guides out there and the process is simple for anyone with any experience in the network appliance realm. For this demonstration I’ll be running a box with pfsense 2.4.2 installed.

On to the walkthrough!

The first step in the process is to add the Squid package through the pfsense package manager UI.

squid1

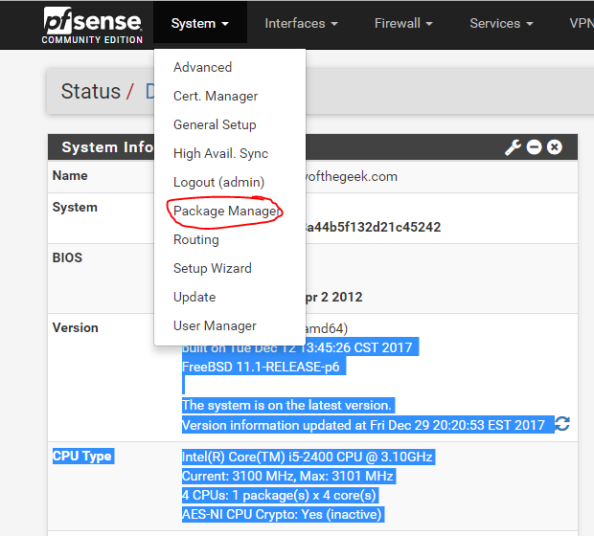
On the Package Manager screen, select the Available Packages section and install the Squid package.  After the installation is complete, you’ll see Squid shown in the Installed Packages section.

squid2

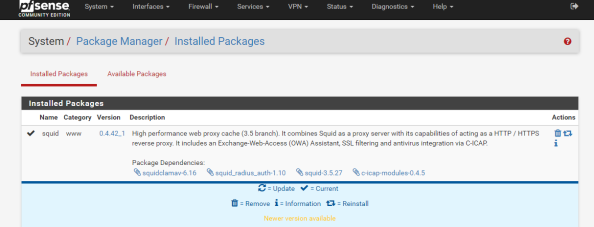
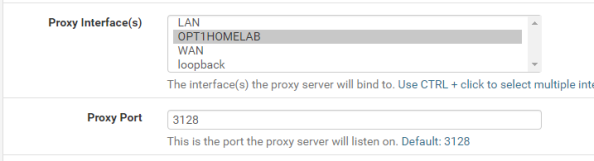
Notice the package installed is a branch of the 3.5 release while the latest release available directly via Squid is 4.0.  It’s always fun to have the latest and greatest, but pfsense is an all-in-one solution so it comes with some sacrifices.  Let’s get some of the basic configuration settings done with.  Go to the Services menu, select the Squid Proxy Server menu item, and go the General section.  First up choose the interface you want Squid to be available for and specify a port for it to listen on.

squid3.png

Now check off the Allow Users on Interface unless you have a reason to limit it to certain subnets attached to the interface.  Additionally I’d recommend checking the Resolve DNS IPv4 First option.  I banged my head against the wall with a ton of issues with Squid when I turned on authentication and this option wasn’t set.  You can thank me for saving you hours of Google and trying other options.

squid4

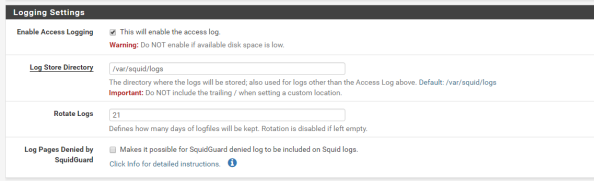
Setup basic logging with the settings below.

squid5.png

Basic settings are complete and it’s a good time to test the proxy from a client machine to verify its base functionality.  You can do this by directing one of your client machines to use the proxy and attempting to access a website.

After you have verified functionality you’ll need to add support for SSH to the pfsense box since we’ll need to make some changes via the command shell.  For that you’ll want to navigate the System menu, select the Advanced menu item, and go to the Admin Access section.  Scroll down from there to the Secure Shell section and click the checkbox for Enable Secure Shell and set a the SSH port to the port of your choice.  I chose 50,000.

squid6

The Secure Shell Server is active, but the firewall blocks access to it across all interfaces by default.  You now need to create the appropriate firewall rule to allow access from devices behind the interface you wish to use to SSH to the box.  For me this is the interface that my lab devices connect to.  For this you’ll select Firewall from the top menu, select the Rules menu item, and select the appropriate interface from the menu items.  Once there, click the Add button to create a firewall rule allowing devices within the subnet to hit the router interface over the port you configured earlier as seen below.  The SSH listener will now be running and will be accessible from the designated interface.

squid7.png

Now you must configure DNS such that the pfsense box can resolve the Active Directory DNS namespace to perform Kerberos related activities.  You can go the easy route and make the Active Directory domain controller the primary DNS server for pfsense via the GUI.  However, I use pfsense as the primary DNS resolver for the lab environment and forward queries to Google’s DNS servers at 8.8.8.8.

In order to continue using with my preferred configuration, I needed to take a few additional steps.  First I needed to add a Domain Override to the DNS Resolver service on pfsense to ensure it doesn’t pass the query along to the external DNS server.  I did this by selecting Services from the main menu, selecting the DNS Resolver menu item, and going to the General Settings section.  I then scrolled down to the Domain Overrides section and added the appropriate override for my Active Directory DNS namespace as seen below.  Take note that you can’t go modifying the resolv.conf as you would in a normal Linux distro since pfsense will scrub any changes you make to the file each time it restarts its services.  Get used to this behavior, we’re going to see it a number of times through this blog entry and we’ll have to learn to work around that limitation (feature?).

squid8.png

Next up you’ll want to verify name resolution is working as intended and it can be tested by running a query from the pfsense box.  Go to the Diagnostics on the main menu, select the DNS Lookup item, and type in the hostname representing the Active Directory DNS namespace.  It should resolve to the entries representing domain controllers in your Active Directory domain.  Successful testing makes the DNS configuration complete.

squid9.png

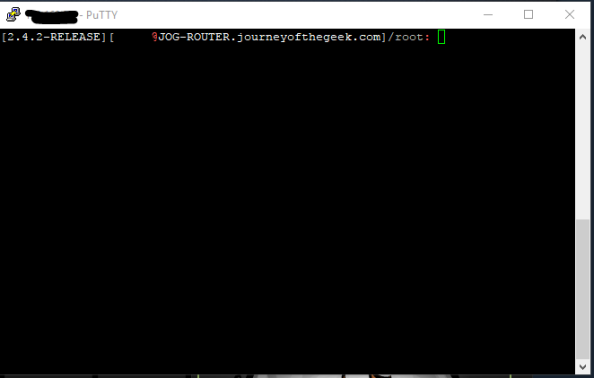
On to the guts of the configuration.  Pfsense comes with the krb5 package installed so all you need to do is configure it.  For that you are going to need to access the command shell.  Open up your favorite SSH client and connect to the pfsense box as an administrative user.  Upon successful login you’ll see the menu below.

squid10.png
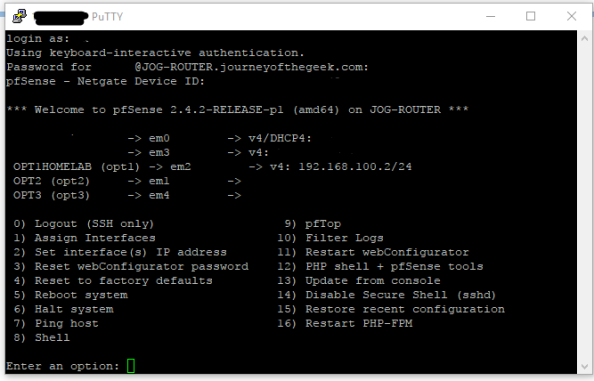
You want to hit the command shell so choose option 8 and you will be dropped into the shell.

squid11.png

The first step is to configure the krb5 package to integrate with the Active Directory domain.  For that you’ll need to create a krb5.conf file.  Create a new a krb5.conf file in the /etc/ directory and populate it with the appropriate information.  I’ve included the content of my krb5.conf file as an example.

[libdefaults]
default_realm = JOURNEYOFTHEGEEK.LOCAL
dns_lookup_realm = false
dns_lookup_kdc = true
default_tgs_enctypes = aes128-cts-hmac-sha1-96
default_tkt_enctypes = aes128-cts-hmac-sha1-96
permitted_enctypes = aes128-cts-hmac-sha1-96

[realms]
JOURNEYOFTHEGEEK.LOCAL = {
kdc = jog-dc.journeyofthegeek.local
}

[domain_realm]
.journeyofthegeek.local = JOURNEYOFTHEGEEK.LOCAL
journeyofthegeek.local = JOURNEYOFTHEGEEK.LOCAL

[logging]
kdc = FILE:/var/log/kdc.log
Default = FILE:/var/log/krb5lib.log

Check out the MIT documentation on the options available to you in the krb5.conf. I made the choice to limit the encryption algorithms to AES128 for simplicity purposes, feel free to use something else if you wish. Once the settings are populated the file can be saved.

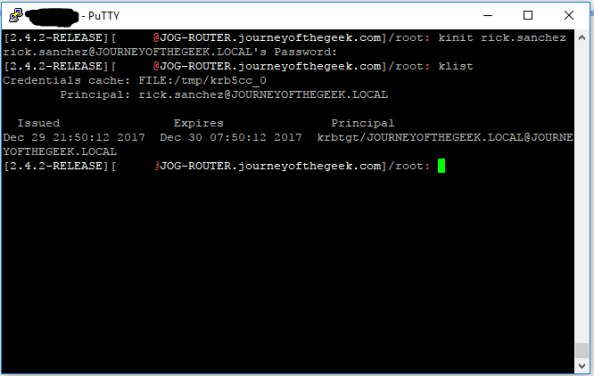
It’s time to test the Kerberos configuration.  You do that by using running kinit and authenticating as a valid user in the Active Directory domain.  If the configuration is correct klist will display the a valid Kerberos ticket granting ticket (TGT) for the user.

squid12.png

The system is now configured to interact with the Active Directory domain using Kerberos.  You now need to create a security principal in Active Directory to represent the Squid service.  Create a new user in Active Directory and name it whatever you wish, I used svc_squid for this lab.  Since I chose to use AES128, I had to select the account control option on the user account in Active Directory Users and Computers (ADUC) that the service supported AES128.  You can ignore that step if you chose not to force an encryption level.  Now a service principal name (SPN) for the service is needed to identify the service when a user attempts to authenticate to it.  For that you’ll need to open an elevated command prompt and use the setspn command.

squid13.png

Wonderful you have a security principal created and it includes the appropriate identifier.  You now need to create a keytab that the service can use to authenticate to Active Directory.  In comes ktpass.  From the same elevated command prompt run the command as seen below.

squid14.png

Pay attention to case sensitivity because it matters when we’re talking MIT Kerberos, which is Kerberos implementation pfsense is using.  The link I included above will explain the options.  I set the crypto option to AES128 to ensure the keytab aligns with the other options I’ve configured around encryption.

Next up you need to transfer the keytab to the pfsense box.  I used WinSCP to transfer the keytab to the pfsense box to the /usr/local/etc/squid/ directory.   The keytab is on the pfsense box but you need to tell Squid where the keytab is.  In a typical Squid implementation you’d define variable in the Squid startup script which would be consumed by the authentication helper.  However, this is another case where pfsense will overwrite any changes you make to the startup script.

In addition to being unable to modify the startup script to set, pfsense also overwrites any changes you make directly to the squid.conf file.  To get around this you’ll need to add the configuration options to the config file through the pfsense GUI.  From within the GUI go to the Services section of the main menu, select the Squid Proxy Server menu item, go to the General section, scroll down and hit the Advanced Options button and scroll to the Advanced Features section.  In the Custom Options (Before Auth) field, you’ll want to add the lines below.

squid15.png

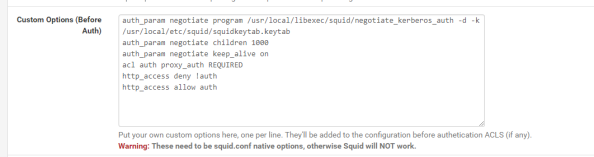
The first four lines I’ve added here are called directives in Squid.  The first directive instructs Squid to use the negotiate_kerberos_auth authentication helper.  The options I’ve added to the helper set a few different configuration options for the helper.  The -k option allows me to direct Squid to the keytab file I added to the server which I couldn’t do with a variable in the startup script.  The -d option writes debug information for the helper to Squid cache.log and the -t option shuts off the replay cache for MIT Kerberos.   The second directive sets the child authentication processes to 1,000.  You’ll want to do some research on this directive if you’re moving this into a production environment.  I simply choose 1000 so I wouldn’t run any risk of getting my authentication requests queued for the purposes of this lab.  The third directive is set to on by default and should only be set to off if you run into issues with PUT/POST requests.

The fourth directive starts enforcing access controls within Squid.  Access controls within Squid are a bit weird.  The Squid wiki does a decent job of explaining how they work.  The short of what I’ve done in the fourth directive is create an access list called auth which will contain all users who successfully authenticate against Squid.  The next line denies users access to the http_access list if the user doesn’t below to the auth access line (blocking non-authenticated users).  The final line allows users who are in the auth list into the http_access list (allows authenticated users).

With that last amount of configuration, you’ve gotten pfsense and Squid configured for Kerberos authentication.  I’ll quickly demonstrate the what a successful implementation looks like.  For that I’m going to bounce over to a Windows 10 domain-joined machine with Chrome installed and configured to use the proxy server.  Navigating to Amazon displays the webpage with no authentication prompts and running a klist from a command prompt shows I have a Kerberos ticket for the proxy.

squid16.png

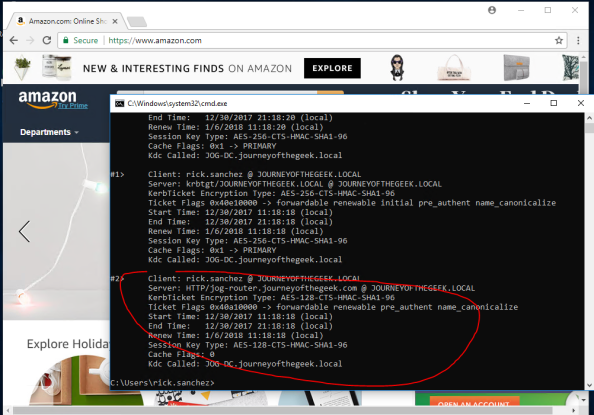
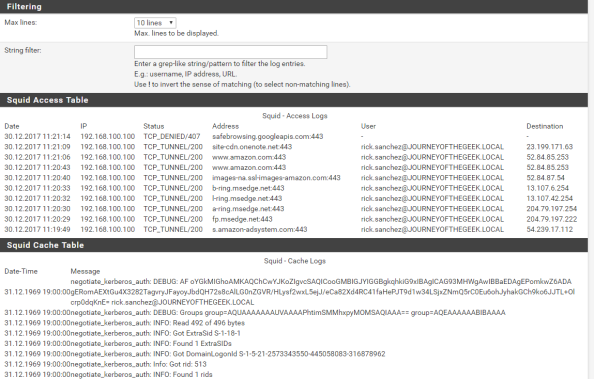
Going back into the pfsense GUI, going to the Services menu, selecting the Squid Proxy Server menu item and navigating to the Real Time section shows the access log displaying Rick Sanchez accessing Amazon and successful consumption of the Kerberos ticket in the Cache Log section.

squid17.png

In a future post I’ll dig a bit deeper into Azure AD Cloud Discovery and setup automatic forwarding of logs using the Microsoft collector.

Have a happy New Year!