Entra ID – Deep Dive – Entra ID Authentication – Part 3

Entra ID – Deep Dive – Entra ID Authentication – Part 3

This is part of my series on Microsoft Entra ID:

  1. Entra ID – Deep Dive – The Basics – Part 1
  2. Entra ID – Deep Dive – Protocol Primer – Part 2
  3. Entra ID – Deep Dive – Entra ID Authentication – Part 3
  4. Entra ID – Deep Dive – Workload Identity Federation – Bonus

Back for more are ya? Today we’re gonna chat about how you could add Entra ID authentication into your custom-built web application. I’ll be digging into the Entra ID application registration process and examining the requests and responses for the whole authentication process via a local proxy using HTTP Toolkit. The goal here is not to give you coding best practices (god save you if you use any of my code in production) but instead to help you understand how all this stuff works and how products are (and are not) exercising the OIDC and OAuth protocols under the hood.

If you haven’t read my first and second post in the series, stop what you’re doing right now and read them. I’m going into this post assuming you have and thus assuming knowledge and understanding basic Entra ID concepts like applications vs service principals and a foundational understanding of OIDC and OAuth.

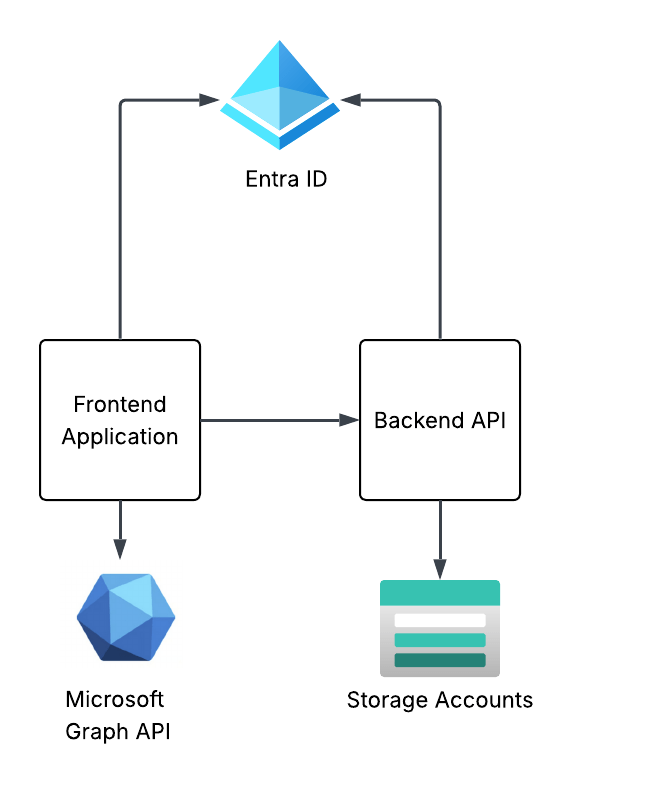
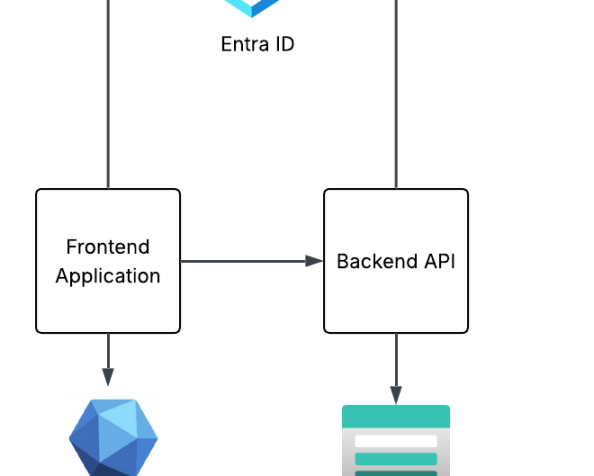
The solution design I’m building towards this in this series of posts is a simple frontend web application and backend API that are using Entra ID for authentication and authorization. The end design will look something like the below. This post will focus on the frontend web application.
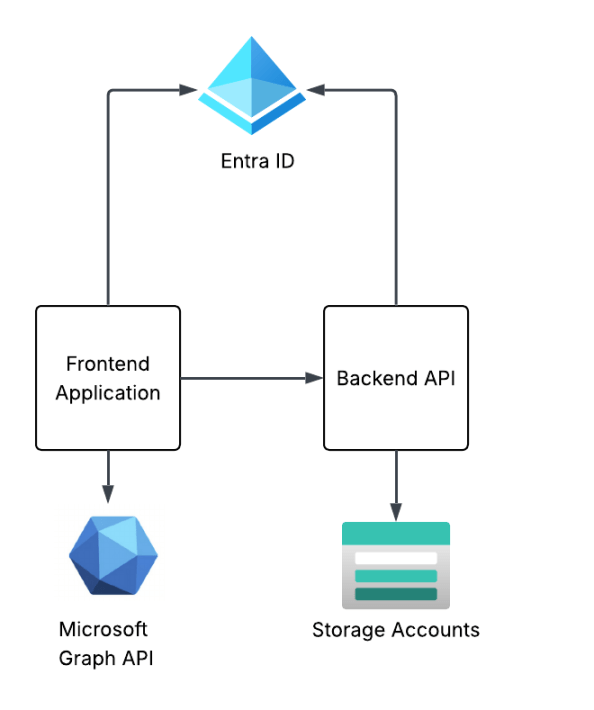
Series solution design

Creating the frontend application registration

As I covered in my first post, the application registration (or application resource) is the globally unique representation of the application across Entra ID. There can only be one application registration for an application across all Entra ID tenants. An application registration can be single tenant (used only in your Entra ID tenant) or multi-tenant (can be used across Entra ID tenants). I like to think of the process of creating the application process similar to the manual client registration process mentioned in the OAuth spec. The result is the same as we’ll configure a bunch of information required for OAuth such as the redirect URI, the grant types it supports, and whether the client will be public or confidential client. Once registered, Entra will return a unique client_id and client_secret if a confidential application. There are additional Entra-specific properties we can populate, but the manual client registration explanation makes the most sense in my brain at least.

Creating an application registration can be done through the Portal, CLI/PowerShell, REST, Terraform, etc. I’m going to create it direct through the Microsoft Graph REST API because I want to walk through all the gory properties. To create an app registration, your user account needs to be at least hold the Entra ID Application Developer role. To keep things simple and address my laziness, my user will be setup as a global admin.

# Set the properties for the application
app_display_name = "Demo frontend app for Entra authentication"
description = "This app is used to demonstrate a frontend application where a user authenticates using Entra ID authentication via OIDC"
contact = "business_unit1@my.com"
........
# Create an app registration
def create_app_registration(display_name: str, contact: str):
"""This function creates a new application registration in Microsoft Graph API if it doesn't already exist
Args:
display_name (str): The display name for the new application registration.
contact (str): The contact information to associate with the application registration.
Returns:
dict: The details of the created application registration.
"""
check_app = get_app_registration_by_display_name(display_name)
if check_app is not None:
print(f"Application {check_app['displayName']} already exists and its id is {check_app['id']}")
return check_app
else:
print("Creating new application registration...")
body = {
"displayName": display_name,
"description": description,
# Setting to false means this is a confidential client application vs a public client
"isFallbackPublicClient": False,
# Set a service management reference which can be the contact associated with the application
"serviceManagementReference": contact,
# Create the app as multi tenant; single tenant would use AzureADMyOrg
"signInAudience": "AzureADMultipleOrgs",
# Add a redirect URI to support OIDC authentication
"web": {
"redirectUris": [
"http://localhost:8100/callback"
]
}
}
response = requests.post(
'https://graph.microsoft.com/v1.0/applications',
headers={
'Content-Type': 'application/json',
'Authorization': f'Bearer {user_token.token}'
},
json=body
)
return response.json()
app_frontend = create_app_registration(app_display_name, contact)
print(json.dumps(app_frontend, indent=2))

The application registration I’m creating above is being created as a multi-tenant application instead of a single tenant application and is determined by the signInAudience being set to a value of AzureADMultipleOrgs. I’m doing this because I may do an additional post in this series walking through multi-tenant applications. Most of the application registrations you create will be single tenant and would have this property set to AzureADMyOrg.

Since I’m building a web application, I’m going to be configuring it as a confidential client (which means it will have a credential) and I’m going to use the authorization code flow. I don’t want my application registration to ever support being used as a public client so I set isFallbackPublicClient to false. This will force my client to provide a credential when attempting to obtain a token. If you were building an application that would live direct on the user’s desktop or mobile device, you’d need to set to that true because at that point your application would be a public client.

Under the web property, I’m setting the redirectUri property to the endpoint in my application I want the user redirected to after the user successfully authenticates to Entra ID and consents to whatever scope the application (or OAuth client) is requesting. In this case, my application runs directly on my machine so this is set to localhost.

You’ll also see I’m setting the serviceManagementReference property. Best practice is for you to set this property with a contact within the business unit for that owns the application. This can be helpful if the application registration becomes stale at this point and you detect that during your regular audits (which OF COURSE you’re doing!)

Once complete, I get the response below.

Creating new application registration...
{
"@odata.context": "https://graph.microsoft.com/v1.0/$metadata#applications/$entity",
"id": "be0af053-faf4-44b3-b071-XXXXXXXX",
"deletedDateTime": null,
"appId": "fc815c55-d456-4d38-be76-XXXXXXXX",
"applicationTemplateId": null,
"disabledByMicrosoftStatus": null,
"createdByAppId": "04b07795-8ddb-461a-XXXXXXXXXXXX",
"createdDateTime": "2026-06-25T01:19:12.1150491Z",
"displayName": "Demo frontend app for Entra authentication",
"description": "This app is used to demonstrate a frontend application where a user authenticates using Entra ID authentication via OIDC",
"groupMembershipClaims": null,
"identifierUris": [],
"isDeviceOnlyAuthSupported": null,
"isDisabled": null,
"isFallbackPublicClient": false,
"nativeAuthenticationApisEnabled": null,
"notes": null,
"publisherDomain": "XXXXXXXX.onmicrosoft.com",
"serviceManagementReference": "business_unit1@jogcloud.com",
"signInAudience": "AzureADMultipleOrgs",
"tags": [],
"tokenEncryptionKeyId": null,
"uniqueName": null,
"samlMetadataUrl": null,
"defaultRedirectUri": null,
"certification": null,
"optionalClaims": null,
"servicePrincipalLockConfiguration": null,
"requestSignatureVerification": null,
"addIns": [],
"api": {
"acceptMappedClaims": null,
"knownClientApplications": [],
"requestedAccessTokenVersion": null,
"oauth2PermissionScopes": [],
"preAuthorizedApplications": []
},
"appRoles": [],
"info": {
"logoUrl": null,
"marketingUrl": null,
"privacyStatementUrl": null,
"supportUrl": null,
"termsOfServiceUrl": null
},
"keyCredentials": [],
"parentalControlSettings": {
"countriesBlockedForMinors": [],
"legalAgeGroupRule": "Allow"
},
"passwordCredentials": [],
"publicClient": {
"redirectUris": []
},
"requiredResourceAccess": [],
"verifiedPublisher": {
"displayName": null,
"verifiedPublisherId": null,
"addedDateTime": null
},
"web": {
"homePageUrl": null,
"logoutUrl": null,
"redirectUris": [
"http://localhost:8100/callback"
],
"implicitGrantSettings": {
"enableAccessTokenIssuance": false,
"enableIdTokenIssuance": false
},
"redirectUriSettings": [
{
"uri": "http://localhost:8100/callback",
"index": null
}
]
},
"spa": {
"redirectUris": []
}
}

Next up, I want to set an owner. Every application registration should have an owner and this is a child object of the application. Now don’t go willy-nilly throwing any business unit person into that field (the owner cannot be a group as of the date of this post). When a user is an owner of an application registration, they can modify the application registration. The owner should be set to some privileged user account in Entra where access to that privileged account is tightly controlled.

import requests
import json
# Set the owners of the application using their Entra ID user object id
owners = [
"2e69d9f2-b5b3-482b-9c15-XXXXXXXXXXXX"
]
........
# Add owners to the application registration
def add_owners_app_registration(owners: list, app_id: str):
"""This function adds owners to an application registration in Microsoft Graph API
Args:
owners (list): A list of Entra ID user object IDs to add as owners.
app_id (str): The object ID of the application registration to add owners to.
Returns:
list: The updated list of owners for the application registration.
"""
# Check the current owners to see if the owner is already listed
check_owners = get_app_registration_owner(app_id)
if check_owners is not None:
for owner in owners:
if owner in [o['id'] for o in check_owners]:
print(f"Owner {owner} is already an owner of the application.")
# Since owner isn't there, add it
else:
print(f"Adding owner {owner} to the application...")
response = requests.post(
f'https://graph.microsoft.com/v1.0/applications/{app_id}/owners/$ref',
headers={
'Content-Type': 'application/json',
'Authorization': f'Bearer {user_token.token}'
},
json={
"@odata.id": f"https://graph.microsoft.com/v1.0/directoryObjects/{owner}"
}
)
if response.status_code == 204:
print(f"Owner {owner} added successfully.")
else:
print(f"Failed to add owner {owner}. Response: {response.status_code} - {response.text}")
else:
print("No current owners found for the application.")
for owner in owners:
print(f"Adding owner {owner} to the application...")
response = requests.post(
f'https://graph.microsoft.com/v1.0/applications/{app_id}/owners/$ref',
headers={
'Content-Type': 'application/json',
'Authorization': f'Bearer {user_token.token}'
},
json={
"@odata.id": f"https://graph.microsoft.com/v1.0/directoryObjects/{owner}"
}
)
if response.status_code == 204:
print(f"Owner {owner} added successfully.")
else:
print(f"Failed to add owner {owner}. Response: {response.status_code} - {response.text}")
new_owners = get_app_registration_owner(app_id)
return new_owners
new_owners = add_owners_app_registration(owners = owners, app_id=app_frontend['id'])
print(json.dumps(new_owners, indent=2))

Next up I need to create a client credential for my application. This will act as its client_secret to support its confidential client status. Entra ID supports multiple types of credentials including a basic client secret, client certificate, and federated credential. Of the three, the federated credential is the sweet spot if you can make it work. This is where you can use something like a managed identity which means the actual secret is automatically managed and rotated by Microsoft. Way easier lifecycle. Federated credentials can also use external identity providers, like GCP, GitHub and others neat integrations via the workload identity federation. A client certificate should be your next preferred credential since it has higher assurance and avoids having to worry about secret rotation and leakage. Since I’m lazy, I’ll be using a client secret.

Below I create a client secret that will be valid for a year.

# Create a date one year from now that will be used to expire the app registration credential
start_date = datetime.now(timezone.utc)
end_date = (datetime.now(timezone.utc) + relativedelta(years=1)).replace(hour=23, minute=59, second=59, microsecond=0)
formatted_start_date = start_date.strftime('%Y-%m-%dT%H:%M:%SZ')
formatted_end_date = end_date.strftime('%Y-%m-%dT%H:%M:%SZ')
.........
# Create a client secret
def create_password_credential(app_id, end_date, start_date, override=False):
"""This function creates a password credential for an application registration in Microsoft Graph API. It will delete existing
credentials if override is set to True, otherwise it will return a message that a credential already exists.
Args:
app_id (str): The object ID of the application registration to create a password credential for.
end_date (str): The end date and time for the password credential in ISO 8601 format.
start_date (str): The start date and time for the password credential in ISO 8601 format.
override (bool): Whether to override existing password credentials. Defaults to False.
Returns:
dict: The deatils of the created password credential or a blank dict if a credential already exists and override is False.
"""
# Check to see if the app already has a password credential
app = get_app_registration(app_id)
if app['passwordCredentials'] == []:
# Create a new credential
body = {
"displayName": "primary",
"endDateTime": end_date,
"startDateTime": start_date
}
response = requests.post(
f'https://graph.microsoft.com/beta/applications/{app_id}/addPassword',
headers={
'Content-Type': 'application/json',
'Authorization': f'Bearer {user_token.token}'
},
json=body
)
if response.status_code != 200:
print(f"Error creating password credential: {response.status_code}: {response.text}")
else:
print("Created new password credential.")
return response.json()
elif override:
# Delete existing credentials
for cred in app['passwordCredentials']:
print("Deleting existing password credential...")
response = requests.post(
f'https://graph.microsoft.com/beta/applications/{app_id}/removePassword',
headers={
'Content-Type': 'application/json',
'Authorization': f'Bearer {user_token.token}'
},
json={
"keyId": cred['keyId']
}
)
if response.status_code != 204:
print(f"Error deleting password credential: {response.status_code}: {response.text}")
# Create a new credential
body = {
"displayName": "primary",
"endDateTime": end_date,
"startDateTime": start_date
}
response = requests.post(
f'https://graph.microsoft.com/beta/applications/{app_id}/addPassword',
headers={
'Content-Type': 'application/json',
'Authorization': f'Bearer {user_token.token}'
},
json=body
)
if response.status_code != 200:
print(f"Error creating password credential: {response.status_code}: {response.text}")
else:
print("Created new password credential after deleting existing one.")
return response.json()
else:
print("A secret already exists. You can delete it and create a new one by setting override=True")
return app['passwordCredentials'][0]
password_credential_frontend = create_password_credential(app_frontend['id'], formatted_end_date, formatted_start_date, override=False)

Alright, at this point we have an application registration and client credential, which essentially means we have manually registered the application as an OAuth client to the authorization server (Entra ID). I now have a client_id (appId property) and client_secret. What next?

Creating the frontend service principal

I now need a security principal (or identity) to act as an identity for this instance of my application in this Entra ID tenant. In comes the service principal. There are many types of service principals as I mentioned previously, for this use case I’ll be creating an application service principal. Manual creation of this is only required because I’m creating it programmatically through REST. If I created this app registration in Azure Portal a service principal would automatically be created.

Creating the service principal is very straightforward and there’s not much need you to pass beyond the appId (or client id) of the application registration. Most of the properties are synchronized from the application resource the service principal is being created for. You’ll reference the appId of the application resource which handles the mapping back to the application resource.

def create_service_principal(app_id: str):
"""This function creates a service principal for an application registration in Microsoft Graph API if it doesn't already exist
Args:
app_id (str): The application ID of the service principal to create.
Returns:
dict or None: The details of the created service principal if successful, otherwise None.
"""
# Check to see if the service principal already exists
service_principal = get_service_principal_by_app_id(app_id)
if service_principal is not None:
print(f"Service principal already exists: {service_principal['id']}")
return service_principal
else:
body = {
"appId": app_id
}
response = requests.post(
'https://graph.microsoft.com/v1.0/servicePrincipals',
headers={
'Content-Type': 'application/json',
'Authorization': f'Bearer {user_token.token}'
},
json=body
)
if response.status_code == 201:
return response.json()
else:
print(f"Error creating service principal: {response.status_code}: {response.text}")
return None
# Get or create the service principal
service_principal_frontend = create_service_principal(app_frontend['appId'])
print(json.dumps(service_principal_frontend, indent=2))

This spits out a new service principal object seen below. If we want the instance of the application to access any resources itself or in a delegated manner, the service principal will be the resource that is granted the permissions.

{
"@odata.context": "https://graph.microsoft.com/v1.0/$metadata#servicePrincipals/$entity",
"id": "ce341fd2-fd6b-4dab-9beb-XXXXXXXXXXXX",
"deletedDateTime": null,
"accountEnabled": true,
"alternativeNames": [],
"appDisplayName": "Demo frontend app for Entra authentication",
"appDescription": "This app is used to demonstrate a frontend application where a user authenticates using Entra ID authentication via OIDC",
"appId": "fc815c55-d456-4d38-be76-XXXXXXXXXXX",
"applicationTemplateId": null,
"appOwnerOrganizationId": "6c80de31-d5e4-4029-93e4-XXXXXXXXXXXX",
"appRoleAssignmentRequired": false,
"createdByAppId": "04b07795-8ddb-461a-bbee-XXXXXXXXXXXX",
"createdDateTime": "2026-06-25T01:41:05Z",
"description": null,
"disabledByMicrosoftStatus": null,
"displayName": "Demo frontend app for Entra authentication",
"homepage": null,
"isDisabled": null,
"loginUrl": null,
"logoutUrl": null,
"notes": null,
"notificationEmailAddresses": [],
"preferredSingleSignOnMode": null,
"preferredTokenSigningKeyThumbprint": null,
"replyUrls": [
"http://localhost:8100/callback"
],
"servicePrincipalNames": [
"fc815c55-d456-4d38-be76-XXXXXXXXXXX
],
"servicePrincipalType": "Application",
"signInAudience": "AzureADMultipleOrgs",
"tags": [],
"tokenEncryptionKeyId": null,
"samlSingleSignOnSettings": null,
"addIns": [],
"appRoles": [],
"info": {
"logoUrl": null,
"marketingUrl": null,
"privacyStatementUrl": null,
"supportUrl": null,
"termsOfServiceUrl": null
},
"keyCredentials": [],
"oauth2PermissionScopes": [],
"passwordCredentials": [],
"resourceSpecificApplicationPermissions": [],
"verifiedPublisher": {
"displayName": null,
"verifiedPublisherId": null,
"addedDateTime": null
}
}

Document your required permissions!

It’s best practice to document the permission your application will require versus being an asshole and forcing someone to guess, struggle, learn to hate you, and likely over permission. While this isn’t required for delegated permissions, it’s still best practice if possible. It should be possible in almost all instances (with some exceptions for agents if you’re brave enough). Permissions are divided into two categories which include role permissions and scope permissions. Role permissions are going to be the permissions the app exercises using its own identity context (we’ll see some of this in a future post) and scope permissions are going to be delegated permissions it requires. The permissions an application requires can be documented as part of the app registration (or application resource) by setting the requiredResourceAccess property of the application registration. This doesn’t grant any access, but simply informs the administrator what permissions will be required from the application. It doesn’t prohibit the administrator or user granting it additional permissions beyond what is required.

# Get the existing app permissions
def get_app_permissions(id: str):
"""This function retrieves the existing permissions required for an application registration from the Microsoft Graph API.
Args:
id (str): The object ID of the application registration to retrieve permissions for.
Returns:
list: A list of required resource permissions or else an empty list
"""
response = requests.get(
f'https://graph.microsoft.com/v1.0/applications/{id}',
headers={
'Content-Type': 'application/json',
'Authorization': f'Bearer {user_token.token}'
}
)
if response.status_code != 200:
print(f"Error getting app permissions: {response.status_code}: {response.text}")
return None
# Return the current permission set or a blank array if there are no permissions currently set
return response.json().get('requiredResourceAccess') or []
# Add the app permissions to the app registration. This is useful for multi-tenant apps to document required permissions. It does not grant any permissions.
def add_app_permissions(app_id: str, resource_access: list):
"""This function adds the required permissions to an application registration in Microsoft Graph API
Args:
app_id (str): The object ID of the application registration to add permissions to.
resource_access (list): A list of permissions to add to the application registration in the format of requiredResourceAccess.
Returns:
dict or None: The updated application registration details if successful, otherwise None.
"""
# Get the existing permissions in order to append to them
app_permissions = get_app_permissions(app_id)
# Append the new permissions to the existing ones
for permission in resource_access:
# Check if this resource already exists in the app permissions
existing_resource = None
for resource in app_permissions:
if resource['resourceAppId'] == permission['resourceAppId']:
existing_resource = resource
break
if existing_resource:
# Append the new permissions to the existing resource
for access in permission['resourceAccess']:
if access not in existing_resource['resourceAccess']:
existing_resource['resourceAccess'].append(access)
else:
# Add the new resource and its permissions
app_permissions.append(permission)
# Update the app registration with the new permissions
body = {
"requiredResourceAccess": app_permissions
}
response = requests.patch(
f'https://graph.microsoft.com/v1.0/applications/{app_id}',
headers={
'Content-Type': 'application/json',
'Authorization': f'Bearer {user_token.token}'
},
json=body
)
if response.status_code != 204:
print(f"Error adding app permissions: {response.status_code}: {response.text}")
return None
else:
print("App permissions documented as required successfully.")
return get_app_registration(app_id)
new_permissions = [
{
"resourceAppId": "00000003-0000-0000-c000-000000000000", # Microsoft Graph
"resourceAccess": [
{
"id": "e1fe6dd8-ba31-4d61-89e7-88639da4683d", # User.Read
"type": "Scope"
}
]
}
]
app_required_permissions = add_app_permissions(app_frontend['id'], new_permissions)['requiredResourceAccess']
print("\n=== App required permissions ===")
print(json.dumps(app_required_permissions, indent=2))

Once those are added they will appear in the API permissions section of the Application Registration inside of the Azure Portal as seen below. For my app I’m documenting that it requires the User.Read delegated permission on the Microsoft Graph API. For some of the built-in applications like the Microsoft Graph, some permissions will require admin consent and some will not like User.Read. Like I covered in my first post, this is determined by the creator of the application resource when they define the scopes. If you add these things programmatically it’s a bit more work because you need to dig up the resource’s appId and object ids of the permission. Something like Microsoft Graph is well documented. For other applications, you’ll need to do some digging via API calls.
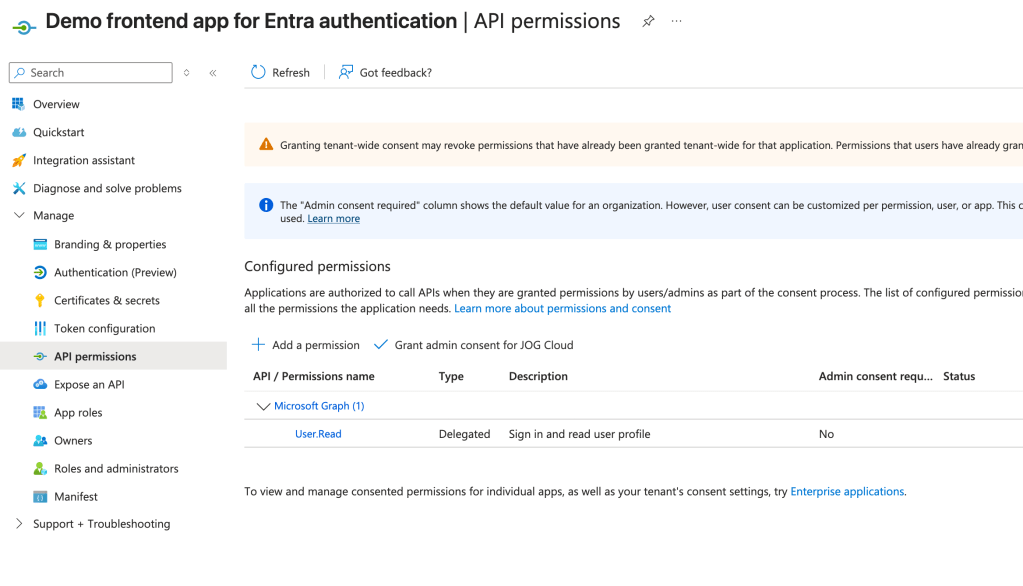
Alright, at this point we’re ready to test our app!

Authenticating to the application

After starting the application I immediately see a lookup to metadata endpoint for the OIDC and OAuth endpoints. This is triggered an MSAL instance is started in the code. These endpoints will be used throughout the login process.
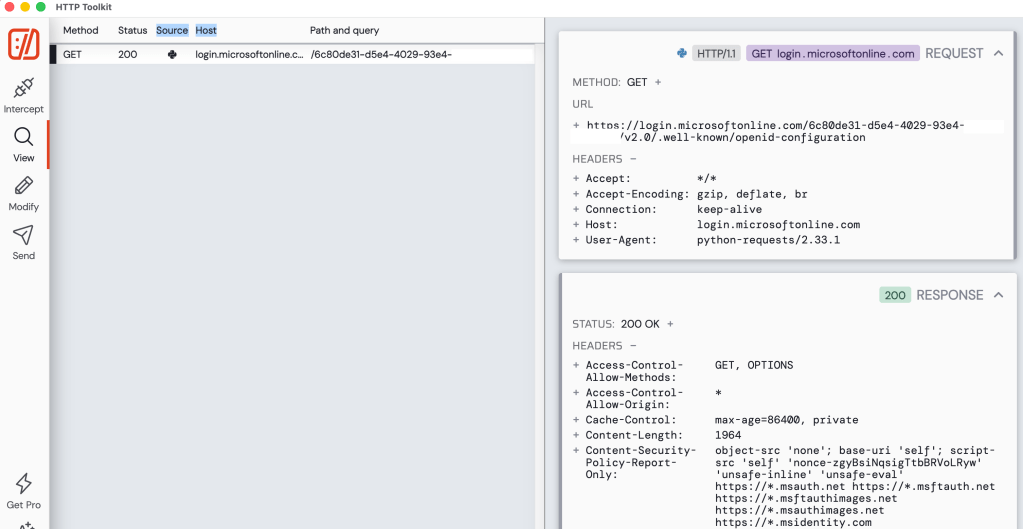
Opening my website I’m faced with a very simple login screen (simple setup for a simple man).
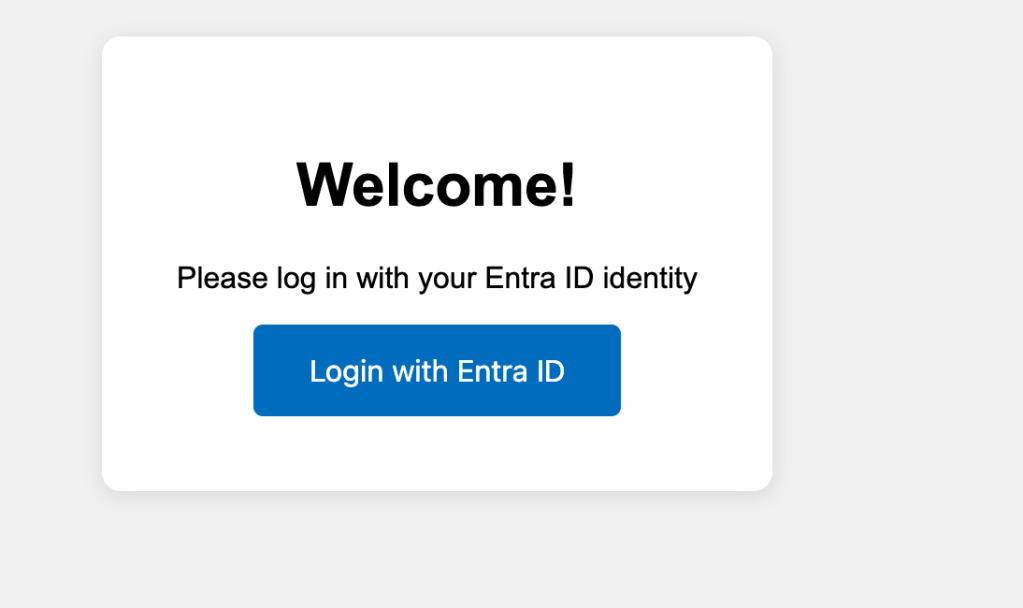
Once I click login with Entra ID, the underlining MSAL library redirects me to the /authorize endpoint of Entra where my user is prompted to authenticate. The request that is generated is below.

https://login.microsoftonline.com/6c80de31-d5e4-4029-93e4-XXXXXXXXXXXX/oauth2/v2.0/authorize?
client_id=afbd7539-a21f-4d11-93a3-XXXXXXXXXXXX&
response_type=code&
redirect_uri=http%3A%2F%2Flocalhost%3A8100%2Fcallback&
scope=User.Read+offline_access+openid+profile&
state=iuxzJhtpdQrWHKqG&code_challenge=L2KNF971_Izy0wWY4v_8GJ1XXXXXXXXXXXX&
code_challenge_method=S256&
nonce=b448a1420a781ac5f18bc2db7f74e06a42fbedca3dd04ebdXXXXXXXXXXXX&
client_info=1

In this request we see all the things we covered in the second post for the protocol primer. There is the redirect URI that the user will be redirected to after authenticating to Entra ID, the response_type indicating this is the authorization code grant type, the client id of my application, the state property used to mitigate CSRF attacks, the nonce to prevent replay attacks, and the code challenge and code challenge method for PKCE.

Now one thing to note is you’ll find a lot of samples on the wider Internet for MSAL (and likely generated by LLMs if you’re one of those vibe coders) that will use the acquire_token_for_client method (like this Microsoft sample here). This method WILL NOT use PKCE. If you want to include the code challenge and code verifier for PKCE you will need to use the initiate_auth_code_flow method.

The scopes query perimeter includes the Microsoft Graph User.Read permission, offline_access (for a refresh token), openid (for an id token), and profile (for access to the user’s basic profile for OIDC). The code in my app specifically requests User.Read, the remaining scopes are automatically added by MSAL for each request depending on the method you’re calling. Most documentation out there will tell you that you can’t exclude them, but you actually can using the exclude_scopes property.

My user completes the authentication process and the user is then prompted to consent to the application’s service principal to be delegated the requested scopes. Once the user accepts, the user’s consent is saved in Entra ID and the user is no longer required to consent moving forward. You’ll notice my application says app is unverified because it’s using localhost. For anything remotely relating to production, you should configure a publishing domain and validate it.
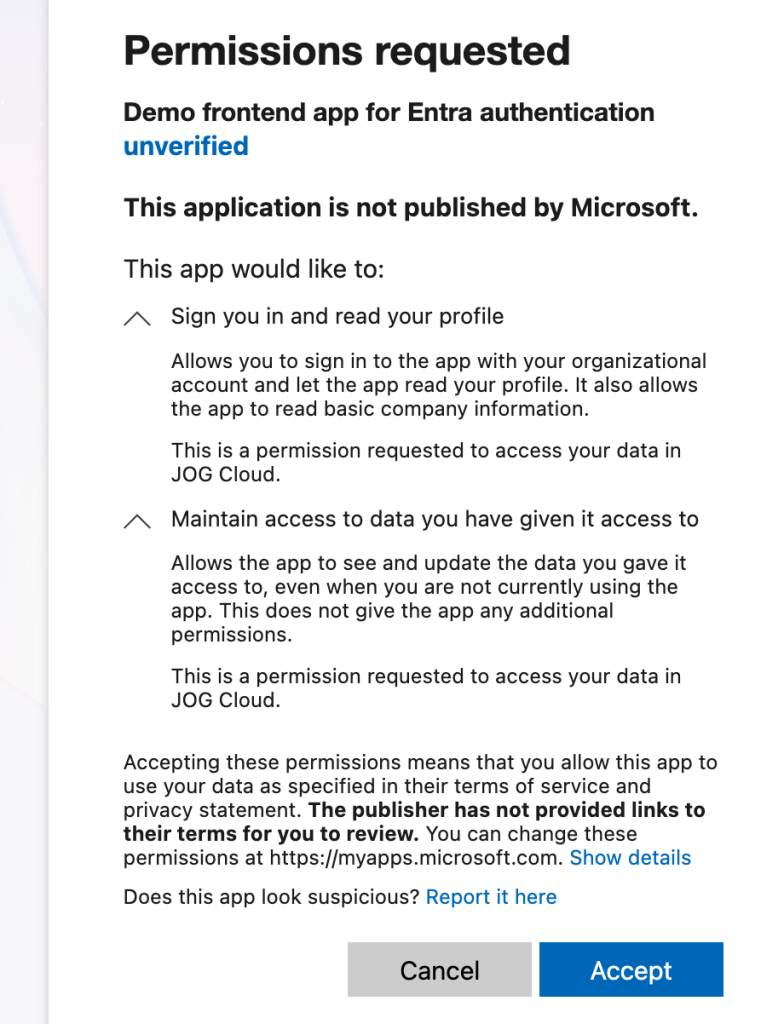
Once the user consents, the user is redirected to the redirect uri registered for the application with an authorization code generated by Entra ID. My application then makes a call to the /oauth2/v2.0/token endpoint in Entra to exchange the authorization code for an access token, identity token, and refresh token. It provides its client secret to authenticate itself to Entra and the code_verifier value allowing Entra to validate this is the original client who requested the access token (PKCE).
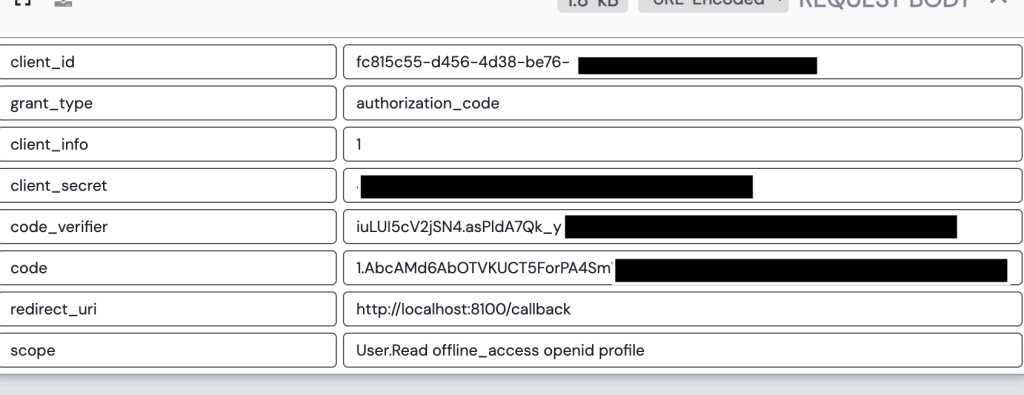
Entra validates the client secret and code verifier and if valid returns an access token, refresh token, and id token. My application can use the id token to authenticate the user and grant it access to the application.

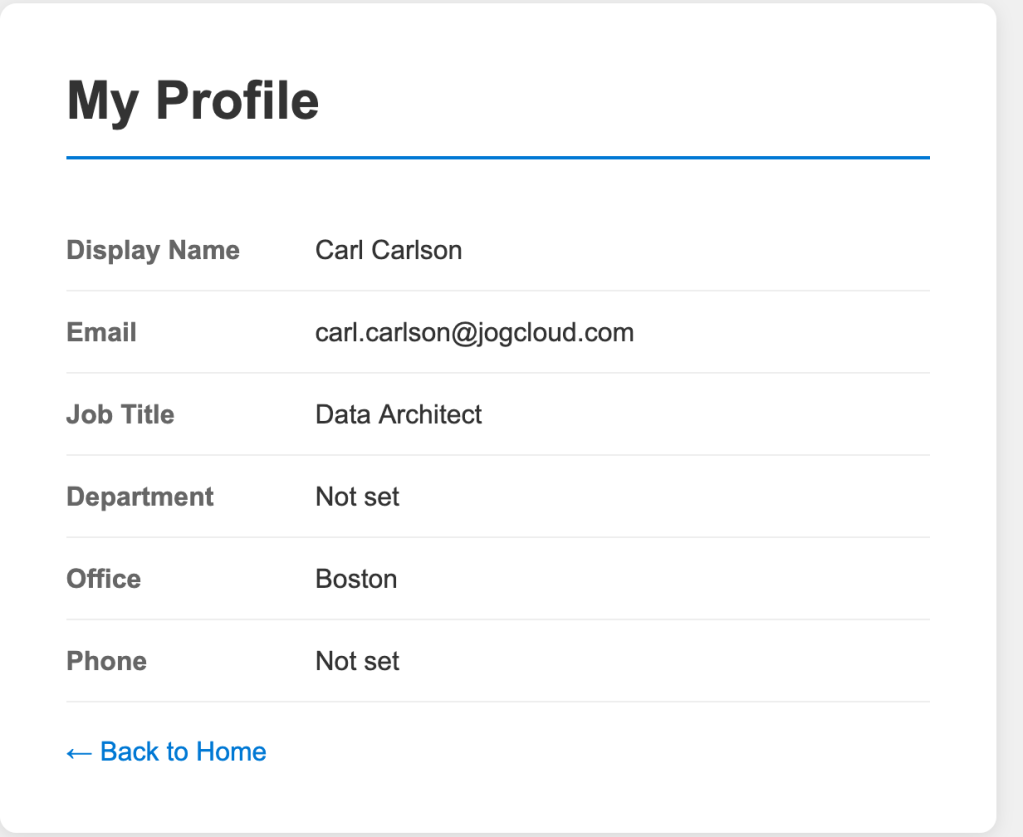
Once logged in, I navigate to the profile page of the application. This page has basic profile information about the user collected from the get user endpoint in the Microsoft Graph.
Navigating to the tokens page of the application displays the decoded access token and id token. In the payload of the id token we can see this id token is intended for the application (which you must validate in your code to ensure someone isn’t trying to pass you some rando token meant for another application) via the aud claim. We also get some basic information about the user. The full schema of the id token is in the official public docs. Some of the helpful properties are the user’s full name and their object id (oid). The object id could be used to pull additional information about the user (which we’ll see next post). We can also stuff additional claims in this id token if we wanted to. I’ll demonstrate this in a future post where I add a user’s group memberships into the id token.

{
"aud": "fc815c55-d456-4d38-be76-XXXXXXXXXXXX",
"exp": 1782358405,
"iat": 1782354505,
"iss": "https://login.microsoftonline.com/6c80de31-d5e4-4029-93e4-XXXXXXXXXXXX/v2.0",
"name": "Carl Carlson",
"nbf": 1782354505,
"nonce": "19297055204c96a487b701f62890cf1c867a7fac55814081f53cbe4XXXXXXXX",
"oid": "2e69d9f2-b5b3-482b-9c15-XXXXXXXXXXXX",
"preferred_username": "carl.carlson@jogcloud.com",
"rh": "1.AbcAMd6AbOTVKUCT5ForPA4SmVVcgfxW1XXXXXXXXXXXX",
"sid": "005f65fa-bad8-71a5-49eb-XXXXXXXXXXXX",
"sub": "p9RBIgpi113pdPH37Q50qylIbANwgMtDXXXXXXXXXXXX",
"tid": "6c80de31-d5e4-4029-93e4-XXXXXXXXXXXX",
"uti": "tL2-eu4OB0KFhXGl7j4UAA",
"ver": "2.0"
}

The end-to-end flow

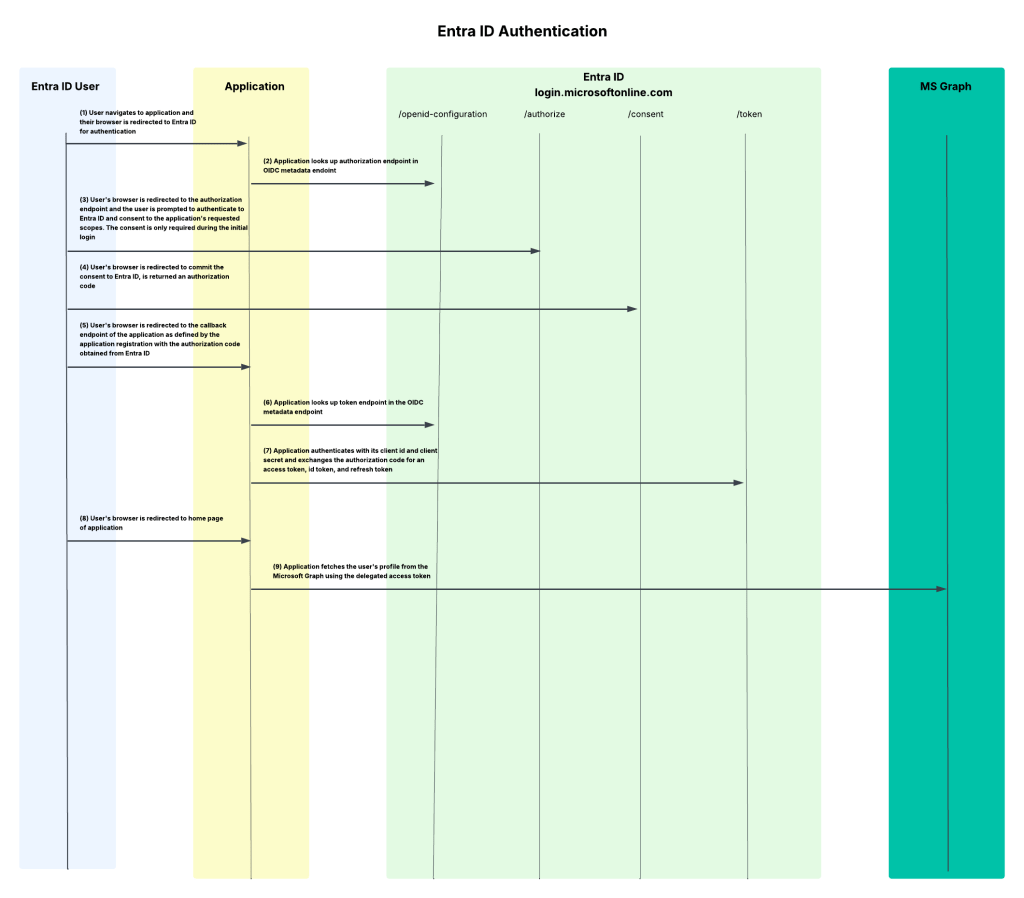
So I’ve authenticated my user to the application using OIDC and gained delegated access to the Microsoft Graph API via OAuth all using Entra. Not too shabby. This is the most basic of basic use cases. In my next post I’ll walk you through how to add group information to the id or access token which you could use within your application to authorize the user within the application.

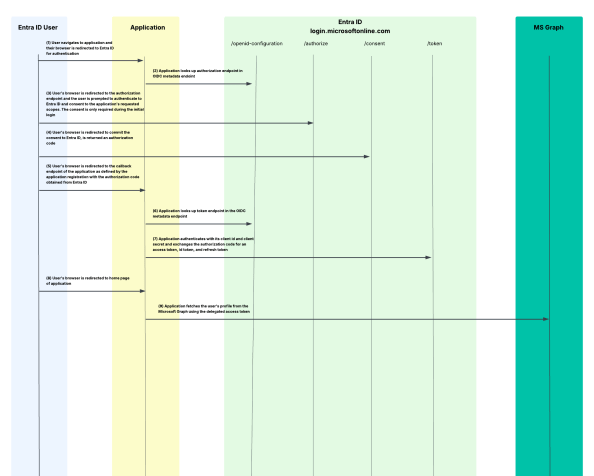
I’m a big fan of old school style protocol flow diagrams, so I threw one together that walks through the end-to-end process I’ve outlined today.
Summing It Up

Yeah, I know that was a lot. If all you take out of this post is a better understanding of what app registrations and service principals do and have a general understanding of how they’re structured, and what the protocol flow looks like when using Entra ID for OIDC/OAuth, that’s a win.

If you want to muck around with this stuff yourself in a personal or test tenant, I’ve published all the code I put together to run through these posts in this repository. It’s a work in progress which I’m fine-tuning as I write these posts but it does have the sample frontend app included in it if you want to take a glance at my application-level code and perhaps want to replicate what I walked through today. Please do not use any of this code in a production app. This is purely intended to demonstrate the concepts. I’m constantly modifying it, so YMMV if it works any given day.

Some key takeaways for you:

  1. Every app registration should have an owner. Just be aware the owner can modify the app registration so don’t go nuts and give this to a non-privileged user.
  2. Set the servericeManagementReference property to some type of BU-level distribution list. This will cover you in case the owners are wiped out through someone accidentally removing them or them leaving the company.
  3. Make sure you’re using the correct methods in the MSAL library if your goal is to use PKCE to align with OAuth 2.1.
  4. If you setup an app registration, be a good human being and document the permissions the app is going to require. You’re not required to, it should be a must for multi-tenant applications especially. It doesn’t limit what users and administrators can grant the application, but can act as minimum set of permissions to function.
  5. When configuring an app registration that will be a confidential client, try to use a federated identity credential. If your app is running in Azure, you can use a managed identity. This will both be more secure and make your app owner’s life a little less miserable having to rotate credentials.

See you next post!
Entra ID – Deep Dive – The Basics – Part 1

Entra ID – Deep Dive – The Basics – Part 1

This is part of my series on Microsoft Entra ID:

  1. Entra ID – Deep Dive – The Basics – Part 1
  2. Entra ID – Deep Dive – Protocol Primer – Part 2
  3. Entra ID – Deep Dive – Entra ID Authentication – Part 3
  4. Entra ID – Deep Dive – Workload Identity Federation – Bonus

Yeah… You read that right. I’m finally biting the bullet and doing a series on Entra ID. There are some cobwebs there, but once upon a time I was a half-baked “identity guy”. Nah, I’m not returning to that place, but I have had to visit it more frequently over the past few months. With the growing use of agents, identity has one again become of those things that apparently everyone is a so called “expert in”. I aint no expert, but I have been digging into the chatter around the implications of agents into the identity world. Given my employer, that has been spending some time in the Entra ID Agent Identity space.

Digging into that demanded I go back to some of the basics of Entra ID such as the purpose of an application registration versus a service principal and the request flow when authenticating a user to an application using OIDC (OpenID Connect) or executing an on-behalf-of flow in OAuth. I had conceptual knowledge of the above, but it was too ivory tower. I needed to eat the dog food and do it. After spending a few weeks reading through the documentation, reviewing captured requests and responses, reviewing RFCs, and poorly coding some applications to exercise on the concepts I figured it was time to brain dump what I learned before I get distracted with some new shiny widget and forget 60% of it.

So yeah… that’s where this series is coming from. Hopefully some folks out there draw some value out of it beyond serving as a refresher for my neural pathways.

With that rambling out of the way, let’s get to it.

WTF is Entra ID?

Many years ago when Microsoft first introduced Azure Active Directory my peers and I scratched our heads with this question. Given the name, the initial assumption was it was the Windows Active Directory “killer” (stop trying to make that happen, it aint gonna happen). That seems to have been a pretty common assumption given what I’ve heard from customers over the years as I sat in the vendor space and is likely why the name was shifted a few years back to Entra ID. Either that or marketing needed to justify their existence with another product rename.

If you want the professional explanation as to what Entra ID is you can read the public documentation and bask in the marketing mumbo jumbo. Since you’re here, you’re going to get the less fancy and quick and dirty Matt Felton explanation. My take is that Entra ID does a lot of shit, but at its core it is:

  • An identity store for the identities of human and non-human security principals, their attributes, and their credentials.
  • An authentication service which can act as an OAuth Authorization Server, OIDC identity provider, SAML IdP / SP, and even Kerberos / LDAP provider (gross)
  • A data store for resources that represent applications that can be used for OAuth and OIDC

It provides these core services to Microsoft’s cloud services such as M365, Azure, Dynamics 365, and whatever other clouds Microsoft has that I’m missing. It can be extended to provide these services to other applications by integrating with it via one of the supported protocols like we’ll see in further posts in this series.

Entra ID is divided into separate tenants which represent unique identity boundaries. Services for a given customer (such as an Azure subscription) are associated to an Entra ID tenant which acts as the identity boundary for those resources. Tenants can trust other tenants to facilitate cross tenant accessing of resources through features like Entra ID External ID.

The identity and data store pieces of the Entra ID service are where users, groups, many types of service principals, applications, and device resources are stored. For us old people, similar to an LDAP, each of these resources is similar to an object in LDAP that has a schema with specific properties that are consumed by native Microsoft and third-party services.

That should be enough context to give you a very general idea of what Entra ID is. Like I mentioned above, it does a lot of shit (conditional access, privileged identity management, etc) that isn’t relevant to the point of this series and that I’m not going to discuss. If you can hammer it in your head those two core functions, it will be enough to get you through this series.

Human Resources in Entra

Within Entra ID human accounts will be represented by user resources. User resources have a selection of properties you’ll be familiar with if you’ve ever worked with an LDAP or Windows Active Directory. These include properties like givenName, surname, mail, and userPrincipalName. These user resources can be created directly in Entra to create “cloud users”, created through the Entra ID External ID, or created by a synchronization process like Entra Connect Sync or a third-party solution like Okta. Humans will use these user accounts (resources) to authenticate to Entra ID to access integrated services. A typical user account looks like the below:

  {
    "businessPhones": [
      "555-555-5503"
    ],
    "displayName": "John Smith",
    "givenName": "John",
    "id": "b44b0442-d7e8-48f9-5555-5bfe1a4dabbc",
    "jobTitle": "Accountant",
    "mail": "john.smith@sometenant.com",
    "mobilePhone": "555-555-5503",
    "officeLocation": "Oz",
    "preferredLanguage": null,
    "surname": "Smith",
    "userPrincipalName": "john.smith@sometenant.com"
  }

Users can be organized into group resources. Like Windows Active Directory, these groups can be used to grant access to resource or used as distribution groups for email. Entra has multiple types of groups including Microsoft 365 Groups (Unified, your mail-enabled security groups for the modern age), Security Groups (for providing access to Entra-integrated resources), and mail-enabled security groups and distribution groups synchronized from Windows Active Directory. You’ll likely use a mix and there are benefits and considerations of both paths. A typical Microsoft 365 group looks like the below:

 {
    "classification": null,
    "createdDateTime": "2024-07-03T18:20:02Z",
    "creationOptions": [
      "ExchangeProvisioningFlags:3552",
      "Team"
    ],
    "deletedDateTime": null,
    "description": null,
    "displayName": "Fabrikam Employees",
    "expirationDateTime": null,
    "groupTypes": [
      "Unified"
    ],
    "id": "dedf1a66-103d-46c1-5555-c62439776bfc",
    "infoCatalogs": [],
    "isAssignableToRole": null,
    "mail": "fabrikam_employees@fabrikam.com",
    "mailEnabled": true,
    "mailNickname": "fabrikam_employees",
    "membershipRule": null,
    "membershipRuleProcessingState": null,
    "onPremisesDomainName": null,
    "onPremisesLastSyncDateTime": null,
    "onPremisesNetBiosName": null,
    "onPremisesProvisioningErrors": [],
    "onPremisesSamAccountName": null,
    "onPremisesSecurityIdentifier": null,
    "onPremisesSyncEnabled": null,
    "preferredDataLocation": null,
    "preferredLanguage": null,
    "proxyAddresses": [
      "SMTP:fabrikam_employees@fabrikam.com"
    ],
    "renewedDateTime": "2024-07-03T18:20:02Z",
    "resourceBehaviorOptions": [
      "WelcomeEmailDisabled",
      "SubscribeMembersToCalendarEventsDisabled",
      "HideGroupInOutlook"
    ],
    "resourceProvisioningOptions": [
      "Team"
    ],
    "securityEnabled": false,
    "securityIdentifier": "S-1-12-1-3739163238-1187057725-555555555-4234901305",
    "serviceProvisioningErrors": [],
    "theme": null,
    "uniqueName": null,
    "visibility": "Public"
  }

That’s all I’m going to say about humans, since the primary purpose of this series is the non-human side of the fence.

Non-Human Resources

For non-human identities our main resources are applications and service principals. There are others such as device identities, but I won’t be getting into that.

First, there is the application resource. You’ll see this referred to as the application registration or app registration in Microsoft documentation and Microsoft GUI-based experiences like the Azure Portal. The application resource (or app registration) is the globally unique representation of an application across all of Entra ID and exists only within the Entra ID tenant it was registered in. It’s easiest to think of an application resource as an OAuth client registration, because OAuth and OIDC are likely why this type of resource exists anyway (I’ll cover this a bit more in some upcoming posts). An application resource can have a credential which is used to authenticate it to Entra ID (OAuth confidential client) and this credential can be a secret, certificate (very cool and under used), or a federated credential (basis of workload identity). This resource will include properties required for OAuth flows such as the client id (appId), the audience (identifierUris), any scopes it exposes (oauth2PermissionScopes), and redirectUris (when using interactive OAuth flows). Below is an example of an application resource associated with an application that authenticates users with Entra ID.

{
"id": "55555555-5555-5555-5555-555555555555",
"deletedDateTime": null,
"appId": "11111111-1111-1111-1111-111111111111",
"applicationTemplateId": null,
"disabledByMicrosoftStatus": null,
"createdByAppId": "88888888-8888-8888-8888-888888888888",
"createdDateTime": "2026-07-15T02:13:57Z",
"displayName": "Demo Entra ID application - Frontend",
"description": "This application is the frontend for my demo Entra ID application",
"groupMembershipClaims": "ApplicationGroup",
"identifierUris": [],
"isDeviceOnlyAuthSupported": null,
"isDisabled": null,
"isFallbackPublicClient": false,
"nativeAuthenticationApisEnabled": null,
"notes": null,
"publisherDomain": "sometenant.onmicrosoft.com",
"serviceManagementReference": "business_unit1@sometenant.onmicrosoft.com",
"signInAudience": "AzureADMultipleOrgs",
"tags": [],
"tokenEncryptionKeyId": null,
"uniqueName": null,
"samlMetadataUrl": null,
"defaultRedirectUri": null,
"certification": null,
"requestSignatureVerification": null,
"addIns": [],
"api": {
"acceptMappedClaims": null,
"knownClientApplications": [],
"requestedAccessTokenVersion": null,
"oauth2PermissionScopes": [],
"preAuthorizedApplications": []
},
"appRoles": [],
"info": {
"logoUrl": null,
"marketingUrl": null,
"privacyStatementUrl": null,
"supportUrl": null,
"termsOfServiceUrl": null
},
"keyCredentials": [],
"optionalClaims": {
"accessToken": [],
"idToken": [
{
"additionalProperties": [],
"essential": false,
"name": "groups",
"source": null
}
],
"saml2Token": []
},
"parentalControlSettings": {
"countriesBlockedForMinors": [],
"legalAgeGroupRule": "Allow"
},
"passwordCredentials": [
{
"customKeyIdentifier": null,
"displayName": null,
"endDateTime": "2028-07-15T02:14:07.273797Z",
"hint": "8pV",
"keyId": "eea9ef15-ec2f-4cbc-9e6d-2e1dc8ffba30",
"secretText": null,
"startDateTime": "2026-07-15T02:14:07.273797Z"
}
],
"publicClient": {
"redirectUris": []
},
"requiredResourceAccess": [
{
"resourceAppId": "55555555-5555-5555-5555-555555555555",
"resourceAccess": [
{
"id": "00000000-0000-0000-0000-000000000001",
"type": "Scope"
}
]
},
{
"resourceAppId": "00000003-0000-0000-c000-000000000000",
"resourceAccess": [
{
"id": "e1fe6dd8-ba31-4d61-89e7-88639da4683d",
"type": "Scope"
},
{
"id": "98830695-27a2-44f7-8c18-0c3ebc9698f6",
"type": "Role"
}
]
}
],
"verifiedPublisher": {
"displayName": null,
"verifiedPublisherId": null,
"addedDateTime": null
},
"web": {
"homePageUrl": null,
"logoutUrl": null,
"redirectUris": [
"http://localhost:8100/callback"
],
"implicitGrantSettings": {
"enableAccessTokenIssuance": false,
"enableIdTokenIssuance": false
},
"redirectUriSettings": [
{
"uri": "http://localhost:8100/callback",
"index": null
}
]
},
"servicePrincipalLockConfiguration": {
"isEnabled": true,
"allProperties": true,
"credentialsWithUsageVerify": null,
"credentialsWithUsageSign": null,
"identifierUris": null,
"tokenEncryptionKeyId": null
},
"spa": {
"redirectUris": []
}
}

The service principal resource is the other major non-human resource to be aware of. A service principal represents an instance of an application resource in an Entra ID tenant. While you’ll only ever have a single application resource in the registered Entra ID tenant to represent an application, that application might have multiple service principals in multiple Entra ID tenants if it was built as a multi-tenant application. When permissions are granted to an application to access a resource secured with Entra ID, it will use the permissions associated to the service principal. The Microsoft GUI-experience will call a service principal an Enterprise Application.

As you’ll see below, a service principal looks a lot like the application resource its providing an identity for. The appId property is the property used to directly map it back to the application resource. The service principal type in this scenario is Application. There are a variety of service principal types that provide a non-human identity for different use cases like for managed identities, agent identity blueprints, and agent identities.

{
"id": "44444444-4444-4444-4444-444444444444",
"deletedDateTime": null,
"accountEnabled": true,
"alternativeNames": [],
"appDisplayName": "Demo Entra ID application - Frontend",
"appDescription": "This application is the frontend for my demo Entra ID application",
"appId": "11111111-1111-1111-1111-111111111111",
"applicationTemplateId": null,
"appOwnerOrganizationId": "88888888-8888-8888-8888-888888888888",
"appRoleAssignmentRequired": false,
"createdByAppId": "88888888-8888-8888-8888-888888888888",
"createdDateTime": "2026-07-15T02:14:16Z",
"description": null,
"disabledByMicrosoftStatus": null,
"displayName": "Demo Entra ID application - Frontend",
"homepage": null,
"isDisabled": null,
"loginUrl": null,
"logoutUrl": null,
"notes": null,
"notificationEmailAddresses": [],
"preferredSingleSignOnMode": null,
"preferredTokenSigningKeyThumbprint": null,
"replyUrls": [
"http://localhost:8100/callback"
],
"servicePrincipalNames": [
"611111111-1111-1111-1111-111111111111"
],
"servicePrincipalType": "Application",
"signInAudience": "AzureADMultipleOrgs",
"tags": [],
"tokenEncryptionKeyId": null,
"samlSingleSignOnSettings": null,
"addIns": [],
"appRoles": [],
"info": {
"logoUrl": null,
"marketingUrl": null,
"privacyStatementUrl": null,
"supportUrl": null,
"termsOfServiceUrl": null
},
"keyCredentials": [],
"oauth2PermissionScopes": [],
"passwordCredentials": [],
"resourceSpecificApplicationPermissions": [],
"verifiedPublisher": {
"displayName": null,
"verifiedPublisherId": null,
"addedDateTime": null
}
}

The official documentation likes to refer to the application object as the template for the application and the service principal as the security principal. I think that’s a pretty damn good single sentence explanation.

What are we going to build?

Now that you have the bare bones basics of Entra, you likely want to understand how an application would go about using it for authentication and authorization. While you might not be doing this now and it may not seem relevant, it will become very relevant to you if you begin building agents in Microsoft’s clouds through Microsoft Foundry, CoPilot Studio, or the 18 other random services Microsoft allows agents to be built. This will also be relevant to you if you’re going to consume Microsoft resources (such as Azure) from other clouds through an application or an agent. So yeah, you should understand what this looks like to do. The whole Entra ID Agent Identity feature builds on these foundational pieces.

To see these concepts in action I’m going to walk through a very simplistic solution with a frontend website and backend API in Python. The frontend website is built using the Flask Framework and the backend API is built with fastapi.

Demo application architecture

The frontend website will use Entra ID to authenticate the user and will be issued an OIDC id token to identify the user. The frontend will get some information from the user from the id token and access token it receives from Entra and will make additional calls to the Microsoft Graph API using the client credentials flow to grab other attributes of the user’s identity. I’ll also show how to include the user’s Entra ID group information in the id or access token and how to handle nested group membership.

The frontend will have some pages that call functions within the backend API. One example is the story endpoint will pull a pre-built AI generated story about the user which has been uploaded to blob storage in an Azure Storage Account. The backend API will use the on-behalf-of flow to access the storage account as the user to pull the user’s specific story.

This will demonstrate some of the most common flows including authentication, OAuth client credentials flow, and OAuth on-behalf-of (or jwt bearer). I’ll show you how the id tokens and access tokens look in different scenarios pointing out the relevant claims and how they’re used upstream. I’ll even share some process flows so you understand what does what in a given flow.

My primary goal here is give you the basics so you can walk away with a more solid understanding of what’s happening under the hood and how Entra ID has decided to implement OIDC and OAuth. I can’t stress how helpful this will be for you once you start diving into the agent identity space (which I’ll be covering after this series).

Summing it up

Ok, so you know what you’re in for. This series is gonna be relatively deep in the weeds so bring your favorite caffeinated beverage for future posts. I’m doing everything direct with the REST APIs because I want to show you the gory details. No pretty SDKs for you. If you’ve had a “conceptual” idea of how this works without the implementation specifics (like I did before I went down this rabbit hole) this series should help to fill those gaps.

In the next post I’ll walk through setting up Entra for the frontend website, authenticating a user, and exploring the id token and access token. The post following that will walk through using the application’s identity context to get more information about the user from the Microsoft Graph API such as nested group membership, then I’ll finish up the series by walking through the on-behalf-of flow with the backend API to show you how to carry the user’s identity context through the application to the destination resource down the line.

See you next post!

Microsoft Foundry – BYO AI Gateway – Part 3

Microsoft Foundry – BYO AI Gateway – Part 3

This is part of my series on Microsoft Foundry:

  1. Microsoft Foundry’s Evolution
  2. Microsoft Foundry BYO AI Gateway (BYO Model) – Part 1
  3. Microsoft Foundry BYO AI Gateway (BYO Model) – Part 2
  4. Microsoft Foundry BYO AI Gateway (BYO Model) – Part 3
  5. Microsoft Foundry Publishing Agent to Microsoft Teams – Part 1 – Overview
  6. Microsoft Foundry Publishing Agent to Microsoft Teams – Part 2 – The GUI Experience
  7. Microsoft Foundry Publishing Agent to Microsoft Teams – Part 3 – The programmatic experience

Hello once again folks! Today I’m going to add yet another post to my BYO AI Gateway feature of Microsoft Foundry series. In my first post I gave a background on the use case for this feature, in the second post I walked the concepts required to understand the feature, the resources involved in the setup, and the schema of those resource objects. In this post I’m going to walk through the architecture I setup to play with this feature, why I made the choices I did, and dig into some of the actual Terraform code I put together to set this whole thing up. Let’s dive in!

The foundational architecture

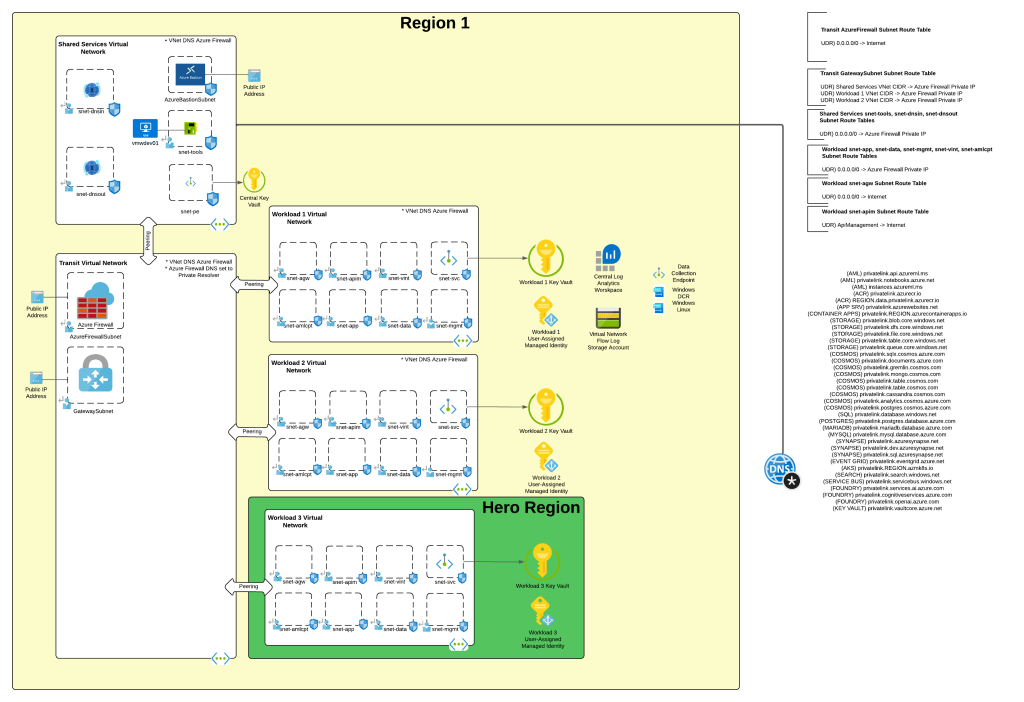
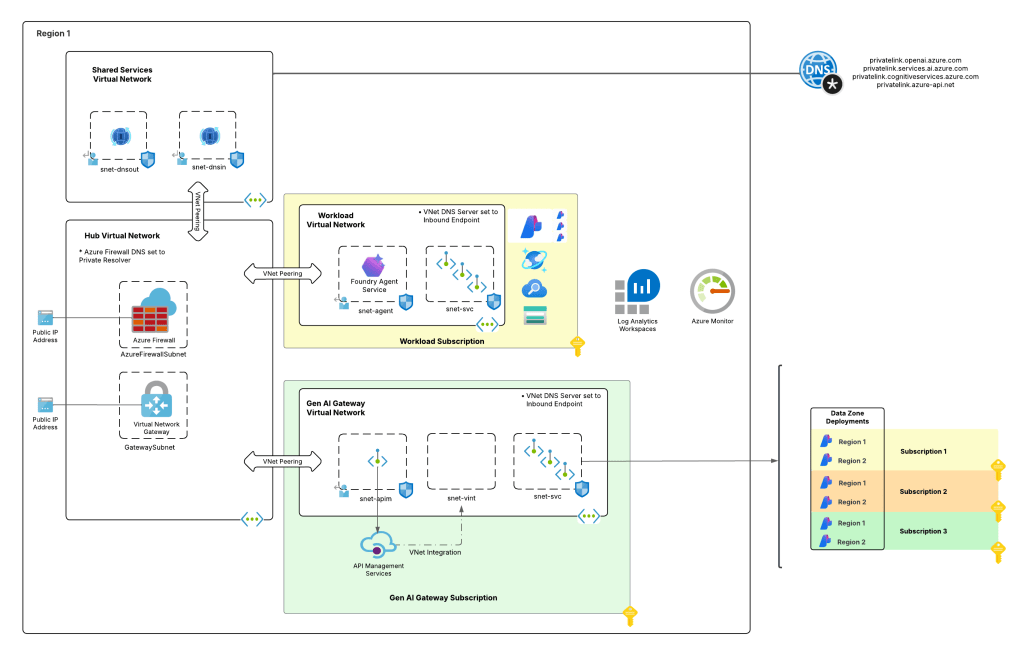
When I wanted to experiment with this feature I wanted to test it in an architecture that is typical to my customer base. For this I chose the classic tried and true hub and spoke architecture. I opted out of VWAN and went with a traditional virtual network model because I prefer the visibility and control to that model during experimentation. When the hub becomes a managed VWAN Hub, I get that fancy overlay which makes invisible some of the magic of what is happening underneath. This model enables me to do packet captures at every step and manage routing at a very granular level, which is a must when playing with cutting edge features.

For this setup I have a lab I built out in Terraform which gives me that hub and spoke architecture, centralized DNS resolution, logging, and access to multiple regions. The multiple regions piece of the puzzle is key because feature availability across Foundry features and APIM v2 SKUs are still in flux. The lab also uses three spoke virtual networks. This gives allows me to plop pieces in different spokes to see how things behave and track traffic patterns. It also gives me flexibility when I need to wait for purge operations like when purging a Microsoft Foundry resource configured with a standard agent setup and clearing the lock on the delegated subnet for the VNet injection model. If you’ve mucked around with this you know sometimes it can be 15 minutes and sometimes it can be 2 days.

I drop one of three spokes into one of the “hero” regions. This is a region that gets new features sooner than ours. For example, in this lab I drop it into East US 2 while the hub and other two spokes go in West US 3 (where I’m less likely to run into an quota or capacity issues). East US 2 gives me the option to deploy APIM v2 Standard SKU. In the next section I’ll explain why I’m going with v2 for this experimentation.

Foundational architecture

AI Gateway Architecture

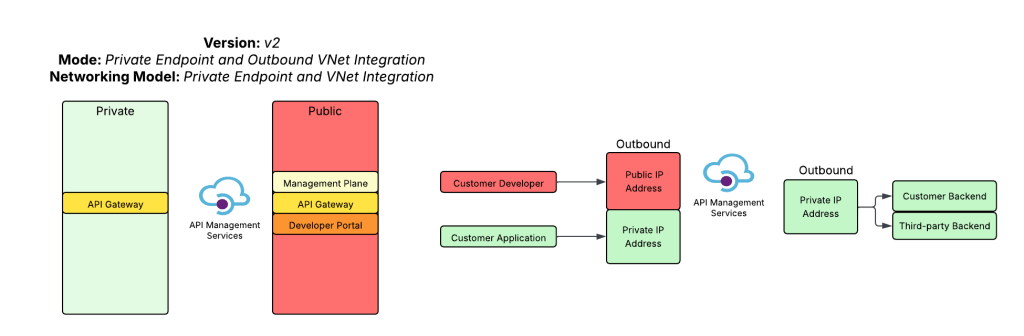
For an AI Gateway I decided to use APIM. My buddy Piotr Karpala has a great repository of 3rd-party AI Gateway solutions if you want to test this with something outside of APIM. I’m going to plop this into the “hero” region spoke in East US 2 to so I can deploy a v2 Standard SKU. The reason I’m using a v2 SKU is it provides another networking model that the classic SKUs do not, and that is Private Endpoint and VNet integration. In this model I block public traffic to the APIM service, create a Private Endpoint to enable private inbound access, and setup VNet integration to a delegated subnet to keep outbound traffic from any of the APIM instances flowing through my virtual network so I can mediate it and optionally inspect it. While the Private Endpoint is only supported for the Gateway and not the Developer Portal, I don’t care in this instance because I don’t plan on using the Developer Portal on an APIM acting as an AI Gateway. You can also create a private endpoint for a APIM v2 service instance that uses VNet injection, but it requires the Premium SKU and I’m super cheap, so I opted out of that.

APIM v2 with Private Endpoint and VNet Integration

The reason I picked this networking model for APIM is it makes it easy for me to inject the service into a Microsoft Foundry account configured with a standard agent and the managed virtual network model. In a future post I’ll dive more into the managed virtual network model. For now, just be aware that is exists, it’s in preview, and it doesn’t have many of the limitations the Foundry Agent Service VNet injection model has. There are considerations no doubt, but my personal take is it’s the better of the two strategically.

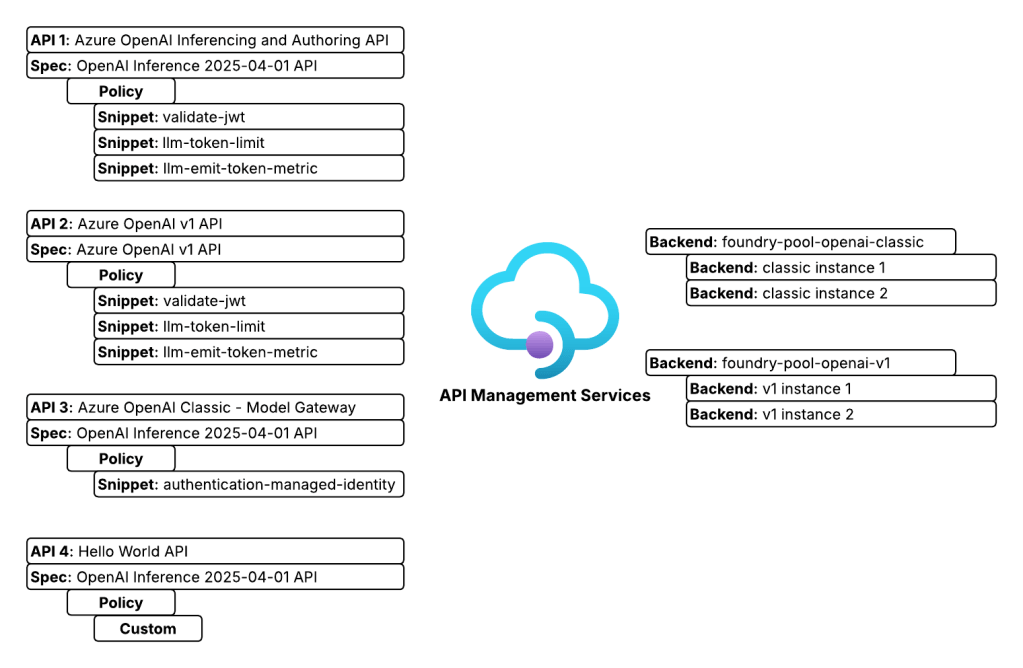
On the APIM instance I configured two backend objects, one for each Foundry instance. The backends are organized into a pooled backend so I could load balance across the two Foundry instances to maximize my TPM (tokens per minute). I defined four APIs. Two APIs support the Azure OpenAI inferencing and authoring API, one supports the Azure OpenAI v1 API, and the last is a simple custom Hello World API I use to test connectivity. I use two APIs for the Azure OpenAI inferencing and authoring API because one is designed to support APIM as an AI Gateway uses some custom policy snippets and the other is very generic and is used to test model gateway connections from Foundry purely so I’m familiar with the basics of them.

APIM APIs

Foundry Architecture

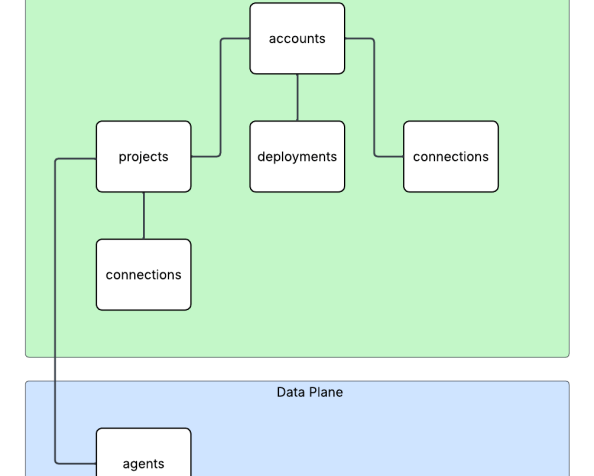
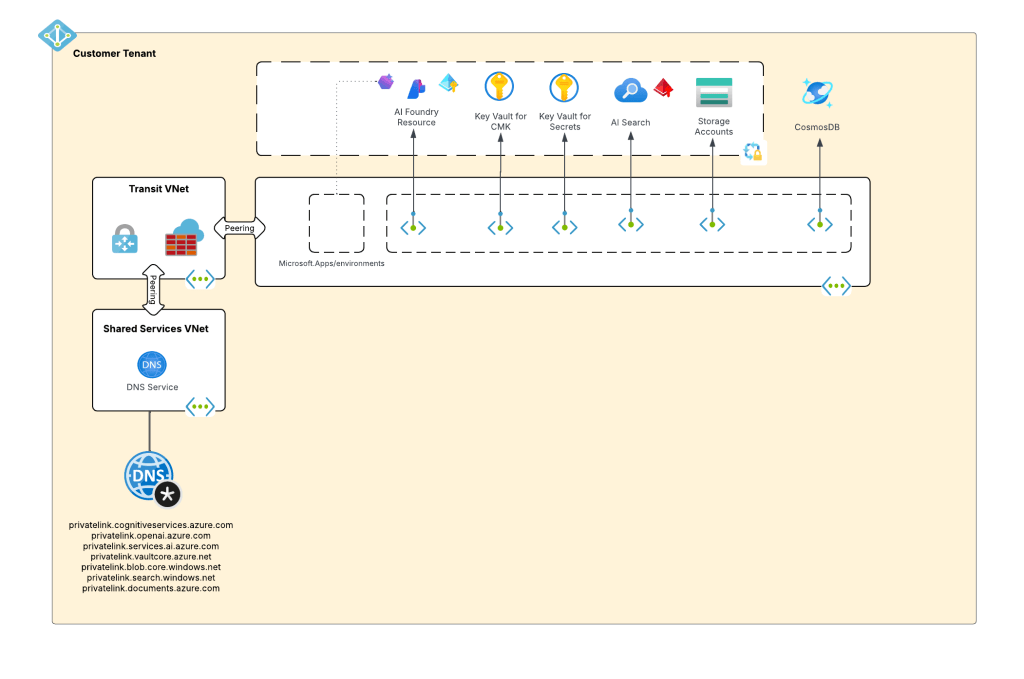
The Foundry architecture is quite simple. I deployed a single instance of Foundry configured to support standard agents and using a VNet injection model. A subnet is delegated in a different spoke to support the agent vnet injection and supporting Private Endpoints are deployed to a separate subnet in that same virtual network.

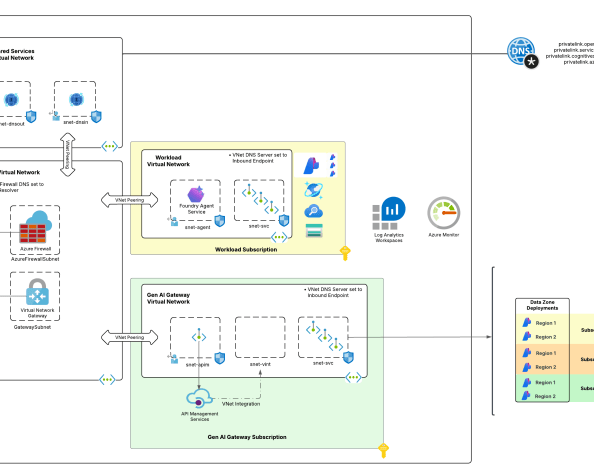
The whole setup looks something like the below:

Lab setup

Setting up the AI Gateway

At this point you should have a good understanding of what I’m working with. Let’s talk button pushing. The first thing you’ll need to do is get your AI Gateway setup. To setup the APIM instance I using the Terraform AzureRM and AzApi providers. Like I mentioned above, it was setup as a v2 with the standard SKU public network access disabled, inbound access restricted to private endpoints and outbound access configured for VNet integration. You can find the whole of the code in my lab repository if you’re curious. For the purposes of the post, I’ll only be including the relevant snippets.

One critical thing to take note of is whatever networking model you choose for APIM for this integration, you need to use a certificate issued by a trusted public CA (certificate authority). This is required because at the date of this post, the agent service does not support certificates issued by private CAs. Reason being, you have no ability to inject that root and intermediate certs into the trusted store of the agent compute. For this lab I used the Terraform Acme and Cloudflare providers. It’s actually not bad at all to have a fresh cert provisioned directly as part of the pipeline for labbing and the like, and best part is it’s free for cheap people like myself. There is a sample of that code in the repo.

As I mentioned in my last post, the BYO AI Gateway integration with Foundry supports static or dynamic setup. In the static model you define the models directly in the connection metadata you want to be made available to the connection (see my last post for an example). In the dynamic model the models can be fetched by an API call to the management.azure.com API. This latter option requires additional operations be defined in the API such as what you see below.

## Create an operation to support getting a specific deployment by name when using the Foundry APIM connection
##
resource "azurerm_api_management_api_operation" "apim_operation_openai_original_get_deployment_by_name" {
depends_on = [
azurerm_api_management_api.openai_original
]
operation_id = "get-deployment-by-name"
api_name = azurerm_api_management_api.openai_original.name
api_management_name = azurerm_api_management.apim.name
resource_group_name = azurerm_resource_group.rg_ai_gateway.name
display_name = "Get Deployment by Name"
method = "GET"
url_template = "/deployments/{deploymentName}"
template_parameter {
name = "deploymentName"
required = true
type = "string"
}
}
## Create an operation to support enumerating deployments when using the Foundry APIM connection
##
resource "azurerm_api_management_api_operation" "apim_operation_openai_original_list_deployments_by_name" {
depends_on = [
azurerm_api_management_api_operation_policy.apim_policy_openai_original_get_deployment_by_name
]
operation_id = "list-deployments"
api_name = azurerm_api_management_api.openai_original.name
api_management_name = azurerm_api_management.apim.name
resource_group_name = azurerm_resource_group.rg_ai_gateway.name
display_name = "List Deployments"
method = "GET"
url_template = "/deployments"
}

You then define a policy for that operation to configure it to call the correct endpoint via the ARM API like below. Notice I used the authentication-managed-identity policy snippet to use the APIM managed identity to call the Foundry resource to fetch deployment information. If you’re sharing the API across backends, make sure all backends have all the same models deployed. If not, you’ll need to incorporate some additional logic to hit the backend for each pool to ensure you don’t return models that don’t exist in a specific backend. This will require your APIM instance managed identity to have at least the Azure RBAC Reader role over the Foundry resources.

## Create an policy for the get deployment by name operation to route to the Foundry APIM connection
##
resource "azurerm_api_management_api_operation_policy" "apim_policy_openai_original_get_deployment_by_name" {
depends_on = [
azurerm_api_management_api_operation.apim_operation_openai_original_get_deployment_by_name,
]
api_name = azurerm_api_management_api.openai_original.name
operation_id = azurerm_api_management_api_operation.apim_operation_openai_original_get_deployment_by_name.operation_id
api_management_name = azurerm_api_management.apim.name
resource_group_name = azurerm_resource_group.rg_ai_gateway.name
xml_content = <<XML
<policies>
<inbound>
<authentication-managed-identity resource="https://management.azure.com/" />
<rewrite-uri template="/deployments/{deploymentName}?api-version=${local.ai_services_arm_api_version}" copy-unmatched-params="false" />
<!--Specify a Foundry deployment that has the models deployed -->
<set-backend-service base-url="https://management.azure.com${azurerm_cognitive_account.ai_foundry_accounts[keys(local.ai_foundry_regions)[0]].id}" />
</inbound>
<backend>
<base />
</backend>
<outbound>
<base />
</outbound>
<on-error>
<base />
</on-error>
</policies>
XML
}
## Create an policy for the list deployments operation to route to the Foundry APIM connection
##
resource "azurerm_api_management_api_operation_policy" "apim_policy_openai_original_list_deployments_by_name" {
depends_on = [
azurerm_api_management_api_operation.apim_operation_openai_original_list_deployments_by_name
]
api_name = azurerm_api_management_api.openai_original.name
operation_id = azurerm_api_management_api_operation.apim_operation_openai_original_list_deployments_by_name.operation_id
api_management_name = azurerm_api_management.apim.name
resource_group_name = azurerm_resource_group.rg_ai_gateway.name
xml_content = <<XML
<policies>
<inbound>
<authentication-managed-identity resource="https://management.azure.com/" />
<rewrite-uri template="/deployments?api-version=${local.ai_services_arm_api_version}" copy-unmatched-params="false" />
<!--Azure Resource Manager-->
<set-backend-service base-url="https://management.azure.com${azurerm_cognitive_account.ai_foundry_accounts[keys(local.ai_foundry_regions)[0]].id}" />
</inbound>
<backend>
<base />
</backend>
<outbound>
<base />
</outbound>
<on-error>
<base />
</on-error>
</policies>
XML
}

In my lab, I defined these two operations for both the classic (OpenAI Inferencing and Authoring API) and v1 API. This allowed me to mess around with both static and dynamic APIM and Model Gateway connections.

Once you get Foundry hooked into APIM using this integration (and I’ll cover the Foundry part in the next post), you get access to some pretty neat information in the headers. As of the date of this post, these will be some of the headers you’ll see. You’ll notice my x-forwarded-for path includes my endpoint’s IP address as well as the IP of the container running in the managed Microsoft-compute environment (notice that is using CGNAT IP space which clears up why CGNAT is unsupported to be used by the customer when using agent with VNet injection). The x-ms-foundry-project-id is the unique project GUID of the project the agent was created under (could be useful for throttling and logging). The x-ms-foundry-agent-id is the unique agent identifier of the specific revision of the agent (again useful for logging and throttling). The x-ms-client-request-id is actually the Foundry project managed identity, not the agent identity which is important to note. If you want to use Entra for the BYO AI Gateway APIM connection, you’re going to be limited to this or API key. There is a connection authentication option to use the agent’s actual Entra ID Agent Identity, but I’ve only used that for the MCP Server feature of Foundry, never for this so I’m not sure if it works or is supported.

{
"Authorization": "Bearer REDACTED",
"Content-Length": "474",
"Content-Type": "application/json; charset=utf-8",
"Host": "apimeusXXXXX.azure-api.net",
"Max-Forwards": "10",
"Correlation-Context": "leaf_customer_span_id=173926958944XXXXXX",
"traceparent": "00-62ff160923b2c1724242c037be40e7cb-4f1b402461aXXXXX-01",
"X-Request-ID": "96534855-a35a-481a-886d-XXXXXXXXXXXX",
"x-ms-client-request-id": "76ddf586-260b-4e37-8f4c-XXXXXXXXXXXX",
"openai-project": "sampleproject1",
"x-ms-foundry-agent-id": "TestAgent-ai-gateway-static:5",
"x-ms-foundry-model-id": "conn1apimgwstaticopenai/gpt-4o",
"x-ms-foundry-project-id": "455cbebf-a0bc-425e-99f6-XXXXXXXXXXX",
"x-forwarded-for": "100.64.9.87;10.0.9.213:10095",
"x-envoy-external-address": "100.64.9.87",
"x-envoy-expected-rq-timeout-ms": "1800000",
"x-k8se-app-name": "j8820ec0658b4aeXXXXX-dataproxy--vuww7ja",
"x-k8se-app-namespace": "wonderfulsky-a2fXXXXX",
"x-k8se-protocol": "http1",
"x-k8se-app-kind": "web",
"x-ms-containerapp-name": "j8820ec0658b4aeXXXXX-dataproxy",
"x-ms-containerapp-revision-name": "j8820ec0658b4aeXXXXX-dataproxy--vuww7ja",
"x-arr-ssl": "2048|256|CN=Microsoft Azure RSA TLS Issuing CA 04;O=Microsoft Corporation;C=US|CN=*.azure-api.net;O=Microsoft Corporation;L=Redmond;S=WA;C=US",
"x-forwarded-proto": "https",
"x-forwarded-path": "/v1/https/apimeusXXXXX.azure-api.net/openai/deployments/gpt-4o/chat/completions?api-version=2025-03-01-preview",
"X-ARR-LOG-ID": "76ddf586-260b-4e37-8f4c-XXXXXXXXXXXX",
"CLIENT-IP": "10.0.9.213:10095",
"DISGUISED-HOST": "apimeusXXXXX.azure-api.net",
"X-SITE-DEPLOYMENT-ID": "apimwebappXXXXXX6OTVsZqxOcTZLpubQ9iNmzQ8kzMOmkEhw",
"WAS-DEFAULT-HOSTNAME": "apimwebappXXXXXX6otvszqxoctzlpubq9inmzq8kzmomkehw.apimaseXXXXXXX6otvszqxoctz.appserviceenvironment.net",
"X-AppService-Proto": "https",
"X-Forwarded-TlsVersion": "1.3",
"X-Original-URL": "/openai/deployments/gpt-4o/chat/completions?api-version=2025-03-01-preview",
"X-WAWS-Unencoded-URL": "/openai/deployments/gpt-4o/chat/completions?api-version=2025-03-01-preview",
"X-Azure-JA4-Fingerprint": "t13d1113h2_d3731e0d3936_XXXXXXXXXXXX"
}

Using the information above, I crafted the policy below. It’s nothing fancy, but shows an example of throttling based on the project id and logging the agent identifier via the token metrics policy to potentially make chargeback more granular. Either way, these additional headers give you more to play with.

## Create an API Management policy for the OpenAI v1 API
##
resource "azurerm_api_management_api_policy" "apim_policy_openai_v1" {
depends_on = [
azurerm_api_management_api.openai_v1
]
api_name = azurerm_api_management_api.openai_v1.name
api_management_name = azurerm_api_management.apim.name
resource_group_name = azurerm_resource_group.rg_ai_gateway.name
xml_content = <<XML
<policies>
<inbound>
<base />
<!-- Evaluate the JWT and ensure it was issued by the right Entra ID tenant -->
<validate-jwt header-name="Authorization" failed-validation-httpcode="403" failed-validation-error-message="Forbidden">
<openid-config url="https://login.microsoftonline.com/${var.entra_id_tenant_id}/v2.0/.well-known/openid-configuration" />
<issuers>
<issuer>https://sts.windows.net/${var.entra_id_tenant_id}/</issuer>
</issuers>
</validate-jwt>
<!-- Extract the Entra ID application id from the JWT -->
<set-variable name="appId" value="@(context.Request.Headers.GetValueOrDefault("Authorization",string.Empty).Split(' ').Last().AsJwt().Claims.GetValueOrDefault("appid", "none"))" />
<!-- Extract the Agent ID from the x-ms-foundry-agent-id header. This is only relevant for Foundry native agents -->
<set-variable name="agentId" value="@(context.Request.Headers.GetValueOrDefault("x-ms-foundry-agent-id", "none"))" />
<!-- Extract the project GUID from the x-ms-foundry-project-id header. This is only relevant for Foundry native agents -->
<set-variable name="projectId" value="@(context.Request.Headers.GetValueOrDefault("x-ms-foundry-project-id", "none"))" />
<!-- Extract the Foundry Project name from the "openai-project" header. This is only relevant for Foundry native agents -->
<set-variable name="projectName" value="@(context.Request.Headers.GetValueOrDefault("openai-project", "none"))" />
<!-- Extract the deployment name from the uri path -->
<set-variable name="uriPath" value="@(context.Request.OriginalUrl.Path)" />
<set-variable name="deploymentName" value="@(System.Text.RegularExpressions.Regex.Match((string)context.Variables["uriPath"], "/deployments/([^/]+)").Groups[1].Value)" />
<!-- Set the X-Entra-App-ID header to the Entra ID application ID from the JWT -->
<set-header name="X-Entra-App-ID" exists-action="override">
<value>@(context.Variables.GetValueOrDefault<string>("appId"))</value>
</set-header>
<set-header name="X-Foundry-Agent-ID" exists-action="override">
<value>@(context.Variables.GetValueOrDefault<string>("agentId"))</value>
</set-header>
<set-header name="X-Foundry-Project-Name" exists-action="override">
<value>@(context.Variables.GetValueOrDefault<string>("projectName"))</value>
</set-header>
<set-header name="X-Foundry-Project-ID" exists-action="override">
<value>@(context.Variables.GetValueOrDefault<string>("projectId"))</value>
</set-header>
<choose>
<!-- If the request isn't from a Foundry native agent and is instead an application or external agent -->
<when condition="@(context.Variables.GetValueOrDefault<string>("agentId") == "none" && context.Variables.GetValueOrDefault<string>("projectId") == "none")">
<!-- Throttle token usage based on the appid -->
<llm-token-limit counter-key="@(context.Variables.GetValueOrDefault<string>("appId","none"))" estimate-prompt-tokens="true" tokens-per-minute="10000" remaining-tokens-header-name="x-apim-remaining-token" tokens-consumed-header-name="x-apim-tokens-consumed" />
<!-- Emit token metrics to Application Insights -->
<llm-emit-token-metric namespace="openai-metrics">
<dimension name="model" value="@(context.Variables.GetValueOrDefault<string>("deploymentName","None"))" />
<dimension name="client_ip" value="@(context.Request.IpAddress)" />
<dimension name="appId" value="@(context.Variables.GetValueOrDefault<string>("appId","00000000-0000-0000-0000-000000000000"))" />
</llm-emit-token-metric>
</when>
<!-- If the request is from a Foundry native agent -->
<otherwise>
<!-- Throttle token usage based on the agentId -->
<llm-token-limit counter-key="@($"{context.Variables.GetValueOrDefault<string>("projectId")}_{context.Variables.GetValueOrDefault<string>("agentId")}")" estimate-prompt-tokens="true" tokens-per-minute="10000" remaining-tokens-header-name="x-apim-remaining-token" tokens-consumed-header-name="x-apim-tokens-consumed" />
<!-- Emit token metrics to Application Insights -->
<llm-emit-token-metric namespace="llm-metrics">
<dimension name="model" value="@(context.Variables.GetValueOrDefault<string>("deploymentName","None"))" />
<dimension name="client_ip" value="@(context.Request.IpAddress)" />
<dimension name="agentId" value="@(context.Variables.GetValueOrDefault<string>("agentId","00000000-0000-0000-0000-000000000000"))" />
<dimension name="projectId" value="@(context.Variables.GetValueOrDefault<string>("projectId","00000000-0000-0000-0000-000000000000"))" />
</llm-emit-token-metric>
</otherwise>
</choose>
<choose>
<!-- If the request is from a Foundry native agent -->
<when condition="@(context.Variables.GetValueOrDefault<string>("agentId") != "none" && context.Variables.GetValueOrDefault<string>("projectId") != "none")">
<authentication-managed-identity resource="https://cognitiveservices.azure.com/" />
</when>
</choose>
<set-backend-service backend-id="${module.backend_pool_aifoundry_instances_openai_v1.name}" />
</inbound>
<backend>
<forward-request />
</backend>
<outbound>
<base />
</outbound>
</policies>
XML
}

Summing it up

I was going to go crazy and incorporate the Foundry setup and testing into this post as well but decided against it. There is a point when the brain melts and if mine is already melting, yours may be as well. I’ll walk through those pieces in the next post. You have a few main takeaways. First, let’s review the high level setup of your AI Gateway.

  1. Create your backends that point to the Microsoft Foundry endpoints.
  2. Import the relevant API. If at all possible, go with the v1 API. It will support access to other models besides OpenAI models and additional features.
  3. Add the GET and LIST operations and define the relevant policies if you’re planning on supporting dynamic models vs static. Dynamic seems to make more sense to me, but I haven’t seen enough orgs adopt this yet to form a good opinion.
  4. Craft your custom policies. I highly recommend you regularly review the headers being passed. They could change and even better data may be added to them.

Next, let’s talk about key gotchas.

  1. The certificate used on your AI Gateway MUST be issued from a well-known public CA in order for it to be trusted by the agent running in Foundry comptue. If it isn’t, this integration will fail and may not fail in a way that is obvious the TLS session failure between the agent compute and the AI Gateway is to blame.
  2. If you’re using APIM, think about the Private Endpoint and VNet integration pattern if you’re capable of using v2. If it won’t work for you, or you’re still using the classic SKU, if you want to support managed VNet you’ll need to incorporate an Application Gateway in front of your AI Gateway likely. This means more operational overhead and costs.
  3. While every Foundry Agent (v2) is given an Entra ID Agent Identity created from the Entra ID Agent Blueprint associated to the project, when using the ProjectManagedIdentity authentication type, you’ll see the project’s managed identity in the logs. If you’re able to test with the agent identity authentication type, let me know.
  4. Really noodle on how you can use the project headers for throttling and possibly chargeback. It makes a ton of sense if you’re aligning your Foundry account and project model correctly.

See you next post!

Microsoft Foundry – BYO AI Gateway – Part 2

Microsoft Foundry – BYO AI Gateway – Part 2

This is part of my series on Microsoft Foundry:

  1. Microsoft Foundry’s Evolution
  2. Microsoft Foundry BYO AI Gateway (BYO Model) – Part 1
  3. Microsoft Foundry BYO AI Gateway (BYO Model) – Part 2
  4. Microsoft Foundry BYO AI Gateway (BYO Model) – Part 3
  5. Microsoft Foundry Publishing Agent to Microsoft Teams – Part 1 – Overview
  6. Microsoft Foundry Publishing Agent to Microsoft Teams – Part 2 – The GUI Experience
  7. Microsoft Foundry Publishing Agent to Microsoft Teams – Part 3 – The programmatic experience

Hello again! Today I’m going to continue my series on Microsoft Foundry’s new support for the BYO AI Gateway. In my past few posts I’ve walked through the evolution of Foundry and covered at a high level what an AI Gateway is and the problem this feature solves. In this post we’re gonna get down and dirty with the technical details on setting this up within Microsoft Foundry. I’ll do a follow-up post to focus on the APIM (API Management) configuration. Grab your coffee and put on your thinking music (for me that is some Blink and Third Eye Blind. Yeah, I’m old.).

Let’s get to it!

Current State Architecture

My customer base is primarily in the regulated industry so most of my customers are still at the experimentation state with the Foundry Agent Service. Given these customers have strict security requirements they are largely using the agent service with the standard agent configuration. In this configuration the outbound traffic (subsets of it, but that is a much larger conversation) can be tunneled through the customer virtual network for centralized logging, mediation, and facilitating access to private resources (again, with limitations today) through what the product group calls VNet injection but I’d say is more closely described as VNet integration via a delegated subnet. Threads (conversations in v2 agents) and agent metadata are stored in a Cosmos DB, vector stores created by an agent from tools such as the File Search tool are stored in AI Search, and files uploaded to the Foundry resource by users are stored in a Storage Account. These resources are all provisioned by the customer into the customer subscription and fully managed by the customer (RBAC, encryption, HA settings, etc). Private Endpoints for each resource are created within the customer’s virtual network and made accessible from the agent delegated subnet. The whole environment looks similar to what you see below.

Foundry Agent Service – Standard Agent Configuration with VNet Injection

As I covered in my last post, as of the date of this post Foundry native agents can only consume models deployed to their own Foundry resource. This creates an issue for customers wanting the governance of the models, visibility into the use of the LLMs, and improvements security posture and operational optimizations an AI Gateway can provide when it sits between the agent and the model. For now, customers are working around doing this using what I refer to as external agents. External agents run outside of Microsoft Foundry on customer-managed compute like an on-premises Kubernetes cluster or an Azure Function deployed to the customer subscription. The downfall of this direction is these external agents live on compute customers have to manage and can’t access many of the tools available to Foundry-native agents. This is the problem the BYO AI Gateway feature is attempting to fix.

No BYO Gateway vs BYO Gateway

Foundry resource architecture

Here is where the new connection type introduced in Foundry comes to the rescue. Before I dive into the details of that, I think it’s helpful to level set a bit on the resource hierarchy within Foundry. At the top is the top-level Azure resource referred to as the Foundry service which under the hood is a Cognitive Services account. The relevant resources for this discussion are below the account resource and are projects, deployments, and connections. Projects serve a few purposes with two of them being logical boundaries around connections (at the management plane) and agents (at the data plane) provisioned under the projects. Deployments of models (such as GPT-5) are children of the account and are made available to all projects within the account. The account can also have connections objects which can be shared across projects.

Relevant resource hierarchy

For the purposes of this discussion, I’m going to focus on the connection objects. Connection objects can be created at the account level and project level as discussed above. In the standard agent configuration, you’ll create a number of different connections during setup including connections to Cosmos, AI Search, and Azure Storage. Additional common connections could be to an App Insights instance for tracing or a Grounding With Bing Search resource to use with the Grounding with Bing tool. Connection objects will contain some type of pointer, like a URI and a credential. That credential is usually API Key, some Entra ID-based authentication mechanism, or general OAuth.

Connections are created at the account level when the Foundry account itself needs to access them. This could be for the usage of Content Understanding, to a Key Vault for storing connection secrets (API keys) in a customer subscription, an an App Insights instance used for tracing. From what I’ve observed, you will create connections at the account level if they need to be shared across all projects OR they’re used by the Foundry resource in general vs some type of project construct. Connections used by projects can also be created at the project level. When you provision a standard agent for example, you’ll create connection objects to the Cosmos DB, Storage Account, and AI Search resources mentioned above. The new category of connections for this post will be created at the project level. I’d had mixed behavior with how effectively connection objects at the account can be used downstream by the projects.

APIM and Model Gateway Connections

The BYO AI Gateway feature uses two new types of connection categories: ApiManagement and ModelGateway. These objects are the glue that allow the Foundry native agents to route requests for models through an AI Gateway. When we’re connecting to an APIM instance, you should ideally use the ApiManagement category and when you’re connecting to a third-party category you’ll use the ModelGateway category.

As of the date of this blog post, these connection objects have the following schema (relevant properties to this discussion only):

name: The name of the connection (needs to be less than 60 characters in my testing)
properties: {
category: ApiManagement or ModelGateway
target: The URI you want the agent to connect to
authType: For ApiManagement this can be ApiKey or ProjectManagedIdentity
credentials: This will be populated with the value of the API key if using that authType
isSharedToAll: true or false if you want this shared across all projects
# ApiManagement category with static models
metadata: {
deploymentInPath: true or false
inferenceAPIVersion: API version used for inferencing (not used if using OpenAI v1 API)
# Models discussed in detail below
models: "[{\"name\":\"gpt-4o\",\"properties\":{\"model\":{\"format\":\"OpenAI\",\"name\":\"gpt-4o\",\"version\":\"2024-08-06\"}}}]"
}
# ApiManagement category with dynamic discovery
metadata: {
deploymentAPIVersion: ARM API version for CognitiveServices/accounts/deployments API calls
deploymentInPath: true or false
inferenceAPIVersion: API version used for inferencing (not used if using OpenAI v1 API)
}
# ModelGateway category with static models
metadata: {
deploymentInPath: true or false
inferenceAPIVersion: API version used for inferencing (not used if using OpenAI v1 API)
# Models discussed in detail below
models: "[{\"name\":\"gpt-4o\",\"properties\":{\"model\":{\"format\":\"OpenAI\",\"name\":\"gpt-4o\",\"version\":\"2024-08-06\"}}}]"
}
# ModelGateway category with dynamic models
metadata: {
deploymentInPath: true or false
inferenceAPIVersion: API version used for inferencing (not used if using OpenAI v1 API)
deploymentAPIVersion: ARM API version for CognitiveServices/accounts/deployments API calls
modelDiscovery: "{\"deploymentProvider\":\"AzureOpenAI\",\"getModelEndpoint\":\"/deployments/{deploymentName}\",\"listModelsEndpoint\":\"/deployments\"}"
}

I’ll walk through each of these properties in as much detail as I’ve been able to glean from them with my testing.

The category property is self-explanatory. You either set to this to ApiManagement (if using APIM) or Model Gateway (if using a third-party AI Gateway like a Kong or LiteLLM).

The target property is the URI you want the agent to try to connect to. As an example, if I create an API on my APIM instance for the v1 OpenAPI named openai-v1 my target would look like “https://myapim.azure-api.net/openai-v1/v1&#8221;. As of the date of this blog post, you MUST use the azure-api-net FQDN for the APIM. If you try to do a custom domain you’ll get an error back telling you that it’s not supported. I have a request into the product group to lift this limitation. I’ll update this if that is done. For third-party model gateway, this property serves the same purpose but can be any valid domain.

The authType property is going to be either ApiKey or ProjectManagedIdentity for an APIM connection. ProjectManagedIdentity will authenticate to the upstream APIM using the agent’s project’s Entra ID managed identity. When using ProjectManagedIdentity you must also specify the audience property and set it to cognitive services.azure.com if connecting to a backend Foundry resource hosting models. For a model gateway connection this will either be ApiKey or OAuth. Details on the OAuth setup can be found in the samples GitHub (I haven’t mucked with it yet). If you’re using the authType of ApiKey you additional need to pass the credentials property which includes a property of key with the API key similar to what you see below.

authType: ApiKey
credentials = {
key = MYAPIKEY
}

I haven’t messed extensively with the isSharedToAll property as of yet. For my use case I set this to false so each project got its own connection object. You may be able to create this object at the account level and set the isSharedToAll property, but I haven’t tested that yet. If you have, def let me know if that works.

Ok, now on to the property that can bring the most pain. Here we have the metadata property. This property is going to the main guts that makes this whole thing work. A few considerations, if doing this with Terraform or REST (can’t speak to Bicep or ARM), each of the properties I’m going to cover are CASE SENSITIVE. If you do the wrong casing, your connection object will not work. When connecting to an APIM or model gateway you can have Foundry either enumerate the models available (called dynamic discovery) or you can provide the exact models you want to expose (called static models).

Let’s first cover static models. Here is an example of me creating a connection to an APIM instance with static models using the authType or ProjectManagedIdentity. One thing to note is in my backend object in my APIM I’m appending /v1 to the backend path vs doing it in this connection object.

{
"id": "/subscriptions/X/resourceGroups/X/providers/Microsoft.CognitiveServices/accounts/X/projects/sampleproject1/connections/conn1apimgwstaticopenai-v1",
"name": "conn1apimgwstaticopenai-v1",
"properties": {
"audience": "https://cognitiveservices.azure.com",
"authType": "ProjectManagedIdentity",
"category": "ApiManagement",
"isSharedToAll": false,
"metadata": {
"deploymentInPath": "false",
"inferenceAPIVersion": null,
"models": "[{\"name\":\"gpt-4o\",\"properties\":{\"model\":{\"format\":\"OpenAI\",\"name\":\"gpt-4o\",\"version\":\"2024-08-06\"}}}]"
},
"target": "https://X.azure-api.net/openai-v1",
}

Since I’m using the v1 Azure OpenAI API, I don’t need to specify an inferenceAPIVersion. If I was using the classic API I’d need to specify the version (such as 2025-04-01-preview). Notice also I have set deploymentInPath to false. When set to true the connection will add the /deployments/deployment_name to the path. For the v1 API this isn’t required. Finally you got the models property. With a static model setup I list out the models I’m exposing to the connection. If you’re using Terraform, you MUST wrap the models in the jsonecode function. If you don’t, it will not work. The static model option is pretty helpful if you want to strictly control exactly what models the project is getting access to.

Let’s now switch over to dynamic discovery. Dynamic discovery requires you define a few additional operations inside of your API. The details can be found in this GitHub repo, but the basics of is you define an operation for a GET on a specific model and a LIST to find all the models available. These operations are management plane operations at the ARM API to retrieve deployment information. Here is an example of a setup with dynamic discovery using an APIM connection.

{
"id": "/subscriptions/X/resourceGroups/X/providers/Microsoft.CognitiveServices/accounts/X/projects/sampleproject1/connections/conn1apimgwdynamicopenai-v1",
"location": null,
"name": "conn1apimgwdynamicopenai-v1",
"properties": {
"audience": "https://cognitiveservices.azure.com",
"authType": "ProjectManagedIdentity",
"category": "ApiManagement",
"group": "AzureAI",
"isSharedToAll": false,
"metadata": {
"deploymentAPIVersion": "2024-10-01",
"deploymentInPath": "false",
"inferenceAPIVersion": null
},
"target": "https://X.azure-api.net/openai-v1",
},
"type": "Microsoft.CognitiveServices/accounts/projects/connections"
}

When doing the dynamic discovery, you’ll see the deploymentAPIVersion property set to the API version for the GET and LIST deployment operations of the ARM REST API. I added these operations into the API after I imported the v1 OpenAI spec. You can see an example in Terraform I put together in my lab repo. Dynamic discovery is a great solution when you want to the developer to have access to any new deployments you may push to the Foundry resources.

I’m not going to run through the ModelGateway connection categories because they will largely emulate what you see above with some minor differences. The official Foundry samples GitHub repo has the gory details. I also have examples in Terraform available in my own repo (if you dare subject yourself to reading my code).

Ok, so now you understand the basics of setting up the connection and what you need to do on the APIM side. For more details on setting up APIM you can reference this official repo.

Summing It Up

Ok, so you now you understand the basic connection object, how to set it up, and how it works. I’m going to cut it here and continue in another post where I’ll dig into the dirty details of how it looks to use this because I don’t want to overload your brain (and mine) with a super long post.

Before I jet I will want to provide some critical resources:

  1. My AMAZING peer Piotr Karpala has put together a repository with examples of this pattern (and some 3rd-party integrations) with Bicep. The stuff in there is gold. He was also my late night buddy helping me work through the quirks of this integration late at night. Couldn’t have gotten it done without him (or at least would have broken many keyboards).
  2. The Product Group’s official samples and explanations of the setup are located here. I’d highly recommending referencing them because they will always have more up to date instructions than my blog.
  3. I’ve put together some Terraform samples for my own purposes which are you welcome to reference, loot for your own means, and laugh at my pathetic coding ability. Check out this one for the Foundry portion and this one for the APIM portion.

And here are your tips for this post:

  1. RTFM. Seriously, read the official documentation. Today, this integration is challenging to put in place. If you try to lone wolf it, let me know how many keyboards end up being thrown through your window.
  2. If you’re coding in Terraform or making REST calls to create these connections, remember CASE SENSITIVITY matters. If you do the wrong case sensitivity, the resource will still create but it won’t work. You’ll get very frustrated trying to troubleshoot it.
  3. If you’re coding in Terraform don’t forget to use the jsonencode function on the models property. If you skip that, the resource will create but shit will not work.
  4. This is only supported for prompt agents today.
  5. Don’t forget this is public preview. So test it, but expect things to change and don’t throw this into production.

In the next post I’ll walk through how you can test the integration, some of the quirks and considerations for identity and authentication, and some of the neat APIM policy you can craft given some of the new information that is sent in the request.

See you next post!