Microsoft Foundry – Publishing Agent to Microsoft Teams – Part 3 – The Programmatic Experience

Microsoft Foundry – Publishing Agent to Microsoft Teams – Part 3 – The Programmatic Experience

This is part of my series on Microsoft Foundry:

  1. Microsoft Foundry’s Evolution
  2. Microsoft Foundry BYO AI Gateway (BYO Model) – Part 1
  3. Microsoft Foundry BYO AI Gateway (BYO Model) – Part 2
  4. Microsoft Foundry BYO AI Gateway (BYO Model) – Part 3
  5. Microsoft Foundry Publishing Agent to Microsoft Teams – Part 1 – Overview
  6. Microsoft Foundry Publishing Agent to Microsoft Teams – Part 2 – The GUI Experience
  7. Microsoft Foundry Publishing Agent to Microsoft Teams – Part 3 – The programmatic experience

And I’m back again with the third post in my series on publishing agents built in the Microsoft Foundry Agent Service to Microsoft Teams. I started the series by walking through the benefits of publishing a Foundry agent to Teams and explained the purpose Bot Services serves today in the flow. In the second post I walked through the GUI experience, the workflow occurring under the hood, and why the GUI experiencing publishing flow won’t work for most customers. For this third post we’re gonna jump down into the weeds and dissect the programmatic approach using raw calls to the Azure REST API.

Let’s get to it!

What used to be required?

Back when I published this initial series way back in the olden days of May 2026, publishing a Foundry agent to Microsoft Teams when the Foundry account was locked down was quite complex. My very smart peer Graeme Foster put together a stellar blog post on the topic. I’m not going to go into deep detail on the old flow because you can grab those details from Graeme’s original post. Instead, we’re going to hit the key challenges of the old method.

As I discussed in my last post, most large enterprises have requirements around controlling and governing inbound traffic to their Azure resources. For resources deployed to Microsoft Foundry, like an model deployment or an agent, that control is exercised through the service firewall native to most all Microsoft PaaS services. The typical configuring is to disable inbound public network access and restrict access through a Private Endpoint. Restricting to a Private Endpoints means the traffic needs to be routed through the customer’s virtual network. With Microsoft Teams traffic, this is not possible today and that traffic can only reach an endpoint with a public IP.

Foundry with inbound public network access denies Teams traffic

We got a problem here right? Teams cannot reach the Private Endpoint in the customer virtual network. The solution around this problem has historically been to funnel that traffic in through a firewall, reverse proxy like Application Gateway, or a publicly exposed API Gateway like API Management by modifying the activity endpoint on the Bot Service resource. Which ingress solution you picked depended on your risk tolerance. It’s unlikely your security team is willing to allow all IP addresses through the firewall or reverse proxy, so you’d probably filter with a firewall rule or WAF (web application firewall) rule. Teams is a multi-tenant service, so you may want to evaluate the headers in the incoming request to check if the incoming header matches your Entra ID tenant ID. While those controls are nice, the real thing you very much want to do is validate the JWT (JSON web token) being passed in the request is from a Bot Service in your Entra ID tenant. Like I mentioned in my last post, Bot Service uses its own STS which uses a common signing certificate for the service holistically (from what I’ve seen) so validating the claims within the JWT is a must as Graeme covers in his post.

Below is an example of an authorization header generated by Bot Services and the x-ms-tenant-id header that would be validated by the customer in the old method.

[
{
"TraceRecords": {
"Authorization": {
"header": {
"alg": "RS256",
"kid": "PNDitLKaGJW-60l42Kz7-4RqwWM",
"x5t": "PNDitLKaGJW-60l42Kz7-4RqwWM",
"typ": "JWT"
},
"payload": {
"serviceurl": "https://smba.trafficmanager.net/amer/6c80de31-d5e4-4029-93e4-XXXXXXXXXXX/",
"nbf": 1788568132,
"exp": 1788571732,
"iss": "https://api.botframework.com",
"aud": "be377583-32aa-4263-b657-7ec426f9f6fc"
}
},
"X-Forwarded-For": "52.112.116.181:46080;10.0.8.4",
"x-ms-tenant-id": "6c80de31-d5e4-4029-93e4-XXXXXXXXXXXX",
}
]

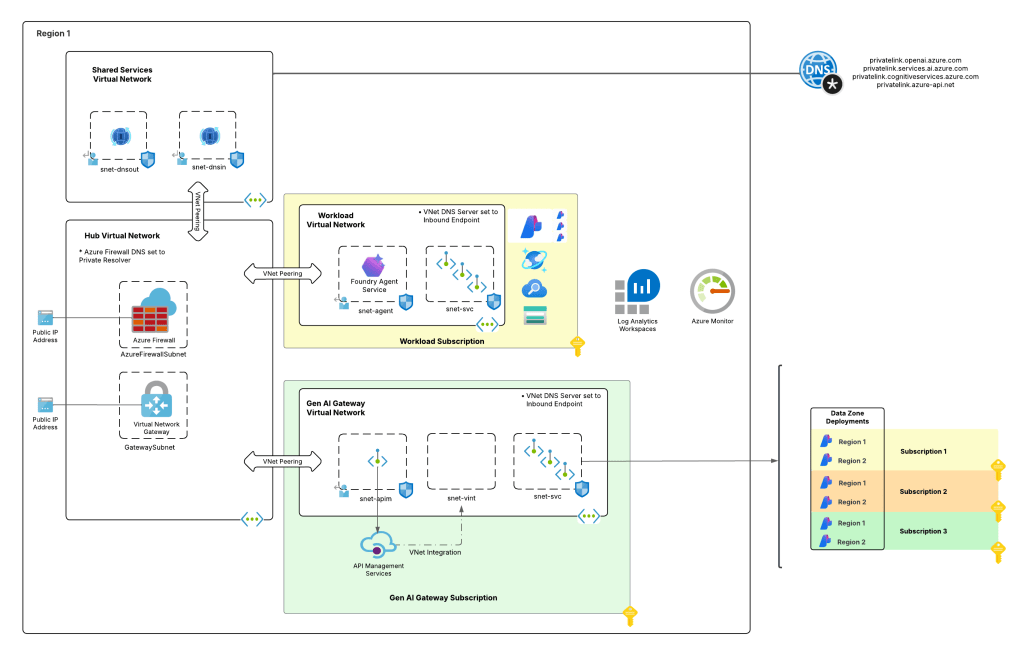
This inevitably led to some variant of the complex architecture seen below for most complex and regulated enterprises. It was a lot of complexity, extra infrastructure, potential bottlenecks, and extra latency. Nothing good.

In addition to this inbound flow, you also needed to account for the outbound flow from the agent back to the Bot Service. As I described in my first post in this series, the reply message to the user is a separate TCP call initiated by the agent to the Bot Services. That outbound flow required you had had a firewall rule allowing traffic to smba.trafficmanager.net.

The flow in the olden days of May 2026

Thankfully, the Product Group felt for us poor central IT folks and have now made this whole flow drastically easier.
What is required now?

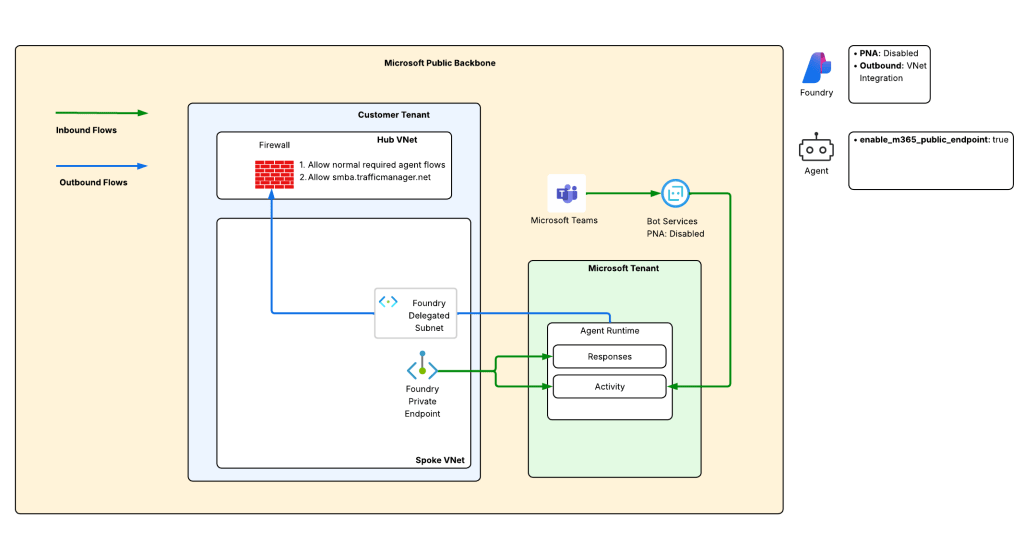
Gone is the overly complex inbound flow and the required outbound flow to smba.trafficmanager.net (at least I don’t see it anymore in my firewall logs). So how is this accomplished? The public documentation gives some good detail on exactly what has changed. In my simple brain terms, Microsoft has created an alternative path to the activity endpoint (other Foundry and agent endpoints are not available through this path) of the Foundry agent that Microsoft Teams can route to. Instead of the customer having to do IP filtering, Microsoft performs it. Instead of the customer having to crack open the JWT issued by the Bot Service, Microsoft does it. This new configuration shifts responsibility for this security controls from the customer to Microsoft. Not too shabby right?

The new flow!

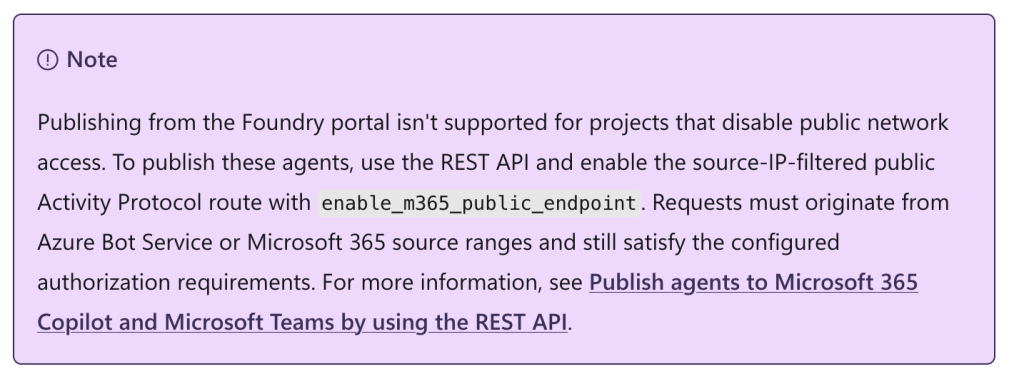
This is accomplished through a new property of the agent called enable_m365_public_endpoint which must be set to true.

Alright, so you’re celebrating a less painful flow now. Let’s bounce over to how we’d enable this programmatically.

Programmatically publishing an agent

The Product Group has done a great job creating a detailed write-up of the necessary Azure ARM REST API calls required to publish an agent programmatically. I’ll be walking through this using a Jupyter Notebook and some simple Python.

Before we can begin publishing we need to deploy an instance of Microsoft Foundry where inbound public network access is restricted and outbound traffic of the agent is controlled (using either VNet integration or managed VNet). The product group has published samples for both these scenarios in this the official samples repository. If you want to make your eyes bleed reading awful Terraform code, I have some samples in my personal repo. You’ll then need to deploy a prompt or hosted agent to Microsoft Foundry. The public documentation has a ton of examples of this, so I’m going to assume you’re successful in making that happen.

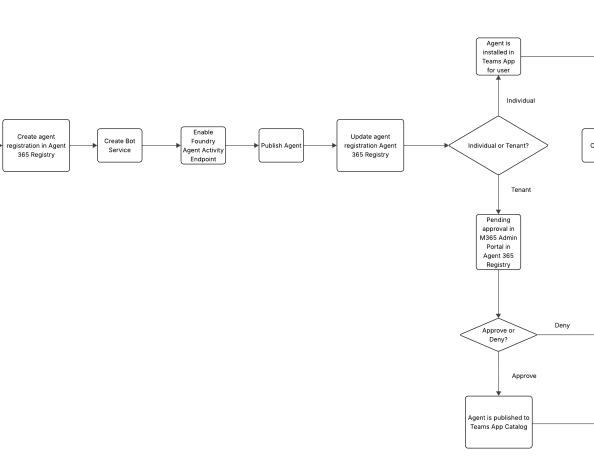
Once you have the environment setup up and agent deployed you can begin the publishing process. As a reminder, here is the general workflow to publish as it stands today.

Foundry agent publishing workflow

The first step in the publishing process (at least for today, this is likely going away in the future) you need to create a Bot Service. As discussed in my first post, the Bot Service will service as the intermediary between Microsoft Teams and the activity endpoint in the agent. Before we can create the Bot Service we need to get the agent’s Entra ID Agent Identity Blueprint’s principal id. We can do this like seen below:

import os
import json
import requests
from dotenv import load_dotenv
# Load environmental variables
load_dotenv(override=True)
# Function that gets the agent object
def get_foundry_agent(account_name: str, project_name: str, agent_name: str, token: str):
"""This function retrieves a Foundry agent by name from a Foundry project
Args:
account_name (str): The name of the Foundry account
project_name (str): The name of the Foundry project
agent_name (str): The name of the Foundry agent to retrieve
token (str): The authentication token to use for the API request
Returns:
dict: The Foundry agent details if found, otherwise None
"""
response = requests.get(
f"https://{account_name}.services.ai.azure.com/api/projects/{project_name}/agents/{agent_name}?api-version=v1",
headers={
"Content-Type": "application/json",
"Authorization": f"Bearer {token}"
}
)
if response.status_code == 200:
return response.json()
else:
logging.error(f"Failed to retrieve agent: {response.status_code} - {response.text}")
return None
# Grab the principal_id of the Entra ID Agent Identity associated with the Foundry Agent
foundry_account_name = os.getenv("FOUNDRY_ACCOUNT_NAME")
project_name = os.getenv("FOUNDRY_PROJECT_NAME")
agent_name = "hosted-azure-expert-agent"
agent = get_foundry_agent(foundry_account_name, project_name, agent_name, user_token.token)
agent_principal_id = agent.get("instance_identity", {}).get("principal_id")
print(f"Foundry Agent Principal ID: {agent_principal_id}")
print(json.dumps(agent, indent=2))

In addition to the principal id of the blueprint, we’ll need the Entra ID tenant ID, and the activity endpoint. The activity endpoint will look something like: https://FOUNDRY_ACCOUNT_NAME.services.ai.azure.com/api/projects/PROJECT_NAME/agents/AGENT_NAME/endpoint/protocols/activityProtocol?api-version=2025-05-15-preview. Once you have those inputs you can create the Bot Service resource. I have a Terraform sample of how to structure the resource located in this repository.

Once the Bot Service resource is created you’re ready for the next step which is going to be enabling the activity endpoint on the agent, setting the authorization scheme for the activity endpoint (which in this case I set to BotServiceTenant since I’ll be publishing for my whole organization), and I set the magical property of enable_m365_public_endpoint to true.

import os
import json
import requests
from dotenv import load_dotenv
# Load environmental variables
load_dotenv(override=True)
# Function that enables the activity protocol for the agent and configures the required Bot Service authorization scheme
def enable_agent_activity_protocol(account_name: str, project_name: str, agent_name: str, token: str):
"""This function enables the activity protocol for a Foundry agent and configures the required Bot Service authorization scheme
Args:
account_name (str): The name of the Foundry account
project_name (str): The name of the Foundry project
agent_name (str): The name of the Foundry agent to retrieve
token (str): The authentication token to use for the API request
Returns:
dict: The updated Foundry agent details if the update was successful, otherwise None
"""
#
body = {
"agent_endpoint": {
"protocol_configuration": {
"responses": {},
"activity": {
"enable_m365_public_endpoint": True
}
},
"authorization_schemes": [
{
# Entra authentication for responses endpoint
"type": "Entra",
},
{
# Allow all users in the Entra ID tenant to call the agent via Teams
"type": "BotServiceTenant"
}
]
}
}
response = requests.patch(
f"https://{account_name}.services.ai.azure.com/api/projects/{project_name}/agents/{agent_name}",
params={"api-version": "2025-11-15-preview"},
headers={
"Content-Type": "application/merge-patch+json",
"Authorization": f"Bearer {token}"
},
json=body
)
if response.status_code == 200:
return response.json()
else:
logging.error(f"Failed to enable agent activity protocol: {response.status_code} - {response.text}")
return None
# Grab the principal_id of the Entra ID Agent Identity associated with the Foundry Agent
foundry_account_name = os.getenv("FOUNDRY_ACCOUNT_NAME")
project_name = os.getenv("FOUNDRY_PROJECT_NAME")
agent_name = "hosted-azure-expert-agent"
enabled_agent = enable_agent_activity_protocol(foundry_account_name, project_name, agent_name, user_token.token)
enabled_agent_guid = enabled_agent.get('versions', {}).get("latest", {}).get("agent_guid", {})
print(f"Enabled Agent GUID: {enabled_agent_guid}")
updated_agent_endpoint = enabled_agent.get('agent_endpoint', {})
print(f"Updated Agent Endpoint: {json.dumps(updated_agent_endpoint, indent=2)}")

Next, I’m ready to publish the agent to Teams. For this I’m going to use the /microsoft365/publish endpoint of my agent resource in the Foundry API. Just like in the last post, I want to populate some information for the Agent 365 Agent Registry entry and the Team Store application.

import os
import json
import requests
from dotenv import load_dotenv
# Load environmental variables
load_dotenv(override=True)
def publish_agent_teams(
# Foundry stuff
agent_name: str,
project_name: str,
account_name: str,
# Bot Service stuff
bot_resource_id: str,
# Teams stuff
agent_display_name: str,
app_version: str,
publish_scope: str,
publish_as_autopilot: bool,
short_description: str,
full_description: str,
developer_name: str,
developer_website_url: str,
privacy_url: str,
terms_of_use_url: str,
token: str
):
"""This function uses the Foundry API to publish a Foundry agent to Microsoft Teams
Args:
agent_name (str): The name of the Foundry agent to publish
project_name (str): The name of the Foundry project
account_name (str): The name of the Foundry account
bot_resource_id (str): The resource ID of the Bot registered in Entra ID for this agent
agent_display_name (str): The display name of the agent to show in Teams
app_version (str): The version of the Teams app to publish
publish_scope (str): The scope to publish the Teams app to, either "Shared" (available to you) or "Tenant (admin must approve)"
publish_as_autopilot (bool): Whether to publish the agent as an Autopilot in Teams
short_description (str): A short description of the agent to display in Teams
full_description (str): A full description of the agent to display in Teams
developer_name (str): The name of the developer or organization that created the agent, to display in Teams
developer_website_url (str): The URL for the developer's website, to display in Teams
privacy_url (str): The URL for the privacy policy for this agent, to display in Teams
terms_of_use_url (str): The URL for the terms of use for this agent, to display in Teams
token (str): The Entra ID access token with the scope of https://ai.azure.com/.default to authenticate the API request
Returns:
dict: The response from the Foundry API if the publish was successful, otherwise None
"""
body = {
"agentDisplayName": agent_display_name,
"botServiceArmId": bot_resource_id,
"publishScope": publish_scope,
"publishAsAutopilot": publish_as_autopilot,
"appVersion": app_version,
"developerName": developer_name,
"developerWebsiteUrl": developer_website_url,
"fullDescription": full_description,
"privacyUrl": privacy_url,
"shortDescription": short_description,
"termsOfUseUrl": terms_of_use_url
}
response = requests.post(
url = f"https://{account_name}.services.ai.azure.com/api/projects/{project_name}/agents/{agent_name}/microsoft365/publish",
params = {
"api-version": "2025-11-15-preview"
},
headers={
"Content-Type": "application/json",
"Accept": "application/json",
"Authorization": f"Bearer {token}",
},
json=body
)
if response.status_code == 200:
print("Agent published successfully! Status code: 200")
else:
logging.error(f"Failed to publish agent: {response.status_code} - {response.text}")
return None
AGENT_DISPLAY_NAME = "FHA - Azure Expert - Teams"
APP_VERSION = "1.0.1"
PUBLISH_SCOPE = "Tenant"
PUBLISH_AS_AUTOPILOT = False
SHORT_DESCRIPTION = "FHA - Azure Expert"
FULL_DESCRIPTION = "FHA - Azure Expert published to Teams from Microsoft Foundry"
DEVELOPER_NAME = "Carl Carlson"
DEVELOPER_WEBSITE_URL = "https://www.example.com"
PRIVACY_URL = "https://www.example.com/privacy"
TERMS_OF_USE_URL = "https://www.example.com/terms"
publish_response = publish_agent_teams(
# Foundry stuff
agent_name = os.getenv("FOUNDRY_AGENT_NAME"),
project_name = os.getenv("FOUNDRY_PROJECT_NAME"),
account_name = os.getenv("FOUNDRY_ACCOUNT_NAME"),
# Bot Service stuff
bot_resource_id = os.getenv("BOT_RESOURCE_ID"),
# Teams stuff
agent_display_name = AGENT_DISPLAY_NAME,
app_version = APP_VERSION,
publish_scope = PUBLISH_SCOPE,
publish_as_autopilot = PUBLISH_AS_AUTOPILOT,
short_description = SHORT_DESCRIPTION,
full_description = FULL_DESCRIPTION,
developer_name = DEVELOPER_NAME,
developer_website_url = DEVELOPER_WEBSITE_URL,
privacy_url = PRIVACY_URL,
terms_of_use_url = TERMS_OF_USE_URL,
token = user_token.token
)

Once publishing is complete, I’ll then need to approve it using the Microsoft 365 Admin Portal as seen in the last post. Poking through the Microsoft Graph APIs, I couldn’t find a specific API endpoint for the Agent Registry to programmatically approve and push it to the organization’s Teams store. The APIs for Agent 365 in general are not great right now. Vasil Michev did a great blog post on the topic. Unfortunately, the state of the APIs are much better months after his post. You can poke around the Agent Registry API which is really badly named the Copilot Package Management API if you want to poke around programmatically. If you can get the https://graph.microsoft.com/beta/copilot/agentRegistrations/{agent_registration_id} endpoint working without it throwing an unauthorized response, please drop a post in the comment and tell me how you did it. You will be my hero.

I’ve put a sample notebook here if you want to muck around with the programmatic publishing process.

Summing it up

So yeah, this new publishing process is just a TAD less painful for us poor central IT folks. It will likely get even easier in the very near future so keep an eye out on the public documentation for updates. Maybe that pesky Bot Service resource gets removed? 😉

So key takeaways:

  1. For most organizations you’ll need to do the programmatic publishing process because it’s unlikely you’re cool with public inbound network access.
  2. The new publishing process removing the complex architecture that used to be required to make this work.
  3. Use the new enable_m365_public_endpoint property when you publish if you value your sanity.
  4. Keep an eye on the Agent 365 API documentation. If the APIs are documented somewhere that I don’t know about, educate me. You’ll be my best buddy!
  5. Keep a close eye on the public documentation for upcoming changes that will further simplify this process.
Microsoft Foundry – Publish Agents to Microsoft Teams – Part 2 – The GUI Experience

Microsoft Foundry – Publish Agents to Microsoft Teams – Part 2 – The GUI Experience

This is part of my series on Microsoft Foundry:

  1. Microsoft Foundry’s Evolution
  2. Microsoft Foundry BYO AI Gateway (BYO Model) – Part 1
  3. Microsoft Foundry BYO AI Gateway (BYO Model) – Part 2
  4. Microsoft Foundry BYO AI Gateway (BYO Model) – Part 3
  5. Microsoft Foundry Publishing Agent to Microsoft Teams – Part 1 – Overview
  6. Microsoft Foundry Publishing Agent to Microsoft Teams – Part 2 – The GUI Experience
  7. Microsoft Foundry Publishing Agent to Microsoft Teams – Part 3 – The programmatic experience

Hello again fellow geeks. While I typically like to stick to one post every few weeks for sanity sake, I want to get this series down and recorded before I get distracted by something else and forget what is fresh in my mind. You know the feeling, right?

This post will continue my series on publishing agents built in the Microsoft Foundry Agent Service to Microsoft Teams. In my last post gave a brief over of the Foundry Agent Service, why you would publish an agent to Teams, and the role of the AI Bot Service in the process (at least as that role stands today). For this post my focus will be walking through the GUI-based experience for publishing an agent, where it works, where it doesn’t work, and the high level workflow of what happens when you hit the publish button.

Where the GUI process works

As it is today? Pretty much no where in my opinion. Sure muck around with it your lab, but any real enterprise environment it ain’t gonna work. Why? Well because of this big blue blurb in the documentation.

Let me dig in a bit into exactly what this blurb means. For any Azure-based PaaS service there is inbound traffic. Inbound traffic is when some endpoint initiates a connection to the Azure PaaS instance. For example, an inbound flow to Foundry might be an endpoint making a connection to a model endpoint to make an inference.

By default, every Microsoft PaaS service has a hostname in a public DNS zone that will resolve to a public IP (exempting some compute-based services where you can disable this) and every PaaS service allows inbound traffic to that endpoint by default. Whether or not traffic is accepted over the public endpoint is typically controlled by a property of the resource named publicNetworkAccess. In the case of Microsoft Foundry this setting is set at the Foundry account level. Below is an example of a Foundry account that has inbound public network access disabled.

{
"id": "/subscriptions/97515654-3331-440d-XXXXXXXXXXXX/resourceGroups/rgmsfcusg5b111/providers/Microsoft.CognitiveServices/accounts/msfcusg5b111",
"name": "msfcusg5b111",
"type": "Microsoft.CognitiveServices/accounts",
"location": "centralus",
"sku": {
"name": "S0"
},
"kind": "AIServices",
"tags": {
...
},
"properties": {
...
"publicNetworkAccess": "Disabled",
}

When the publicNetworkAccess property is set to disabled for Microsoft Foundry, all inbound traffic to the public endpoint will be denied by the service firewall. This means no IP exceptions and no exceptions for service endpoint traffic. It can still support inbound traffic to the public endpoint for its specific set of trusted Azure services. I go into the gory details of how the PaaS service firewall works, what the trusted service exception is, and the other types of exceptions you can use for the service firewall depending on the PaaS service and all that other fun nerd stuff in my series on Network Security Perimeters if you want to dig in. It’s worth a read if you’re a heavy service firewall user today, because Network Security Perimeters on are track to replace that functionality (and they do a WHOLE lot more).

For the purposes of this post, know the service firewall exists and it is the thing denying inbound traffic when we set publicNetworkAccess to disabled. If you attempt to publish a Foundry agent that has publicNetworkAccess (often referred to as PNA) set to disabled, you’ll receive this error:

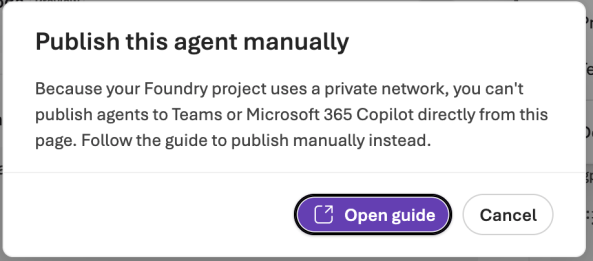
Error when using GUI-based publishing process if PNA is disabled

All of that was a long and overly wordy way of saying the GUI process as it is today will not work for any customer that disabled inbound public network access, which is pretty much every large enterprise customer. Where it may work is for sandbox-like environments where security controls are minimal or if your specific org isn’t subject to strict security controls and inbound PNA isn’t a problem.

How does the GUI process works

You may be saying, “Why should I care if I can’t use it?” Valid question, but for quick proof-of-concepts or sandbox like environments it has a role. It’s also helpful to get a feeling for the overall publishing workflow. While it may be more compact and simple via the GUI process, the programmatic steps don’t differ all too much. There simply are more and you have more configuration options.

Before you run these steps you’ll need to ensure you have the specific set of permissions over Bot Services or be granted the Azure Bot Services Contributor role, Contributor role, or Owner role at the resource group or subscription. Additionally, you’ll require the Foundry User role on the Foundry project.

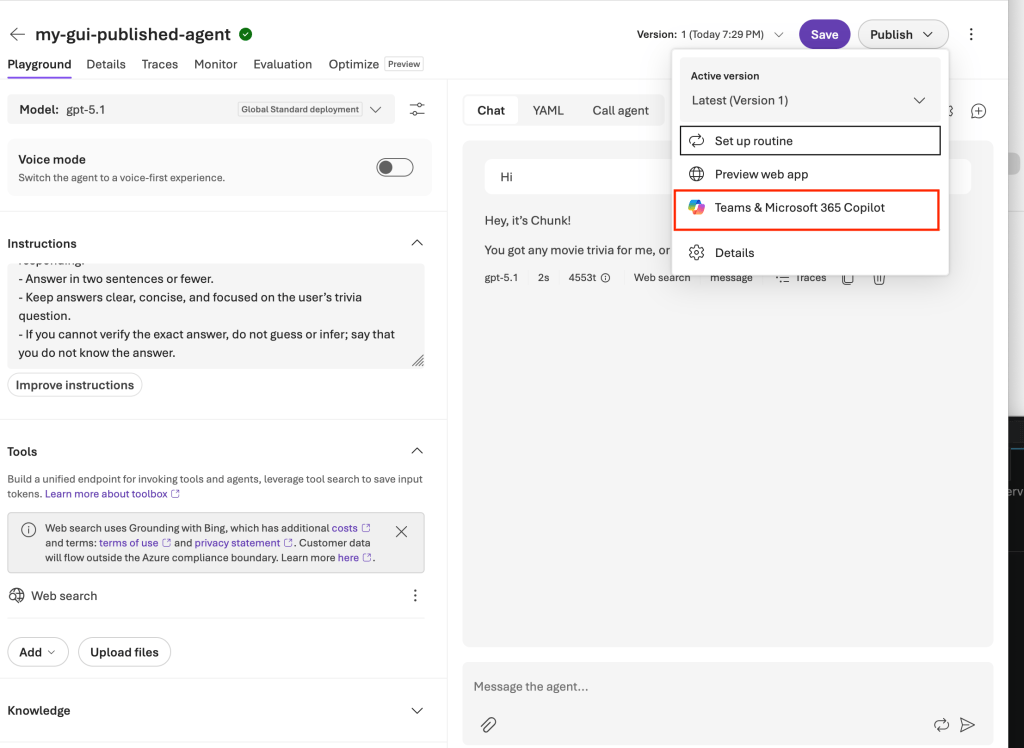
Let’s assume we have a new Foundry account, PNA is enabled, we got the permissions mentioned above, we’ve created a project, and we’ve created a new prompt agent. In the top right hand corner we have pretty white button that says Publish. The option we’re interested in is the Teams & Microsoft 365 Copilot option as seen below highlighted in red.

If you’ve disabled inbound PNA on the Foundry account, you’d see the error I posted above when you click this.

First step in publishing to teams

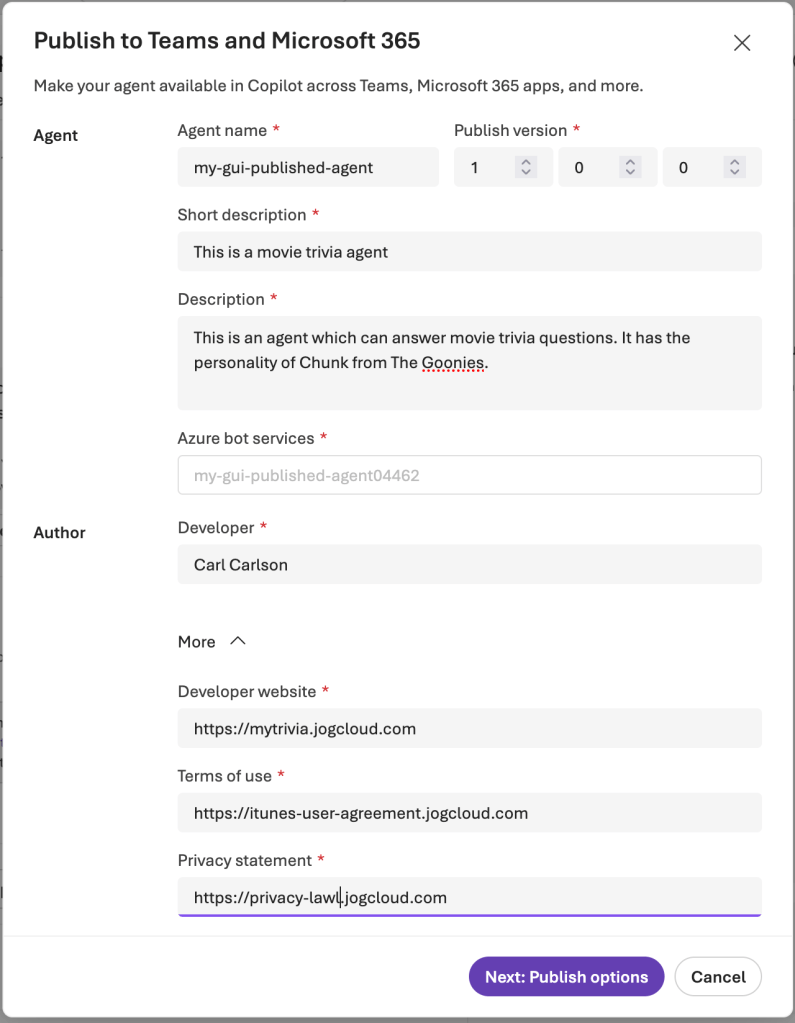
In the next Publish to Teams and Microsoft 365 window you’ll be prompted to enter some information. Many of these inputs will be used to populate properties in the Agent 365 Agent Registry for the agent and will be used for the manifest file that is created for sideloading into Teams or pushed to the organization’s Teams App Store.

Populating information about agent

Notice that the Azure bot services field is populated automatically. This is because unbeknownst to you, clicking the Publish button created a Bot Services resource in the same resource group as the Foundry resource in the background. This is where the requirement for permissions over Bot Services comes into play. This behavior the requirement for a Bot Service resource may be going away (hooray) at some point in the near future.

Bot Service automatically created

You begin to see why this process isn’t very usable for an enterprise. This probably just triggered a crapload of Azure Policies you’ll now have to deal with around naming conventions, missing tags, PNA enabled for the Bot Service, and likely others.

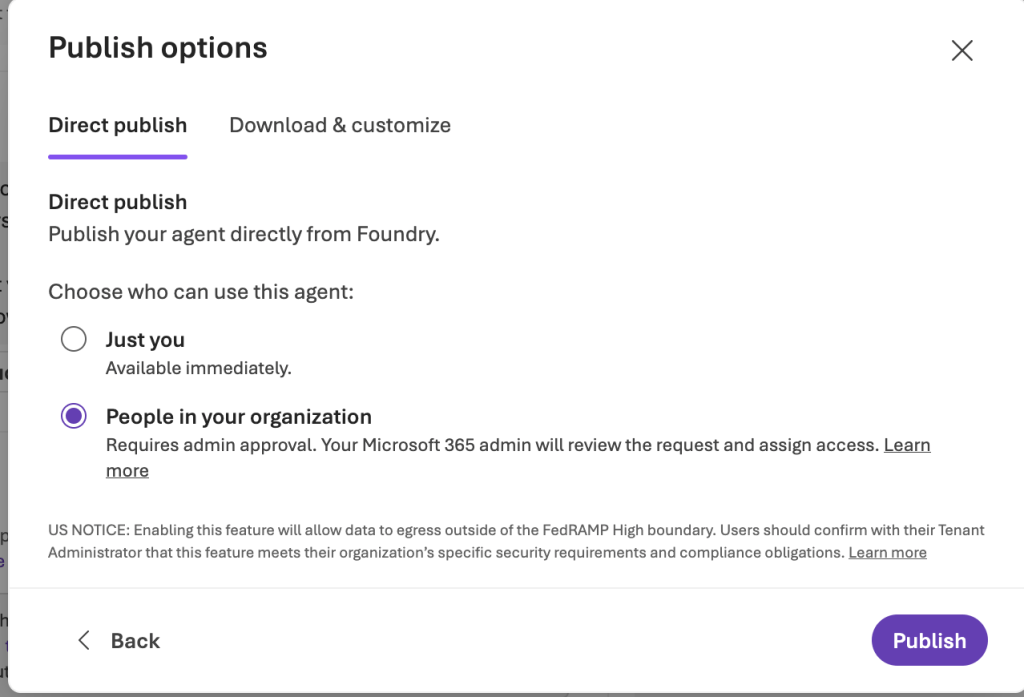
Next, you’ll click on the Next: Publish options button. This will advance you to the Publish options screen. In the Direct Publish section you can choose to install this Teams app for yourself (essentially sideloads it from my understanding) or you can install it for the entire organization. The latter will trigger a request process in the Microsoft 365 Admin Portal in the Agent 365 Agent Registry window as we’ll see a bit later.

The Download & customize section allows you to download a ZIP file with the generated manifest in it if you need to further customize what the workflow has created.

Publish to Teams for just you or the entire org

I complete the workflow by clicking Publish.

Before I jump to the next section, I decided to be nosey and see if I could determine the endpoints being called to process the various API operations. It turns out that there are specific API endpoints behind the Foundry Portal that trigger the backend orchestration of the various API calls we’ll perform when we do it programmatically in the next post. Some of the endpoints of note are:

  1. Press Publish to Teams and Microsoft 365 button
  2. Press Next: Publish Options
  3. Press Publish

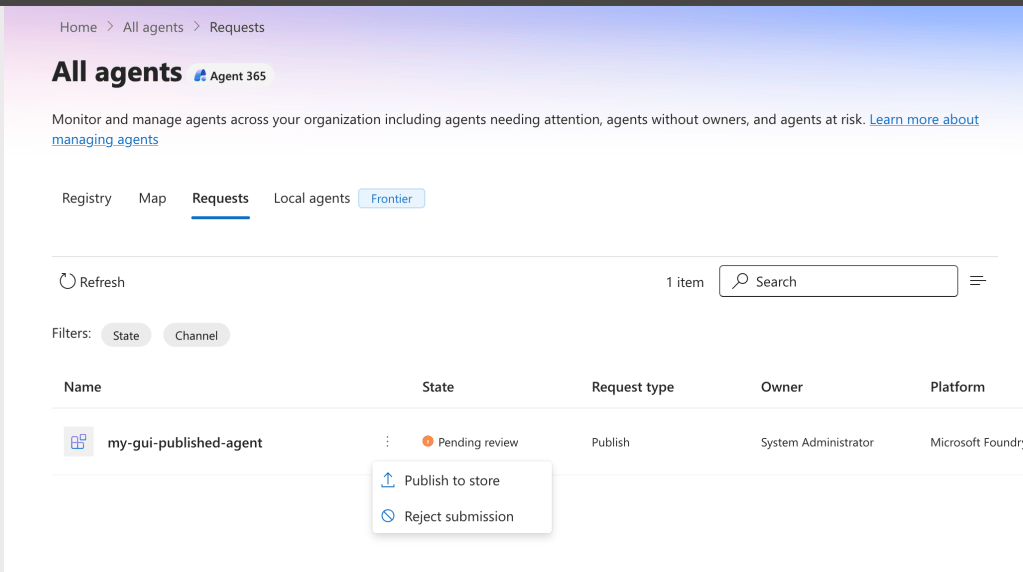
If I pop over to the Microsoft 365 Admin Portal I can see the agent is pending approval in the Agent 365 Agent Registry where I can publish it to the Teams store to make it available to the wider organization I can outright reject it.

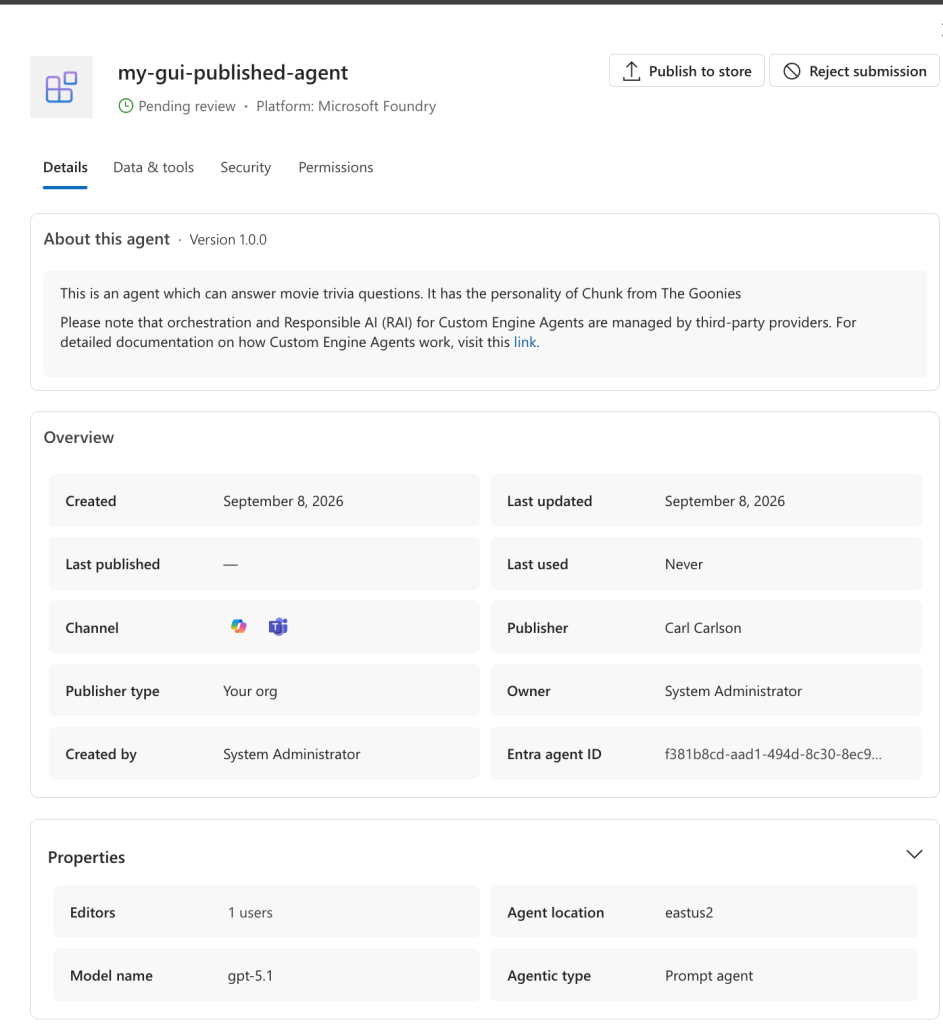
Before approving it, I can explore the information populated for the agent within the agent registry. I can see that the information I populated within the Foundry GUI populated the information in the registry. I also see that it has been assigned an Entra ID Agent Identity created from the Entra ID Agent Identity Blueprint created for the agent. I can also review permissions the agent requires (this will be primarily OAuth permissions via Entra as far as I can tell), any tools it has (haven’t messed with the Agent 365 Tools Registry yet), and information about the security of the agent consolidated from Purview.

Registry details of agent awaiting publishing

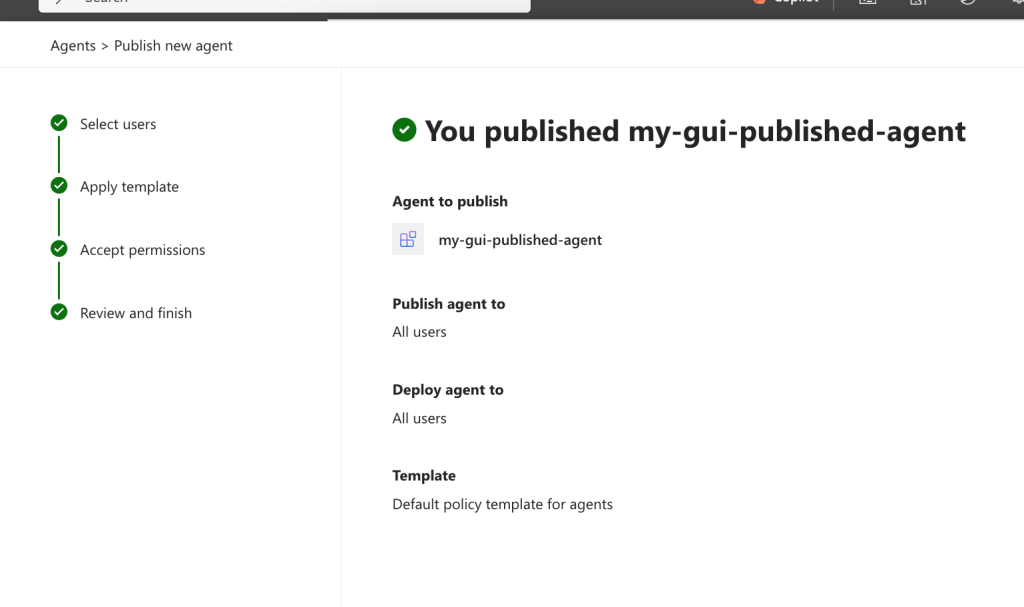
When I hit the Publish to store button I trigger the final process. Here I can choose which users or groups can install the agent in Microsoft Teams and which have the agent pre-installed. I can apply an Agent 365 Policy Template (requires Agent 365 license) which can enforce specific conditional access policies, give it Entra ID access package, and assign custom security attributes (custom security attributes are an underused feature so I’ll dig more into this in future). Lastly, if the agent is requesting any permissions I’m able to accept them or deny the push to the store.

After I run through the workflow and publish it, I get the image below.

Agent publishing is complete

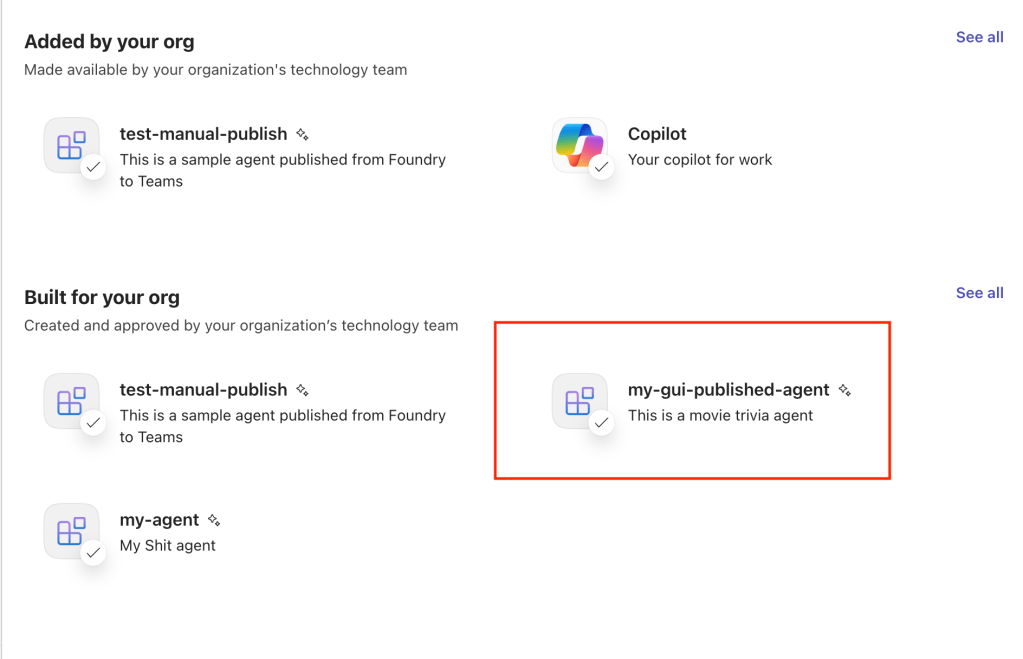
It can take a fair amount of time for the agent to appear for your users in the Teams store for your users to install. Sometimes it’s 15 minutes and sometimes it seems like forever. Typical joys of Teams caching and Microsoft’s seemingly random timers. Eventually the agent will appear as a Teams app your user can add.

Agent available as app in Teams Store

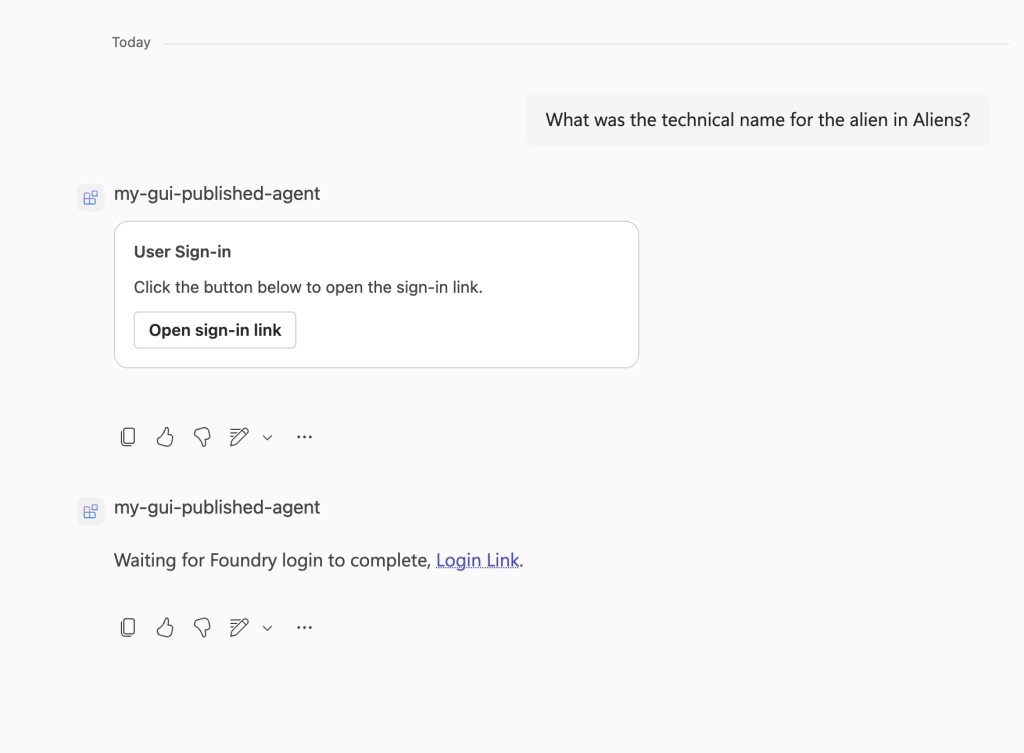
Once the user adds the agent they can begin chatting with it. The first chat they send they’ll need be prompted to sign into Foundry. This sign in is required to validate the user has appropriate permissions to call the agent.

User prompted to sign-in to Foundry

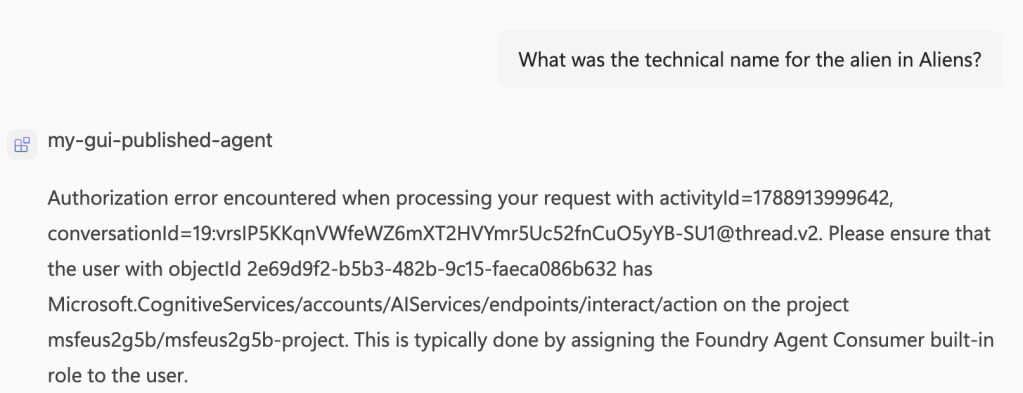
If the user doesn’t have the Foundry Agent Consumer role or equivalent permissions on the Foundry project the agent is in the user will receive an authorization error like the below.

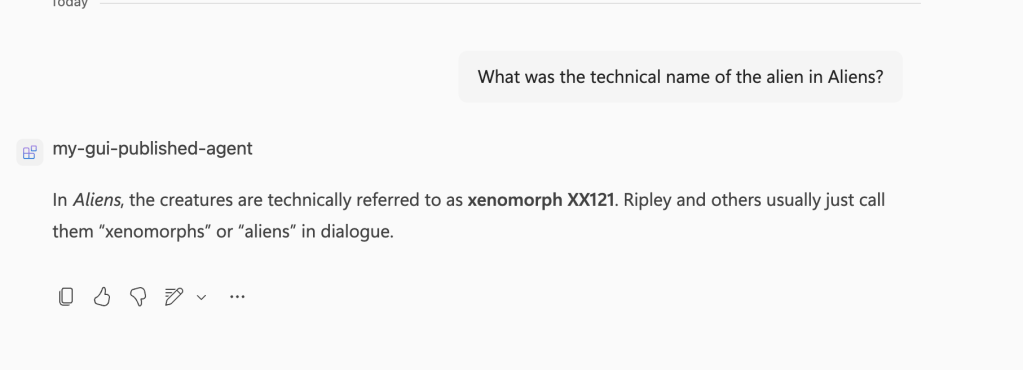
Once user is granted the role on the Foundry project, the user can now converse with the agent!

Authorized user conversing with the agent

At this point you’ve got an agent created in Foundry, which has an entry in the Agent 365 Agent Registry, and has been published as a Teams to the organization’s Teams store for authorized users to consume. Seems so simple right?

The reality

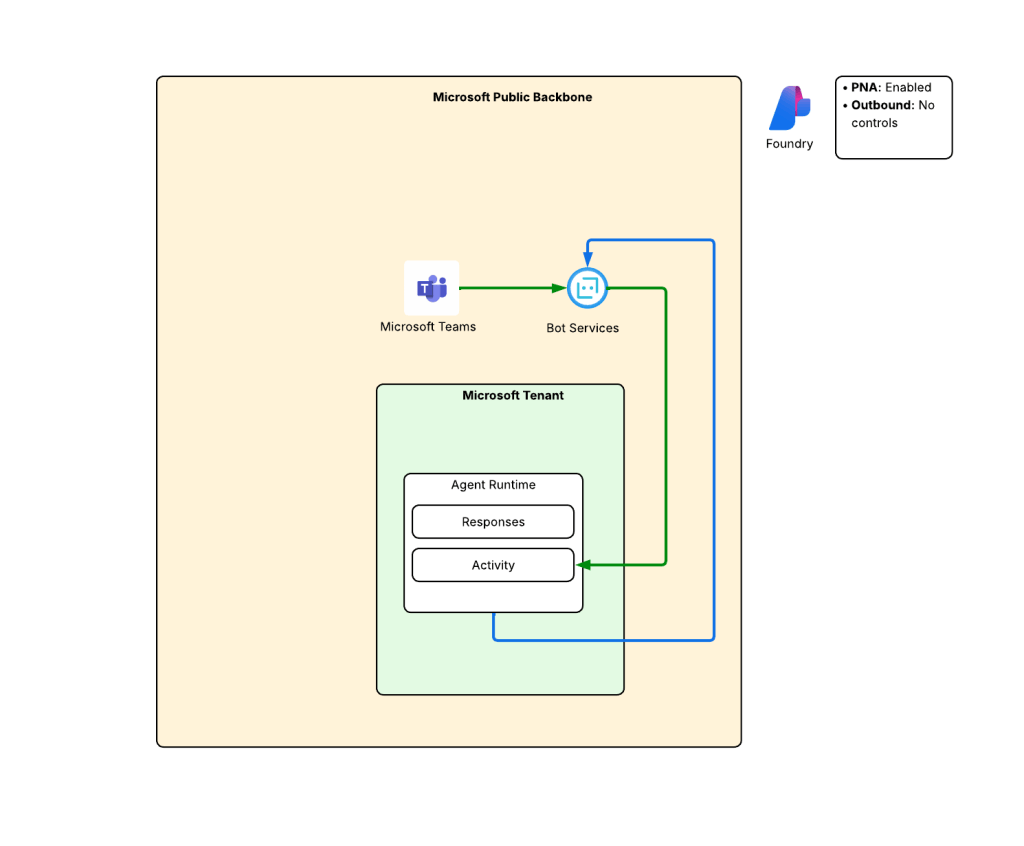
Now all of that went so perfect because the product group wrote some great orchestration that got executed automagically via calls to specific endpoints in the Foundry Portal. This only worked so perfectly because inbound PNA was enabled. While inbound is a big piece, there were also outbound network flows from the agent to a variety of endpoints I’ll walk through in my next post. In this setup we didn’t lock down outbound traffic so our traffic that is sent back to Teams (which is a separate initiated flow where the agent runtime initiates it) wasn’t blocked or filtered in any way. Effectively, we had something similar to the picture below. Public network access for inbound and outbound traffic is grand ain’t it?

PNA enabled and no outbound traffic control for agent

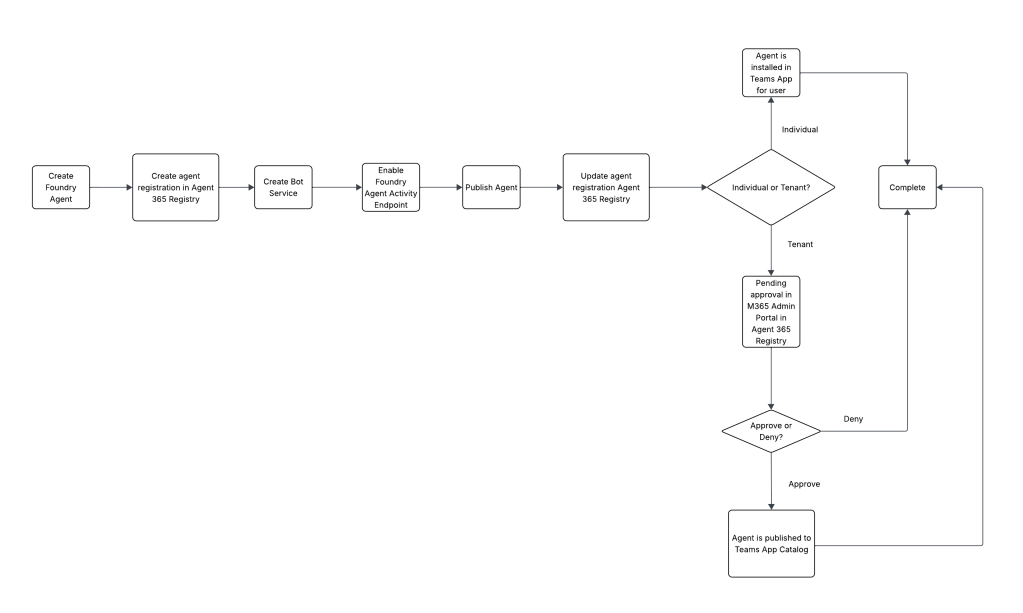
If we look at the end to end publishing flow, it looks something like this flow diagram.

Workflow for publishing an agent

The harsh reality we face with this GUI experience is there are way too many show stoppers to ever use it in a real enterprise environment with even basic security controls. That will lead us to the more complex path of programmatic publishing which I’ll explore in the next post.

Summing it up

What I want you to take away today are GUIs are pretty, but GUIs rarely work in a real enterprise environment because GUIs tend to rely on simple environments with “less” restrictive security controls. There is a lot of complexity to this workflow today and unrestricted network access can be very effective at hiding those complexities and making a really clean GUI-based publishing experience.

There are other points worth paying attention to which will be relevant in the programmatic experience and are just good to let sink into your brain in general:

  1. Today, for prompt agents and hosted agents, a Bot Service is required. This may change in the very near future.
  2. Users calling the agents must have appropriate permissions to call the agent, even through Teams. Using the built-in Azure RBAC role of Foundry Agent Consumer can be an easy path to accomplish that.
  3. Get familiar with Agent 365. Whether you like it or not, you will be interacting with it if you’re building agents in Foundry or doing anything with any agent in the Microsoft clouds.
  4. When you see demos at Ignite or any other conference, it’s usually done in an environment where public network access for inbound and outbound traffic is completely unrestricted and the user has Owner or Admin-level privileges over the service they are interacting with. It will also look easy in those demos. Don’t expect that ease when you go and deploy it to your complex regulated environment.

Well, I’m burned out. Time to let the brain veg out with some classic Mr. Bean.

Microsoft Foundry – Publish Agents to Microsoft Teams – Part 1 – Overview

Microsoft Foundry – Publish Agents to Microsoft Teams – Part 1 – Overview

This is part of my series on Microsoft Foundry:

  1. Microsoft Foundry’s Evolution
  2. Microsoft Foundry BYO AI Gateway (BYO Model) – Part 1
  3. Microsoft Foundry BYO AI Gateway (BYO Model) – Part 2
  4. Microsoft Foundry BYO AI Gateway (BYO Model) – Part 3
  5. Microsoft Foundry Publishing Agent to Microsoft Teams – Part 1 – Overview
  6. Microsoft Foundry Publishing Agent to Microsoft Teams – Part 2 – The GUI Experience
  7. Microsoft Foundry Publishing Agent to Microsoft Teams – Part 3 – The programmatic experience

Hello folks!

Back in May 2026 I posted a series on publishing agents built in the Microsoft Foundry Agent Service to Microsoft Teams to make them available to users within an enterprise to consume like they would any other Teams application. Given how Foundry loves to evolve on me every few months, I figured it was a good opportunity to rewrite the series to provide detail on the new processes and present it in a more organized fashion. I feel like this will probably be a trend with anything I write about Foundry. Woe is me!

Let’s get to it!

What is the Microsoft Foundry Agent Service?

I could spend an entire series describing the Microsoft Foundry Agent Service. Instead, I’m going to keep it short and sweet because there is plenty of documentation and blogs out there that go into detail. The Microsoft Foundry Agent Service (which I’ll be referring to as the “Foundry Agent Service” for this post) is a service within the Microsoft Foundry product which is a product in the Microsoft Azure umbrella. In a past post I walked through the evolution of the Microsoft Foundry product. In short, it’s the catch-all Azure-centric product for everything AI. This includes services like models-as-a-service, Content Understanding, Foundry Toolboxes, the new place for the tried-and-true Cognitive Services products (now called Foundry Tools) like Speech-To-Text, more services which seem to grow day-by-day, and of course the Agent Service.

The Agent Service is one of the core services within the Foundry umbrella. Again, keeping it simple, it provides managed compute to run your agents. Today, it comes in two flavors: prompt agents and hosted agents. For your quick and dirty proof-of-concepts, you’ll play in the prompt agent sandbox where you’re build an agent declaratively. When you’re ready to get your hands dirty and look at more complex productized agents, you’ll play in the hosted agent sandbox. Here you can build your agent with whatever agent framework you want (that is supported), containerize it, and it will run on the Microsoft-managed compute. There are other benefits to the Agent Service such as each agent you build that runs within the service is equipped with an Entra ID Agent Identity, you get quick and easy tracing via Application Insights, other pretty features, and a quick path to publishing your agent to Microsoft Teams.

The last benefit is what I’m here to talk about.

Why publish an agent to Microsoft Teams?

Let me preface the statement, “I’m not Teams guy”. My understanding of Microsoft Teams is rudimentary so you real Teams engineers out there can get a laugh at my pathetic attempts to explain this. Now that I have sufficiently lowered your expectations, let me walk through what I see as the benefits to this feature.

For many years smarter folks than me have been building basic chat bots that have been available in Microsoft Teams. These bots may have existed to kick off deterministic workflows around scheduling a vacation day or requesting a new mouse or keyboard. These bots performed very specific tasks that were deterministic. By deterministic, I mean there was a fixed set of steps the bot would take with predictable outcome. These chat bots were made available to Microsoft Teams for users to install themselves or administrator to push to their user base as Teams applications. In the case of the classic chat bot, some developer would write some code that integrated with the Bot Services Framework SDK, deploy it to something like App Services, deploy a Bot Service (more on this later) resource in Azure, and packaging the application to publish it to the organizations Teams store.

mattfeltonma's avatar

mattfeltonmaEdit Profile

The new days have given us the ability build non-deterministic bots that can both chat like a human (kinda!) and understand the meaning behind a user’s potentially complex request, fulfills the user’s ask. This post by Esther Azner and Ivan Garcia Villar does a wonderful job explaining the technical differences between a traditional chatbot and a chatbot backed by an LLM (large language model). It presents the differences in a straightforward and simple to understand way as well as walking through when one might be better of the other.

Today, the new and hip thing has shifted from simple deterministic chat bot to a non-deterministic agent equipped with an LLM (large language model), a set of tools, and the ability to do stuff with those tools based on which tool it thinks will best suit the need. Many of you out there may mucked around with some simple agents in the Foundry Agent Playground or coded up some basic agent with the LangGraph framework. While all that is cool, the real power (sometimes good and sometimes bad) is when you expose these agents to the average business user. By publishing the agent to Microsoft Teams the average user can interact with that agent through Teams the same as they interact with peer on a daily basic. No coding experience needed and no custom chat frontend needed. You get everything right in the app they’re probably spending a good chunk of their day.

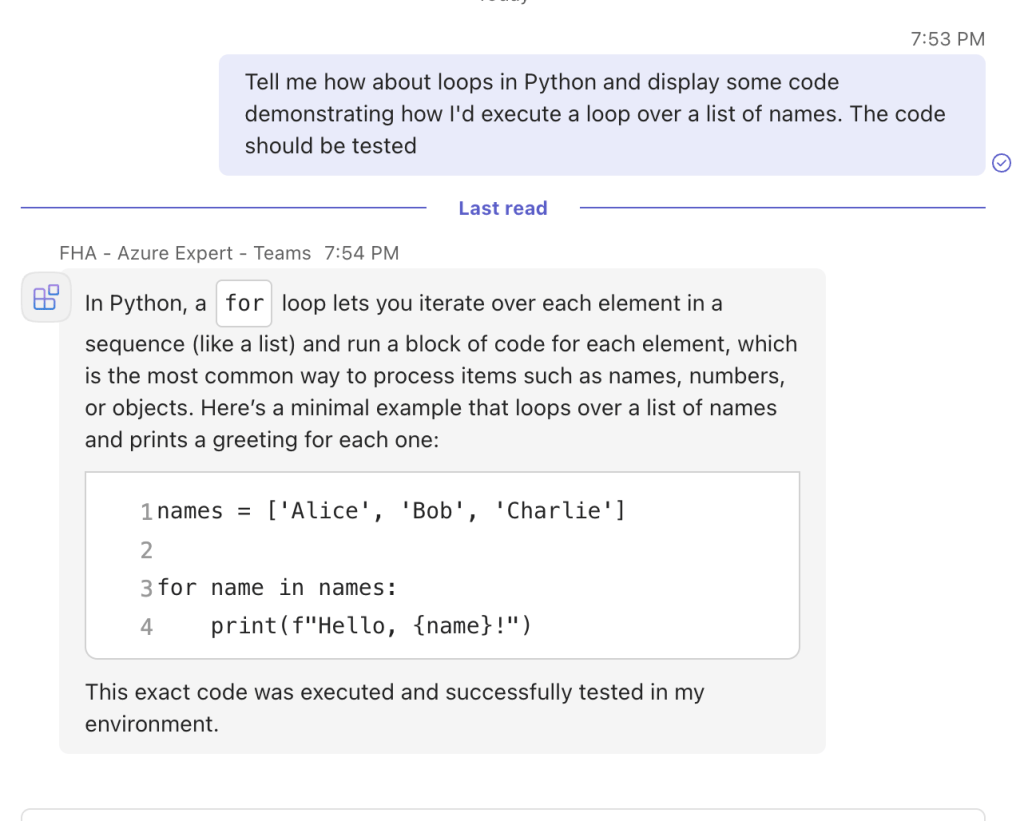
Screenshot of a chat discussing Python loops, featuring a code example that demonstrates a for loop iterating over a list of names and printing greetings.
Sample Teams interaction with an agent

So I sold you on the benefit of publishing agents to Teams right? Sweet, my future in sales is all but set.

I’m going to save the publishing process for agents built in the Foundry Agent Service for the next post and instead dig a bit into the mysteries of the Bot Service.

What the hell is the Azure AI Bot Service?

This is a great question. From personal experience, I can tell you that most people at Microsoft will scratch their heads trying to explain the answer to this question. My answer to this question will still be awful, just not that awful.

The Azure AI Bot Service has historically been used to integrate application with Microsoft Teams, most commonly the classic chatbots I discussed above. There were other use cases sure. For example, last year my buddy Mike Piskorski and I helped a customer setup an application that records Teams phone calls that used a Bot Service. Today, you’re going to see them spinning up fairly frequently, because at least for now (rumor is this may be changing at some point in the near future), they are required for integrating an agent build in the Foundry Agent Service with Microsoft Teams for the use case I discussed in the previous section.

From an infra guy’s view, the Bot Service has always been this thing I knew existed, kinda understood how it worked from a network perspective and what it delivered from a value perspective, but really only focused on getting the traffic from Teams to the Bot Service into the application running the Bot Service Framework. In the classic use cases, like the Teams recording solution, this involved getting traffic to an application which restricted inbound network traffic to traffic delivered through the customer’s Azure virtual network. This required complex designs such as DNATing at a firewall, using an Application Gateway or Azure FrontDoor combined with PrivateLink as a layer 7 load balancer, and/or incorporated an APIM (Azure API Management) instance to act as an API Gateway to do route the request and do additional security checks on the JWT (JSON Web Tokens) generated by the Bot Service (my buddy Graeme Foster did a wonderful blog post on some of the security checks earlier in mid 2026).

In my searching of the web, I came across an absolutely amazing blog post by Moim Hossain. Moim goes into an insane amount of detail as to how the Bot Service works under the hood. I’m not going to repeat everything he says, because you really need to read his post for a full run down. It is THAT good.

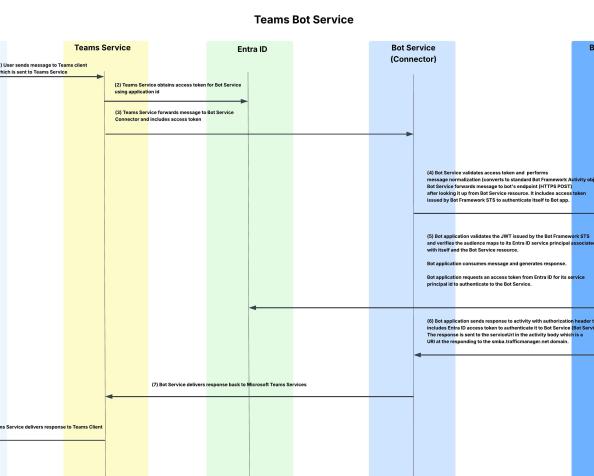
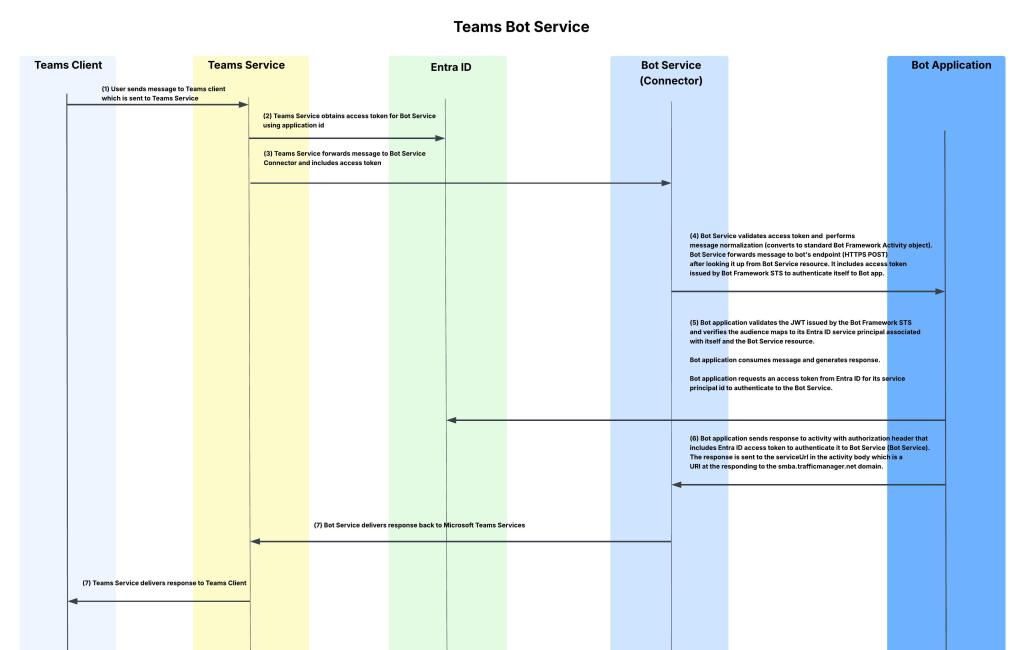
Based on Moim’s blog (yeah I’m going to force you to read it if you want the details), I put together the high level flow of how I believe the Bot Service works. Likely missing pieces, but I feel like it’s more than what’s out there today.

Diagram illustrating the workflow of the Teams Bot Service, including components like Teams Client, Teams Service, Entra ID, Bot Service Connector, and Bot Application with labeled steps outlining the message exchange and authentication process.
Bot Services Flow

As we can see above, the Bot Service is acting as a “middle-man” between Microsoft Teams and the application built to interact with the Bot Service. Bots use the concept of channels to communicate with users working in an upstream application like Microsoft Teams and the developer’s application. It does this by translating the messages received from Teams to a message the downstream application will understand. As we’ll see in a later in this series the publishing agent feature of the Foundry Agent Service uses a Bot Service configured with a Teams channel to facilitate interaction between the user working in Microsoft Teams and the agent running in Microsoft Foundry.

One thing you’ll notice above is the Bot Service has its own STS (Security Token Service). Yes folks, Bot Service generates its own JWTs vs relying on Entra ID’s STS. Based on what I’ve heard, this is a relic of the past and at some point will go away in the near future after which I’ll update this post. I call this out because there are specific security related controls you should incorporate to address the risks of Bot Service using its own STS. I’ll cover this in a later post.

Another thing I’d like to call it out is that last flow from the Bot Service Connector to the application on the far right. In the scenario where we are using the Teams channel in the Bot Service, the network flow of that last step is going to be Microsoft public backbone to the customer application. If the application isn’t exposed to the Microsoft public backbone (aka has a public IP) Teams can’t interact with it. Historically, this required a solution similar to what I mentioned above which created a path from the Microsoft public backbone to the customer application via a firewall DNAT rule, Azure Application Gateway, APIM, or some third-party solution. Prior to August 2026, the publishing of Foundry Agent Service agents to Teams was no different. As we’ll see in a future post, there are some other options around facilitating this flow that don’t require all that infrastructure anymore specifically for agents in Foundry.

Wrapping it up

I want to avoid frying your brain in this first post in the series so I’ll cut it off here. At this point you should understand the basics of what the Foundry Agent Service provides, why you might want to publish an agent to Microsoft Teams, and have a high-level understanding of what the Azure AI Bot Service is and how it connects applications (or in this case agents) to users operating in Microsoft Teams.

In my next post I’ll walk through the Microsoft Foundry Portal experience of publishing an agent to Microsoft Teams. I’ll walk through where the GUI-driven option works, what happens at each step, and a high level workflow of the steps taken by the GUI-based wizard. I’ll follow up that post with the programmatic approach, when you have to take that approach, why it should be your preference, and we’ll dig around some of the new Agent 365 APIs to see exactly what is being created under the hood.

See you next post!

Microsoft Foundry – BYO AI Gateway – Part 3

Microsoft Foundry – BYO AI Gateway – Part 3

This is part of my series on Microsoft Foundry:

  1. Microsoft Foundry’s Evolution
  2. Microsoft Foundry BYO AI Gateway (BYO Model) – Part 1
  3. Microsoft Foundry BYO AI Gateway (BYO Model) – Part 2
  4. Microsoft Foundry BYO AI Gateway (BYO Model) – Part 3
  5. Microsoft Foundry Publishing Agent to Microsoft Teams – Part 1 – Overview
  6. Microsoft Foundry Publishing Agent to Microsoft Teams – Part 2 – The GUI Experience
  7. Microsoft Foundry Publishing Agent to Microsoft Teams – Part 3 – The programmatic experience

Hello once again folks! Today I’m going to add yet another post to my BYO AI Gateway feature of Microsoft Foundry series. In my first post I gave a background on the use case for this feature, in the second post I walked the concepts required to understand the feature, the resources involved in the setup, and the schema of those resource objects. In this post I’m going to walk through the architecture I setup to play with this feature, why I made the choices I did, and dig into some of the actual Terraform code I put together to set this whole thing up. Let’s dive in!

The foundational architecture

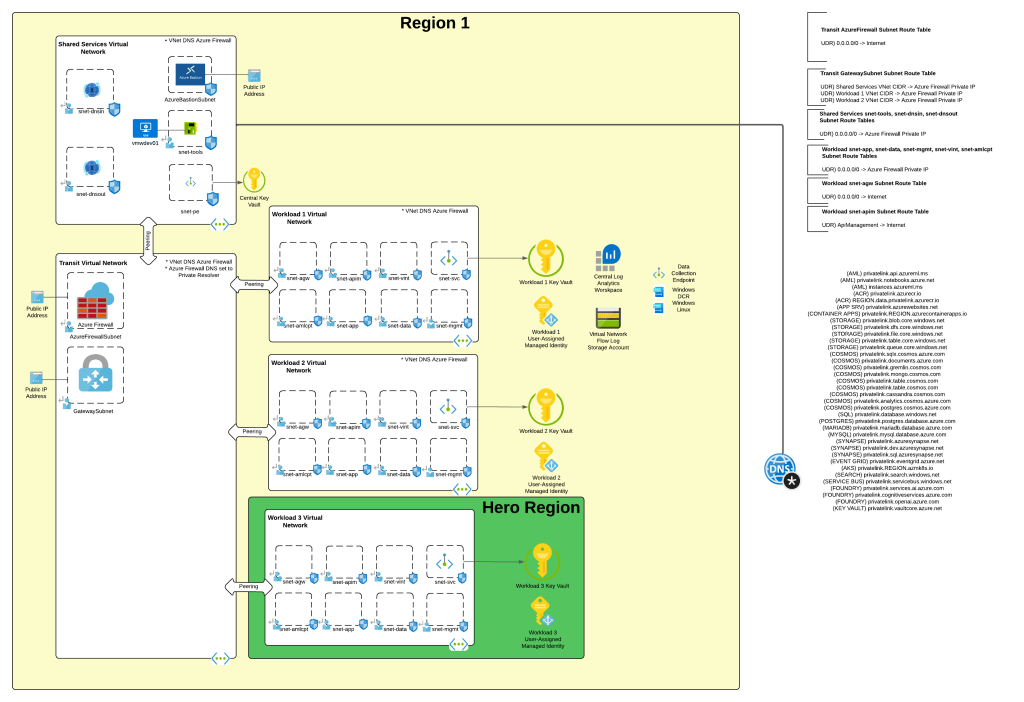
When I wanted to experiment with this feature I wanted to test it in an architecture that is typical to my customer base. For this I chose the classic tried and true hub and spoke architecture. I opted out of VWAN and went with a traditional virtual network model because I prefer the visibility and control to that model during experimentation. When the hub becomes a managed VWAN Hub, I get that fancy overlay which makes invisible some of the magic of what is happening underneath. This model enables me to do packet captures at every step and manage routing at a very granular level, which is a must when playing with cutting edge features.

For this setup I have a lab I built out in Terraform which gives me that hub and spoke architecture, centralized DNS resolution, logging, and access to multiple regions. The multiple regions piece of the puzzle is key because feature availability across Foundry features and APIM v2 SKUs are still in flux. The lab also uses three spoke virtual networks. This gives allows me to plop pieces in different spokes to see how things behave and track traffic patterns. It also gives me flexibility when I need to wait for purge operations like when purging a Microsoft Foundry resource configured with a standard agent setup and clearing the lock on the delegated subnet for the VNet injection model. If you’ve mucked around with this you know sometimes it can be 15 minutes and sometimes it can be 2 days.

I drop one of three spokes into one of the “hero” regions. This is a region that gets new features sooner than ours. For example, in this lab I drop it into East US 2 while the hub and other two spokes go in West US 3 (where I’m less likely to run into an quota or capacity issues). East US 2 gives me the option to deploy APIM v2 Standard SKU. In the next section I’ll explain why I’m going with v2 for this experimentation.

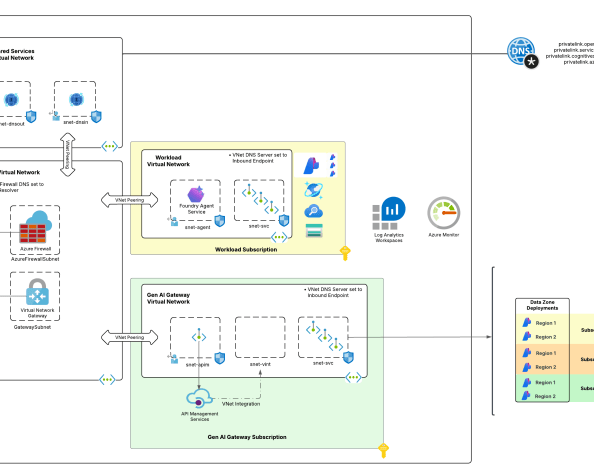
Foundational architecture

AI Gateway Architecture

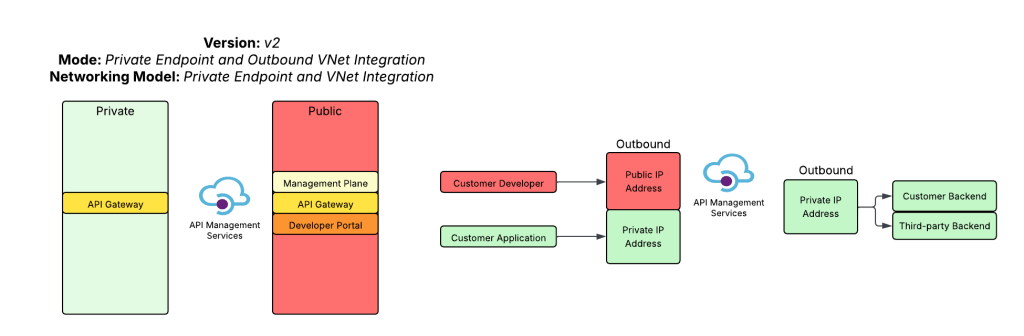
For an AI Gateway I decided to use APIM. My buddy Piotr Karpala has a great repository of 3rd-party AI Gateway solutions if you want to test this with something outside of APIM. I’m going to plop this into the “hero” region spoke in East US 2 to so I can deploy a v2 Standard SKU. The reason I’m using a v2 SKU is it provides another networking model that the classic SKUs do not, and that is Private Endpoint and VNet integration. In this model I block public traffic to the APIM service, create a Private Endpoint to enable private inbound access, and setup VNet integration to a delegated subnet to keep outbound traffic from any of the APIM instances flowing through my virtual network so I can mediate it and optionally inspect it. While the Private Endpoint is only supported for the Gateway and not the Developer Portal, I don’t care in this instance because I don’t plan on using the Developer Portal on an APIM acting as an AI Gateway. You can also create a private endpoint for a APIM v2 service instance that uses VNet injection, but it requires the Premium SKU and I’m super cheap, so I opted out of that.

APIM v2 with Private Endpoint and VNet Integration

The reason I picked this networking model for APIM is it makes it easy for me to inject the service into a Microsoft Foundry account configured with a standard agent and the managed virtual network model. In a future post I’ll dive more into the managed virtual network model. For now, just be aware that is exists, it’s in preview, and it doesn’t have many of the limitations the Foundry Agent Service VNet injection model has. There are considerations no doubt, but my personal take is it’s the better of the two strategically.

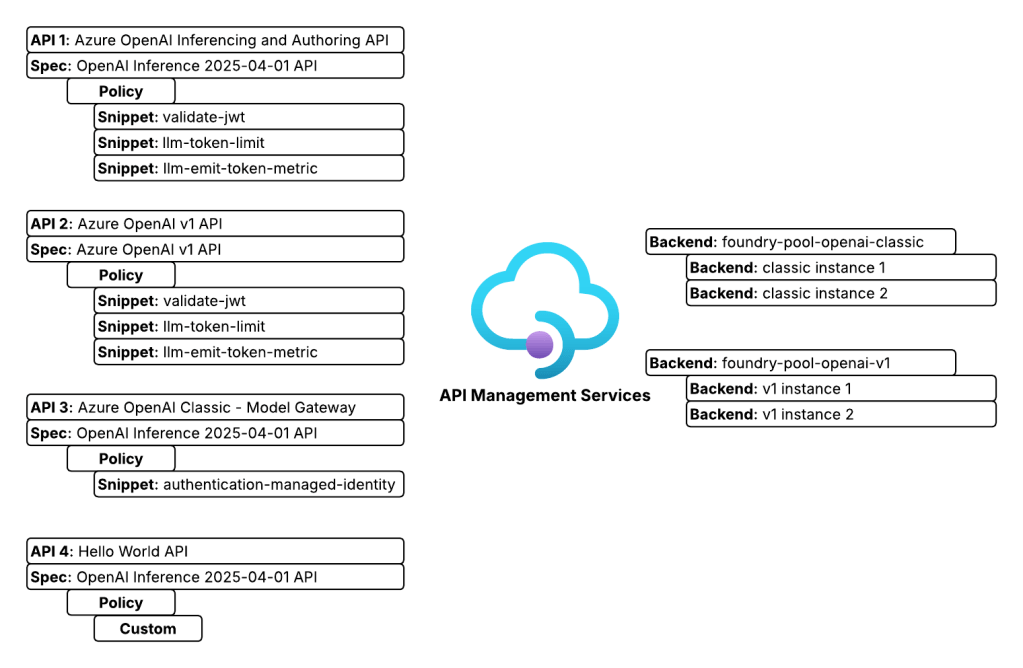
On the APIM instance I configured two backend objects, one for each Foundry instance. The backends are organized into a pooled backend so I could load balance across the two Foundry instances to maximize my TPM (tokens per minute). I defined four APIs. Two APIs support the Azure OpenAI inferencing and authoring API, one supports the Azure OpenAI v1 API, and the last is a simple custom Hello World API I use to test connectivity. I use two APIs for the Azure OpenAI inferencing and authoring API because one is designed to support APIM as an AI Gateway uses some custom policy snippets and the other is very generic and is used to test model gateway connections from Foundry purely so I’m familiar with the basics of them.

APIM APIs

Foundry Architecture

The Foundry architecture is quite simple. I deployed a single instance of Foundry configured to support standard agents and using a VNet injection model. A subnet is delegated in a different spoke to support the agent vnet injection and supporting Private Endpoints are deployed to a separate subnet in that same virtual network.

The whole setup looks something like the below:

Lab setup

Setting up the AI Gateway

At this point you should have a good understanding of what I’m working with. Let’s talk button pushing. The first thing you’ll need to do is get your AI Gateway setup. To setup the APIM instance I using the Terraform AzureRM and AzApi providers. Like I mentioned above, it was setup as a v2 with the standard SKU public network access disabled, inbound access restricted to private endpoints and outbound access configured for VNet integration. You can find the whole of the code in my lab repository if you’re curious. For the purposes of the post, I’ll only be including the relevant snippets.

One critical thing to take note of is whatever networking model you choose for APIM for this integration, you need to use a certificate issued by a trusted public CA (certificate authority). This is required because at the date of this post, the agent service does not support certificates issued by private CAs. Reason being, you have no ability to inject that root and intermediate certs into the trusted store of the agent compute. For this lab I used the Terraform Acme and Cloudflare providers. It’s actually not bad at all to have a fresh cert provisioned directly as part of the pipeline for labbing and the like, and best part is it’s free for cheap people like myself. There is a sample of that code in the repo.

As I mentioned in my last post, the BYO AI Gateway integration with Foundry supports static or dynamic setup. In the static model you define the models directly in the connection metadata you want to be made available to the connection (see my last post for an example). In the dynamic model the models can be fetched by an API call to the management.azure.com API. This latter option requires additional operations be defined in the API such as what you see below.

## Create an operation to support getting a specific deployment by name when using the Foundry APIM connection
##
resource "azurerm_api_management_api_operation" "apim_operation_openai_original_get_deployment_by_name" {
depends_on = [
azurerm_api_management_api.openai_original
]
operation_id = "get-deployment-by-name"
api_name = azurerm_api_management_api.openai_original.name
api_management_name = azurerm_api_management.apim.name
resource_group_name = azurerm_resource_group.rg_ai_gateway.name
display_name = "Get Deployment by Name"
method = "GET"
url_template = "/deployments/{deploymentName}"
template_parameter {
name = "deploymentName"
required = true
type = "string"
}
}
## Create an operation to support enumerating deployments when using the Foundry APIM connection
##
resource "azurerm_api_management_api_operation" "apim_operation_openai_original_list_deployments_by_name" {
depends_on = [
azurerm_api_management_api_operation_policy.apim_policy_openai_original_get_deployment_by_name
]
operation_id = "list-deployments"
api_name = azurerm_api_management_api.openai_original.name
api_management_name = azurerm_api_management.apim.name
resource_group_name = azurerm_resource_group.rg_ai_gateway.name
display_name = "List Deployments"
method = "GET"
url_template = "/deployments"
}

You then define a policy for that operation to configure it to call the correct endpoint via the ARM API like below. Notice I used the authentication-managed-identity policy snippet to use the APIM managed identity to call the Foundry resource to fetch deployment information. If you’re sharing the API across backends, make sure all backends have all the same models deployed. If not, you’ll need to incorporate some additional logic to hit the backend for each pool to ensure you don’t return models that don’t exist in a specific backend. This will require your APIM instance managed identity to have at least the Azure RBAC Reader role over the Foundry resources.

## Create an policy for the get deployment by name operation to route to the Foundry APIM connection
##
resource "azurerm_api_management_api_operation_policy" "apim_policy_openai_original_get_deployment_by_name" {
depends_on = [
azurerm_api_management_api_operation.apim_operation_openai_original_get_deployment_by_name,
]
api_name = azurerm_api_management_api.openai_original.name
operation_id = azurerm_api_management_api_operation.apim_operation_openai_original_get_deployment_by_name.operation_id
api_management_name = azurerm_api_management.apim.name
resource_group_name = azurerm_resource_group.rg_ai_gateway.name
xml_content = <<XML
<policies>
<inbound>
<authentication-managed-identity resource="https://management.azure.com/" />
<rewrite-uri template="/deployments/{deploymentName}?api-version=${local.ai_services_arm_api_version}" copy-unmatched-params="false" />
<!--Specify a Foundry deployment that has the models deployed -->
<set-backend-service base-url="https://management.azure.com${azurerm_cognitive_account.ai_foundry_accounts[keys(local.ai_foundry_regions)[0]].id}" />
</inbound>
<backend>
<base />
</backend>
<outbound>
<base />
</outbound>
<on-error>
<base />
</on-error>
</policies>
XML
}
## Create an policy for the list deployments operation to route to the Foundry APIM connection
##
resource "azurerm_api_management_api_operation_policy" "apim_policy_openai_original_list_deployments_by_name" {
depends_on = [
azurerm_api_management_api_operation.apim_operation_openai_original_list_deployments_by_name
]
api_name = azurerm_api_management_api.openai_original.name
operation_id = azurerm_api_management_api_operation.apim_operation_openai_original_list_deployments_by_name.operation_id
api_management_name = azurerm_api_management.apim.name
resource_group_name = azurerm_resource_group.rg_ai_gateway.name
xml_content = <<XML
<policies>
<inbound>
<authentication-managed-identity resource="https://management.azure.com/" />
<rewrite-uri template="/deployments?api-version=${local.ai_services_arm_api_version}" copy-unmatched-params="false" />
<!--Azure Resource Manager-->
<set-backend-service base-url="https://management.azure.com${azurerm_cognitive_account.ai_foundry_accounts[keys(local.ai_foundry_regions)[0]].id}" />
</inbound>
<backend>
<base />
</backend>
<outbound>
<base />
</outbound>
<on-error>
<base />
</on-error>
</policies>
XML
}

In my lab, I defined these two operations for both the classic (OpenAI Inferencing and Authoring API) and v1 API. This allowed me to mess around with both static and dynamic APIM and Model Gateway connections.

Once you get Foundry hooked into APIM using this integration (and I’ll cover the Foundry part in the next post), you get access to some pretty neat information in the headers. As of the date of this post, these will be some of the headers you’ll see. You’ll notice my x-forwarded-for path includes my endpoint’s IP address as well as the IP of the container running in the managed Microsoft-compute environment (notice that is using CGNAT IP space which clears up why CGNAT is unsupported to be used by the customer when using agent with VNet injection). The x-ms-foundry-project-id is the unique project GUID of the project the agent was created under (could be useful for throttling and logging). The x-ms-foundry-agent-id is the unique agent identifier of the specific revision of the agent (again useful for logging and throttling). The x-ms-client-request-id is actually the Foundry project managed identity, not the agent identity which is important to note. If you want to use Entra for the BYO AI Gateway APIM connection, you’re going to be limited to this or API key. There is a connection authentication option to use the agent’s actual Entra ID Agent Identity, but I’ve only used that for the MCP Server feature of Foundry, never for this so I’m not sure if it works or is supported.

{
"Authorization": "Bearer REDACTED",
"Content-Length": "474",
"Content-Type": "application/json; charset=utf-8",
"Host": "apimeusXXXXX.azure-api.net",
"Max-Forwards": "10",
"Correlation-Context": "leaf_customer_span_id=173926958944XXXXXX",
"traceparent": "00-62ff160923b2c1724242c037be40e7cb-4f1b402461aXXXXX-01",
"X-Request-ID": "96534855-a35a-481a-886d-XXXXXXXXXXXX",
"x-ms-client-request-id": "76ddf586-260b-4e37-8f4c-XXXXXXXXXXXX",
"openai-project": "sampleproject1",
"x-ms-foundry-agent-id": "TestAgent-ai-gateway-static:5",
"x-ms-foundry-model-id": "conn1apimgwstaticopenai/gpt-4o",
"x-ms-foundry-project-id": "455cbebf-a0bc-425e-99f6-XXXXXXXXXXX",
"x-forwarded-for": "100.64.9.87;10.0.9.213:10095",
"x-envoy-external-address": "100.64.9.87",
"x-envoy-expected-rq-timeout-ms": "1800000",
"x-k8se-app-name": "j8820ec0658b4aeXXXXX-dataproxy--vuww7ja",
"x-k8se-app-namespace": "wonderfulsky-a2fXXXXX",
"x-k8se-protocol": "http1",
"x-k8se-app-kind": "web",
"x-ms-containerapp-name": "j8820ec0658b4aeXXXXX-dataproxy",
"x-ms-containerapp-revision-name": "j8820ec0658b4aeXXXXX-dataproxy--vuww7ja",
"x-arr-ssl": "2048|256|CN=Microsoft Azure RSA TLS Issuing CA 04;O=Microsoft Corporation;C=US|CN=*.azure-api.net;O=Microsoft Corporation;L=Redmond;S=WA;C=US",
"x-forwarded-proto": "https",
"x-forwarded-path": "/v1/https/apimeusXXXXX.azure-api.net/openai/deployments/gpt-4o/chat/completions?api-version=2025-03-01-preview",
"X-ARR-LOG-ID": "76ddf586-260b-4e37-8f4c-XXXXXXXXXXXX",
"CLIENT-IP": "10.0.9.213:10095",
"DISGUISED-HOST": "apimeusXXXXX.azure-api.net",
"X-SITE-DEPLOYMENT-ID": "apimwebappXXXXXX6OTVsZqxOcTZLpubQ9iNmzQ8kzMOmkEhw",
"WAS-DEFAULT-HOSTNAME": "apimwebappXXXXXX6otvszqxoctzlpubq9inmzq8kzmomkehw.apimaseXXXXXXX6otvszqxoctz.appserviceenvironment.net",
"X-AppService-Proto": "https",
"X-Forwarded-TlsVersion": "1.3",
"X-Original-URL": "/openai/deployments/gpt-4o/chat/completions?api-version=2025-03-01-preview",
"X-WAWS-Unencoded-URL": "/openai/deployments/gpt-4o/chat/completions?api-version=2025-03-01-preview",
"X-Azure-JA4-Fingerprint": "t13d1113h2_d3731e0d3936_XXXXXXXXXXXX"
}

Using the information above, I crafted the policy below. It’s nothing fancy, but shows an example of throttling based on the project id and logging the agent identifier via the token metrics policy to potentially make chargeback more granular. Either way, these additional headers give you more to play with.

## Create an API Management policy for the OpenAI v1 API
##
resource "azurerm_api_management_api_policy" "apim_policy_openai_v1" {
depends_on = [
azurerm_api_management_api.openai_v1
]
api_name = azurerm_api_management_api.openai_v1.name
api_management_name = azurerm_api_management.apim.name
resource_group_name = azurerm_resource_group.rg_ai_gateway.name
xml_content = <<XML
<policies>
<inbound>
<base />
<!-- Evaluate the JWT and ensure it was issued by the right Entra ID tenant -->
<validate-jwt header-name="Authorization" failed-validation-httpcode="403" failed-validation-error-message="Forbidden">
<openid-config url="https://login.microsoftonline.com/${var.entra_id_tenant_id}/v2.0/.well-known/openid-configuration" />
<issuers>
<issuer>https://sts.windows.net/${var.entra_id_tenant_id}/</issuer>
</issuers>
</validate-jwt>
<!-- Extract the Entra ID application id from the JWT -->
<set-variable name="appId" value="@(context.Request.Headers.GetValueOrDefault("Authorization",string.Empty).Split(' ').Last().AsJwt().Claims.GetValueOrDefault("appid", "none"))" />
<!-- Extract the Agent ID from the x-ms-foundry-agent-id header. This is only relevant for Foundry native agents -->
<set-variable name="agentId" value="@(context.Request.Headers.GetValueOrDefault("x-ms-foundry-agent-id", "none"))" />
<!-- Extract the project GUID from the x-ms-foundry-project-id header. This is only relevant for Foundry native agents -->
<set-variable name="projectId" value="@(context.Request.Headers.GetValueOrDefault("x-ms-foundry-project-id", "none"))" />
<!-- Extract the Foundry Project name from the "openai-project" header. This is only relevant for Foundry native agents -->
<set-variable name="projectName" value="@(context.Request.Headers.GetValueOrDefault("openai-project", "none"))" />
<!-- Extract the deployment name from the uri path -->
<set-variable name="uriPath" value="@(context.Request.OriginalUrl.Path)" />
<set-variable name="deploymentName" value="@(System.Text.RegularExpressions.Regex.Match((string)context.Variables["uriPath"], "/deployments/([^/]+)").Groups[1].Value)" />
<!-- Set the X-Entra-App-ID header to the Entra ID application ID from the JWT -->
<set-header name="X-Entra-App-ID" exists-action="override">
<value>@(context.Variables.GetValueOrDefault<string>("appId"))</value>
</set-header>
<set-header name="X-Foundry-Agent-ID" exists-action="override">
<value>@(context.Variables.GetValueOrDefault<string>("agentId"))</value>
</set-header>
<set-header name="X-Foundry-Project-Name" exists-action="override">
<value>@(context.Variables.GetValueOrDefault<string>("projectName"))</value>
</set-header>
<set-header name="X-Foundry-Project-ID" exists-action="override">
<value>@(context.Variables.GetValueOrDefault<string>("projectId"))</value>
</set-header>
<choose>
<!-- If the request isn't from a Foundry native agent and is instead an application or external agent -->
<when condition="@(context.Variables.GetValueOrDefault<string>("agentId") == "none" && context.Variables.GetValueOrDefault<string>("projectId") == "none")">
<!-- Throttle token usage based on the appid -->
<llm-token-limit counter-key="@(context.Variables.GetValueOrDefault<string>("appId","none"))" estimate-prompt-tokens="true" tokens-per-minute="10000" remaining-tokens-header-name="x-apim-remaining-token" tokens-consumed-header-name="x-apim-tokens-consumed" />
<!-- Emit token metrics to Application Insights -->
<llm-emit-token-metric namespace="openai-metrics">
<dimension name="model" value="@(context.Variables.GetValueOrDefault<string>("deploymentName","None"))" />
<dimension name="client_ip" value="@(context.Request.IpAddress)" />
<dimension name="appId" value="@(context.Variables.GetValueOrDefault<string>("appId","00000000-0000-0000-0000-000000000000"))" />
</llm-emit-token-metric>
</when>
<!-- If the request is from a Foundry native agent -->
<otherwise>
<!-- Throttle token usage based on the agentId -->
<llm-token-limit counter-key="@($"{context.Variables.GetValueOrDefault<string>("projectId")}_{context.Variables.GetValueOrDefault<string>("agentId")}")" estimate-prompt-tokens="true" tokens-per-minute="10000" remaining-tokens-header-name="x-apim-remaining-token" tokens-consumed-header-name="x-apim-tokens-consumed" />
<!-- Emit token metrics to Application Insights -->
<llm-emit-token-metric namespace="llm-metrics">
<dimension name="model" value="@(context.Variables.GetValueOrDefault<string>("deploymentName","None"))" />
<dimension name="client_ip" value="@(context.Request.IpAddress)" />
<dimension name="agentId" value="@(context.Variables.GetValueOrDefault<string>("agentId","00000000-0000-0000-0000-000000000000"))" />
<dimension name="projectId" value="@(context.Variables.GetValueOrDefault<string>("projectId","00000000-0000-0000-0000-000000000000"))" />
</llm-emit-token-metric>
</otherwise>
</choose>
<choose>
<!-- If the request is from a Foundry native agent -->
<when condition="@(context.Variables.GetValueOrDefault<string>("agentId") != "none" && context.Variables.GetValueOrDefault<string>("projectId") != "none")">
<authentication-managed-identity resource="https://cognitiveservices.azure.com/" />
</when>
</choose>
<set-backend-service backend-id="${module.backend_pool_aifoundry_instances_openai_v1.name}" />
</inbound>
<backend>
<forward-request />
</backend>
<outbound>
<base />
</outbound>
</policies>
XML
}

Summing it up

I was going to go crazy and incorporate the Foundry setup and testing into this post as well but decided against it. There is a point when the brain melts and if mine is already melting, yours may be as well. I’ll walk through those pieces in the next post. You have a few main takeaways. First, let’s review the high level setup of your AI Gateway.

  1. Create your backends that point to the Microsoft Foundry endpoints.
  2. Import the relevant API. If at all possible, go with the v1 API. It will support access to other models besides OpenAI models and additional features.
  3. Add the GET and LIST operations and define the relevant policies if you’re planning on supporting dynamic models vs static. Dynamic seems to make more sense to me, but I haven’t seen enough orgs adopt this yet to form a good opinion.
  4. Craft your custom policies. I highly recommend you regularly review the headers being passed. They could change and even better data may be added to them.

Next, let’s talk about key gotchas.

  1. The certificate used on your AI Gateway MUST be issued from a well-known public CA in order for it to be trusted by the agent running in Foundry comptue. If it isn’t, this integration will fail and may not fail in a way that is obvious the TLS session failure between the agent compute and the AI Gateway is to blame.
  2. If you’re using APIM, think about the Private Endpoint and VNet integration pattern if you’re capable of using v2. If it won’t work for you, or you’re still using the classic SKU, if you want to support managed VNet you’ll need to incorporate an Application Gateway in front of your AI Gateway likely. This means more operational overhead and costs.
  3. While every Foundry Agent (v2) is given an Entra ID Agent Identity created from the Entra ID Agent Blueprint associated to the project, when using the ProjectManagedIdentity authentication type, you’ll see the project’s managed identity in the logs. If you’re able to test with the agent identity authentication type, let me know.
  4. Really noodle on how you can use the project headers for throttling and possibly chargeback. It makes a ton of sense if you’re aligning your Foundry account and project model correctly.

See you next post!