Deep Dive into Azure AD and AWS SSO Integration – Part 1

Deep Dive into Azure AD and AWS SSO Integration – Part 1

Hello fellow geeks!

Back in 2017 I did a series of posts on how to integrate Azure AD using the AWS app available in the Azure Marketplace with AWS IAM in order to use Azure AD as an identity provider for an AWS account.  The series has remained quite popular over the past two years, largely because the integration has remained the same without much improvement.  All of this changed last week when AWS released support for integration between Azure AD and AWS SSO.

The past integration between the two platforms functioned, but suffered from three primary challenges:

  1. The AWS app was designed to synchronize identity data between AWS and Azure AD for a single AWS account
  2. The SAML trust between Azure AD and an AWS account had to be established separately for each AWS account.
  3. The application manifest file used by the AWS app to establish a mapping of roles between Azure AD and synchronized AWS IAM roles had a limitation of 1200 which didn’t scale for organizations with a large AWS footprint.

To understand these challenges, I’m going to cover some very basic AWS concepts.

The most basic component an AWS presence is an AWS account.  Like an Azure subscription, it represents a billing relationship, establishes limitations for services, and acts as an authorization boundary.  Where it differs from an Azure subscription is that each AWS account has a separate identity and authentication boundary.

While multiple Azure subscriptions can be associated with a single instance of Azure AD to centralize identity and authentication, the same is not true for AWS.  Each AWS account has its own instance of AWS IAM with its own security principals and no implicit trust with any other account.

Azure Subscription Identity vs AWS Account Identity

Azure Subscription Identity vs AWS Account Identity

Since there is no implicit trust between accounts, that trust needs to be manually established by the customer.  For example, if a customer wants bring their own identities using SAML, they need to establish a SAML trust with each AWS account.

SAML Trusts with each AWS Account

SAML Trusts with each AWS Account

This is nice from a security perspective because you have a very clear security boundary that you can use effectively to manage blast radius.  This is paramount in the cloud from a security standpoint.  In fact, AWS best practice calls for separate accounts to mitigate risks to workloads of different risk profiles.  A common pattern to align with this best practice is demonstrated in the AWS Landing Zone documentation.  If you’re interested in a real life example of what happens when you don’t establish a good radius, I encourage you to read the cautionary tale of Code Spaces.

AWS Landing Zone

AWS Landing Zone

However, it doesn’t come without costs because each AWS IAM instance needs to be managed separately.  Prior to the introduction of AWS SSO (which we’ll cover later), you as the customer would be on the hook for orchestrating the provisioning of security principals (IAM Users, groups, roles, and identity providers) in every account.  Definitely doable, but organizations skilled at identity management are few and far between.

Now that you understand the importance of having multiple AWS accounts and that each AWS account has a separate instance of AWS IAM, we can circle back to the challenges of the past integration.  The AWS App available in the Azure Marketplace has a few significant gaps

The app is designed to simplify the integration with AWS by providing the typical “wizard” type experience Microsoft so loves to provide.  Plug in a few pieces of information and the SAML trust between Azure AD and your AWS account is established on the Azure AD end to support an identity provider initiated SAML flow.  This process is explained in detail in my past blog series.

In addition to easing the SAML integration, it also provides a feature to synchronize AWS IAM roles from an AWS account to the application manifest file used by the AWS app.  The challenges here are two-fold: one is the application manifest file has a relatively small limit of entries; the other is the synchronization process only supports a single AWS account.  These two gaps make it unusable by most enterprises.

Azure AWS Application Sync Process

Azure Marketplace AWS Application Sync Process

Both Microsoft and AWS have put out workarounds to address the gaps.  However, the workarounds require the customer to either develop or run custom code and additional processes and neither addresses the limitation of the application manifest.  This lead to many organizations to stick with their on-premises security token service (AD FS, Ping, etc) or going with another 3rd party IDaaS (Okta, Centrify, etc).  This caused them to miss out on the advanced features of Azure AD, some of which they were more than likely already paying for via the use of Office 365.  These features include adaptive authentication, contextual authorization, and modern multi-factor authentication.

AWS recognized the challenge organizations were having managing AWS accounts at scale and began introducing services to help enterprises manage the ever growing AWS footprint.  The first service was AWS Organizations.  This service allowed enterprises to centralize some management operations, consolidate billing, and group accounts together for billing or security and compliance.  For those of you from the Azure world, the concept is similar to the benefits of using Azure Management Groups and Azure Policy.  This was a great start, but the platform still lacked a native solution for centralized identity management.
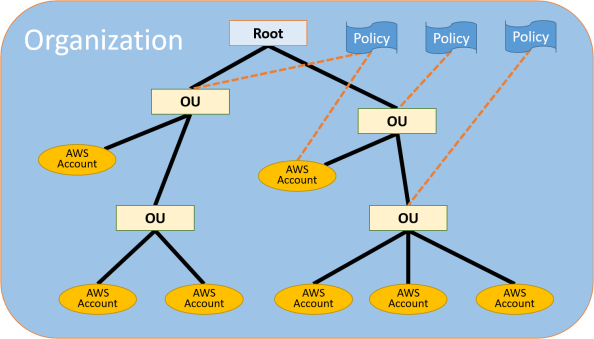
AWS Organization

AWS Organization

At the end of 2017, AWS SSO was introduced.  Through integration with AWS Organizations, AWS SSO has the ability to enumerate all of the AWS accounts associated with an Organization and act as a centralized identity, authentication, and authorization plane.

While the product had potential, at the time of its release it only supported scenarios where users and groups were created directly in the AWS SSO directory or were sourced from an AWS Managed AD or customer-managed AD using the LDAP connector.  It lacked support for acting as a SAML service provider to a third-party identity provider.  Since the service lacks the features of most major on-premises security token services and IDaaS providers, many organizations kept to the standard pattern of managing identity across their AWS accounts using their own solutions and processes.

Fast forward to last week and AWS announced two new features for AWS SSO.  The first feature is that it can now act as a SAML service provider to Azure AD (YAY!).  By federating directly with AWS SSO, there is no longer a requirement to federate Azure AD which each individual AWS account.

The second feature got me really excited and that was support for the System for Cross-domain Identity Management (SCIM) specification through the addition of SCIM endpoints.  If you’re unfamiliar SCIM, it addresses a significant gap in IAM in the cloud world, and that is identity management.  If you’ve ever integrated with any type of cloud service, you are more than likely aware of the pains of having to upload CSVs or install custom vendor connectors in order to provision security principals into a cloud identity store.  SCIM seeks to solve that problem by providing a specification for a REST API that allows for management of the lifecycle of security principals.

Support for this feature, along with Azure AD’s longtime support for SCIM, allows Azure AD to handle the identity lifecycle management of the shadow identities in AWS SSO which represent Azure AD Users and Groups.  This is an absolutely awesome feature of Azure AD and I’m thrilled to see that AWS is taking advantage of it.

Well folks, that will close out this entry in the series.  Over the next few posts I’ll walk through what the integration and look behind the curtains a bit with my go to tool Fiddler.

See you next post!


Visualizing AWS Logging Data in Azure Monitor – Part 2

Visualizing AWS Logging Data in Azure Monitor – Part 2

Welcome back folks!

In this post I’ll be continuing my series on how Azure Monitor can be used to visualize log data generated by other cloud services.  In my last post I covered the challenges that multicloud brings and what Azure can do to help with it.  I also gave an overview of Azure Monitor and covered the design of the demo I put together and will be walking through in this post.  Please take a read through that post if you haven’t already.  If you want to follow along, I’ve put the solution up on Github.

Let’s quickly review the design of the solution.

Capture

This solution uses some simple Python code to pull information about the usage of AWS IAM User access id and secret keys from an AWS account.  The code runs via a Lambda and stores the Azure Log Analytics Workspace id and key in environment variables of the Lambda that are encrypted with an AWS KMS key.  The data is pulled from the AWS API using the Boto3 SDK and is transformed to JSON format.  It’s then delivered to the HTTP Data Collector API which places it into the Log Analytics Workspace.  From there, it becomes available to Azure Monitor to query and visualize.

Setting up an Azure environment for this integration is very simple.  You’ll need an active Azure subscription.  If you don’t have one, you can setup a free Azure account to play around.  Once you’re set with the Azure subscription, you’ll need to create an Azure Log Analytics Workspace.  Instructions for that can be found in this Microsoft article.  After the workspace has been setup, you’ll need to get the workspace id and key as referenced in the Obtain workspace ID and key section of this Microsoft article.  You’ll use this workspace ID and key to authenticate to the HTTP Data Collector API.

If you have a sandbox AWS account and would like to follow along, I’ve included a CloudFormation template that will setup the AWS environment.  You’ll need to have an AWS account with sufficient permissions to run the template and provision the resources.  Prior to running the template, you will need to zip up the lambda_function.py and put it on an AWS S3 bucket you have permissions on.  When you run the template you’ll be prompted to provide the S3 bucket name, the name of the ZIP file, the Log Analytics Workspace ID and key, and the name you want the API to assign to the log in the workspace.

The Python code backing the solution is pretty simple.  It uses all standard Python modules except for the boto3 module used to interact with AWS.

import json
import logging
import re
import csv
import boto3
import os
import hmac
import base64
import hashlib
import datetime

from io import StringIO
from datetime import datetime
from botocore.vendored import requests

The first function in the code parses the ARN (Amazon Resource Name) to extract the AWS account number.  This information is later included in the log data written to Azure.

# Parse the IAM User ARN to extract the AWS account number
def parse_arn(arn_string):
    acct_num = re.findall(r'(?<=:)[0-9]{12}',arn_string)
    return acct_num[0]

The second function uses the strftime method to transform the timestamp returned from the AWS API to a format that the Azure Monitor API will detect as a timestamp and make that particular field for each record in the Log Analytics Workspace a datetime type.

# Convert timestamp to one more compatible with Azure Monitor
def transform_datetime(awsdatetime):
transf_time = awsdatetime.strftime("%Y-%m-%dT%H:%M:%S")
return transf_time

The next function queries the AWS API for a listing of AWS IAM Users setup in the account and creates dictionary object representing data about that user. That object is added to a list which holds each object representing each user.

# Query for a list of AWS IAM Users
def query_iam_users():
    
    todaydate = (datetime.now()).strftime("%Y-%m-%d")
    users = []
    client = boto3.client(
        'iam'
    )

    paginator = client.get_paginator('list_users')
    response_iterator = paginator.paginate()
    for page in response_iterator:
        for user in page['Users']:
            user_rec = {'loggedDate':todaydate,'username':user['UserName'],'account_number':(parse_arn(user['Arn']))}
            users.append(user_rec)
    return users

The query_access_keys function queries the AWS API for a listing of the access keys that have been provisioned the AWS IAM User as well as the status of those keys and some metrics around the usage.  The resulting data is then added to a dictionary object and the object added to a list.  Each item in the list represents a record for an AWS access id.

# Query for a list of access keys and information on access keys for an AWS IAM User
def query_access_keys(user):
    keys = []
    client = boto3.client(
        'iam'
    )
    paginator = client.get_paginator('list_access_keys')
    response_iterator = paginator.paginate(
        UserName = user['username']
    )

    # Get information on access key usage
    for page in response_iterator:
        for key in page['AccessKeyMetadata']:
            response = client.get_access_key_last_used(
                AccessKeyId = key['AccessKeyId']
            )
            # Santize key before sending it along for export

            sanitizedacctkey = key['AccessKeyId'][:4] + '...' + key['AccessKeyId'][-4:]
            # Create new dictonionary object with access key information
            if 'LastUsedDate' in response.get('AccessKeyLastUsed'):

                key_rec = {'loggedDate':user['loggedDate'],'user':user['username'],'account_number':user['account_number'],
                'AccessKeyId':sanitizedacctkey,'CreateDate':(transform_datetime(key['CreateDate'])),
                'LastUsedDate':(transform_datetime(response['AccessKeyLastUsed']['LastUsedDate'])),
                'Region':response['AccessKeyLastUsed']['Region'],'Status':key['Status'],
                'ServiceName':response['AccessKeyLastUsed']['ServiceName']}
                keys.append(key_rec)
            else:
                key_rec = {'loggedDate':user['loggedDate'],'user':user['username'],'account_number':user['account_number'],
                'AccessKeyId':sanitizedacctkey,'CreateDate':(transform_datetime(key['CreateDate'])),'Status':key['Status']}
                keys.append(key_rec)
    return keys

The next two functions contain the code that creates and submits the request to the Azure Monitor API.  The product team was awesome enough to provide some sample code in the in the public documentation for this part.  The code is intended for Python 2 but only required a few small changes to make it compatible with Python 3.

Let’s first talk about the build_signature function.  At this time the API uses HTTP request signing using the Log Analytics Workspace id and key to authenticate to the API.  In short this means you’ll have two sets of shared keys per workspace, so consider the workspace your authorization boundary and prioritize proper key management (aka use a different workspace for each workload, track key usage, and rotate keys as your internal policies require).

Breaking down the code below, we the string that will act as the header includes the HTTP method, length of request content, a custom header of x-ms-date, and the REST resource endpoint.  The string is then converted to a bytes object, and an HMAC is created using SHA256 which is then base-64 encoded.  The result is the authorization header which is returned by the function.

def build_signature(customer_id, shared_key, date, content_length, method, content_type, resource):
    x_headers = 'x-ms-date:' + date
    string_to_hash = method + "\n" + str(content_length) + "\n" + content_type + "\n" + x_headers + "\n" + resource
    bytes_to_hash = bytes(string_to_hash, encoding="utf-8")  
    decoded_key = base64.b64decode(shared_key)
    encoded_hash = base64.b64encode(
        hmac.new(decoded_key, bytes_to_hash, digestmod=hashlib.sha256).digest()).decode()
    authorization = "SharedKey {}:{}".format(customer_id,encoded_hash)
    return authorization

Not much needs to be said about the post_data function beyond that it uses the Python requests module to post the log content to the API.  Take note of the limits around the data that can be included in the body of the request.  Key takeaways here is if you plan pushing a lot of data to the API you’ll need to chunk your data to fit within the limits.

def post_data(customer_id, shared_key, body, log_type):
    method = 'POST'
    content_type = 'application/json'
    resource = '/api/logs'
    rfc1123date = datetime.utcnow().strftime('%a, %d %b %Y %H:%M:%S GMT')
    content_length = len(body)
    signature = build_signature(customer_id, shared_key, rfc1123date, content_length, method, content_type, resource)
    uri = 'https://' + customer_id + '.ods.opinsights.azure.com' + resource + '?api-version=2016-04-01'

    headers = {
        'content-type': content_type,
        'Authorization': signature,
        'Log-Type': log_type,
        'x-ms-date': rfc1123date
    }

    response = requests.post(uri,data=body, headers=headers)
    if (response.status_code >= 200 and response.status_code <= 299):
        print("Accepted")
    else:
        print("Response code: {}".format(response.status_code))

Last but not least we have the lambda_handler function which brings everything together. It first gets a listing of users, loops through each user to information about the access id and secret keys usage, creates a log record containing information about each key, converts the data from a dict to a JSON string, and writes it to the API. If the content is successfully delivered, the log for the Lambda will note that it was accepted.

def lambda_handler(event, context):

    # Enable logging to console
    logging.basicConfig(level=logging.INFO,format='%(asctime)s - %(name)s - %(levelname)s - %(message)s')

    try:

        # Initialize empty records array
        #
        key_records = []
        
        # Retrieve list of IAM Users
        logging.info("Retrieving a list of IAM Users...")
        users = query_iam_users()

        # Retrieve list of access keys for each IAM User and add to record
        logging.info("Retrieving a listing of access keys for each IAM User...")
        for user in users:
            key_records.extend(query_access_keys(user))
        # Prepare data for sending to Azure Monitor HTTP Data Collector API
        body = json.dumps(key_records)
        post_data(os.environ['WorkspaceId'], os.environ['WorkspaceKey'], body, os.environ['LogName'])

    except Exception as e:
        logging.error("Execution error",exc_info=True)

Once the data is delivered, it will take a few minutes for it to be processed and appear in the Log Analytics Workspace. In my tests it only took around 2-5 minutes, but I wasn’t writing much data to the API.  After the data processes you’ll see a new entry under the listing of Custom Logs in the Log Analytics Workspace.  The entry will be the log name you picked and with a _CL at the end.  Expanding the entry will display the columns that were created based upon the log entry.  Note that the columns consumed from the data you passed will end with an underscore and a character denoting the data type.

mylog

Now that the data is in the workspace, I can start querying it and creating some visualizations.  Azure Monitor uses the Kusto Query Language (KQL).  If you’ve ever created queries in Splunk, the language will feel familiar.

The log I created in AWS and pushed to the API has the following schema.  Note the addition of the underscore followed by a character denoting the column data type.

  • logged_Date (string) – The date the Lambda ran
  • user_s (string) – The AWS IAM User the key belongs to
  • account_number_s (string) – The AWS Account number the IAM Users belong to
  • AccessKeyId (string) – The id of the access key associated with the user which has been sanitized to show just the first 4 and last 4 characters
  • CreateDate_t (timestamp) – The date and time when the access key was created
  • LastUsedDate_t (timestamp) – The date and time the key was last used
  • Region_s (string) – The region where the access key was last used
  • Status_s (string) – Whether the key is enabled or disabled
  • ServiceName_s (string) – The AWS service where the access key was last used

In addition to what I’ve pushed, Azure Monitor adds a TimeGenerated field to each record which is the time the log entry was sent to Azure Monitor.  You can override this behavior and provide a field for Azure Monitor to use for this if you like (see here).  There are some other miscellaneous fields are inherited from whatever schema the API is drawing from.  These are fields such as TenantId and SourceSystem, which in this case is populated with RestAPI.

Since my personal AWS environment is quite small and the AWS IAM Users usage are very limited, my data sets aren’t huge.  To address this I created a number of IAM Users with access keys for the purpose blog.  I’m getting that out of the way so my AWS friends don’t hate on me. 🙂

One of core best practices in key management with shared keys is to ensure you rotate them.  The first data point I wanted to extract was which keys that existed in my AWS account were over 90 days old.  To do that I put together the following query:

AWS_Access_Key_Report_CL
| extend key_age = datetime_diff('day',now(),CreateDate_t)
| project Age=key_age,AccessKey=AccessKeyId_s, User=user_s
| where Age > 90
| sort by Age

Let’s walk through the query.  The first line tells the query engine to run this query against the AWS_Access_Key_Report_CL.  The next line creates a new field that contains the age of the key by determining the amount of time that has passed between the creation date of the key and today’s date.  The line after that instructs the engine to pull back only the key_age field I just created and the AccessKeyId_s, user_s , and status_s fields.  The results are then further culled down to pull only records where the key age is greater than 90 days and finally the results are sorted by the age of the key.

query1

Looks like it’s time to rotate that access key in use by Azure AD. 🙂

I can then pin this query to a new shared dashboard for other users to consume.  Cool and easy right?  How about we create something visual?

Looking at the trends in access key creation can provide some valuable insights into what is the norm and what is not.  Let’s take a look a the metrics for key creation (of the keys still exist in an enabled/disabled state).  For that I’m going to use the following query:

AWS_Access_Key_Report_CL
| make-series AccessKeys=count() default=0 on CreateDate_t from datetime(2019-01-01) to datetime(2020-01-01) step 1d

In this query I’m using the make-series operator to count the number of access keys created each day and assigning a default value of 0 if there are no keys created on that date.  The result of the query isn’t very useful when looking at it in tabular form.

query2.PNG

By selecting the Line drop down box, I can transform the date into a line grab which shows me spikes of creation in log creation.  If this was real data, investigation into the spike of key creations on 6/30 may be warranted.

quer2_2.PNG

I put together a few other visuals and tables and created a custom dashboard like the below.  Creating the dashboard took about an hour so, with much of the time invested in figuring out the query language.

dashboard

What you’ve seen here is a demonstration of the power and simplicity of Azure Monitor.  By adding a simple to use API, Microsoft has exponentially increased the agility of the tool by allowing it to become a single pane of glass for monitoring across clouds.   It’s also worth noting that Microsoft’s BI (business intelligence) tool Power BI has direct integration with Azure Log Analytics.  This allows you to pull that log data into PowerBI and perform more in-depth analysis and to create even richer visualizations.

Well folks, I hope you’ve found this series of value.  I really enjoyed creating it and already have a few additional use cases in mind.  Make sure to follow me on Github as I’ll be posting all of the code and solutions I put together there for your general consumption.

Have a great day!


Capturing and Visualizing Office 365 Security Logs – Part 1

Welcome back again my fellow geeks!

I’ve been busy over the past month nerding out on some pet projects.  I thought it would be fun to share one of those pet projects with you.  If you had a chance to check out my last series, I walked through my first Python experiment which was to write a re-usable tool that could be used to pull data from Microsoft’s Graph API (Microsoft Graph).

For those of you unfamiliar with Microsoft Graph, it’s the Restful API (application programming interface) that is used to interact with Microsoft cloud offerings such as Office 365 and Azure.  You’ve probably been interacting with it without even knowing it if through the many PowerShell modules Microsoft has released to programmatically interact with those services.

One of the many resources which can be accessed through Microsoft Graph are Azure AD (Active Directory) security and audit reports.  If you’re using Office 365, Microsoft Azure, or simply Azure AD as an identity platform for SSO (single sign-on) to third-party applications like SalesForce, these reports provide critical security data.  You’re going to want to capture them, store them, and analyze them.  You’re also going to have to account for the window that Microsoft makes these logs available.

The challenge is they are not available via the means logs have traditionally been captured on-premises by using syslogd, installing an SIEM agent, or even Windows Event Log Forwarding.  Instead you’ll need to take a step forward in evolving the way you’re used to doing things. This is what moving to the cloud is all about.

Microsoft allows you to download the logs manually via the Azure Portal GUI (graphical user interface) or capture them by programmatically interacting with Microsoft Graph.  While the former option may work for ad-hoc use cases, it doesn’t scale.  Instead we’ll explore the latter method.

If you have an existing enterprise-class SIEM (Security Information and Event Management) solution such as Splunk, you’ll have an out of box integration.  However, what if you don’t have such a platform, your organization isn’t yet ready to let that platform reach out over the Internet, or you’re interested in doing this for a personal Office 365 subscription?  I fell into the last category and decided it would be an excellent use case to get some experience with Python, Microsoft Graph, and take advantage of some of the data services offered by AWS (Amazon Web Services).   This is the use case and solution I’m going to cover in this post.

Last year I had a great opportunity to dig into operational and security logs to extract useful data to address some business problems.  It was my first real opportunity to examine large amounts of data and to create different visualizations of that data to extract useful trends about user and application behavior.  I enjoyed the hell out of it and thought it would be fun to experiment with my own data.

I decided that my first use case would be Office 365 security logs.  As I covered in my last series my wife’s Office 365 account was hacked.  The damage was minor as she doesn’t use the account for much beyond some crafting sites (she’s a master crocheter as you can see from the crazy awesome Pennywise The Clown she made me for Christmas).

img_4301

The first step in the process was determining an architecture for the solution.  I gave myself a few requirements:

  1. The solution must not be dependent on my home lab infrastructure
  2. Storage for the logs must be cheap and readily available
  3. The credentials used in my Python code needs to be properly secured
  4. The solution must be automated and notify me of failures
  5. The data needs to be available in a form that it can be examined with an analytics solution

Based upon the requirements I decided to go the serverless (don’t hate me for using that tech buzzword 🙂 ) route.  My decisions were:

  • AWS Lambda would run my code
  • Amazon CloudWatch Events would be used to trigger the Lambda once a day to download the last 24 hours of logs
  • Amazon S3 (Simple Storage Service) would store the logs
  • AWS Systems Manager Parameter Store would store the parameters my code used leveraging AWS KMS (Key Management Service) to encrypt the credentials used to interact with Microsoft Graph
  • Amazon Athena would hold the schema for the logs and make the data queryable via SQL
  • Amazon QuickSight would be used to visualize the data by querying Amazon Athena

The high level architecture is pictured below.

untitled

I had never done a Lambda before so I spent a few days looking at some examples and doing the typical Hello World that we all do when we’re learning something new.  From there I took the framework of Python code I put together for general purpose queries to the Microsoft Graph, and adapted it into two Lambdas.  One Lambda would pull Sign-In logs while the other would pull Audit Logs.  I also wanted a repeatable way to provision the Lambdas to share with others and get some CloudFormation practice and brush up on my very dusty Bash scripting.   The results are located here in one of my Github repos.

I’m going to stop here for this post because we’ve covered a fair amount of material.  Hopefully after reading this post you understand that you have to take a new tact with getting logs for cloud-based services such as Azure AD.  Thankfully the cloud has brought us a whole new toolset we can use to automate the extraction and storage of those logs in a simple and secure manner.

In my next post I’ll walk through how I used Athena and QuickSight to put together some neat dashboards to satisfy my nerdy interests and get better insight into what’s happening on a daily basis with my Office 365 subscription.

See you next post and go Pats!