Over the past few weeks I’ve been diving into the relatively new Azure product Azure Virtual Network Manager (AVNM). AVNM was first introduced back in late 2021 with the connectivity feature and security admin rule feature. In the past year both features have begun to trickle into general availability in some regions. I was interested in the Security Admin Rules feature so I did my usual thing and began to read through all the documentation and experiment with the service. I’ll be covering Security Admin Rules in another post. In this short post I will be focusing on how you onboard virtual networks to the connectivity and security admin rule features.
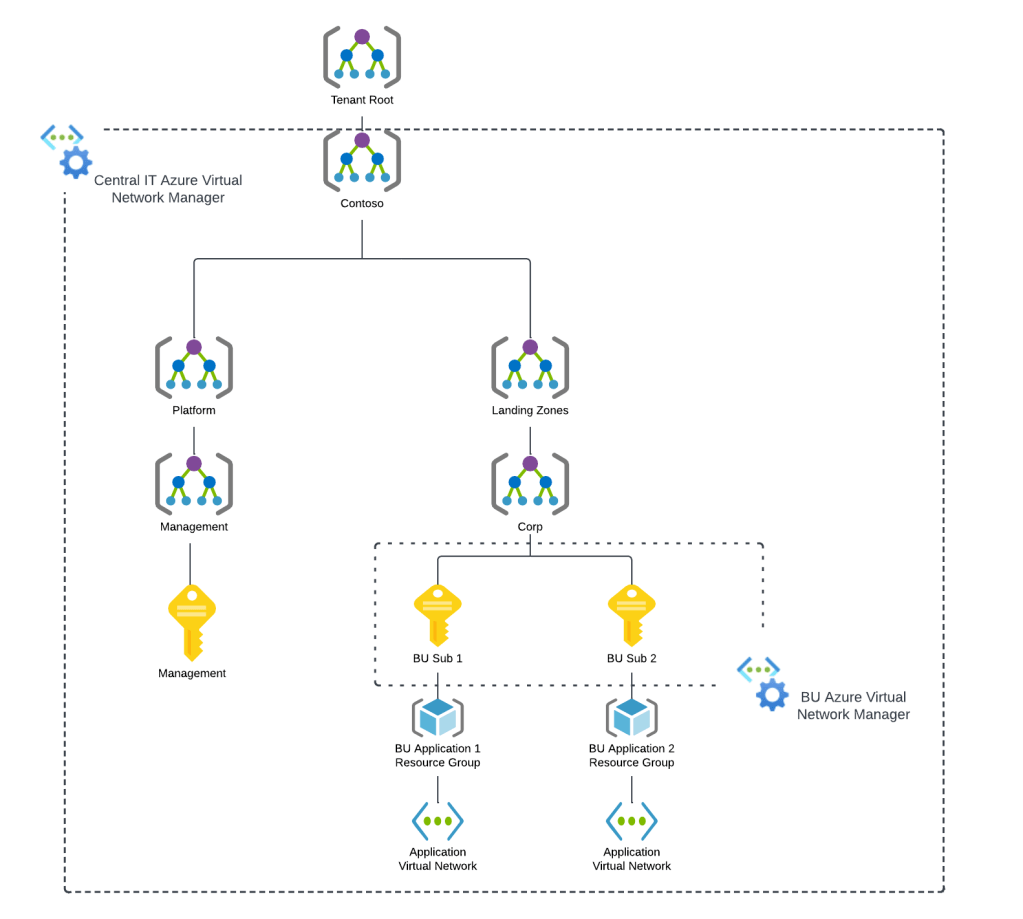
When an AVNM instance is created, it is assigned a scope of what it can manage. This can subscriptions added individually or it can be all subscriptions under a specific management group. A given scope can only have one AVNM instance assigned to it.
Azure Virtual network Manager Sample Architecture
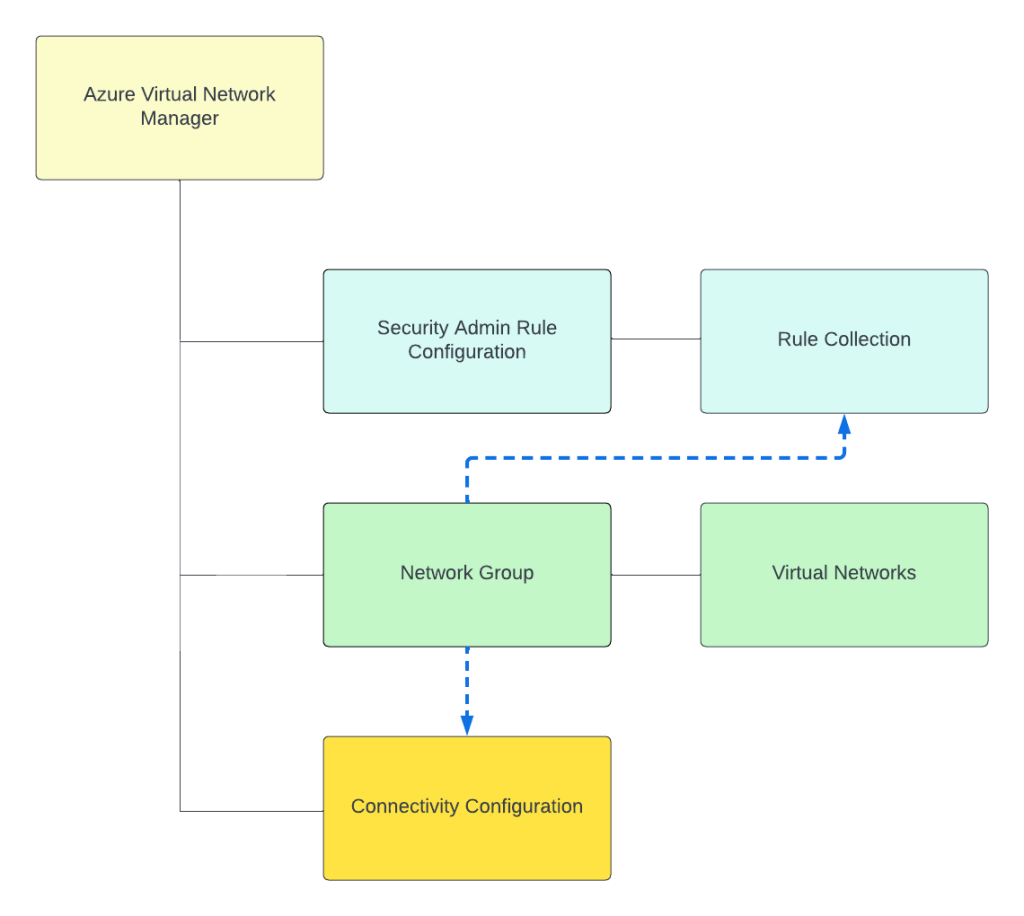
Today, under the assigned scope, AVNM can manage how virtual networks are connected to each other with the connectivity feature and what traffic is allowed or denied within the virtual network with the security admin rules feature superseding Network Security Groups. Within an AVNM instance you group virtual networks under the managed scope into a construct called a Network Group. Network Groups are then associated to either a connectivity or security admin rule configuration as seen below.
Network groups can contain multiple virtual networks and virtual networks can be members of multiple Network Groups. Virtual networks can be added to a Network Group manually or dynamically through Azure Policy. The rest of this post will focus on dynamic membership and some of the interesting properties of the Azure Policy definitions.
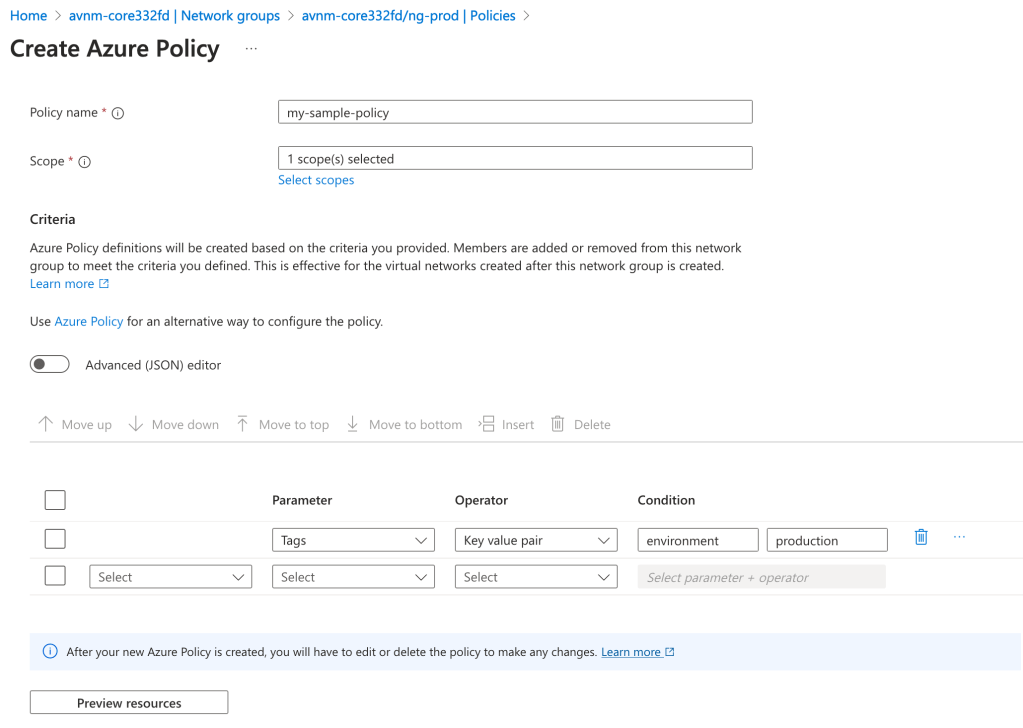
Before I dive into the policy definition I want to call out a neat feature the Product Group built into the solution. When accessing an AVNM instance from the Azure Portal there is a handy GUI-based tool included that can be used to graphically build the conditions on which virtual networks will be members of the Network Group. In the background, this tool builds out the Azure Policy definition and creates the assignment at the scopes you specify. This is one of the only products I’ve come across within Azure that assists the customer in building out an Azure Policy for the service. Great job by the product group!
Azure Policy builder to onboard virtual networks into a Network Group in Azure Virtual Network Manager
With the settings pictured above, I’m creating an Azure Policy to onboard all virtual networks tagged (there are a number of parameters and operators combinations you can use besides tags) with the key of environment and value of production under the specified scope to the Network Group. The policy will look something like this:
I’ve bolded the two properties I want you to key in on. The first property is the mode property. If you’ve written a custom Azure Policy or examined built-in policies you will likely be used to that property being set to either all or indexed. Here you will see it is set to Microsoft.Network.Data. This is one of the new resource provider modes that has been introduced which extends Azure Policy’s functionality. The other interesting property is the effect property. Again, you will likely be used to this being audit, deny, deployIfNotExists, etc. Instead, it is populated with a value of addToNetworkGroup. Both of these properties are specific to AVNM’s feature for dynamic members into its Network Groups.
Being the geek I am, I decided to try writing my own custom Azure Policy definition which would parameterize the the tag key, value, and resource id of the Network Group. Interestingly, you’re blocked from parameterizing the Network Group id due to a regex filter that has been put in. This regex filter validates that the Network Group id looks like an id and will reject if you try to do it as a parameter. I plan on submitting some feedback requesting this regex filter be removed which would allow for this to be fully parameterized. As of now, it looks like you’ll need an Azure Policy definition for each Network Group where you’re using dynamic membership.
Error message when parameterizing Network Group resource id
Once you create your Azure Policy definition and create the assignment, at the next policy evaluation the matching virtual networks will be added into the Network Group as dynamic members. The feature works exactly as described and is incredibly handy in quickly and efficiently onboarding new and existing virtual networks to a specific Network Group to apply a connectivity or security admin rule configuration.
Well folks that’s it for this short blog post. I found the dynamic membership and new Azure Policy properties interesting enough to warrant their own post. I’ve added an example working parameterized Azure Policy definition to my custom Azure Policy GitHub repo if you’re interested in messing around with it yourself.
Expect more posts to come on Azure Virtual Network Manager. Have a great night!
5/28/2024 – Updated to mention that objectid of security principal is now included in native diagnostic logs
Hello again folks! Today I’m going to bounce back into AOAI (Azure OpenAI Service) mode and cover a topic that frequently comes up with my customers in regards to securing the service. Over the past year I’ve covered the infrastructure and security controls available within the AOAI. Much of that focus was on accessing the service through an SDK (software development kit) or directly through the API. Today I’m going to spend some time talking about the security controls available to secure the Azure OpenAI Studio, which I’m going to refer to as Studio for the rest of this post.
If you’re unfamiliar with Studio, it’s a GUI-based experience for interacting with the data plane of the AOAI service. In my authorization post, I cover the difference between the service’s management and data planes. At a high level, the management plane is for operations “on the service” while the data plane is for operations “in the service”.
Azure OpenAI Service Management Plane vs Data Plane
Microsoft recommends using an SDK or the API directly when interacting with the data plane of the service. It’s a good recommendation because there are lots of knobs for you to turn to lock down the service and address gaps in the service. When the service is using through the Azure OpenAI Studio, you lose the ability to inject some type of control component between the user’s endpoint and the instance of AOAI. The rest of this post will cover why that is, what controls are available to you, and what risks you’ll have to accept if you opt to make Studio available to your users.
Before I jump into the details of what you get and what you don’t get, I want to cover what some of the main use cases are for using Studio versus accessing the service through an SDK or direct through the API. First and foremost, it should be obvious that GUIs are much more accessible than having to write code to interact with the API. For example, say I’m performing a PoC (proof-of-concept) of the service and I want to quickly test the gpt 3.5 model’s ability to answer a question in my field. For that I can use the Completions interface within Studio to get a chat-like interface with zero coding.
Example of Chat Completion functionality in Azure OpenAI Studio
Another use case may be I want a simple way to test the models on my organization’s data to see if the models can provide value to that data. I don’t want to invest a ton of time coding to perform this functionality because I don’t yet know if the models will be able to provide any value on top of my data.
A lot of the use for Studio comes down to its simplicity of use. If you need to do some basic PoC with minimal funding, using Studio can be a nice shortcut to doing all the code you’d need to do in order to interact with the API to perform the actions.
Long story short, if you’re offering this service to your business units you’re likely going to be asked to provide Studio access to your users. My goal here is to help you understand the risks and mitigations of doing so.
So how does the Azure OpenAI Studio work? It appears to use an MVC (model-view-controller) architecture (or something similar to it for those application developer purists who are much smarter than me). In simple terms for non-developers like myself, the Studio application instructs the user’s browser which data plane endpoints to call and then provides a pretty view in the user’s browser of the responses received from those endpoints.
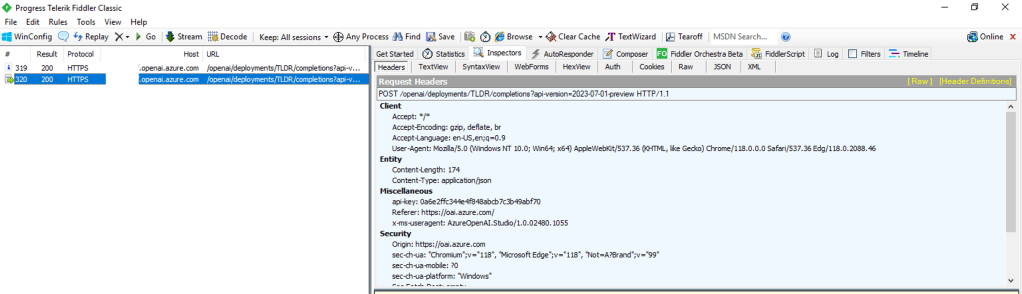
For you non-developers like myself, I find it helpful to perform an action within Studio and then review the Fiddler capture to observe what the browser did. In the Fiddler capture below, I used the Chat Completion interface in Studio to send a request a completion. You can see that the request was sent from my browser to the data plane endpoint of the service (openai.azure.com).
Fiddler capture of Chat Completion in Azure OpenAI Studio
This trait of the Studio can work to your advantage when you need to secure the Studio. If the calls are made from the user’s endpoint to the data plane, then that means network controls around the data plane can be used to enforce control over access to the Studio for the instance of AOAI. As I covered in my prior posts, AOAI is no different from other Microsoft PaaS services and provides the standard network controls which include the service firewall and support for Private Endpoints.
A common security standard for organizations using Azure is to use Private Endpoints for PaaS services. Private Endpoints allow you to restrict access to the public IP of a PaaS service and limit it to access through an endpoint deployed in the customer’s virtual network. Accessing the service through the Private Endpoint requires the user’s endpoint to be within your organization’s private network. This means by creating a Private Endpoint you can block access to access to the AOAI instance through Studio to endpoints within your private network. If the user attempts to access the AOAI instance through Studio outside of the private network, they’ll be blocked and will receive the error you see below.
Network controls blocking access through Azure OpenAI Studio
Placing your AOAI instance behind a Private Endpoint will be your primary means of controlling access to an AOAI instance through Studio. Creating the private endpoint and blocking public access keeps user’s from accessing the AOAI instance through Studio when hitting the public IP. However, users can still reach the AOAI instance through Studio if they are on the private network. You can lock that down by wrapping an NSG (Network Security Group) around the subnet containing the Private Endpoint, turning on Private Endpoint Network Policies in the subnet, and placing some type of mediator (such an Azure API Management instance) between the user’s endpoint and the AOAI instance. That will restrict the users to the API when interacting with the AOAI instance.
Example AOAI architecture
Outside of network controls, you don’t have much ability to control Studio access. There are no specific RBAC permissions that I’m aware of today that could be stripped from an RBAC role to prevent access to Studio. When it comes to authorization you should strive for least privilege as you’ve always done. My authorization blog has some guidance on how to handle that within the service.
Now that you understand what controls you have, let’s talk about the risks you’re going to need to accept if you plan on granting users access to Studio.
First and foremost, you’re going to need to accept the very basic logging provided by the diagnostics logging available within an AOAI instance. As I cover in the linked post above, the logging is minimal. Prompts and responses will not be logged, traceability in the logs will be limited, and you won’t get metrics as to token usage per call. The lack of visibility into prompts and responses becomes all that much more critical if shut off the built in content filtering and abuse monitoring.
Next up, you won’t have the ability to limit the usage of service on a per user or per app basis. AOAI has API limits around requests and tokens. There are capabilities today to control this on per user or per app basis within a single instance of AOAI today.
Let me summarize what we covered today:
Network controls are your primary means to securing access to an AOAI instance through the Azure OpenAI Studio
Placing an AOAI instance behind a Private Endpoint and blocking public access restrict Azure OpenAI Studio access to the AOAI instance to endpoints within your private network
Azure OpenAI Studio access to an AOAI instance can be blocked completely by placing the AOAI instance behind a private endpoint, inserting some sort of mediation solution (such as API Management, and wrapping an NSG around the subnet containing the Private Endpoint which blocks all access but traffic from the mediator.
Exercise least privilege using Azure RBAC but be aware there is no specific permission that allows access to the Azure OpenAI Studio
The diagnostic logs provided limited information. Prompts and responses are not logged to the diagnostic logs and neither are token consumption. The former will mean you don’t have visibility into the prompts users are making (think abuse, inclusion of PII, etc) and the latter means you won’t be able to tell who is creating the costs within the instance.
Considering all of the above, my recommendation to customers it to establish an approval process for usage of Studio and ensure there is a strong business need to justify accepting the risks outlined above. The lack of logging is the real gut punch for me. That is a lot of risk, especially since most regulated orgs opt out of content filtering and abuse monitoring.
Nothing to fancy in this post, but hopefully it helps some folks better understand the security options for Azure OpenAI Studio access.
Today I’m taking a break from my AI series to cover an interesting topic that came up at a customer.
My customer base exists within the heavily regulated financial services industry which means a strong security posture. Many of these customers have requirements for inspection of network traffic which includes traffic between devices within their internal network space. This requirement gets interesting when talking inspection of traffic destined for a service behind a Private Endpoint. I’ve posted extensively on Private Endpoints on this blog, including how to perform traffic inspection in a traditional hub and and spoke network architecture. One area I hadn’t yet delved into was how to achieve this using Azure Virtual WAN (VWAN).
VWAN is Microsoft’s attempt to iterate on the hub and spoke networking architecture and make the management and setup of the networking more turnkey. Achieving that goal has been an uphill battle for VWAN with it historically requiring very complex architectures to achieve the network controls regulated industries strive for. There has been solid progress over the past few months with routing intent and support for additional third-party next generation firewalls running in the VWAN hub such as Palo Alto becoming available. These improvements have opened the doors for regulated customers to explore VWAN Secure Hubs as a substitute for a traditional hub and spoke. This brings us to our topic: How do VWAN Secure Hubs work when there is a requirement to inspect traffic destined for a Private Endpoint?
My first inclination when pondering this question was that it would work in the same way a traditional hub and spoke works. In past posts I’ve covered that pattern. You can take a look at this repository I’ve put together which walks through the protocol flows in detail if you’re curious. The short of it is inspection requires enabling network policies for the subnet the Private Endpoints are deployed to and SNATing at the firewall. The SNATing is required at the firewall because Private Endpoints do not obey user-defined routes defined in a route table. Without the SNAT you get asymmetric routing that becomes a nightmare of troubleshooting to identify. Making it even more confusing, some services like Azure Storage will magically keep traffic symmetric as I’ve covered in past posts. Best practice for traditional hub and spoke is SNATing for firewall inspection with Private Endpoints.
Hub and Spoke Firewall Inspection
My first stop was to read through the Microsoft documentation. I came across this article first which walks through traffic inspection with Azure Firewall with a VWAN Secure Hub. As expected, the article states that SNAT is required (yes I’m aware of the exception for Azure Firewall Application Rules, but that is the exception and not the rule and very few in my customer space use Azure Firewall). Ok great, this aligns with my understanding. But wait, this article about Secure Hub with routing intent does not mention SNAT at all. So is SNAT required or not?
When public documentation isn’t consistent (which of course NEVER happens) it’s time to lab and see what we see. I threw together a single region VWAN Secure Hub with Azure Firewall, enabled routing intent for both Internet and Private traffic, and connected my home lab over a S2S VPN. I created then Private Endpoint for a Key Vault and Azure SQL resource. Per the latter article mentioned above, I enabled Private Endpoint Network Policies for the snet-svc subnet in the spoke virtual network. Finally, I created a single Network Rule allowing traffic for 443 and 1433 from my lab to the spoke virtual network. This ensured I didn’t run into the transparent proxy aspect of Application Rules throwing off my findings.
Lab used
If you were doing this in the “real world” you’d setup a packet capture on the firewall and validate you see both sides of the conversation. If you’ve used Azure Firewall, you’re well aware it does not yet support packet captures making this impossible. Thankfully, Microsoft has recently introduced Azure Firewall Structure Firewall Logs which include a log called Azure Firewall Flow Trace Log. This log will show you the gooey details of the TCP conversation and helps to fill the gap of troubleshooting asymmetric traffic while Microsoft works on offering a packet capture capability (a man can dream, can’t he?).
While the rest of the Azure Firewall Structured Logs need nothing special to be configured, the Flow Trace Logs do (likely because as of 8/20/2023 they’re still in public preview). You need to follow the instructions located within this document. Make sure you give it a solid 30 minutes of completing the steps to enable the feature before you enable the log through the diagnostic settings of the Azure Firewall. Also, do not leave this running. Beyond the performance hit that can occur because of how chatty this log is, you could also be in a world of hurt for a big Log Analytics Workspace bill if you leave it running.
Once I had my lab deployed and the Flow Trace Logs working, I next went ahead testing using the Test-NetConnection PowerShell cmdlet from a Windows machine in my home lab. This is a wonderful cmdlet if you need something built-in to Windows to do a TCP Ping.
Testing Azure SQL via Private Endpoint
In the above image you can see that the TCP Ping to port 1433 of an Azure SQL database behind a Private Endpoint was successful. Review of the Azure Firewall Network Logs showed my Network Rule firing which tells me the TCP SYN at least passed through providing proof that Private Endpoint Network Policies were successfully affecting the traffic to the Private Endpoint.
What about return traffic? For that I went to the Flow Trace Logs. Oddly enough, the firewall was also receiving the SYN-ACK back from the Private Endpoint all without SNAT being configured. I repeated the test for a Azure Key Vault behind a Private Endpoint and observed the same behavior (and I’ve confirmed in the Azure Key Vault needs SNAT for return traffic in the past in a standard hub and spoke).
Azure Firewall Flow Trace Log
So is SNAT required or not? You’re likely expecting me to answer yes or no. Well today I’m going to surprise you with “I don’t know”. While testing with these two services in this architecture seemed to indicate it was not, I’ve circulated these findings within Microsoft and the recommendation to SNAT to ensure flow symmetry remains. As I’ve documented in prior posts, not all Azure services behave the same way with traffic symmetry and Azure Private Endpoints (Azure Storage for example) and for consistent purposes you should be SNATing. Do not rely on your testing of a few services in a very specific architecture as being gospel. You should be following the practices outlined in the documentation.
I feel like I’m ending this blog Sopranos-style with fade to black, but sometimes even tech has mystery. In this post you got a taste of how Flow Trace Logs can help troubleshoot traffic symmetry issues when using Azure Firewall and you learned that not all things in the cloud work the way you expect them to work. Sometimes that is intentional and sometimes it’s not intentional. When you run into this type of situation where behavior you’re observing doesn’t match documentation, it’s always best to do what is documented (in this case you should be doing SNAT). Maybe it’s something you’re doing wrong (this is me we’re talking about) or maybe you don’t have all the data (I tested 2 of 100+ services). If you go with what you experience, you risk that undocumented behavior being changed or corrected and then being in a heap of trouble in the middle of the night (oh the examples I could give of this across my time at cloud providers over a glass of Titos).
Well folks, that wraps things up. TLDR; SNAT until the documentation says otherwise regardless of what you experience.
Over the past few years I’ve written a ton on Private Endpoints for PaaS (platform-as-a-service) services Microsoft provides. I haven’t written anything about the Private Link service that powers the Private Endpoints. There is a fair amount of community knowledge and documentation on building a Private Link service behind an Azure Load Balancer, but far less on how to do it behind an Application Gateway (Adam Stuart’s video on it is a wonderful resource). Today, I’m going to make an attempt at furthering that collective community knowledge with a post on the feature and give you access to a deployable lab you can use to replicate what I’ll be writing about in this post. Keep in mind the service is still in public preview, so remember to check the latest documentation to validate the correctness of what I discuss below.
Let’s get to it!
I’ll be using a lab environment that I’ve built which mimics a typical enterprise environment. The lab uses a hub-and-spoke architecture where on-premises connectivity and centralized mediation and optional inspection is provided in a transit virtual network which is peered to all spoke virtual network. A shared services virtual network provides core infrastructure services such as DNS. The other spoke contains the workload which is a simple Python application deployed in Azure App Services.
The App Service has been configured to inject both its ingress and egress traffic into the virtual network using a combination of Private Endpoints and Regional VNet Integration. An Application Gateway has been placed in front of the App Service and has been deployed with both a public listener (listening on 8443) and a private listener (listening on 443). The application is accessible to internal clients (such as the VMs in the shared service virtual network) by issuing an HTTP request to https://www.jogcloud.com. Azure Private DNS provides the necessary DNS resolution for internal clients.
The deployed Python application retrieves the current time from a public API (assuming the API is up) and returns the source IP on the HTTP request as well as the X-Forwarded-For header. I’ll use this application to show some of the caveats of this pattern that are worth knowing if you ever plan to operationalize it.
To maintain visibility and control of traffic coming in either publicly or privately to the application, the route table assigned to the Application Gateway subnet is configured to route traffic through the Azure Firewall instance in the hub before allowing the traffic to the App Service. This pattern allows for democratization of Application Gateway while maintaining the ability to exercise additional IDS/IPS (intrusion detection/intrusion prevention) via the security appliance in the hub.
Lab Environment
Imagine this application is serving up confidential data and you need to provide a partner organization with access. Your information security team does not want the partner accessing the application over the Internet due to the sensitivity of the information the partner will be accessing. While direct connectivity with the partner is an option, it would likely result in a significant amount of design to ensure the partner’s network only knows about the application IP space and appropriate firewall rules are in place to limit access to the Application Gateway endpoint. In this scenario, your organization will be the provider and the customer’s organization will be the consumer. I don’t know about you, but I’ve been in this situation a lot of times in my past. Back in the day (yeah I’m old, what of it?) you’d have to go the direct connectivity route and you’d spend months putting together a design and getting it approved by the powers that be. Let’s now look at how the new Private Link feature of Application Gateway can make this whole problem a lot easier to solve.
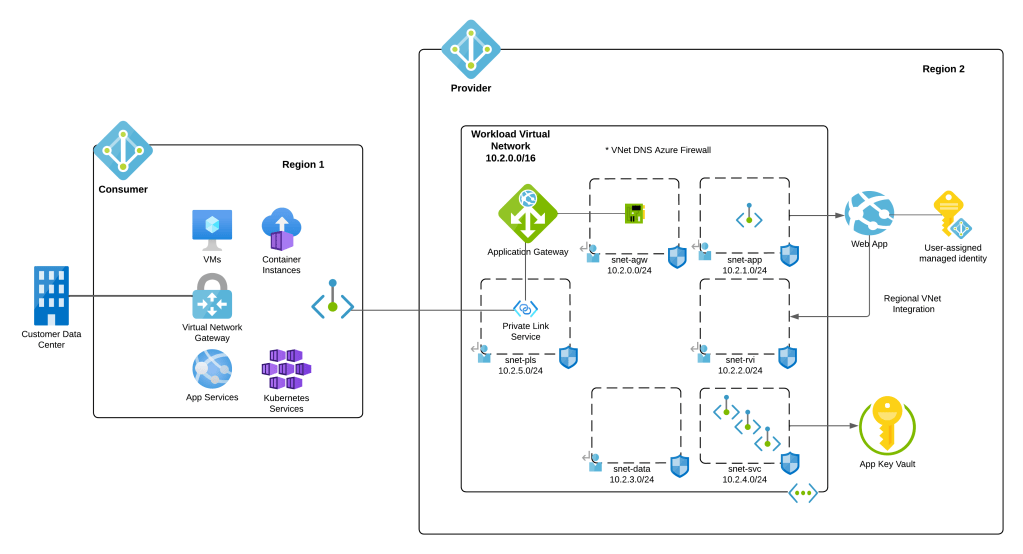
Assume this partner has a presence in Azure so we don’t have to get into the complexity of alternatives (such as building an isolated virtual network with VPN Gateway the partner connects to). The service could be exposed to the customer using the architecture below. Note that I’ve trimmed down the provider environment to show only the workload virtual network and illustrated a few compute services on the consumer end that are capable of accessing services exposed through Private Endpoints.
Goal State
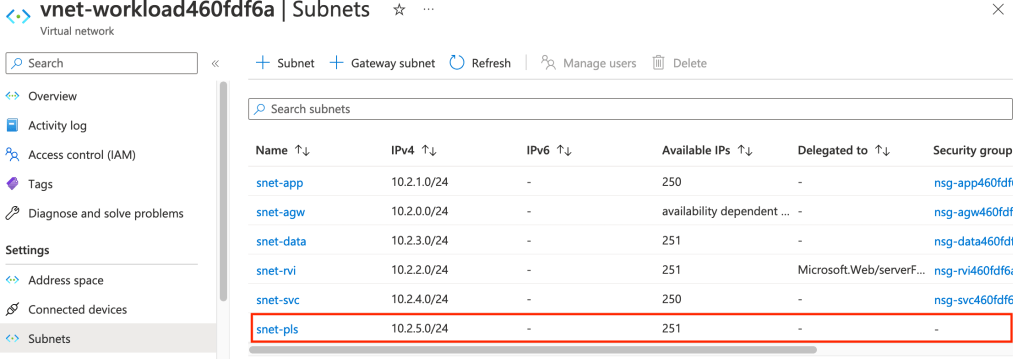
In the above image you will notice a new subnet in the provider’s virtual network. This subnet is used for the Private Link configuration. Traffic entering the provider environment will be NATed to an IP within this subnet. You can opt to use an existing subnet, but I’d recommend dedicating a subnet instead vs mixing it within the any of the application tier subnets.
There are considerations when sizing the subnet. Each IP allocated to the subnet can be used to service 64,000 connections and you can have up to eight IP addresses as of today allowing you to escape with a /28 (5 IP addresses reserved by Azure + 8 IPs for PrivateLink configuration). Just remember this is preview so that limit could be changed in the future. For the purposes of this post I used a /24 since I’m terrible at subnetting.
New subnet for Private Link Configuration
It’s time to create the Private Link configuration now that the subnet is in place. This can be done in all the usual ways (Portal, CLI, PowerShell, REST). When using the Portal you will need to navigate to the Application Gateway instance you’re using, select the Private Link menu item and select the option to add a new Private Link configuration.
Private Link Configuration Setup
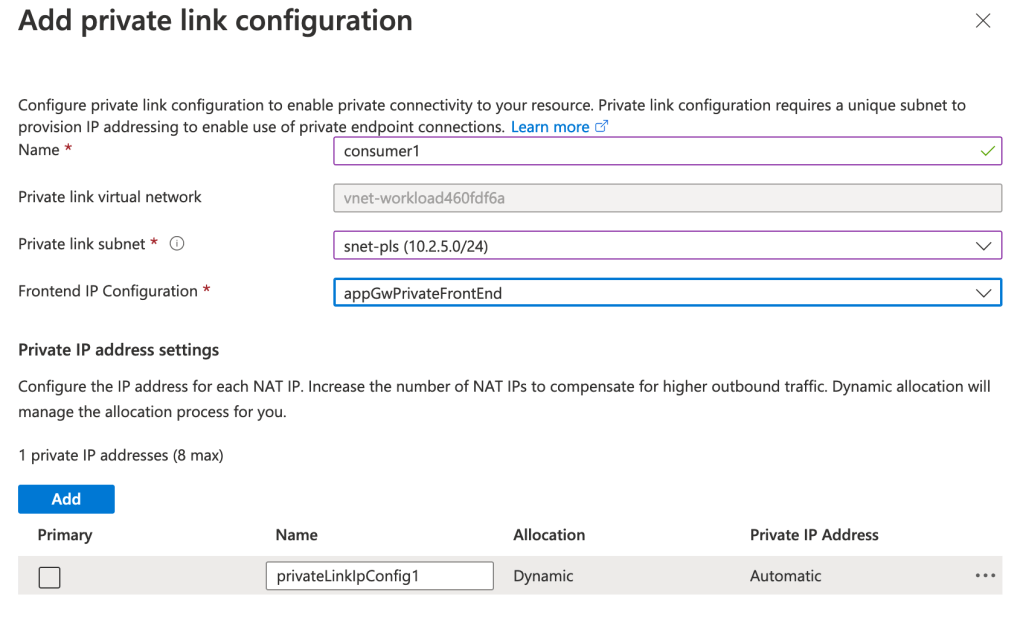
On the next screen you will need to select the subnet you’ll use for the Private Link configuration. You will also pick the listener you want to expose and determine the number of IPs you want to allocate to the service. Note that both the public and private listeners are available. If you’re exposing a service within your virtual network, you’ll likely be creating these with private listeners almost exclusively. A use case for a public listener might be a single client wants a more consistent network experience provided by their ExpressRoute or VPN connectivity into Azure vs going over the Internet.
Private Link configuration
Once completed, you can freely create Private Endpoints for your service within the same tenant. Within the same tenant, your Private Link service will be detected when creating a Private Endpoint as seen below. All that is left for you to do is create a DNS entry that matches the FQDN you are presenting within the certificates loaded on your Application Gateway. At this point you should be saying, “That’s all well and good Matt, but my use case is providing this to a consumer in a DIFFERENT tenant.” Let’s explore that scenario.
Creating Private Endpoint in same tenant
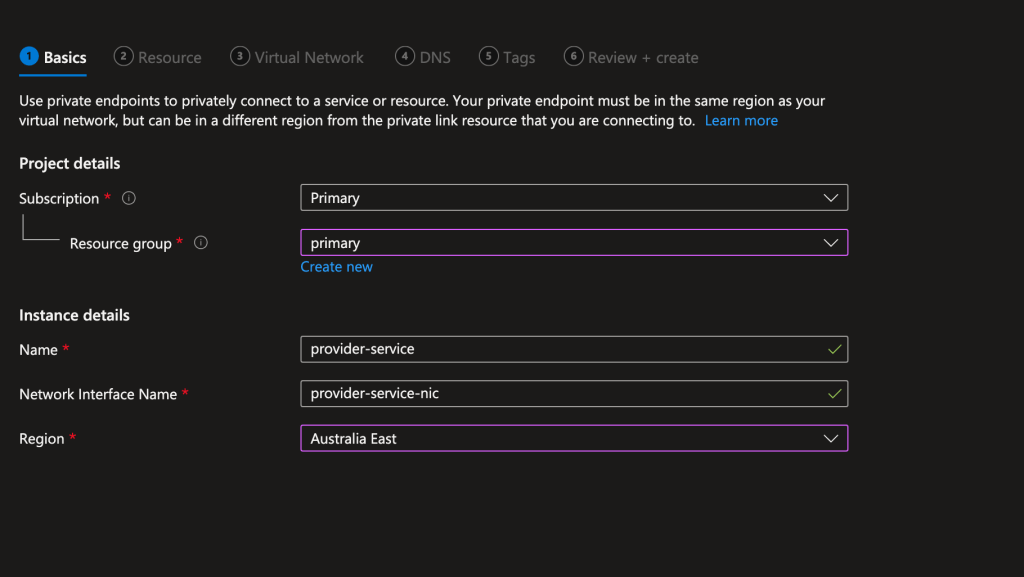
I switched to a subscription in a separate Azure AD tenant which would represent the consumer. In this tenant I created a virtual network with a single subnet with the IP space of 10.1.0.0/16 which overlaps with the provider’s network demonstrating that overlapping IP space doesn’t matter with Private Link. In that subnet I placed a VM running Ubuntu that I would use to SSH in. I created this resources in the Australia East region to demonstrate that the service exposed via Private Link can have Private Endpoints created for it in any other Azure region. Connections made through the Private Endpoint will ride the Azure backbone to the destined service.
Once the basics were in place for testing, I then created the Private Endpoint for the provider service within the consumer’s network. This can be done through the Private Link Center blade using the Private Endpoint menu item in the Azure Portal as seen below.
Creation of Private Endpoint
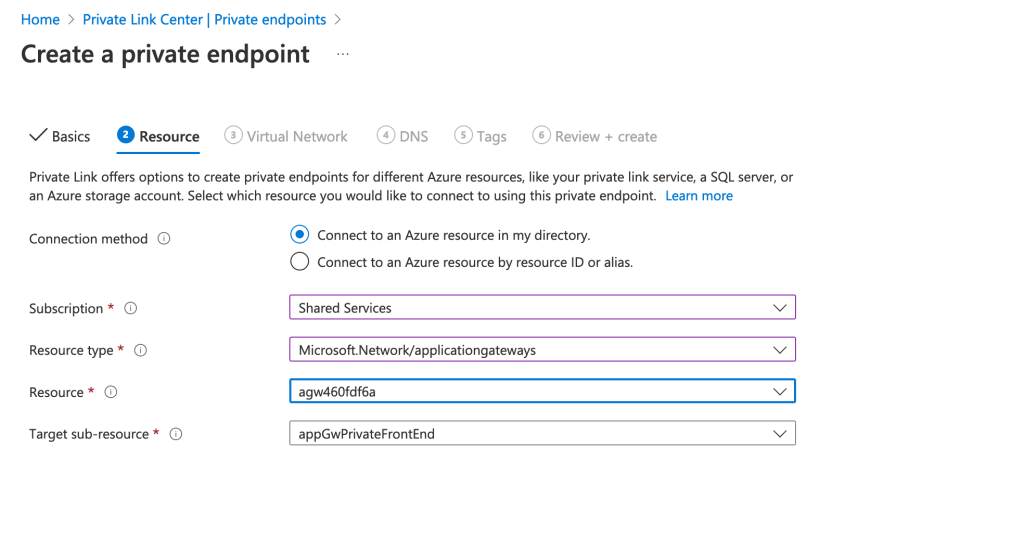
On the resource screen you will need to provide the resource id of the Application Gateway and the listener name. This is additional information you would need to pass to the consumer of any Application Gateway Private Link enabled service.
Private Endpoint Creation – Resource
Bouncing back to the provider tenant, I navigated back to the Application Gateway resource and the Private Link menu item under the Private endpoint connections section. Private Endpoint creation for Private Link services across tenant work via request and approval process. Here I was able to approve the association of the consumer’s Private Endpoint with the Private Link service in the provider tenant.
Approval of Private Endpoint association
Once approved, I bounced back to the consumer tenant and grabbed the IP address assigned to the Private Endpoint that was created. I then SSH’d into the Ubuntu VM and created a DNS entry in the host file of the VM for the service I was consuming. In this scenario, I had created a listener on the Application Gateway which handles all requests from *.jogcloud.com. Once the DNS record was created, I then used curl to issue a request to the application. Success!
Successful access of application from consumer
The application spits back the client IP and X-Forwarded-For header of the HTTP request. Ignore the client IP of 169.254.129.1, that is appearing due to the load balancer component of the App Service. Focus instead on the X-Forwarded-For. Notice that the first value in the header is the NATd IP from the subnet that was dedicated to the Private Link service. The next IP in line is the private IP address of the Azure Firewall instance. As I mentioned earlier, the Application Gateway is configured to send incoming traffic through the Azure Firewall instance for additional inspection before passing on to the App Service instance. The Azure Firewall is configured for NAT to ensure traffic symmetry in this scenario.
What I want you to take away from the above is that the Private Link service is NATing the traffic, so unless the consumer has a forward web proxy on the other end appending to the X-Forwarded-For header (or potentially other headers to aid with identification), troubleshooting a user’s connection will take careful correlation of requests across App Gateway, Azure Firewall, and the underlining application logs. In the below image, you can see I used curl to add a value to the X-Forwarded-For header which was carried on through the request.
Request with X-Forwarded-For value added by consumer
What I love about this integration is it’s very simple to setup and it allows a whole bunch of additional security controls to be introduced into the flow such as the Application Gateway WAF or a firewall’s IDS/IPS features.
Here are some key takeaways for you to ponder on over this holiday break:
For HTTP/HTTPS traffic, the Application Gateway Private Link pattern allows for the introduction of additional security controls into the network flow beyond what you’d get with a Private Link service fronted by an Azure Standard Load Balancer
Setup for the consumer is very simple. All you need to do is provide them with the resource id of the application gateway and the listener name. They can then use the native Private Endpoint creation experience to setup access to your service.
Don’t forget the importance of ensuring the customer trusts the certificate the Application Gateway is providing and can reach applicable CRL/OCSP endpoints if you’re using them. Best bet is to use a trusted 3rd party certificate authority.
DNS DNS DNS. The customer will need to manage the relevant DNS records on their end. You will want to ensure they know which FQDNs you are including within your certificate so the records they create match those FQDNs. If there is a mismatch, any secure session setup will fail.
With that said, feel free to give the feature a try. You can use the lab I’ve posted on GitHub and the steps I’ve outlined in this blog to experiment with the service yourself.