Update 11/4/2024 – Added limitations Update 10/11/2024 – Updated with generally available announcement
Welcome back! Today I’m going to step back from the Generative AI world and talk about some good ole networking. Networking is one of those technical components of every solution that gets glossed over until the rubber hits the road and the application graduates to “production-worthy”. Sitting happily beside security, it’s the topic I’m most often asked to help out with at Microsoft. I’m going to share a new feature has gone generally available under the radar that is pretty damn cool, even if a bit confusing.
Organizations in the regulated space frequently have security controls where a simple 5-tuple-based firewall rule at OSI layer 4 won’t suffice and traffic inspection needs to occur to analyze layer 7. Take for an example a publicly facing web application deployed to Azure. These applications can be subject to traffic inspection at multiple layers like an edge security service (Akamai, CloudFlare, FrontDoor, etc) and again when the traffic enters the customer’s virtual through a security appliance (F5, Palo Alto, Application Gateway, Azure Firewall, etc). Most of the time you can get away with those two inspection points (edge security service and security appliance deployed into virtual network) for public traffic and one inspection point for private traffic (security appliance deployed into virtual network and umpteenth number of security appliances on-premises). However, that isn’t always the case.
Many customers I work with have robust inspection requirements that may require multiple inspection points within Azure. The two most common patterns where this pops up is when traffic first moves through an Application Gateway or APIM (API Management) instance. In these scenarios some customers want to funnel the traffic through an additional inspection point such as their third-party firewall for additional checks or a centralized choke point managed by information security (in the event Application Gateways / APIM have been democratized). When the backend is a traditional virtual machine or virtual network injected/integrated (think something like an App Service Environment v3) the routing is quite simple and looks like something like the below.
Traffic inspection with traditional virtual machine or VNet Injected/VNet integrated service
In the above image we slap a custom route table on the Application Gateway subnet, and add a user-defined route that says when contacting the subnet containing the frontend resources of the application, it needs to go the firewall first. To ensure the symmetry of return traffic, we put a route table on the frontend subnet with a user-defined route that says communication to the Application Gateway subnet needs to also go to the firewall. The routes in these two route tables are more specific than the system route for the virtual network and take precedence forcing both the incoming and return traffic to flow symmetrically through the firewall. Easy enough.
The routing when inspecting traffic to services which receive their inbound traffic via a Private Endpoint (such as an App Service running in a Premium App Services Plan, a Storage Account, a Key Vault, etc) that inspection gets more challenging. These challenges exist for both controlling the traffic to the Private Endpoint and controlling the return traffic.
When a Private Endpoint is provisioned in a virtual network, a new system route is injected into the route tables of each subnet in that virtual network AND any peered virtual networks. This route is a /32 for the IP address assigned to the network interface associated with the Private Endpoint as seen in the image below.
System route added by the creation of a Private Endpoint in a virtual network
Historically, to work around this you had to drop /32 routes everywhere to override those routes to push the incoming traffic to the Private Endpoints through an inspection point. This was a nightmare at scale as you can imagine. Back in August 2023, Microsoft introduced what they call Private Endpoint Network Policies, which is a property of a subnet that allows you to better manage this routing (in addition to optionally enforcing Network Security Groups on Private Endpoints) by allowing less specific routes to override the more specific Private Endpoint /32 routes. You set this property to Enabled (both this routing feature and network security group enforcement) or RouteTableEnabled (just this routing feature). This property is set on the subnet you place the Private Endpoints into. Yeah I know, confusing because that is not how routing is supposed to work (where less specific routes of the same length override more specific routes), but this is an SDN (software defined network) so they’ll do what they please and you’ll like it.
Private Endpoint route invalid because Private Endpoint Network Policy property set to RouteTableEnabled
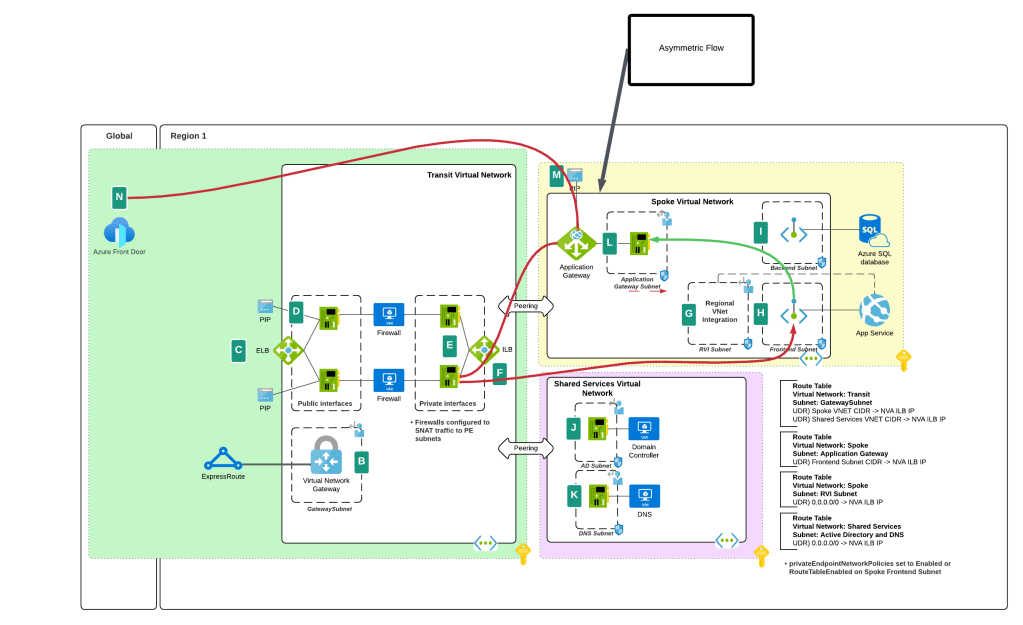
While this feature helped to address traffic to the Private Endpoint, handling the return traffic wasn’t so simple. Wrapping a custom route table around a subnet containing Private Endpoints does nothing to control return traffic from the Private Endpoints. They do not care about your user-defined routes and won’t honor them. This created an asymmetric traffic flow where incoming traffic was routed through the inspection point but return traffic bypassed it and went direct to the calling endpoint.
This misconfiguration was very common in customer environments and rarely was noticed because many TCP sessions with Private Endpoints are short lived and thus the calling client isn’t affected by the TCP RST sent by the firewall after X number of minutes. Customers could work around this by SNATing to the NVA’s (inspection point) IP address and ensure the return traffic was sent back to the NVA before it was passed back to the calling client. What made it more confusing was some services “just worked” because Microsoft was handling that symmetry in the data plane of the SDN. Azure Storage was an example of such a service. If you’re interested in understanding the old behavior, check out this post.
Prior asymmetric behavior without SNAT at NVA
You’ll notice I said “prior” behavior. Yes folks, SNATing when using a 3rd-party NVA (announcement is specific to 3rd-party NVAs. Those of you using Azure Firewall in a virtual network, Azure Firewall in a VWAN Secure Hub, or a 3rd-party NVA in a VWAN Secure Hub will need to continue to SNAT for now (As of 11/2024) until this feature is extended to those use case.
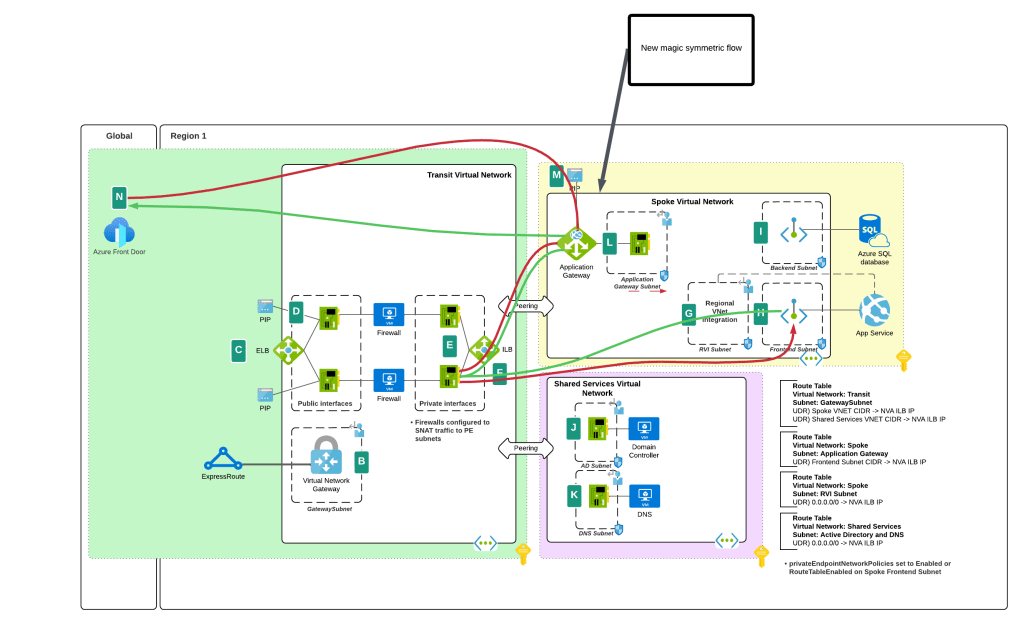
I bet you’re thinking “Oh cool, Microsoft is now having Private Endpoints honor user-defined routes in route tables”. Ha ha, that would make far too much sense! Instead Microsoft has chosen to require resource tags on the NICs of the NVAs to remove the SNAT requirement. Yeah, wouldn’t have been my choice either but here we are. Additionally, in my testing, I had it working without the resource tags to get a symmetric flow of traffic. My assumption (and total assumption as an unimportant person at Microsoft) is that this may be the default behavior on some of the newer SDN stacks while older SDN stacks may require the tags. Either way, do what the documentation says and put the tags in place.
As of today (10/11/2024) the generally available documentation is confusing as to what you need to do. I’ve provided some feedback to the author to fix some of the wording, but in the meantime let me explain what you need to do. You need to create a resource tag on either the NIC (non-VMSS) or VM instance (VMSS) that has a key of disableSnatOnPL with a value of true.
Magic of SDN ensuring symmetric flowwithout SNAT
TLDR; SNAT should no longer be required to ensure symmetric traffic flow when placing an NVA between an endpoint and a Private Endpoint if you have the proper resource tag in place. My testing of the new feature was done in Central US and Canada Central with both Azure Key Vault and Azure SQL. I tested when the calling endpoint was within the same virtual network, when it was in a peered virtual network connected in a hub and spoke environment, and when the calling machine was on-premises calling a private endpoint in a spoke. In all scenarios the NVA showed a symmetric flow of traffic in a packet capture.
10/29/2024 – Microsoft has announced a deployment option referred to as a data zone (https://azure.microsoft.com/en-us/blog/accelerate-scale-with-azure-openai-service-provisioned-offering/). Data zones can be thought of as data sovereignty boundaries incorporated into the existing global deployment option. This will significantly ease load balancing so you will no longer need to deploy individual regional instances and can instead deploy a single instance with a data zone deployment within a single subscription. As you hit the cap for TPM/RPM within that subscription, you can then repeat the process with a new subscription and load balance across the two. This will result in fewer backends and a more simple load balancing setup.
Welcome back folks!
Today I’m back again talking load balancing in AOAI (Azure OpenAI Service). This is an area which has seen a ton of innovation over the past year. From what began as a very basic APIM (API Management) policy snippet providing randomized load balancing was matured to add more intelligence by a great crew out of Microsoft via the “Smart” Load Balancing Policy. Innovative Microsoft folk threw together a solution called PowerProxy which provides load balancing and other functionality without the need for APIM. Simon Kurtz even put together a new Python library to provide load balancing at the SDK-level without the need for additional infrastructure. Lots of great ideas put into action.
The Product Group for APIM over at Microsoft was obviously paying attention to the focus in this area and have introduced native functionality which makes addressing this need cake. With the introduction of the load balancer and circuit breaker feature in APIM, you can now perform complex load balancing without needing a complex APIM policy. This dropped with a bunch of other Generative AI Gateway (told you this would become an industry term!) features for APIM that were announced this week. These other features include throttling based on tokens consumed (highly sought after feature!), emitting token counts to App Insights, caching completions for optimization of token usage, and a simpler way to onboard AOAI into APIM. Very cool stuff of which I’ll be covering over the next few weeks. For this post I’m going to focus on the new load balancing and circuit breaker feature.
Before I dive into the new feature I want to do a quick review of why scaling across AOAI instances is so important. For each model you have a limited amount of requests and tokens you can pass to the service within a given subscription within a region. These limits vary on a per model basis. If you’re consuming a lot of prompts or making a lot of requests it’s fairly easy to hit these limits. I’ve seen a customer hit the limits within a region with one document processing application. I had another customer who deployed a single Chat Bot in a simple RAG (retrieval augmented generation) that was being used by large swath of their help desk staff and limits were quickly a problem. The point I’m making here is you will hit these limits and you will need to add figure out how to solve it. Solving it is going to require additional instances in different Azure regions likely spread across multiple subscriptions. This means you’ll need to figure out a way to spread applications across these instances to mitigate the amount of throttling your applications have to deal with.
Load Balancing Azure OpenAI Service
As I covered earlier, there are a lot of ways you can load balancing this service. You could do it at the local application using Simon’s Python library if you need to get something up and running quickly for an application or two. If you have an existing deployed API Gateway like an Apigee or Mulesoft, you could do it there if you can get the logic right to support it. If you want to custom build something from scratch or customize a community offering like PowerProxy you could do that as well if you’re comfortable owning support for the solution. Finally, you have the native option of using Azure APIM. I’m a fan of the APIM option over the Python library because it’s scalable to support hundreds of applications with a GenAI (generative AI) need. I also like it more than custom building something because the reality is most customers don’t have the people with the necessary skill sets to build something and are even less likely to have the bodies to support yet another custom tool. Another benefit of using APIM include the backend infrastructure powering the solution (load balancers, virtual machines, and the like) are Microsoft’s responsibility to run and maintain. Beyond load balancing, it’s clear that Microsoft is investing in other “Generative AI Gateway” types of functionality that make it a strategic choice to move forward with. These other features are very important from a security and operations perspective as I’ve covered in past posts. No, there was not someone from Microsoft holding me hostage forcing me to recommend APIM. It is a good solution for this use case for most customers today.
Ok, back to the new load balancing and circuit breaker feature. This new feature allows you to use new native APIM functionality to create a load balancing and circuit breaker policy around your APIM backends. Historically to do this you’d need a complex policy like the “smart” load balancing policy seen below to accomplish this feature set.
<policies>
    <inbound>
        <base />
        <!-- Getting the main variable where we keep the list of backends -->
        <cache-lookup-value key="listBackends" variable-name="listBackends" />
        <!-- If we can't find the variable, initialize it -->
        <choose>
            <when condition="@(context.Variables.ContainsKey("listBackends") == false)">
                <set-variable name="listBackends" value="@{
                    // -------------------------------------------------
                    // ------- Explanation of backend properties -------
                    // -------------------------------------------------
                    // "url":          Your backend url
                    // "priority":     Lower value means higher priority over other backends.
                    //                 If you have more one or more Priority 1 backends, they will always be used instead
                    //                 of Priority 2 or higher. Higher values backends will only be used if your lower values (top priority) are all throttling.
                    // "isThrottling": Indicates if this endpoint is returning 429 (Too many requests) currently
                    // "retryAfter":   We use it to know when to mark this endpoint as healthy again after we received a 429 response

                    JArray backends = new JArray();
                    backends.Add(new JObject()
                    {
                        { "url", "https://andre-openai-eastus.openai.azure.com/" },
                        { "priority", 1},
                        { "isThrottling", false },
                        { "retryAfter", DateTime.MinValue }
                    });

                    backends.Add(new JObject()
                    {
                        { "url", "https://andre-openai-eastus-2.openai.azure.com/" },
                        { "priority", 1},
                        { "isThrottling", false },
                        { "retryAfter", DateTime.MinValue }
                    });

                    backends.Add(new JObject()
                    {
                        { "url", "https://andre-openai-northcentralus.openai.azure.com/" },
                        { "priority", 1},
                        { "isThrottling", false },
                        { "retryAfter", DateTime.MinValue }
                    });

                    backends.Add(new JObject()
                    {
                        { "url", "https://andre-openai-canadaeast.openai.azure.com/" },
                        { "priority", 2},
                        { "isThrottling", false },
                        { "retryAfter", DateTime.MinValue }
                    });

                    backends.Add(new JObject()
                    {
                        { "url", "https://andre-openai-francecentral.openai.azure.com/" },
                        { "priority", 3},
                        { "isThrottling", false },
                        { "retryAfter", DateTime.MinValue }
                    });

                    backends.Add(new JObject()
                    {
                        { "url", "https://andre-openai-uksouth.openai.azure.com/" },
                        { "priority", 3},
                        { "isThrottling", false },
                        { "retryAfter", DateTime.MinValue }
                    });

                    backends.Add(new JObject()
                    {
                        { "url", "https://andre-openai-westeurope.openai.azure.com/" },
                        { "priority", 3},
                        { "isThrottling", false },
                        { "retryAfter", DateTime.MinValue }
                    });

                    backends.Add(new JObject()
                    {
                        { "url", "https://andre-openai-australia.openai.azure.com/" },
                        { "priority", 4},
                        { "isThrottling", false },
                        { "retryAfter", DateTime.MinValue }
                    });

                    return backends;
                }" />
                <!-- And store the variable into cache again -->
                <cache-store-value key="listBackends" value="@((JArray)context.Variables["listBackends"])" duration="60" />
            </when>
        </choose>
        <authentication-managed-identity resource="https://cognitiveservices.azure.com" output-token-variable-name="msi-access-token" ignore-error="false" />
        <set-header name="Authorization" exists-action="override">
            <value>@("Bearer " + (string)context.Variables["msi-access-token"])</value>
        </set-header>
        <set-variable name="backendIndex" value="-1" />
        <set-variable name="remainingBackends" value="1" />
    </inbound>
    <backend>
        <retry condition="@(context.Response != null && (context.Response.StatusCode == 429 || context.Response.StatusCode >= 500) && ((Int32)context.Variables["remainingBackends"]) > 0)" count="50" interval="0">
            <!-- Before picking the backend, let's verify if there is any that should be set to not throttling anymore -->
            <set-variable name="listBackends" value="@{
                JArray backends = (JArray)context.Variables["listBackends"];

                for (int i = 0; i < backends.Count; i++)
                {
                    JObject backend = (JObject)backends[i];

                    if (backend.Value<bool>("isThrottling") && DateTime.Now >= backend.Value<DateTime>("retryAfter"))
                    {
                        backend["isThrottling"] = false;
                        backend["retryAfter"] = DateTime.MinValue;
                    }
                }

                return backends;
            }" />
            <cache-store-value key="listBackends" value="@((JArray)context.Variables["listBackends"])" duration="60" />
            <!-- This is the main logic to pick the backend to be used -->
            <set-variable name="backendIndex" value="@{
                JArray backends = (JArray)context.Variables["listBackends"];

                int selectedPriority = Int32.MaxValue;
                List<int> availableBackends = new List<int>();

                for (int i = 0; i < backends.Count; i++)
                {
                    JObject backend = (JObject)backends[i];

                    if (!backend.Value<bool>("isThrottling"))
                    {
                        int backendPriority = backend.Value<int>("priority");

                        if (backendPriority < selectedPriority)
                        {
                            selectedPriority = backendPriority;
                            availableBackends.Clear();
                            availableBackends.Add(i);
                        }
                        else if (backendPriority == selectedPriority)
                        {
                            availableBackends.Add(i);
                        }
                    }
                }

                if (availableBackends.Count == 1)
                {
                    return availableBackends[0];
                }

                if (availableBackends.Count > 0)
                {
                    //Returns a random backend from the list if we have more than one available with the same priority
                    return availableBackends[new Random().Next(0, availableBackends.Count)];
                }
                else
                {
                    //If there are no available backends, the request will be sent to the first one
                    return 0;
                }
                }" />
            <set-variable name="backendUrl" value="@(((JObject)((JArray)context.Variables["listBackends"])[(Int32)context.Variables["backendIndex"]]).Value<string>("url") + "/openai")" />
            <set-backend-service base-url="@((string)context.Variables["backendUrl"])" />
            <forward-request buffer-request-body="true" />
            <choose>
                <!-- In case we got 429 or 5xx from a backend, update the list with its status -->
                <when condition="@(context.Response != null && (context.Response.StatusCode == 429 || context.Response.StatusCode >= 500) )">
                    <cache-lookup-value key="listBackends" variable-name="listBackends" />
                    <set-variable name="listBackends" value="@{
                        JArray backends = (JArray)context.Variables["listBackends"];
                        int currentBackendIndex = context.Variables.GetValueOrDefault<int>("backendIndex");
                        int retryAfter = Convert.ToInt32(context.Response.Headers.GetValueOrDefault("Retry-After", "-1"));

                        if (retryAfter == -1)
                        {
                            retryAfter = Convert.ToInt32(context.Response.Headers.GetValueOrDefault("x-ratelimit-reset-requests", "-1"));
                        }

                        if (retryAfter == -1)
                        {
                            retryAfter = Convert.ToInt32(context.Response.Headers.GetValueOrDefault("x-ratelimit-reset-tokens", "10"));
                        }

                        JObject backend = (JObject)backends[currentBackendIndex];
                        backend["isThrottling"] = true;
                        backend["retryAfter"] = DateTime.Now.AddSeconds(retryAfter);

                        return backends;
                    }" />
                    <cache-store-value key="listBackends" value="@((JArray)context.Variables["listBackends"])" duration="60" />
                    <set-variable name="remainingBackends" value="@{
                        JArray backends = (JArray)context.Variables["listBackends"];

                        int remainingBackends = 0;

                        for (int i = 0; i < backends.Count; i++)
                        {
                            JObject backend = (JObject)backends[i];

                            if (!backend.Value<bool>("isThrottling"))
                            {
                                remainingBackends++;
                            }
                        }

                        return remainingBackends;
                    }" />
                </when>
            </choose>
        </retry>
    </backend>
    <outbound>
        <base />
        <!-- This will return the used backend URL in the HTTP header response. Remove it if you don't want to expose this data -->
        <set-header name="x-openai-backendurl" exists-action="override">
            <value>@(context.Variables.GetValueOrDefault<string>("backendUrl", "none"))</value>
        </set-header>
    </outbound>
    <on-error>
        <base />
    </on-error>
</policies>
Complex policies like the above are difficult to maintain and easy to break (I know, I break my policies all of time). Compare that with a policy that does something very similar with the new load balancing and circuit breaker feature.
<policies>
    <!-- Throttle, authorize, validate, cache, or transform the requests -->
    <inbound>
        <set-backend-service backend-id="backend_pool_aoai" />
        <base />
    </inbound>
    <!-- Control if and how the requests are forwarded to services  -->
    <backend>
        <base />
    </backend>
    <!-- Customize the responses -->
    <outbound>
        <base />
    </outbound>
    <!-- Handle exceptions and customize error responses  -->
    <on-error>
        <base />
    </on-error>
</policies>
A bit simpler eh? With the new feature you establish a new APIM backend of a “pool” type. In this backend you configure your load balancing and circuit breaker logic. In the Terraform template below, I’ve created a load balanced pool that includes three existing APIM backends which are each an individual AOAI instance. I’ve divided the three backends into two priority groups such that the APIM so that APIM will concentrate the requests to the first priority group until a circuit break rule is triggered. I configured a circuit breaker rule that will hold sending additional requests for 1 minute (tripDuration) to a backend if that backend returns a single (count) 429 over the course of 1 minute (interval). You’ll likely want to play with the tripDuration and interval to figure out what works for you.
Priority group 2 will only be used if all the backends in priority group 1 have circuit breaker rules tripped. The use case here might be that your priority group 1 instance is a AOAI instance setup for PTU (provisioned throughput units) and you want overflow to dump down into instances deployed at the standard tier (basically consumption based).
resource "azapi_resource" "symbolicname" {
  type = "Microsoft.ApiManagement/service/backends@2023-05-01-preview"
  name = "string"
  parent_id = "string"
  body = jsonencode({
    properties = {
      circuitBreaker = {
        rules = [
          {
            failureCondition = {
              count = 1
              errorReasons = [
                "Backend service is throttling"
              ]
              interval = "PT1M"
              statusCodeRanges = [
                {
                  max = 429
                  min = 429
                }
              ]
            }
            name = "breakThrottling "
            tripDuration = "PT1M",
            acceptRetryAfter = true
          }
        ]
      }
      description = "This is the load balanced backend"
      pool = {
        services = [
          {
            id = "/subscriptions/XXXXXXXX-XXXX-XXXX-XXXX-XXXXXXXXXXXX/resourceGroups/rg-demo-aoai/providers/Microsoft.ApiManagement/service/apim-demo-aoai-jog/backends/openai-3",
            priority = 1
          },
          {
            id = "/subscriptions/XXXXXXXX-XXXX-XXXX-XXXX-XXXXXXXXXXXX/resourceGroups/rg-demo-aoai/providers/Microsoft.ApiManagement/service/apim-demo-aoai-jog/backends/openai-1",
            priority = 2
          },
          {
            id = "/subscriptions/XXXXXXXX-XXXX-XXXX-XXXX-XXXXXXXXXXXX/resourceGroups/rg-demo-aoai/providers/Microsoft.ApiManagement/service/apim-demo-aoai-jog/backends/openai-2",
            priority = 2
          }
        ]
      }
    }
  })
}
Very cool right? This makes for way simpler APIM policy which means troubleshooting APIM policy that much easier. You could also establish different pools for different categories of applications. Maybe you have a pool with a PTU and standard tier instances for mission-critical production apps and another pool of only standard instances for non-production applications. You could then direct specific applications (based on their Entra ID service principal id) to different pools. This feature gives you a ton of flexibility in how you handle load balancing without a to of APIM policy overhead.
With the introduction of this feature into APIM, it makes APIM that much more of an appealing solution for this use case. No longer do you need a complex policy and in-depth APIM policy troubleshooting skills to make this work. Tack on the additional GenAI features Microsoft introduced that I mentioned earlier, as well as its existing features and capabilities available in APIM policy, you have a damn fine tool for your Generative AI Gateway use case.
Well folks that wraps up this post. I hope this overview gave you some insight into why load balancing is important with AOAI, what the historical challenges have been doing it within APIM, and how those challenges have been largely removed with the added bonus of additional new GenAI-based features make this a tool worth checking out.
Over the past few weeks I’ve been diving into the relatively new Azure product Azure Virtual Network Manager (AVNM). AVNM was first introduced back in late 2021 with the connectivity feature and security admin rule feature. In the past year both features have begun to trickle into general availability in some regions. I was interested in the Security Admin Rules feature so I did my usual thing and began to read through all the documentation and experiment with the service. I’ll be covering Security Admin Rules in another post. In this short post I will be focusing on how you onboard virtual networks to the connectivity and security admin rule features.
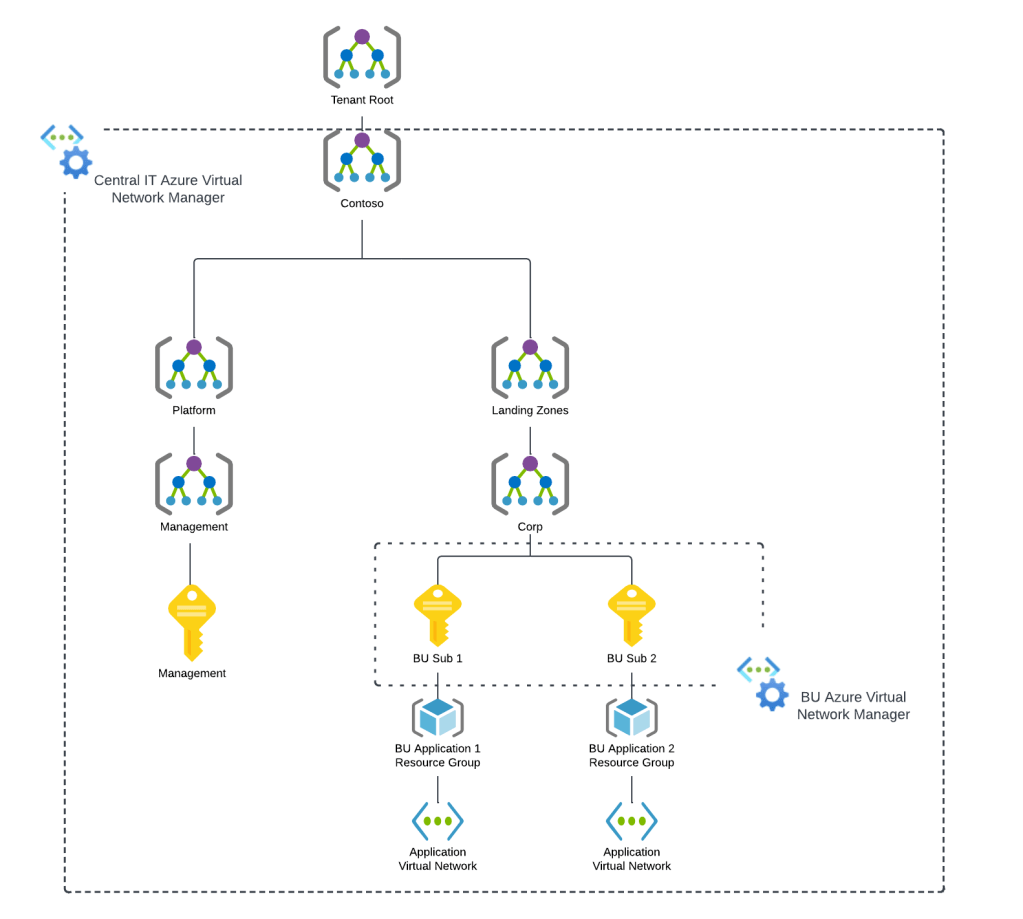
When an AVNM instance is created, it is assigned a scope of what it can manage. This can subscriptions added individually or it can be all subscriptions under a specific management group. A given scope can only have one AVNM instance assigned to it.
Azure Virtual network Manager Sample Architecture
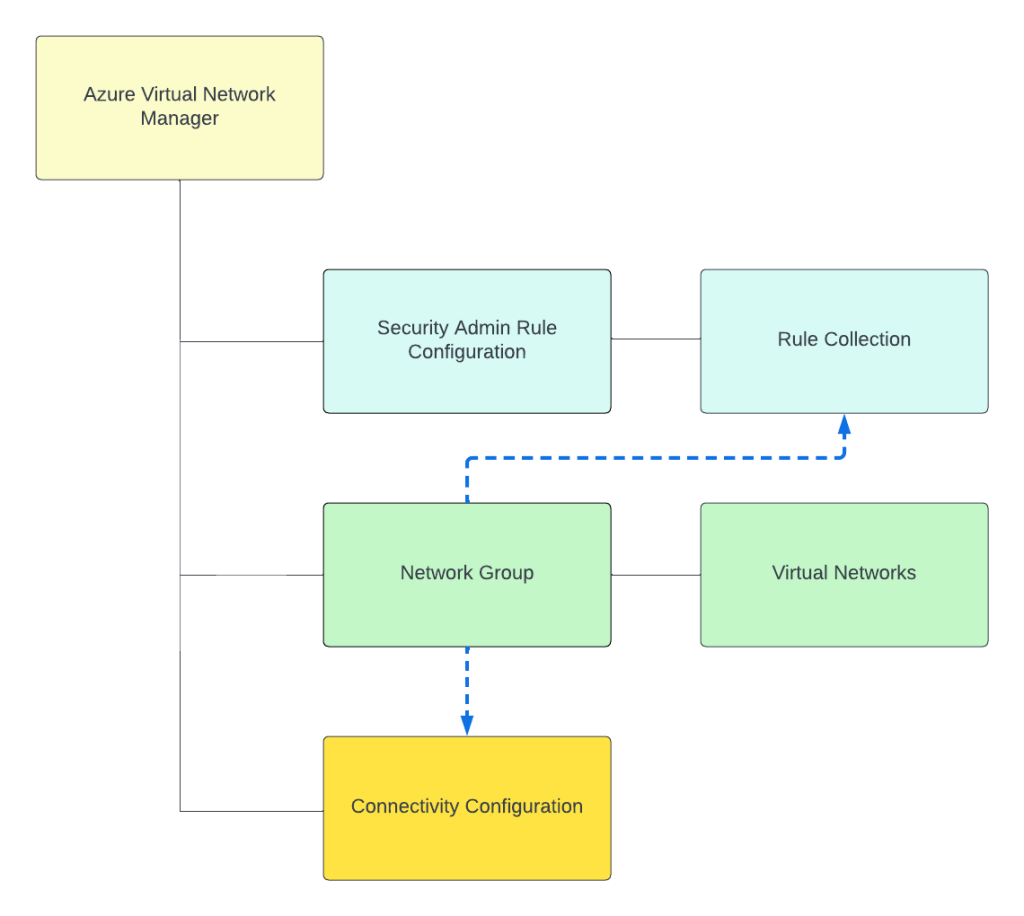
Today, under the assigned scope, AVNM can manage how virtual networks are connected to each other with the connectivity feature and what traffic is allowed or denied within the virtual network with the security admin rules feature superseding Network Security Groups. Within an AVNM instance you group virtual networks under the managed scope into a construct called a Network Group. Network Groups are then associated to either a connectivity or security admin rule configuration as seen below.
Network groups can contain multiple virtual networks and virtual networks can be members of multiple Network Groups. Virtual networks can be added to a Network Group manually or dynamically through Azure Policy. The rest of this post will focus on dynamic membership and some of the interesting properties of the Azure Policy definitions.
Before I dive into the policy definition I want to call out a neat feature the Product Group built into the solution. When accessing an AVNM instance from the Azure Portal there is a handy GUI-based tool included that can be used to graphically build the conditions on which virtual networks will be members of the Network Group. In the background, this tool builds out the Azure Policy definition and creates the assignment at the scopes you specify. This is one of the only products I’ve come across within Azure that assists the customer in building out an Azure Policy for the service. Great job by the product group!
Azure Policy builder to onboard virtual networks into a Network Group in Azure Virtual Network Manager
With the settings pictured above, I’m creating an Azure Policy to onboard all virtual networks tagged (there are a number of parameters and operators combinations you can use besides tags) with the key of environment and value of production under the specified scope to the Network Group. The policy will look something like this:
I’ve bolded the two properties I want you to key in on. The first property is the mode property. If you’ve written a custom Azure Policy or examined built-in policies you will likely be used to that property being set to either all or indexed. Here you will see it is set to Microsoft.Network.Data. This is one of the new resource provider modes that has been introduced which extends Azure Policy’s functionality. The other interesting property is the effect property. Again, you will likely be used to this being audit, deny, deployIfNotExists, etc. Instead, it is populated with a value of addToNetworkGroup. Both of these properties are specific to AVNM’s feature for dynamic members into its Network Groups.
Being the geek I am, I decided to try writing my own custom Azure Policy definition which would parameterize the the tag key, value, and resource id of the Network Group. Interestingly, you’re blocked from parameterizing the Network Group id due to a regex filter that has been put in. This regex filter validates that the Network Group id looks like an id and will reject if you try to do it as a parameter. I plan on submitting some feedback requesting this regex filter be removed which would allow for this to be fully parameterized. As of now, it looks like you’ll need an Azure Policy definition for each Network Group where you’re using dynamic membership.
Error message when parameterizing Network Group resource id
Once you create your Azure Policy definition and create the assignment, at the next policy evaluation the matching virtual networks will be added into the Network Group as dynamic members. The feature works exactly as described and is incredibly handy in quickly and efficiently onboarding new and existing virtual networks to a specific Network Group to apply a connectivity or security admin rule configuration.
Well folks that’s it for this short blog post. I found the dynamic membership and new Azure Policy properties interesting enough to warrant their own post. I’ve added an example working parameterized Azure Policy definition to my custom Azure Policy GitHub repo if you’re interested in messing around with it yourself.
Expect more posts to come on Azure Virtual Network Manager. Have a great night!
5/28/2024 – Updated to mention that objectid of security principal is now included in native diagnostic logs
Hello again folks! Today I’m going to bounce back into AOAI (Azure OpenAI Service) mode and cover a topic that frequently comes up with my customers in regards to securing the service. Over the past year I’ve covered the infrastructure and security controls available within the AOAI. Much of that focus was on accessing the service through an SDK (software development kit) or directly through the API. Today I’m going to spend some time talking about the security controls available to secure the Azure OpenAI Studio, which I’m going to refer to as Studio for the rest of this post.
If you’re unfamiliar with Studio, it’s a GUI-based experience for interacting with the data plane of the AOAI service. In my authorization post, I cover the difference between the service’s management and data planes. At a high level, the management plane is for operations “on the service” while the data plane is for operations “in the service”.
Azure OpenAI Service Management Plane vs Data Plane
Microsoft recommends using an SDK or the API directly when interacting with the data plane of the service. It’s a good recommendation because there are lots of knobs for you to turn to lock down the service and address gaps in the service. When the service is using through the Azure OpenAI Studio, you lose the ability to inject some type of control component between the user’s endpoint and the instance of AOAI. The rest of this post will cover why that is, what controls are available to you, and what risks you’ll have to accept if you opt to make Studio available to your users.
Before I jump into the details of what you get and what you don’t get, I want to cover what some of the main use cases are for using Studio versus accessing the service through an SDK or direct through the API. First and foremost, it should be obvious that GUIs are much more accessible than having to write code to interact with the API. For example, say I’m performing a PoC (proof-of-concept) of the service and I want to quickly test the gpt 3.5 model’s ability to answer a question in my field. For that I can use the Completions interface within Studio to get a chat-like interface with zero coding.
Example of Chat Completion functionality in Azure OpenAI Studio
Another use case may be I want a simple way to test the models on my organization’s data to see if the models can provide value to that data. I don’t want to invest a ton of time coding to perform this functionality because I don’t yet know if the models will be able to provide any value on top of my data.
A lot of the use for Studio comes down to its simplicity of use. If you need to do some basic PoC with minimal funding, using Studio can be a nice shortcut to doing all the code you’d need to do in order to interact with the API to perform the actions.
Long story short, if you’re offering this service to your business units you’re likely going to be asked to provide Studio access to your users. My goal here is to help you understand the risks and mitigations of doing so.
So how does the Azure OpenAI Studio work? It appears to use an MVC (model-view-controller) architecture (or something similar to it for those application developer purists who are much smarter than me). In simple terms for non-developers like myself, the Studio application instructs the user’s browser which data plane endpoints to call and then provides a pretty view in the user’s browser of the responses received from those endpoints.
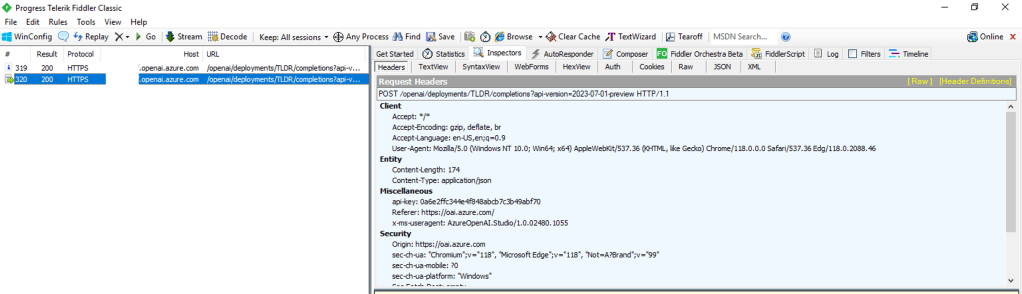
For you non-developers like myself, I find it helpful to perform an action within Studio and then review the Fiddler capture to observe what the browser did. In the Fiddler capture below, I used the Chat Completion interface in Studio to send a request a completion. You can see that the request was sent from my browser to the data plane endpoint of the service (openai.azure.com).
Fiddler capture of Chat Completion in Azure OpenAI Studio
This trait of the Studio can work to your advantage when you need to secure the Studio. If the calls are made from the user’s endpoint to the data plane, then that means network controls around the data plane can be used to enforce control over access to the Studio for the instance of AOAI. As I covered in my prior posts, AOAI is no different from other Microsoft PaaS services and provides the standard network controls which include the service firewall and support for Private Endpoints.
A common security standard for organizations using Azure is to use Private Endpoints for PaaS services. Private Endpoints allow you to restrict access to the public IP of a PaaS service and limit it to access through an endpoint deployed in the customer’s virtual network. Accessing the service through the Private Endpoint requires the user’s endpoint to be within your organization’s private network. This means by creating a Private Endpoint you can block access to access to the AOAI instance through Studio to endpoints within your private network. If the user attempts to access the AOAI instance through Studio outside of the private network, they’ll be blocked and will receive the error you see below.
Network controls blocking access through Azure OpenAI Studio
Placing your AOAI instance behind a Private Endpoint will be your primary means of controlling access to an AOAI instance through Studio. Creating the private endpoint and blocking public access keeps user’s from accessing the AOAI instance through Studio when hitting the public IP. However, users can still reach the AOAI instance through Studio if they are on the private network. You can lock that down by wrapping an NSG (Network Security Group) around the subnet containing the Private Endpoint, turning on Private Endpoint Network Policies in the subnet, and placing some type of mediator (such an Azure API Management instance) between the user’s endpoint and the AOAI instance. That will restrict the users to the API when interacting with the AOAI instance.
Example AOAI architecture
Outside of network controls, you don’t have much ability to control Studio access. There are no specific RBAC permissions that I’m aware of today that could be stripped from an RBAC role to prevent access to Studio. When it comes to authorization you should strive for least privilege as you’ve always done. My authorization blog has some guidance on how to handle that within the service.
Now that you understand what controls you have, let’s talk about the risks you’re going to need to accept if you plan on granting users access to Studio.
First and foremost, you’re going to need to accept the very basic logging provided by the diagnostics logging available within an AOAI instance. As I cover in the linked post above, the logging is minimal. Prompts and responses will not be logged, traceability in the logs will be limited, and you won’t get metrics as to token usage per call. The lack of visibility into prompts and responses becomes all that much more critical if shut off the built in content filtering and abuse monitoring.
Next up, you won’t have the ability to limit the usage of service on a per user or per app basis. AOAI has API limits around requests and tokens. There are capabilities today to control this on per user or per app basis within a single instance of AOAI today.
Let me summarize what we covered today:
Network controls are your primary means to securing access to an AOAI instance through the Azure OpenAI Studio
Placing an AOAI instance behind a Private Endpoint and blocking public access restrict Azure OpenAI Studio access to the AOAI instance to endpoints within your private network
Azure OpenAI Studio access to an AOAI instance can be blocked completely by placing the AOAI instance behind a private endpoint, inserting some sort of mediation solution (such as API Management, and wrapping an NSG around the subnet containing the Private Endpoint which blocks all access but traffic from the mediator.
Exercise least privilege using Azure RBAC but be aware there is no specific permission that allows access to the Azure OpenAI Studio
The diagnostic logs provided limited information. Prompts and responses are not logged to the diagnostic logs and neither are token consumption. The former will mean you don’t have visibility into the prompts users are making (think abuse, inclusion of PII, etc) and the latter means you won’t be able to tell who is creating the costs within the instance.
Considering all of the above, my recommendation to customers it to establish an approval process for usage of Studio and ensure there is a strong business need to justify accepting the risks outlined above. The lack of logging is the real gut punch for me. That is a lot of risk, especially since most regulated orgs opt out of content filtering and abuse monitoring.
Nothing to fancy in this post, but hopefully it helps some folks better understand the security options for Azure OpenAI Studio access.