Deep Dive into Azure AD and AWS SSO Integration – Part 2

Deep Dive into Azure AD and AWS SSO Integration – Part 2

Welcome back folks.

Today I’ll be continuing my series on the new integration between Azure AD and AWS SSO.  In my last post I covered the challenges with the prior integration between the two platforms, core AWS concepts needed to understand the new integration, and how the new integration addresses the challenges of the prior integration.

In this post I’m going to give some more context to the challenges covered in the first post and then provide an overview of the what the old and new patterns look like.  This will help clarify the value proposition of the integration for those of you who may still not be convinced.

The two challenges I want to focus on are:

  1. The AWS app was designed to synchronize identity data between AWS and Azure AD for a single AWS account
  2. The SAML trust between Azure AD and an AWS account had to be established separately for each AWS account.

Challenge 1 was unique to the Azure Marketplace AWS app because they were attempting to solve the identity lifecycle management problem.  Your security token service (STS) needs to pass a SAML assertion which includes the AWS IAM roles you are asserting for the user.  Those roles need to be mapped to the user somewhere for your STS to tap into them.  This is a problem you’re going to feel no matter what STS you use, so I give the team that put together the AWS app together credit for trying.

The folks over at AWS came up with an elegant solution requiring some transformation in the claims passed in the SAML token and another solution to store the roles in commonly unused attributes in Active Directory.  However, both solutions suffered the same problem in that you’re forced to workaround that mapping, which becomes considerably difficult as you began to scale to hundreds of AWS accounts.

Challenge 2 plagues all STSs because the SAML trust needs to be created for each and every AWS account.  Again, something that begins to get challenging as you scale.

AWS Past Integration

AWS Past Integration

In the image above, we see an example of how some enterprises addressed these problems.  We see that there is some STS in use acting as an identity provider (idP) (could be Azure AD, Okta, Ping, AD FS, whatever) that has a SAML trust with each AWS account.  The user to AWS IAM role mappings are included in an attribute of the user’s Active Directory user account.  When the user attempts to access AWS, the STS queries Active Directory for the information.  There is a custom process (manual or automated) that queries each AWS account for a list of AWS IAM Roles that are associated with the IdP in the AWS account.  These roles are then populated in the attribute for each relevant user account.  Lastly, CloudFormation is used to push IAM Roles to each AWS account.  This could be pushed through a manual process or a CI/CD pipeline.

Yeah this works, but who wants all that overhead?  Let’s look at the new method.

Azure AD and AWS SSO Integration

Azure AD and AWS SSO Integration

In the new integration where we use Azure AD and AWS SSO together, we now only need to establish a single SAML trust with AWS SSO.  Since AWS SSO is integrated with AWS Organizations it can be used as a centralized identity source for all AWS accounts within the organization.  Additionally, we can now leverage Azure AD to manage the synchronization of identity data (users and groups) from Azure AD to AWS SSO.  We then map our users or groups to permission sets (collections of IAM policies) in AWS SSO which are then provisioned as IAM roles in the relevant AWS accounts.  If we want to add a user to a role in AWS IAM, we can add that user to the relevant group in Azure AD and wait for the synchronization process to occur.  Once it’s complete, that user will have access to that IAM role in the relevant accounts.  A lot less work, right?

Let’s sum up what changes here:

  • We can use existing processes already in place to move users in and out of groups either on-premises in Windows AD (that is syncing to Azure AD with Azure AD Connect) or directly in Azure AD (if we’re not syncing from Windows AD).
  • Group to role mappings are now controlled in AWS SSO
  • Permission sets (or IAM policies for the IAM roles) are now centralized in AWS SSO
  • We no longer have to provision the IAM roles individually into each AWS account, we can centrally control it in AWS SSO

Cool right?

In my few posts I’ll begin walking through the integration an demonstrating some the solution.

Thanks!

Deep Dive into Azure AD and AWS SSO Integration – Part 1

Deep Dive into Azure AD and AWS SSO Integration – Part 1

Hello fellow geeks!

Back in 2017 I did a series of posts on how to integrate Azure AD using the AWS app available in the Azure Marketplace with AWS IAM in order to use Azure AD as an identity provider for an AWS account.  The series has remained quite popular over the past two years, largely because the integration has remained the same without much improvement.  All of this changed last week when AWS released support for integration between Azure AD and AWS SSO.

The past integration between the two platforms functioned, but suffered from three primary challenges:

  1. The AWS app was designed to synchronize identity data between AWS and Azure AD for a single AWS account
  2. The SAML trust between Azure AD and an AWS account had to be established separately for each AWS account.
  3. The application manifest file used by the AWS app to establish a mapping of roles between Azure AD and synchronized AWS IAM roles had a limitation of 1200 which didn’t scale for organizations with a large AWS footprint.

To understand these challenges, I’m going to cover some very basic AWS concepts.

The most basic component an AWS presence is an AWS account.  Like an Azure subscription, it represents a billing relationship, establishes limitations for services, and acts as an authorization boundary.  Where it differs from an Azure subscription is that each AWS account has a separate identity and authentication boundary.

While multiple Azure subscriptions can be associated with a single instance of Azure AD to centralize identity and authentication, the same is not true for AWS.  Each AWS account has its own instance of AWS IAM with its own security principals and no implicit trust with any other account.

Azure Subscription Identity vs AWS Account Identity

Azure Subscription Identity vs AWS Account Identity

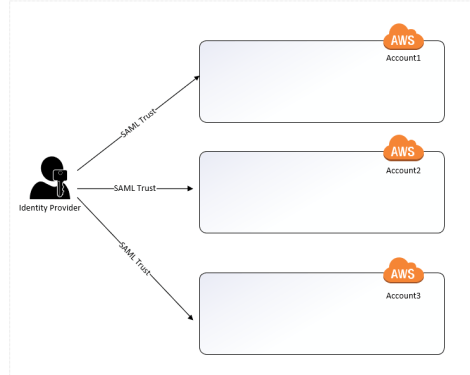
Since there is no implicit trust between accounts, that trust needs to be manually established by the customer.  For example, if a customer wants bring their own identities using SAML, they need to establish a SAML trust with each AWS account.

SAML Trusts with each AWS Account

SAML Trusts with each AWS Account

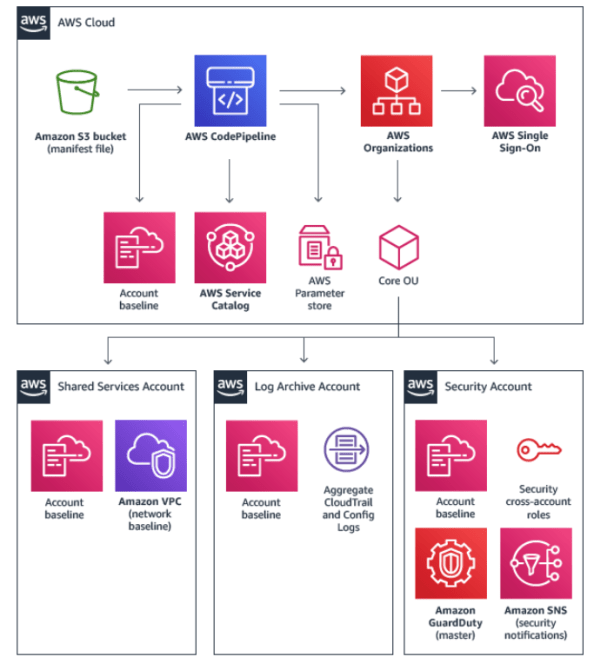
This is nice from a security perspective because you have a very clear security boundary that you can use effectively to manage blast radius.  This is paramount in the cloud from a security standpoint.  In fact, AWS best practice calls for separate accounts to mitigate risks to workloads of different risk profiles.  A common pattern to align with this best practice is demonstrated in the AWS Landing Zone documentation.  If you’re interested in a real life example of what happens when you don’t establish a good radius, I encourage you to read the cautionary tale of Code Spaces.

AWS Landing Zone

AWS Landing Zone

However, it doesn’t come without costs because each AWS IAM instance needs to be managed separately.  Prior to the introduction of AWS SSO (which we’ll cover later), you as the customer would be on the hook for orchestrating the provisioning of security principals (IAM Users, groups, roles, and identity providers) in every account.  Definitely doable, but organizations skilled at identity management are few and far between.

Now that you understand the importance of having multiple AWS accounts and that each AWS account has a separate instance of AWS IAM, we can circle back to the challenges of the past integration.  The AWS App available in the Azure Marketplace has a few significant gaps

The app is designed to simplify the integration with AWS by providing the typical “wizard” type experience Microsoft so loves to provide.  Plug in a few pieces of information and the SAML trust between Azure AD and your AWS account is established on the Azure AD end to support an identity provider initiated SAML flow.  This process is explained in detail in my past blog series.

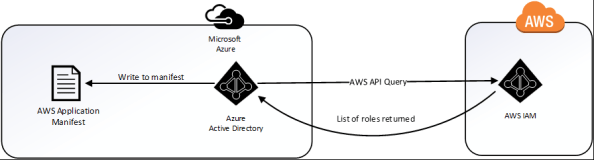
In addition to easing the SAML integration, it also provides a feature to synchronize AWS IAM roles from an AWS account to the application manifest file used by the AWS app.  The challenges here are two-fold: one is the application manifest file has a relatively small limit of entries; the other is the synchronization process only supports a single AWS account.  These two gaps make it unusable by most enterprises.

Azure AWS Application Sync Process

Azure Marketplace AWS Application Sync Process

Both Microsoft and AWS have put out workarounds to address the gaps.  However, the workarounds require the customer to either develop or run custom code and additional processes and neither addresses the limitation of the application manifest.  This lead to many organizations to stick with their on-premises security token service (AD FS, Ping, etc) or going with another 3rd party IDaaS (Okta, Centrify, etc).  This caused them to miss out on the advanced features of Azure AD, some of which they were more than likely already paying for via the use of Office 365.  These features include adaptive authentication, contextual authorization, and modern multi-factor authentication.

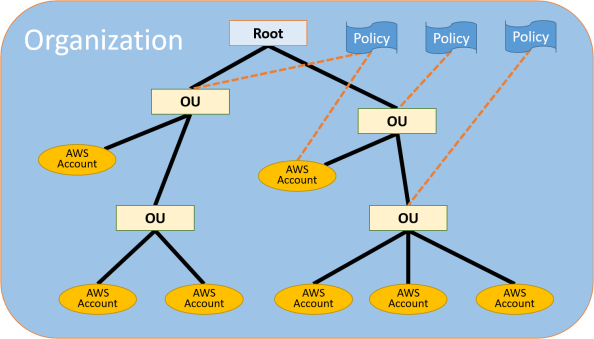
AWS recognized the challenge organizations were having managing AWS accounts at scale and began introducing services to help enterprises manage the ever growing AWS footprint.  The first service was AWS Organizations.  This service allowed enterprises to centralize some management operations, consolidate billing, and group accounts together for billing or security and compliance.  For those of you from the Azure world, the concept is similar to the benefits of using Azure Management Groups and Azure Policy.  This was a great start, but the platform still lacked a native solution for centralized identity management.

AWS Organization

AWS Organization

At the end of 2017, AWS SSO was introduced.  Through integration with AWS Organizations, AWS SSO has the ability to enumerate all of the AWS accounts associated with an Organization and act as a centralized identity, authentication, and authorization plane.

While the product had potential, at the time of its release it only supported scenarios where users and groups were created directly in the AWS SSO directory or were sourced from an AWS Managed AD or customer-managed AD using the LDAP connector.  It lacked support for acting as a SAML service provider to a third-party identity provider.  Since the service lacks the features of most major on-premises security token services and IDaaS providers, many organizations kept to the standard pattern of managing identity across their AWS accounts using their own solutions and processes.

Fast forward to last week and AWS announced two new features for AWS SSO.  The first feature is that it can now act as a SAML service provider to Azure AD (YAY!).  By federating directly with AWS SSO, there is no longer a requirement to federate Azure AD which each individual AWS account.

The second feature got me really excited and that was support for the System for Cross-domain Identity Management (SCIM) specification through the addition of SCIM endpoints.  If you’re unfamiliar SCIM, it addresses a significant gap in IAM in the cloud world, and that is identity management.  If you’ve ever integrated with any type of cloud service, you are more than likely aware of the pains of having to upload CSVs or install custom vendor connectors in order to provision security principals into a cloud identity store.  SCIM seeks to solve that problem by providing a specification for a REST API that allows for management of the lifecycle of security principals.

Support for this feature, along with Azure AD’s longtime support for SCIM, allows Azure AD to handle the identity lifecycle management of the shadow identities in AWS SSO which represent Azure AD Users and Groups.  This is an absolutely awesome feature of Azure AD and I’m thrilled to see that AWS is taking advantage of it.

Well folks, that will close out this entry in the series.  Over the next few posts I’ll walk through what the integration and look behind the curtains a bit with my go to tool Fiddler.

See you next post!


Debugging Azure SDK for Python Using Fiddler

Debugging Azure SDK for Python Using Fiddler

Hi there folks.  Recently I was experimenting with the Azure Python SDK when I was writing a solution to pull information about Azure resources within a subscription.  A function within the solution was used to pull a list of virtual machines in a given Azure subscription.  While writing the function, I recalled that I hadn’t yet had experience handling paged results the Azure REST API which is the underlining API being used by the SDK.

I hopped over to the public documentation to see how the API handles paging.  Come to find out the Azure REST API handles paging in a similar way as the Microsoft Graph API by returning a nextLink property which contains a reference used to retrieve the next page of results.  The Azure REST API will typically return paged results for operations such as list when the items being returned exceed 1,000 items (note this can vary depending on the method called).

So great, I knew how paging was used.  The next question was how the SDK would handle paged results.  Would it be my responsibility or would it by handled by the SDK itself?

If you have experience with AWS’s Boto3 SDK for Python (absolutely stellar SDK by the way) and you’ve worked in large environments, you are probably familiar with the paginator subclass.  Paginators exist for most of the AWS service classes such as IAM and S3.  Here is an example of a code snipped from a solution I wrote to report on aws access keys.

def query_iam_users():

todaydate = (datetime.now()).strftime("%Y-%m-%d")
users = []
client = boto3.client(
'iam'
)

paginator = client.get_paginator('list_users')
response_iterator = paginator.paginate()
for page in response_iterator:
for user in page['Users']:
user_rec = {'loggedDate':todaydate,'username':user['UserName'],'account_number':(parse_arn(user['Arn']))}
users.append(user_rec)
return users

Paginators make handling paged results a breeze and allow for extensive flexibility in controlling how paging is handled by the underlining AWS API.

Circling back to the Azure SDK for Python, my next step was to hop over to the SDK public documentation.  Navigating the documentation for the Azure SDK (at least for the Python SDK, I can’ t speak for the other languages) is a bit challenging.  There are a ton of excellent code samples, but if you want to get down and dirty and create something new you’re going to have dig around a bit to find what you need.  To pull a listing of virtual machines, I would be using the list_all method in VirtualMachinesOperations class.  Unfortunately I couldn’t find any reference in the documentation to how paging is handled with the method or class.

So where to now?  Well next step was the public Github repo for the SDK.  After poking around the repo I located the documentation on the VirtualMachineOperations class.  Searching the class definition, I was able to locate the code for the list_all() method.  Right at the top of the definition was this comment:

Use the nextLink property in the response to get the next page of virtual
machines.

Sounds like handling paging is on you right?  Not so fast.  Digging further into the method I came across the function below.  It looks like the method is handling paging itself releasing the consumer of the SDK of the overhead of writing additional code.

        def internal_paging(next_link=None):
            request = prepare_request(next_link)

            response = self._client.send(request, stream=False, **operation_config)

            if response.status_code not in [200]:
                exp = CloudError(response)
                exp.request_id = response.headers.get('x-ms-request-id')
                raise exp

            return response

I wanted to validate the behavior but unfortunately I couldn’t find any documentation on how to control the page size within the Azure REST API.  I wasn’t about to create 1,001 virtual machines so instead I decided to use another class and method in the SDK.  So what type of service would be a service that would return a hell of a lot of items?  Logging of course!  This meant using the list method of the ActivityLogsOperations class which is a subclass of the module for Azure Monitor and is used to pull log entries from the Azure Activity Log.  Before I experimented with the class, I hopped back over to Github and pulled up the source code for the class.  Low and behold we an internal_paging function within the list method that looks very similar to the one for the list_all vms.

        def internal_paging(next_link=None):
            request = prepare_request(next_link)

            response = self._client.send(request, stream=False, **operation_config)

            if response.status_code not in [200]:
                raise models.ErrorResponseException(self._deserialize, response)

            return response

Awesome, so I have a method that will likely create paged results, but how do I validate it is creating paged results and the SDK is handling them?  For that I broke out one of my favorite tools Telerik’s Fiddler.

There are plenty of guides on Fiddler out there so I’m going to skip the basics of how to install it and get it running.  Since the calls from the SDK are over HTTPS I needed to configure Fiddler to intercept secure web traffic.  Once Fiddler was up and running I popped open Visual Studio Code, setup a new workspace, configured a Python virtual environment, and threw together the lines of code below to get the Activity Logs.

from azure.common.credentials import ServicePrincipalCredentials
from azure.mgmt.monitor import MonitorManagementClient

TENANT_ID = 'mytenant.com'
CLIENT = 'XXXXXXXX-XXXX-XXXX-XXXX-XXXXXXXXXXXX'
KEY = 'XXXXXX'
SUBSCRIPTION = 'XXXXXX-XXXX-XXXX-XXXX-XXXXXXXX'

credentials = ServicePrincipalCredentials(
    client_id = CLIENT,
    secret = KEY,
    tenant = TENANT_ID
)
client = MonitorManagementClient(
    credentials = credentials,
    subscription_id = SUBSCRIPTION
)

log = client.activity_logs.list(
    filter="eventTimestamp ge '2019-08-01T00:00:00.0000000Z' and eventTimestamp le '2019-08-24T00:00:00.0000000Z'"
)

for entry in log:
    print(entry)

Let me walk through the code quickly.  To make the call I used an Azure AD Service Principal I had setup that was granted Reader permissions over the Azure subscription I was querying.  After obtaining an access token for the service principal, I setup a MonitorManagementClient that was associated with the Azure subscription and dumped the contents of the Activity Log for the past 20ish days.  Finally I incremented through the results to print out each log entry.

When I ran the code in Visual Studio Code an exception was thrown stating there was an certificate verification error.

requests.exceptions.SSLError: HTTPSConnectionPool(host='login.microsoftonline.com', port=443): Max retries exceeded with url: /mytenant.com/oauth2/token (Caused by SSLError(SSLCertVerificationError(1, '[SSL: CERTIFICATE_VERIFY_FAILED] certificate verify failed: unable to get local issuer certificate (_ssl.c:1056)')))

The exception is being thrown by the Python requests module which is being used underneath the covers by the SDK.  The module performs certificate validation by default.  The reason certificate verification is failing is Fiddler uses a self-signed certificate when configured to intercept secure traffic when its being used as a proxy.  This allows it to decrypt secure web traffic sent by the client.

Python doesn’t use the Computer or User Windows certificate store so even after you trust the self-signed certificate created by Fiddler, certificate validation still fails.  Like most cross platform solutions it uses its own certificate store which has to be managed separately as described in this Stack Overflow article.  You should use the method described in the article for any production level code where you may be running into this error, such as when going through a corporate web proxy.

For the purposes of testing you can also pass the parameter verify with the value of False as seen below.  I can’t stress this enough, be smart and do not bypass certificate validation outside of a lab environment scenario.

requests.get('https://somewebsite.org', verify=False)

So this is all well and good when you’re using the requests module directly, but what if you’re using the Azure SDK?  To do it within the SDK we have to pass extra parameters called kwargs which the SDK refers to as an Operation config.  The additional parameters passed will be passed downstream to the methods such as the methods used by the requests module.

Here I modified the earlier code to tell the requests methods to ignore certificate validation for the calls to obtain the access token and call the list method.

from azure.common.credentials import ServicePrincipalCredentials
from azure.mgmt.monitor import MonitorManagementClient

TENANT_ID = 'mytenant.com'
CLIENT = 'XXXXXXXX-XXXX-XXXX-XXXX-XXXXXXXXXXXX'
KEY = 'XXXXXX'
SUBSCRIPTION = 'XXXXXX-XXXX-XXXX-XXXX-XXXXXXXX'

credentials = ServicePrincipalCredentials(
    client_id = CLIENT,
    secret = KEY,
    tenant = TENANT_ID,
    verify = False
)
client = MonitorManagementClient(
    credentials = credentials,
    subscription_id = SUBSCRIPTION,
    verify = False
)

log = client.activity_logs.list(
    filter="eventTimestamp ge '2019-08-01T00:00:00.0000000Z' and eventTimestamp le '2019-08-24T00:00:00.0000000Z'",
    verify = False
)

for entry in log:
    print(entry)

After the modifications the code ran successfully and I was able to verify that the SDK was handling paging for me.

fiddler.png

Let’s sum up what we learned:

  • When using an Azure SDK leverage the Azure REST API reference to better understand the calls the SDK is making
  • Use Fiddler to analyze and debug issues with the Azure SDK
  • Never turn off certificate verification in a production environment and instead validate the certificate verification error is legitimate and if so add the certificate to the trusted store
  • In lab environments, certificate verification can be disabled by passing an additional parameter of verify=False with the SDK method

Hope that helps folks.  See you next time!

Deep Dive into Azure Managed Identities – Part 1

“I love the overhead of password management” said no one ever.

Password management is hard.  It’s even harder when you’re managing the credentials for non-humans, such as those used by an application.  Back in the olden days when the developer needed a way to access an enterprise database or file share, they’d put in a request with help desk or information security to have an account (often referred to as a service account) provisioned in Windows Active Directory, an LDAP, or a SQL database.  The request would go through a business approval and some support person would created the account, set the password, and email the information to the developer.  This process came with a number of risks:

  • Risk of compromise of the account
  • Risk of abuse of the account
  • Risk of a significant outage

These risks arise due to the following gaps in the process:

  • Multiple parties knowing the password (the party who provisions the account and the developer)
  • The password for the account being communicated to the developer unencrypted such as plain text in an email
  • The password not being changed after it is initially set due to the inability or difficult to change the password
  • The password not being regularly rotated due to concerns over application outages
  • The password being shared with other developers and the account then being used across multiple applications without the dependency being documented

Organizations tried to mitigate the risk of compromise by performing such actions as requiring a long and complex password, delivering the password in an encrypted format such as an encrypted Microsoft Office document, instituting policy requiring the password to be changed (exceptions with this one are frequent due to outage concerns), implementing password vaulting and management such as CyberArk Enterprise Password Vault or Hashicorp Vault, and instituting behavioral monitoring solutions to check for abuse.  Password rotation and monitoring are some of the more effective mitigations but can also be extremely challenging and costly to institute at a scale even with a vaulting and management solution.  Even then, there are always the exceptions to the systems with legacy applications which are not compatible (sadly these are often some of the more critical systems).

When the public cloud came around the credential management challenge for application accounts exploded due to the most favored traits of a public cloud which include on-demand self-service and rapid elasticity and scalability.  The challenge that was a few hundred application identities has grown quickly into thousands of applications and especially containers and serverless functions such as AWS Lambda and Azure Functions.  Beyond the volume of applications, the public cloud also changes the traditional security boundary due to its broad network access trait.  Instead of the cozy feeling multiple firewalls gave you, you now have developers using cloud services such as storage or databases which are directly administered via the cloud management plane which is exposed directly to the Internet.  It doesn’t stop here folks, you also have developers heavily using SaaS-based version control solutions to store the code which may have credentials hardcoded into it potentially publicly exposing those credentials.

Thankfully the public cloud providers have heard the cries of us security folk and have been working hard to help address the problem.  One method in use is the creation of security principals which are designed around the use of temporary credentials.  This way there are no long standing credentials to share, compromise, or abuse.  Amazon has robust use of this concept in AWS using IAM Roles.  Instead of hardcoding a set of IAM User credentials in a Lambda or an application running on an EC2 instance, a role can be created with the necessary permissions required for the application and be assumed by either the Lambda service or EC2 instance.

For this series of posts I’m going to be focusing on one of Microsoft Azure’s solutions to this problem, which are called Managed Identities.  For you folks that are more familiar with AWS, Managed Identities conceptually work the same was as IAM Roles.  A security principal is created, permissions are granted, and the identity is assumed by a resource such as an Azure Web App or an Azure VM.  There are some features that differ from IAM Roles that add to the appeal of Managed Identities such as associating the identity lifecycle of the Managed Identity to the resource such that when the resource is created, the managed identity is created, and when the resource is destroyed, the identity is destroy.

In the next entry I will do a deeper dive into what a managed identity looks like behind the scenes.

See you soon fellow geek!