AWS Managed Microsoft AD Deep Dive Part 4 – Configuring LDAPS

AWS Managed Microsoft AD Deep Dive  Part 4 – Configuring LDAPS

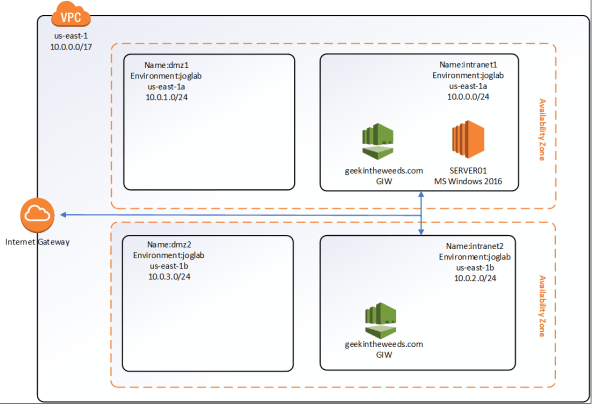
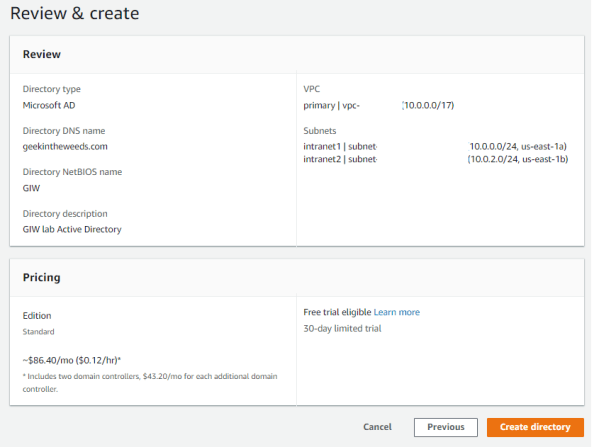
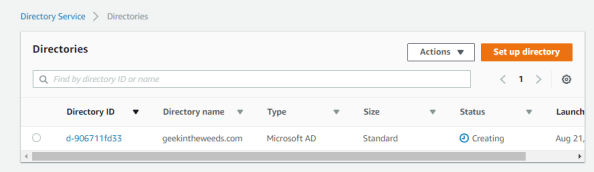
I’m back again with another entry in my deep dive into AWS Managed Microsoft Active Directory (AD).  So far I’ve provided an overview of the service, covered how to configure the service, and analyzed the Active Directory default configuration such as the directory structure, security principals, password policies, and group policy setup by Amazon for new instances.  In this post I’m going to look at the setup of LDAPS and how Amazon supports configuration of it in the delegated model they’ve setup for the service.

Those of you that have supported a Windows AD environment will be quite familiar with the wonders and sometimes pain of the Lightweight Directory Access Protocol (LDAP).  Prior to the modern directories such as AWS Cloud Directory, Azure Active Directory the LDAP protocol served critical roles by providing both authentication and a method of which to work with data stored in directory data stores such as Windows AD.  For better or worse the protocol is still relevant today when working with Windows AD for both of the above capabilities (less for authentication these days if you stay away from backwards-thinking vendors).  LDAP servers listen on port 389 and 636 with 389 maintaining traffic in the clear (although there are exceptions where data is encrypted in transit such as Microsoft’s usage of Kerberos encryption or the use of StartTLS (credit to my friend Chris Jasset for catching my omission of StartTLS)) and 636 (LDAPS) providing encryption in transit via an SSL tunnel (hopefully not anymore) or a TLS tunnel.

Windows AD maintains that pattern and serves up the content of its data store over LDAP over ports 389 and 636 and additionally ports 3268 and 3269 for global catalog queries.  In the assume breach days we’re living in, we as security professionals want to protect our data as it flows over the network which means we’ll more often than not (exceptions are again Kerberos encryption usage mentioned above) be using LDAPS over ports 636 or 3269.  To provide that secure tunnel the domain controllers will need to be setup with a digital certificate issued by a trusted certificate authority (CA).    Domain Controllers have unique requirements for the certificates they use.  If you’re using  Active Directory Certificate Services (AD CS) Microsoft takes care of providing the certificate template for you.

So how do you provision a certificate to a Domain Controller’s certificate store when you don’t have administrative privileges such as the case for a managed service like AWS Managed Active Directory?   For Microsoft Azure Active Directory Domain Services (AAD DS) the public certificate and private key are uploaded via a web page in the Azure Portal which is a solid way of doing it.  Amazon went in a different and instead takes advantage of certificate autoenrollment.  If you’re not familiar with autoenrollment take a read through this blog.  In short, it’s an automated way to distribute certificates and eliminate some of the overheard of manually going through the typical certificate lifecycle which may contain manual steps.

If we bounce back to the member server in my managed domain, open the Group Policy Management Console (GPMC), and navigate to the settings tab of the AWS Managed Active Directory Policy we see that autoenrollment has been enabled on the domain controllers.  This setting explains why Amazon requires a member server joined to the managed domain be configured running AD CS.  Once the AD CS instance is setup, the CA has been configured either to as a root or subordinate CA, and a proper template is enabled for autoenrollment, the domain controllers will request the appropriate certificate and will begin using it for LDAPS.

4awsadds1.png

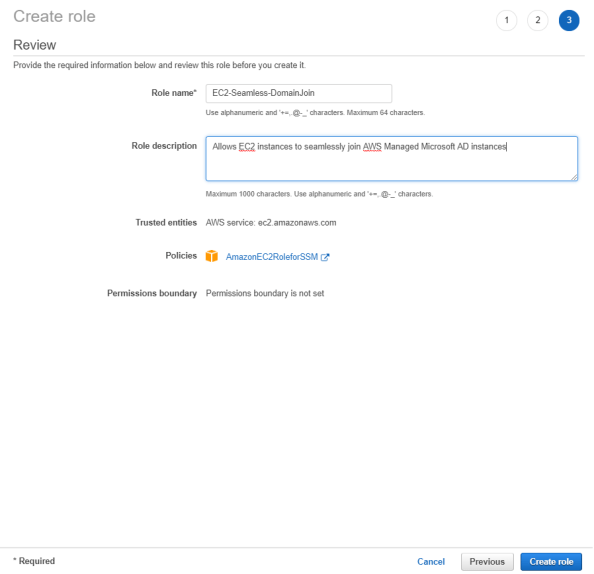
If you’ve ever worked with AD CS you may be asking yourself how you’ll be able to install AD CS in a domain where you aren’t a domain administrator when the Microsoft documentation specifically states you need to be a member of the Enterprise Admins and root domains Domain Admins group.  Well folks that is where the AWS Delegated Enterprise Certificate Authority Administrators group comes into play.  Amazon has modified the forest to delegate the appropriate permissions to install AD CS in a domain environment.  If we navigate to the CN=Public Key Services, CN=Services, CN=Configuration using ADSIEdit and view the Security for the container we see this group has been granted full permissions over the node allowing the necessary objects to be populated underneath it.

4awsadds2.png

I found it interesting that in the instructions provided by Amazon for enabling LDAPS the instructions state the Domain Controller certificate template needs to modified to remove the Client Authentication EKU.  I’d be interested in knowing the reason for modifying the Domain Controller certificate.  If I had to guess it’s to prevent the domain controller from using the certificate outside of LDAPS such as for mutual authentication during smart card logon.  Notice that from this article domain controllers only require the Server Authentication EKU when a certificate is only used to secure LDAPS.

I’ve gone ahead and installed AD CS on SERVER01 as an Enterprise root CA and thanks to the delegation model, the CA is provisioned with all the necessary goodness in CN=Public Key Services.  I also created the new certificate template following the instructions from Amazon.  The last step is to configure the traffic flow such that the managed domain controllers can contact the CA to request a certificate.  The Amazon instructions actually have a typo in them.  On Step 4 it instructs you to modify the security group for your CA and to create a new inbound rule allowing all traffic from the source of your CA’s AWS Security group.  The correct security group is actually the security group automatically configured by Amazon that is associated with the managed Active Directory instance.

At this point you’ll need to wait a few hours for the managed domain controllers to detect the new certificates available for autoenrollment.  Mine actually only took about an hour to roll the certificates out.

4awsadds3.png

To test the service I opened LDP.EXE and established a secure session over port 636 and all worked as expected.

4awsadds4.png

Since I’m a bit OCD I also pulled the certificate using openssl to validate it’s been issued by my CA.  As seen in the screenshot below the certificate was issued by the geekintheweeds-CA which is the CA I setup earlier.

4awsadds5.png

Beyond the instructions Amazon provides, you’ll also want to give some thought as to how you’re going to handle revocation checks. Keep in mind that by default AD CS stores revocation information in AD. If you have applications configured to check for revocation remember to ensure those apps can communicate with the domain controllers over port 389 so design your security groups with this in mind.

Well folks that will wrap up this post. Now that LDAPS is configured, I’ll begin the tests looking at the protocols and ciphers supported when accessing LDAPS as well as examining the versions of NTLM supported and the encryption algorithms supported with Kerberos.

See you next post!


AWS Managed Microsoft AD Deep Dive Part 2 – Setup

AWS Managed Microsoft AD Deep Dive  Part 2 – Setup

Today I’ll continue my deep dive into AWS Managed Microsoft AD.  In the last blog post I provided an overview of the reasons an organization would want to explore a managed service for Windows Active Directory (Windows AD).  In this post I’ll be providing an overview of my lab environment and demoing how to setup an instance of AWS Managed Microsoft AD and seamlessly joining a Windows EC2 instance.

Let’s dive right into it.

Let’s first cover what I’ll be using as a lab.  Here I’ve setup a virtual private cloud (VPC) with default tenancy which is a requirement to use AWS Managed Microsoft AD.  The VPC has four subnets configured within it named intranet1, intranet2, dmz1, and dmz2.  The subnets intranet1/dmz1 and intranet2/dmz2 provide us with our minimum of two availability zones, which is another requirement of the service.  I’ve created a route table that routes traffic destined for IP ranges outside the VPC to an Internet Gateway and applied that route table to both the intranet1 and intranet2 subnets.  This will allow me to RDP to the EC2 instances I create.  Later in the series I’ll configure VPN connectivity with my on-premises lab to demonstrate how the managed AD can be used on-prem.  Below is a simple Visio diagraming the lab.

1awsadds1.png

To create a new instance of AWS Managed Microsoft AD, I’ll be using the AWS Management Console.  After successfully logging in, I navigate to the Services menu and select the Directory Service link under the Security, Identity & Compliance section as seen below.

1awsadds2.png

The Directory Service page then loads which is a launching pad for configuration of the gamut of AWS Directory Services including AWS Cloud Directory, Simple AD, AD Connector, Amazon Cognito, and of course AWS Managed Microsoft AD.  Any directory instance that you’ve created would appear in the listing to the right.  To create a new instance I select the Set up Directory button.

1awsadds3.png

The Set up a directory page loads and I’m presented with the options to create an instance of AWS Managed Microsoft AD, Simple AD, AD Connector, or an Amazon Cognito User Pool.  Before I continue, I’ll provide the quick and dirty on the latter three options.  Simple AD is actually Samba made to emulate some of the capabilities of Windows Active Directory.  The AD Connector acts as a sort of proxy to interact with an existing Windows Active Directory.  I plan on a future blog series on that one.  Amazon Cognito is Amazon’s modern authentication solution (looks great for B2C)  providing Open ID Connect, OAuth 2.0, and SAML services to applications.  That one will warrant a future blog series as well.  For this series we’ll be select the AWS Managed Microsoft AD option and clicking the Next button.

1awsadds4.png

A new page loads where we configure the directory information.  Here I’m given the option to choose between a standard or enterprise offering of the service.  Beyond storage I’ve been unable to find or pull any specifications of the EC2 instances Amazon is managing in the background for the domain controllers.  I have to imagine Enterprise means more than just 16GB of storage and would include additional memory and CPU.  For the purposes of this series, I’ll be selecting Standard Edition.

Next I’ll provide the key configuration details for forest which includes the fully qualified domain name (FQDN) for the forest I want created as well as optionally specifying the NetBIOS name.  The Admin password set here is used for the delegated administrator account Amazon creates for the customer.  Make sure this password is securely stored, because if it’s lost Amazon has no way of recovering it.

1awsadds5.png

After clicking the Next button I’m prompted to select the virtual private cloud (VPC) I want to service deployed to.  The VPC used must include at least two subnets that are in different availability zones.  I’ll be using the intranet1 and intranet2 subnets shown in my lab diagram earlier in the post.

1awsadds6.png

The next page that loads provides the details of the instance that will be provisioned.  Once I’m satisfied the configuration is correct I select the Create Directory button to spin up the service.

1awsadds7.png

Amazon states it takes around 20 minutes or so to spin up the instance, but my experience was more like 30-45 minutes.  The main Directories Services page displays the status of the directory as Creating.  As part of this creation a new Security Group will be created which acts as a firewall for the managed domain controllers.  Unlike some organization that try to put firewalls between domain-join clients and domain controllers, Amazon has included all the necessary flows and saves  you a ton of troubleshooting with packet captures.

1awsadds8

One of the neat features offered with this service is the ability to seamlessly domain-join Windows EC2 instances during creation.  Before that feature can be leveraged an AWS Identity and Access Management (IAM) role needs to setup that has the AmazonEC2RoleforSSM attached to it.  AWS IAM is by far my favorite feature of AWS.  At a very high level, you can think of AWS IAM as being the identity service for the management of AWS resources.  It’s insanely innovative and flexible in its ability to integrate with modern authentication solutions and in how granular you can be in defining rights and permissions to AWS resources.  I could do multiple series just covering the basics (which I plan to do in the future) but to progress this entry let me briefly explain AWS IAM Roles.  Think of an AWS IAM Role as a unique security principal similar to a user but without any credentials. The role is assigned a set of rights and permissions which AWS refers to as a policy.  The role is then assumed by a human (such as federated user) or non-human (such as EC2 instance) granting the entity the rights and permissions defined in the policy attached to the role.  In this scenario the EC2 instance I create will be assuming the AmazonEC2RoleforSSM.  This role grants a number of rights and permissions within AWS’s Simple System Manager (SSM), which for your Microsoft-heavy users is a scaled down SCCM.  It requires this role to orchestrate the domain-join upon instance creation.

To create the role I’ll open back up the Services menu and select IAM from the Security, Identity & Compliance menu.

1awsadds9.png

The IAM dashboard will load which provides details as to the number of users, groups, policies, roles, and identity providers I’ve created.  From the left-hand menu I’ll select the Roles link.

1awsadds10.png

The Role page then loads and displays the Roles configured for my AWS account. Here I’ll select the Create Role button to start the role creation process.

1awsadds11.png

The Create Role page loads and prompts me to select a trusted entity type.  I’ll be using this role for EC2 instances so I’ll select the AWS service option and chose EC2 as the service that will use the role.  Once both options are selects I select the Next: Permission button.

1awsadds12.png

Next up we need to assign a policy to the role.  We can either create a new policy or select an existing one.  For seamless domain-join with AWS Managed Microsoft AD, EC2 instances must use the AmazonEC2forSSM policy.  After selecting the policy I select the Next: Review button.

1awsadds13.png

On the last page I’ll name the role, set a description, and select the Create role button. The role is then provisioned and available for use.

1awsadds14.png

Navigating back to the Directory Services page, I can see that the geekintheweeds.com instance is up and running. This means we can now create some EC2 instances and seamlessly join them to the domain.

1awsadds15.png

The EC2 instance creation is documented endless on the web, so I won’t waste time walking through it beyond showing the screenshot below which displays the options for seamless domain-join. The EC2 instance created will be named SERVER01.

1awsadds16.png

After a few minutes the instance is ready to go. I start the Remote Desktop on my client machine and attempt a connection to the EC2 instance using the Admin user and credentials I set for the AD domain.

1awsadds17.png

Low and behold I’m logged into the EC2 instance using my domain credentials!

1awsadds18.png

As you can see setup of the service and EC2 instances is extremely simple and could made that much more simple if we tossed out the GUI and leveraged cloud formation templates to seamlessly spin up entire environments at a push of a button.

We covered a lot of content in this entry so I’ll close out here.  In the next entry I’ll examine the directory structure Amazon creates including the security principals and key permissions.

See you next post!


AWS Managed Microsoft AD Deep Dive Part 1 – Overview

AWS Managed Microsoft AD Deep Dive  Part 1 – Overview

Welcome back my fellow geeks!

Earlier this year I did a deep dive into Microsoft’s managed Active Directory service, Microsoft Azure Active Directory Domain Services (AAD DS).  I found was a service in its infancy and showing some promise, but very far from being an enterprise-ready service.  I thought it would be fun to look at Amazon’s (which I’ll refer to as Amazon Web Services (AWS) for the rest of the entries in this series) take on a managed Microsoft Active Directory (or as Microsoft is referring to it these days Windows Active Directory).

Unless your organization popped up in the last year or two and went the whole serverless route you are still managing operating systems that require centralized authentication, authorization, and configuration management.  You also more than likely have a ton of legacy/classic on-premises applications that require legacy protocols such as Kerberos and LDAP.  Your organization is likely using Windows Active Directory (Windows AD) to provide these capabilities along with Windows AD’s basic domain name system (DNS) service and centralized identity data store.

It’s unrealistic to assume you’re going to shed all those legacy applications prior to beginning your journey into the public cloud.  I mean heck, shedding the ownership of data centers alone can be a huge cost driver.  Organizations are then faced with the challenge of how to do Windows AD in the public cloud.  Is it best to extend an existing on-premises forest into the public cloud?  What about creating a resource forest with a trust?  Or maybe even a completely new forest with no trust?  Each of these options have positives and negatives that need to be evaluated against organizational requirements across the business, technical, and legal arenas.

Whatever choice you make, it means additional infrastructure in the form of more domain controllers.  Anyone who has managed Windows AD in an enterprise knows how much overhead managing domain controllers can introduce.  Let me clarify that by managing Windows AD, it does not mean opening Active Directory Users and Computers (ADUC) and creating user accounts and groups.  I’m talking about examining performance monitor AD counters and LDAP Debug logs to properly size domain controllers, configuring security controls to comply with PCI and HIPAA requirements or aligning with DISA STIGS, managing updates and patches, and troubleshooting the challenges those bring which requires extensive knowledge of how Active Directory works.  In this day an age IT staff need to be less focused on overhead such as this and more focused on working closely with its business units to drive and execute upon business strategy.  That folks is where managed services shine.

AWS offers an extensive catalog of managed services and Windows AD is no exception.  Included within the AWS Directory Services offerings there is a powerful offering named Amazon Web Services Directory Service for Microsoft Active Directory, or more succinctly AWS Managed Microsoft AD.  It provides all the wonderful capabilities of Windows AD without all of the operational overhead.  An interesting fact is that the service has been around since December 2015 in comparison to Microsoft’s AAD DS which only went into public preview at in 3rd Q 2017.  This head start has done AWS a lot of favors and in this engineer’s opinion, has established AWS Managed Microsoft AD as the superior managed Windows AD service over Microsoft’s AAD DS.  We’ll see why as the series progresses.

Over the course of this series I’ll be performing a similar analysis as I did in my series on Microsoft AAD DS.  I’ll also be examining the many additional capabilities AWS Managed Microsoft AD provides and demoing some of them in action.  My goal is that by the end of this series you understand the technical limitations that come with the significant business benefits of leveraging a managed service.

See you next post!

AWS and Microsoft’s Cloud App Security

AWS and Microsoft’s Cloud App Security

It seems like it’s become a weekly occurrence to have sensitive data exposed due to poorly managed cloud services.  Due to Amazon’s large market share with Amazon Web Services (AWS) many of these instances involve publicly-accessible Simple Storage Service (S3) buckets.  In the last six months alone there were highly publicized incidents with FedEx and Verizon.  While the cloud can be empowering, it can also be very dangerous when there is a lack of governance, visibility, and acceptance of the different security mindset cloud requires.

Organizations that have been in operation for many years have grown to be very reliant on the network boundary acting as the primary security boundary.  As these organizations begin to move to a software defined data center model this traditional boundary quickly becomes less and less effective.  Unfortunately for these organizations this, in combination with a lack of sufficient understanding of cloud, gives rise to mistakes like sensitive data being exposed.

One way in which an organization can protect itself is to leverage technologies such as cloud access security brokers (cloud security gateways if you’re Forrester reader) to help monitor and control data as it travels between on-premises and the cloud.  If you’re unfamiliar with the concept of a CASB, I covered it in a previous entry and included a link to an article which provides a great overview.

Microsoft has its own CASB offering called Microsoft Cloud App Security (CAS).  It’s offered as part of Microsoft’s Enterprise Mobility and Security (EMS) E5/A5 subscription.  Over the past several months multiple connectors to third party software-as-a-service (SaaS) providers have been introduced, including one for AWS.  The capabilities with AWS are limited at this point to pulling administrative logs and user information but it shows promise.

As per usual, Microsoft provides an integration guide which is detailed in button pushing, but not so much in concepts and technical details as to what is happening behind the scenes.  Since the Azure AD and AWS blog series has attracted so many views, I thought it would be fun and informative to do an entry for how Cloud App Security can be used with AWS.

I’m not in the habit of re-creating documentation so I’ll be referencing the Microsoft integration guide throughout the post.

The first thing that needs doing is the creation of a security principal in AWS Identity and Access Management (AWS IAM) that will be used by your tenant’s instance of CAS to connect to resources in your AWS account.   The first four steps are straightforward but step 5 could a bit of an explanation.

awscas1.pngHere we’re creating a custom IAM policy for the security principal granting it a number of permissions within the AWS account.  IAM policies are sets of permissions which are attached to a human or non-human identity or AWS resource and are evaluated when a call to the resource is made.  In the traditional on-premises world, you can think of it as something somewhat similar to a set of NTFS file permissions.  When the policy pictured above is created the security principal is granted a set of permissions across all instances of CloudTrail, CloudWatch, and IAM within the account.

If you’re unfamiliar with AWS services, CloudTrail is a service which audits the API calls made to AWS resources.  Some of the information included in the events include the action taken, the resource the action was taken upon, the security principal that made the action, the date time, and source IP address of the security principal who performed the action.  The CloudWatch service allows for monitoring of metrics and optionally triggering events based upon metrics reaching specific thresholds.  The IAM service is AWS’s identity store for the cloud management layer.

Now that we have a basic understanding of the services, let’s look at the permissions Microsoft is requiring for CAS to do its thing.  The CloudTrail permissions of DescribeTrails, LookupEvents, and GetTrailStatus allow CAS to query for all trails enabled on an AWS account (CloudTrail is enabled by default on all AWS resources), lookup events in a trail, and get information about the trail such as start and stop logging times.  The CloudWatch permissions of Describe* and Get* are fancy ways of asking for  READ permissions on CloudWatch resources.  These permissions include describe-alarms-history, describe alarms, describe-alarms-for-metric, get-dashboard, and get-metric-statistics.  The IAM permissions are similar to what’s being asked for in CloudWatch, basically asking for full read.

Step number 11 instructs us to create a new CloudTrail trail.  AWS by default audits all events across all resources and stores them for 90 days.  Trails enable you to direct events captured by CloudTrail to an S3 bucket for archiving, analysis, and responding to events.

awscas2.png

The trail created is consumed by CAS to read the information captured via CloudTrail.  The permissions requested above become a bit more clear now that we see CAS is requesting read access for all trails across an account for monitoring goodness.  I’m unclear as to why CAS is asking for read for CloudWatch alarms unless it has some integration in that it monitors and reports on alarms configured for an AWS account.  The IAM read permissions are required so it can pull user  information it can use for the User Groups capability.

After the security principal is created and a sample trail is setup, it’s time to configure the connector for CAS.  Steps 12 – 15 walk through the process.  When it is complete AWS now shows as a connected app.

awscas3.png

After a few hours data will start to trickle in from AWS.  Navigating to the Users and Accounts section shows all of the accounts found in the IAM instance for my AWS account.  Envision this as your one stop shop for identifying all of the user accounts across your many cloud services.  A single pane of glass to identity across SaaS.

awscas4.png

On the Activity Log I see all of the API activities captured by CloudTrail.  If I wanted to capture more audit information, I can enable CloudTrail for the relevant resource and point it to the trail I configured for CAS.  I haven’t tested what CAS does with multiple trails, but based upon the permissions we configured when we setup the security principal, it should technically be able to pull from any trail we create.

awscas7.png

Since the CAS and AWS integration is limited to pulling logging information, lets walk through an example of how we could use the data.  Take an example where an organization has a policy that the AWS root user should not be used for administrative activities due to the level of access the account gets by default.  The organization creates AWS IAM users accounts for each of its administrators who administer the cloud management layer.  In this scenario we can create a new policy in CAS to detect and alert on instances where the AWS root user is used.

First we navigate to the Policies page under the Control section of CAS.

awscas6.png

On the Policies page we’re going to choose to create a new policy settings in the image below.  We’ll designate this as a high severity privileged account alert.  We’re interested in knowing anytime the account is used so we choose the Single Activity option.

awscas7

We’ll pretend we were smart users of CAS and let it collect data for a few weeks to get a sampling of the types of events which are captured and to give us some data to analyze.  We also went the extra mile and leveraged the ability of CAS to pull in user information from AWS IAM such that we can choose the appropriate users from the drop-down menus.

Since this is a demo and my AWS lab has a lot of activity by the root account we’re going to limit our alerts to the creation of new AWS IAM users.  To do that we set our filter to look for an Activity type equal to Create user.  Our main goal is to capture usage of the root account so we add another filter rule that searches for a User with the name equal to aws root user where it is the actor in an event.

awscas8.png

Finally we configure the alert to send an email to the administrator when the event occurs.  The governance capabilities don’t come into play in this use case.

awscas9

Next we jump back to AWS and create a new AWS IAM user named testuser1.  A few minutes after the user is created we see the event appearing in CloudTrail.

awscas10

After a few minutes, CAS generates and alert and I receive an email seen in the image below.   I’m given information as to the activity, the app, the date and time it was performed, and the client’s IP address.

awscas11.png

If I bounce back to CAS I see one new Alert.  Navigating to the alert I’m able to dismiss it, adjust the policy that generated it, or resolve it and add some notes to the resolution.

awscas12.png

I also have the option to dig deeper to see some of the patterns of the user’s behavior or the pattern of the behaviors from a specific IP address as seen below.

awscas13.png

awscas14.png

All this information is great, but what can we do with it?  In this example, it delivers visibility into the administrative activities occurring at the AWS cloud management layer by centralizing the data into a single repository which I can then send other data such as O365 activity, Box, SalesForces, etc.  By centralizing the information I can begin doing some behavioral analytics to develop standard patterns of behavior of my user base.  Understanding standard behavior patterns is key to being ahead of the bad guys whether they be insiders or outsiders.  I can search for deviations from standard patterns to detect a threat before it becomes too widespread.  I can also be proactive about putting alerts and enforcement (available for other app connectors in CAS but not AWS at this time) to stop the behavior before the threat is realized.  If I supplemented this data with log information from my on-premises proxy via Cloud App Discovery, I get an even larger sampling improving the quality of the data as well as giving me insight into shadow IT.  Pulling those “shadow” cloud solutions into the light allow me to ensure the usage of the services complies with organizational policies and opens up the opportunity of reducing costs by eliminating redundant services.

Microsoft categorizes the capabilities that help realize these benefits as the Discover and Investigate capabilities of CAS. The solution also offers a growing number of enforcement mechanisms (Microsoft categorized these enforcement mechanisms as Control) which add a whole other layer of power behind the solution.  Due to the limited integration with AWS I can’t demo those capabilities with this post.  I’ll cover those in a future post.

I hope this post helped you better understand the value that CASB/CSGs like Microsoft’s Cloud App Security can bring to the table.  While the product is still very new and a bit sparse on support with 3rd party applications, the list is growing every day. I predict the capabilities provided by technology such as Microsoft’s Cloud App Security will be as standard to IT as a firewall in the years to come.  If you’re already in Office 365 you should be ensuring you integrate these capabilities into your arsenal to understand the value they can bring to your business.

Thanks and have a wonderful week!