Happy New Year! Over the last few months of 2024, I was buried in AI Foundry (FKA Azure AI Studio. Hey marketing needs to do something a few times a year.) proof-of-concepts with my best buddy Jose. The product is very new, very powerful, but also very complex to get up and running in a regulated environment. Through many hours labbing scenarios out and troubleshooting with customers, I figured it was time to share some of what I learned.
So what is AI Foundry? If you want the Microsoft explanation of what it is, read the documentation. Here you’ll get the Matt Felton opinion on what it is (god help you). AI Foundry is a toolset intended to help AI Engineers build Generative AI applications. It allows them to interact with the LLMs (large language models) and build complex workflows (via Prompt Flows) in a no code (like Chat Playground) or low code (prompt flow interface) environment. As you can imagine, this is an attractive tool to get the people who know Generative AI quick access to the LLMs so use cases can be validated before expensive development cycles are spent building the pretty front-end and code required to make it a real application.
Before we get into the guts of the use cases Jose and I have run into, I want to start with the basics of how the hell this service is setup. This will likely require a post or two, so grab your coffee and get ready for a crash course.
AI Foundry is built on top of AML (Azure Machine Learning). If you’re ever built out a locked down AML instance, you have some understanding of the many services that work together to provide the service. AI Foundry inherits these components and provides a sleek user interface on top and typically requires additional resources like Azure OpenAI and AI Search (for RAG use cases). Like AML there are lots and lots of pieces that you need to think about, plan for, and implement in the correct manner to make the secured instance of AI Foundry work.
One specific feature of AML plays an important role within AI Foundry and that is the concept of a hub workspace. A hub is an AML workspace that centrally manages the security, networking, compute resources, and quota for children AML workspaces. These child AML workspaces are referred to as projects. The whole goal of the hub is to make it easier for your various business units to do the stuff they need to do with AML/AI Foundry without having to manage the complex pieces like the security and networking. My guidance would be to think about giving each business unit a Foundry Hub that they can group projects of similar environment (prod or non-prod) and data sensitivity.
General relationship between AI Foundry Hub and AI Foundry Projects
Ok, so you get the basic gist of this. When you deploy an AI Foundry instance, behind the scenes an AML workspace designated as a hub is created. Each project you create is a “child” AML workspace of the hub workspace and will inherit some resources from the hub. Now that you’re grounded in that basic piece, let’s talk about the individual components.
The many resources involved with a secured AI Foundry instance
As you can see in the above image, there are a lot of components of this solution that you will likely use if you want to deploy an AI Foundry instance that has the necessary security and networking controls. Let me give you a quick and dirty explanation of each component. I’ll dive deeper into the identity, authorization, and networking aspects of these components in future posts.
Managed identities
There are lots of managed identities in use with this product. There is a managed identity for the hub, a managed identity for the project, and managed identities for the various compute. One of the challenges of AI Foundry is knowing which managed identity (and if not a managed identity, the user’s identity) is being used to access a specific resource.
Azure Storage Account
Just like in AML, there is a default storage account associated with the workspace. Unlike with a traditional AML workspace you may be familiar with, the hub feature allows all project workspaces to leverage the same storage account. The storage account is used by the workspaces to store artifacts like logs in blob storage and artifacts like prompt flows in file storage. The hub and projects isolate their data to specific containers (for blob) and folders (for file) with Azure ABAC (holy f*ck a use case for this feature finally) setup such that the managed identities for the workspaces can only access containers/folders for data related to their specific workspace.
Azure Key Vault
The Azure Key Vault will store any keys used for connections created from within the AI Foundry project. This could be keys for the default storage account or keys used for API access to models you deploy from the model catalog.
Azure Container Registry
While this is deemed optional, I’d recommend you plan on deploying it. When deploy a prompt flow there uses certain functionality to the managed compute, the container image used isn’t the default runtime and an ACR instance will be spun up automatically without all the security controls you’ll likely want.
Azure OpenAI Service
This is used for deployment of OpenAI and some Microsoft chat and embedding models
Azure AI Service
This can be used as an alternative to the Azure OpenAI Service. It has some additional functionality beyond just hosting the models such as speed and the like.
Azure AI Search
This will be used for anything RAG related. Most likely you’ll see it used with the Chat With Your Data feature of the Chat Playground.
Managed Network
This is used to host the compute instances, serverless endpoints and managed online endpoints spun up for compute operations within AI Foundry. I’ll do a deep dive into networking within the service in a future post.
Azure Firewall
If building a secured instance, you’re going to use a managed virtual network that is locked down to all Internet access via outbound rules. Under the hood an Azure Firewall instance (standard for almost all use cases) will be spun up in the managed virtual network. You interact with it through the creation of the outbound rules and can’t directly administer it. However, you will be paying for it.
Role Assignments
So so so many role assignments. I’ll cover these in a future post.
Azure Private DNS
Used heavily for interacting with the AI Foundry instance and models/endpoints you deploy. I’ll cover this in an upcoming post.
Are you frightened yet? If not you should be! Don’t worry though, over this series I’ll walk you through the pain points of getting this service up and running. Once you get past the complex configuration, it’s a crazy valuable service that you’ll have a high demand for from your business units.
In the next post I’ll walk through the complexities of authorization within AI Foundry.
Today, I’m going to be posting my first post in a series on Azure AI Studio. I’ll let the true AI professionals give you the gory details and features of the service. The way my small brain thinks of the service is a platform built on top of AML (Azure Machine Learning) to make building applications that use Generative AI more developer-friendly. You can build and test applications, deploy third-party models, and organize applications into “projects” which can be secured to a specific project team but share resources across an organization via the concept of a hub. I’ll cover more on those pieces in a future blog post, but for today I want to focus on a pattern I was messing around that I think would be appealing to most folks.
One of the neat features of AI Studio is the Chat Playground. The Chat Playground is a web interface for interacting with models you have deployed to Azure AI Studio. You can send prompts and receive completions, adjust parameters such as temperature, and even get a code sample of the code being run by the web interface. The models that can e deployed include OpenAI models deployed to an AOAI (Azure OpenAI Service) instance or third-party models like Meta’s Llama deployed to a serverless endpoint or self-managed compute (in AML called managed online endpoint). For the purposes of this post I’m going to be focusing on OpenAI models deployed to an AOAI instance.
Azure AI Studio Chat Playground
You’re probably looking at this and thinking, “Yeah that is cool… a similar functionality exists in Azure OpenAI Studio and it does the same thing.” That’s correct it does, but for many organizations using the Azure OpenAI Studio’s Chat Playground isn’t an option for a number of different reasons both operational and security-related.
From an operational perspective, the Azure OpenAI Studio’s Chat Playground is designed to communicate directly with the endpoint for an AOAI instance. As I’ve covered in previous posts, this can be problematic. One reason is you’re limited to the quota within the instance which could cause you to hit limits quickly if you direct a whole ton of users to it. Typically, you will load balance across multiple instances deployed to multiple regions across multiple subscriptions as I discuss in my post on load balancing AOAI. The other problem is dealing with internal chargebacks. If I have multiple BUs (business units) hammering away at an instance, I don’t have any easy to determine who which folks in what BU consumed what. While metrics are token usage are captured in the metrics streamed from an instance, there is no way to associate that usage with an individual.
On the security side, communicating directly with the AOAI instance means I can’t review the prompts and responses being sent and received by the service. Many regulated organizations have requirements for these to be captured for review to ensure the service is being used appropriately and sensitive data isn’t being sent that hasn’t been approved to be sent. Additionally, availability of the AOAI instance could be affected by one user going nuts and consuming the full quota.
The challenges outlined above have driven many customers to insert a control point. The industry seems determined to coin this architectural component a Gen AI Gateway so I’ll play along. For you fellow old folks, all a Gen AI Gateway really is an API Gateway with some Gen AI-related features slapped on top of it. It sits between the front-facing user application and the models processing the prompts and responses. The GenAI-specific features available within the gateway help to address the operational and security challenges I’ve outlined above. If you’re curious about the specifics on this, you can check out my post on load balancing, logging, tracking token usage, rate limiting, and extracting useful information from the conversation such as prompts and responses.
Example design and process flow of a Gen AI Gateway
In the image above I’ve included an example of how APIM (Azure API Management) could be used to provide such functionality. Within the customer base I work with at Microsoft, many customers have built something that functions similar to what you see above. A design like this helps to address the operational and security challenges I’ve outlined above.
Wonderful right? Now what the **** does this have to do with AI Studio’s Chat Playground? Well, unlike the Azure OpenAI Studio’s Chat Playground, AI Studio’s offering does support modifying the endpoint to point to your generative AI gateway. How you do this isn’t super intuitive, but it does work. Whether you go this route is totally up to you. Ok, disclaimer is done, let’s talk about how you do this.
One thing to understand about using AI Studio’s Chat Playground is it works the same way that Azure OpenAI Studio’s version works in regards to where the TCP connections are sourced from when making calls to the model. As can be seen in the Fiddler capture below, the TCP connections made when you submit a prompt from the Chat Playground are sourced from the user’s endpoint.
Fiddler capture showing Chat Completion coming from user endpoint
This makes our life much easier because we likely control the path that user’s packet takes and the DNS the user uses which means we can direct that user’s packet to a Gen AI Gateway. For the purposes of this post, my goal is to funnel these prompts and completions through an APIM instance I have in place which has some APIM policy snippets that do some checks and balances and a call a small app (based off an awesome solution assembled by my buddy Shaun Callighan) which logs prompts and responses and calculates token metrics. The data processed by the app are then sent to an Event Hub, processed by Stream Analytics, and dumped into CosmosDB.
APIM between Chat Playground and AOAI
When you want to connect to an AOAI instance from AI Studio’s Chat Playground you add it as a connection. These connections can created at the hub level (think of this as a logical container for the projects) and then shared across projects. When adding the connection you can browse for the instance you want to connect to or enter manually.
Adding a connection to an AOAI instance
If you were to do that you won’t be able to create a deployment of a model or access a deployment of a model deployed in the instances behind it. This is because AI Studio is making calls to the Azure management plane to enumerate the deployments within the instance. Since there isn’t an AOAI with the hostname of your AOAI instance, you’ll be unable to add deployments or pick a deployment from the Chat Playground.
To work around this, you need to add a connection to one of your AOAI instances. This will be your “stub” instance that we’ll modify the endpoint of to point to API Management. If you’re load balancing across multiple AOAI instances behind APIM, you need to ensure that you’ve already created your model deployments and you’ve named them consistently across all of the AOAI instances you’re load balancing to. In the image below, I modify the endpoint to point to my APIM instance. The azure-openai-log-helper path is added to send it to a specific API I have setup on APIM that handles logging. For your environment, you’ll likely just need the hostname.
Modifying the endpoint name
Now before you go running and trying to use the Chat Playground, you’ll have to make a change to the APIM policy. Since the user’s browser is being told to make the call to this endpoint from a different domain (AI Studio’s domain) we need to ensure there is a CORS policy in place on the APIM instance to allow for this, otherwise it will be blocked by APIM. If you forget about this policy you’ll get a back a 200 from the APIM instance but nothing will be in the response.
Once you’ve modified your APIM policy with the CORS update, you’ll be good to go! Your requests will now flow through APIM for all the GenAI Gateway goodness.
Chat Completion from AI Studio Chat Playground flowing through APIM
When messing with this I ran into a few things I want to call out:
Do not forget the CORS policy. If you run into a 200 response from APIM with no content, it’s probably the CORS snippet.
If you have a validate-jwt snippet in your APIM policy that includes validating the claim includes cognitivesservices, remove that. The claim passed by AI Studio includes a trailing forward slash which won’t likely match what you get back if you’re using the MSAL library in code. You could certainly include some logic to handle it, but honestly the security benefit is so little from checking the claim just make it easy on yourself and remove the check for the claim. Keep the check that validate-jwt snippet but restrict it to checking the tenant ID in the token.
Chat Playground will pass the content property as the prompt as an array (this is the more modern approach to allow for multi-modal models like GPT-4o which can handle images and audio). If you have an APIM policy in place to parse the request body and extract information you’ll need to update it to also handle when content is passed as an array.
Chat Playground allows for the user to submit an image along with text in the prompt. Ensure your APIM policy is capable of handling prompts like that. Dealing with human users being able to submit images to an LLM and ensuring you’re reviewing that image for DLP and calculating token consumption for streaming Chat Completion is a whole other blog topic that I’m not going to do today. Key thing is you want to account for that. Block images or ensure your policy is capable of handling it if you’re deploying 4o or 4 Vision.
Well folks that sums up this post. I realize this solution is a bit funky, and I’m not gonna tell you to use it. I’m simply putting it out there as an option if you have a business need strong enough to provide a ChatGPT-style solution but don’t have the bandwidth or time to whip up your own application.
Update 11/4/2024 – Added limitations Update 10/11/2024 – Updated with generally available announcement
Welcome back! Today I’m going to step back from the Generative AI world and talk about some good ole networking. Networking is one of those technical components of every solution that gets glossed over until the rubber hits the road and the application graduates to “production-worthy”. Sitting happily beside security, it’s the topic I’m most often asked to help out with at Microsoft. I’m going to share a new feature has gone generally available under the radar that is pretty damn cool, even if a bit confusing.
Organizations in the regulated space frequently have security controls where a simple 5-tuple-based firewall rule at OSI layer 4 won’t suffice and traffic inspection needs to occur to analyze layer 7. Take for an example a publicly facing web application deployed to Azure. These applications can be subject to traffic inspection at multiple layers like an edge security service (Akamai, CloudFlare, FrontDoor, etc) and again when the traffic enters the customer’s virtual through a security appliance (F5, Palo Alto, Application Gateway, Azure Firewall, etc). Most of the time you can get away with those two inspection points (edge security service and security appliance deployed into virtual network) for public traffic and one inspection point for private traffic (security appliance deployed into virtual network and umpteenth number of security appliances on-premises). However, that isn’t always the case.
Many customers I work with have robust inspection requirements that may require multiple inspection points within Azure. The two most common patterns where this pops up is when traffic first moves through an Application Gateway or APIM (API Management) instance. In these scenarios some customers want to funnel the traffic through an additional inspection point such as their third-party firewall for additional checks or a centralized choke point managed by information security (in the event Application Gateways / APIM have been democratized). When the backend is a traditional virtual machine or virtual network injected/integrated (think something like an App Service Environment v3) the routing is quite simple and looks like something like the below.
Traffic inspection with traditional virtual machine or VNet Injected/VNet integrated service
In the above image we slap a custom route table on the Application Gateway subnet, and add a user-defined route that says when contacting the subnet containing the frontend resources of the application, it needs to go the firewall first. To ensure the symmetry of return traffic, we put a route table on the frontend subnet with a user-defined route that says communication to the Application Gateway subnet needs to also go to the firewall. The routes in these two route tables are more specific than the system route for the virtual network and take precedence forcing both the incoming and return traffic to flow symmetrically through the firewall. Easy enough.
The routing when inspecting traffic to services which receive their inbound traffic via a Private Endpoint (such as an App Service running in a Premium App Services Plan, a Storage Account, a Key Vault, etc) that inspection gets more challenging. These challenges exist for both controlling the traffic to the Private Endpoint and controlling the return traffic.
When a Private Endpoint is provisioned in a virtual network, a new system route is injected into the route tables of each subnet in that virtual network AND any peered virtual networks. This route is a /32 for the IP address assigned to the network interface associated with the Private Endpoint as seen in the image below.
System route added by the creation of a Private Endpoint in a virtual network
Historically, to work around this you had to drop /32 routes everywhere to override those routes to push the incoming traffic to the Private Endpoints through an inspection point. This was a nightmare at scale as you can imagine. Back in August 2023, Microsoft introduced what they call Private Endpoint Network Policies, which is a property of a subnet that allows you to better manage this routing (in addition to optionally enforcing Network Security Groups on Private Endpoints) by allowing less specific routes to override the more specific Private Endpoint /32 routes. You set this property to Enabled (both this routing feature and network security group enforcement) or RouteTableEnabled (just this routing feature). This property is set on the subnet you place the Private Endpoints into. Yeah I know, confusing because that is not how routing is supposed to work (where less specific routes of the same length override more specific routes), but this is an SDN (software defined network) so they’ll do what they please and you’ll like it.
Private Endpoint route invalid because Private Endpoint Network Policy property set to RouteTableEnabled
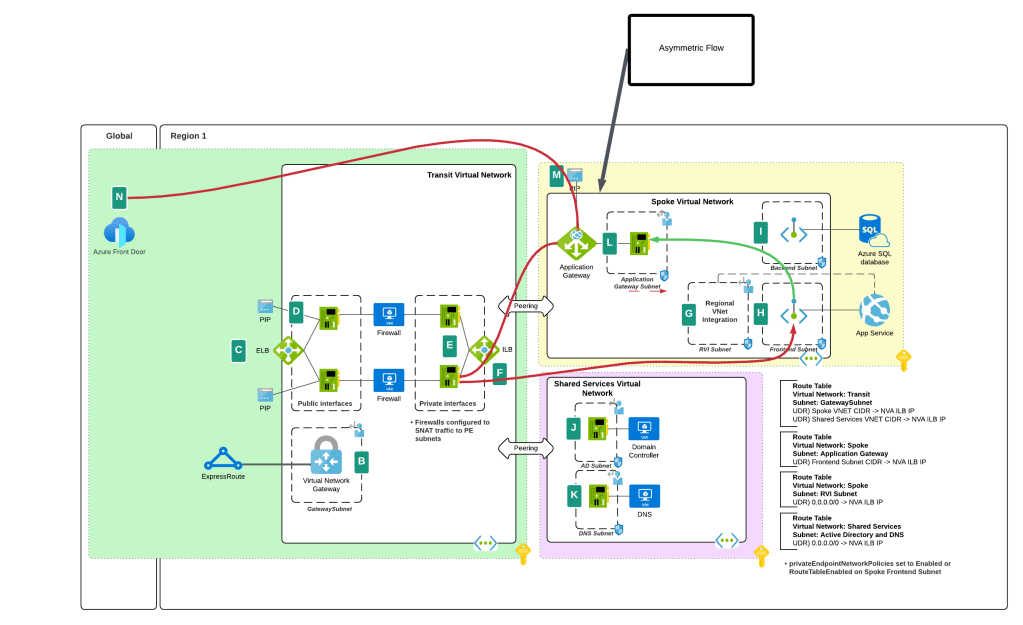
While this feature helped to address traffic to the Private Endpoint, handling the return traffic wasn’t so simple. Wrapping a custom route table around a subnet containing Private Endpoints does nothing to control return traffic from the Private Endpoints. They do not care about your user-defined routes and won’t honor them. This created an asymmetric traffic flow where incoming traffic was routed through the inspection point but return traffic bypassed it and went direct to the calling endpoint.
This misconfiguration was very common in customer environments and rarely was noticed because many TCP sessions with Private Endpoints are short lived and thus the calling client isn’t affected by the TCP RST sent by the firewall after X number of minutes. Customers could work around this by SNATing to the NVA’s (inspection point) IP address and ensure the return traffic was sent back to the NVA before it was passed back to the calling client. What made it more confusing was some services “just worked” because Microsoft was handling that symmetry in the data plane of the SDN. Azure Storage was an example of such a service. If you’re interested in understanding the old behavior, check out this post.
Prior asymmetric behavior without SNAT at NVA
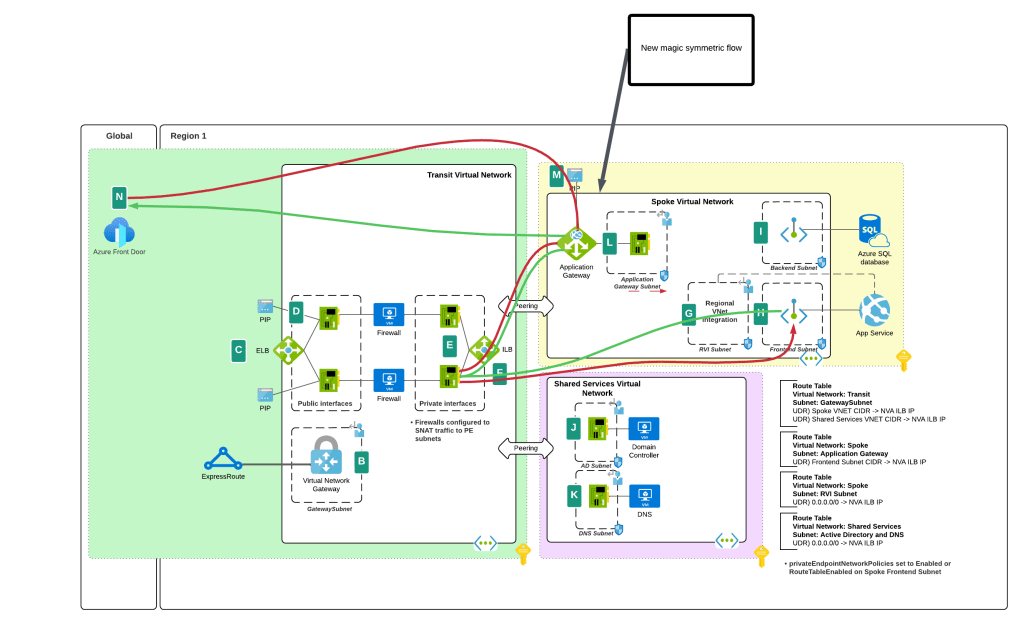
You’ll notice I said “prior” behavior. Yes folks, SNATing when using a 3rd-party NVA (announcement is specific to 3rd-party NVAs. Those of you using Azure Firewall in a virtual network, Azure Firewall in a VWAN Secure Hub, or a 3rd-party NVA in a VWAN Secure Hub will need to continue to SNAT for now (As of 11/2024) until this feature is extended to those use case.
I bet you’re thinking “Oh cool, Microsoft is now having Private Endpoints honor user-defined routes in route tables”. Ha ha, that would make far too much sense! Instead Microsoft has chosen to require resource tags on the NICs of the NVAs to remove the SNAT requirement. Yeah, wouldn’t have been my choice either but here we are. Additionally, in my testing, I had it working without the resource tags to get a symmetric flow of traffic. My assumption (and total assumption as an unimportant person at Microsoft) is that this may be the default behavior on some of the newer SDN stacks while older SDN stacks may require the tags. Either way, do what the documentation says and put the tags in place.
As of today (10/11/2024) the generally available documentation is confusing as to what you need to do. I’ve provided some feedback to the author to fix some of the wording, but in the meantime let me explain what you need to do. You need to create a resource tag on either the NIC (non-VMSS) or VM instance (VMSS) that has a key of disableSnatOnPL with a value of true.
Magic of SDN ensuring symmetric flowwithout SNAT
TLDR; SNAT should no longer be required to ensure symmetric traffic flow when placing an NVA between an endpoint and a Private Endpoint if you have the proper resource tag in place. My testing of the new feature was done in Central US and Canada Central with both Azure Key Vault and Azure SQL. I tested when the calling endpoint was within the same virtual network, when it was in a peered virtual network connected in a hub and spoke environment, and when the calling machine was on-premises calling a private endpoint in a spoke. In all scenarios the NVA showed a symmetric flow of traffic in a packet capture.
10/29/2024 – Microsoft has announced a deployment option referred to as a data zone (https://azure.microsoft.com/en-us/blog/accelerate-scale-with-azure-openai-service-provisioned-offering/). Data zones can be thought of as data sovereignty boundaries incorporated into the existing global deployment option. This will significantly ease load balancing so you will no longer need to deploy individual regional instances and can instead deploy a single instance with a data zone deployment within a single subscription. As you hit the cap for TPM/RPM within that subscription, you can then repeat the process with a new subscription and load balance across the two. This will result in fewer backends and a more simple load balancing setup.
Welcome back folks!
Today I’m back again talking load balancing in AOAI (Azure OpenAI Service). This is an area which has seen a ton of innovation over the past year. From what began as a very basic APIM (API Management) policy snippet providing randomized load balancing was matured to add more intelligence by a great crew out of Microsoft via the “Smart” Load Balancing Policy. Innovative Microsoft folk threw together a solution called PowerProxy which provides load balancing and other functionality without the need for APIM. Simon Kurtz even put together a new Python library to provide load balancing at the SDK-level without the need for additional infrastructure. Lots of great ideas put into action.
The Product Group for APIM over at Microsoft was obviously paying attention to the focus in this area and have introduced native functionality which makes addressing this need cake. With the introduction of the load balancer and circuit breaker feature in APIM, you can now perform complex load balancing without needing a complex APIM policy. This dropped with a bunch of other Generative AI Gateway (told you this would become an industry term!) features for APIM that were announced this week. These other features include throttling based on tokens consumed (highly sought after feature!), emitting token counts to App Insights, caching completions for optimization of token usage, and a simpler way to onboard AOAI into APIM. Very cool stuff of which I’ll be covering over the next few weeks. For this post I’m going to focus on the new load balancing and circuit breaker feature.
Before I dive into the new feature I want to do a quick review of why scaling across AOAI instances is so important. For each model you have a limited amount of requests and tokens you can pass to the service within a given subscription within a region. These limits vary on a per model basis. If you’re consuming a lot of prompts or making a lot of requests it’s fairly easy to hit these limits. I’ve seen a customer hit the limits within a region with one document processing application. I had another customer who deployed a single Chat Bot in a simple RAG (retrieval augmented generation) that was being used by large swath of their help desk staff and limits were quickly a problem. The point I’m making here is you will hit these limits and you will need to add figure out how to solve it. Solving it is going to require additional instances in different Azure regions likely spread across multiple subscriptions. This means you’ll need to figure out a way to spread applications across these instances to mitigate the amount of throttling your applications have to deal with.
Load Balancing Azure OpenAI Service
As I covered earlier, there are a lot of ways you can load balancing this service. You could do it at the local application using Simon’s Python library if you need to get something up and running quickly for an application or two. If you have an existing deployed API Gateway like an Apigee or Mulesoft, you could do it there if you can get the logic right to support it. If you want to custom build something from scratch or customize a community offering like PowerProxy you could do that as well if you’re comfortable owning support for the solution. Finally, you have the native option of using Azure APIM. I’m a fan of the APIM option over the Python library because it’s scalable to support hundreds of applications with a GenAI (generative AI) need. I also like it more than custom building something because the reality is most customers don’t have the people with the necessary skill sets to build something and are even less likely to have the bodies to support yet another custom tool. Another benefit of using APIM include the backend infrastructure powering the solution (load balancers, virtual machines, and the like) are Microsoft’s responsibility to run and maintain. Beyond load balancing, it’s clear that Microsoft is investing in other “Generative AI Gateway” types of functionality that make it a strategic choice to move forward with. These other features are very important from a security and operations perspective as I’ve covered in past posts. No, there was not someone from Microsoft holding me hostage forcing me to recommend APIM. It is a good solution for this use case for most customers today.
Ok, back to the new load balancing and circuit breaker feature. This new feature allows you to use new native APIM functionality to create a load balancing and circuit breaker policy around your APIM backends. Historically to do this you’d need a complex policy like the “smart” load balancing policy seen below to accomplish this feature set.
<policies>
    <inbound>
        <base />
        <!-- Getting the main variable where we keep the list of backends -->
        <cache-lookup-value key="listBackends" variable-name="listBackends" />
        <!-- If we can't find the variable, initialize it -->
        <choose>
            <when condition="@(context.Variables.ContainsKey("listBackends") == false)">
                <set-variable name="listBackends" value="@{
                    // -------------------------------------------------
                    // ------- Explanation of backend properties -------
                    // -------------------------------------------------
                    // "url":          Your backend url
                    // "priority":     Lower value means higher priority over other backends.
                    //                 If you have more one or more Priority 1 backends, they will always be used instead
                    //                 of Priority 2 or higher. Higher values backends will only be used if your lower values (top priority) are all throttling.
                    // "isThrottling": Indicates if this endpoint is returning 429 (Too many requests) currently
                    // "retryAfter":   We use it to know when to mark this endpoint as healthy again after we received a 429 response

                    JArray backends = new JArray();
                    backends.Add(new JObject()
                    {
                        { "url", "https://andre-openai-eastus.openai.azure.com/" },
                        { "priority", 1},
                        { "isThrottling", false },
                        { "retryAfter", DateTime.MinValue }
                    });

                    backends.Add(new JObject()
                    {
                        { "url", "https://andre-openai-eastus-2.openai.azure.com/" },
                        { "priority", 1},
                        { "isThrottling", false },
                        { "retryAfter", DateTime.MinValue }
                    });

                    backends.Add(new JObject()
                    {
                        { "url", "https://andre-openai-northcentralus.openai.azure.com/" },
                        { "priority", 1},
                        { "isThrottling", false },
                        { "retryAfter", DateTime.MinValue }
                    });

                    backends.Add(new JObject()
                    {
                        { "url", "https://andre-openai-canadaeast.openai.azure.com/" },
                        { "priority", 2},
                        { "isThrottling", false },
                        { "retryAfter", DateTime.MinValue }
                    });

                    backends.Add(new JObject()
                    {
                        { "url", "https://andre-openai-francecentral.openai.azure.com/" },
                        { "priority", 3},
                        { "isThrottling", false },
                        { "retryAfter", DateTime.MinValue }
                    });

                    backends.Add(new JObject()
                    {
                        { "url", "https://andre-openai-uksouth.openai.azure.com/" },
                        { "priority", 3},
                        { "isThrottling", false },
                        { "retryAfter", DateTime.MinValue }
                    });

                    backends.Add(new JObject()
                    {
                        { "url", "https://andre-openai-westeurope.openai.azure.com/" },
                        { "priority", 3},
                        { "isThrottling", false },
                        { "retryAfter", DateTime.MinValue }
                    });

                    backends.Add(new JObject()
                    {
                        { "url", "https://andre-openai-australia.openai.azure.com/" },
                        { "priority", 4},
                        { "isThrottling", false },
                        { "retryAfter", DateTime.MinValue }
                    });

                    return backends;
                }" />
                <!-- And store the variable into cache again -->
                <cache-store-value key="listBackends" value="@((JArray)context.Variables["listBackends"])" duration="60" />
            </when>
        </choose>
        <authentication-managed-identity resource="https://cognitiveservices.azure.com" output-token-variable-name="msi-access-token" ignore-error="false" />
        <set-header name="Authorization" exists-action="override">
            <value>@("Bearer " + (string)context.Variables["msi-access-token"])</value>
        </set-header>
        <set-variable name="backendIndex" value="-1" />
        <set-variable name="remainingBackends" value="1" />
    </inbound>
    <backend>
        <retry condition="@(context.Response != null && (context.Response.StatusCode == 429 || context.Response.StatusCode >= 500) && ((Int32)context.Variables["remainingBackends"]) > 0)" count="50" interval="0">
            <!-- Before picking the backend, let's verify if there is any that should be set to not throttling anymore -->
            <set-variable name="listBackends" value="@{
                JArray backends = (JArray)context.Variables["listBackends"];

                for (int i = 0; i < backends.Count; i++)
                {
                    JObject backend = (JObject)backends[i];

                    if (backend.Value<bool>("isThrottling") && DateTime.Now >= backend.Value<DateTime>("retryAfter"))
                    {
                        backend["isThrottling"] = false;
                        backend["retryAfter"] = DateTime.MinValue;
                    }
                }

                return backends;
            }" />
            <cache-store-value key="listBackends" value="@((JArray)context.Variables["listBackends"])" duration="60" />
            <!-- This is the main logic to pick the backend to be used -->
            <set-variable name="backendIndex" value="@{
                JArray backends = (JArray)context.Variables["listBackends"];

                int selectedPriority = Int32.MaxValue;
                List<int> availableBackends = new List<int>();

                for (int i = 0; i < backends.Count; i++)
                {
                    JObject backend = (JObject)backends[i];

                    if (!backend.Value<bool>("isThrottling"))
                    {
                        int backendPriority = backend.Value<int>("priority");

                        if (backendPriority < selectedPriority)
                        {
                            selectedPriority = backendPriority;
                            availableBackends.Clear();
                            availableBackends.Add(i);
                        }
                        else if (backendPriority == selectedPriority)
                        {
                            availableBackends.Add(i);
                        }
                    }
                }

                if (availableBackends.Count == 1)
                {
                    return availableBackends[0];
                }

                if (availableBackends.Count > 0)
                {
                    //Returns a random backend from the list if we have more than one available with the same priority
                    return availableBackends[new Random().Next(0, availableBackends.Count)];
                }
                else
                {
                    //If there are no available backends, the request will be sent to the first one
                    return 0;
                }
                }" />
            <set-variable name="backendUrl" value="@(((JObject)((JArray)context.Variables["listBackends"])[(Int32)context.Variables["backendIndex"]]).Value<string>("url") + "/openai")" />
            <set-backend-service base-url="@((string)context.Variables["backendUrl"])" />
            <forward-request buffer-request-body="true" />
            <choose>
                <!-- In case we got 429 or 5xx from a backend, update the list with its status -->
                <when condition="@(context.Response != null && (context.Response.StatusCode == 429 || context.Response.StatusCode >= 500) )">
                    <cache-lookup-value key="listBackends" variable-name="listBackends" />
                    <set-variable name="listBackends" value="@{
                        JArray backends = (JArray)context.Variables["listBackends"];
                        int currentBackendIndex = context.Variables.GetValueOrDefault<int>("backendIndex");
                        int retryAfter = Convert.ToInt32(context.Response.Headers.GetValueOrDefault("Retry-After", "-1"));

                        if (retryAfter == -1)
                        {
                            retryAfter = Convert.ToInt32(context.Response.Headers.GetValueOrDefault("x-ratelimit-reset-requests", "-1"));
                        }

                        if (retryAfter == -1)
                        {
                            retryAfter = Convert.ToInt32(context.Response.Headers.GetValueOrDefault("x-ratelimit-reset-tokens", "10"));
                        }

                        JObject backend = (JObject)backends[currentBackendIndex];
                        backend["isThrottling"] = true;
                        backend["retryAfter"] = DateTime.Now.AddSeconds(retryAfter);

                        return backends;
                    }" />
                    <cache-store-value key="listBackends" value="@((JArray)context.Variables["listBackends"])" duration="60" />
                    <set-variable name="remainingBackends" value="@{
                        JArray backends = (JArray)context.Variables["listBackends"];

                        int remainingBackends = 0;

                        for (int i = 0; i < backends.Count; i++)
                        {
                            JObject backend = (JObject)backends[i];

                            if (!backend.Value<bool>("isThrottling"))
                            {
                                remainingBackends++;
                            }
                        }

                        return remainingBackends;
                    }" />
                </when>
            </choose>
        </retry>
    </backend>
    <outbound>
        <base />
        <!-- This will return the used backend URL in the HTTP header response. Remove it if you don't want to expose this data -->
        <set-header name="x-openai-backendurl" exists-action="override">
            <value>@(context.Variables.GetValueOrDefault<string>("backendUrl", "none"))</value>
        </set-header>
    </outbound>
    <on-error>
        <base />
    </on-error>
</policies>
Complex policies like the above are difficult to maintain and easy to break (I know, I break my policies all of time). Compare that with a policy that does something very similar with the new load balancing and circuit breaker feature.
<policies>
    <!-- Throttle, authorize, validate, cache, or transform the requests -->
    <inbound>
        <set-backend-service backend-id="backend_pool_aoai" />
        <base />
    </inbound>
    <!-- Control if and how the requests are forwarded to services  -->
    <backend>
        <base />
    </backend>
    <!-- Customize the responses -->
    <outbound>
        <base />
    </outbound>
    <!-- Handle exceptions and customize error responses  -->
    <on-error>
        <base />
    </on-error>
</policies>
A bit simpler eh? With the new feature you establish a new APIM backend of a “pool” type. In this backend you configure your load balancing and circuit breaker logic. In the Terraform template below, I’ve created a load balanced pool that includes three existing APIM backends which are each an individual AOAI instance. I’ve divided the three backends into two priority groups such that the APIM so that APIM will concentrate the requests to the first priority group until a circuit break rule is triggered. I configured a circuit breaker rule that will hold sending additional requests for 1 minute (tripDuration) to a backend if that backend returns a single (count) 429 over the course of 1 minute (interval). You’ll likely want to play with the tripDuration and interval to figure out what works for you.
Priority group 2 will only be used if all the backends in priority group 1 have circuit breaker rules tripped. The use case here might be that your priority group 1 instance is a AOAI instance setup for PTU (provisioned throughput units) and you want overflow to dump down into instances deployed at the standard tier (basically consumption based).
resource "azapi_resource" "symbolicname" {
  type = "Microsoft.ApiManagement/service/backends@2023-05-01-preview"
  name = "string"
  parent_id = "string"
  body = jsonencode({
    properties = {
      circuitBreaker = {
        rules = [
          {
            failureCondition = {
              count = 1
              errorReasons = [
                "Backend service is throttling"
              ]
              interval = "PT1M"
              statusCodeRanges = [
                {
                  max = 429
                  min = 429
                }
              ]
            }
            name = "breakThrottling "
            tripDuration = "PT1M",
            acceptRetryAfter = true
          }
        ]
      }
      description = "This is the load balanced backend"
      pool = {
        services = [
          {
            id = "/subscriptions/XXXXXXXX-XXXX-XXXX-XXXX-XXXXXXXXXXXX/resourceGroups/rg-demo-aoai/providers/Microsoft.ApiManagement/service/apim-demo-aoai-jog/backends/openai-3",
            priority = 1
          },
          {
            id = "/subscriptions/XXXXXXXX-XXXX-XXXX-XXXX-XXXXXXXXXXXX/resourceGroups/rg-demo-aoai/providers/Microsoft.ApiManagement/service/apim-demo-aoai-jog/backends/openai-1",
            priority = 2
          },
          {
            id = "/subscriptions/XXXXXXXX-XXXX-XXXX-XXXX-XXXXXXXXXXXX/resourceGroups/rg-demo-aoai/providers/Microsoft.ApiManagement/service/apim-demo-aoai-jog/backends/openai-2",
            priority = 2
          }
        ]
      }
    }
  })
}
Very cool right? This makes for way simpler APIM policy which means troubleshooting APIM policy that much easier. You could also establish different pools for different categories of applications. Maybe you have a pool with a PTU and standard tier instances for mission-critical production apps and another pool of only standard instances for non-production applications. You could then direct specific applications (based on their Entra ID service principal id) to different pools. This feature gives you a ton of flexibility in how you handle load balancing without a to of APIM policy overhead.
With the introduction of this feature into APIM, it makes APIM that much more of an appealing solution for this use case. No longer do you need a complex policy and in-depth APIM policy troubleshooting skills to make this work. Tack on the additional GenAI features Microsoft introduced that I mentioned earlier, as well as its existing features and capabilities available in APIM policy, you have a damn fine tool for your Generative AI Gateway use case.
Well folks that wraps up this post. I hope this overview gave you some insight into why load balancing is important with AOAI, what the historical challenges have been doing it within APIM, and how those challenges have been largely removed with the added bonus of additional new GenAI-based features make this a tool worth checking out.