You didn’t think I was done with AWS Managed Microsoft AD yet did you? In this post I’m going to perform some tests to evaluate the protocols and ciphers suites available for LDAPS as well as checking out the managed Domain Controllers support for NTLMv1 and the cipher suites supported for Kerberos. I’ll be using the same testing mechanisms I used when for my series on Microsoft Azure Active Directory Domain Services.
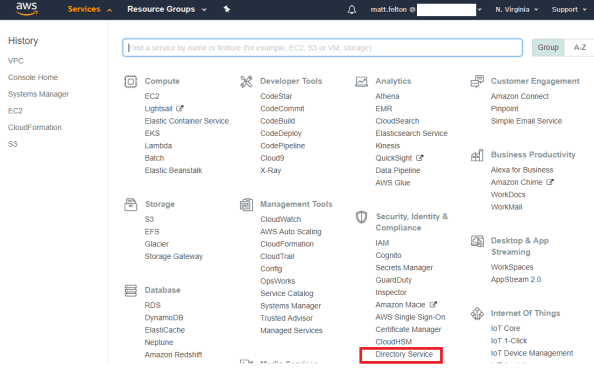
For those of you who are new to the series, I’ve been performing a deep dive review of AWS Managed Microsoft AD which is Amazon’s answer to a managed Windows Active Directory service. In the first post I provided a high level overview of the service, in the second post I covered the setup of the service, the third post reviewed the directory structure, pre-configured security principals and group policies, and the delegated security model, and in the fourth entry I delved into how Amazon has managed to delegate configuration of LDAPS and the requirements that pop up due to their design choices. I highly recommend you review those posts as well as my series on Microsoft Azure AD Domain Services if you’d like to compare the two services.
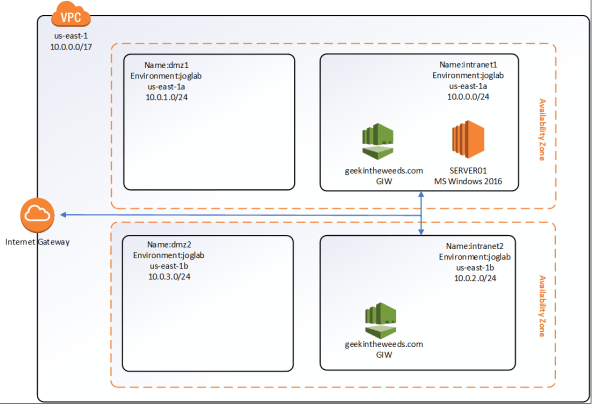
I’ve made a modification to my lab and have added another server named SERVER02 which will be running Linux. The updated Visio looks like this.

Server01 has been configured with the Windows Remote Server Administration Tools (RSAT) for Active Directory as well as holding the Active Directory Certificate Services (AD CS) role and being configured as a root Enterprise CA. I’ve also done all the necessary configuration to distribute the certificates to the managed domain controllers and have successfully tested LDAPS. Server02 will be used to test SSLv3 and NTLM. I’ve modified the instance to use the domain controllers as DNS servers by overriding DHCP settings as outlined in this article.
The first thing I’m going to do is test to see if SSLv3 has been disabled on the managed domain controllers. Recall that the managed Domain Controllers are running Windows Server 2012 R2 which has SSLv3 enabled by default. It can be disabled by modifying the registry as documented here. Believe it or not you can connect to the managed domain controllers registry via a remote registry connection. Checking the registry location shows that the SSLv3 node hasn’t been created which is indicative of SSLv3 still being enabled.

To be sure I checked it using the same method that I used in my Azure AD Domain Services post which is essentially compiling another version of openssh that supports SSLv3. After the customized version was installed and I queried the Domain Controller over port 636 which you can see in the screenshot below that SSLv3 is still enabled. Suffice to say this surprised me considering what I had seen so far in regards to the security of the service. This will be a show stopper for some organizations in adopting the service especially since it isn’t configurable by the customer that I observed.

So SSLv3 is enabled and presents a risk. Have the cipher suites been hardened? For this I’ll again use a tool developed by Thomas Pornin. The options I’m using perform an exhaustive search across the typically offered cipher suites, space the connections out by 1 second, and start with a minimum of sslv3.

The results are what I expected and mimic the results I saw when testing Azure AD Domain Services, minus the support for SSLv3 which Microsoft has disabled in their managed offering. The supported cipher suites look to be the out of the box defaults for Server 2012 R2 and include RC4 and 3DES which are ciphers with known vulnerabilities. The inability to disallow the ciphers might again be a show stopper for organizations with strict security requirements.
The Kerberos protocol is a critical component of Windows Active Directory providing the glue to hold the service together including (but in no way exhaustive) being behind the users authentication to a domain-joined machine, the single sign-on experience, and the ability to form trusts with other forests. Given the importance of the protocol, it’s important to ensure its backed by strong ciphers. The ciphers supported by a Windows Active Directory are configurable and can be checked by looking at the msDS-SupportedEncryptionTypes attribute of a domain controller object.
I next pulled up a domain controller object in ADUC and reviewed the attribute. The attribute on the managed domain controllers has a value of 28, which is the default for Windows Server 2012 R2. The value translates to support of the following cipher suites:
- RC4_HMAC_MD5
- AES128_CTS_HMAC_SHA1
- AES256_CTS_HMAC_SHA1_96
These are the same cipher suites supported by Microsoft’s Azure AD Domain Services service. In this case both vendors have left the configuration to the defaults.
Lastly, to emulate my testing Azure AD Domain Services, I tested support for NTLMv1. By default Windows Server 2012 R2 supports NTLMv1 due to requirements for backwards compatibility. Microsoft has long recommended disabling NTLMv1 due to the documented issues with the security of the protocol. Sadly there are a large number of applications and devices in use in enterprises which still require NTLMv1.
To test the AWS managed domain controllers I’m going to use Samba’s smbclient package on SERVER02. I’ll use the client to connect to the domain controller’s share from SERVER02 using NTLM. I first installed the smbclient package by running:
yum install samba-client.
The client enforces the use NTLMV2 in smbclient by default so I needed to make some modifications to the global section of the smb.conf file by adding client ntlmv2 auth = no. This option disables NTLMv2 on smbclient and will force it to use NTLMv1.

In order to see whether or not the client was using NTLMv1 when connecting to the domain controllers, I started a packet capture using tcpdump before initiating a connection with the smbclient.

I then transferred the packet capture over to my Windows box with WinSCP, opened the capture with WireShark, and navigated to the packet containing the Session Setup Request. In the parsed capture we don’t see an NTLMv2 Response which means NTLMv1 was used to authenticate to the domain controller indicating NTLMv1 is supported by the managed domain controllers.

So what can we take from the findings of this analysis?
- Amazon has left the secure transport protocols to the defaults which means SSLv3 is supported.
- Amazon has left the cipher suites to the defaults which means both RC4 and 3DES cipher suites are supported for both LDAPS and Kerberos.
I’d really like to see Amazon address the support for SSLv3 as soon as possible. There is no reason I can see why that shouldn’t be shut off by default. Similar to my requests to Microsoft, I’d like to see Amazon allow the supported cipher suites to be configurable via the AWS Management Console. These two changes would save organizations with strict security requirements, such as those in the public sector, to utilize the services without introducing significant risk (and audit headaches).
In my next post I’ll demonstrate how the service can be leveraged to provide Windows Active Directory service to on-premises machines or machines in another public cloud as well as exploring how to create a forest trust with the service.
See you next post!