Authentication in Azure OpenAI Service

This is part of my series on the Azure OpenAI Service:

  1. Azure OpenAI Service – Infra and Security Stuff
  2. Azure OpenAI Service – Authentication
  3. Azure OpenAI Service – Authorization
  4. Azure OpenAI Service – Logging
  5. Azure OpenAI Service – Azure API Management and Entra ID
  6. Azure OpenAI Service – Granular Chargebacks
  7. Azure OpenAI Service – Load Balancing
  8. Azure OpenAI Service – Blocking API Key Access
  9. Azure OpenAI Service – Securing Azure OpenAI Studio
  10. Azure OpenAI Service – Challenge of Logging Streaming ChatCompletions
  11. Azure OpenAI Service – How To Get Insights By Collecting Logging Data
  12. Azure OpenAI Service – How To Handle Rate Limiting
  13. Azure OpenAI Service – Tracking Token Usage with APIM
  14. Azure AI Studio – Chat Playground and APIM
  15. Azure OpenAI Service – Streaming ChatCompletions and Token Consumption Tracking
  16. Azure OpenAI Service – Load Testing

Updates:

  • 1/18/2024 to reference considerable library changes with new API version. See below for details
  • 4/3/2023 with simpler way to authenticate with Azure AD via Python SDK

Hello again!

1/18/2024 Update – Hi folks! There were some considerable changes to the OpenAI Python SDK which offers an even simpler integration with the Azure OpenAI Service. While the code in this post is a bit dated, I feel the thought process is still important so I’m going to preserve it as is! If you’re looking for examples of how to authenticate with the Azure OpenAI Service using the Python SDK with different types of authentication (service principal vs managed identity) or using the REST API, I’ve placed a few examples in this GitHub repository. Hope it helps!

Days and nights have been busy diving deeper into the AI landscape. I’ve been reading a great book by Tom Taulli called Artificial Intelligence Basics: A Non-Technical Introduction. It’s been a huge help in getting down the vocabulary and understanding the background to the technology from the 1950s on. In combination with the book, I’ve been messing around a lot with Azure’s OpenAI Service and looking closely at the infrastructure and security aspects of the service.

In my last post I covered the controls available to customers to secure their specific instance of the service. I noted that authentication to the service could be accomplished using Azure Active Directory (AAD) authentication. In this post I’m going to take a deeper look at that. Be ready to put your geek hat on because this post will be getting down and dirty into the code and HTTP transactions. Let’s get to it!

Before I get into the details of how supports AAD authentication, I want to go over the concepts of management plane and data plane. Think of management plane for administration of the resource and data plane for administration of the data hosted within the resource. Many services in Azure have separate management planes and data planes. One such service is Azure Storage which just so happens to have similarities with authentication to the OpenAI Service.

When a customer creates an Azure Storage Account they do this through interaction with the management plane which is reached through the ARM API hosted behind management.azure.come endpoint. They must authenticate against AAD to get an access token to access the API. Authorization via Azure RBAC then takes place to validate the user, managed identity, or service principal has permissions on the resource. Once the storage account is created, the customer could modify the encryption key from a platform managed key (PMK aka key managed by Microsoft) to a customer managed key (CMK), enable soft delete, or enable network controls such as the storage firewall. These are all operations against the resource.

Once the customer is ready to upload blob data to the storage account, they will do this through a data plane operation. This is done through the Blob Service API. This API is hosted behind the blob.core.windows.net endpoint and operations include creation of a blob or deletion of a blob. To interact with this API the customer has two means of authentication. The first method is the older method of the two and involves the use of static keys called storage account access keys. Every storage account gets two of these keys when a storage account is provisioned. Used directly, these keys grant full access to all operations and all data hosted within the storage account (SAS tokens can be used to limit the operations, time, and scope of access but that won’t be relevant when we talk the OpenAI service). Not ideal right? The second method is the recommended method and that involves AAD authentication. Here the security principal authenticates to AAD, receives an access token, and is then authorized for the operation via Azure RBAC. Remember, these are operations against the data hosted within the resource.

Authentication in Management Plane vs Data Plane in Azure Storage

Now why did I give you a 101 on Azure Storage authentication? Well, because the Azure OpenAI Service works in a very similar way.

Let’s first talk about the management plane of the Azure OpenAI Service. Like Azure Storage (and the rest of Azure’s services) it is administered through the ARM API behind the management.azure.com endpoint. Customers will use the management plane when they want to create an instance of the Azure OpenAI Service, switch it from a PMK to CMK, or setup diagnostic settings to redirect logs (I’ll cover logging in a future post). All of these operations will require authentication to AAD and authorization via Azure RBAC (I’ll cover authorization in a future post).

Simple right? Now let’s move to the complexity of the data plane.

Two API keys are created whenever a customer creates an Azure OpenAI Service instance. These API keys allow the customer full access to all data plane operations. These operations include managing a deployment of a model, managing training data that has been uploaded to the service instance and used to fine tune a model, managing fine tuned models, and listing available models. These operations are performed against the Azure OpenAI Service API which lives behind a unique label with an FQDN of openai.azure.com (such as myservice.openai.azure.com). Pretty much all the stuff you would be doing through the Azure OpenAI Studio. If you opt to use these keys you’ll need to remember control access to these keys via securing management plane authorization aka Azure RBAC.

Azure OpenAI Service API Keys

In the above image I am given the option to regenerate the keys in the case of compromise or to comply with my organization’s key rotation process. Two keys are provided to allow for continued access to the service while other key is being rotated.

Here I have simple bit of code using the OpenAI Python SDK. In the code I provide a prompt to the model and ask it to complete it for me and use one of the API keys to authenticate to it.

import logging
import sys
import os
import openai

def main():
    # Setup logging
    try:
        logging.basicConfig(
            level=logging.ERROR,
            format='%asctime)s - %(name)s - %(levelname)s - %(message)s',
            handlers=[logging.StreamHandler(sys.stdout)]
        )
    except:
        logging.error('Failed to setup logging: ', exc_info=True)

    try:

        # Setup OpenAI Variables
        openai.api_type = "azure"
        openai.api_base = os.getenv('OPENAI_API_BASE')
        openai.api_version = "2022-12-01"
        openai.api_key = os.getenv('OPENAI_API_KEY')

        response = openai.Completion.create(
            engine=os.getenv('DEPLOYMENT_NAME'),
            prompt='Once upon a time'
        )

        print(response.choices[0].text)

    except:
        logging.error('Failed to respond to prompt: ', exc_info=True)


if __name__ == "__main__":
    main()

The model gets creative and provides me with the response below.

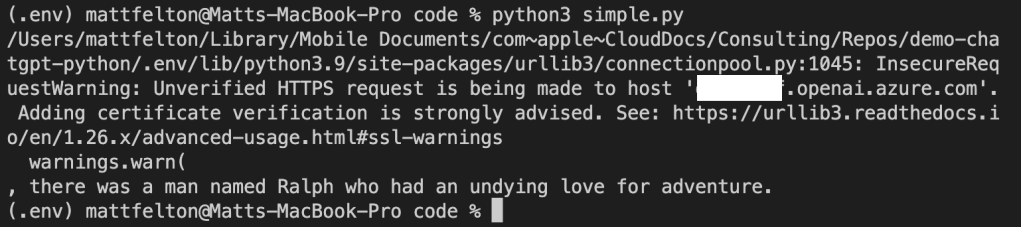
If you look closely you’ll notice an warning about the security of my session. The reason I’m getting that error is shut off certificate verification in the OpenAI library in order to intercept the calls with Fiddler. Now let me tell you, shutting off certificate verification was a pain in the ass because the developers of the SDK are trying to protect users from the bad guys. Long story short, the Azure Python SDK doesn’t provide an option to turn off certificate checking like say the Azure Python SDK (which you can pass a kwarg of verify=False to turn it off in the request library used underneath). While the developers do provide a property called verify_ssl_certs, it doesn’t actually do anything. Since most Python SDKs use the requests library underneath the hood, I went through the library on my machine and found the api_requestor.py file. Within this file I modified the _make_session function which is creating a requests Sessions object. Here I commented out the developers code and added the verify=False property to the Session object being created.

Turning off certificate verification in OpenAI Python SDK

Now don’t go and do this in any environment that matters. If you’re getting a certificate verification failure in your environment you should be notifying your information security team. Certificate verification is an absolute must to ensure the identity of the upstream server and to mitigate the risk of man-in-the-middle attacks.

Once I was able to place Fiddler in the middle of the HTTPS session I was able to capture the conversation. In the screenshot below, you can see the SDK passing the api-key header. Take note of that header name because it will become relevant when we talk AAD authentication. If you’re using OpenAI’s service already, then this should look very familiar to you. Microsoft was nice enough to support the existing SDKs when using one of the API keys.

At this point you’re probably thinking, “That’s all well and good Matt, but I want to use AAD authentication for all the security benefits AAD provides over a static key.” Yeah yeah, I’m getting there. You can’t blame me for nerding out a bit with Fiddler now can you?

Alright, so let’s now talk AAD authentication to the data plane of the Azure OpenAI Service. Possible? Yes, but with some caveats. The public documentation illustrates an example of how to do this using curl. However, curl is great for a demonstration of a concept, but much more likely you’ll be using an SDK for your preferred programming language. Since Python is really the only programming language I know (PowerShell doesn’t count and I don’t want to show my age by acknowledging I know some Perl) let me demonstrate this process using our favorite AAD SDK, MSAL.

For this example I’m going to use a service principal, but if your code is running in Azure you should be using a managed identity. When creating the service principal I granted it the Cognitive Services User RBAC role on the resource group containing the Azure OpenAI Service instance as suggested in the documentation. This is required to authorize the service principal access to data plane operations. There are a few other RBAC roles for the service, but as I said earlier, I’ll cover authorization in a future post. Once the service principal was created and assigned the appropriate RBAC role, I modified my code to include a function which calls MSAL to retrieve an access token with the access scope of Cognitive Services, which the Azure OpenAI Service falls under. I then pass that token as the API key in my call to the Azure OpenAI Service API.

import logging
import sys
import os
import openai
from msal import ConfidentialClientApplication

def get_sp_access_token(client_id, client_credential, tenant_name, scopes):
    logging.info('Attempting to obtain an access token...')
    result = None
    print(tenant_name)
    app = ConfidentialClientApplication(
        client_id=client_id,
        client_credential=client_credential,
        authority=f"https://login.microsoftonline.com/{tenant_name}",
    )
    result = app.acquire_token_for_client(scopes=scopes)

    if "access_token" in result:
        logging.info('Access token successfully acquired')
        return result['access_token']
    else:
        logging.error('Unable to obtain access token')
        logging.error(f"Error was: {result['error']}")
        logging.error(f"Error description was: {result['error_description']}")
        logging.error(f"Error correlation_id was: {result['correlation_id']}")
        raise Exception('Failed to obtain access token')

def main():
    # Setup logging
    try:
        logging.basicConfig(
            level=logging.ERROR,
            format='%asctime)s - %(name)s - %(levelname)s - %(message)s',
            handlers=[logging.StreamHandler(sys.stdout)]
        )
    except:
        logging.error('Failed to setup logging: ', exc_info=True)

    try:
        # Obtain an access token
        token = get_sp_access_token(
            client_id = os.getenv('CLIENT_ID'),
            client_credential = os.getenv('CLIENT_SECRET'),
            tenant_name = os.getenv('TENANT_ID'),
            scopes = "https://cognitiveservices.azure.com/.default"
        )
    except:
        logging.error('Failed to obtain access token: ', exc_info=True)

    try:
        # Setup OpenAI Variables
        openai.api_type = "azure"
        openai.api_base = os.getenv('OPENAI_API_BASE')
        openai.api_version = "2022-12-01"
        openai.api_key = token

        response = openai.Completion.create(
            engine=os.getenv('DEPLOYMENT_NAME'),
            prompt='Once upon a time'
        )

        print(response.choices[0].text)

    except:
        logging.error('Failed to summarize file: ', exc_info=True)


if __name__ == "__main__":
    main()

Let’s try executing that and see what happens.

Uh-oh! What happened? If you recall from earlier the API key is passed in the api-key header. However, to use the access token provided by AAD we have to pass it in the authorization header as seen in the example in Microsoft public documentation.

curl ${endpoint%/}/openai/deployments/YOUR_DEPLOYMENT_NAME/completions?api-version=2022-12-01 \
-H "Content-Type: application/json" \
-H "Authorization: Bearer $accessToken" \
-d '{ "prompt": "Once upon a time" }'

Thankfully there is a solution to this one without requiring you to modify the OpenAI SDK. If you take a look in the api_requestor.py file again in the library you will see it provides the ability to override the headers passed in the request.

With this in mind, I made a few small modifications. I removed the api_key property and added an Authorization header to the request to the Azure OpenAI Service API which includes the access token received back from AAD.

import logging
import sys
import os
import openai
from msal import ConfidentialClientApplication

def get_sp_access_token(client_id, client_credential, tenant_name, scopes):
    logging.info('Attempting to obtain an access token...')
    result = None
    print(tenant_name)
    app = ConfidentialClientApplication(
        client_id=client_id,
        client_credential=client_credential,
        authority=f"https://login.microsoftonline.com/{tenant_name}",
    )
    result = app.acquire_token_for_client(scopes=scopes)

    if "access_token" in result:
        logging.info('Access token successfully acquired')
        return result['access_token']
    else:
        logging.error('Unable to obtain access token')
        logging.error(f"Error was: {result['error']}")
        logging.error(f"Error description was: {result['error_description']}")
        logging.error(f"Error correlation_id was: {result['correlation_id']}")
        raise Exception('Failed to obtain access token')

def main():
    # Setup logging
    try:
        logging.basicConfig(
            level=logging.ERROR,
            format='%asctime)s - %(name)s - %(levelname)s - %(message)s',
            handlers=[logging.StreamHandler(sys.stdout)]
        )
    except:
        logging.error('Failed to setup logging: ', exc_info=True)

    try:
        # Obtain an access token
        token = get_sp_access_token(
            client_id = os.getenv('CLIENT_ID'),
            client_credential = os.getenv('CLIENT_SECRET'),
            tenant_name = os.getenv('TENANT_ID'),
            scopes = "https://cognitiveservices.azure.com/.default"
        )
    except:
        logging.error('Failed to obtain access token: ', exc_info=True)

    try:
        # Setup OpenAI Variables
        openai.api_type = "azure"
        openai.api_base = os.getenv('OPENAI_API_BASE')
        openai.api_version = "2022-12-01"

        response = openai.Completion.create(
            engine=os.getenv('DEPLOYMENT_NAME'),
            prompt='Once upon a time',
            headers={
                'Authorization': f'Bearer {token}'
            }
            

        )

        print(response.choices[0].text)

    except:
        logging.error('Failed to summarize file: ', exc_info=True)


if __name__ == "__main__":
    main()

Running the code results in success!

4/3/2023 Update – Poking around today looking at another aspect of the service, I came across this documentation on an even simpler way to authenticate with Azure AD without having to use an override. In the code below, I specify an openai.api_type of azure_ad which allows me to pass the token direct via the openai_api_key property versus having to pass a custom header. Definitely a bit easier!

import logging
import sys
import os
import openai
from msal import ConfidentialClientApplication

def get_sp_access_token(client_id, client_credential, tenant_name, scopes):
    logging.info('Attempting to obtain an access token...')
    result = None
    print(tenant_name)
    app = ConfidentialClientApplication(
        client_id=client_id,
        client_credential=client_credential,
        authority=f"https://login.microsoftonline.com/{tenant_name}",
    )
    result = app.acquire_token_for_client(scopes=scopes)

    if "access_token" in result:
        logging.info('Access token successfully acquired')
        return result['access_token']
    else:
        logging.error('Unable to obtain access token')
        logging.error(f"Error was: {result['error']}")
        logging.error(f"Error description was: {result['error_description']}")
        logging.error(f"Error correlation_id was: {result['correlation_id']}")
        raise Exception('Failed to obtain access token')

def main():
    # Setup logging
    try:
        logging.basicConfig(
            level=logging.ERROR,
            format='%asctime)s - %(name)s - %(levelname)s - %(message)s',
            handlers=[logging.StreamHandler(sys.stdout)]
        )
    except:
        logging.error('Failed to setup logging: ', exc_info=True)

    try:
        # Obtain an access token
        token = get_sp_access_token(
            client_id = os.getenv('CLIENT_ID'),
            client_credential = os.getenv('CLIENT_SECRET'),
            tenant_name = os.getenv('TENANT_ID'),
            scopes = "https://cognitiveservices.azure.com/.default"
        )
        print(token)
    except:
        logging.error('Failed to obtain access token: ', exc_info=True)

    try:
        # Setup OpenAI Variables
        openai.api_type = "azure_ad"
        openai.api_base = os.getenv('OPENAI_API_BASE')
        openai.api_key = token
        openai.api_version = "2022-12-01"

        response = openai.Completion.create(
            engine=os.getenv('DEPLOYMENT_NAME'),
            prompt='Once upon a time '
        )

        print(response.choices[0].text)

    except:
        logging.error('Failed to summarize file: ', exc_info=True)


if __name__ == "__main__":
    main()

Let me act like I’m ChatGPT and provide you a summary of what we learned today.

  • The Azure OpenAI Service has both a management plane and data plane.
  • The Azure OpenAI Service data plane supports two methods of authentication which include static API keys and Azure AD.
  • The static API keys provide full permissions on data plane operations. These keys should be rotated in compliance with organizational key rotation policies.
  • The OpenAI SDK for Python (and I’m going to assume the others) sends an api-key header by default. This behavior can be overridden to send an Authorization header which includes an access token obtained from Azure AD.
  • It’s recommended you use Azure AD authentication where possible to leverage all the bells and whistles of Azure AD including the usage of managed identities, improved logging, and conditional access for service principal-based access.

Well folks, that concludes this post. I’ll be uploading the code sample above to my GitHub later this week. In the next batch of posts I’ll cover the authorization and logging aspects of the service.

I hope you got some value and good luck in your AI journey!

Azure OpenAI Service – Infra and Security Stuff

This is part of my series on GenAI Services in Azure:

  1. Azure OpenAI Service – Infra and Security Stuff
  2. Azure OpenAI Service – Authentication
  3. Azure OpenAI Service – Authorization
  4. Azure OpenAI Service – Logging
  5. Azure OpenAI Service – Azure API Management and Entra ID
  6. Azure OpenAI Service – Granular Chargebacks
  7. Azure OpenAI Service – Load Balancing
  8. Azure OpenAI Service – Blocking API Key Access
  9. Azure OpenAI Service – Securing Azure OpenAI Studio
  10. Azure OpenAI Service – Challenge of Logging Streaming ChatCompletions
  11. Azure OpenAI Service – How To Get Insights By Collecting Logging Data
  12. Azure OpenAI Service – How To Handle Rate Limiting
  13. Azure OpenAI Service – Tracking Token Usage with APIM
  14. Azure AI Studio – Chat Playground and APIM
  15. Azure OpenAI Service – Streaming ChatCompletions and Token Consumption Tracking
  16. Azure OpenAI Service – Load Testing

Welcome back fellow geeks!

The past few months have been crazy busy. My customer load has doubled and customers who went into hibernation for holidays have decided to wake up in full force. With that new demand comes interesting new use cases and blog topics.

Unless you’ve been living under a rock, you’re well aware of the insane amount of innovation and technical developments in the AI space. It seems every day there’s 10 articles on OpenAI’s models (hilarious South Park episode on ChatGPT recently). Microsoft decided to dive straight into the deep end and formed a partnership with OpenAI. Out of this partnership came the Azure OpenAI Service which runs OpenAI models like ChatGPT on Azure infrastructure. As you can imagine, this offering has big appeal to new and existing Azure customers.

Given the demand I was seeing within my own customers, I decided to take a look at the security controls (or infra/security stuff as one of my data counterparts calls it) available within the service. Before jumping into the service, I did some basic experimentation with the OpenAI’s own service using this wonderful tutorial by the Part Time Larry. I found his step-by-step walkthrough of some of the sample code to be absolutely stellar in understanding just how simple it is to interact with the service.

With a very basic (and I do stress basic) understanding of how to interact with OpenAI’s API, I decided upon a use case. The use case I decided upon was to use the summarization feature he davinci GPT-3 model to summarize the NIST document on Zero Trust. I was interested in which key points it would extract from document and whether those would align with what I drew from the document after reading through it fully (re-reading the doc is still in my todo list!).

Before I could do any of the cool stuff I had to get onboarded to the service. At this time, customers must request their subscriptions be onboarded into the service using the process described in Microsoft’s public documentation. While I waited for my subscription to be onboarded, I read through the public documentation with a focus on the “infra/security” stuff. Like most of the data services in Azure, the information on the levers customers can pull around security controls like network, encryption-at-rest, and identity were very high level and not very useful. Lots of mentions of words, but no real explanation of those features would “look” when enabled in the service. There is also the matter of how Microsoft is handling and securing the data the customer data for the service.

Like every cloud provider, Microsoft operates within the shared responsibility model where Microsoft is responsible for the security of the cloud and you, the customer, are responsible for security within the cloud. Simply put, there are controls Microsoft manages behind the scenes and there are controls Microsoft puts in the customer’s hands and it’s on the customer to enable those controls. Microsoft describes how the data is processed and secured for the Azure OpenAI Service in the public documentation. Customers should additionally review the Microsoft Products and Services Data Protection Addendum and specific product terms. Another great resource to review is documentation within the Microsoft Services Trust Portal. In the Trust Portal you can find all the compliance-related documentation such as the SOC-2 Type II which will provide detail as to Microsoft’s processes and controls it uses to protect data. For a much deeper dive, you can review the FedRAMP SSP (System Security Plan). I typically find myself scanning through the SOC2 first and then very often diving deeper by reading through the relevant sections in the FedRAMP SSP. I’ll let you read through and consume the documentation above (and you should be doing that for every service you consume). For the purposes of this blog post, I’m going to look at the “security within the cloud”.

I’m a big fan of taking a step back and looking at things from a high level architectural view. After reading through documentation, I envisioned the following Azure components being they key components required in any implementation of the service within a regulated industry.

Azure OpenAI Azure Components

Let’s walk through each of these components.

The first component is the Azure OpenAI Service instance which is service under the Cognitive Services umbrella. Azure Cognitive Services includes existing services like speech-to-text, image analysis, and the like. This was a great idea by Microsoft because it would allow the Product Group (PG) managing the Azure OpenAI Service to leverage existing architectural standards already adopted for other services under the Cognitive Services umbrella.

The next component is the Azure Key Vault instance. Within an instance of Azure OpenAI Service there are three types of data that could be stored within a customer’s instance of the service. I say could because this data is only stored if you choose to use specific features and capabilities of the service. This data includes training data you may provide to fine-tune models, the fine-tuned models themselves, and prompts and completions. Training data is only stored if you opt to train your own fine-tuned models and the training data can be removed as soon as you finish training your fine-tuned model. From talking to my much smarter peers, there is a very low percentage of customers that will need to create fine-tuned models. I’ve heard as low as 1% of customers will need to do this since the included models are already trained very effectively. Prompts and completions are by default stored for 30 days for human evaluation to ensure the models are being used in an appropriate way. Customers have the option to opt out of the content filtering using the process outlined in this piece of public documentation. If they opt out, this data is never stored.

If the customer opts to use a feature that creates this data, then the data is encrypted-at-rest by default with Microsoft-managed keys when stored within the Microsoft-managed boundary. This means that Microsoft manages the authorization and rotation of the keys. Many regulated customers have regulatory requirements or internal policies that require the customer to manage authorization and rotation of any keys used to encrypt data in their environment. For that reason, cloud providers such as Microsoft provide the option to use CMKs (Customer Managed Keys). In Azure, these CMKs are stored within an Azure Key Vault instance within a customer’s subscription and the customer controls authorization and access to the keys.

The Azure OpenAI Service supports the use of CMKs to protect at least two out of three of these sets of data. The documentation is unclear as to whether the prompts and completions can be encrypted with CMKs. If you happen to know, let me know in the comments. Take note that for now you need to request access to get your subscription approved for CMKs with the Azure OpenAI Service.

Next up we have virtual networks, private endpoints and Azure Private DNS. Like the rest of the services in the Cognitive Services umbrella, the OpenAI service supports private endpoints as a means to lock down network access to your private IP space. The DNS namespace for the service is privatelink.openai.azure.com. Best practice would have you hosting this zone in Azure Private DNS which we’ll see later on when I share a sample architecture. It is worth noting that the Azure Open AI Service also supports what I refer to as the service firewall. This allows you to limit access to the service to a specific set of public IPs (such as your enterprise’s forward web proxy) or to a specific virtual network via a Service Endpoint.

Next, we have Azure Storage. If you choose to build a fine tuned model training data can be uploaded to an Azure Storage Account within the customer’s subscription. The customer’s instance of the Azure OpenAI Service can then retrieve the data using a method I will explain later in this post.

We then have managed identities and Azure RBAC. For the service, managed identities are used to access the CMKs stored in the customer Key Vault instance. Azure RBAC will be used to control access to the Azure OpenAI Services instance and keys used to call the service APIs.Stepping back and looking at the components above and how they fit together to provide security controls across identity, network, encryption, and encryption, I see it like the below.

For the Azure OpenAI Service instance running the models, you lock down the service using Azure RBAC. Authentication to the service is supported through a set of API keys which you will need to manage rotation of. Optionally, (I haven’t tested this myself), you can use Azure AD authentication to obtain a bearer token to authenticate to the service. You secure network access by restricting access to the service using private endpoints. Data is optionally encrypted with CMKs stored in a customer-managed Key Vault instance to enable the customer to control access to the keys, rotate keys, and audit usage of those keys. The Azure OpenAI Service also offers logs and metrics which can be delivered to Azure Storage, a Log Analytics Workspace, or an Event Hub via the diagnostics settings configured on the instance. The security specific logs you’ll be interested in are the audit logs and potentially the prompt and completion logs.

The Azure Key Vault instance used when customers opt to use CMKs can have access to the keys controlled using Azure RBAC (when using a Key Vault instance enabled for Azure RBAC vault policies) and managed identities. The Azure OpenAI Service instance will access the CMK using the managed identity assigned to the service. Take note that as of today, you cannot use the Key Vault service firewall to restrict network access. Azure Cognitive Services is not considered a Trusted Azure Service for Key Vault and thus can’t be allowed network access when the service firewall is enabled.

If the customer chooses to store training data in an Azure Storage Account before uploading to the service, the account can be secured for user access with Azure RBAC or SAS tokens. Since SAS tokens are a nightmare to manage for humans, you’ll want to control access to the data for humans using Azure RBAC. The Azure OpenAI Service itself does not support the use of a managed identity for access of Azure Storage today. This means you’ll need to secure the data using a SAS token for non-human access of the data during upload. Since the Azure OpenAI Service does not yet support a managed identity for access to Azure Storage, it cannot take advantage of the service instance authorization rules. Allowing just the trusted services for Azure Storage doesn’t seem to work either in my testing. This means that you’ll need to allow all public network access to the storage account. Your means to secure that data will be SAS tokens largely for the access coming from the Azure OpenAI Service. Not ideal, but hey, the service is very new.

So putting everything together than we’ve learned, what could this look like architecturally?

Azure OpenAI Service Sample Architecture

Above is an example architecture that is common in regulated organizations that have adopted Azure VWAN. In this pattern, all service instances related to the deployment would be placed in a dedicated workload subscription as indicated by the orange outline. This includes the virtual network containing the Azure OpenAI Service private endpoint, the Azure OpenAI Service instance, user-assigned managed identity used by the Azure OpenAI Service instance, the workload key vault containing the CMK used to encrypt the data held by the Azure OpenAI Service, and the Azure Storage Account used to stage training data to be uploaded to the service.

The Azure OpenAI Service would have its network access secured to the private endpoint. Both the Azure Key Vault instance and Storage Account would have their network access open to public networks. Access to the data for Azure Key Vault would be secured with Azure AD authentication and Azure RBAC vault policies for authorization. The Azure Storage account would use Azure AD authentication and Azure RBAC to control access for human users and SAS tokens to control access from the Azure OpenAI Service instance.

Lastly, although not listed in the images, it should go without saying that Azure Policy should be put in place to ensure all of the resources look the way you and your security team has decided the resources need to look.

As the service grows and matures, I expect some of these gaps in network controls to be addressed through support for managed identities to access storage accounts and the addition of the service to Azure Key Vault’s trusted services. I also wouldn’t be surprised to see some type of VNet-injection or VNet-integration to be introduced similar to what is available in Azure Machine Learning.

Well folks, I hope this helped you infra and security folks do your “infra/security stuff” for the day and you now better understand some of the levers and switches you have available to you to secure the service. As I progress in my learning of the service and AI in general, I plan on adding some posts which will walk through the implementation in action doing a deeper dive how this architecture looks when implemented. I have it running in my demo environment, but time is a very limited thing these days.

Thanks folks and I hope your journey into AI has been as fun as mine has been so far!

Check out my other posts on this service:

Application Gateway and Private Link

Welcome back fellow geeks!

Over the past few years I’ve written a ton on Private Endpoints for PaaS (platform-as-a-service) services Microsoft provides. I haven’t written anything about the Private Link service that powers the Private Endpoints. There is a fair amount of community knowledge and documentation on building a Private Link service behind an Azure Load Balancer, but far less on how to do it behind an Application Gateway (Adam Stuart’s video on it is a wonderful resource). Today, I’m going to make an attempt at furthering that collective community knowledge with a post on the feature and give you access to a deployable lab you can use to replicate what I’ll be writing about in this post. Keep in mind the service is still in public preview, so remember to check the latest documentation to validate the correctness of what I discuss below.

Let’s get to it!

I’ll be using a lab environment that I’ve built which mimics a typical enterprise environment. The lab uses a hub-and-spoke architecture where on-premises connectivity and centralized mediation and optional inspection is provided in a transit virtual network which is peered to all spoke virtual network. A shared services virtual network provides core infrastructure services such as DNS. The other spoke contains the workload which is a simple Python application deployed in Azure App Services.

The App Service has been configured to inject both its ingress and egress traffic into the virtual network using a combination of Private Endpoints and Regional VNet Integration. An Application Gateway has been placed in front of the App Service and has been deployed with both a public listener (listening on 8443) and a private listener (listening on 443). The application is accessible to internal clients (such as the VMs in the shared service virtual network) by issuing an HTTP request to https://www.jogcloud.com. Azure Private DNS provides the necessary DNS resolution for internal clients.

The deployed Python application retrieves the current time from a public API (assuming the API is up) and returns the source IP on the HTTP request as well as the X-Forwarded-For header. I’ll use this application to show some of the caveats of this pattern that are worth knowing if you ever plan to operationalize it.

To maintain visibility and control of traffic coming in either publicly or privately to the application, the route table assigned to the Application Gateway subnet is configured to route traffic through the Azure Firewall instance in the hub before allowing the traffic to the App Service. This pattern allows for democratization of Application Gateway while maintaining the ability to exercise additional IDS/IPS (intrusion detection/intrusion prevention) via the security appliance in the hub.

Lab Environment

Imagine this application is serving up confidential data and you need to provide a partner organization with access. Your information security team does not want the partner accessing the application over the Internet due to the sensitivity of the information the partner will be accessing. While direct connectivity with the partner is an option, it would likely result in a significant amount of design to ensure the partner’s network only knows about the application IP space and appropriate firewall rules are in place to limit access to the Application Gateway endpoint. In this scenario, your organization will be the provider and the customer’s organization will be the consumer. I don’t know about you, but I’ve been in this situation a lot of times in my past. Back in the day (yeah I’m old, what of it?) you’d have to go the direct connectivity route and you’d spend months putting together a design and getting it approved by the powers that be. Let’s now look at how the new Private Link feature of Application Gateway can make this whole problem a lot easier to solve.

Assume this partner has a presence in Azure so we don’t have to get into the complexity of alternatives (such as building an isolated virtual network with VPN Gateway the partner connects to). The service could be exposed to the customer using the architecture below. Note that I’ve trimmed down the provider environment to show only the workload virtual network and illustrated a few compute services on the consumer end that are capable of accessing services exposed through Private Endpoints.

Goal State

In the above image you will notice a new subnet in the provider’s virtual network. This subnet is used for the Private Link configuration. Traffic entering the provider environment will be NATed to an IP within this subnet. You can opt to use an existing subnet, but I’d recommend dedicating a subnet instead vs mixing it within the any of the application tier subnets.

There are considerations when sizing the subnet. Each IP allocated to the subnet can be used to service 64,000 connections and you can have up to eight IP addresses as of today allowing you to escape with a /28 (5 IP addresses reserved by Azure + 8 IPs for PrivateLink configuration). Just remember this is preview so that limit could be changed in the future. For the purposes of this post I used a /24 since I’m terrible at subnetting.

New subnet for Private Link Configuration

It’s time to create the Private Link configuration now that the subnet is in place. This can be done in all the usual ways (Portal, CLI, PowerShell, REST). When using the Portal you will need to navigate to the Application Gateway instance you’re using, select the Private Link menu item and select the option to add a new Private Link configuration.

Private Link Configuration Setup

On the next screen you will need to select the subnet you’ll use for the Private Link configuration. You will also pick the listener you want to expose and determine the number of IPs you want to allocate to the service. Note that both the public and private listeners are available. If you’re exposing a service within your virtual network, you’ll likely be creating these with private listeners almost exclusively. A use case for a public listener might be a single client wants a more consistent network experience provided by their ExpressRoute or VPN connectivity into Azure vs going over the Internet.

Private Link configuration

Once completed, you can freely create Private Endpoints for your service within the same tenant. Within the same tenant, your Private Link service will be detected when creating a Private Endpoint as seen below. All that is left for you to do is create a DNS entry that matches the FQDN you are presenting within the certificates loaded on your Application Gateway. At this point you should be saying, “That’s all well and good Matt, but my use case is providing this to a consumer in a DIFFERENT tenant.” Let’s explore that scenario.

Creating Private Endpoint in same tenant

I switched to a subscription in a separate Azure AD tenant which would represent the consumer. In this tenant I created a virtual network with a single subnet with the IP space of 10.1.0.0/16 which overlaps with the provider’s network demonstrating that overlapping IP space doesn’t matter with Private Link. In that subnet I placed a VM running Ubuntu that I would use to SSH in. I created this resources in the Australia East region to demonstrate that the service exposed via Private Link can have Private Endpoints created for it in any other Azure region. Connections made through the Private Endpoint will ride the Azure backbone to the destined service.

Once the basics were in place for testing, I then created the Private Endpoint for the provider service within the consumer’s network. This can be done through the Private Link Center blade using the Private Endpoint menu item in the Azure Portal as seen below.

Creation of Private Endpoint

On the resource screen you will need to provide the resource id of the Application Gateway and the listener name. This is additional information you would need to pass to the consumer of any Application Gateway Private Link enabled service.

Private Endpoint Creation – Resource

Bouncing back to the provider tenant, I navigated back to the Application Gateway resource and the Private Link menu item under the Private endpoint connections section. Private Endpoint creation for Private Link services across tenant work via request and approval process. Here I was able to approve the association of the consumer’s Private Endpoint with the Private Link service in the provider tenant.

Approval of Private Endpoint association

Once approved, I bounced back to the consumer tenant and grabbed the IP address assigned to the Private Endpoint that was created. I then SSH’d into the Ubuntu VM and created a DNS entry in the host file of the VM for the service I was consuming. In this scenario, I had created a listener on the Application Gateway which handles all requests from *.jogcloud.com. Once the DNS record was created, I then used curl to issue a request to the application. Success!

Successful access of application from consumer

The application spits back the client IP and X-Forwarded-For header of the HTTP request. Ignore the client IP of 169.254.129.1, that is appearing due to the load balancer component of the App Service. Focus instead on the X-Forwarded-For. Notice that the first value in the header is the NATd IP from the subnet that was dedicated to the Private Link service. The next IP in line is the private IP address of the Azure Firewall instance. As I mentioned earlier, the Application Gateway is configured to send incoming traffic through the Azure Firewall instance for additional inspection before passing on to the App Service instance. The Azure Firewall is configured for NAT to ensure traffic symmetry in this scenario.

What I want you to take away from the above is that the Private Link service is NATing the traffic, so unless the consumer has a forward web proxy on the other end appending to the X-Forwarded-For header (or potentially other headers to aid with identification), troubleshooting a user’s connection will take careful correlation of requests across App Gateway, Azure Firewall, and the underlining application logs. In the below image, you can see I used curl to add a value to the X-Forwarded-For header which was carried on through the request.

Request with X-Forwarded-For value added by consumer

What I love about this integration is it’s very simple to setup and it allows a whole bunch of additional security controls to be introduced into the flow such as the Application Gateway WAF or a firewall’s IDS/IPS features.

Here are some key takeaways for you to ponder on over this holiday break:

  • For HTTP/HTTPS traffic, the Application Gateway Private Link pattern allows for the introduction of additional security controls into the network flow beyond what you’d get with a Private Link service fronted by an Azure Standard Load Balancer
  • Setup for the consumer is very simple. All you need to do is provide them with the resource id of the application gateway and the listener name. They can then use the native Private Endpoint creation experience to setup access to your service.
  • Don’t forget the importance of ensuring the customer trusts the certificate the Application Gateway is providing and can reach applicable CRL/OCSP endpoints if you’re using them. Best bet is to use a trusted 3rd party certificate authority.
  • DNS DNS DNS. The customer will need to manage the relevant DNS records on their end. You will want to ensure they know which FQDNs you are including within your certificate so the records they create match those FQDNs. If there is a mismatch, any secure session setup will fail.

With that said, feel free to give the feature a try. You can use the lab I’ve posted on GitHub and the steps I’ve outlined in this blog to experiment with the service yourself.

Have a happy holiday!

Protecting Azure Backups with Resource Guard – Part 2

Welcome to part 2 of my series on Azure Backup and Resource Guard. In my first post, I gave some background on the value proposition Resource Guard provides. In this post I’ll be walking through how to configure it and demonstrating it in action. I’ll be using the lab pictured below which is based off the Azure Backup demo lab I have up on GitHub.

Lab used to demonstrate Resource Guard

For this demonstration, I used my jogcloud.com Azure AD tenant as the primary tenant where the Recovery Service Vaults will be stored. I have a small environment in my at home lab that is configured with a Windows Active Directory forest that is synchronized to that tenant. The geekintheweeds.com Azure AD tenant acted as the secondary tenant containing the Resource Guard. Homer Simpson will act as the owner of the Resource Guard (perhaps he is someone in Information Security) in the geekintheweeds.com tenant and Maggie Simpson will own the subscription containing the workload and Recovery Services Vault (emulating a typical application owner) in the jogcloud.com tenant.

Since both users are sourced from my on-premises Windows Active Directory forest and synchronized to jogcloud.com, I used Azure AD’s B2B feature to invite Homer Simpson into the geekintheweeds.com tenant. Once added through the B2B process, I setup an RBAC assignment granting Homer Simpson Owner of the subscription containing the Resource Guard.

Role Assignment in geekintheweeds.com tenant

Next up I went to create the Resource Guard in the GIW tenant and received the error below when attempting to create the Resource Guard resource in the GIW Tenant.

Error creating Resource Guard

The error message was pretty useless (not atypical of Azure errors). In this case, this error is due to the Microsoft.DataProtection resource provider not being registered in this subscription. Once registering the resource provider in question, the Resource Guard was provisioned without issue. One thing to note is that while the Resource Guard can exist within a different resource group, subscription, or tenant, it must be in the same region as the Recovery Services Vault it is protecting.

Registering Microsoft.DataProtection resource provider

Once the Resource Guard resource was provisioned, I needed to give Maggie Simpson appropriate access over the Recovery Services Vault in the jogcloud.com tenant. For that, I provisioned a role assignment for the Contributor role on the subscription to the System Operators group synchronized from on-premises that Maggie is a member of.

Role Assignment in jogcloud.com tenant

Navigating to the Recovery Services Vault, Maggie Simpson is capable of modifying the soft delete feature (note it’s disabled for the purposes of this lab so the resources can be easily removed).

Prior to Resource Guard, Maggie Simpson can modify Soft Delete

Switching over to Homer Simpson and logging into the jogcloud.com tenant, I attached the Resource Guard to the Recovery Services Vault. The interface allowed me to select the tenant (directory) and the Resource Guard resource.

Enabling Resource Guard

I had configured the Resource Guard to protect all the operations it was able to. This is confirmed with the confirmation in the screenshot below.

Resource Guard configured to protect sensitive operations

Once the Resource Guard is enabled, navigating back to the Security Settings of the Recovery Services Vault displays a message that Resource Guard is now enabled.

Switching back to Maggie Simpson, I then attempted to modify a backup policy which is considered a sensitive operation and is restricted via the association to the Resource Guard. As expected, Maggie Simpson cannot make the modifications to the Recovery Services Vault without authenticating to the GIW tenant and being authorized on the Resource Guard.

Maggie Simpson blocked from using Resource Guard

Success! Here we demonstrated how we can restrict sensitive operations on an Azure Backup Vault even when a user has a high level of permissions on the vault itself. Resource Guard provides a great security mechanism to establish the blast radius that works best for your organization. I could even add Azure AD PIM to the mix in the support just-in-time access of the Resource Guard. The support for cross-tenant specifically is very unique because there are very few (if any) other Azure resources that allow you to leverage a cross-tenant security boundary.

If you’re using Azure Backup, you should be using Resource Guard as an additional security control to add to the controls you are enforcing with Azure RBAC and Azure Policy. With the introduction into preview of the immutable vaults, Microsoft is providing a variety of tools to take a defense-in-depth approach using the technical features that make the most sense to the needs of your organization. WIth that bit of sales speak, I’m out for the weekend.

Thanks for reading!