Protecting Azure Backups with Resource Guard – Part 2

Welcome to part 2 of my series on Azure Backup and Resource Guard. In my first post, I gave some background on the value proposition Resource Guard provides. In this post I’ll be walking through how to configure it and demonstrating it in action. I’ll be using the lab pictured below which is based off the Azure Backup demo lab I have up on GitHub.

Lab used to demonstrate Resource Guard

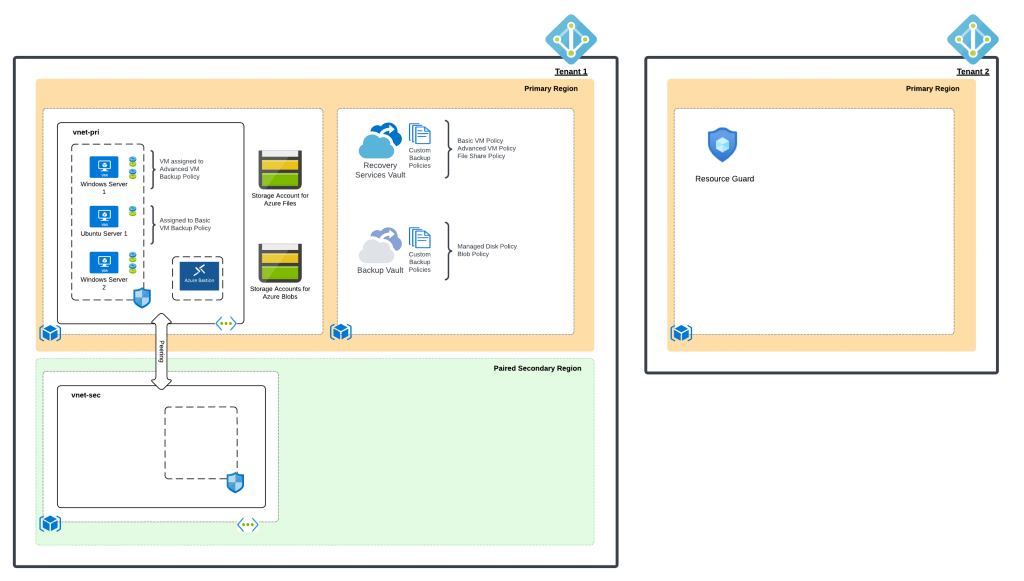
For this demonstration, I used my jogcloud.com Azure AD tenant as the primary tenant where the Recovery Service Vaults will be stored. I have a small environment in my at home lab that is configured with a Windows Active Directory forest that is synchronized to that tenant. The geekintheweeds.com Azure AD tenant acted as the secondary tenant containing the Resource Guard. Homer Simpson will act as the owner of the Resource Guard (perhaps he is someone in Information Security) in the geekintheweeds.com tenant and Maggie Simpson will own the subscription containing the workload and Recovery Services Vault (emulating a typical application owner) in the jogcloud.com tenant.

Since both users are sourced from my on-premises Windows Active Directory forest and synchronized to jogcloud.com, I used Azure AD’s B2B feature to invite Homer Simpson into the geekintheweeds.com tenant. Once added through the B2B process, I setup an RBAC assignment granting Homer Simpson Owner of the subscription containing the Resource Guard.

Role Assignment in geekintheweeds.com tenant

Next up I went to create the Resource Guard in the GIW tenant and received the error below when attempting to create the Resource Guard resource in the GIW Tenant.

Error creating Resource Guard

The error message was pretty useless (not atypical of Azure errors). In this case, this error is due to the Microsoft.DataProtection resource provider not being registered in this subscription. Once registering the resource provider in question, the Resource Guard was provisioned without issue. One thing to note is that while the Resource Guard can exist within a different resource group, subscription, or tenant, it must be in the same region as the Recovery Services Vault it is protecting.

Registering Microsoft.DataProtection resource provider

Once the Resource Guard resource was provisioned, I needed to give Maggie Simpson appropriate access over the Recovery Services Vault in the jogcloud.com tenant. For that, I provisioned a role assignment for the Contributor role on the subscription to the System Operators group synchronized from on-premises that Maggie is a member of.

Role Assignment in jogcloud.com tenant

Navigating to the Recovery Services Vault, Maggie Simpson is capable of modifying the soft delete feature (note it’s disabled for the purposes of this lab so the resources can be easily removed).

Prior to Resource Guard, Maggie Simpson can modify Soft Delete

Switching over to Homer Simpson and logging into the jogcloud.com tenant, I attached the Resource Guard to the Recovery Services Vault. The interface allowed me to select the tenant (directory) and the Resource Guard resource.

Enabling Resource Guard

I had configured the Resource Guard to protect all the operations it was able to. This is confirmed with the confirmation in the screenshot below.

Resource Guard configured to protect sensitive operations

Once the Resource Guard is enabled, navigating back to the Security Settings of the Recovery Services Vault displays a message that Resource Guard is now enabled.

Switching back to Maggie Simpson, I then attempted to modify a backup policy which is considered a sensitive operation and is restricted via the association to the Resource Guard. As expected, Maggie Simpson cannot make the modifications to the Recovery Services Vault without authenticating to the GIW tenant and being authorized on the Resource Guard.

Maggie Simpson blocked from using Resource Guard

Success! Here we demonstrated how we can restrict sensitive operations on an Azure Backup Vault even when a user has a high level of permissions on the vault itself. Resource Guard provides a great security mechanism to establish the blast radius that works best for your organization. I could even add Azure AD PIM to the mix in the support just-in-time access of the Resource Guard. The support for cross-tenant specifically is very unique because there are very few (if any) other Azure resources that allow you to leverage a cross-tenant security boundary.

If you’re using Azure Backup, you should be using Resource Guard as an additional security control to add to the controls you are enforcing with Azure RBAC and Azure Policy. With the introduction into preview of the immutable vaults, Microsoft is providing a variety of tools to take a defense-in-depth approach using the technical features that make the most sense to the needs of your organization. WIth that bit of sales speak, I’m out for the weekend.

Thanks for reading!

What If… Volume 3

Welcome back fellow geeks! I hope you managed to have an enjoyable holiday and took a break from the grind. I took a good week off, and minus some reading around AKS (Azure Kubernetes Service), I completely shut off the work and tech side of my brain. It was a great change!

Today I am back with a new entry into my What If series. In this entry I’ll be covering an interesting quirk of ASR (Azure Site Recovery) that I ran into helping a customer test out the service. For those of you unfamiliar with ASR, it’s a managed service in Microsoft Azure that provides business continuity and disaster recovery for VMs (virtual machines) both within Azure and on-premises. It can also be used to when migrating VMs from on-premises to Azure, between regions, or between availability zones.

With the quick introduction to the service out of the way, let’s get to it.

What if I wanted to test Azure Site Recovery with both Windows and Linux virtual machines?

Over the holiday break I received an email from a customer who doing some validation testing for a planned migration for ADE (Azure Disk Encryption) to SSE (Server-Side Encryption) for Managed Disks using a CMK (Customer Managed Key). As part of the validation process, the customer wanted to understand how ASR would work after when using SSE with CMK instead of ADE. The customer was making the shift from ADE to SSE for Managed Disks with CMK for a few reasons including:

  • Performance benefits by shifting the encryption engine out of the operating system
  • No limitations on specific images for the virtual machine
  • No VM extensions required
  • Can be combined with host-based encryption for end to end encryption

The customer followed the instructions on how to set up ASR for SSE with CMK-enabled disks referenced here. Replication was successful but they noticed the data disk they had attached to the VM in the source region was not automatically attached to the VM in the destination region and required manual attachment. While an inconvenience for a single test, this could create a huge headache at scale when you’re talking about hundreds of VMs.

After receiving the email I immediately spun up a very simple environment in Azure in the East US 2 region consisting of a single virtual network, Windows VM with an attached data disk, Azure Key Vault instance with a single key, and a disk encryption set. In the Central US region I created a second virtual network, Azure Key Vault instance with a single key, and a disk encryption set. My plan was to fail the VM over from East US 2 to Central US using ASR.

Lab environment

As I went through the enablement process I ensured both the OS disk and the data disk were selected for replication as seen in the image below.

ASR VM Disk Selection

Reviewing the configuration shows that two managed disks are set to replicate.

ASR Config

After confirmation I left it alone and came back an hour later and checked the destination resource group. Replicas of both managed disks are present in the destination resource group. Good so far.

Replica Disks

I then did a test failover and pulled up the VM and observed the same thing my customer did. The data disk was not attached even though it was replicated. I was able to manually attach it without an issue, but again, how does this work at scale? Even more interesting was the status of the VM in the Site Recovery section of the Recovery Services Vault. It did not show the data disk as being replicated.

Status of VM in Recovery Services Vault

I ran through the same process a few more times and ran into the same result each time. To make sure it wasn’t an issue with the information the portal was displaying, I wrote some quick Python code to hit the replicationprotecteditem endpoint within the ARM REST API. The results from the API also included only the OS disk in the replication status.

Was this a bug? Did both the customer and I mess something up in setting this up? Turns out it was neither. This is actually expected behavior when replicating a Windows VM when a data disk is attached that is uninitialized in the OS (operating system). For you young folks out there that have never initialized a disk in Microsoft Windows or those of you don’t spend much time in Windows, initialization consists of creating the partition table on the drive which must occur prior formatting the partition with a file system. So why is this required? I’m not really sure and can only theorize. A friend and I talked this over and we theorize it may be a requirement to ensure the disk has some unique identifier in the operating system which may not be able to be generated without the disk first being partitioned.

Note that this issue only occurs with Windows VMs with an uninitialized data disk. It does not occur if the disk has been initialized in Windows and does not occur at all with a Linux VM whether the disk has been partitioned or not. In those cases the data disk will be attached after the VM is failed over.

So there you go folks. If you decide to test out ASR for a proof-of-concept or just a learning experience, remember to initialize your disks on your Windows VMs!

See you next post!