Integrating Azure AD and AWS – Part 2

Update: In November 2019 AWS introduced support for integration between Azure AD and AWS SSO.  The integration offers a ton more features, including out of the box support for multiple AWS accounts.  I highly recommend you go that route if you’re looking to integrate the two platforms.  Check out my series on the new integration here.

Today I will continue the journey into the integration between Azure AD and Amazon Web Services.  In my first entry I covered the reasons why you’d want to integrate Azure AD with AWS and provided a high-level overview of how the solution works.  The remaining entries in this series will cover the steps involved in completing the integration including deep dives into the inner workings of the solution.

Let me start out by talking about the testing environment I’ll be using for this series.

lab.png

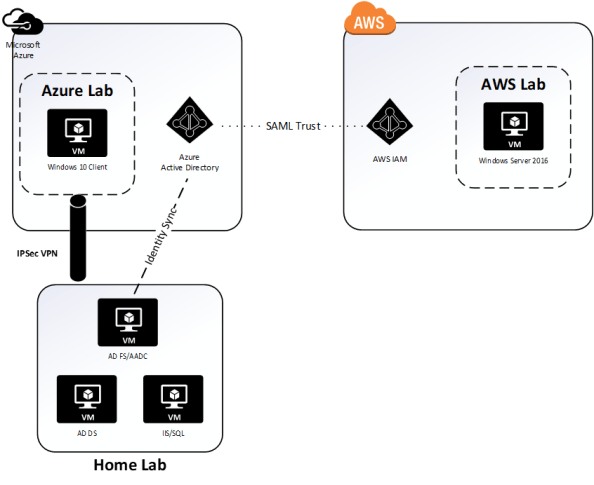
The environment includes three virtual machines (VMs) running on Windows Server 2016 Hyper V on a server at my house.  The virtual machines consists three servers running Windows Server 2016 with one server acting as a domain controller for the journeyofthegeek.local Active Directory (AD) forest, another server running Active Directory Federation Services (AD FS) and Azure AD Connect (AADC), and the third server running MS SQL Server and IIS.  The IIS instance hosts a .NET sample federated application published by Microsoft.

In Microsoft Azure I have a single Vnet configured for connectivity to my on-premises lab through a site-to-site IPSec virtual private network (VPN) I’ve setup with pfSense.  Within the Vnet exists a single VM running Windows 10 that is domain-joined to the journeyofthegeek.local AD domain.  The Azure AD tenant providing the identity backend for the Microsoft Azure subscription is synchronized with the journeyofthegeek.local AD domain using Azure AD Connect and is associated with the domain journeyofthegeek.com.  Authentication to the Azure AD tenant is federated using my instance of AD FS.  I’m not synchronizing passwords and am using an alternate login ID with the user principal name being synchronized to Azure AD being stored in the AD attribute msDS-CloudExtensionAttribute1.  The reason I’m still configured to use an alternate login ID was due to some testing I needed to do for a previous project.

I created a single test user in the journeyofthegeek.local Active Directory domain named Rick Sanchez with a user principal name (UPN) of rick.sanchez@journeyofthegeeklocal and msDS-CloudExtensionAttribute1 of  rick.sanchez@journeyofthegeek.com.  The only attribute to note that the user has populated is the mail attribute which has the value of rick.sanchez@journeyofthegeek.com.  The user is being synchronized to Azure AD via the Azure AD Connect instance.

In AWS I have a single elastic compute cloud (EC2) instance running Windows Server 2016 within a virtual private cloud (VPC).  I’ll be configuring Azure AD as an identity provider associated with the AWS account and will be associating an AWS IAM role named AzureADEC2Admins.  The role will grant full admin rights over the management of the EC2 instances associated to the account via the AmazonEC2FullAccess permissions policy.

Let’s begin shall we?

The first step I’ll be taking is to log into the Azure Portal as an account that is a member of the global admins and navigate to the Azure Active Directory blade.  From there I select Enterprise Applications blade and hit the New Application link.

entapps.png

I then search the application gallery for AWS, select the AWS application, accept the default name, and hit the Add button.  Azure AD will proceed to add the application and will then jump to a quick start page.  So what exactly does it mean to add an application to Azure AD?  Good question, for that we’ll want to use the Azure AD cmdlets.  You can reference this link.

Before we jump into running cmdlets, let’s talk very briefly about the concept of application identities in AAD.  If you’ve managed Active Directory Domain Services (AD DS), you’re very familiar with the concept of service accounts.  When you needed an application (let’s call it a non-human to be more in-line with industry terminology) to access AD-integrated resources directly or on-behalf of a user you would create a security principal to represent the non-human.  That security principal could be a user object, managed service account object, or group managed service account object.  You would then grant that security principal rights and permissions over the resource or grant it the right to impersonate a user and access the resource on the user’s behalf.  The part we want to focus in on is the impersonation or delegation to access a resource on the behalf of a user.  In AD DS that delegation is accomplished through the Kerberos protocol.

When we shift over to AAD the same basic concepts still exist of creating a security principal to represent the application and granting that application direct or delegated access to a resource.  The difference is the protocol handling the access shifts from Kerberos to OAuth 2.0.  One thing many people become confused about is thinking that OAuth handles authentication.  It doesn’t.  It has nothing do with authentication and everything to do with authorization, or more clearly delegation.  When we add an application the AAD a service principal object and sometimes application object (in AWS instance both are created) are created in the AAD tenant to represent the application.  I’m going to speak to the service principal object for the AWS integration, but you can read through this link for a good walkthrough on application and service principal objects and how they differ.

Now back to AWS.  So we added the application and we now have a service principal object in our tenant representing AWS.  Here is a few of the attributes for the object pulled via PowerShell.

awsservice.png

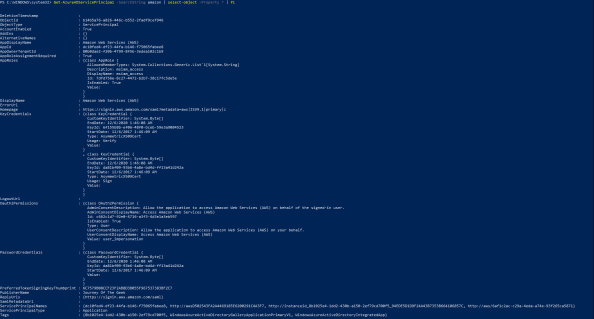
Review of the attributes for the object provide a few pieces of interesting information.   We’ll get to experiment more with what these mean when we start doing Fiddler captures, but let’s talk a bit about them now.  The AppRoles attribute provides a single default role of msiam_access.  Later on we’ll be adding additional roles that will map back to our AWS IAM roles.

Next up we have the KeyCredentials which contains two entries.  This attribute took me a while to work out.  In short, based upon the startDate, I think these two entries are referencing the self-signed certificate included in the IdP metadata that is created after the application is added to the directory.  I’ll cover the IdP metadata in the next entry.

The Oauth2Permissions are a bit funky for this use case since we’re not really allowing the application to access AWS on our behalf, but rather asking it to produce a SAML assertion asserting our identity.  Maybe the delegation can be thought of as delegating Azure AD the right to create logical security tokens representing our users that can be used to assert an identity to AWS.

The PasswordCredentials contains a single entry which shares the same KeyID as the KeyCredential.  As best I can figure from reading the documentation is this would normally contain entries for client keys when not using certificate authentication.  Given that it contains a single entry with the same KeyID as the KeyCredential for signing, I can only guess it will contain an entry even with a certificate is used to authenticate the application.

The last attributes of interest are the PreferredTokenSigningKeyThumbprint which references the certificate within the IdP metadata and the replyURLs which is the assertion consumer URI for AWS.

So yeah, that’s what happens in those 2 or 3 seconds the AWS application is registered with Azure AD.  I found it interesting how the service principal object is used to represent trust between Azure AD and AWS and all the configuration information attached to the object after the application is simply added.  It’s nice to have some of the configuration work done for us out of the box, but there is much more to do.

In the next entry I’ll walk through the Quick Start for the AWS application configuration and explore the metadata Azure AD creates.

The journey continues in my third entry.

Deep dive into AD FS and MS WAP – User Certificate Authentication through a WAP

Hi everyone,

Today I continue my series of posts that cover a behind the scenes look at how Active Directory Federation Service (AD FS) and the Microsoft Web Application Proxy (WAP) interact.  In my first post  I explained the business cases that would call for the usage of a WAP.  In my second post I did a deep dive into the WAP registration process (MS refers to this as the trust establishment with AD FS and the WAP).  In this post I decided to cover how user certificate authentication is achieved when AD FS server is placed behind the WAP.

AD FS offers a few different options to authenticate users to the service including Integrated Windows Authentication (IWA), forms-based authentication, and certificate authentication.  Readers who work in environments with sensitive data where assurance of a user’s identity is important should be familiar with certificate authentication in the Microsoft world.  If you’re unfamiliar with it I recommend you take a read through this Microsoft article.

With the recent release of the National Institute of Standards and Technology (NIST) Digital Identity Guidelines 800-63 which reworks the authenticator assurance levels (AAL) and relegates passwords to AAL1 only, organizations will be looking for other authenticator options.  Given the maturity of authenticators that make use of certificates such as the traditional smart card it’s likely many organizations will look at opportunities for how the existing equipment and infrastructure can be further utilized.  So all the more important we understand how AD FS certificate authentication works.

I’ll be using the lab I described in my first post.  I made the following modifications/additions to the lab:

  • Configure Active Directory Certificate Services (AD CS) certificate authority (CA) to include certificate revocation list (CRL) distribution point (CDP).  The CRLs will be served up via an IIS instance with the address crl.journeyofthegeek.com.  This is the only CDP listed in the certificates.  Certificates created during my original lab setup that are installed within the infrastructure do not include a CDP.
  • Added a non-domain-joined Windows 10 computer which be used as the endpoint the test user accesses the federation service from.

Tool-wise I used ProcMon, Fiddler, API Monitor, and WireShark.

So what did I discover?

Prior to doing any type of user interaction, I setup the tools I would be using moving forward.  On the WAP I started ProcMon as an Administrator and configured my filters to capture only TCP Send and TCP Receive operations.  I also setup WireShark using a filter of ip.addr==192.168.100.10 && tcp.port==80.  The IP address is the IP of the web server hosting my CRLs.  This would ensure I’d see the name of the process making the connection to the CDP as well as the conversation between the two nodes.

pic1

** Note that the machine will cache the CRLs after they are successfully downloaded from the CDP.  It will not make any further calls until the CRLs expire.  To get around this behavior while I was testing I ran the command certutil -setreg chain\ChainCacheResyncFiletime @now as outlined in this article.   This forces the machine to pull the CRLs again from the CDP regardless of whether or not they are expired.  I ran the command as the LOCAL SYSTEM security principal using psexec.

The final step was to start Fiddler as the NETWORK SERVICE security principal using the command psexec -i -u “NT AUTHORITY\Network Service” “C:\Program Files (x86)\Fiddler2\Fiddler.exe”.  Remember that Fiddler needs the public key certificate in the appropriate file location as I outlined in my last post.  Recall that the Web Application Proxy Service and the Active Directory Federation Service running on the WAP both run as that security principal.

Once all the tools were in place I logged into the non-domain joined Windows 10 box and opened up Microsoft Edge and popped the username of my test user into the username field.

pic2.png

After home realm discovery occurred within Azure AD, I received the forms-based login page of my AD FS instance.


pic3.png

Let’s take a look at what’s happened on the WAP so far.

In the initial HTTP Connect session the WAP makes to the AD FS farm, we see that the ClientHello handshake occurs where the WAP authenticates to the AD FS server to authenticate itself as described in my last post.

pic4.png

Once the secure session is established the WAP passes the HTTP GET request to the AD FS server.  It adds a number of headers to the request which AD FS consumes to identify the client is coming from the WAP.  This information is used for a number of AD FS features such as enforcing additional authentication policies for Extranet access.

pic5.png

The WAP also passes a number of query strings.  There are a few interesting query strings here.  The first is the client-request-id which is a unique identifier for the session that AD FS uses to correlate event log errors with the session.  The username is obvious and shows the user’s user principal name that was inputted in the username field at the O365 login page.  The wa query string shows a value of wsignin1.0 indicating the usage of WS-Federation.  The wtrealm indicates the relying party identifier of the application, in this case Azure AD.

pic6

The wctx query string is quite interesting and needs to be parsed a bit on its own.  Breaking down the value in the parameter we come across three unique parameters.

LoginOptions=3 indicates that the user has not selected the “Keep me signed in” option.  If the user had selected that checkbox a value of 1 would have been passed and AD FS would create a persistent cookie which would exist even after the browser closes.  This option is sometimes preferable for customers when opening documents from SharePoint Online so the user does not have to authenticate over and over.

The estsredirect contains the encoded and signed authentication request from O365.  I stared at API monitor for a few hours going API call by API call trying to identify what this looks like once it’s decoded, but was unsuccessful.  If you know how to decode it, I’d love to know.  I’m very curious as to its contents.

The WAP next makes another HTTP GET to the AD FS server this time including the additional query string of pullStatus which is set equal to 0.  I’m clueless as to the function on of this, I couldn’t find anything.  The only other thing that changes is the referer.

My best guess on the above two sessions is the first session is where AD FS performs home realm discovery and maybe some processing on to determine if there are any special configurations for the WAP such as limited or expanded authentication options (device authN, certAuthN only).  The second session is simply the AD FS server presenting the authentication methods configured for Extranet users.

The user then chooses the “Sign in with an X.509 certificate” (I’m not using SNI to host both forms and cert authN on the same port) and the WAP then performs another HTTP CONNECT to port 49443 which is the certificate authentication endpoint on the AD FS server.  It again authenticates to the AD FS server with its client certificate prior to establishing the secure tunnel.

The third session we see a HTTP POST to the AD FS server with the same query parameters as our previous request but also providing a JSON object with a key of AuthMethod and the key value combination of AuthMethod=CertificateAuthentication in the body.

pic7

The next session is another HTTP POST with the same JSON object content and the key value pairs of AuthMethod=CertificateAuthentication and RetrieveCertificate=1 in the body.  The AD FS server sends a 307 Temporary Redirect to the /adfs/backendproxytls/ endpoint on the AD FS server.

Prior to the redirect completing successful we see the calls to the CDP endpoint for the full and delta CRLs.

pic8.png

pic9

I was curious as to which process was pulling the CRLs and identified it was LSASS.EXE from the ProcMon capture.

pic10

At the /adfs/backendproxytls/ endpoint the WAP performs another HTTP POST this time posting a JSON object with a number of key value combinations.

pic11.png

The interesting key value types included in the JSON object are the nested JSON object for Headers which contains all the WAP headers I covered earlier.  The query string JSON object which contains all the query strings I covered earlier.  The SeralizedClientCertificate contains the certificate the user provided after selecting to use certificate authentication.  The AD FS server then sends back a cookie to the WAP.  This cookie is the cookie the representing the user’s authentication to the AD FS server as detailed in this link.

pic12.png

The WAP then performs a final HTTP GET back at the /adfs/ls/ endpoint including the previously described headers and query strings as well as provided the cookie it just received.  The AD FS server responds by providing the assertion requested by Microsoft along with a MSISAuthenticated, MSISSignOut, and MSISLoopDetectionCookie cookies which are described in the link above.

What did we learn?

  1. The certificate is checked at both the WAP and the AD FS server to ensure it is valid and issued from a trusted certificate authority.  Remember to verify you trust the certificate chain of any user certificates on both the AD FS servers and WAPs.
  2. CRL Revocation checking is enabled by default and is performed on both the AD FS server and the WAP.  Remember to verify the locations in your CDP are available by both devices.
  3. The AD FS servers use the LSALogonUser function in the secur32.dll library to perform standard certificate authentication to Active Directory Domain Services.  I didn’t include this, but I captured this by running API monitor on the AD FS server.

In short, if you’re going to use device authentication or user certificate authentication make sure you have your PKI components in order.

See you next post!

Deep dive into AD FS and MS WAP – Overview

Hi everyone,

If you’ve followed my blog at all, you will notice I spend a fair amount of my time writing about the products and technologies powering the integration of on-premises and cloud solutions.  The industry refers to that integration using a variety of buzzwords from hybrid cloud to software defined data center/storage/networking/etc.  I prefer a more simple definition of legacy solutions versus modern solutions.

So what do I mean by a modern solution?  I’m speaking of solutions with the following most if not all of these characteristics:

  • Customer maintains only the layers of the technology that directly present business value
  • Short time to market for new features and features are introduced in a “toggle on and toggle off” manner
  • Supports modern authentication, authorization, and identity management standards and specifications such as Open ID Connect, OAuth, SAML, and SCIM
  • On-demand scaling
  • Provides a robust web-based API
  • Customer data can exist on-premises or off-premises

Since I love the identity realm, I’m going to focus on the bullet regarding modern authentication, authorization, and identity management.  For this series of posts I’m going to look at how Microsoft’s Active Directory Federation Service (AD FS)  and Microsoft’s Web Application Proxy (WAP) can be used to help facilitate the use of modern authentication and authorization.

So where does AD FS and the WAP come in?  AD FS provides us with a security token service producing the logical security tokens used in SAML, OAuth, and Open ID Connect.  Why do we care about the MS WAP?  The WAP acts a reverse proxy giving us the ability to securely expose AD FS to untrusted networks (like the Internet) so that devices outside our traditional firewalled security boundary can leverage our modern authentication and authorization solution.

Some real life business cases that can be solved with this solution are:

  1. Single sign-on (SSO) experience to a SaaS application such as SharePoint online from both an Active Directory domain-joined endpoint or a non-domain joined endpoint such as a mobile phone.
  2. Limit the number of passwords a user needs to remember to access both internal and cloud applications.
  3. Provide authentication or authorization for modernized internal applications for endpoints outside the traditional firewalled security boundary.
  4. Authentication and authorization of devices prior to accessing an internal or cloud application.

As we can see from the above, there are some great benefits around SSO, limiting user credentials to improve security and user experience, and taking our authorization to the next step by doing contextual-based authorization (device information, user location, etc) versus relying upon just Active Directory group.

Microsoft does a relatively decent job describing how to design and implement your AD FS and WAP rollout, so I’m not going to cover much of that in this series.  Instead I’m going to focus on the “behind the scenes” conversations that occur with endpoints, WAP, AD FS, AD DS, and Azure AD. Before I begin delving into the weeds of the product, I’m going to spend this post giving an overview of what my lab looks like.

I recently put together a more permanent lab consisting of a mixture of on-premise VMs running on HyperV and Azure resources.  I manage to stay well within my $150.00 MSDN balance by keeping a majority of the VMs deallocated.   The layout of the lab is diagramed below.

HomeLab


On-premises I am running a small collection of Windows Server 2016 machines within HyperV running on top of Windows Server 2016.  I’m using a standard setup of an AD DS, AD CS, AADC, AD FS, and IIS/MS SQL server.  Running in Azure I have a single VNet with three subnets each separated by a network security group.  My core infrastructure of an AD DS, IIS/MS SQL, and AD FS server exist in my Intranet subnet with my DMZ subnet containing a single WAP.

The Active Directory configuration consists of a single Active Directory forest with an FQDN of journeyofthegeek.local.  The domain has been configured with an explicit UPN of journeyofthegeek.com which is assigned as the UPN suffix for all users synchronized to Azure Active Directory.  The domain is running in Windows Server 2016 domain and forest functional level.  The on-premises domain controller holds all FSMO roles and acts as the DC for the Active Directory site representing the on-premises physical location.  The domain controller in Azure acts as the sole DC for the Active Directory site representing Azure.  Both DCs host the split-brain DNS zone for journeyofthegeek.com.

The on-premises domain controller also runs Active Directory Certificate Services.  The CA is an enterprise CA that is used to distribute certificates to security principals in the environment.  I’ve removed the CDP from the certificate templates issued by the CA to eliminate complications with the CRL revocation checking.

The AD FS servers are members of an AD FS farm named sts.journeyofthegeek.com and use a MS SQL Server 2016 backend for storage of configuration information.  The SQL Server on-premises hosts the SQL instance that the AD FS users are using to store configuration information.

Azure Active Directory Connect is co-located on the AD FS server and uses the same SQL server as the AD FS uses.  It has been integrated with a lab Azure Active Directory tenant I use which has a few licenses of Office 365 Business Essentials.  The objectGUID attribute is used as the immutable ID and the Azure Active Directory tenant has the DNS namespaces of journeyofthegeek.onmicrosoft.com and journeyofthegeek.com associated with it.

The IIS server running in Azure runs a simple .NET application (https://blogs.technet.microsoft.com/tangent_thoughts/2015/02/20/install-and-configure-a-simple-net-4-5-sample-federated-application-samapp/) that is used for claims-based authentication.  I’ll be using that application for demonstrations with the Web Application Proxy and have used it in the past to demonstrate functionality of the Azure Application Proxy.

For the demonstrations throughout these series I’ll be using the following tools:

In my next post I’ll do a deep dive into what happens behind the scenes during the registration of the Web Application Proxy with an AD FS farm.  See you then!


Active Directory Federation Services – SQL Attribute Store

Active Directory Federation Services – SQL Attribute Store

Hi everyone,

I recently had a use case come across my desk where I needed to do a SAML integration with a SaaS provider.  The provider required a number of pieces of information about the user beyond the standard unique identifier.  The additional information would be used to direct the user to the appropriate instance of the SaaS application.

In the past fifty or so SAML integrations I’ve done, I’ve been able to source my data directly from the Active Directory store.  This was because Active Directory was authoritative for the data or there was a reliable data synchronization process in place such that the data was being sourced from an authoritative source.  In this scenario, neither options was available.  Thankfully the data source I needed to hit to get the missing data exposed a subset of its data through a Microsoft SQL view.

I have done a lot in AD FS over the past few years from design to operational support of the service, but I had never sourced information from a data source hosted via MS SQL Server.  I reviewed the Microsoft documentation available via TechNet and found it to be lacking.  Further searches across MS blogs and third-party blogs provided a number of “bits” of information but no real end to end guide.  Given the lack of solid content, I decided it would be fun to put one together so off to Azure I went.

For the lab environment, I built the following:

  • Active Director forest name – geekintheweeds.com
  • Server 1 – SERVERDC (Windows Server 2016)
    • Active Directory Domain Services
    • Active Directory Domain Naming Services
    • Active Directory Certificate Services
  • Server 2 – SERVER-ADFS (Windows Server 2016)
    • Active Directory Federation Services
    • Microsoft SQL Server Express 2016
  • Server 3 – SERVER-WEB (Windows Server 2016)
    • Microsoft IIS

On SERVER-WEB I installed the sample claims application referenced here.  Make sure to follow the instructions in the blog to save yourself some headaches.  There are plenty of blogs out there that discuss building a lab consisting the of the services outlined above, so I won’t cover those details.

On SERVER-ADFS I created a database named hrdb within the same instance as the AD FS databases.  Within the database I created a table named dbo.EmployeeInfo with 5 columns named givenName, surName, email, userName, and role all of data type nvchar(MAX).  The userName column contained the unique values I used to relate a user object in Active Directory back to a record in the SQL database.

Screen Shot 2017-05-28 at 9.18.37 PM

Once the database was created and populated with some sample data and the appropriate Active Directory user objects were created, it was time to begin to configure the connectivity between AD FS and MS SQL.  Before we go creating the new attribute store, the AD FS service account needs appropriate permissions to access the SQL database.  I went the easy route and gave the service account the db_datareader role on the database, although the CONNECT and SELECT permissions would have probably been sufficient.

Screen Shot 2017-05-28 at 9.23.49 PM

After the service account was given appropriate permissions the next step was to configure it as an attribute store in AD FS.  To that I opened the AD FS management console, expanded the service node, and right-clicked on the Attribute Store and selected the Add Attribute Store option.  I used mysql  as the store name and selected SQL option from the drop-down box.  My SQL was a bit rusty so the connection string took a few tries to get right.

Screen Shot 2017-05-28 at 9.28.35 PM

I then created a new claim description to hold the role information I was pulling from the SQL database.

Screen Shot 2017-05-28 at 9.33.12 PM.png

The last step in the process was to create some claim rules to pull data from the SQL database.  Pulling data from a MS SQL datastore requires the use of custom claim rules.  If you’re unfamiliar with the custom claim language, the following two links are two of the best I’ve found on the net:

The first claim rule I created was a rule to query Active Directory via LDAP for the SAM-Account-Name attribute.  This is the attribute I would be using to query the SQL database for the user’s unique record.

Screen Shot 2017-05-28 at 9.42.05 PM.png

Next up I had my first custom claim rule where I queried the SQL database for the value in the userName column for the value of the SAM-Account-Name I pulled from earlier step and I requested back the value in the email column of the record that was returned. Since I wanted to do some transforming of the information in a later step, I added the claim to incoming claim set.

Screen Shot 2017-05-28 at 9.42.39 PM

I then issued another query for the value in the role column.

Screen Shot 2017-05-28 at 9.48.14 PM

Finally, I performed some transforms to verify I was getting the appropriate data that I wanted.  I converted the email address claim type to the Common Name type and the custom claim definition role I referenced above to the out of the box role claim definition.  I then hit the endpoint for the sample claim app and… VICTORY!

Screen Shot 2017-05-28 at 9.52.29 PM

Simple right?  Well it would be if this information had been documented within a single link.  Either way, I had some good lessons learned that I will share with you now:

  • Do NOT copy and paste claim rules.  I chased a number of red herrings trying to figure out why my claim rule was being rejected.  More than likely the copy/paste added an invalid character I was unable to see.
  • Brush up on your MS SQL before you attempt this.  My SQL was super rusty and it caused me to go down a number of paths which wasted time.  Thankfully, my worker Jeff Lee was there to add some brain power and help work through the issues.

Before I sign off, I want to thank my coworker Jeff Lee for helping out on this one.  It was a great learning experience for both of us.

Thanks and have a wonderful Memorial Day!