DNS in Microsoft Azure Part 4 – Private Link DNS

DNS in Microsoft Azure Part 4 – Private Link DNS

Updated October 2023

This is part of my series on DNS in Microsoft Azure.

Hi there geeks!

Azure Private Link is a common topic for customers. It provides a service provider with the ability to inject a path to the instance of their service into a customer’s virtual network. It should come as no surprise that Microsoft makes full use this service to provide its customers with the same capability for it’s PaaS services. While the DNS configuration is straightforward for 3rd-party-provided Private Link services, there is some complexity to DNS when using it for access to Microsoft PaaS services behind a Private Link Private Endpoint.

Before I dive into the complexities of DNS, I want to cover how and why the service came to be.

The service was introduced in September 2019.  One of the primary drivers behind the introduction of the service was to address the customer demand for secure and private connectivity to native Azure services and 3rd-party services.  Native Azure PaaS services used to be accessible only via public IP addresses which required traffic to traverse the public Internet. If the customer wanted the traffic to take a known path to that public IP and have some assurance of consistency in the latency, the customer was forced to implement ExpressRoute with Microsoft Peering (formerly known as ExpressRoute Public Peering) which can be complex and comes with lots of considerations.

Microsoft first tried to address this technical challenge with Service Endpoints, which were introduced in February 2018.  For you AWS folk, the Service Endpoints are probably closest to VPC Gateway Endpoints.  Service Endpoints provide a means for services deployed with the virtual network to access an Azure PaaS service directly over the Microsoft backbone while also tagging the traffic egressing the Service Endpoint with the virtual network identity. The customer’s instance of that PaaS service could then be locked down access from a specific virtual network.

Service Endpoints
Access to public IP of Azure PaaS services

Service Endpoints came with a few gaps. One gap was Service Endpoints are not routable from on-premises so machines coming from on-premises can’t benefit from their deployment. The other gap was a Service Endpoint creates a data exfiltration risk because it is a more efficient route to ALL instances of the Azure PaaS service. Customers were often implementing Service Endpoints directly on the compute subnets which would cause traffic to bypass an organization’s security appliance (think traditional hub-and-spoke) making that exfiltration risk that much greater.

Microsoft made an attempt to mitigate the exfiltration risk Service Endpoint policies which are similar to VPC Gateway Endpoint Policies in controls could be applied via the policy to limit which instances of a PaaS service the Service Endpoint would allow traffic to. Unfortunately, Service Endpoint Policies never seemed to catch on and they are limited to Azure Storage.

Microsoft needed a solution to these two gaps and that’s how Azure Private Link came to be. Azure Private Link includes the concept of an Azure Private Link Service and Private Link Endpoint. I won’t be digging into the details of the Private Link Service component, because the focus of this two-part series is on DNS and its role in providing name resolution for Microsoft native PaaS Private Link Private Endpoints. I do want to cover the benefits Private Link brings to the table because it will reinforce why it’s so important to under the DNS integration.

Private Link addresses the major gaps in Service Endpoints by doing the following:

  • Private access to services running on the Azure platform through the provisioning of a virtual network interface within the customer VNet that is assigned one of the VNet IP addresses from the RFC1918 address space.
  • Makes the services routable and accessible over private IP space to resources running outside of Azure such as machines running in an on-premises data center or virtual machines running in other clouds.
  • Protects against data exfiltration by the Private Endpoint providing access to only a specific instance of a PaaS service.
Azure Private Link
Azure Private Link architecture

Now that you understand what Private Link brings to the table, I’ll focus on the DNS integration required to support Azure native PaaS services deployed behind a Private Link Private Endpoint.

The series is continued in my second post.

Deep Dive into Azure AD and AWS SSO Integration – Part 5

Deep Dive into Azure AD and AWS SSO Integration – Part 5

I’m back yet again with the fifth entry into my series on integrating Azure AD and AWS SSO.  It’s been a journey and the series has covered a lot of ground.  It started with outlining the challenge with the initial integration of Azure AD and AWS using the AWS app in the Azure Marketplace.  From there it took a deep dive into the components of the solution and how it compares to a standard integration using your SAML provider of choice.  It continued with the steps necessary to configure Azure AD and AWS SSO to support the federated trust to enable single sign-on.  The fourth post explored the benefits of SCIM and went step by step on how to configure SCIM between the two services.  For this final post I’m going to cover a few different scenarios to demonstrate what’s possible with this new integration.

Before I jump into the scenarios, there is one final task that needs to be completed now that the federated trust and SCIM have been setup.  That task is setting up the permission sets in AWS SSO.  Permission sets are simply IAM policies (either AWS-managed or custom policies you create).  For those of you from the Microsoft Azure world, an IAM policy is a collection of permissions which define what a security principal (such as a user or role) is authorized to do.  They are most similar to an Azure RBAC role definition but more flexible and granular due to advanced features such as condition keys.  Permission sets are projected into the AWS accounts they are assigned to as AWS IAM roles.  These are the IAM roles the security principal assumes.

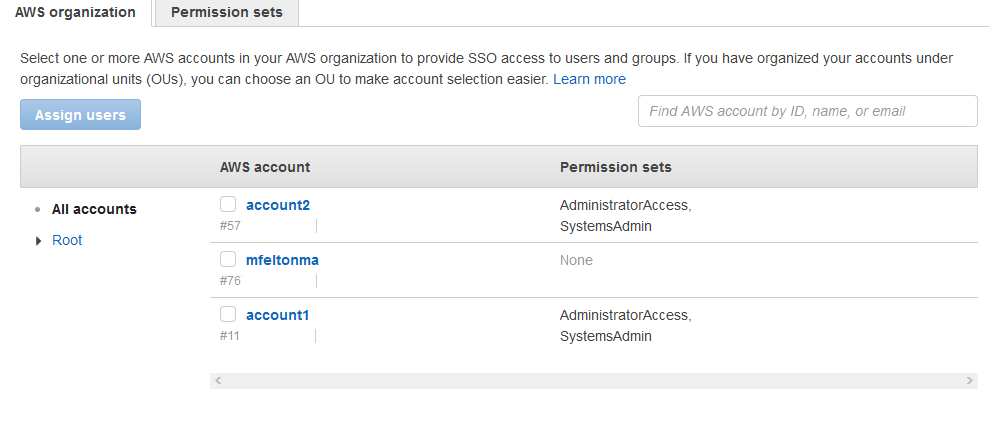
As I mentioned above, AWS SSO supports both AWS-managed IAM policies and custom IAM policies for permission sets.  If you go into the AWS Accounts menu option of AWS SSO you’ll see the accounts associated with the AWS Organization and which permission sets have been associated to the AWS accounts thus resulting in AWS IAM Roles being created within the AWS account.  In the image below you can see that I’ve provisioned two permission sets to account1 and account2.

accountassignments.pngThe permission sets tab displays the permission sets I’ve created and whether or not they’ve been provisioned to any accounts.  In the screenshot below you’ll see I’ve added four AWS-managed policies for Billing, SecurityAudit, AdministratorAccess, and NetworkAdministrator.  Additionally, I created a new permission set named SystemsAdmin which uses a custom IAM policy which restricts the principal assuming the rule to EC2, CloudWatch, and ELB activities.

permissionsets.png

Back on the AWS organization tab, if you click on an account you can see the AWS SSO Users or Groups that have been assigned to a permission set.  In the image below, you can see that I’ve assigned both the B2B Security Admins group and the Security Admins group to the AdministratorAccess permission set and the System Operators group to the SystemsAdmin permission set.

assignments.png

With permission sets out of the way, let’s jump into the scenarios.

Scenario 1 – Windows AD User, AD FS, Azure AD, AWS SSOscenario1.PNG

In this scenario the user is Bart Simpson who is a member of the System Operators group on-premises and exists authoritatively in a Windows AD forest.  A federated trust has been established with Azure AD using an instance of AD FS running on-premises. Azure AD has been integrated with AWS SSO for both SSO (via SAML) and provisioning (via SCIM).

Once Bart was logged into a domain-joined machine, I popped open a browser and navigated to My Apps portal at https://myapps.microsoft.com.  This redirected me to the Azure AD login screen.  Here I entered Bart’s user name.

bartazuread.PNG

Azure AD performed its home realm discovery process, identified that the domain jogcloud.com is configured for federated authentication, and redirected me to AD FS.  Take note I purposely broke integrated windows authentication here to show you each step.  In a correctly configured browser, you wouldn’t see this screen.

bartadfs.PNG

After I successfully authenticated to AD FS, I was bounced back over to Azure AD where the assertion was delivered.  Azure AD then whipped up a SAML assertion for AWS SSO, returned it to the browser, and redirected the browser to the AWS SSO assertion consumer URL.  AWS SSO consumed the assertion and authenticated Bart into AWS SSO displaying the AWS IAM Role selection page with the relevant roles he has permission to access.

bartawssso.PNG

Scenario 2 – Windows AD User, AD FS with Certificate MFA, Azure AD with Conditional Access, AWS SSO

scenario2.PNG

Scenario 1 is pretty simple, so let’s get fancy and layer on some security.  Here I added an access control policy into AD FS requiring certificate-based authentication for members of the Security Admins group.  Additionally, I added a conditional access policy in Azure AD requiring MFA for any user that is a member of that same group.

Since Homer Simpson regularly runs a nuclear reactor, he’s also the Security Admin for JOGCLOUD.  He has been made member of the Windows AD Security Admin group.

As a first step I again popped open a browser and navigated to the My Apps portal.  After Homer’s username was plugged in, Azure AD redirected me to the AD FS server.  I again broke IWA to capture each step in the process.

signin2

After the password challenge was satisfied, I was prompted to provide the appropriate user certificate.

signin3.PNG

From there I was authenticated to Azure AD and served up the My Apps portal.

myapps.PNG

Wondering why I wasn’t prompted for Azure MFA?  No, I didn’t misconfigure it (at least this time).  A not well documented feature (at least in my opinion) of Azure AD is that you can pass a claim asserting a user has satisfied the MFA requirement thus making for a better user experience because the user isn’t required to authenticate multiple times.  Yes folks, this means you can layer your traditional certificate-based authentication on top of Azure AD and AWS. 

mfaonprem.png

After selecting the AWS SSO app, I was signed into AWS SSO and presented with the role selection screen.

awsssosignin1.PNG

I then selected a one of the roles and was signed into the relevant AWS account assuming the AdministratorAccess IAM Role.

awsssosignin2

Scenario 3 – Azure AD B2B User, AWS SSO

scenario3.PNG

What if you have a multi-tenant situation due to an acquisition or merger or perhaps you farm out operations to a managed service provider?  No worries there, B2B is also supported with this pattern.  In this scenario I’m using a user sourced from tenant that has been invited via Azure AD’s B2B.  The user has been added to the B2B Security Admins group which exists authoritatively in the inviting tenant (jogcloud.com) and was synchronized to AWS SSO via SCIM.

Opening a browser and navigating to the My Apps portal kicks off Azure AD authentication and drops the user into their source tenant.  Once there I can change my tenant by selecting the profile icon and selecting the jogcloud tenant.

myappsmultiple.png

I’m then presented with the apps that I’m authorized to use in the jogcloud tenant, which includes the AWS SSO app.

guestmyapp.PNG

Azure AD kicks off the federated authentication and I’m presented with the AWS role selection page where I can choose to assume the AdministratorAccess role in two of the AWS accounts.

guestawsso.png

Scenario 4 – AWS CLI

I know what you’re saying now, “But what about CLI?”  Well folks, for that you can leverage the AWS CLI v2.  It’s still in preview right now, but I did test it using the user from scenario 2 and it worked flawlessly.  The experience is pretty anti-climatic so I’m not going to dive into it.  The user experience is similar to using the Azure PowerShell cmdlets in that a web browser instance is opened and guides you through the authentication process.

That will sum up this series.

Few technologies get me excited enough to write five posts, but this integration is really amazing.  With AWS hooking into Azure AD as effectively as they have (especially love the CLI integration), it reduces operational overhead and improves security which is a combination you rarely see together.  Most importantly, it puts the customer first by optimizing the user experience.  If you weren’t convinced on Azure AD’s capabilities as an IDaaS, hopefully this series has helped educate you as to the value of the platform.

With that I’ll sign off.  A big thanks to the AWS product team that worked on this integration.  You did an amazing job that will greatly benefit our mutual customers.

To the rest of you, I wish you happy holidays!


Deep Dive into Azure AD and AWS SSO Integration – Part 3

Deep Dive into Azure AD and AWS SSO Integration – Part 3

Back for more are you?

Over the past few posts I’ve been covering the new integration between Azure AD and AWS SSO.  The first post covered high level concepts of both platforms and some of the problems with the initial integration which used the AWS app in the Azure Marketplace.  In the second post I provided a deep dive into the traditional integration with AWS using a non-Azure AD security token service like AD FS (Active Directory Federation Services), what the challenges were, how the new integration between Azure AD and AWS SSO addresses those challenges, and the components that make up both the traditional and the new solution.  If you haven’t read the prior posts, I highly recommend you at least read through the second post.

Azure AD and AWS SSO Integration

New Azure AD and AWS SSO Integration

In this post I’m going to get my hands dirty and step through the implementation steps to establish the SAML trust between the two platforms.  I’ve setup a fairly simple lab environment in Azure.  The lab environment consists of a single VNet (virtual network) with a four virtual machines with the following functions:

  • dc1 – Windows Active Directory domain controller for jogcloud.com domain
  • adcs – Active Directory Certificate Services
  • aadc1 – Azure Active Directory Connect (AADC)
  • adfs1 – Active Directory Federation Services

AADC has been configured to synchronize to the jogcloud.com Azure Active Directory tenant.  I’ve configured federated authentication in Azure AD with the AD FS server acting as an identity provider and Windows Active Directory as the credential services provider.

visio of lab environment

Lab Environment

On the AWS side I have three AWS accounts setup associated with an AWS Organization.  AWS SSO has not yet been setup in the master account.

Let’s setup it up, shall we?

The first thing you’ll need to do is log into the AWS Organization master account with an account with appropriate permissions to enable AWS SSO for the organization.  If you’ve never enabled AWS SSO before, you’ll be greeted by the following screen.

1.png

Click the Enable AWS SSO button and let the magic happen in the background.  That magic is provisioning of a service-linked role for AWS SSO in each AWS account in the organization.  This role has a set of permissions which include the permission to write to the AWS IAM instance in the child account.  This is used to push the permission sets configured in AWS SSO to IAM roles in the accounts.

Screenshot of AWS SSO IAM Role

AWS SSO Service-Linked IAM Role

After about a minute (this could differ depending on how many AWS accounts you have associated with your organization), AWS SSO is enabled and you’re redirected to the page below.

Screenshot of AWS SSO successfully enabled page

AWS SSO Successfully Enabled

Now that AWS SSO has been configured, it’s time to hop over to the Azure Portal.  You’ll need to log into the portal as a user with sufficient permissions to register new enterprise applications.  Once logged in, go into the Azure Active Directory blade and select the Enterprise Applications option.

Register new Enterprise Application

Register new Enterprise Application

Once the new blade opens select the New Application option.

Register new application

Register new application

Choose the Non-gallery application potion since we don’t want to use the AWS app in the Azure Marketplace due to the issues I covered in the first post.

Choose Non-gallery application

Choose Non-gallery application

Name the application whatever you want, I went with AWS SSO to keep it simple.  The registration process will take a minute or two.

Registering application

Registering application

Once the process is complete, you’ll want to open the new application and to go the Single sign-on menu item and select the SAML option.  This is the menu where you will configure the federated trust between your Azure AD tenant and AWS SSO on the Azure  AD end.

SAML Configuration Menu

SAML Configuration Menu

At this point you need to collect the federation metadata containing all the information necessary to register Azure AD with AWS SSO.  To make it easy, Azure AD provides you with a link to directly download the metadata.

Download federation metadata

Download federation metadata

Now that the new application is registered in Azure AD and you’ve gotten a copy of the federation metadata, you need to hop back over to AWS SSO.  Here you’ll need to go to Settings.  In the settings menu you can adjust the identity source, authentication, and provisioning methods for AWS SSO.  By default AWS SSO is set to use its own local directory as an identity source and itself for the other two options.

AWS SSO Settings

AWS SSO Settings

Next up, you select the Change option next to the identity source.  As seen in the screenshot below, AWS SSO can use its own local directory, an instance of Managed AD or BYOAD using the AD Connector, or an external identity provider (the new option).  Selecting the External Identity Provider option opens up the option to configure a SAML trust with AWS SSO.

Like any good authentication expert, you know that you need to configure the federated trust on both the identity provider and service provider.  To do this we need to get the federation metadata from AWS SSO, which AWS has been lovely enough to also provide it to us via a simple download link which you’ll want to use to get a copy of the metadata we’ll later import into Azure AD.

Now you’ll need to upload the federation metadata you downloaded from Azure AD in the Identity provider metadata section.  This establishes the trust in AWS SSO for assertions created from Azure AD.  Click the Next: Review button and complete the process.

AWS SSO Identity Sources

Configure SAML trust

You’ll be asked to confirm changing the identity source.  There a few key points I want to call out in the confirmation page.

  • AWS SSO will preserve your existing users and assignments -> If you have created existing AWS SSO users in the local directory and permission sets to go along with them, they will remain even after you enable it but those users will no longer be able to login.
  • All existing MFA configurations will be deleted when customer switches from AWS SSO to IdP.  MFA policy controls will be managed on IdP -> Yes folks, you’ll now need to handle MFA.  Thankfully you’re using Azure AD so you plenty of options there.
  • All items about provisioning – You have to option to manually provision identities into AWS SSO or use the SCIM endpoint to automatically provision accounts.  I won’t be covering it, but I tested manual provisioning and the single sign-on aspect worked flawless.  Know it’s an option if you opt to use another IdP that isn’t as fully featured as Azure AD.

Confirmation prompt

Confirmation prompt

Because I had to, I popped up the federation metadata to see what AWS requiring in the order of claims in the SAML assertion.  In the screenshot below we see is requesting the single claim of nameid-format:emailaddress.  This value of this claim will be used to map the user to the relevant identity in AWS SSO.

AWS SSO Metadata

Back to the Azure Portal once again where you’ll want to hop back to Single sign-on blade of the application you registered.  Here you’ll click the Upload metadata file button and upload the AWS metadata.

Uploading AWS federation metadata

Uploading AWS federation metadata

After the upload is successful you’ll receive a confirmation screen.  You can simple hit the Save button here and move on.

Confirming SAML

Confirming SAML

At this stage you’ve now registered your Azure AD tenant as an identity provider to AWS SSO.  If you were using a non-Azure AD security token service, you could now manually provision your users AWS SSO, create the necessary groups and permissions sets, and administer away.

I’ll wrap up there and cover the SCIM provisioning in the next post.  To sum it up, in this post we configured AWS SSO in the AWS Organization and established the SAML federated trust between the Azure AD tenant and AWS SSO.

See you next post!

Deep Dive into Azure AD and AWS SSO Integration – Part 2

Deep Dive into Azure AD and AWS SSO Integration – Part 2

Welcome back folks.

Today I’ll be continuing my series on the new integration between Azure AD and AWS SSO.  In my last post I covered the challenges with the prior integration between the two platforms, core AWS concepts needed to understand the new integration, and how the new integration addresses the challenges of the prior integration.

In this post I’m going to give some more context to the challenges covered in the first post and then provide an overview of the what the old and new patterns look like.  This will help clarify the value proposition of the integration for those of you who may still not be convinced.

The two challenges I want to focus on are:

  1. The AWS app was designed to synchronize identity data between AWS and Azure AD for a single AWS account
  2. The SAML trust between Azure AD and an AWS account had to be established separately for each AWS account.

Challenge 1 was unique to the Azure Marketplace AWS app because they were attempting to solve the identity lifecycle management problem.  Your security token service (STS) needs to pass a SAML assertion which includes the AWS IAM roles you are asserting for the user.  Those roles need to be mapped to the user somewhere for your STS to tap into them.  This is a problem you’re going to feel no matter what STS you use, so I give the team that put together the AWS app together credit for trying.

The folks over at AWS came up with an elegant solution requiring some transformation in the claims passed in the SAML token and another solution to store the roles in commonly unused attributes in Active Directory.  However, both solutions suffered the same problem in that you’re forced to workaround that mapping, which becomes considerably difficult as you began to scale to hundreds of AWS accounts.

Challenge 2 plagues all STSs because the SAML trust needs to be created for each and every AWS account.  Again, something that begins to get challenging as you scale.

AWS Past Integration

AWS Past Integration

In the image above, we see an example of how some enterprises addressed these problems.  We see that there is some STS in use acting as an identity provider (idP) (could be Azure AD, Okta, Ping, AD FS, whatever) that has a SAML trust with each AWS account.  The user to AWS IAM role mappings are included in an attribute of the user’s Active Directory user account.  When the user attempts to access AWS, the STS queries Active Directory for the information.  There is a custom process (manual or automated) that queries each AWS account for a list of AWS IAM Roles that are associated with the IdP in the AWS account.  These roles are then populated in the attribute for each relevant user account.  Lastly, CloudFormation is used to push IAM Roles to each AWS account.  This could be pushed through a manual process or a CI/CD pipeline.

Yeah this works, but who wants all that overhead?  Let’s look at the new method.

Azure AD and AWS SSO Integration

Azure AD and AWS SSO Integration

In the new integration where we use Azure AD and AWS SSO together, we now only need to establish a single SAML trust with AWS SSO.  Since AWS SSO is integrated with AWS Organizations it can be used as a centralized identity source for all AWS accounts within the organization.  Additionally, we can now leverage Azure AD to manage the synchronization of identity data (users and groups) from Azure AD to AWS SSO.  We then map our users or groups to permission sets (collections of IAM policies) in AWS SSO which are then provisioned as IAM roles in the relevant AWS accounts.  If we want to add a user to a role in AWS IAM, we can add that user to the relevant group in Azure AD and wait for the synchronization process to occur.  Once it’s complete, that user will have access to that IAM role in the relevant accounts.  A lot less work, right?

Let’s sum up what changes here:

  • We can use existing processes already in place to move users in and out of groups either on-premises in Windows AD (that is syncing to Azure AD with Azure AD Connect) or directly in Azure AD (if we’re not syncing from Windows AD).
  • Group to role mappings are now controlled in AWS SSO
  • Permission sets (or IAM policies for the IAM roles) are now centralized in AWS SSO
  • We no longer have to provision the IAM roles individually into each AWS account, we can centrally control it in AWS SSO

Cool right?

In my few posts I’ll begin walking through the integration an demonstrating some the solution.

Thanks!