Welcome back fellow geeks!
I recently had a customer that was interested in staying as purely cloud native as possible, which included any centralized firewall that would be in use. Microsoft has offered up Azure Firewall for a while now and it is a great solution if you’re looking for a very basic fully-managed firewall. Here are some of the neater features of the solution:
- Fully managed by Microsoft with strong SLAs
- Central management of north/south and east/west traffic in a hub in spoke architecture vs the operational overhead caused by trying to manage these flows solely with NSGs (network security groups)
- Transitive routing device for hub and spoke architectures to allow communication between spoke to on-premises and spoke to spoke
- Stateful firewall
- Logging of DNS queries via DNS Proxy capability
Unfortunately this basic feature set rarely satisfied the more regulated customer base I tend to work with. Many of these customers went with the full featured security appliances such as those offered by Palo Alto, Fortigate, and the like. One of the largest gaps in Azure Firewall when compared to the 3rd party vendors was the lack DPI (deep packet inspection) and IDS (intrusion detection system) / IPS (intrusion prevention system) capabilities. Microsoft heard the feedback from its customers and back in February of 2021 made the Azure Firewall Premium SKU available in public preview with a collection of features such as TLS (transport layer security) Inspection, IDPS (intrusion detection prevention system), URL filtering, and improved web category filtering. The addition of these capabilities now has made Azure Firewall a much more appealing cloud-native solution.
I had yet to spend any significant time experimenting with the Premium SKU (I make it a habit to not invest a ton of time into preview features). However, this customer gave me the opportunity to dive into the TLS inspection and IDPS capabilities. These capabilities will be the subject of this post and I’ll spend some time describing the architectural pattern I built out and experimented with.
This particular customer had a requirement to perform DPI and IDPS on incoming web-based traffic from the Internet. I asked the customer to provide the control set they needed to satisfy such that we could map those controls to the technical controls available in Azure-native services. The hope was, since this was web-based traffic only and used across multiple regions, we might be able to satisfy all the controls via a WAF (web application firewall) such as Azure Front Door and supplement with layer 7 load balancing with Azure Application Gateway within a given region. The rest of the traffic, non-web, would be delivered to a firewall running in parallel. This pattern is becoming more common place as the WAFs grow in functionality and feature set.

Unfortunately the above pattern was not an option for the customer because they wanted to maintain a centralized funnel for all traffic via a firewall. This is not an uncommon ask. This meant I had to get the traffic coming in from the WAF to funnel through Azure Firewall. For this pattern to work end to end I would need layer 7 load balancing so that meant I needed an Application Gateway as well. The question was do I place the Azure Firewall before or after the Application Gateway? For the answer to this question I went to the Microsoft documentation. Typically the public documentation leaves a lot to be desired when it comes to identifying the benefits and considerations of a particular pattern (oh how I long for the days of Technet-quality documentation), however the documentation around these patterns is stellar.
After quickly reading the benefits and considerations about the two patterns, the decision looked like it was made for me. The pattern where the firewall is placed after the application gateway aligned with my customer’s use case. It specifically covered TLS inspection and IDPS through Azure Firewall Premium. Curious as to why this TLS inspection at Azure Firewall wasn’t mentioned in the other use case where Azure Firewall is placed in front of Application Gateway, I went down a rabbit hole.
My first stop was the public documentation for the Azure Firewall Premium SKU. Since the feature is still public preview there are a fair amount of limitations but none of the limitations that weren’t planned to be fixed by GA (general availability) looked like show stoppers. However, in the section for TLS Inspection, I noticed this blurb, “Azure Firewall Premium terminates outbound and east-west TLS connections.” I reached out to some internal communities within Microsoft and confirmed that “at this time” Azure Firewall isn’t capable of performing TLS Inspection on traffic coming in the public interface. This limitation meant that I had to get the traffic received from the WAF over to the internal interface and the best way to do this was to intake it from the WAF through the Application Gateway. This would be the pattern I’d experiment with.
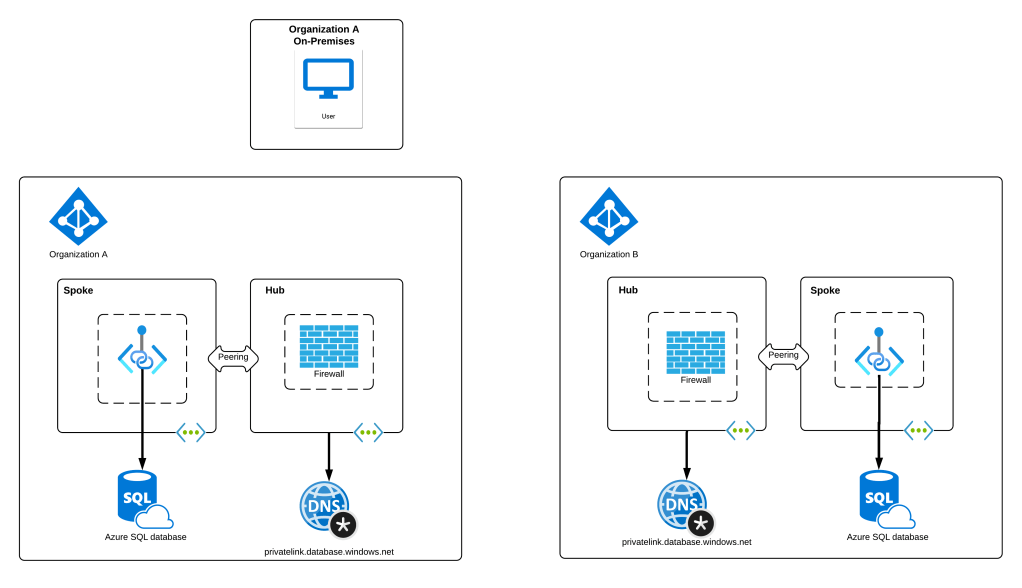
To keep things simple, I focused on a single region and didn’t include a WAF. Load balancing across regions could be done with the customer’s 3rd party WAF where the WAF would resolve to the appropriate regional Application Gateway v2 instance public IP depending on the load balancing pattern (such as geo-location) the customer was using. Once the traffic is received from the WAF, the Application Gateway terminates the TLS session so that it can inspect the URL and host headers and direct the traffic to the appropriate backend, which in this case was the single web server running IIS (Internet Information Services) in a peered spoke virtual network.
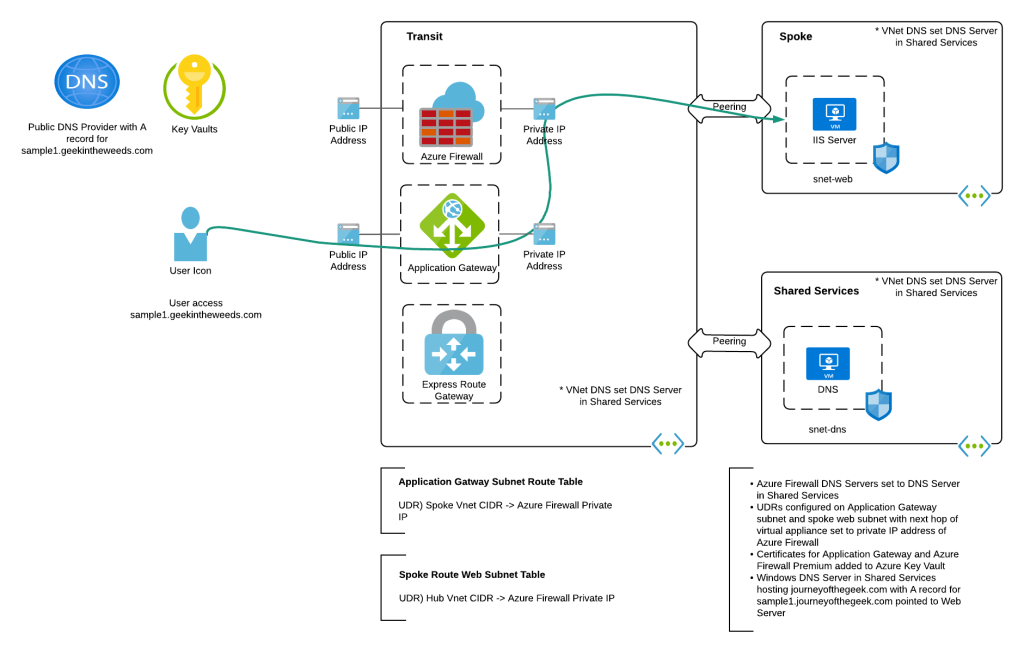
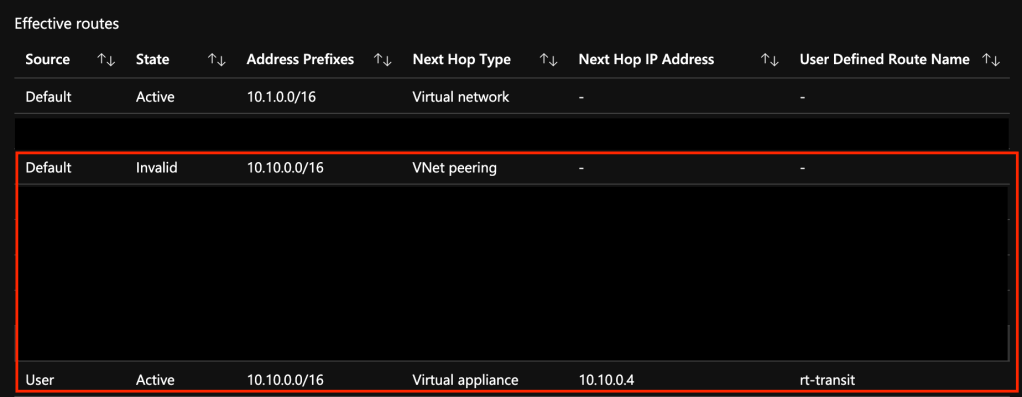
To ensure the traffic leaving the Application Gateway funnels through the Azure Firewall instance, I attached a route table to the Application Gateway. This route table was configured with BGP propagation disabled (to ensure a default route couldn’t be accidentally propagated in) and with a single UDR (user-defined route) which contained the spoke’s virtual network CIDR (Classless Inter-Domain Routing) block with a next hop of the Azure Firewall private IP address. Since UDRs take precedence over system routes, this route would invalidate the system route for the peering. On the web server subnet in the spoke I had a similar route table with a single UDR which contained the transit virtual network CIDR block with a next hop of the Azure Firewall private IP address. This ensured that any communication between the two would flow through the Azure Firewall.
To ensure DNS would resolve, I created an A record in public DNS for sample1.geekintheweeds.com pointing to the public IP address of the Application Gateway. Within Azure, I built a Windows server, installed the DNS service, and created a forward lookup zone for geekintheweeds.com with an A record named sample1 pointing to the web server. Within each virtual network I configured the Windows Server IP address in the DNS Server settings (note that if you do this after you provision Application Gateway, you’ll need to stop and start it). Within the Azure Firewall, I set it to use the server as its DNS server.

Now that the necessary plumbing was in place I needed to put in the appropriate certificates for the Application Gateway, Azure Firewall, and the Web Server. This is where this setup can get ugly. Since this was a lab, I generated all of my certificates from a private CA (certificate authority) I have running in my home lab. Since these CAs are only used for testing the CA issues all certificates without a CDP (certificate revocation distribution point) to keep things simple by avoiding requiring any of those network flows for revocation check lookups. In a production environment you’d want to issue the certificates for the Application Gateway from a trusted public CA so you don’t have to worry about CDPs/OCSP (online certificate status protocol) exposing the endpoints for these flows. For Azure Firewall and the web server you’d be fine using certificates issued by a private CA as long as you ensured appropriate validation endpoints were available.
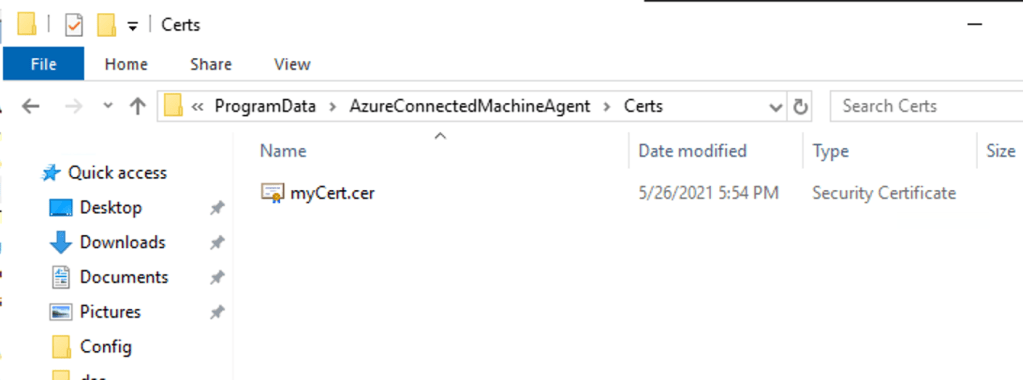
The Application Gateway and web server will use your standard web server certificate. The Azure Firewall is a different story. To support TLS Interception you’ll need to provide it with an intermediary certificate. This type of certificate allows Azure Firewall to generate certificates on the fly to impersonate the services it’s intercepting traffic for. This link explains the finer details of the requirements. Also note that the certificate needs to be imported to an instance of Key Vault which Azure Firewall accesses using a user-assigned managed identity.
Once the Application Gateway was configured in a similar manner as outlined here, I was good to test. Accessing the server from a machine running in my home lab successfully displayed the standard IIS website as hoped! When I viewed the Azure Firewall logs the full URL being accessed by the user was visible proving TLS inspection was working as expected. Success!

The patterns works but there are a number of considerations.
The biggest consideration being Azure Firewall Premium is still in public preview. Regardless of what you may hear from those within Microsoft or outside of Microsoft, DO NOT USE PUBLIC PREVIEW FEATURES IN PRODUCTION. I’d go as far as cautioning against even using them in planned designs. By the time these new products or features make it to GA, they can and often do change, sometimes for the better and sometimes for the worst. If you choose to use these products or features in an upcoming design, make sure to have a plan B if the product doesn’t hit GA or hits GA without the features you need. Remember that Microsoft’s targeted release dates are often moving targets that accelerate or decelerate depending on the feedback from public preview. Unless you have a contractual agreement with a vendor to deliver upon a specific date and there are real penalties to the vendor for not doing that, you should have a fully vetted and tested plan B ready to go.
Outside of my ranting about usage of public preview products and features, here are some other considerations with this pattern:
- Challenges with observability
- Operational overhead of certificate management
- Possible latency issues depending on latency requirements and traffic patterns
In this design the Application Gateway will be SNATing the traffic it receives from the Internet users. To understand the session end to end and correlate the logs from the WAF to the Application Gateway, through the Firewall, to the web server, you’ll need to ensure you’re capturing the x-forwarded-for header and using it to identify the user’s original source IP. This will definitely add complexity to the observability of the environment. Tack on the many mediation points, and identifying where traffic is getting rejected (WAF, App Gateway, firewall, NSG, local machine firewall) will require a strong logging and correlation system.
This pattern is going to require at least 3 separate certificates which will likely be a mix of certificates issued by both public CAs and private CAs. Certificate lifecycle management is a significantly challenging operational task and is often the cause of service outages. If you opt to use a pattern such as this, you’ll need to ensure your operational monitoring and alerting processes around certificate lifecycle management are solid. In addition, you will also need to manage revocation network flows. In a past life, these were the flows I observed that would often bite organizations.
Lastly, this pattern involves a lot of hops where the traffic is being decrypted and re-encrypted. This requires compute time which could add to latency. These latency issues could be impactful depending on the latency requirements of the application and what type and volume of data is flowing between the user and web server.
I have to admit I enjoyed labbing this on out. These days I usually spend a majority of my time in governance conversations focusing on people and process. Getting back into the technology and spending some time playing with the Azure Firewall Premium SKU and Application Gateway was a great learning experience. It will be interesting to see over time how well it will compete against the behemoths of the industry such as Palo Alto.
Over the next week I’ll be making some small tweaks to this design to see whether I can stick the Key Vault behind a Private Endpoint (documentation is unclear as to whether or not this is supported) and messing with the logs provided by both the Azure Firewall and Application Gateway to see how challenging correlation of sessions is.
I hope you have a great long weekend and see you next post!