Updates:
7/2025 – Updated to remove mentions of DNS query logging limitations with Private DNS Resolver due to introduction of DNS Security Policies
This is part of my series on DNS in Microsoft Azure.
- DNS in Microsoft Azure – Azure-provided DNS
- DNS in Microsoft Azure – Azure Private DNS
- DNS in Microsoft Azure – Azure Private DNS Resolver
- DNS in Microsoft Azure – PrivateLink Private Endpoints
- DNS in Microsoft Azure – PrivateLink Private Endpoints and Private DNS
- DNS in Microsoft Azure – Private DNS Fallback
- DNS in Microsoft Azure – DNS Security Policies
Hello again!
In this post I’ll be continuing my series on Azure Private Link and DNS with my 5th entry into the DNS series. In my last post I gave some background into Private Link, how it came to be, and what it offers. For this post I’ll be covering how the DNS integration works for Azure native PaaS services behind Private Link Private Endpoints.
Before we get into the details of how it all works let’s first look at the components that make up an Azure Private Endpoint created for an Azure native service that is integrated with Azure Private DNS. These components include (going from left to right):
- Virtual Network Interface – The virtual network interface (VNI) is deployed into the customer’s virtual network and reserves a private IP address that is used as the path to the Private Endpoint.
- Private Endpoint – The Azure resource that represents the private connectivity to the resource establishes the relationships to the other resources.
- Azure PaaS Service Instance – This could be a customer’s instance of an Azure SQL Server, blob endpoint for a storage account, and any other Microsoft PaaS that supports private endpoints. The key thing to understand is the Private Endpoint facilitates connectivity to a single instance of the service.
- Private DNS Zone Group – The Private DNS Zone Group resource establishes a relationship between the Private Endpoint and an Azure Private DNS Zone automating the lifecycle of the A record(s) registered within the zone. You may not be familiar with this resource if you’ve only used the Azure Portal.
- Azure Private DNS Zone – Each Azure PaaS service has a specific namespace or namespaces it uses for Private Endpoints.
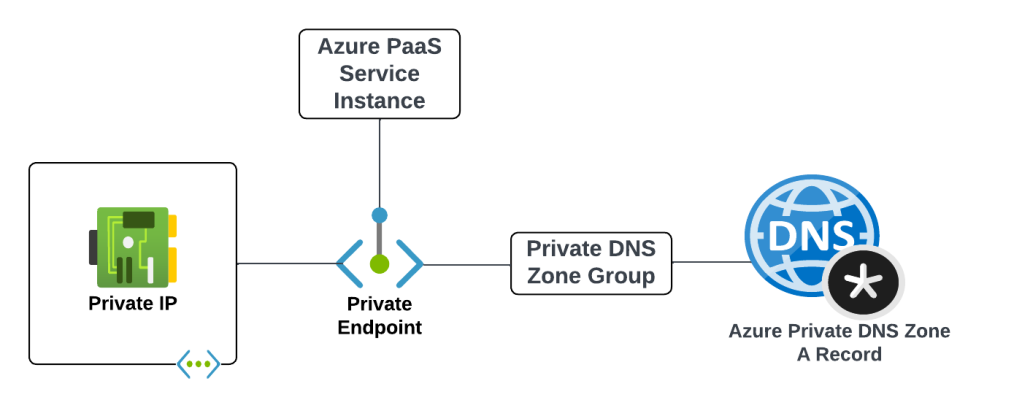
An example of the components involved with a Private Endpoint for the blob endpoint for an Azure Storage Account would be similar to what pictured below.

I’ll now walk through some scenarios to understand how these components work together.
Scenario 1 – Default DNS Pattern Without Private Link Endpoint with a single virtual network
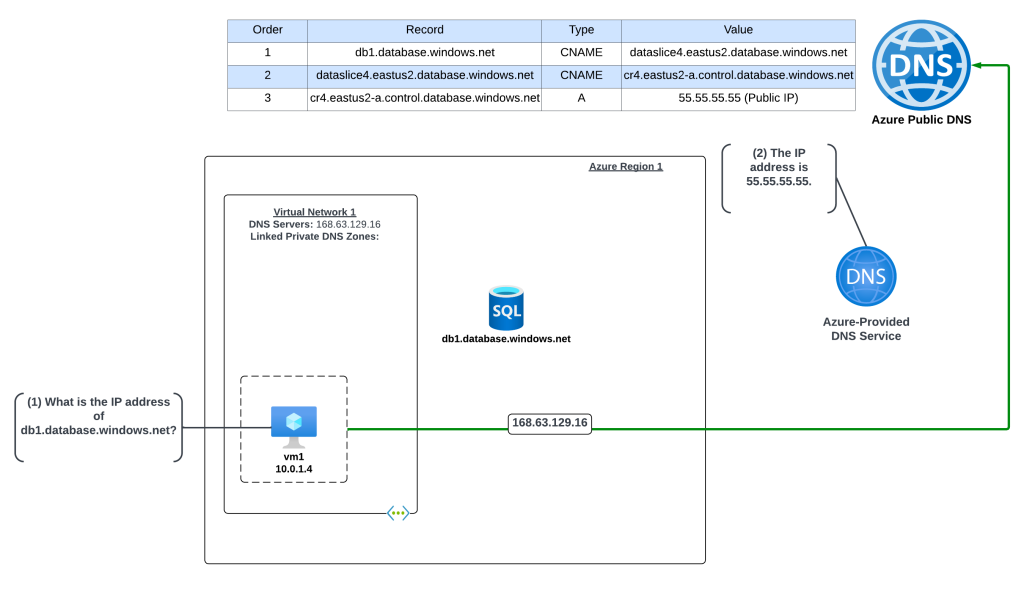
In this example an Azure virtual machine needs to resolve the name of an Azure SQL instance named db1.database.windows.net. No Private Endpoint has been configured for the Azure SQL instance and the VNet is configured to use the 168.63.129.16 virtual IP and Azure-provided DNS.
The query resolution is as follows:
- VM1 creates a DNS query for db1.database.windows.net. VM1 does not have a cached entry for it so the query is passed on to the DNS Server configured for the operating system. The virtual network DNS Server settings has be set to to the default of the virtual IP of 168.63.129.16 and pushed to the VNI by the Azure DHCP Service . The recursive query is sent to the virtual IP and passed on to the Azure-provided DNS service.
- The Azure-provided DNS services checks to see if there is an Azure Private DNS Zone named database.windows.net linked to the virtual network. Once it validates it does not, the recursive query is resolved against the public DNS namespace and the public IP 55.55.55.55 of the Azure SQL instance is returned.
Scenario 2 – DNS Pattern with Private Link Endpoint with a single virtual network

In this example an Azure virtual machine needs to resolve the name of an Azure SQL instance named db1.database.windows.net. A Private Endpoint has been configured for the Azure SQL instance and the VNet is configured to use the 168.63.129.16 virtual IP which will use Azure-provided DNS. An Azure Private DNS Zone named privatelink.database.windows.net has been created and linked to the machine’s virtual network. Notice that a new CNAME has been created in public DNS named db1.privatelink.database.windows.net.
The query resolution is as follows:
- VM1 creates a DNS query for db1.database.windows.net. VM1 does not have a cached entry for it so the query is passed on to the DNS Server configured for the operating system. The virtual network DNS Server settings has be set to to the default of the virtual IP of 168.63.129.16 and pushed to the VNI by the Azure DHCP Service . The recursive query is sent to the virtual IP and passed on to the Azure-provided DNS service.
- The Azure-provided DNS services checks to see if there is an Azure Private DNS Zone named database.windows.net linked to the virtual network. Once it validates it does not, the recursive query is resolved against the public DNS namespace. During resolution the CNAME of privatelink.database.windows.net is returned. The Azure-provided DNS service checks to see if there is an Azure Private DNS Zone named privatelink.database.windows.net linked to the virtual network and determines there is. The query is resolved to the private IP address of 10.0.2.4 of the Private Endpoint.
Scenario 2 Key Takeaway
The key takeaway from this scenario is the Azure-provided DNS service is able to resolve the query to the private IP address because the virtual network zone link is established between the virtual network and the Azure Private DNS Zone. The virtual network link MUST be created between the Azure Private DNS Zone and the virtual network where the query is passed to the 168.63.129.16 virtual IP. If that link does not exist, or the query hits the Azure-provided DNS service through another virtual network, the query will resolve to the public IP of the Azure PaaS instance.
Great, you understand the basics. Let’s apply that knowledge to enterprise scenarios.
Scenario 3 – Azure-to-Azure resolution of Azure Private Endpoints
First up I will cover resolution of Private Endpoints within Azure when it is one Azure service talking to another in a typical enterprise Azure environment with a centralized DNS service.
Scenario 3a- Azure-to-Azure resolution of Azure Private Endpoints with a customer-managed DNS service

First I will cover how to handle this resolution using a customer-managed DNS service running in Azure. Customers may choose to do this over the Private DNS Resolver pattern because they have an existing 3rd-party DNS service (InfoBlox, BlueCat, etc) they already have experience on.
In this scenario the Azure environment has a traditional hub and spoke where there is a transit network such as a VWAN Hub or a traditional virtual network with some type of network virtual appliance handling transitive routing. The customer-managed DNS service is deployed to a virtual network peered with the transit network. The customer-managed DNS service virtual network has a virtual network link to the Private DNS Zone for privatelink.database.windows.net namespace. An Azure SQL instance named db1.database.windows.net has been deployed with a Private Endpoint in a spoke virtual network. An Azure VM has been deployed to another spoke virtual network and the DNS server settings of the virtual network has been configured with the IP address of the customer-managed DNS service.
Here, the VM running in the spoke is resolving the IP address of the Azure SQL instance private endpoint.
The query resolution path is as follows:
- VM1 creates a DNS query for db1.database.windows.net. VM1 does not have a cached entry for it so the query is passed on to the DNS Server configured for the operating system. The virtual network DNS Server settings has be set to 10.1.0.4 which is the IP address of the customer-managed DNS service and pushed to the virtual network interface by the Azure DHCP Service . The recursive query is passed to the customer-managed DNS service over the virtual network peerings.
- The customer-managed DNS service receives the query, validates it does not have a cached entry and that it is not authoritative for the database.windows.net namepsace. It then forwards the query to its standard forwarder which has been configured to the be the 168.63.129.16 virtual IP address for the virtual network in order to pass the query to the Azure-provided DNS service.
- The Azure-provided DNS services checks to see if there is an Azure Private DNS Zone named database.windows.net linked to the virtual network. Once it validates it does not, the recursive query is resolved against the public DNS namespace. During resolution the CNAME of privatelink.database.windows.net is returned. The Azure-provided DNS service checks to see if there is an Azure Private DNS Zone named privatelink.database.windows.net linked to the virtual network and determines there is. The query is resolved to the private IP address of 10.0.2.4 of the Private Endpoint.
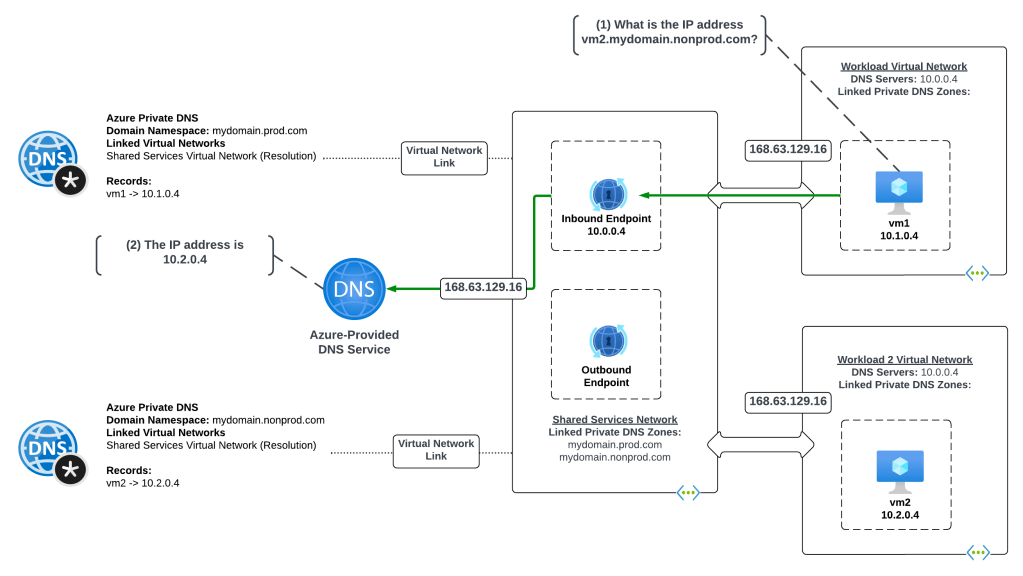
Scenario 3b – Azure-to-Azure resolution of Azure Private Endpoints with the Azure Private DNS Resolver

In this scenario the Azure environment has a traditional hub and spoke where there is a transit network such as a VWAN Hub or a traditional virtual network with some type of network virtual appliance handling transitive routing. An Azure Private DNS Resolver inbound and outbound endpoint has been deployed into a shared services virtual network that is peered with the transit network. The shared services virtual network has a virtual network link to the Private DNS Zone for privatelink.database.windows.net namespace. An Azure SQL instance named db1.database.windows.net has been deployed with a Private Endpoint in a spoke virtual network. An Azure VM has been deployed to another spoke virtual network and the DNS server settings of the virtual network has been configured with the IP address of the Azure Private DNS Resolver inbound endpoint IP.
Here, the VM running in the spoke is resolving the IP address of the Azure SQL instance private endpoint.
- VM1 creates a DNS query for db1.database.windows.net. VM1 does not have a cached entry for it so the query is passed on to the DNS Server configured for the operating system. The virtual network DNS Server settings has be set to 10.1.0.4 which is the IP address of the Azure Private DNS Resolver Inbound Endpoint IP and pushed to the virtual network interface by the Azure DHCP Service . The recursive query is passed to the Azure Private DNS Resolver Inbound Endpoint via the virtual network peerings.
- The inbound endpoint receives the query and passes it into the virtual network through the outbound endpoint which passes it on to the Azure-provided DNS service through the 168.63.129.16 virtual IP.
- The Azure-provided DNS services checks to see if there is an Azure Private DNS Zone named database.windows.net linked to the virtual network. Once it validates it does not, the recursive query is resolved against the public DNS namespace. During resolution the CNAME of privatelink.database.windows.net is returned. The Azure-provided DNS service checks to see if there is an Azure Private DNS Zone named privatelink.database.windows.net linked to the virtual network and determines there is. The query is resolved to the private IP address of 10.0.2.4 of the Private Endpoint.
Scenario 3 Key Takeaways
- When using the Azure Private DNS Resolver, there are a number of architectural patterns for both the centralized model outlined here and a distributed model. You can reference this post for those details.
- It’s not necessary to link the Azure Private DNS Zone to each spoke virtual network as long as you have configured the DNS Server settings of the virtual network to the IP address of your centralized DNS service which should be running in a virtual network which has virtual network links to all of the Azure Private DNS Zones used for PrivateLink.
Scenario 4 – On-premises resolution of Azure Private Endpoints
Let’s now take a look at DNS resolution of Azure Private Endpoints from on-premises machines. As I’ve covered in past posts Azure Private DNS Zones are only resolvable using the Azure-provided DNS service which is only accessible through the 168.63.129.16 virtual IP which is not reachable outside the virtual network. To solve this challenge you will need an endpoint within Azure to proxy the DNS queries to the Azure-provided DNS service and connectivity from-premises into Azure using Azure ExpressRoute or a VPN.
Today you have two options for the DNS proxy which include bringing your own DNS service or using the Azure Private DNS Resolver. I’ll cover both for this scenario.
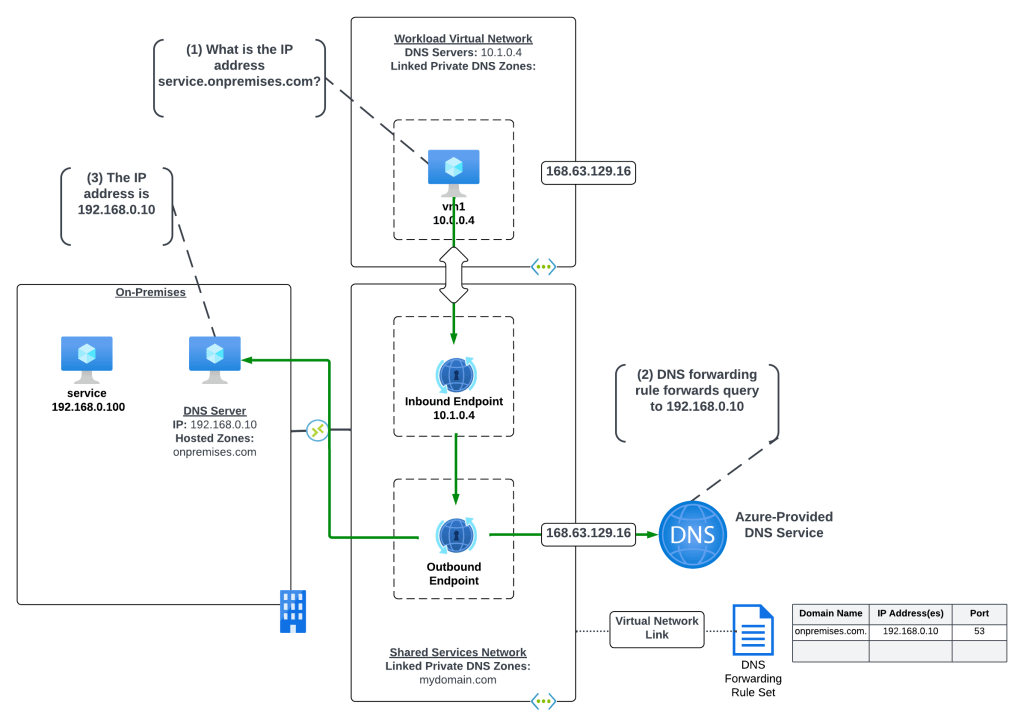
Scenario 4a – On-premises resolution of Azure Private Endpoints using a customer-managed DNS Service
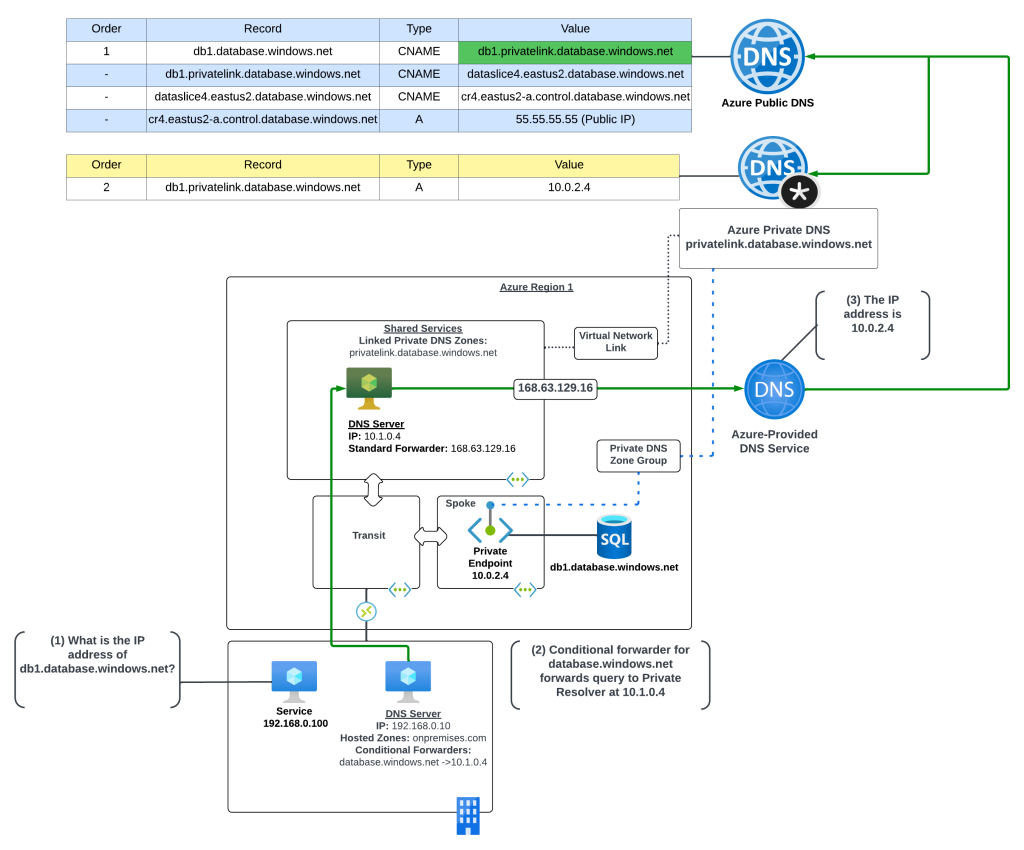
In this scenario the Azure environment has a traditional hub and spoke where there is a transit network such as a VWAN Hub or a traditional virtual network with some type of network virtual appliance handling transitive routing. The customer-managed DNS service is deployed to a virtual network peered with the transit network. The customer-managed DNS service virtual network has a virtual network link to the Private DNS Zone for privatelink.database.windows.net namespace. An Azure SQL instance named db1.database.windows.net has been deployed with a Private Endpoint in a spoke virtual network.
An on-premises environment is connected to Azure using an ExpressRoute or VPN. The on-premises DNS service has been configured with a conditional forwarder for database.windows.net which points to the customer-managed DNS service running in Azure.
The query resolution path is as follows:
- The on-premises machine creates a DNS query for db1.database.windows.net. After validating it does not have a cached entry it sends the DNS query to the on-premises DNS server which is configured as its DNS server.
- The on-premises DNS server receives the query, validates it does not have a cached entry and that it is not authoritative for the database.windows.net namespace. It determines it has a conditional forwarder for database.windows.net pointing to 10.1.0.4 which is the IP address of the customer-managed DNS service running in Azure. The query is recursively passed on to the customer-managed DNS service via the ExpressRoute or Site-to-Site VPN connection
- The customer-managed DNS service receives the query, validates it does not have a cached entry and that it is not authoritative for the database.windows.net namepsace. It then forwards the query to its standard forwarder which has been configured to the be the 168.63.129.16 virtual IP address for the virtual network in order to pass the query to the Azure-provided DNS service.
- The Azure-provided DNS services checks to see if there is an Azure Private DNS Zone named database.windows.net linked to the virtual network. Once it validates it does not, the recursive query is resolved against the public DNS namespace. During resolution the CNAME of privatelink.database.windows.net is returned. The Azure-provided DNS service checks to see if there is an Azure Private DNS Zone named privatelink.database.windows.net linked to the virtual network and determines there is. The query is resolved to the private IP address of 10.0.2.4 of the Private Endpoint.
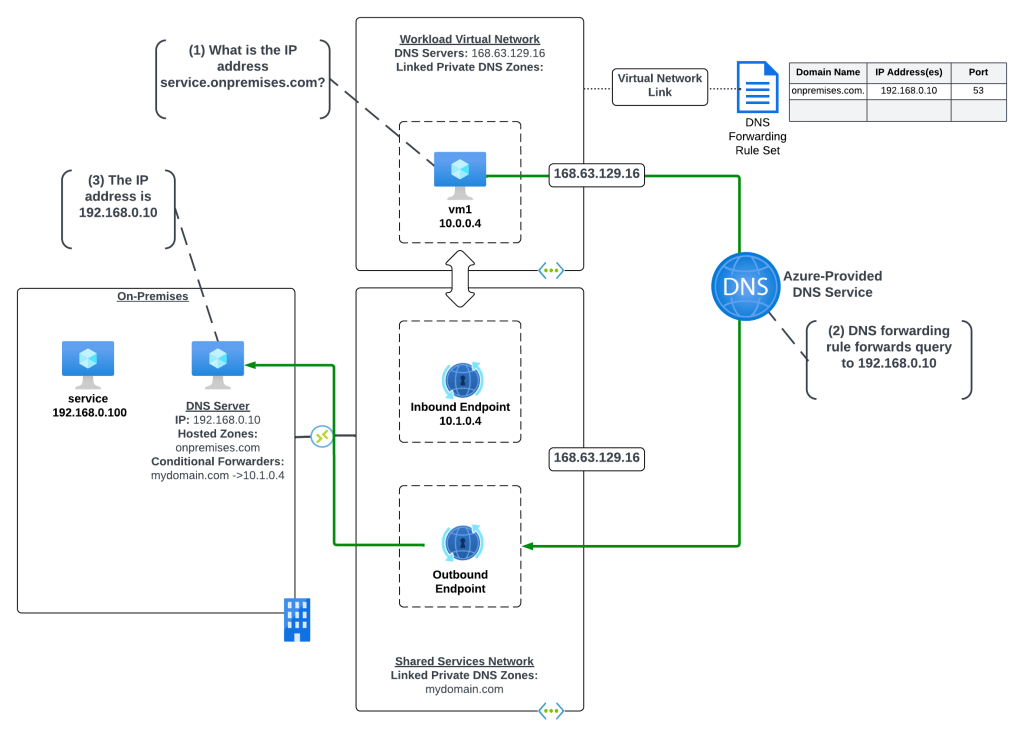
Scenario 4b – On-premises resolution of Azure Private Endpoints using Azure Private DNS Resolver

Now let me cover this pattern when using the Azure Private DNS Resolver. I’m going to assume you have some basic knowledge of how the Azure Private DNS Resolver works and I’m going to focus on the centralized model. If you don’t have baseline knowledge of the Azure Private DNS Resolver or you’re interested in the distributed mode and the pluses and minuses of it, you can reference this post.
In this scenario the Azure environment has a traditional hub and spoke where there is a transit network such as a VWAN Hub or a traditional virtual network with some type of network virtual appliance handling transitive routing. The Private DNS Resolver is deployed to a virtual network peered with the transit network. The Private DNS Resolver virtual network has a virtual network link to the Private DNS Zone for privatelink.database.windows.net namespace. An Azure SQL instance named db1.database.windows.net has been deployed with a Private Endpoint in a spoke virtual network.
An on-premises environment is connected to Azure using an ExpressRoute or VPN. The on-premises DNS service has been configured with a conditional forwarder for database.windows.net which points to the Private DNS Resolver inbound endpoint.
The query resolution path is as follows:
- The on-premises machine creates a DNS query for db1.database.windows.net. After validating it does not have a cached entry it sends the DNS query to the on-premises DNS server which is configured as its DNS server.
- The on-premises DNS server receives the query, validates it does not have a cached entry and that it is not authoritative for the database.windows.net namespace. It determines it has a conditional forwarder for database.windows.net pointing to 10.1.0.4 which is the IP address of the inbound endpoint for the Azure Private DNS Resolver running in Azure. The query is recursively passed on to the inbound endpoint over the ExpressRoute or Site-to-Site VPN connection
- The inbound endpoint receives the query and passes it into the virtual network through the outbound endpoint which passes it on to the Azure-provided DNS service through the 168.63.129.16 virtual IP.
- The Azure-provided DNS services checks to see if there is an Azure Private DNS Zone named database.windows.net linked to the virtual network. Once it validates it does not, the recursive query is resolved against the public DNS namespace. During resolution the CNAME of privatelink.database.windows.net is returned. The Azure-provided DNS service checks to see if there is an Azure Private DNS Zone named privatelink.database.windows.net linked to the virtual network and determines there is. The query is resolved to the private IP address of 10.0.2.4 of the Private Endpoint.
Scenario 4 Key Takeaways
The key takeaways from this scenario are:
- You must setup a conditional forwarder on the on-premises DNS server for the PUBLIC namespace of the service. While using the privatelink namespace may work with your specific DNS service based on how the vendor has implemented, Microsoft recommends using the public namespace.
- Understand the risk you’re accepting with this setup. All DNS resolution for the public namespace will now be sent up to the Azure Private DNS Resolver or customer-managed DNS service. If your connectivity to Azure goes down, or those DNS components are unavailable, your on-premises endpoints may start having failures accessing websites that are using Azure services (think images being pulled from an Azure storage account).
- If your on-premises DNS servers use non-RFC1918 address space, you will not be able to use scenario 3b. The Azure Private DNS Resolver inbound endpoint DOES NOT support traffic received from non-RFC1918 address space.
Other Gotchas
Throughout these scenarios you have likely observed me using the public namespace when referencing the resources behind a Private Endpoint (example: using db1.database.windows.net versus using db1.privatelink.database.windows.net). The reason for doing this is because the certificates for Azure PaaS services does not include the privatelink namespace in the certificate provisioned to the instance of the service. There are exceptions for this, but they are few and far between. You should always use the public namespace when referencing a Private Endpoint unless the documentation specifically tells you not to.
Let me take a moment to demonstrate what occurs when an application tries to access a service behind a Private Endpoint using the PrivateLink namespace. In this scenario there is a virtual machine which has been configured with proper resolution to resolve Private Endpoints to the appropriate Azure Private DNS Zone.

Now I’ll attempt to make an HTTPS connection to the Azure Key Vault instance using the PrivateLink namespace of privatelink.vaultcore.azure.net. In the image below you can see the error returned states the PrivateLink namespace is not included in the subject alternate name field of the certificate presented by the Azure Key Vault instance. What this means is the client can’t verify the identity of the server because the identities presented in the certificate doesn’t match the identity that was requested. You’ll often see this error as a certificate name mismatch in most browsers or SDKs.

Final Thoughts
There are some key takeaways for you with this post:
- Know your DNS resolution path. This is absolutely critical when troubleshooting Private Endpoint DNS resolution.
- Always check your zone links. 99% of the time you’re going to be used the centralized model for DNS described in this post. After you verify your DNS resolution path, validate that you’ve linked the Private DNS Zone to your DNS Server / Azure Private DNS Resolver virtual network.
- Create your on-premises conditional forwarders for the PUBLIC namespaces for Azure PaaS services, not the Private Link namespace.
- Call your services behind Private Endpoints using the public hostname not the Private Link hostname. Using the Private Link hostname will result in certificate mismatches when trying to establish secure sessions.
- Don’t go and link your Private DNS Zone to every single virtual network. You don’t need to do this if you’re using the centralized model. There are very rare instances where the zone must be linked to the virtual network for some deployment check the product group has instituted, but that is rare.
- Centralize your Azure Private DNS Zones in a single subscription and use a single zone for each PrivateLink service across your environments (prod, non-prod, test, etc). If you try to do different zones for different environments you’re going to run into challenges when providing on-premises resolution to those zones because you now have two authorities for the same namespace.
Before I close out I want to plug a few other blog posts I’ve assembled for Private Endpoints which are helpful in understanding the interesting way they work.
- This post walks through the interesting routes Private Endpoints inject in subnet route tables. This one is important if you have a requirement to inspect traffic headed toward a service behind a Private Endpoint.
- This post covers how Network Security Groups work with Private Endpoints and some of the routing improvements that were recently released to help with inspection requirements around Private Endpoints.
Thanks!