This is part of my series on GenAI Services in Azure:
- Azure OpenAI Service – Infra and Security Stuff
- Azure OpenAI Service – Authentication
- Azure OpenAI Service – Authorization
- Azure OpenAI Service – Logging
- Azure OpenAI Service – Azure API Management and Entra ID
- Azure OpenAI Service – Granular Chargebacks
- Azure OpenAI Service – Load Balancing
- Azure OpenAI Service – Blocking API Key Access
- Azure OpenAI Service – Securing Azure OpenAI Studio
- Azure OpenAI Service – Challenge of Logging Streaming ChatCompletions
- Azure OpenAI Service – How To Get Insights By Collecting Logging Data
- Azure OpenAI Service – How To Handle Rate Limiting
- Azure OpenAI Service – Tracking Token Usage with APIM
- Azure AI Studio – Chat Playground and APIM
- Azure OpenAI Service – Streaming ChatCompletions and Token Consumption Tracking
- Azure OpenAI Service – Load Testing
Updates:
- 11/23/2023 Take note that the APIM policy mentioned in this post will not work when performing streaming completions. Take a look at my recent post on your options for handling streaming completions.
Yes folks, it’s time for yet another Azure OpenAI Service post. This time around I’m going to cover a pattern that can help with operationalizing the service by collecting and analyzing logging data for proper internal chargebacks to the many business units you likely have requesting the service. You’ll want to put on your nerd hat today because we’re going to need to dive a bit in the weeds for this one.
Let me first address why this post is even necessary. The capabilities provided by the AOAI (Azure OpenAI Service) have the feel of a core foundational technology, almost feeling as necessary as basic networking and PKI (public key infrastructure). The service has usages in almost every portion of the business and, very likely, every business unit is asking you for AI at this point.
Beyond the business demand, the architecture of the Azure OpenAI Service lends itself well to being centralized. Each instance offers the same set of static models and the data sent to and returned from the models is ephemeral. Unless you are creating fine-tuned models (which should be a very small percentage of customers), there isn’t any data stored by the service. Yes, there is default storage and human review of prompts and completions for abuse, but customers can opt out of this process. Additionally, as of the date of this blog, customers do not have access to those stored prompts and completions anyway so the risk of one compromise of those 30-days of stored prompts and completions due to a failed customer control doesn’t exist. Don’t get me wrong, there are legitimate reasons to create business unit specific instances for the service for edge use cases such as the creation of fine-tuned models. There are also good arguments to be made to create specific instances for compliance boundaries and separating production from non-production. However, you should be looking at consolidating instances where possible and providing it as a centralized core service.
Now if you go down the route I suggested above, you’ll run into a few challenges. Two of most significant challenges are throttling limits per instance and chargebacks. Addressing the throttling problem isn’t terribly difficult if you’re using the APIM (Azure API Management) pattern I mentioned in my last post. You can enforce specific limits on a per application basis when using Azure AD authentication at APIM on the frontend and you can use a very basic round robin-like load balancing APIM policy at the backend to scale across multiple Azure OpenAI Service instances. The chargeback problem is a bit more difficult to solve and that’s what I’ll be covering in the rest of the post.
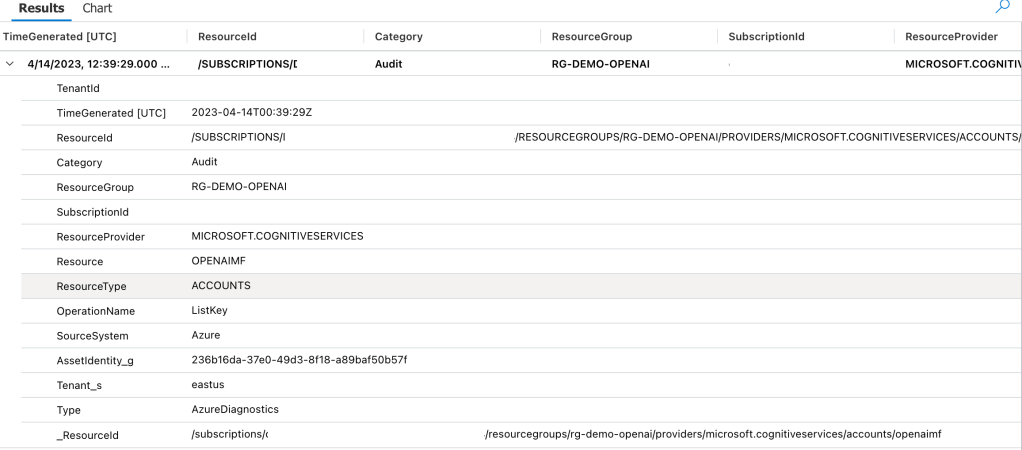
The AOAI Service uses a consumption model for pricing which means the more you consume, the more you pay. If you opt to centralize the service, you’re going to need a way to know which app is consuming which amount of tokens. As I covered in my logging post, the native logging capabilities of the AOAI service are lacking as of the date of this blog post. The logs don’t include details as to who made a call (beyond an obfuscated IP address) or the number of tokens consumed by a specific call. Without this information you won’t be able to determine chargebacks. You should incorporate some of this logging directly into the application calling the AOAI service, but that logging will likely be application centric where the intention is to trace a specific call back to an individual user. For a centralized service, you’re likely more interested in handling chargebacks at the enterprise level and want to be able to associate specific token consumption back to a specific business unit’s application.
I took some time this week and thought about how this might be able to be done. The architecture below is what I came up with:

APIM and APIM custom policies are the key components of this architecture that make chargebacks possible. It is used to accomplish two goals:
- Enforce Azure AD Authentication and Authorization to the AOAI endpoint.
- Provide detailed logging of the request and response sent to the service.
Enforcing Azure AD authentication and authorization gives me the calling application’s service principal or managed identity identifier which allows me to correlate the application back to a specific business unit. If you want the details on that piece you can check out my last post. I’ve also pushed the custom APIM policy snippet to GitHub if you’d like to try it yourself.
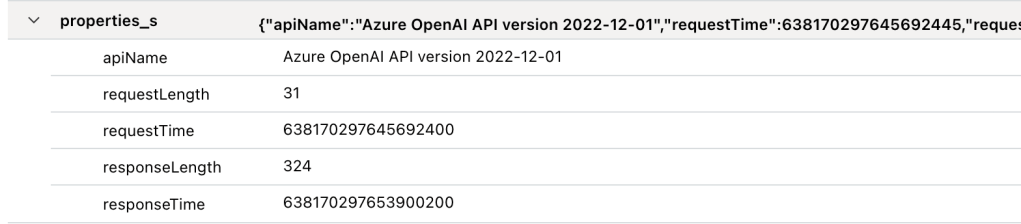
The second goal is again accomplished through a custom APIM policy. Since APIM sits in the middle of the conversation it gets access to both the request from the application to the AOAI service and the response back. Within the response from a Completion or ChatCompletion the API returns the number of prompt, completion, and total tokens consumed by a specific request as can be seen below.
{
  "choices": [
    {
      "finish_reason": "stop",
      "index": 0,
      "message": {
        "content": "This is a test message.",
        "role": "assistant"
      }
    }
  ],
  "created": 1684425128,
  "id": "chatcmpl-7HaDAS0JUZKcAt2ch2GC2tOJhrG2Q",
  "model": "gpt-35-turbo",
  "object": "chat.completion",
  "usage": {
    "completion_tokens": 6,
    "prompt_tokens": 14,
    "total_tokens": 20
  }
}
Awesome, the information we need is there but how do we log it? For that, you can use an APIM Logger. An APIM Logger is an integration with a specific instance of Azure Application Insights or Azure Event Hub. The integration allows you to specify the logger in an APIM policy and send specific data to that integrated service. For the purposes of this integration I choose the Azure Event Hub. The reason being I wanted to allow logging large events (the integration supports up to 200KB messages) in case I wanted to capture the prompt or completion and I wanted the flexibility to integrate with an upstream service for ETL (extract, transform, load).
Setting the up the logger isn’t super intuitive if you want to use a managed identity for APIM to authenticate to the Azure Event Hub. Once the logger is created, you can begin calling it in the APIM policy. Below is an example of the APIM policy I used to parse the request and response and extract the information I was interested in.
        <log-to-eventhub logger-id="chargeback" partition-id="1">@{
                var responseBody = context.Response.Body?.As<JObject>(true);
                return new JObject(
                    new JProperty("event-time", DateTime.UtcNow.ToString()),
                    new JProperty("appid", context.Request.Headers.GetValueOrDefault("Authorization",string.Empty).Split(' ').Last().AsJwt().Claims.GetValueOrDefault("appid", string.Empty)),
                    new JProperty("operation", responseBody["object"].ToString()),
                    new JProperty("model", responseBody["model"].ToString()),
                    new JProperty("modeltime", context.Response.Headers.GetValueOrDefault("Openai-Processing-Ms",string.Empty)),
                    new JProperty("completion_tokens", responseBody["usage"]["completion_tokens"].ToString()),
                    new JProperty("prompt_tokens", responseBody["usage"]["prompt_tokens"].ToString()),
                    new JProperty("total_tokens", responseBody["usage"]["total_tokens"].ToString())
                ).ToString();
        }</log-to-eventhub>
In the policy above I’m extracting the application’s client id from the access token generated by Azure Active Directory for access to the Azure OpenAI Service. Recall that I have the other policy snippet in place I mentioned earlier in this post in place to force the application to authenticate and authorize using Azure AD. I then grab the pieces of information from the response that I would find useful in understanding the costs of the service and each app’s behavior within the AOAI service.
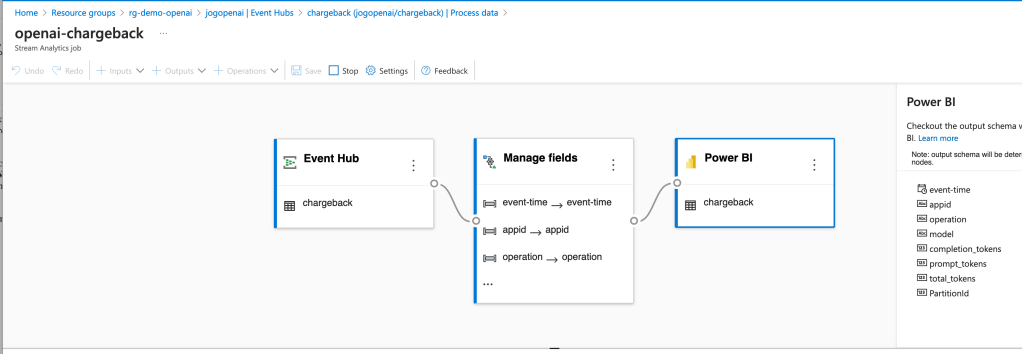
Now that the logs are being streamed to the Event Hub, you need something to pick them up. You have a lot of options in this space. You could use Azure Data Factory, custom function, Logic App, SIEM like Splunk, and many others. What you choose to do here really depends on where you want to put the data and what you want to do with it prior to putting it there. To keep it simple for this proof-of-concept, I chose the built-in Azure Stream Analytics integration with Event Hub.
The integration creates a Stream Analytics Job that connects to the Event Hub, does small amount of transformation in setting the types for specific fields, and loads the data into a PowerBI dataset.
Once the integration was setup, the requests and responses I was making to the AOAI services began to populate in the Power BI dataset. I was then able to build some really basic (and very ugly) visuals to demonstrate the insights this pattern provides for chargebacks. Each graphic shows the costs accumulated by individual applications by their application id.

Pretty cool right? Simple, easy to implement, and decent information to work from.
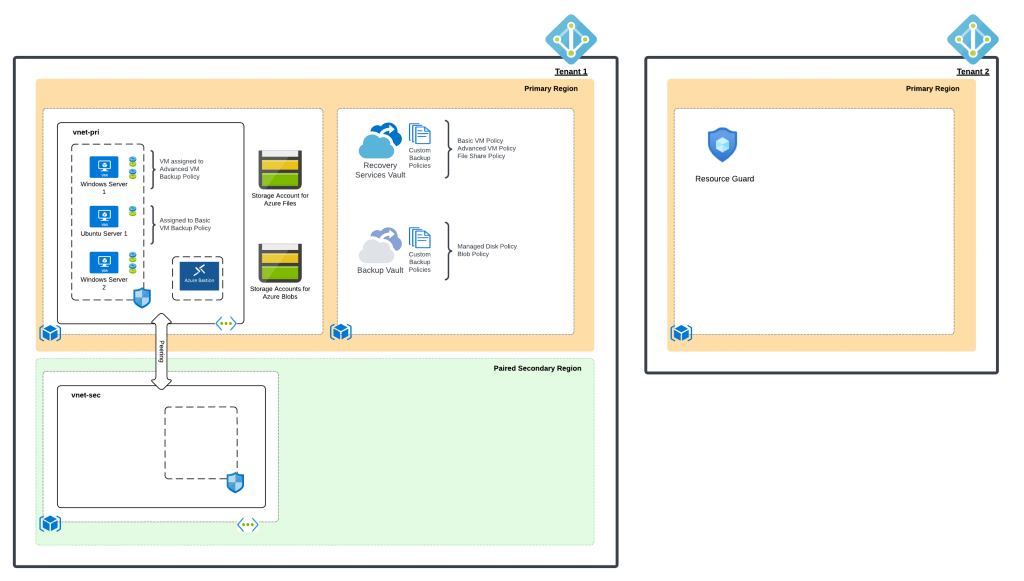
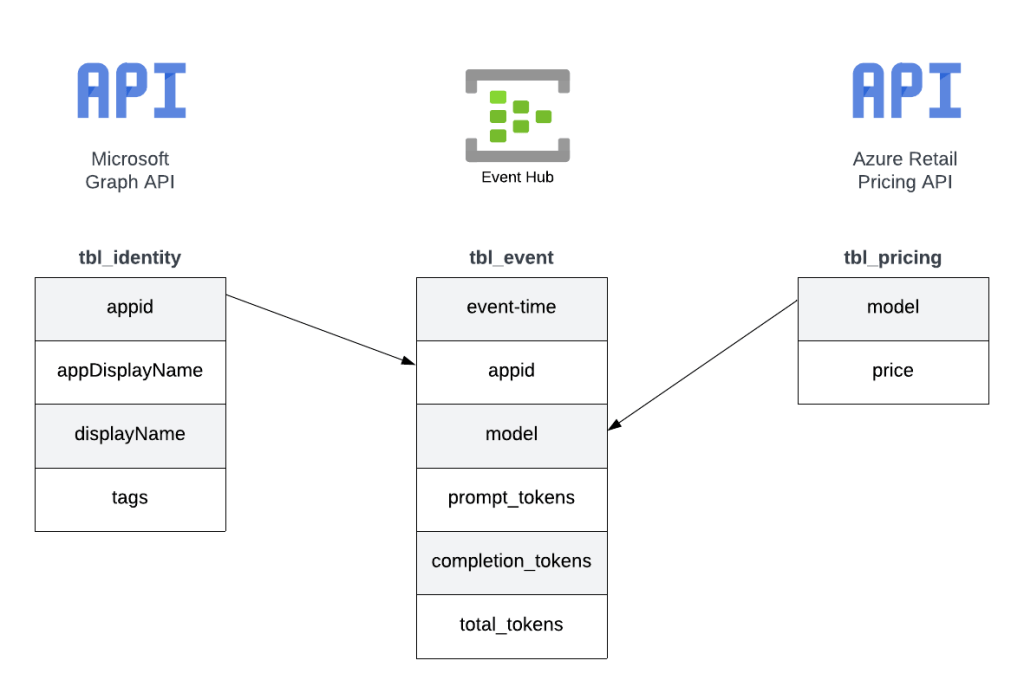
Since this was a POC, I cut some corners on the reporting piece. For example, I hardcoded the model pricing into some custom columns. If I were to do this at the enterprise level, I’d be supplementing this information from data pulled from the Microsoft Graph and the Azure Retail Pricing REST API. From the Microsoft Graph I’d pull additional attributes about the service principal / managed identity such as a more human readable name. From the Azure Retail Pricing REST API I’d pull down the most recent prices on a per model basis. I’d also likely store this data inside something like Cosmos or Azure SQL to provide for more functionality. From a data model perspective, I’d envision a “enterprise-ready” data model version of the pattern looking like the below.
The key challenge I set out to address here was how to get the data necessary to do chargebacks and what could I do with that data once I got it. Mission accomplished!
Well folks, that covers it. I’d love to see someone looking for a side project with more data skills than me (likely any human being breathing air today) build out the more “full featured” solution using a similar data model to what I referenced above. I hope this pattern helps point your organization in the right direction and spurs some ideas as to how you could solve the ETL and analysis part within your implementation of this pattern.
I’m always interested in hearing about cool solutions. If you come up with something neat, please let me know in the comments or each out on LinkedIn.
Have a great week!