Integrating Azure AD and AWS – Part 3

Update: In November 2019 AWS introduced support for integration between Azure AD and AWS SSO.  The integration offers a ton more features, including out of the box support for multiple AWS accounts.  I highly recommend you go that route if you’re looking to integrate the two platforms.  Check out my series on the new integration here.

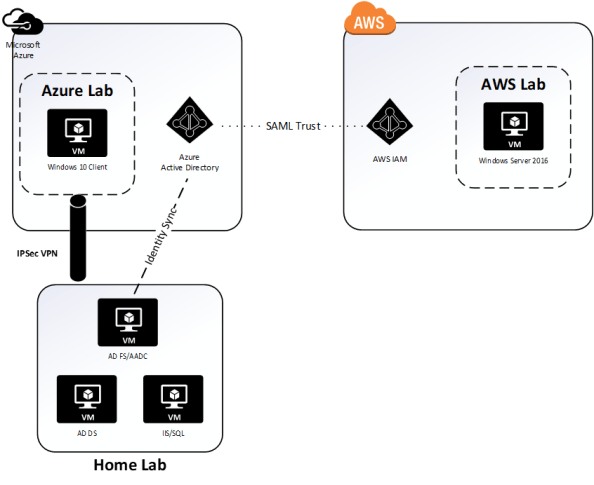
Welcome!  This entry continues my series in the integration of Azure AD and AWS.  In my first entry I covered what the advantages of the integration are.  In the second entry I walked through my lab configuration and went over what happens behind the scenes when an application is added to Azure AD from the application gallery.  In this post I’m going to walk through some of the configuration we need to do in both Azure AD and AWS.  I’ll also be breaking open the Azure AD and AWS metadata and examining the default assertion sent by Microsoft out of the box.

In my last entry I  added the AWS application to my Azure AD tenant from the Azure AD Application Gallery.  The application is now shown as added in the All Applications view of the Azure Active Directory blade for my tenant.

pic1.png

After selecting AWS from the listing of applications I’m presented with a variety of configuration options.  Starting with Properties we’re provided with some general information and configuration options.  We need to ensure that the application is enabled for users to sign-in and that it’s visible to users so we can select it from the access panel later on.  Notice also that that I’m configuring the application to require the user be assigned to the application.pic2

On the Users and groups page I’ve assigned Rick Sanchez to the application to allow the account access and display it on the access panel.

pic3

After waiting about 10 minutes (there is a delay in the time it takes for the application to appear in the application panel) I log into the Access Panel as Rick Sanchez and we can see that the AWS app has been added for Rick Sanchez.

pic4

Back to the properties page of the AWS application, my next stop is the Single sign-on page. Here I drop down the Single Sign-on Mode drop box and select SAML-based Sign-on option. Changing the mode to SAML-based Sign-on exposes a ton of options. The first option that caught my eye was the Amazon Web Services (AWS) Domain and URLs. Take notice of the note that says Amazon Web Services (AWS) is pre-integrated with Azure AD and requires no mandatory URL settings. Yeah, not exactly true as we progress through this series.

pic5.png

Further down we see the section that allows us to configure the unique user identifier and additional attributes.   By default Microsoft includes the name, givenName, surName, and emailAddress claims.  I’ll need to make some changes there to pass the claims Amazon requires, but let’s hold off on that for now.

pic6.png

Next up a copy of the Azure AD metadata (IdP metadata) is provided for download.  Additionally some advanced options are available which provide the capability to sign the SAML response, assertion, or both as well as switching the hash algorithm between SHA1 and SHA256.

pic7.png

Now like any nerd, I want to poke around the IdP metadata and see what the certificate Azure AD is using to sign looks like.  Opening up the metadata in a web browser parses the XML and makes the format look pretty.  From there I grab the contents X509Certificate tag (the base-64 encoded public-key certificate), dump it to Notepad, and renam it with a file extension of cer.  Low and behold, what do we see but a self-signed certificate.  This is a case where I can see the logic that the operational overhead is far greater than the potential security risk.  I mean really, does anyone want to deal with the challenge of hundreds of thousands of customers not understanding the basics of public key infrastructure and worrying about revocation, trust chains, and the like?  You get a pass Microsoft… This time anyway.

pic8.png

Before I proceed with the next step in the configuration, let’s take a look at what the assertion looks like without any of the necessary configuration.  For this I’ll use Fiddler to act as a man-in-the-middle between the client and the web.  In session 6 of the screenshot below we see that the SAML response was returned to the web browser from Azure.

pic9.png

Next up we extract that information with the Text Wizard, base-64 decode it, copy it to Notepad, save it as an XML file, and open it with IE.  The attributes containing values of interest are as follows:

  • Destination – The destination is the service provider assertion consumer URI

pic10.png

  • NameID – This is the unique identifier of the used by the service provider to identify the user accessing the service

pic11.png

  • Recipient– The recipient attribute references the service the assertion is intended for.  Oasis security best practices for SAML require the service provider to verify this attribute match the URI for the service provider assertion consumer URI

pic12.png

  • Audience – The audience attribute in the audienceRestriction section mitigates the threat of the assertion being stolen and used to impersonate a user.  Oasis security best practices require the service provider to verify this when the assertion is received to ensure it is recognizes the identifier.  The way in which this is accomplished is the value in the audience attribute is checked against the service provider EntityID attribute.

pic13.png

Additionally we have some interesting claims including tenantid, objectidentifier of the user object in Azure AD, name, surname, givenname, displayname, identityprovider, and authnmethosreferences.  I don’t think any of these need further explanation.

pic14.png

Let’s now take a look at the AWS (service provider in SAML terms) metadata.  The AWS metadata is available for download from here.  After it’s downloaded it can be opened with IE.

pic15.png

The fields of interest in this set of metadata is:

  • EntityID – The entityID is the unique identifier AWS will provide in its authentication requests.  Let’s note the value of urn:amazon:webservices for later as it will come in handy due to some issues with Microsoft’s default settings.

pic16

  • NameIDFormat – This tells me both transient and persistent are accepted.  I won’t go into details on Name ID format, you can review that for yourself in the Oasis standard.  Suffice to say the Name ID format required by the service provider can throw some wrenches into integrations when using a more basic security token service (STS) like AD FS.

pic17

  • AssertionConsumerService – This is where our browser will post back the SAML assertion after a successful authentication.  Note the URI in the location field.

pic18.png

  • RequestedAttributes – This provides us with a listing of all the attributes AWS will accept in an assertion.  Note that the only two required attributes are Role and RoleSessionName.

We’ve added the AWS application to Azure AD, granted a user access to the application, and have started the SAML setup within Azure AD (Identity Provider).  Let’s continue that setup by configuring which attributes Azure AD will include in the assertions delivered to AWS.  From review of the AWS metadata we know that we need to  send claims of Role and RoleSessionName.  The RoleE will match to an an AWS IAM Role handling authorization of what we can do within AWS and the RoleSessionName provides a unique identifier for the user asserting the entitlement.

Back in the Azure AD Portal I’m going to click the option to View and edit all other user attributes.  The exposes the attributes Microsoft sends by default.  These include givenName, suName, emailAddress, and name.  Since the AWS metadata only requires RoleSessionName and Role, I’m going to delete the other attributes.  No sense in exposing additional information that isn’t needed!

pic19.png

After the extra attributes are deleted I create the two required attributes as seen in the screenshot below.

pic20.png

I’m now going to bounce over to the AWS Management Console.  After logging in I navigate to the Services menu and choose IAM.

pic21.png

On the IAM menu I choose the Identity providers menu item and hit the Create Provider button.

pic22.png

On the next screen I’m required to configure the identity provider settings.  I choose SAML from the drop-down box enter a provider name of MAAD and upload the IdP metadata I downloaded from Azure AD referenced earlier in the blog entry and hit the Next Step button.

pic23.png

On the next page I verify the provider name and the type of identity provider and hit the Create button.  Once that is complete I see the new entry listed in identity providers list.  Easy right?

pic24.png

We have an identity provider, but that identity provider needs some IAM roles to be associated with the identity provider that my fictional users can assert.  For that I go to the Roles section and hit the Create Role button.

pic25.png

On the next screen I select the SAML button as the type of trusted entity since the role is going to be asserted via the SAML trust with Azure AD.  Here I select the MAAD provider and choose the option to allow the users to access both the AWS Management Console and the API and then hit the Next: Permissions button.

pic26.png

As I referenced in my first entry to this series, the role I’m going to create is going to be capable of managing all EC2 instances.  For that I choose the AmazonEC2FullAccess policy template and then hit the Next:Review button.

pic267.png

On the last screen I name the new role AzureADEC2Admins, write a short description, and hit the Create Role button.

pic28.png

The new role is created and can be seen associated to the identity provider representing the trust between AWS and Azure AD.

pic29.png

Let’s sum up what we did for this entry.  We examined the key settings Microsoft exposes for configuration with the AWS integration.  We examined the Azure AD (IdP) and AWS (SP) metadata to understand which settings are important to this integration and what those settings do.  We examined an assertion generated out of Azure AD prior to any of the necessary customization being completed to understand what a canned assertion looks like.  Finally, we completed a majority of the tasks we need to complete on the AWS side to create the SAML trust on the AWS end and to create a role JoG users can asserts.  Are your eyes bleeding yet?

In my last post in this series I’ll walk through the rest of the configuration needed on the Azure AD end.  This will include going over some of the mistakes the Microsoft tutorial makes as well as covering configuration of Azure AD’s provisioning integration as to what it means and how we can effectively configure it.  Finally, we’ll put all the pieces of the puzzle together, assert our identity, and review logs at AWS to see what they look like when a federated user performs actions in AWS.

The journey continues in my fourth entry.

Integrating Azure AD and AWS – Part 2

Update: In November 2019 AWS introduced support for integration between Azure AD and AWS SSO.  The integration offers a ton more features, including out of the box support for multiple AWS accounts.  I highly recommend you go that route if you’re looking to integrate the two platforms.  Check out my series on the new integration here.

Today I will continue the journey into the integration between Azure AD and Amazon Web Services.  In my first entry I covered the reasons why you’d want to integrate Azure AD with AWS and provided a high-level overview of how the solution works.  The remaining entries in this series will cover the steps involved in completing the integration including deep dives into the inner workings of the solution.

Let me start out by talking about the testing environment I’ll be using for this series.

lab.png

The environment includes three virtual machines (VMs) running on Windows Server 2016 Hyper V on a server at my house.  The virtual machines consists three servers running Windows Server 2016 with one server acting as a domain controller for the journeyofthegeek.local Active Directory (AD) forest, another server running Active Directory Federation Services (AD FS) and Azure AD Connect (AADC), and the third server running MS SQL Server and IIS.  The IIS instance hosts a .NET sample federated application published by Microsoft.

In Microsoft Azure I have a single Vnet configured for connectivity to my on-premises lab through a site-to-site IPSec virtual private network (VPN) I’ve setup with pfSense.  Within the Vnet exists a single VM running Windows 10 that is domain-joined to the journeyofthegeek.local AD domain.  The Azure AD tenant providing the identity backend for the Microsoft Azure subscription is synchronized with the journeyofthegeek.local AD domain using Azure AD Connect and is associated with the domain journeyofthegeek.com.  Authentication to the Azure AD tenant is federated using my instance of AD FS.  I’m not synchronizing passwords and am using an alternate login ID with the user principal name being synchronized to Azure AD being stored in the AD attribute msDS-CloudExtensionAttribute1.  The reason I’m still configured to use an alternate login ID was due to some testing I needed to do for a previous project.

I created a single test user in the journeyofthegeek.local Active Directory domain named Rick Sanchez with a user principal name (UPN) of rick.sanchez@journeyofthegeeklocal and msDS-CloudExtensionAttribute1 of  rick.sanchez@journeyofthegeek.com.  The only attribute to note that the user has populated is the mail attribute which has the value of rick.sanchez@journeyofthegeek.com.  The user is being synchronized to Azure AD via the Azure AD Connect instance.

In AWS I have a single elastic compute cloud (EC2) instance running Windows Server 2016 within a virtual private cloud (VPC).  I’ll be configuring Azure AD as an identity provider associated with the AWS account and will be associating an AWS IAM role named AzureADEC2Admins.  The role will grant full admin rights over the management of the EC2 instances associated to the account via the AmazonEC2FullAccess permissions policy.

Let’s begin shall we?

The first step I’ll be taking is to log into the Azure Portal as an account that is a member of the global admins and navigate to the Azure Active Directory blade.  From there I select Enterprise Applications blade and hit the New Application link.

entapps.png

I then search the application gallery for AWS, select the AWS application, accept the default name, and hit the Add button.  Azure AD will proceed to add the application and will then jump to a quick start page.  So what exactly does it mean to add an application to Azure AD?  Good question, for that we’ll want to use the Azure AD cmdlets.  You can reference this link.

Before we jump into running cmdlets, let’s talk very briefly about the concept of application identities in AAD.  If you’ve managed Active Directory Domain Services (AD DS), you’re very familiar with the concept of service accounts.  When you needed an application (let’s call it a non-human to be more in-line with industry terminology) to access AD-integrated resources directly or on-behalf of a user you would create a security principal to represent the non-human.  That security principal could be a user object, managed service account object, or group managed service account object.  You would then grant that security principal rights and permissions over the resource or grant it the right to impersonate a user and access the resource on the user’s behalf.  The part we want to focus in on is the impersonation or delegation to access a resource on the behalf of a user.  In AD DS that delegation is accomplished through the Kerberos protocol.

When we shift over to AAD the same basic concepts still exist of creating a security principal to represent the application and granting that application direct or delegated access to a resource.  The difference is the protocol handling the access shifts from Kerberos to OAuth 2.0.  One thing many people become confused about is thinking that OAuth handles authentication.  It doesn’t.  It has nothing do with authentication and everything to do with authorization, or more clearly delegation.  When we add an application the AAD a service principal object and sometimes application object (in AWS instance both are created) are created in the AAD tenant to represent the application.  I’m going to speak to the service principal object for the AWS integration, but you can read through this link for a good walkthrough on application and service principal objects and how they differ.

Now back to AWS.  So we added the application and we now have a service principal object in our tenant representing AWS.  Here is a few of the attributes for the object pulled via PowerShell.

awsservice.png

Review of the attributes for the object provide a few pieces of interesting information.   We’ll get to experiment more with what these mean when we start doing Fiddler captures, but let’s talk a bit about them now.  The AppRoles attribute provides a single default role of msiam_access.  Later on we’ll be adding additional roles that will map back to our AWS IAM roles.

Next up we have the KeyCredentials which contains two entries.  This attribute took me a while to work out.  In short, based upon the startDate, I think these two entries are referencing the self-signed certificate included in the IdP metadata that is created after the application is added to the directory.  I’ll cover the IdP metadata in the next entry.

The Oauth2Permissions are a bit funky for this use case since we’re not really allowing the application to access AWS on our behalf, but rather asking it to produce a SAML assertion asserting our identity.  Maybe the delegation can be thought of as delegating Azure AD the right to create logical security tokens representing our users that can be used to assert an identity to AWS.

The PasswordCredentials contains a single entry which shares the same KeyID as the KeyCredential.  As best I can figure from reading the documentation is this would normally contain entries for client keys when not using certificate authentication.  Given that it contains a single entry with the same KeyID as the KeyCredential for signing, I can only guess it will contain an entry even with a certificate is used to authenticate the application.

The last attributes of interest are the PreferredTokenSigningKeyThumbprint which references the certificate within the IdP metadata and the replyURLs which is the assertion consumer URI for AWS.

So yeah, that’s what happens in those 2 or 3 seconds the AWS application is registered with Azure AD.  I found it interesting how the service principal object is used to represent trust between Azure AD and AWS and all the configuration information attached to the object after the application is simply added.  It’s nice to have some of the configuration work done for us out of the box, but there is much more to do.

In the next entry I’ll walk through the Quick Start for the AWS application configuration and explore the metadata Azure AD creates.

The journey continues in my third entry.

Integrating Azure AD and AWS – Part 1

Update: In November 2019 AWS introduced support for integration between Azure AD and AWS SSO.  The integration offers a ton more features, including out of the box support for multiple AWS accounts.  I highly recommend you go that route if you’re looking to integrate the two platforms.  Check out my series on the new integration here.

Hi everyone.  After being slammed with work from the real job over the past few months, I’m back with a new deep dive into the integration between Azure Active Directory (AAD) and Amazon Web Services (AWS).  I enjoyed the heck out of this one because I finally got some playtime in AWS and got to integrate two of the big cloud providers together to make some cool stuff happen.  There are a lot of blogs and articles out there (including Microsoft’s and Amazon’s *cough cough*) which provide the steps to accomplish this integration, but either the steps are incomplete, outdated, or wrong and none of them give a great explanation of the why or the how.  I can’t complain though, what else would I blog about?

Before we jump into the technologies that power the integration, let me first answer the question as to why we’d want to do the integration in the first place.

Let’s face it, managing digital identities is hard and it’s only getting harder with the introduction of cloud technology to the mix.  The tens of thousands of identities you’re managing for your users on-premises data center can quickly grow into the millions when SaaS comes into the mix. The operational overhead or supporting those millions of identities can eat up a large part of your IT budget and make your user experience miserable.  Beyond the cost issue, saddling your users with hundreds of credentials means users are going to re-use passwords and store them in whatever ways are convenient for them (under the keyboard anyone?) which introduces the risk of the credentials being compromised and sensitive data getting leaked.

Now more than ever you need to put a strong focus on centralized identity management and modern authentication and authorization.  Historically this was very challenging to do because of the lack of application programming interfaces (APIs) that allowed for create read update delete (CRUD) operations against the individual user records represented in an application database such as a SQL backend.  Beyond the lack of good APIs, you also were stuck using complicated and limiting legacy authentication and authorization protocols such as Kerberos, NTLM, LDAP, and the like.

Thankfully the industry has made a dramatic shift towards providing robust web-based APIs and support for modern authentication and authorization such as SAML, WS-Fed, Open ID Connect, and OAuth.  This presents a unique opportunity for organizations to shift towards a centralized identity management model where one authoritative store drives the lifecycle of an identity across all applications.  With the introduction of the modern protocols, users aren’t required to maintain thousands of credentials and can instead rely upon a singular trusted credential service provider (CSP) to act as the primary authentication point allowing users to then assert their identities to applications.  This frees the application from having to be saddled with storing and managing user credentials as well as improving the user experience, not to mention using these modern protocols is far simpler for your average developer.

Integrating AAD and AWS allow you to take advantage of centralized identity and modern authentication and authorization.  AAD specifically allows you to leverage all the cool features of a modern Identity-as-a-Service (IDaaS) offering such as behavioral analytics, multifactor authentication, adaptive authentication, and contextual-based authorization.  The short of it is you get a rock solid IDaaS to back the industry leading PaaS and IaaS offerings of AWS.  The best of both worlds right?

Now that you understand why you’d want to integrate the two solutions, let’s look at the technology powering the solution. In this integration the vendors are leveraging the concepts of modern APIs and modern authentication and authorization I touched upon above.  First up is authentication.

aws-signon

In this integration SAML, specifically the identity provider-initiated single sign-on POST binding, is being used to assert the user’s identity to the service provider (SP) after the user successfully authenticates with the identity provider (IdP).  Azure AD plays the role of IdP and AWS plays the role of SP.  The sequence of events plays out as follows:

  1. The user navigates to AAD and authenticates using either a credential or an asserted identity from a federated identity store.  The user then selects AWS from the listing of applications exposed through a method like the MyApps portal.  AAD generates an assertion containing a claim of the user’s identity and the AWS Identity and Access Management (IAM) role(s) the user is authorized to use and redirects the user to an endpoint at AWS.
  2. The user’s browser posts the assertion to the endpoint at AWS.
  3. The assertion is passed to the AWS security token service (STS) which checks the assertion to ensure it is from an identity provider that has been configured to be trusted for the AWS account, verifies the roles can be granted to a federated user, and completes the authentication process granting the user access to the AWS management console.(Don’t worry, we’ll dig into this process much more deeply using Fiddler in the next post.)

For provisioning, the AWS API is used.  AAD queries the AWS API using credentials for an AWS security principal that is associated with a role that has the IAMReadOnlyAccess permissions policy or greater.  It queries for the IAM roles configured for the account and synchronizes those roles back to AAD.  When the synchronization is complete, AAD users can then be added to the relevant roles from within AAD creating a one stop shop for doing your identity lifecycle management, authentication, and authorization.  Nice right?

At a high level that is the why and the what. In my upcoming posts in this series I’ll be digging deep into the how.  This will include how to do the integration, the pitfalls of the Microsoft tutorial, and of course Fiddler captures showing the conversations between the web browser, AAD, and AWS.

The journey continues in my second entry.