
This is part of my series on Microsoft Foundry:
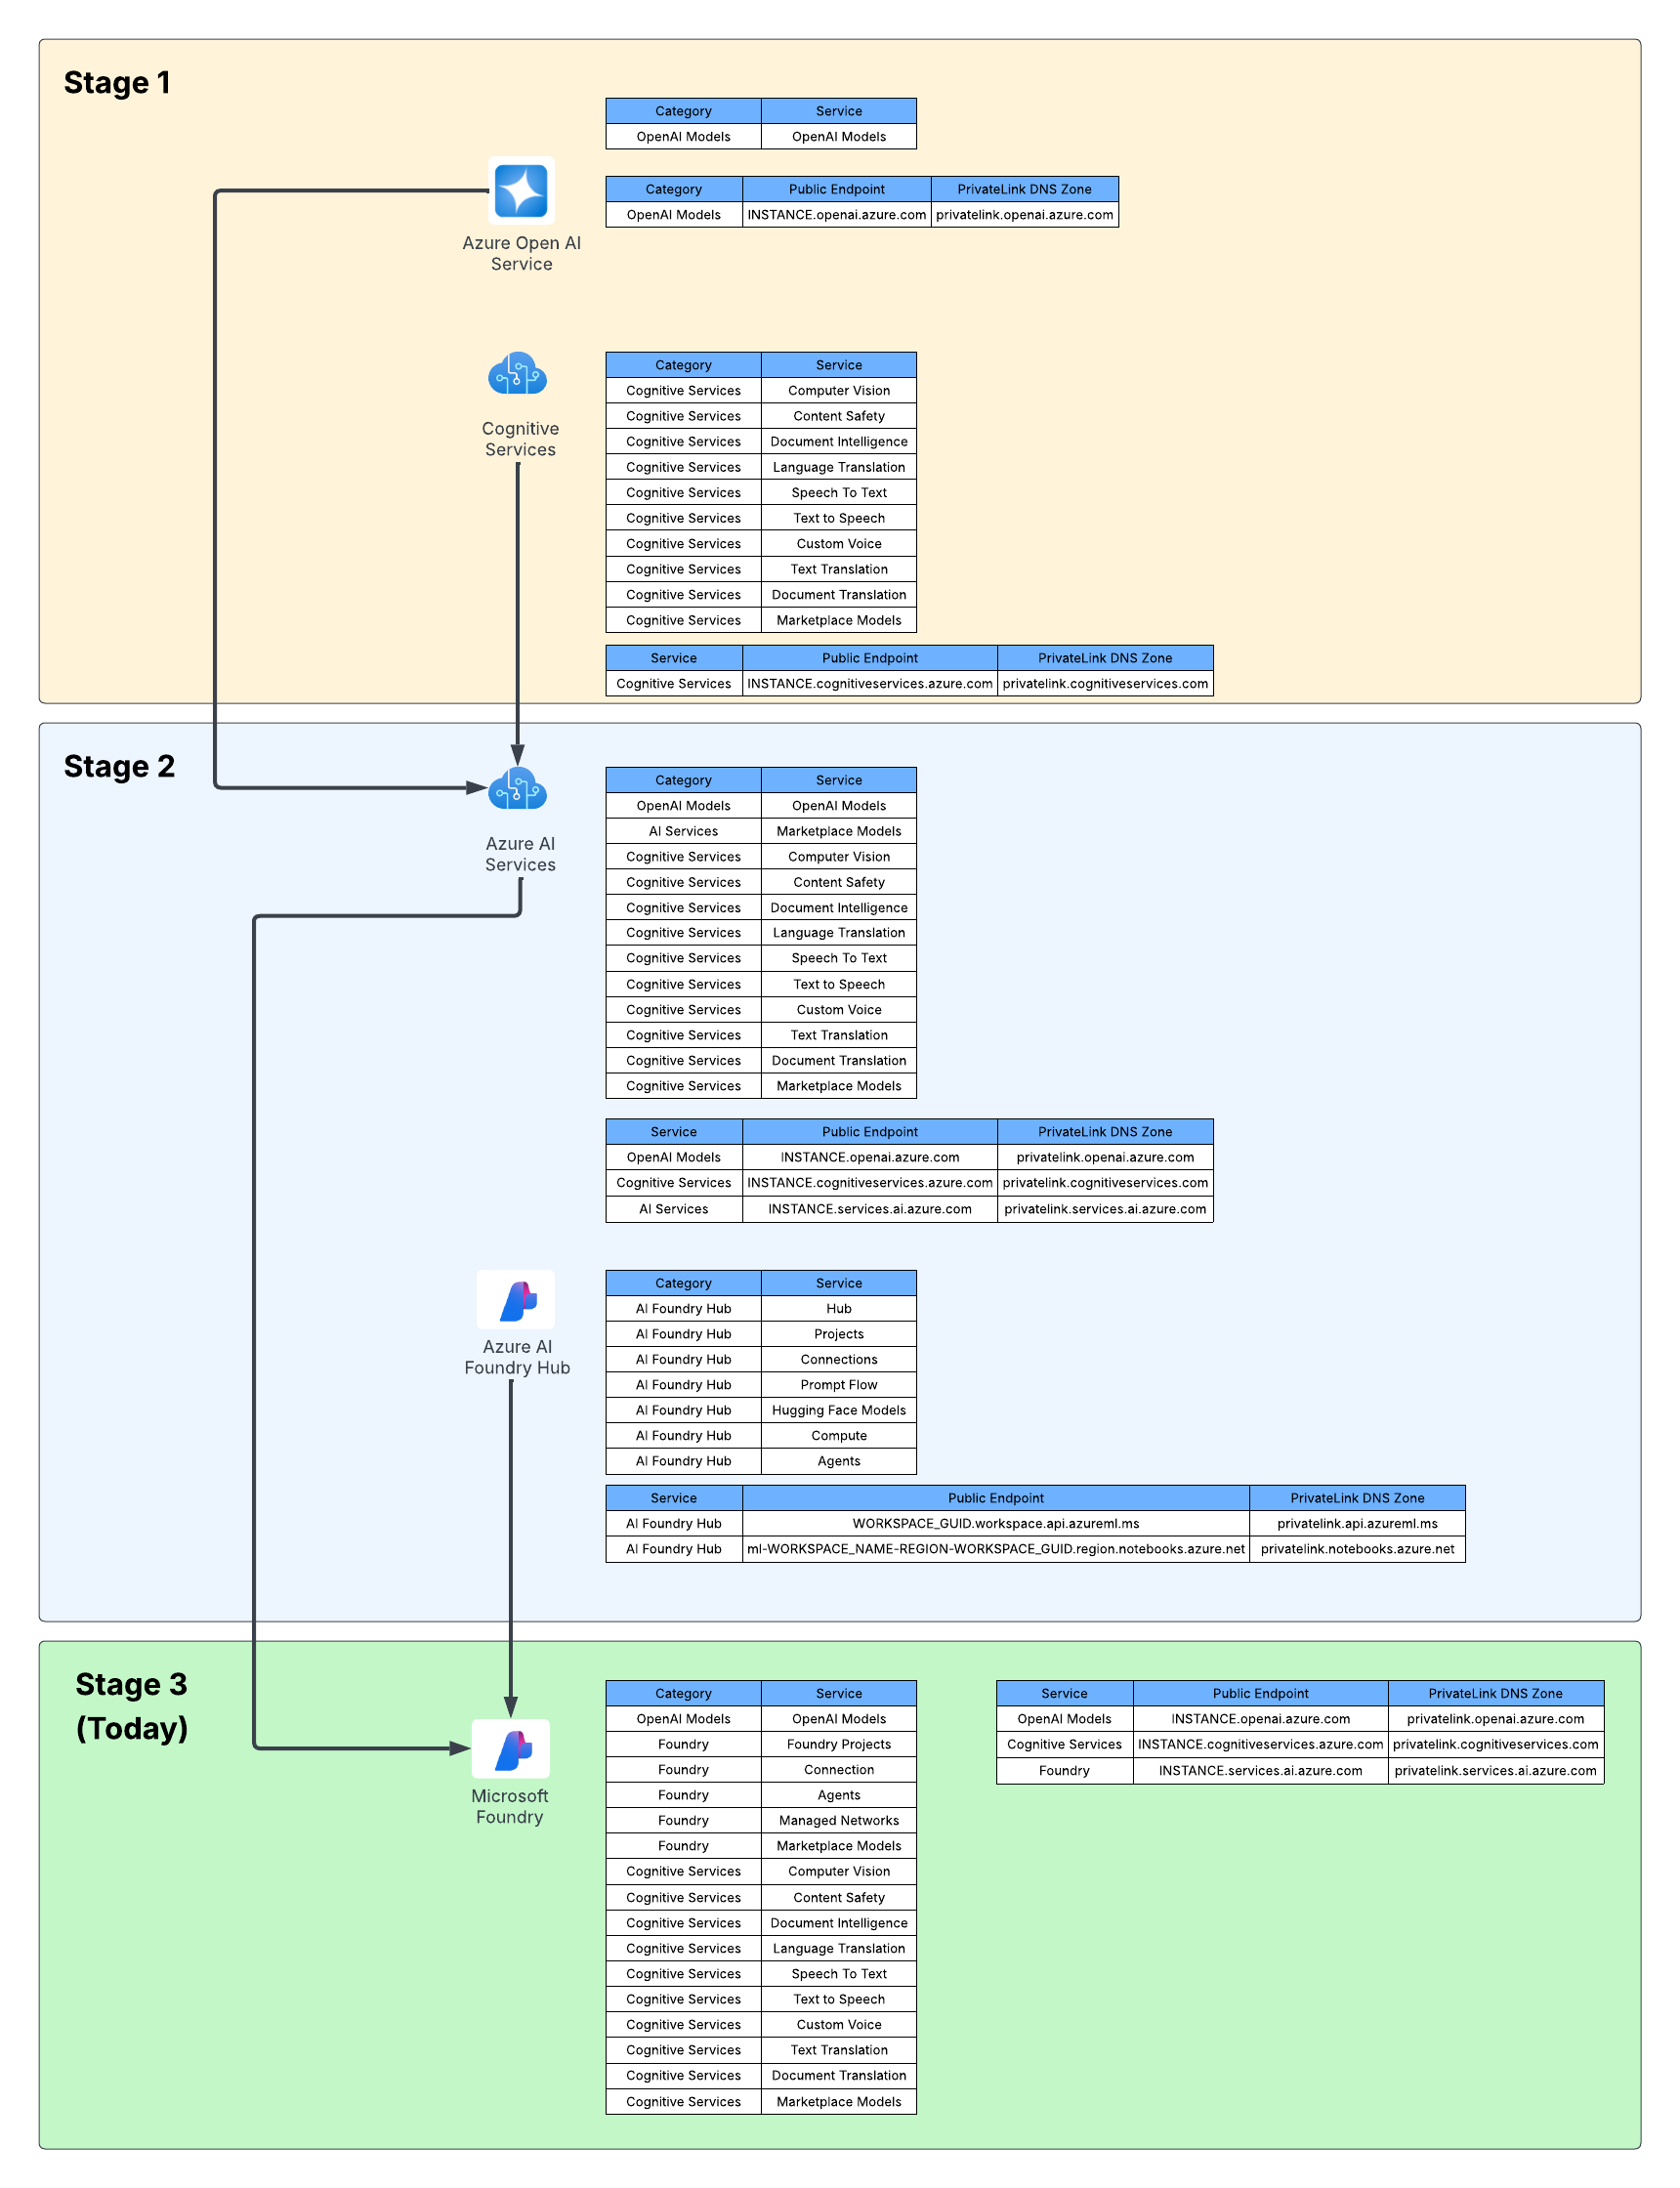
- Microsoft Foundry’s Evolution
- Microsoft Foundry BYO AI Gateway (BYO Model) – Part 1
- Microsoft Foundry BYO AI Gateway (BYO Model) – Part 2
- Microsoft Foundry BYO AI Gateway (BYO Model) – Part 3
- Microsoft Foundry Publishing Foundry Agents to Microsoft Teams – Part 1
- Microsoft Foundry Publishing Foundry Agents to Microsoft Teams – Part 2
Hello once again folks! Today I’m going to add yet another post to my BYO AI Gateway feature of Microsoft Foundry series. In my first post I gave a background on the use case for this feature, in the second post I walked the concepts required to understand the feature, the resources involved in the setup, and the schema of those resource objects. In this post I’m going to walk through the architecture I setup to play with this feature, why I made the choices I did, and dig into some of the actual Terraform code I put together to set this whole thing up. Let’s dive in!
The foundational architecture
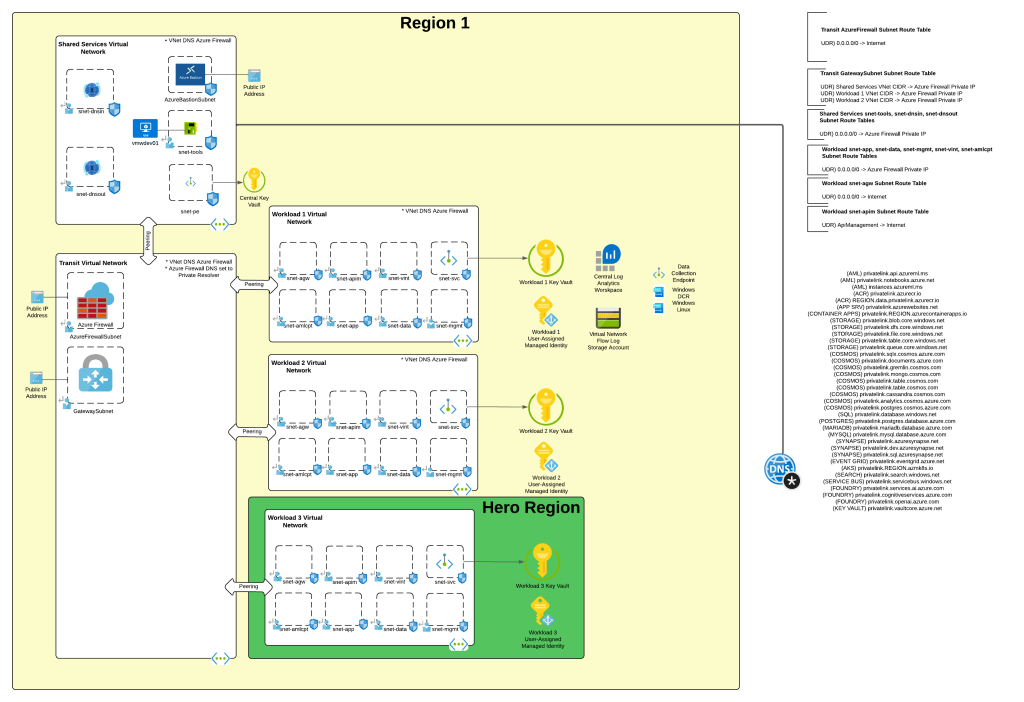
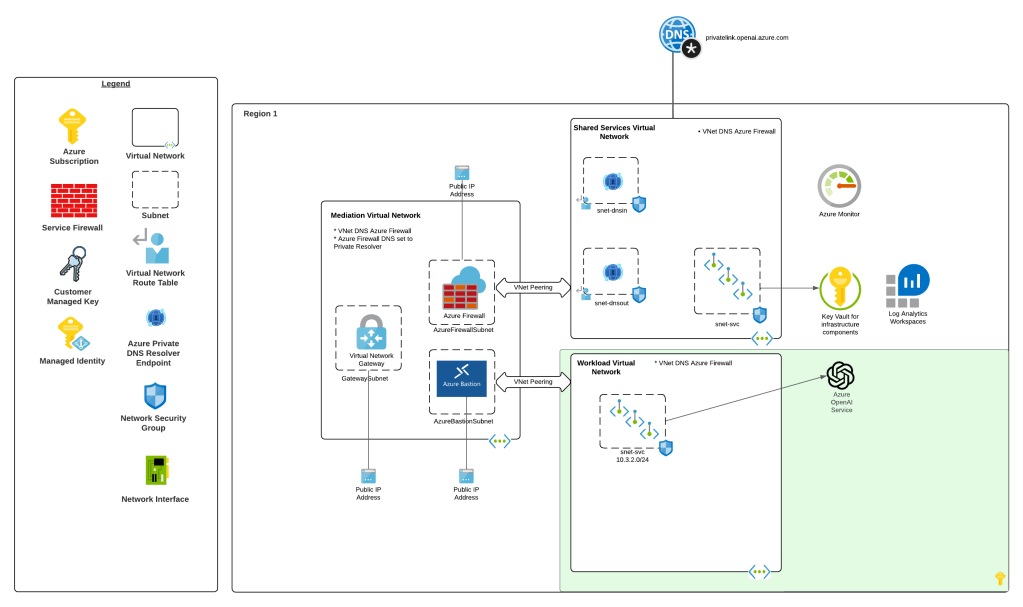
When I wanted to experiment with this feature I wanted to test it in an architecture that is typical to my customer base. For this I chose the classic tried and true hub and spoke architecture. I opted out of VWAN and went with a traditional virtual network model because I prefer the visibility and control to that model during experimentation. When the hub becomes a managed VWAN Hub, I get that fancy overlay which makes invisible some of the magic of what is happening underneath. This model enables me to do packet captures at every step and manage routing at a very granular level, which is a must when playing with cutting edge features.
For this setup I have a lab I built out in Terraform which gives me that hub and spoke architecture, centralized DNS resolution, logging, and access to multiple regions. The multiple regions piece of the puzzle is key because feature availability across Foundry features and APIM v2 SKUs are still in flux. The lab also uses three spoke virtual networks. This gives allows me to plop pieces in different spokes to see how things behave and track traffic patterns. It also gives me flexibility when I need to wait for purge operations like when purging a Microsoft Foundry resource configured with a standard agent setup and clearing the lock on the delegated subnet for the VNet injection model. If you’ve mucked around with this you know sometimes it can be 15 minutes and sometimes it can be 2 days.
I drop one of three spokes into one of the “hero” regions. This is a region that gets new features sooner than ours. For example, in this lab I drop it into East US 2 while the hub and other two spokes go in West US 3 (where I’m less likely to run into an quota or capacity issues). East US 2 gives me the option to deploy APIM v2 Standard SKU. In the next section I’ll explain why I’m going with v2 for this experimentation.
AI Gateway Architecture
For an AI Gateway I decided to use APIM. My buddy Piotr Karpala has a great repository of 3rd-party AI Gateway solutions if you want to test this with something outside of APIM. I’m going to plop this into the “hero” region spoke in East US 2 to so I can deploy a v2 Standard SKU. The reason I’m using a v2 SKU is it provides another networking model that the classic SKUs do not, and that is Private Endpoint and VNet integration. In this model I block public traffic to the APIM service, create a Private Endpoint to enable private inbound access, and setup VNet integration to a delegated subnet to keep outbound traffic from any of the APIM instances flowing through my virtual network so I can mediate it and optionally inspect it. While the Private Endpoint is only supported for the Gateway and not the Developer Portal, I don’t care in this instance because I don’t plan on using the Developer Portal on an APIM acting as an AI Gateway. You can also create a private endpoint for a APIM v2 service instance that uses VNet injection, but it requires the Premium SKU and I’m super cheap, so I opted out of that.
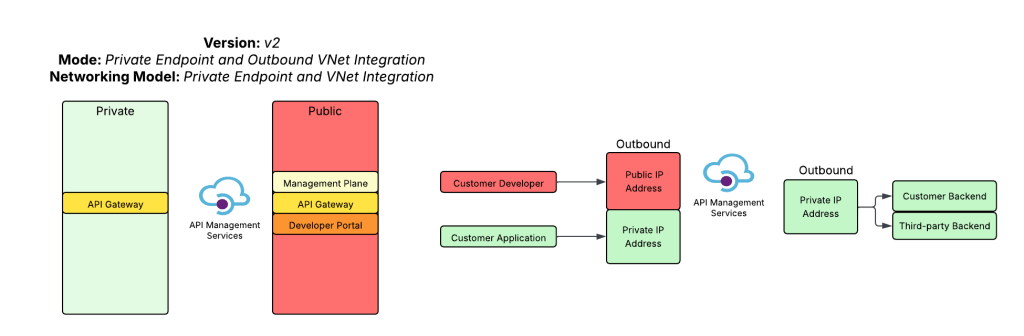
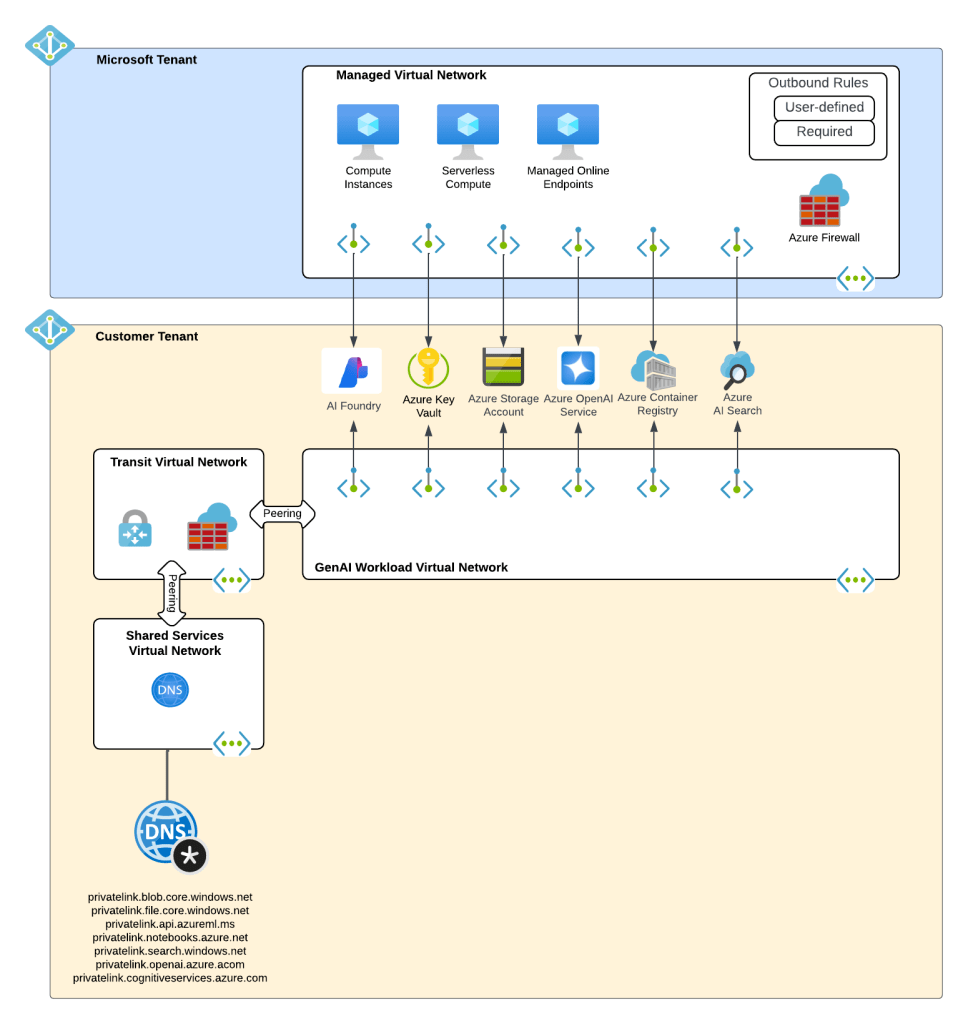
The reason I picked this networking model for APIM is it makes it easy for me to inject the service into a Microsoft Foundry account configured with a standard agent and the managed virtual network model. In a future post I’ll dive more into the managed virtual network model. For now, just be aware that is exists, it’s in preview, and it doesn’t have many of the limitations the Foundry Agent Service VNet injection model has. There are considerations no doubt, but my personal take is it’s the better of the two strategically.
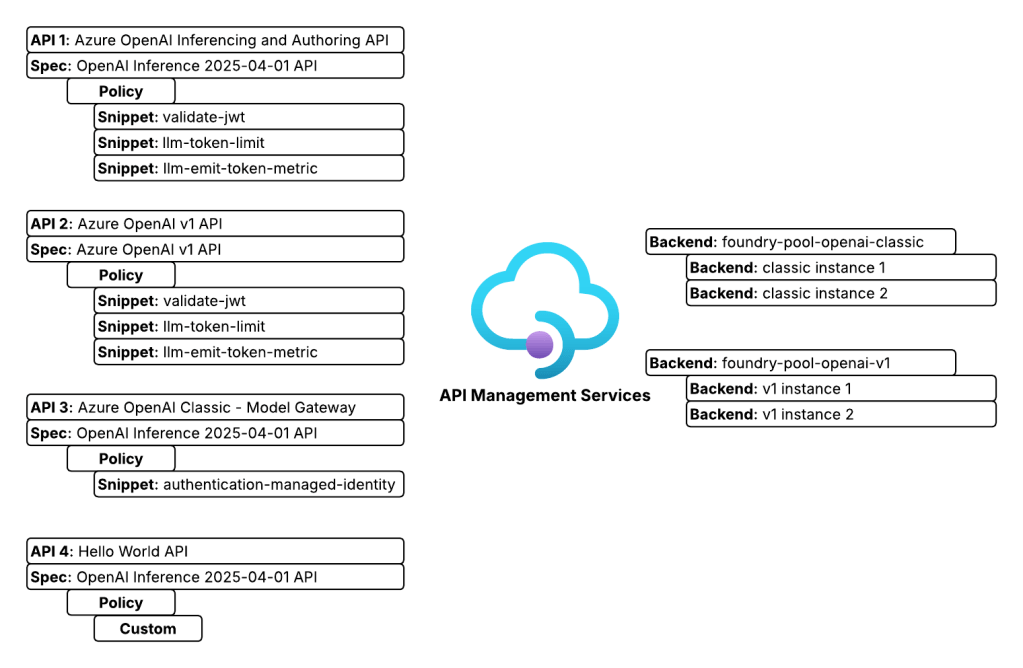
On the APIM instance I configured two backend objects, one for each Foundry instance. The backends are organized into a pooled backend so I could load balance across the two Foundry instances to maximize my TPM (tokens per minute). I defined four APIs. Two APIs support the Azure OpenAI inferencing and authoring API, one supports the Azure OpenAI v1 API, and the last is a simple custom Hello World API I use to test connectivity. I use two APIs for the Azure OpenAI inferencing and authoring API because one is designed to support APIM as an AI Gateway uses some custom policy snippets and the other is very generic and is used to test model gateway connections from Foundry purely so I’m familiar with the basics of them.
Foundry Architecture
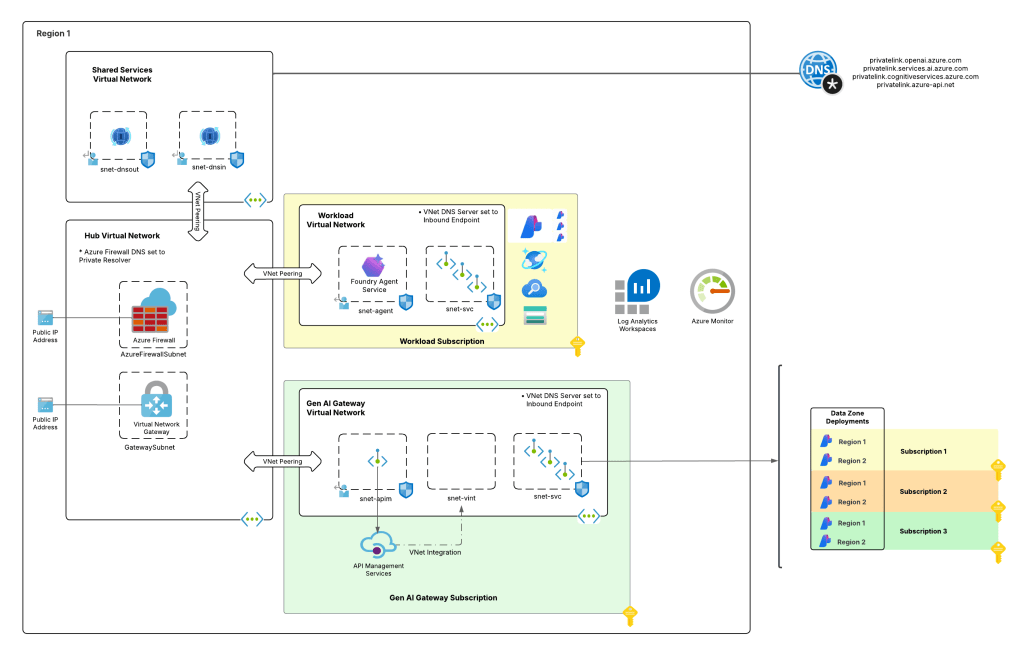
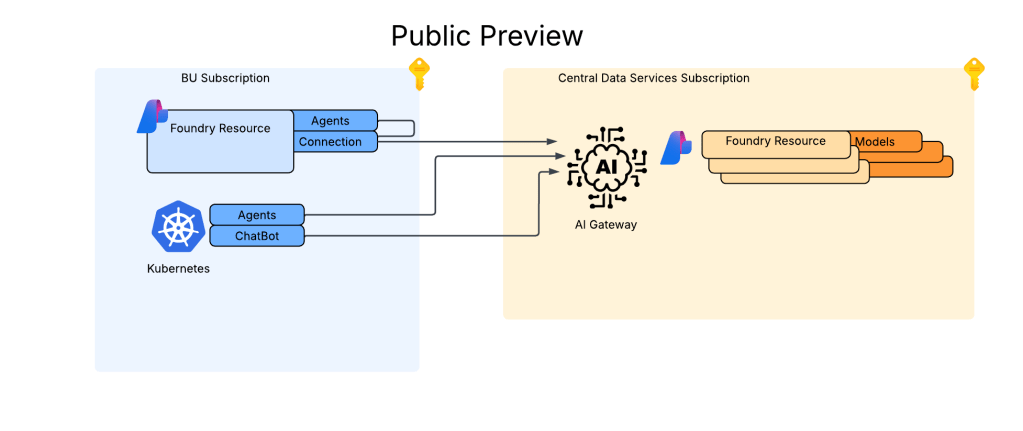
The Foundry architecture is quite simple. I deployed a single instance of Foundry configured to support standard agents and using a VNet injection model. A subnet is delegated in a different spoke to support the agent vnet injection and supporting Private Endpoints are deployed to a separate subnet in that same virtual network.
The whole setup looks something like the below:
Setting up the AI Gateway
At this point you should have a good understanding of what I’m working with. Let’s talk button pushing. The first thing you’ll need to do is get your AI Gateway setup. To setup the APIM instance I using the Terraform AzureRM and AzApi providers. Like I mentioned above, it was setup as a v2 with the standard SKU public network access disabled, inbound access restricted to private endpoints and outbound access configured for VNet integration. You can find the whole of the code in my lab repository if you’re curious. For the purposes of the post, I’ll only be including the relevant snippets.
One critical thing to take note of is whatever networking model you choose for APIM for this integration, you need to use a certificate issued by a trusted public CA (certificate authority). This is required because at the date of this post, the agent service does not support certificates issued by private CAs. Reason being, you have no ability to inject that root and intermediate certs into the trusted store of the agent compute. For this lab I used the Terraform Acme and Cloudflare providers. It’s actually not bad at all to have a fresh cert provisioned directly as part of the pipeline for labbing and the like, and best part is it’s free for cheap people like myself. There is a sample of that code in the repo.
As I mentioned in my last post, the BYO AI Gateway integration with Foundry supports static or dynamic setup. In the static model you define the models directly in the connection metadata you want to be made available to the connection (see my last post for an example). In the dynamic model the models can be fetched by an API call to the management.azure.com API. This latter option requires additional operations be defined in the API such as what you see below.
## Create an operation to support getting a specific deployment by name when using the Foundry APIM connection##resource "azurerm_api_management_api_operation" "apim_operation_openai_original_get_deployment_by_name" { depends_on = [ azurerm_api_management_api.openai_original ] operation_id = "get-deployment-by-name" api_name = azurerm_api_management_api.openai_original.name api_management_name = azurerm_api_management.apim.name resource_group_name = azurerm_resource_group.rg_ai_gateway.name display_name = "Get Deployment by Name" method = "GET" url_template = "/deployments/{deploymentName}" template_parameter { name = "deploymentName" required = true type = "string" }}## Create an operation to support enumerating deployments when using the Foundry APIM connection##resource "azurerm_api_management_api_operation" "apim_operation_openai_original_list_deployments_by_name" { depends_on = [ azurerm_api_management_api_operation_policy.apim_policy_openai_original_get_deployment_by_name ] operation_id = "list-deployments" api_name = azurerm_api_management_api.openai_original.name api_management_name = azurerm_api_management.apim.name resource_group_name = azurerm_resource_group.rg_ai_gateway.name display_name = "List Deployments" method = "GET" url_template = "/deployments"}
You then define a policy for that operation to configure it to call the correct endpoint via the ARM API like below. Notice I used the authentication-managed-identity policy snippet to use the APIM managed identity to call the Foundry resource to fetch deployment information. If you’re sharing the API across backends, make sure all backends have all the same models deployed. If not, you’ll need to incorporate some additional logic to hit the backend for each pool to ensure you don’t return models that don’t exist in a specific backend. This will require your APIM instance managed identity to have at least the Azure RBAC Reader role over the Foundry resources.
## Create an policy for the get deployment by name operation to route to the Foundry APIM connection##resource "azurerm_api_management_api_operation_policy" "apim_policy_openai_original_get_deployment_by_name" { depends_on = [ azurerm_api_management_api_operation.apim_operation_openai_original_get_deployment_by_name, ] api_name = azurerm_api_management_api.openai_original.name operation_id = azurerm_api_management_api_operation.apim_operation_openai_original_get_deployment_by_name.operation_id api_management_name = azurerm_api_management.apim.name resource_group_name = azurerm_resource_group.rg_ai_gateway.name xml_content = <<XML <policies> <inbound> <authentication-managed-identity resource="https://management.azure.com/" /> <rewrite-uri template="/deployments/{deploymentName}?api-version=${local.ai_services_arm_api_version}" copy-unmatched-params="false" /> <!--Specify a Foundry deployment that has the models deployed --> <set-backend-service base-url="https://management.azure.com${azurerm_cognitive_account.ai_foundry_accounts[keys(local.ai_foundry_regions)[0]].id}" /> </inbound> <backend> <base /> </backend> <outbound> <base /> </outbound> <on-error> <base /> </on-error> </policies> XML}## Create an policy for the list deployments operation to route to the Foundry APIM connection##resource "azurerm_api_management_api_operation_policy" "apim_policy_openai_original_list_deployments_by_name" { depends_on = [ azurerm_api_management_api_operation.apim_operation_openai_original_list_deployments_by_name ] api_name = azurerm_api_management_api.openai_original.name operation_id = azurerm_api_management_api_operation.apim_operation_openai_original_list_deployments_by_name.operation_id api_management_name = azurerm_api_management.apim.name resource_group_name = azurerm_resource_group.rg_ai_gateway.name xml_content = <<XML <policies> <inbound> <authentication-managed-identity resource="https://management.azure.com/" /> <rewrite-uri template="/deployments?api-version=${local.ai_services_arm_api_version}" copy-unmatched-params="false" /> <!--Azure Resource Manager--> <set-backend-service base-url="https://management.azure.com${azurerm_cognitive_account.ai_foundry_accounts[keys(local.ai_foundry_regions)[0]].id}" /> </inbound> <backend> <base /> </backend> <outbound> <base /> </outbound> <on-error> <base /> </on-error> </policies> XML}
In my lab, I defined these two operations for both the classic (OpenAI Inferencing and Authoring API) and v1 API. This allowed me to mess around with both static and dynamic APIM and Model Gateway connections.
Once you get Foundry hooked into APIM using this integration (and I’ll cover the Foundry part in the next post), you get access to some pretty neat information in the headers. As of the date of this post, these will be some of the headers you’ll see. You’ll notice my x-forwarded-for path includes my endpoint’s IP address as well as the IP of the container running in the managed Microsoft-compute environment (notice that is using CGNAT IP space which clears up why CGNAT is unsupported to be used by the customer when using agent with VNet injection). The x-ms-foundry-project-id is the unique project GUID of the project the agent was created under (could be useful for throttling and logging). The x-ms-foundry-agent-id is the unique agent identifier of the specific revision of the agent (again useful for logging and throttling). The x-ms-client-request-id is actually the Foundry project managed identity, not the agent identity which is important to note. If you want to use Entra for the BYO AI Gateway APIM connection, you’re going to be limited to this or API key. There is a connection authentication option to use the agent’s actual Entra ID Agent Identity, but I’ve only used that for the MCP Server feature of Foundry, never for this so I’m not sure if it works or is supported.
{ "Authorization": "Bearer REDACTED", "Content-Length": "474", "Content-Type": "application/json; charset=utf-8", "Host": "apimeusXXXXX.azure-api.net", "Max-Forwards": "10", "Correlation-Context": "leaf_customer_span_id=173926958944XXXXXX", "traceparent": "00-62ff160923b2c1724242c037be40e7cb-4f1b402461aXXXXX-01", "X-Request-ID": "96534855-a35a-481a-886d-XXXXXXXXXXXX", "x-ms-client-request-id": "76ddf586-260b-4e37-8f4c-XXXXXXXXXXXX", "openai-project": "sampleproject1", "x-ms-foundry-agent-id": "TestAgent-ai-gateway-static:5", "x-ms-foundry-model-id": "conn1apimgwstaticopenai/gpt-4o", "x-ms-foundry-project-id": "455cbebf-a0bc-425e-99f6-XXXXXXXXXXX", "x-forwarded-for": "100.64.9.87;10.0.9.213:10095", "x-envoy-external-address": "100.64.9.87", "x-envoy-expected-rq-timeout-ms": "1800000", "x-k8se-app-name": "j8820ec0658b4aeXXXXX-dataproxy--vuww7ja", "x-k8se-app-namespace": "wonderfulsky-a2fXXXXX", "x-k8se-protocol": "http1", "x-k8se-app-kind": "web", "x-ms-containerapp-name": "j8820ec0658b4aeXXXXX-dataproxy", "x-ms-containerapp-revision-name": "j8820ec0658b4aeXXXXX-dataproxy--vuww7ja", "x-arr-ssl": "2048|256|CN=Microsoft Azure RSA TLS Issuing CA 04;O=Microsoft Corporation;C=US|CN=*.azure-api.net;O=Microsoft Corporation;L=Redmond;S=WA;C=US", "x-forwarded-proto": "https", "x-forwarded-path": "/v1/https/apimeusXXXXX.azure-api.net/openai/deployments/gpt-4o/chat/completions?api-version=2025-03-01-preview", "X-ARR-LOG-ID": "76ddf586-260b-4e37-8f4c-XXXXXXXXXXXX", "CLIENT-IP": "10.0.9.213:10095", "DISGUISED-HOST": "apimeusXXXXX.azure-api.net", "X-SITE-DEPLOYMENT-ID": "apimwebappXXXXXX6OTVsZqxOcTZLpubQ9iNmzQ8kzMOmkEhw", "WAS-DEFAULT-HOSTNAME": "apimwebappXXXXXX6otvszqxoctzlpubq9inmzq8kzmomkehw.apimaseXXXXXXX6otvszqxoctz.appserviceenvironment.net", "X-AppService-Proto": "https", "X-Forwarded-TlsVersion": "1.3", "X-Original-URL": "/openai/deployments/gpt-4o/chat/completions?api-version=2025-03-01-preview", "X-WAWS-Unencoded-URL": "/openai/deployments/gpt-4o/chat/completions?api-version=2025-03-01-preview", "X-Azure-JA4-Fingerprint": "t13d1113h2_d3731e0d3936_XXXXXXXXXXXX"}
Using the information above, I crafted the policy below. It’s nothing fancy, but shows an example of throttling based on the project id and logging the agent identifier via the token metrics policy to potentially make chargeback more granular. Either way, these additional headers give you more to play with.
## Create an API Management policy for the OpenAI v1 API##resource "azurerm_api_management_api_policy" "apim_policy_openai_v1" { depends_on = [ azurerm_api_management_api.openai_v1 ] api_name = azurerm_api_management_api.openai_v1.name api_management_name = azurerm_api_management.apim.name resource_group_name = azurerm_resource_group.rg_ai_gateway.name xml_content = <<XML <policies> <inbound> <base /> <!-- Evaluate the JWT and ensure it was issued by the right Entra ID tenant --> <validate-jwt header-name="Authorization" failed-validation-httpcode="403" failed-validation-error-message="Forbidden"> <openid-config url="https://login.microsoftonline.com/${var.entra_id_tenant_id}/v2.0/.well-known/openid-configuration" /> <issuers> <issuer>https://sts.windows.net/${var.entra_id_tenant_id}/</issuer> </issuers> </validate-jwt> <!-- Extract the Entra ID application id from the JWT --> <set-variable name="appId" value="@(context.Request.Headers.GetValueOrDefault("Authorization",string.Empty).Split(' ').Last().AsJwt().Claims.GetValueOrDefault("appid", "none"))" /> <!-- Extract the Agent ID from the x-ms-foundry-agent-id header. This is only relevant for Foundry native agents --> <set-variable name="agentId" value="@(context.Request.Headers.GetValueOrDefault("x-ms-foundry-agent-id", "none"))" /> <!-- Extract the project GUID from the x-ms-foundry-project-id header. This is only relevant for Foundry native agents --> <set-variable name="projectId" value="@(context.Request.Headers.GetValueOrDefault("x-ms-foundry-project-id", "none"))" /> <!-- Extract the Foundry Project name from the "openai-project" header. This is only relevant for Foundry native agents --> <set-variable name="projectName" value="@(context.Request.Headers.GetValueOrDefault("openai-project", "none"))" /> <!-- Extract the deployment name from the uri path --> <set-variable name="uriPath" value="@(context.Request.OriginalUrl.Path)" /> <set-variable name="deploymentName" value="@(System.Text.RegularExpressions.Regex.Match((string)context.Variables["uriPath"], "/deployments/([^/]+)").Groups[1].Value)" /> <!-- Set the X-Entra-App-ID header to the Entra ID application ID from the JWT --> <set-header name="X-Entra-App-ID" exists-action="override"> <value>@(context.Variables.GetValueOrDefault<string>("appId"))</value> </set-header> <set-header name="X-Foundry-Agent-ID" exists-action="override"> <value>@(context.Variables.GetValueOrDefault<string>("agentId"))</value> </set-header> <set-header name="X-Foundry-Project-Name" exists-action="override"> <value>@(context.Variables.GetValueOrDefault<string>("projectName"))</value> </set-header> <set-header name="X-Foundry-Project-ID" exists-action="override"> <value>@(context.Variables.GetValueOrDefault<string>("projectId"))</value> </set-header> <choose> <!-- If the request isn't from a Foundry native agent and is instead an application or external agent --> <when condition="@(context.Variables.GetValueOrDefault<string>("agentId") == "none" && context.Variables.GetValueOrDefault<string>("projectId") == "none")"> <!-- Throttle token usage based on the appid --> <llm-token-limit counter-key="@(context.Variables.GetValueOrDefault<string>("appId","none"))" estimate-prompt-tokens="true" tokens-per-minute="10000" remaining-tokens-header-name="x-apim-remaining-token" tokens-consumed-header-name="x-apim-tokens-consumed" /> <!-- Emit token metrics to Application Insights --> <llm-emit-token-metric namespace="openai-metrics"> <dimension name="model" value="@(context.Variables.GetValueOrDefault<string>("deploymentName","None"))" /> <dimension name="client_ip" value="@(context.Request.IpAddress)" /> <dimension name="appId" value="@(context.Variables.GetValueOrDefault<string>("appId","00000000-0000-0000-0000-000000000000"))" /> </llm-emit-token-metric> </when> <!-- If the request is from a Foundry native agent --> <otherwise> <!-- Throttle token usage based on the agentId --> <llm-token-limit counter-key="@($"{context.Variables.GetValueOrDefault<string>("projectId")}_{context.Variables.GetValueOrDefault<string>("agentId")}")" estimate-prompt-tokens="true" tokens-per-minute="10000" remaining-tokens-header-name="x-apim-remaining-token" tokens-consumed-header-name="x-apim-tokens-consumed" /> <!-- Emit token metrics to Application Insights --> <llm-emit-token-metric namespace="llm-metrics"> <dimension name="model" value="@(context.Variables.GetValueOrDefault<string>("deploymentName","None"))" /> <dimension name="client_ip" value="@(context.Request.IpAddress)" /> <dimension name="agentId" value="@(context.Variables.GetValueOrDefault<string>("agentId","00000000-0000-0000-0000-000000000000"))" /> <dimension name="projectId" value="@(context.Variables.GetValueOrDefault<string>("projectId","00000000-0000-0000-0000-000000000000"))" /> </llm-emit-token-metric> </otherwise> </choose> <choose> <!-- If the request is from a Foundry native agent --> <when condition="@(context.Variables.GetValueOrDefault<string>("agentId") != "none" && context.Variables.GetValueOrDefault<string>("projectId") != "none")"> <authentication-managed-identity resource="https://cognitiveservices.azure.com/" /> </when> </choose> <set-backend-service backend-id="${module.backend_pool_aifoundry_instances_openai_v1.name}" /> </inbound> <backend> <forward-request /> </backend> <outbound> <base /> </outbound> </policies>XML}
Summing it up
I was going to go crazy and incorporate the Foundry setup and testing into this post as well but decided against it. There is a point when the brain melts and if mine is already melting, yours may be as well. I’ll walk through those pieces in the next post. You have a few main takeaways. First, let’s review the high level setup of your AI Gateway.
- Create your backends that point to the Microsoft Foundry endpoints.
- Import the relevant API. If at all possible, go with the v1 API. It will support access to other models besides OpenAI models and additional features.
- Add the GET and LIST operations and define the relevant policies if you’re planning on supporting dynamic models vs static. Dynamic seems to make more sense to me, but I haven’t seen enough orgs adopt this yet to form a good opinion.
- Craft your custom policies. I highly recommend you regularly review the headers being passed. They could change and even better data may be added to them.
Next, let’s talk about key gotchas.
- The certificate used on your AI Gateway MUST be issued from a well-known public CA in order for it to be trusted by the agent running in Foundry comptue. If it isn’t, this integration will fail and may not fail in a way that is obvious the TLS session failure between the agent compute and the AI Gateway is to blame.
- If you’re using APIM, think about the Private Endpoint and VNet integration pattern if you’re capable of using v2. If it won’t work for you, or you’re still using the classic SKU, if you want to support managed VNet you’ll need to incorporate an Application Gateway in front of your AI Gateway likely. This means more operational overhead and costs.
- While every Foundry Agent (v2) is given an Entra ID Agent Identity created from the Entra ID Agent Blueprint associated to the project, when using the ProjectManagedIdentity authentication type, you’ll see the project’s managed identity in the logs. If you’re able to test with the agent identity authentication type, let me know.
- Really noodle on how you can use the project headers for throttling and possibly chargeback. It makes a ton of sense if you’re aligning your Foundry account and project model correctly.
See you next post!


")

