
This is part of my series on Network Security Perimeters:
- Network Security Perimeters – The Problem They Solve
- Network Security Perimeters – NSP Components
- Network Security Perimeters – NSPs in Action – Key Vault Example
- Network Security Perimeters – NSPs in Action – AI Workload Example
- Network Security Perimeters – NSPs for Troubleshooting
Hello folks! The past 3 months have been completely INSANE with customer work, building demos, experimentation and learning. It’s been awesome, but goddamn has it been grueling. I’m back to finally close out my series on Network Security Perimeters. In my past posts I’ve covered NSPs from an conceptional level, the components that make them up, and two separate examples. Today I’m going to cover my favorite use case for NSPs, and this is using them for troubleshooting.
The Setup
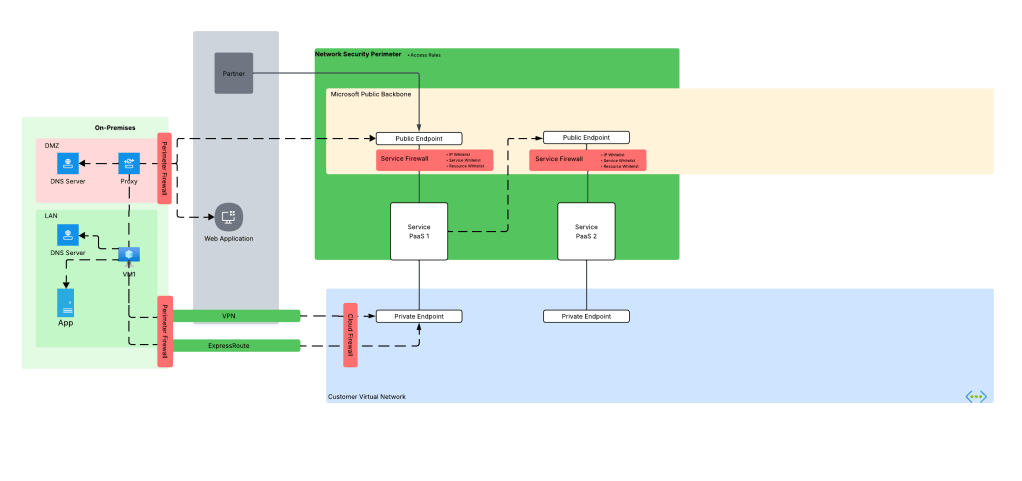
At a very high level most enterprises have an architecture similar what you see below. In this architecture network boundaries are setup around endpoints and services. These boundaries are erected to separate hardware and services based on the data stored in that environment, the security controls enforced in that environment, whether that environment has devices connected to the Internet, what type of trust level the humans and non-humans running in those environments have, and other similar variables. For the purposes of this post, we’re gonna keep it simple and stick to LAN (trusted) and DMZ (untrusted). DMZ is where devices connected to the Internet live and LAN is where devices restricted to the private network live.
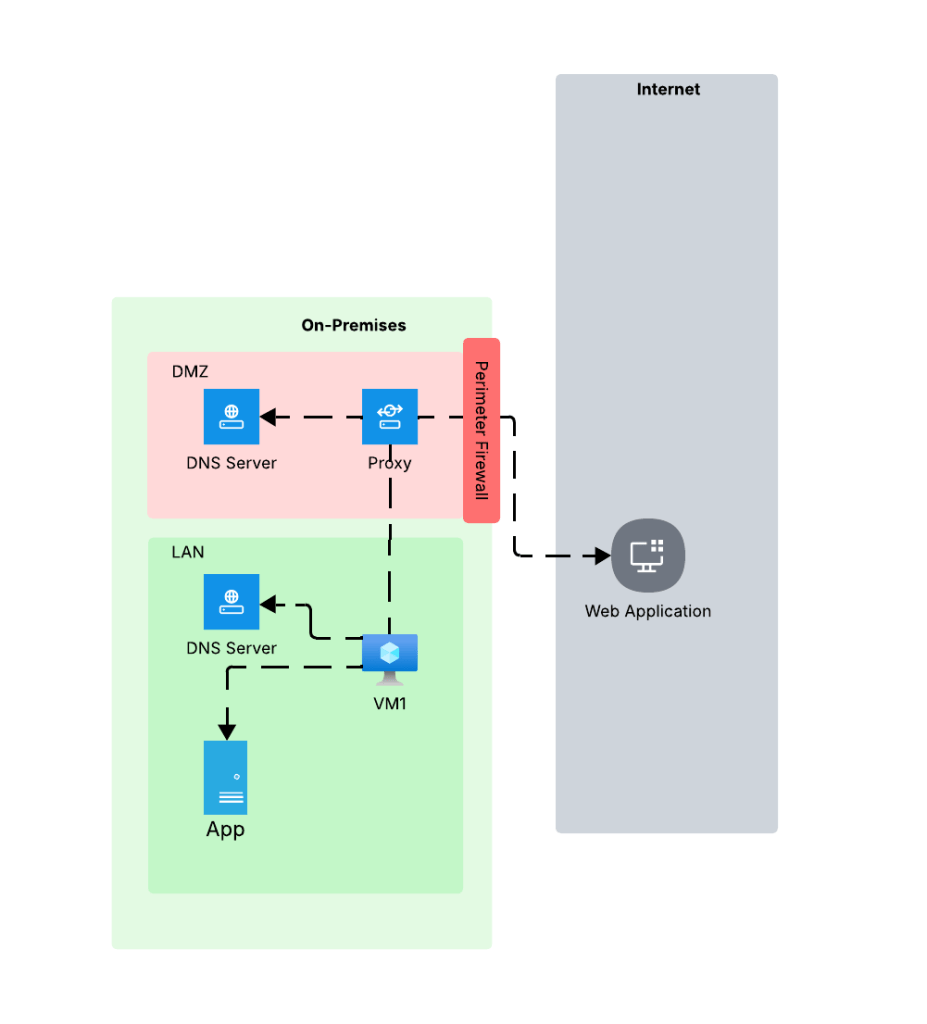
Environments like these typically restrict access to the Internet through a firewall or appliance/service that is performing a forward web proxy function. This allows enterprises to control what traffic leaves their private network through traditional layer 5-tuple means, deep packet inspection to inspect and control traffic at layer 7, and control access to specific websites based on the user or endpoint identity. Within the LAN there is typically a private DNS service that provides name resolution for internal domains. The DMZ has either separate dedicated DNS infrastructure for DNS caching and limited conditional fowarding or it utilizes some third-party hosted DNS service like a CloudFlare. The key takeaway from the DNS resolution piece is the machines within the LAN and DMZ use different DNS services and typically the DMZ is limited or completely incapable of resolving domains hosted on the internal DNS servers.
You’re likely thinking, “Cool Matt, thanks for the cloud 101. WTF is your point?” The place where this type of setup really bites customers is when consuming Private Endpoints. I can’t tell you how many times over the years I’ve been asked to help a customer struggling with Private Endpoints only to find out the problem is DNS related to this infrastructure. The solution is typically a simple proxy bypass, but getting to that resolution often takes hours of troubleshooting. I’m going to show you how NSPs can make troubleshooting this problem way easier.
The Problem
Before we dive into the NSP piece, let’s look at how the problem described above manifests. Take an organization that uses a high level architecture to integrate with Azure such as pictured below.
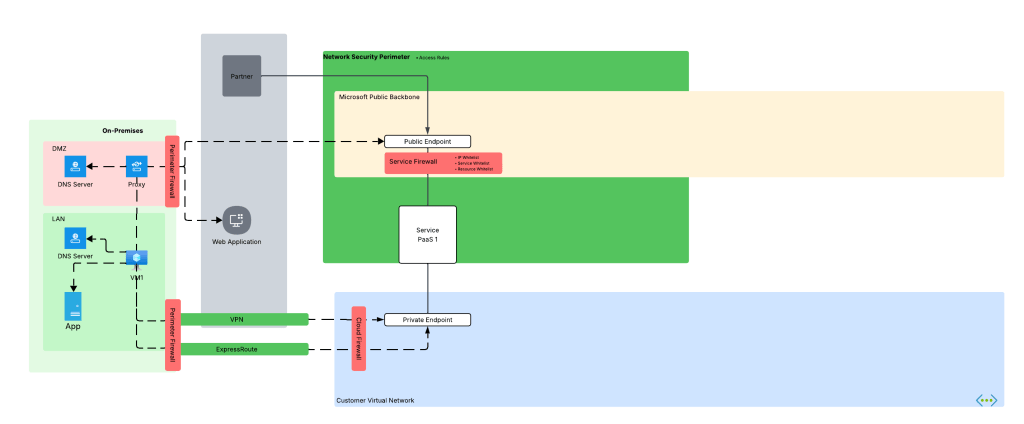
Here we have an organization that has connectivity with Azure configure through both an ExpressRoute with S2S VPN as fallback (I hate this fallback method, but that’s a blog for another day). In the ideal world, VM1 hits Service PaaS 1 on that Private Endpoint with the traffic being sent through the VPN or ExpressRoute connection. To do that, the DNS server in the LAN must properly resolve to the private IP address of the Private Endpoint deployed for Service PaaS 1 (check out my series on DNS if you’re unfamiliar with how that works). Let’s assume the enterprise has properly configured DNS so VM1 resolves to the correct IP address.
Now it’s Monday morning and you are the team that manages Azure. You get a call from a user complaining they can’t connect to the Private Endpoint for their Azure Storage account for blob access and gives you the typical “Azure is broken!”. You hop on a call with the user and ask the user to do some nslookups from their endpoint which return the correct private IP address. You even have the user run a curl against the FQDN and still you get back the correct IP address.
This is typically the scenario that at some point gets escalated beyond support and someone from the account team says, “Hey Matt, can you look at this?” I’ll hop on a call, get a lowdown of what the customer is doing, double-check what the customer checked, maybe take a glance at routing and Network Security Groups and then jump to what is almost always the problem in these scenarios. The next question out of my mouth is, “Do you have a proxy?”
So why does this matter? This question is important whenever we consider HTTP/HTTPS traffic because it is almost always sent through through an appliance or service that is performing the architectural function of a forward web proxy before it egresses to the Internet as I covered earlier. This could be a service hosted within the organization’s boundry or it could be a third-party service like a ZScaler. Where it’s hosted isn’t super important (but can play a role in DNS), the key thing to understand is the enterprise using one and is the application being used to access the Azure PaaS service using it.
When HTTP/HTTPS traffic is configured to be proxied, the connection from the endpoint is made to the proxy service. The proxy service examines the endpoint’s request, executes any controls configured, and initiates a connection to the outbound service. This last piece is what we care about because to make a connection, the proxy service needs to do its own DNS query which means it will use the DNS server configured in the proxy. This is typically the problem because as I covered earlier, this DNS service doesn’t typically have resolution to internal domains, which would include resolution to the privatelink domains used by Azure PaaS services.
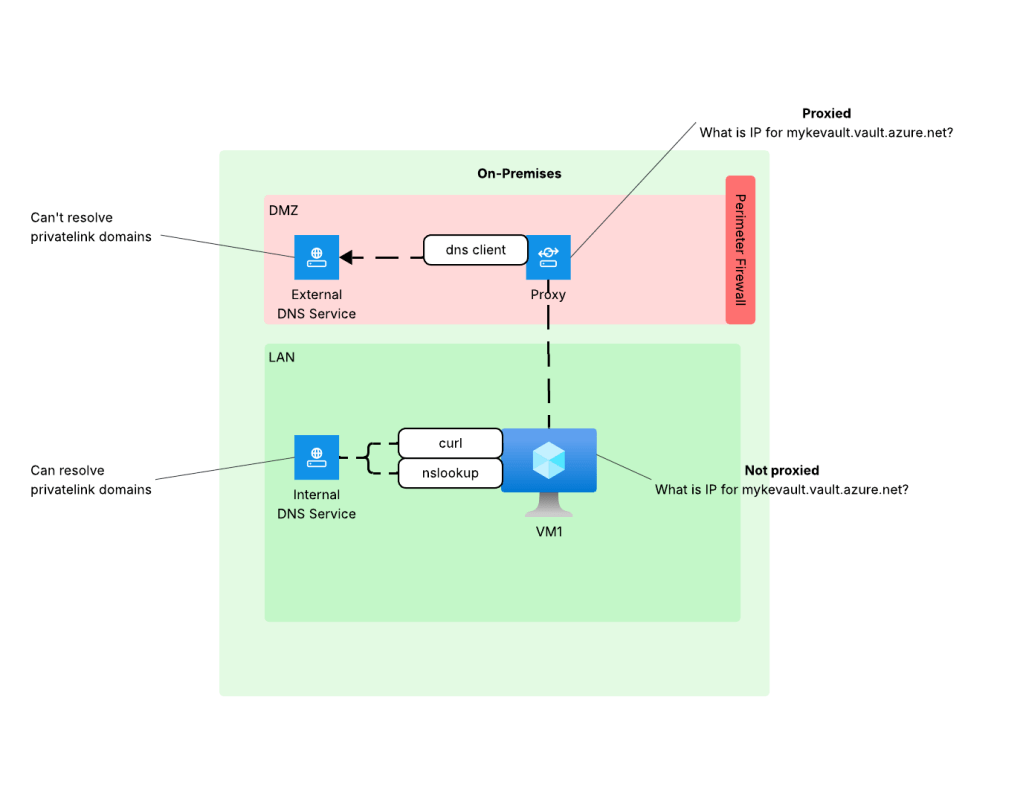
When you did curl (without specifying proxy settings) or nslookup the machine was hitting the internal DNS service which does have the ability to resolve privatelink domains giving you the false sense that everything looks good from a DNS perspective. The resolution to this problem is to work with the proxy team to put in the appropriate proxy bypass so the endpoint will connect directly to the Azure PaaS (thus using its own DNS service).
All of this sounds simple, right? The reality is getting to the point of identifying the issue was the proxy tends to take hours, if not days, and tons of people from a wide array of teams across the enterprise. This means a lot of money spent diagnosing and resolving the issue.
What if there was an easier way? In comes NSPs.
NSPs to the rescue!
If you were a good Azure citizen, you would have wrapped this service in an NSP (assuming that service has been onboarded by Microsoft to NSPs) and turned on logging as I covered in my prior posts. If you had done that, you could have leveraged the NSP logs (the NSPAccessLogs table) to identify incoming traffic being blocked by the NSP. Below is an example of what the log entry looks like.
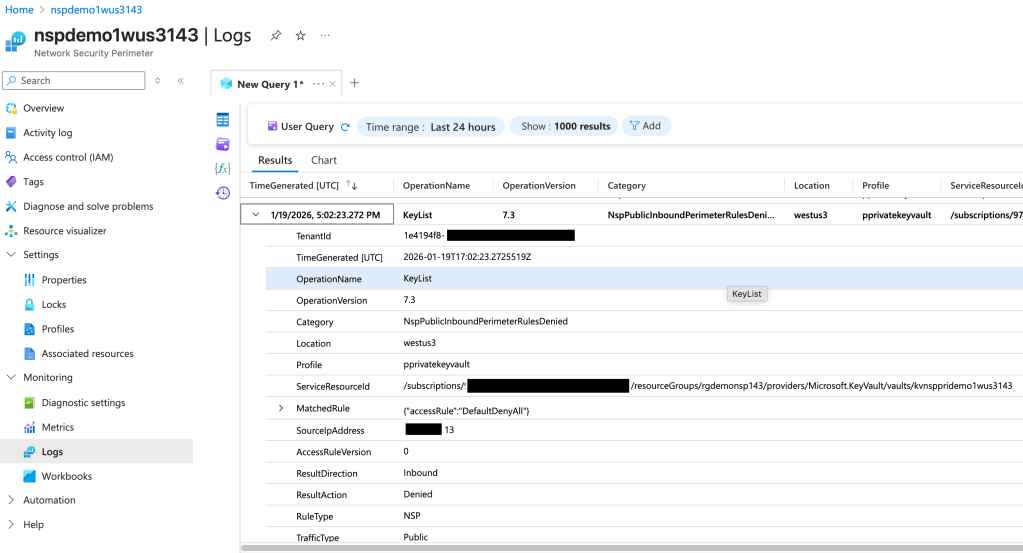
In the above log entry I get detail as to the operation the user attempted to perform (in this instance listing the Keys in a Key Vault), the effect of the NSP (traffic is denied), and the category of traffic (Public). If we go back to the troubleshooting steps from earlier, I may have been able to identify this problem WAY earlier and with far less people involved even if the Azure resource platform logs obfuscated the full IP address or didn’t list it at all. I can’t stress the value this presents, especially having a standardized log format. The amount of hours my customers could have saved by enabling and using these logs makes me sad.
Even more uses!
Beyond troubleshooting the proxy problem, there are any scenarios where this comes in super handy. Another such example is PaaS to PaaS traffic. Often times the documentation around when a PaaS talks to another PaaS is not clear. It may not be obvious that one PaaS is trying to communicate with another over the Microsoft public backbone. This is another area NSPs can help because this traffic can also be logged and used for troubleshooting
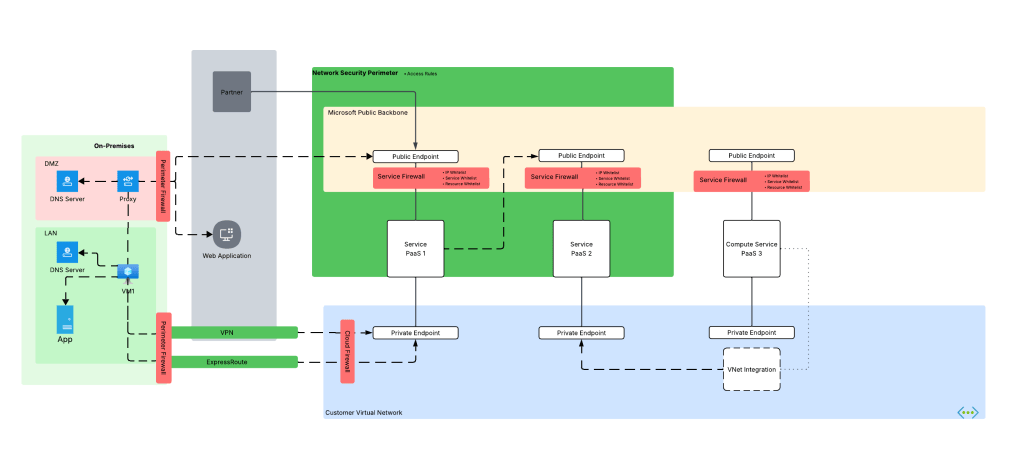
We’re not done yet! Some Azure compute services can integrate into a customer virtual network using a combination of Private Endpoints for inbound traffic and regional VNet integration for outbound access (traffic initiated by the PaaS and destined for customer endpoints or endpoints in the public IP space). A good example is Azure App Services or the new API Management v2 SKUs. Often times, I’ll work with customers who think they enabled this correctly but only actually enabled Private Endpoints and missed configuring regional Vnet integration causing outbound traffic to leave the Microsoft public backbone and hit the PaaS over public IPs or misconfigured DNS for the virtual network the PaaS service has been integrated with. NSP logs can help here as well.
Summing it up
Here are the key takeways for you for this post:
- Enable NSPs wherever they are supported. If you’re not comfortable enforcing them, at least turn them on for the logging.
- Don’t forget NSPs capture both the inbound AND outbound traffic. You’d be amazed how many Azure PaaS services (service based) can make outbound network calls that you probably aren’t tracking or controlling.
- Like platform logs, NSP logs are not simply a security tool. Don’t lock them away from operations behind a SIEM. Make them available to both security and operations so everyone can benefit.
- Remember that enforcing NSPs WILL block the associated resources from delivering their logs to a Log Analytics Workspace, Storage Account, or Event Hub. If you’re using a centralized Log Analytics Workspace model, you’ll want to leave your NSPs in transition mode for now.
NSPs are more than just a tool to block and get visibility into incoming and outbound traffic for security purposes, but also an important tool in your toolbox to help with day-to-day operational headaches. If you’re not using NSPs for supported services today, you should be. There is absolutely zero reason not to do it, and your late night troubleshooting sessions will only consume 1 Mountain Dew vs 10!
That’s it for me. Off to snowblow!


