AWS Managed Microsoft AD Deep Dive Part 2 – Setup

AWS Managed Microsoft AD Deep Dive  Part 2 – Setup

Today I’ll continue my deep dive into AWS Managed Microsoft AD.  In the last blog post I provided an overview of the reasons an organization would want to explore a managed service for Windows Active Directory (Windows AD).  In this post I’ll be providing an overview of my lab environment and demoing how to setup an instance of AWS Managed Microsoft AD and seamlessly joining a Windows EC2 instance.

Let’s dive right into it.

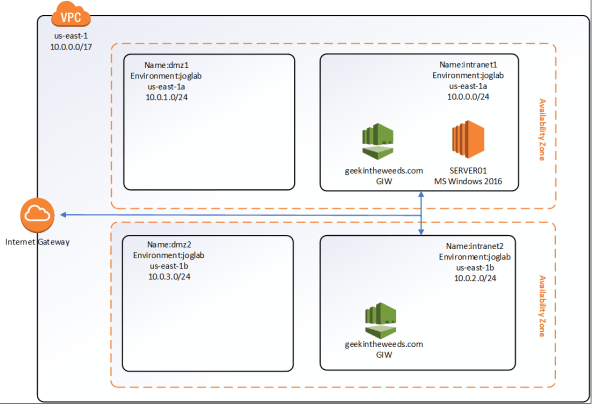
Let’s first cover what I’ll be using as a lab.  Here I’ve setup a virtual private cloud (VPC) with default tenancy which is a requirement to use AWS Managed Microsoft AD.  The VPC has four subnets configured within it named intranet1, intranet2, dmz1, and dmz2.  The subnets intranet1/dmz1 and intranet2/dmz2 provide us with our minimum of two availability zones, which is another requirement of the service.  I’ve created a route table that routes traffic destined for IP ranges outside the VPC to an Internet Gateway and applied that route table to both the intranet1 and intranet2 subnets.  This will allow me to RDP to the EC2 instances I create.  Later in the series I’ll configure VPN connectivity with my on-premises lab to demonstrate how the managed AD can be used on-prem.  Below is a simple Visio diagraming the lab.

1awsadds1.png

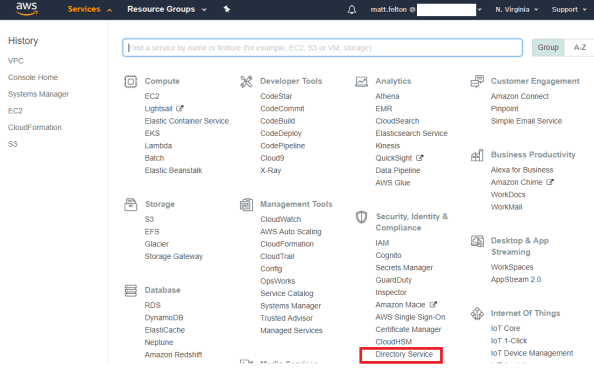
To create a new instance of AWS Managed Microsoft AD, I’ll be using the AWS Management Console.  After successfully logging in, I navigate to the Services menu and select the Directory Service link under the Security, Identity & Compliance section as seen below.

1awsadds2.png

The Directory Service page then loads which is a launching pad for configuration of the gamut of AWS Directory Services including AWS Cloud Directory, Simple AD, AD Connector, Amazon Cognito, and of course AWS Managed Microsoft AD.  Any directory instance that you’ve created would appear in the listing to the right.  To create a new instance I select the Set up Directory button.

1awsadds3.png

The Set up a directory page loads and I’m presented with the options to create an instance of AWS Managed Microsoft AD, Simple AD, AD Connector, or an Amazon Cognito User Pool.  Before I continue, I’ll provide the quick and dirty on the latter three options.  Simple AD is actually Samba made to emulate some of the capabilities of Windows Active Directory.  The AD Connector acts as a sort of proxy to interact with an existing Windows Active Directory.  I plan on a future blog series on that one.  Amazon Cognito is Amazon’s modern authentication solution (looks great for B2C)  providing Open ID Connect, OAuth 2.0, and SAML services to applications.  That one will warrant a future blog series as well.  For this series we’ll be select the AWS Managed Microsoft AD option and clicking the Next button.

1awsadds4.png

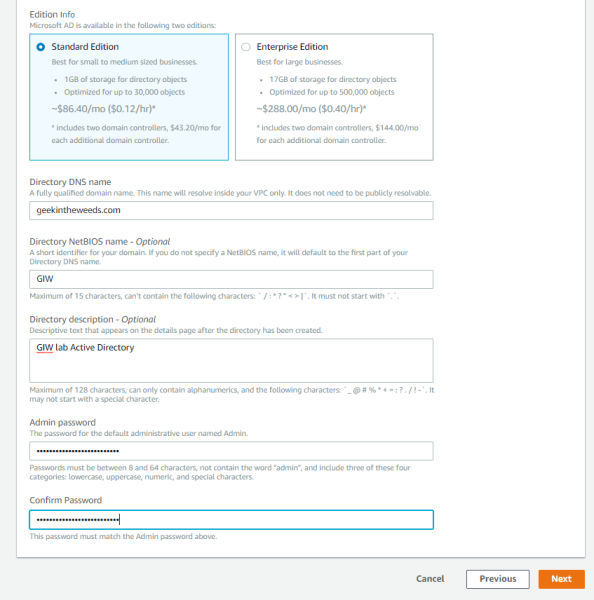
A new page loads where we configure the directory information.  Here I’m given the option to choose between a standard or enterprise offering of the service.  Beyond storage I’ve been unable to find or pull any specifications of the EC2 instances Amazon is managing in the background for the domain controllers.  I have to imagine Enterprise means more than just 16GB of storage and would include additional memory and CPU.  For the purposes of this series, I’ll be selecting Standard Edition.

Next I’ll provide the key configuration details for forest which includes the fully qualified domain name (FQDN) for the forest I want created as well as optionally specifying the NetBIOS name.  The Admin password set here is used for the delegated administrator account Amazon creates for the customer.  Make sure this password is securely stored, because if it’s lost Amazon has no way of recovering it.

1awsadds5.png

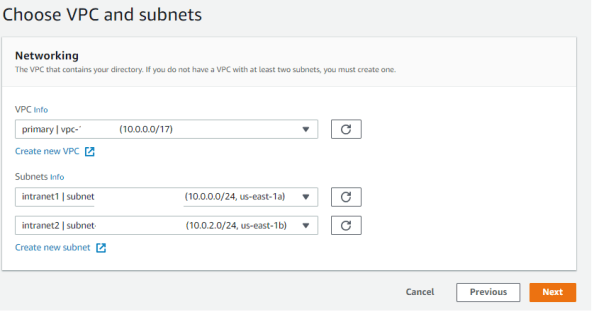
After clicking the Next button I’m prompted to select the virtual private cloud (VPC) I want to service deployed to.  The VPC used must include at least two subnets that are in different availability zones.  I’ll be using the intranet1 and intranet2 subnets shown in my lab diagram earlier in the post.

1awsadds6.png

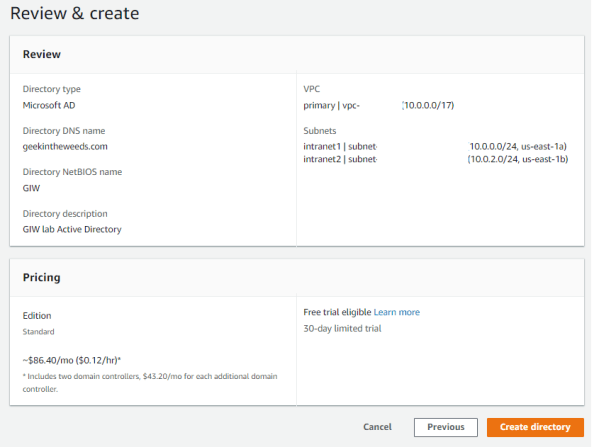
The next page that loads provides the details of the instance that will be provisioned.  Once I’m satisfied the configuration is correct I select the Create Directory button to spin up the service.

1awsadds7.png

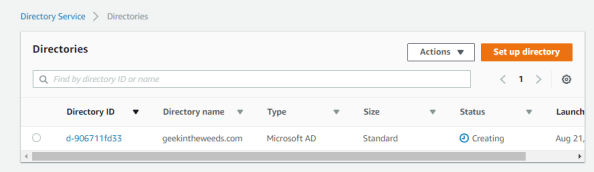
Amazon states it takes around 20 minutes or so to spin up the instance, but my experience was more like 30-45 minutes.  The main Directories Services page displays the status of the directory as Creating.  As part of this creation a new Security Group will be created which acts as a firewall for the managed domain controllers.  Unlike some organization that try to put firewalls between domain-join clients and domain controllers, Amazon has included all the necessary flows and saves  you a ton of troubleshooting with packet captures.

1awsadds8

One of the neat features offered with this service is the ability to seamlessly domain-join Windows EC2 instances during creation.  Before that feature can be leveraged an AWS Identity and Access Management (IAM) role needs to setup that has the AmazonEC2RoleforSSM attached to it.  AWS IAM is by far my favorite feature of AWS.  At a very high level, you can think of AWS IAM as being the identity service for the management of AWS resources.  It’s insanely innovative and flexible in its ability to integrate with modern authentication solutions and in how granular you can be in defining rights and permissions to AWS resources.  I could do multiple series just covering the basics (which I plan to do in the future) but to progress this entry let me briefly explain AWS IAM Roles.  Think of an AWS IAM Role as a unique security principal similar to a user but without any credentials. The role is assigned a set of rights and permissions which AWS refers to as a policy.  The role is then assumed by a human (such as federated user) or non-human (such as EC2 instance) granting the entity the rights and permissions defined in the policy attached to the role.  In this scenario the EC2 instance I create will be assuming the AmazonEC2RoleforSSM.  This role grants a number of rights and permissions within AWS’s Simple System Manager (SSM), which for your Microsoft-heavy users is a scaled down SCCM.  It requires this role to orchestrate the domain-join upon instance creation.

To create the role I’ll open back up the Services menu and select IAM from the Security, Identity & Compliance menu.

1awsadds9.png

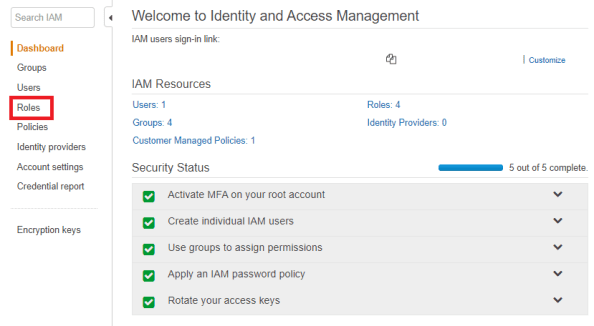
The IAM dashboard will load which provides details as to the number of users, groups, policies, roles, and identity providers I’ve created.  From the left-hand menu I’ll select the Roles link.

1awsadds10.png

The Role page then loads and displays the Roles configured for my AWS account. Here I’ll select the Create Role button to start the role creation process.

1awsadds11.png

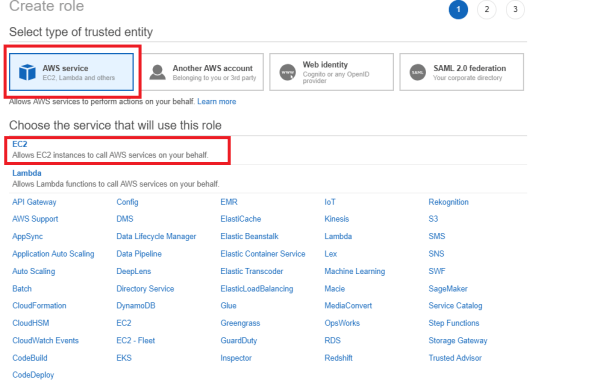
The Create Role page loads and prompts me to select a trusted entity type.  I’ll be using this role for EC2 instances so I’ll select the AWS service option and chose EC2 as the service that will use the role.  Once both options are selects I select the Next: Permission button.

1awsadds12.png

Next up we need to assign a policy to the role.  We can either create a new policy or select an existing one.  For seamless domain-join with AWS Managed Microsoft AD, EC2 instances must use the AmazonEC2forSSM policy.  After selecting the policy I select the Next: Review button.

1awsadds13.png

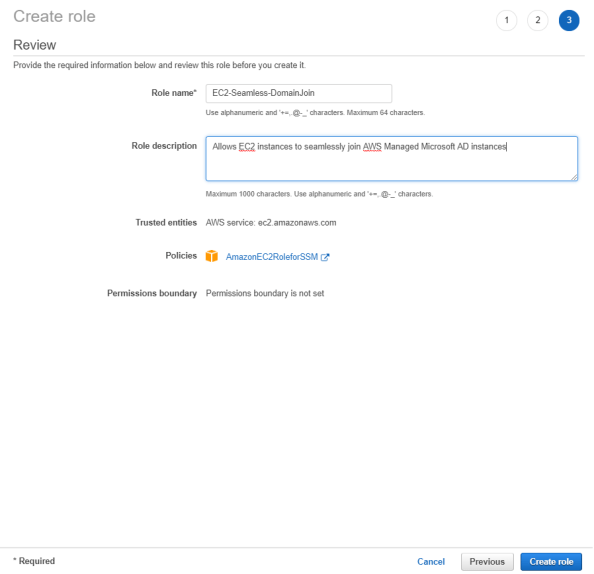
On the last page I’ll name the role, set a description, and select the Create role button. The role is then provisioned and available for use.

1awsadds14.png

Navigating back to the Directory Services page, I can see that the geekintheweeds.com instance is up and running. This means we can now create some EC2 instances and seamlessly join them to the domain.

1awsadds15.png

The EC2 instance creation is documented endless on the web, so I won’t waste time walking through it beyond showing the screenshot below which displays the options for seamless domain-join. The EC2 instance created will be named SERVER01.

1awsadds16.png

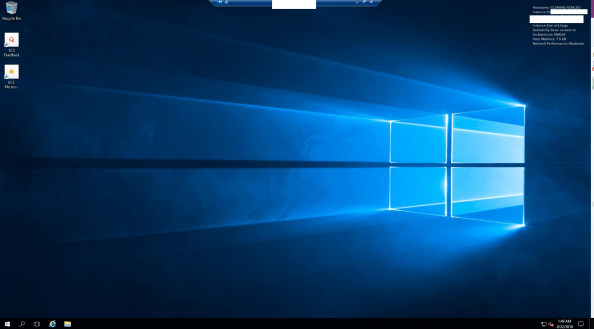
After a few minutes the instance is ready to go. I start the Remote Desktop on my client machine and attempt a connection to the EC2 instance using the Admin user and credentials I set for the AD domain.

1awsadds17.png

Low and behold I’m logged into the EC2 instance using my domain credentials!

1awsadds18.png

As you can see setup of the service and EC2 instances is extremely simple and could made that much more simple if we tossed out the GUI and leveraged cloud formation templates to seamlessly spin up entire environments at a push of a button.

We covered a lot of content in this entry so I’ll close out here.  In the next entry I’ll examine the directory structure Amazon creates including the security principals and key permissions.

See you next post!


Exploring Azure AD Privileged Identity Management (PIM) – Part 3 – Deep Dive

Exploring Azure AD Privileged Identity Management (PIM) – Part 3 – Deep Dive

Welcome back fellow geeks to my third post on my series covering Azure AD Privileged Identity Management (AAD PIM).  In my first post I provided an overview of the service and in my second post I covered the initial setup and configuration of PIM.  In this post we’re going to take a look at role activation and approval as well as looking behind the scenes to see if we can figure out makes the magic of AAD PIM work.

The lab I’ll be using consists of a non-domain joined Microsoft Windows 10 Professional version 1803 virtual machine (VM) running on Hyper V on my home lab.  The VM has a local user configured that is a member of the Administrators group.  I’ll be using Microsoft Edge and Google Chrome as my browsers and running Telerik’s Fiddler to capture the web conversation.  The users in this scenario will be sourced from the Journey Of The Geek tenant and one will be licensed with Office 365 E5 and EMS E5 and the other will be licensed with just EMS E5.  The tenant is not synchronized from an on-premises Windows Active Directory.  The user Homer Simpsons has been made eligible for the Security Administrators role.

With the intro squared away, let’s get to it.

First thing I will do is navigate to the Azure Portal and authenticate as Homer Simpson.  As expected, since the user is not Azure MFA enforced, he is allowed to authenticate to the Azure Portal with just a password.  Once I’m into the Azure Portal I need to go into AAD PIM which I do from the shortcut I added to the user’s dashboard.

3pim1.png

Navigating to the My roles section of the menu I can see that the user is eligible to for the Security Administrator Azure Active Directory (AAD) role.

3pim2

Selecting the Activate link opens up a new section where the user will complete the necessary steps to activate the role.  As you can see from my screenshot below, the Security Administrator role is one of the roles Microsoft considers high risk and enforces step-up authentication via Azure MFA.  Selecting the Verify your identity before proceeding link opens up another section that informs the user he or she needs to verify the identity with an MFA challenge.  If the user isn’t already configured for MFA, they will be setup for it at this stage.

3pim3.png

Homer Simpson is already configured for MFA so after the successful response to the MFA challenge the screen refreshes and the Activation button can now be clicked.

3pim4.png

After clicking the Activation button I enter a new section where I can configure a custom start time, configuration an activation duration (up to the maximum configured for the Role), provide ticketing information, and provide an activation reason..  As you can see I’ve adjusted the max duration for an activation from the default of one hour to three hours and have configured a requirement to provide a ticket number.  This could be mapped back to your internal incident or change management system.

3pim5.png

After filling in the required information I click the Activate button, the screen refreshes back to the main request screen, and I’m informed that activation for this role requires approval.  In addition to modifying the activation and requiring a ticket number, I also configured the role to require approval.

3pim6.png

At this point I opened an instance of Google Chrome and authenticated to Azure AD as a user who is in the privileged role administrator role.  Opening up AAD PIM with this user and navigating to the My roles section and looking at the Active roles shows the user is a permanent member of the Security Administrators, Global Administrators, and Privileged Role Administrators roles.

3pim7.png

I then navigate over to the Approve requests section.  Here I can see the pending request from Homer Simpson requesting activation of the Security Administrator role.  I’m also provided with the user’s reason and start and end time.  I’d like to see Microsoft add a column for the user’s ticket number.  My approving user may want to reference the ticket for more detail on why the user is requesting the role

3pim8.png

At this point I select the pending request and click the Approve button.  A new section opens where I need to provide the approval reason after which I hit the Approve button.

3pim9.png

After approving the blue synchronization-like image is refreshed to a green check box indicating the approval has been process and the user’s role is now active.

3pim10

If I navigate to My audit history section I can see the approval of Homer’s request has been logged as well as the reasoning I provided for my approval.

3pim11.png

If I bounce back to the Microsoft Edge browser instance that Homer Simpsons is logged into and navigate to the My requests and I can see that my activation has been approved and it’s now active.

3pim12.png

At this point I have requested the role and the role has been approved by a member of the Privileged Role Administrators role.  Let’s try modifying an AIP Policy.  Navigating back to Homer Simpsons dashboard I select the Azure Information Protection icon and receive the notification below.

3pim13.png

What happened?  Navigating to Homer Simpsons mailbox shows the email confirming the role has been activated.

3pim14.png

What gives?  To figure out the answer to that question, I’m going to check on the Fiddler capture I started before logging in as Homer Simpson.

In this capture I can see my browser sending my bearer token to various AIP endpoints and receiving a 401 return code with an error indicating the user isn’t a member of the Global Administrators or Security Administrators roles.

3pim15.png

I’ll export the bearer token, base64 decode it and stick it into Notepad. Let’s refresh the web page and try accessing AIP again. As we can see AIP opens without issues this time.

3pim16.png

At this point I dumped the bearer token from the failure and the bearer token from a success and compared the two as seen below.  The IAT, NBF, and EXP are simply speak to times specific to the claim.  I can’t find any documentation on the aio or uti claims.  If anyone has information on those two, I’d love to see it.

3pim17.png

I thought it would be interesting at this point to deactivate my access and see if I could still access AIP.  To deactivate a role the user simply accesses AAD PIM, goes to My Roles and looks the Active Roles section as seen below.

3pim18.png

After deactivation I went back to the dashboard and was still able to access AIP.  After refreshing the browser I was unable to access AIP.  Since I didn’t see any obvious cookies or access tokens being created or deleted.  My guess at this point is applications that use Azure AD or Office 365 Roles have some type of method of receiving data from AAD PIM.  A plausible scenario would be an application receives a bearer token, queries Azure AD to see if the user is in one a member of the relevant roles for the application.  Perhaps for eligible roles there is an additional piece of information indicating the timespan the user has the role activated and that time is checked against the time the bearer token was issued.  That would explain my experience above because the bearer token my browser sent to AIP was obtained prior to activating my role.  I verified this by comparing the bearer token issued from the delegation point at first login to the one sent to AIP after I tried accessing it after activation.  Only after a refresh did I obtain a new bearer token from the delegation endpoint.

Well folks that’s it for this blog entry.  If you happen to know the secret sauce behind how AAD PIM works and why it requires a refresh I’d love to hear it!  See you next post.

Exploring Azure AD Privileged Identity Management (PIM) – Part 1

Exploring Azure AD Privileged Identity Management (PIM) – Part 1

We’re going to take a break from Azure Information Protection and shift our focus to Azure Active Directory Privileged Identity Management (AAD PIM).

If you’ve ever had to manage an application, you’re familiar with the challenge of trying to keep a balance between security and usability when it comes to privileged access.  In many cases you’re stuck with users that have permanent membership in privileged roles because the impact to usability of the application is far too great to manage that access on an “as needed basis” or as we refer to it in the industry “just in time” (JIT).   If you do manage to remove that permanent membership requirement (often referred to as standing privileged access) you’re typically stuck with a complicated automation solution or a convoluted engineering solution that gives you security but at the cost of usability and increasing operational complexity.

Not long ago the privileged roles within Azure Active Directory (AAD), Office 365 (O365), and Azure Role-Based Access Control had this same problem.  Either a user was a permanent member of the privileged role or you had to string together some type of request workflow that interacted with the Graph API or triggered a PowerShell script.  In my first entry into Azure AD, I had a convoluted manual process which involved requests, approvals, and a centralized password management system.  It worked, but it definitely impacted productivity.

Thankfully Microsoft (MS) has addressed this challenge with the introduction of Azure AD Privileged Identity Management (AAD PIM).  In simple terms AAD PIM introduces the concept of an “eligible” administrator which allows you to achieve that oh so wonderful JIT.  AAD PIM is capable of managing a wide variety of roles which is another area Microsoft has made major improvements on.  Just a few years ago close to everything required being in the Global Admin role which was a security nightmare.

In addition to JIT, AAD PIM also provides a solid level of logging and analytics, a centralized view into what users are members of privileged roles, alerting around the usage of privileged roles, approval workflow capabilities (love this feature), and even provides an access review capability to help with access certification campaigns.  You can interact with AAD PIM through the Azure Portal, Graph API, or PowerShell.

To get JIT you’ll need an Azure Active Directory Premium P2 or Enteprise Mobility and Security E5 license.  Microsoft states that every use that benefits from the feature requires a license.  While this is a licensing requirement, it’s not technically enforced as we see in my upcoming posts.

You’re probably saying, “Well this is all well and good Matt, but there is nothing here I couldn’t glean from Microsoft documentation.”  No worries my friends, we’ll be using this series to walk to demonstrate the capabilities so you can see them in action.  I’ll also be breaking out my favorite tool Fiddler to take a look behind the scenes of how Microsoft manages to elevate access for the user after a privileged role has been activated.


The Evolution of AD RMS to Azure Information Protection – Part 6 – Deep Dive into Client Bootstrapping

The Evolution of AD RMS to Azure Information Protection – Part 6 – Deep Dive into Client Bootstrapping

Today I’m back with more Azure Information Protection (AIP) goodness.  Over the past five posts I’ve covered the use cases, concepts and migration paths.  Today I’m going to get really nerdy and take a look behind the curtains at how the MSIPC client shipped with Office 2016 interacts with AIP .  I’ll be examining the MSIPC client log and reviewing procmon and Fiddler captures.  If the thought of examining log files and SOAP calls excites you, this is a post for you.  Make sure to take a read through my previous posts to ensure you understand my lab infrastructure and configuration as well as key AIP concepts.

Baselining the Client

Like any good engineer, I wanted to baseline my machine to ensure the MSIPC client was functioning correctly.  Recall that my clients are migrating from an on-premises AD RMS implementation to AIP.  I haven’t completed my removal of AD RMS so the service connection point for on-premises AD RMS is still there and the migration scripts Microsoft provides are still in use.  Let’s take a look at the registry entries that are set via the Migrate-Client and Migrate-User script.  In my last post I covered the purpose of the two scripts.  For the purposes of this post, I’m going to keep it brief and only cover registry entries applicable to the MSIPC client shipped with Office 2016.

  1. Migrate-Client
    • Condition: Runs each computer startup only if it detects it has not run before or the version variable in the script has been changed.
    • Registry Entries Modified:
      • Deletes HKLM\Software\Microsoft\MSIPC\ServiceLocation keys
      • Deletes HKLM\Software\Wow6432Node\Microsoft\MSIPC\ServiceLocation key
      • Deletes HKLM\Software\Microsoft\MSIPC\ServiceLocation\LicensingRedirection key
      • Deletes HKLM\Software\Wow6432Node\Microsoft\MSIPC\ServiceLocation\LicensingRedirection key
      • Add Default value to HKLM\Software\Microsoft\MSIPC\ServiceLocation\EnterpriseCertification key with data value pointing to AIP endpoint for tenant
      • Add Default value to HKLM\Software\Wow6432Node\Microsoft\MSIPC\ServiceLocation\EnterpriseCertification key with data value pointing to AIP endpoint for tenant
      • Add a value for the FQDN and single label URLs to on-premises AD RMS licensing pipeline to HKLM\Software\Microsoft\MSIPC\ServiceLocation\LicensingRedirection key with data values pointing to AIP endpoints for tenant
      • Add a value for the FQDN and single label URLs to on-premises AD RMS licensing pipeline to HKLM\Software\Wow6432NodeMicrosoft\MSIPC\ServiceLocation\LicensingRedirection key with data values pointing to AIP endpoints for tenant
  2. Migrate-User
    • Condition: Runs each user logon only if it detects it has not run before or the version variable in the script has been changed.
    • Registry Entries Modified:
      • Deletes HKCU\Software\Microsoft\Office\16.0\Common\DRM key
      • Deletes HKCU\Software\Classes\Local Settings\Software\Microsoft\MSIPC key
      • Deletes HKCU\Software\Classes\Microsoft.IPViewerChildMenu\shell key
      • Add DefaultServerUrl value to HKCU\Software\Microsoft\Office\16.0\Common\DRM key and set its data value to the AIP endpoint for the tenant
    • Files Modified:
      • Deletes the contents of the %localappdata%\Microsoft\MSIPC folder

A quick review of my client settings validates that all the necessary registry entries are in place and I have no issues consuming and created protected content.

Resetting the Client

If you have administered AD RMS in the past, you will be very familiar with how to re-bootstrap an RMS client.  Microsoft has made that entire process easier by incorporating a “reset” function into the AIP client.  The function can be accessed in Microsoft Office by hitting the drop down arrow for the AIP icon on the toolbar and selecting the Help and Feedback option.

6AIP1.png

After clicking the Help and Feedback option, a new window pops up where you can select the Reset Settings option to which performs a series of changes to the registry, deletions of RMS licenses, and AIP metadata.  Lastly, I log out of the machine.

6AIP2.png


Bootstrapping the Client with Azure Information Protection

After logging back in I start up Fiddler, open Microsoft Word, and attempt to open a file that was protected with my AD RMS cluster. The file opens successfully.

One thing to note is if you’re using Windows 10 and Microsoft Edge like I was, you’ll need to take the extra steps outlined here to successfully capture due to the AppContainer Isolation feature added back in Windows 8. If you do not take those extra steps, you’ll get really odd behavior. Microsoft Edge will fail any calls to intranet endpoints (such as AD FS in my case) by saying it can’t contact the proxy. Trying with Internet Explorer will simply cause Fiddler to fail to make the calls and to throw a DNS error. Suffice to say, I spent about 20 minutes troubleshooting the issue before I remembered Fiddler’s dialog box that pops up every new install about AppContainer and Microsoft Edge.

The first thing we’re going to look at is the MSIPC log files which keep track of the client activity. I have to give an applause to whichever engineer over at Microsoft thought it would be helpful to include such a detailed log. If you’ve administered on-premises AD RMS in the past on previous versions of Microsoft Office, you’ll know the joys (pain?) of client side tracing with DebugView.

When we pop open the log we get some great detail as to the client behavior. We can see the client read a number of registry entries. The first thing we see is the client discover that is not initialized so it calls an API to bootstrap the user. Notice in the below that it has identified my user and it’s mentioning OAuth as a method for authentication to the endpoint.

6AIP3.png

Following this we have a few more registry queries to discover the version of the operating system. We then have our first HTTP session opened by the client. I’m pretty sure this session is the initial user authentication to Azure AD in order to obtain a bearer access token for the user to call further APIs

6AIP4.png

Bouncing over to Fiddler we can check out the authentication process. We can see the machine reach out to Azure AD (login.windows.net), perform home realm discovery which Azure AD determines that geekintheweeds.com is configured for federated authentication. The client makes the connection to the AD FS server where the user is seamlessly authenticated via Kerberos. The windowstransport endpoint is called which supports the WS-Trust 1.3 active profile.  In an WS-Trust active flow, the client initiates the request (hence it’s active) vs the passive flow where the service provider initiates the flow.  This is how Office applications support modern (aka federated) authentication.

6AIP5

After the assertion is obtained, it’s posted to the /common/oauth2/token endpoint at login.windows.net.  The assertion is posted within a request for an access token, refresh token, and id token request using the saml1_1-bearer token grant type for the Azure RMS endpoint.

6AIP6.png

The machine is returned an access token, refresh token, and id token.  We can see the token returned is a bearer token allowing client to impersonate my user moving forward.

6AIP7.png

Dumping the access token into the Fiddler TextWizard and decoding the Base64 gives us the details of the token.  Within the token we can see an arm (authenticated method reference) of wia indicating the user authenticated using Windows authentication.  A variety of information about the user is included in the token including UPN, first name, and last name.

6AIP8.png

I’m fairly certain the tokens are cached to a flat file based upon some of the data I did via procmon while the bootstrap process initiated.  You can see the calls to create the file and write to it below.

6AIP9

After the tokens are obtained and cached we see from the log file that the MSIPC client then discovers it doesn’t have machine certificates.  It goes through the process of creating the machine certificates.

6AIP10.png

We now see the MISPC client attempts to query for the SRV record Microsoft introduced with Office 2016 to help with migrations from AD RMS.  The client then attempts discovery of service by querying the RMS-specific registry keys in the HKLM hive and comes across the information we hardcoded into the machine via the migration scripts.  It uses this information to make a request to the non-authenticated endpoint of https://<tenant_specific>/_wmcs/certification/server.asmx.

6AIP11

Bouncing back to Fiddler and continuing the conversation we can see a few different connections are created.  We see one to api.informationprotection.azure.com, another to mobile.pipe.aria.microsoft.com, and yet another to the AIP endpoint for my tenant.

6AIP12.png

I expected the conversation between api.informationprotection.azure.com and the AIP endpoint for my tenant.  The connection to mobile.pipe.aria.microsoft.com interested me.  I’m not sure if it was randomly captured or if it was part of the consumption of protected content.  I found a few Reddit posts where people were theorizing it has something to do with how Microsoft consumes telemetry from Microsoft Office.  As you could probably guess, this piqued my interest to know what exactly Microsoft was collecting.

We can see from the Fiddler captures that an application on the client machine is posting data to https://mobile.pipe.aria.microsoft.com/Collector/3.0/.  Examination of the request header shows the user agent as AriaSDK Client and the sdk-version of ACT-Windows Desktop.  This looks to be the method in which the telemetry agent for Office collects its information.

6AIP13.png

If we decode the data within Fiddler and dump both sets of data to Notepad we get some insight into what’s being pulled. Most of the data is pretty generic in that there is information about the version of Word I’m using, the operating system version, information that my machine is a virtual machine, and some activity IDs which must relate to something MS holds on their end. The only data point I found interesting was that my tenant ID is included in it. Given tenant id isn’t exactly a secret, it’s still interesting it’s being collected. It must be fascinating to see this telemetry at scale. Interesting stuff either way.

6AIP14.png

Continuing the conversation, let’s examine the chatter with my tenant’s AIP endpoint since the discovery was requested by the MSIPC client.  We see a SOAP request of GetServerInfo posted to https://<tenant_specific>/_wmcs/certification/server.asmx.  The response we receive from the endpoint has all the information our RMS client will need to process the request.  My deep dive into AD RMS was before I got my feet with Fiddler so I’ve never examined the conversations with the SOAP endpoints within AD RMS.  Future blog post maybe?  Either way, I’ve highlighted the interesting informational points below.  We can see that the service is identifying itself as RMS Online, has a set of features that cater to modern authentication, runs in Cryptomode 2, and supports a variety of authentication methods.  I’m unfamiliar with the authentication types beyond X509 and OAuth 2.  Maybe carry overs from on-prem?  Something to explore in the future.  The data boxed in red are all the key endpoints the RMS client needs to know to interact with the service moving forward.  Take note the request at this endpoint doesn’t require any authentication.  That comes in later requests.

6AIP15.png

After the response is received the MSIPC writes a whole bunch of registry entries to the HKCU hive for the user to cache all the AIP endpoint information it discovered.  It then performs a service discovery against the authenticated endpoint using its bearer token it cached to the tokencache file.

6AIP16.png

Once the information is written to the registry, the client initiates a method called GetCertAndLicURLsWithNewSD.  It uses the information it discovered previously to query the protected endpoint https://<tenant_specific>/_wmcs/oauth2/servicediscovery/servicediscovery.asmx.  Initially it receives a 401 unauthorized back with instructions to authenticate uses a bearer token.

6AIP17.png

The client tries again this time providing the bearer token it obtained earlier and placed in the tokencache file.  The SOAP action of ServiceDiscoveryForUser is performed and the client requests the specific endpoints for certification, licensing, and the new tracking portal feature of AIP.

6AIP18.png

The SOAP response contains the relevant service endpoints and user for which the query applied to.

6AIP19.png

The MSIPC client then makes a call to /_wmcs/oauth2/certification/server.asmx with a SOAP request of GetLicensorCertificate.  I won’t break that one down response but it returns the SLC certificate chain in XrML format.  For my tenant this included both the new SLC I generated when I migrated to AIP as well as the SLC from my on-premises AD RMS cluster that I uploaded.

6AIP20.png

The MISPC log now shows a method called GetNewRACandCLC being called which is used to obtain a RAC and CLC. This is done by making a call to the certification pipeline.

6AIP21.png

The call to /_wmcs/oauth2/certification/certification.asmx does exactly as you would expect and calls the SOAP request of Certify. This included my user’s RAC, and both SLCs and certificates in that chain. The one interesting piece in the response was a Quota tag as seen below. I received back five certificates, so maybe there is a maximum that can be returned? If you have more than 4 on-premises AD RMS clusters you’re consolidating to AIP, you might be in trouble. 🙂

6AIP22.png

The MISPC log captures the successful certification and logs information about the RAC.

6AIP23.png

Next up the client attempts to obtain a CLC by calling continuing with the GetNewRACandCLC method. It first calls the /_wmcs/licensing/server.asmx pipeline and makes a GetServerInfo SOAP request which returns the same information we saw in the last request to server.asmx. This request isn’t authenticated and the information returned is written to the HKCU hive for the user.

6AIP24.png

The service successfully returns the users CLC.  The last step in the process is the MSIPC service requests the RMS templates associated with the user.  You can see the template that is associated custom AIP classification label I created.

6AIP25.png

Last but not least, the certificates are written to the %LOCALAPPDATA%\Microsoft\MSIPC directory.

6AIP26.png

Conclusion

Very cool stuff right? I find it interesting in that the MSIPC client performs pretty much the same way it performs with on-premises exempting some of the additional capabilities introduced such as the search for the SRV DNS records and the ability to leverage modern authentication via the bearer token. The improved log is a welcome addition and again, stellar job to whatever engineer at Microsoft thought it would be helpful to include all the detail that is included in that log.

If you’ve used AD RMS or plan to use AIP and haven’t peeked behind the curtains I highly recommend it. Seeing how all the pieces fit together and how a relatively simple web service and a creative use of certificates can provide such a robust and powerful security capability will make your appreciate the service AD RMS tried to be and how far ahead of its time it was.

I know I didn’t cover the calls to the AIP-classification specific web calls, but I’ll explore that in my next entry.  Hopefully you enjoyed nerding out on this post as much as I did. Have a great week and see you next post!