Securing Azure OpenAI Studio

Securing Azure OpenAI Studio

This is part of my series on GenAI Services in Azure:

  1. Azure OpenAI Service – Infra and Security Stuff
  2. Azure OpenAI Service – Authentication
  3. Azure OpenAI Service – Authorization
  4. Azure OpenAI Service – Logging
  5. Azure OpenAI Service – Azure API Management and Entra ID
  6. Azure OpenAI Service – Granular Chargebacks
  7. Azure OpenAI Service – Load Balancing
  8. Azure OpenAI Service – Blocking API Key Access
  9. Azure OpenAI Service – Securing Azure OpenAI Studio
  10. Azure OpenAI Service – Challenge of Logging Streaming ChatCompletions
  11. Azure OpenAI Service – How To Get Insights By Collecting Logging Data
  12. Azure OpenAI Service – How To Handle Rate Limiting
  13. Azure OpenAI Service – Tracking Token Usage with APIM
  14. Azure AI Studio – Chat Playground and APIM
  15. Azure OpenAI Service – Streaming ChatCompletions and Token Consumption Tracking
  16. Azure OpenAI Service – Load Testing

Updates

  • 5/28/2024 – Updated to mention that objectid of security principal is now included in native diagnostic logs

Hello again folks! Today I’m going to bounce back into AOAI (Azure OpenAI Service) mode and cover a topic that frequently comes up with my customers in regards to securing the service. Over the past year I’ve covered the infrastructure and security controls available within the AOAI. Much of that focus was on accessing the service through an SDK (software development kit) or directly through the API. Today I’m going to spend some time talking about the security controls available to secure the Azure OpenAI Studio, which I’m going to refer to as Studio for the rest of this post.

If you’re unfamiliar with Studio, it’s a GUI-based experience for interacting with the data plane of the AOAI service. In my authorization post, I cover the difference between the service’s management and data planes. At a high level, the management plane is for operations “on the service” while the data plane is for operations “in the service”.

Azure OpenAI Service Management Plane vs Data Plane

Microsoft recommends using an SDK or the API directly when interacting with the data plane of the service. It’s a good recommendation because there are lots of knobs for you to turn to lock down the service and address gaps in the service. When the service is using through the Azure OpenAI Studio, you lose the ability to inject some type of control component between the user’s endpoint and the instance of AOAI. The rest of this post will cover why that is, what controls are available to you, and what risks you’ll have to accept if you opt to make Studio available to your users.

Before I jump into the details of what you get and what you don’t get, I want to cover what some of the main use cases are for using Studio versus accessing the service through an SDK or direct through the API. First and foremost, it should be obvious that GUIs are much more accessible than having to write code to interact with the API. For example, say I’m performing a PoC (proof-of-concept) of the service and I want to quickly test the gpt 3.5 model’s ability to answer a question in my field. For that I can use the Completions interface within Studio to get a chat-like interface with zero coding.

Example of Chat Completion functionality in Azure OpenAI Studio

Another use case may be I want a simple way to test the models on my organization’s data to see if the models can provide value to that data. I don’t want to invest a ton of time coding to perform this functionality because I don’t yet know if the models will be able to provide any value on top of my data.

A lot of the use for Studio comes down to its simplicity of use. If you need to do some basic PoC with minimal funding, using Studio can be a nice shortcut to doing all the code you’d need to do in order to interact with the API to perform the actions.

Long story short, if you’re offering this service to your business units you’re likely going to be asked to provide Studio access to your users. My goal here is to help you understand the risks and mitigations of doing so.

So how does the Azure OpenAI Studio work? It appears to use an MVC (model-view-controller) architecture (or something similar to it for those application developer purists who are much smarter than me). In simple terms for non-developers like myself, the Studio application instructs the user’s browser which data plane endpoints to call and then provides a pretty view in the user’s browser of the responses received from those endpoints.

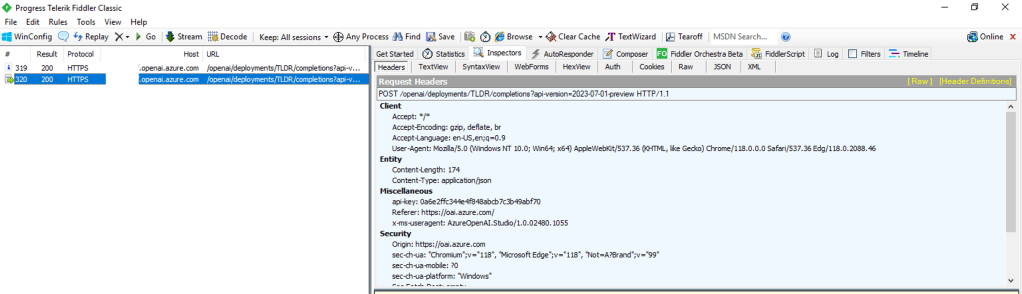
For you non-developers like myself, I find it helpful to perform an action within Studio and then review the Fiddler capture to observe what the browser did. In the Fiddler capture below, I used the Chat Completion interface in Studio to send a request a completion. You can see that the request was sent from my browser to the data plane endpoint of the service (openai.azure.com).

Fiddler capture of Chat Completion in Azure OpenAI Studio

This trait of the Studio can work to your advantage when you need to secure the Studio. If the calls are made from the user’s endpoint to the data plane, then that means network controls around the data plane can be used to enforce control over access to the Studio for the instance of AOAI. As I covered in my prior posts, AOAI is no different from other Microsoft PaaS services and provides the standard network controls which include the service firewall and support for Private Endpoints.

A common security standard for organizations using Azure is to use Private Endpoints for PaaS services. Private Endpoints allow you to restrict access to the public IP of a PaaS service and limit it to access through an endpoint deployed in the customer’s virtual network. Accessing the service through the Private Endpoint requires the user’s endpoint to be within your organization’s private network. This means by creating a Private Endpoint you can block access to access to the AOAI instance through Studio to endpoints within your private network. If the user attempts to access the AOAI instance through Studio outside of the private network, they’ll be blocked and will receive the error you see below.

Network controls blocking access through Azure OpenAI Studio

Placing your AOAI instance behind a Private Endpoint will be your primary means of controlling access to an AOAI instance through Studio. Creating the private endpoint and blocking public access keeps user’s from accessing the AOAI instance through Studio when hitting the public IP. However, users can still reach the AOAI instance through Studio if they are on the private network. You can lock that down by wrapping an NSG (Network Security Group) around the subnet containing the Private Endpoint, turning on Private Endpoint Network Policies in the subnet, and placing some type of mediator (such an Azure API Management instance) between the user’s endpoint and the AOAI instance. That will restrict the users to the API when interacting with the AOAI instance.

Example AOAI architecture

Outside of network controls, you don’t have much ability to control Studio access. There are no specific RBAC permissions that I’m aware of today that could be stripped from an RBAC role to prevent access to Studio. When it comes to authorization you should strive for least privilege as you’ve always done. My authorization blog has some guidance on how to handle that within the service.

Now that you understand what controls you have, let’s talk about the risks you’re going to need to accept if you plan on granting users access to Studio.

First and foremost, you’re going to need to accept the very basic logging provided by the diagnostics logging available within an AOAI instance. As I cover in the linked post above, the logging is minimal. Prompts and responses will not be logged, traceability in the logs will be limited, and you won’t get metrics as to token usage per call. The lack of visibility into prompts and responses becomes all that much more critical if shut off the built in content filtering and abuse monitoring.

Next up, you won’t have the ability to limit the usage of service on a per user or per app basis. AOAI has API limits around requests and tokens. There are capabilities today to control this on per user or per app basis within a single instance of AOAI today.

Let me summarize what we covered today:

  • Network controls are your primary means to securing access to an AOAI instance through the Azure OpenAI Studio
  • Placing an AOAI instance behind a Private Endpoint and blocking public access restrict Azure OpenAI Studio access to the AOAI instance to endpoints within your private network
  • Azure OpenAI Studio access to an AOAI instance can be blocked completely by placing the AOAI instance behind a private endpoint, inserting some sort of mediation solution (such as API Management, and wrapping an NSG around the subnet containing the Private Endpoint which blocks all access but traffic from the mediator.
  • Exercise least privilege using Azure RBAC but be aware there is no specific permission that allows access to the Azure OpenAI Studio
  • The diagnostic logs provided limited information. Prompts and responses are not logged to the diagnostic logs and neither are token consumption. The former will mean you don’t have visibility into the prompts users are making (think abuse, inclusion of PII, etc) and the latter means you won’t be able to tell who is creating the costs within the instance.

Considering all of the above, my recommendation to customers it to establish an approval process for usage of Studio and ensure there is a strong business need to justify accepting the risks outlined above. The lack of logging is the real gut punch for me. That is a lot of risk, especially since most regulated orgs opt out of content filtering and abuse monitoring.

Nothing to fancy in this post, but hopefully it helps some folks better understand the security options for Azure OpenAI Studio access.

Thanks!

Blocking API Key Access in Azure OpenAI Service

Blocking API Key Access in Azure OpenAI Service

This is part of my series on GenAI Services in Azure:

  1. Azure OpenAI Service – Infra and Security Stuff
  2. Azure OpenAI Service – Authentication
  3. Azure OpenAI Service – Authorization
  4. Azure OpenAI Service – Logging
  5. Azure OpenAI Service – Azure API Management and Entra ID
  6. Azure OpenAI Service – Granular Chargebacks
  7. Azure OpenAI Service – Load Balancing
  8. Azure OpenAI Service – Blocking API Key Access
  9. Azure OpenAI Service – Securing Azure OpenAI Studio
  10. Azure OpenAI Service – Challenge of Logging Streaming ChatCompletions
  11. Azure OpenAI Service – How To Get Insights By Collecting Logging Data
  12. Azure OpenAI Service – How To Handle Rate Limiting
  13. Azure OpenAI Service – Tracking Token Usage with APIM
  14. Azure AI Studio – Chat Playground and APIM
  15. Azure OpenAI Service – Streaming ChatCompletions and Token Consumption Tracking
  16. Azure OpenAI Service – Load Testing

Hello folks! I’m back again with another post on the Azure OpenAI Service. I’ve been working with a number of Microsoft customers in regulated industries helping to get the service up and running in their environments. A question that frequently comes up in this conversations is “How do I prevent usage of the API keys?”. Today, I’m going to cover this topic.

I’ve covered authentication in the AOAI (Azure OpenAI Service) in a past post so read that if you need the gory details. For the purposes of this post, you need to understand that AOIA supports both API keys and AAD (Azure Active Directory) authentication. This dual support is similar to other Azure PaaS (platform-as-a-service) offerings such as Azure Storage, Azure CosmosDB, and Azure Search. When the AOAI instance is created, two API keys are generated which provide full permissions at the data plane. If you’re unfamiliar with the data plane versus management plane, check out my post on authorization.

Azure Portal showing AOAI API Keys

Given the API keys provide full permissions at the data plane monitoring and controlling their access is critical. As seen in my logging post monitoring the usage of these keys is no simple task since the built-in logging is minimal today. You could use a custom APIM (Azure API Management) policy to include a portion of the API key to track its usage if you’re using the advanced logging pattern, but you still don’t have any ability to restrict what the person/application can do within the data plane like you can when using AAD authentication and authorization. You should prefer AAD authentication and authorization where possible and tightly control API key usage.

In my authorization and logging posts I covered how to control and track who gets access to the API keys. I’ve also covered how APIM can be placed in front of an AOAI instance to enforce AAD authentication. If you block network access to the AOAI service to anything but APIM (such as using a Private Endpoint and Network Security Group) you force the usage of APIM which forces the use of AAD authentication preventing API keys from being used.

Azure OpenAI Service and Azure API Management Pattern

The major consideration of the pattern above is it breaks the Azure OpenAI Studio as of today (this may change in the future). The Azure OpenAI Studio is an GUI-based application available within the Azure Portal which allows for simple point-and-click actions within the AOAI data plane. This includes actions such as deploying models and sending prompts to a model through a GUI interface. While all this is available via API calls, you will likely have a user base that wants access a simple GUI to perform these types of actions without having to code to them. To work around this limitation you have to open up network access from the user’s endpoint to the AOAI instance. Opening up these network flows allows the user to bypass APIM which means the user could use an API key to make calls to the AOAI service. So what to do?

In every solution in tech (and life) there is a screwdriver and a hammer. While the screwdriver is the optimal way to go, sometimes you need the hammer. With AOAI the hammer solution is to block usage of API key-based authentication at the AOAI instance level. Since AOAI exists under the Azure Cognitive Services framework, it benefits from a poorly documented property called disableLocalAuth. Setting this property to true blocks the API key-based authentication completely. This property can be set at creation or after the AOAI instance has been deployed. You can set it via PowerShell or via a REST call. Below is code demonstrating how to set it using a call to the Azure REST API.

body=$(cat <<EOF
{
    "properties" : {
        "disableLocalAuth": true
    }
}

az rest --method patch --uri "https://management.azure.com/subscriptions/SUBSCRIPTION_ID/resourceGroups/RESOURCE_GROUP/providers/Microsoft.CognitiveServices/accounts/AOAI_INSTANCE_NAME?api-version=2021-10-01" --body $body              

The AOIA instance will take about 2-5 minutes to update. Once the instance finishes updating, all calls to it using API key-based authentication will receive an error such as seen below when using the OpenAI Python SDK.

You can re-enable the usage of API keys by setting the property back to false. Doing this will update the AOAI resource again (around 2-5 minutes) and the instance will begin accepting API keys. Take note that turning the setting off and then back on again WILL cycle the API keys so don’t go testing this if you have applications in production using API keys today.

Mission accomplished right? The user or application can only access the AOAI instance using AAD authentication which enforced granular Azure RBAC authroization. Heck, there is even an Azure Policy available you can use to audit whether AOAI instances have had this property set.

There is a major consideration with the above method. While you’ve blocked access to the API keys, you’re still created a way to circumvent APIM. This means you lose out on the advanced logging provided by APIM and you’ll have to live with the native logging. You’ll need to determine whether that risk is acceptable to your organization.

My suggestion would be to use this control in combination with strict authorization and network controls. There should be a very limited set of users with permissions directly on the AOAI resource and the direct network access to the resource should be tightly controlled. The network control could be accomplished by creating a shared jump host users that require this access could use. Key thing is you treat access to the Azure OpenAI Studio as an exception versus the norm. I’d imagine Microsoft will evolve the Azure OpenAI Studio deployment options over time and address the gaps in native logging. For today, this provides a reasonable compromise.

I did encounter one “quirk” with this option that is worth noting. The account I used to lab this all out had the Owner role assignment at the subscription level. With this account I was able to do whatever I wanted within the AOAI data layer when disableLocalAuth was set to false. When I set disableLocalAuth to true I was unable to make data plane calls (such as deploying new models). When I granted my user one of the data plane roles (such as Azure Cognitive Service OpenAI Contributor) I was able to perform data plane operations once again. It seems like setting this property to true enforces a rule which requires being granted specific data plane-level permissions. Make sure you understand this before you modify the property.

Well folks that concludes this blog post. Here are your key takeaways:

  1. API Key-based authentication can be blocked at the AOIA instance by setting the disableLocalAuth property to true. This setting can be set at deployment or post deployment and takes 2-5 minutes to take effect. Switching the value of this property from true to false will regenerate the API keys for the instance.
  2. The Azure OpenAI Studio requires the user’s endpoint have direct network access to the AOAI instance. This is because it uses the user’s endpoint to make specific API calls to the data plane. You can look at this yourself using debug mode in your browser or a local proxy like Fiddler. Direct network access to the AOAI instance means you will only have the information located in the native logs for the activities the user performs.
  3. Setting disableLocalAuth to true enforces a requirement to have specific data plane-level permissions. Owner on the subscription or resource group is not sufficient. Ensure you pre-provision your users or applications who require access to the AOAI instance with the built-in Azure RBAC roles such as Azure Cognitive Services OpenAI User or a custom role with equivalent permissions prior to setting the option to true.

Thanks folks and have a great weekend!

Granular Chargebacks in Azure OpenAI Service

Granular Chargebacks in Azure OpenAI Service

This is part of my series on GenAI Services in Azure:

  1. Azure OpenAI Service – Infra and Security Stuff
  2. Azure OpenAI Service – Authentication
  3. Azure OpenAI Service – Authorization
  4. Azure OpenAI Service – Logging
  5. Azure OpenAI Service – Azure API Management and Entra ID
  6. Azure OpenAI Service – Granular Chargebacks
  7. Azure OpenAI Service – Load Balancing
  8. Azure OpenAI Service – Blocking API Key Access
  9. Azure OpenAI Service – Securing Azure OpenAI Studio
  10. Azure OpenAI Service – Challenge of Logging Streaming ChatCompletions
  11. Azure OpenAI Service – How To Get Insights By Collecting Logging Data
  12. Azure OpenAI Service – How To Handle Rate Limiting
  13. Azure OpenAI Service – Tracking Token Usage with APIM
  14. Azure AI Studio – Chat Playground and APIM
  15. Azure OpenAI Service – Streaming ChatCompletions and Token Consumption Tracking
  16. Azure OpenAI Service – Load Testing

Updates:

Yes folks, it’s time for yet another Azure OpenAI Service post. This time around I’m going to cover a pattern that can help with operationalizing the service by collecting and analyzing logging data for proper internal chargebacks to the many business units you likely have requesting the service. You’ll want to put on your nerd hat today because we’re going to need to dive a bit in the weeds for this one.

Let me first address why this post is even necessary. The capabilities provided by the AOAI (Azure OpenAI Service) have the feel of a core foundational technology, almost feeling as necessary as basic networking and PKI (public key infrastructure). The service has usages in almost every portion of the business and, very likely, every business unit is asking you for AI at this point.

Beyond the business demand, the architecture of the Azure OpenAI Service lends itself well to being centralized. Each instance offers the same set of static models and the data sent to and returned from the models is ephemeral. Unless you are creating fine-tuned models (which should be a very small percentage of customers), there isn’t any data stored by the service. Yes, there is default storage and human review of prompts and completions for abuse, but customers can opt out of this process. Additionally, as of the date of this blog, customers do not have access to those stored prompts and completions anyway so the risk of one compromise of those 30-days of stored prompts and completions due to a failed customer control doesn’t exist. Don’t get me wrong, there are legitimate reasons to create business unit specific instances for the service for edge use cases such as the creation of fine-tuned models. There are also good arguments to be made to create specific instances for compliance boundaries and separating production from non-production. However, you should be looking at consolidating instances where possible and providing it as a centralized core service.

Now if you go down the route I suggested above, you’ll run into a few challenges. Two of most significant challenges are throttling limits per instance and chargebacks. Addressing the throttling problem isn’t terribly difficult if you’re using the APIM (Azure API Management) pattern I mentioned in my last post. You can enforce specific limits on a per application basis when using Azure AD authentication at APIM on the frontend and you can use a very basic round robin-like load balancing APIM policy at the backend to scale across multiple Azure OpenAI Service instances. The chargeback problem is a bit more difficult to solve and that’s what I’ll be covering in the rest of the post.

The AOAI Service uses a consumption model for pricing which means the more you consume, the more you pay. If you opt to centralize the service, you’re going to need a way to know which app is consuming which amount of tokens. As I covered in my logging post, the native logging capabilities of the AOAI service are lacking as of the date of this blog post. The logs don’t include details as to who made a call (beyond an obfuscated IP address) or the number of tokens consumed by a specific call. Without this information you won’t be able to determine chargebacks. You should incorporate some of this logging directly into the application calling the AOAI service, but that logging will likely be application centric where the intention is to trace a specific call back to an individual user. For a centralized service, you’re likely more interested in handling chargebacks at the enterprise level and want to be able to associate specific token consumption back to a specific business unit’s application.

I took some time this week and thought about how this might be able to be done. The architecture below is what I came up with:

Azure OpenAI Service Chargeback Architecture

APIM and APIM custom policies are the key components of this architecture that make chargebacks possible. It is used to accomplish two goals:

  1. Enforce Azure AD Authentication and Authorization to the AOAI endpoint.
  2. Provide detailed logging of the request and response sent to the service.

Enforcing Azure AD authentication and authorization gives me the calling application’s service principal or managed identity identifier which allows me to correlate the application back to a specific business unit. If you want the details on that piece you can check out my last post. I’ve also pushed the custom APIM policy snippet to GitHub if you’d like to try it yourself.

The second goal is again accomplished through a custom APIM policy. Since APIM sits in the middle of the conversation it gets access to both the request from the application to the AOAI service and the response back. Within the response from a Completion or ChatCompletion the API returns the number of prompt, completion, and total tokens consumed by a specific request as can be seen below.

{
  "choices": [
    {
      "finish_reason": "stop",
      "index": 0,
      "message": {
        "content": "This is a test message.",
        "role": "assistant"
      }
    }
  ],
  "created": 1684425128,
  "id": "chatcmpl-7HaDAS0JUZKcAt2ch2GC2tOJhrG2Q",
  "model": "gpt-35-turbo",
  "object": "chat.completion",
  "usage": {
    "completion_tokens": 6,
    "prompt_tokens": 14,
    "total_tokens": 20
  }
}

Awesome, the information we need is there but how do we log it? For that, you can use an APIM Logger. An APIM Logger is an integration with a specific instance of Azure Application Insights or Azure Event Hub. The integration allows you to specify the logger in an APIM policy and send specific data to that integrated service. For the purposes of this integration I choose the Azure Event Hub. The reason being I wanted to allow logging large events (the integration supports up to 200KB messages) in case I wanted to capture the prompt or completion and I wanted the flexibility to integrate with an upstream service for ETL (extract, transform, load).

Setting the up the logger isn’t super intuitive if you want to use a managed identity for APIM to authenticate to the Azure Event Hub. Once the logger is created, you can begin calling it in the APIM policy. Below is an example of the APIM policy I used to parse the request and response and extract the information I was interested in.

        <log-to-eventhub logger-id="chargeback" partition-id="1">@{
                var responseBody = context.Response.Body?.As<JObject>(true);
                return new JObject(
                    new JProperty("event-time", DateTime.UtcNow.ToString()),
                    new JProperty("appid", context.Request.Headers.GetValueOrDefault("Authorization",string.Empty).Split(' ').Last().AsJwt().Claims.GetValueOrDefault("appid", string.Empty)),
                    new JProperty("operation", responseBody["object"].ToString()),
                    new JProperty("model", responseBody["model"].ToString()),
                    new JProperty("modeltime", context.Response.Headers.GetValueOrDefault("Openai-Processing-Ms",string.Empty)),
                    new JProperty("completion_tokens", responseBody["usage"]["completion_tokens"].ToString()),
                    new JProperty("prompt_tokens", responseBody["usage"]["prompt_tokens"].ToString()),
                    new JProperty("total_tokens", responseBody["usage"]["total_tokens"].ToString())
                ).ToString();
        }</log-to-eventhub>

In the policy above I’m extracting the application’s client id from the access token generated by Azure Active Directory for access to the Azure OpenAI Service. Recall that I have the other policy snippet in place I mentioned earlier in this post in place to force the application to authenticate and authorize using Azure AD. I then grab the pieces of information from the response that I would find useful in understanding the costs of the service and each app’s behavior within the AOAI service.

Now that the logs are being streamed to the Event Hub, you need something to pick them up. You have a lot of options in this space. You could use Azure Data Factory, custom function, Logic App, SIEM like Splunk, and many others. What you choose to do here really depends on where you want to put the data and what you want to do with it prior to putting it there. To keep it simple for this proof-of-concept, I chose the built-in Azure Stream Analytics integration with Event Hub.

The integration creates a Stream Analytics Job that connects to the Event Hub, does small amount of transformation in setting the types for specific fields, and loads the data into a PowerBI dataset.

Azure Stream Analytics and Event Hub Integration

Once the integration was setup, the requests and responses I was making to the AOAI services began to populate in the Power BI dataset. I was then able to build some really basic (and very ugly) visuals to demonstrate the insights this pattern provides for chargebacks. Each graphic shows the costs accumulated by individual applications by their application id.

Power BI Report Showing Application by Application Costs

Pretty cool right? Simple, easy to implement, and decent information to work from.

Since this was a POC, I cut some corners on the reporting piece. For example, I hardcoded the model pricing into some custom columns. If I were to do this at the enterprise level, I’d be supplementing this information from data pulled from the Microsoft Graph and the Azure Retail Pricing REST API. From the Microsoft Graph I’d pull additional attributes about the service principal / managed identity such as a more human readable name. From the Azure Retail Pricing REST API I’d pull down the most recent prices on a per model basis. I’d also likely store this data inside something like Cosmos or Azure SQL to provide for more functionality. From a data model perspective, I’d envision a “enterprise-ready” data model version of the pattern looking like the below.

Possible data model

The key challenge I set out to address here was how to get the data necessary to do chargebacks and what could I do with that data once I got it. Mission accomplished!

Well folks, that covers it. I’d love to see someone looking for a side project with more data skills than me (likely any human being breathing air today) build out the more “full featured” solution using a similar data model to what I referenced above. I hope this pattern helps point your organization in the right direction and spurs some ideas as to how you could solve the ETL and analysis part within your implementation of this pattern.

I’m always interested in hearing about cool solutions. If you come up with something neat, please let me know in the comments or each out on LinkedIn.

Have a great week!

APIM and Azure OpenAI Service – Azure AD

This is part of my series on GenAI Services in Azure:

  1. Azure OpenAI Service – Infra and Security Stuff
  2. Azure OpenAI Service – Authentication
  3. Azure OpenAI Service – Authorization
  4. Azure OpenAI Service – Logging
  5. Azure OpenAI Service – Azure API Management and Entra ID
  6. Azure OpenAI Service – Granular Chargebacks
  7. Azure OpenAI Service – Load Balancing
  8. Azure OpenAI Service – Blocking API Key Access
  9. Azure OpenAI Service – Securing Azure OpenAI Studio
  10. Azure OpenAI Service – Challenge of Logging Streaming ChatCompletions
  11. Azure OpenAI Service – How To Get Insights By Collecting Logging Data
  12. Azure OpenAI Service – How To Handle Rate Limiting
  13. Azure OpenAI Service – Tracking Token Usage with APIM
  14. Azure AI Studio – Chat Playground and APIM
  15. Azure OpenAI Service – Streaming ChatCompletions and Token Consumption Tracking
  16. Azure OpenAI Service – Load Testing

Hello folks!

I’m back with another entry on the Azure OpenAI Service (AOAI). In my previous posts, I’ve focused on the native security features that Microsoft provides to its customers to secure their instance of the service. However, in this post, I’ll be taking a slightly different approach. I’ll be walking you through a pattern that can be used to supplement those native features using Azure API Management (APIM)

For those who are unfamiliar with APIM, it is Azure’s API Gateway PaaS (platform-as-a-service) offering. Like any good API Gateway, it provides an abstraction layer away from backend APIs, which allows you to add additional authentication/authorization controls, throttling, transform requests, and log information from the requests and responses. In this post, I’ll be covering how the authentication/authorization controls can be used to supplement what is provided natively in AOAI. 

I’ve covered authentication in the AOAI in a previous post, refer to that post for the gory details. For the purposes of this post, you need to understand at the data plane it supports both Azure AD authentication/Azure RBAC authorization and authentication with two API keys created when the service is instantiated.

Azure OpenAI Service Authentication and Authorization

To my knowledge, there is no way to disable the usage of API keys. Moreover, as I’ve discussed in my logging post, it is extremely difficult to trace back to what is using the API keys because the source IP address is masked and the calls aren’t associated with specific API keys or Azure AD identities. This makes it critically important to control who has access to the API keys. In my post on authorization within the service, I cover this conversation in more detail, and yes, it can be done with Azure RBAC.

Sample log entry from Azure Open AI Service


Controlling access should be your first priority. However, wouldn’t it be great to restrict access to the service to Azure AD authentication only? This is where APIM comes in. APIM is placed between the application calling the AOAI service and the AOAI service. This establishes a man-in-the-middle scenario where APIM can analyze and modify the request and responses between the application and AOAI service.

APIM and AOAI Data Flow

The image above is an example of this pattern. Here, the calling application is provisioned with either a service principal (running outside of Azure) or a managed identity (running within Azure or integrated with Azure Arc). Instead of pointing the application directly to the Azure OpenAI Service, it is pointed to a custom domain configured on the APIM instance, and the APIM instance is configured to front the Azure OpenAI Service API. My peer Jake Wang put together some wonderful instructions on how to set this piece up in this repository.

Once APIM is set up to pass traffic along to the AOAI service, a custom APIM policy can be introduced to start controlling access. Since the goal is to limit access to the AOAI service to applications using an Azure AD identity, the validate-jwt policy can be used. This policy captures and extracts the JSON Web Token (bearer token) and parses the content within it to verify that the token was issued by the issuer specified in the policy. 

The policy would be structured as shown below. In this policy, any request made to the API must include a JWT issued by the Azure AD tenant (you can find your tenant ID here). Additionally, the policy filters to ensure that the token is intended for the Cognitive Services OAuth scope, which AOAI falls under. If the request doesn’t include the JWT issued by the tenant, the user receives a 403.

<!--
    This sample policy enforces Azure AD authentication and authorization to the Azure OpenAI Service. 
    It limits the authorization tokens issued by the organization's tenant for Cognitive Services.
    The authorization token is passed on to the Azure OpenAI Service ensuring authorization to the actions within
    the service are limited to the permissions defined in Azure RBAC.

    You must provide values for the AZURE_OAI_SERVICE_NAME and TENANT_ID parameters.
-->
<policies>
    <inbound>
        <base />
        <set-backend-service base-url="https://{{AZURE_OAI_SERVICE_NAME}}.openai.azure.com/openai" />
        <validate-jwt header-name="Authorization" failed-validation-httpcode="403" failed-validation-error-message="Forbidden">
            <openid-config url="https://login.microsoftonline.com/{{TENANT_ID}}/v2.0/.well-known/openid-configuration" />
            <issuers>
                <issuer>https://sts.windows.net/{{TENANT_ID}}/</issuer>
            </issuers>
            <required-claims>
                <claim name="aud">
                    <value>https://cognitiveservices.azure.com</value>
                </claim>
            </required-claims>
        </validate-jwt>
    </inbound>
    <backend>
        <base />
    </backend>
    <outbound>
        <base />
    </outbound>
    <on-error>
        <base />
    </on-error>
</policies>

If you followed the instructions in the repository I linked above, you can enforce this policy for the API you created as seen below.

APIM Policy In Place

Once the policy is in place, you can test it by attempting to authenticate to the APIM API endpoint and specifying an AOAI API key. In the image below, an attempt is made to call the endpoint with an API key.

APIM Denying Request with API Keys

Success! Even though the API key is valid, APIM is rejecting the request before it ever reaches the AOAI instance, preventing the API keys from being used. 

This pattern also passes the bearer token on to the AOAI service, so the RBAC you configure on your AOAI instance will be enforced. In my post on authorization, I provide some guidance on which built-in RBAC roles make since and which permissions you’ll want to carefully distribute.

What’s even cooler is that now that the application is forced to authenticate using Azure AD, the application ID can be extracted. If there are multiple applications hitting the same AOAI instance, different throttling can be applied on a per-application basis instead of having them share one big pool of request/token allowance at the AOAI service level

This can be achieved with a policy similar to the one shown below. This policy looks for specific app IDs in the bearer token and applies different throttling based on the application.

<!--
    This sample policy enforces Azure AD authentication and authorization to the Azure OpenAI Service. 
    It limits the authorization tokens issued by the organization's tenant for Cognitive Services.
    The authorization token is passed on to the Azure OpenAI Service ensuring authorization to the actions within
    the service are limited to the permissions defined in Azure RBAC.

    The sample policy also sets different throttling limits per application id. This is useful when an organization
    has multiple applications consuming the same instance of the Azure OpenAI Service. This sample shows throttling
    rules for two separate applications.

    You must provide values for the AZURE_OAI_SERVICE_NAME, TENANT_ID, and CLIENT_ID_APP parameters. You can add multiple
    lines for as many applications as you need to throttle.
-->
<policies>
    <inbound>
        <base />
        <set-backend-service base-url="https://{{AZURE_OAI_SERVICE_NAME}}.openai.azure.com/openai" />
        <validate-jwt header-name="Authorization" failed-validation-httpcode="403" failed-validation-error-message="Forbidden">
            <openid-config url="https://login.microsoftonline.com/{{TENANT_ID}}/v2.0/.well-known/openid-configuration" />
            <issuers>
                <issuer>https://sts.windows.net/{{TENANT_ID}}/</issuer>
            </issuers>
            <required-claims>
                <claim name="aud">
                    <value>https://cognitiveservices.azure.com</value>
                </claim>
            </required-claims>
        </validate-jwt>
        <choose>
            <when condition="@(context.Request.Headers.GetValueOrDefault("Authorization","").Split(' ').Last().AsJwt().Claims.GetValueOrDefault("appid", string.Empty).Equals("{{CLIENT_ID_APP1}}"))">
                <rate-limit-by-key calls="1" renewal-period="60" counter-key="@(context.Request.Headers.GetValueOrDefault("Authorization","").Split(' ').Last().AsJwt().Claims.GetValueOrDefault("appid", string.Empty))" increment-condition="@(context.Response.StatusCode == 200)" />
            </when>
        </choose>
        <choose>
            <when condition="@(context.Request.Headers.GetValueOrDefault("Authorization","").Split(' ').Last().AsJwt().Claims.GetValueOrDefault("appid", string.Empty).Equals("{{CLIENT_ID_APP2}}"))">
                <rate-limit-by-key calls="10" renewal-period="60" counter-key="@(context.Request.Headers.GetValueOrDefault("Authorization","").Split(' ').Last().AsJwt().Claims.GetValueOrDefault("appid", string.Empty))" increment-condition="@(context.Response.StatusCode == 200)" />
            </when>
        </choose>
    </inbound>
    <backend>
        <base />
    </backend>
    <outbound>
        <base />
    </outbound>
    <on-error>
        <base />
    </on-error>
</policies>

While the above is impressive, it only works if the application is restricted from direct access to the Azure OpenAI Service. To achieve this, I recommend creating a Private Endpoint for the AOAI service and wrapping a Network Security Group around the subnet (NSGs are now supported for private endpoints) to block access to the resources within the subnet to anything but the APIM instance. Keep in mind that the APIM instance needs to be able to access resources within the virtual network, which means that an APIM needs to be deployed in internal mode. The architecture could look similar to the image below.

APIM and Azure OpenAI Service with Private Networking

One thing to note is that if access is blocked as described above, it will break the AOAI studio feature within the Azure Portal. This is because calls to the data plane of the AOAI service are now blocked. A workaround could be to use a jump host or shared server if you need to continue supporting that feature. However, that opens up the risk that someone could write some code while on that machine and use the API keys. 

Let me sum up what we learned today:

  • APIM policies can be used to enforce Azure AD authentication and can block the use of API keys.
  • You must lock down the Azure OpenAI Service to just APIM to make this effective. Remember this will break access to the Studio within the Azure Portal.
  • Since you’re forcing Azure AD authentication, you can use the application id to add custom throttling.

That’s all for this post. The policy samples used in this blog have been uploaded to this repository on GitHub. Feel free to experiment with them and build upon them. If you end up building upon them and doing anything interesting, do reach out and let me know. I’m always interested in geeking out! In my next post, I’ll cover how to use an APIM policy to create custom logging that can be delivered to an Event Hub and consumed by the upstream service of your choice. Have a great week!