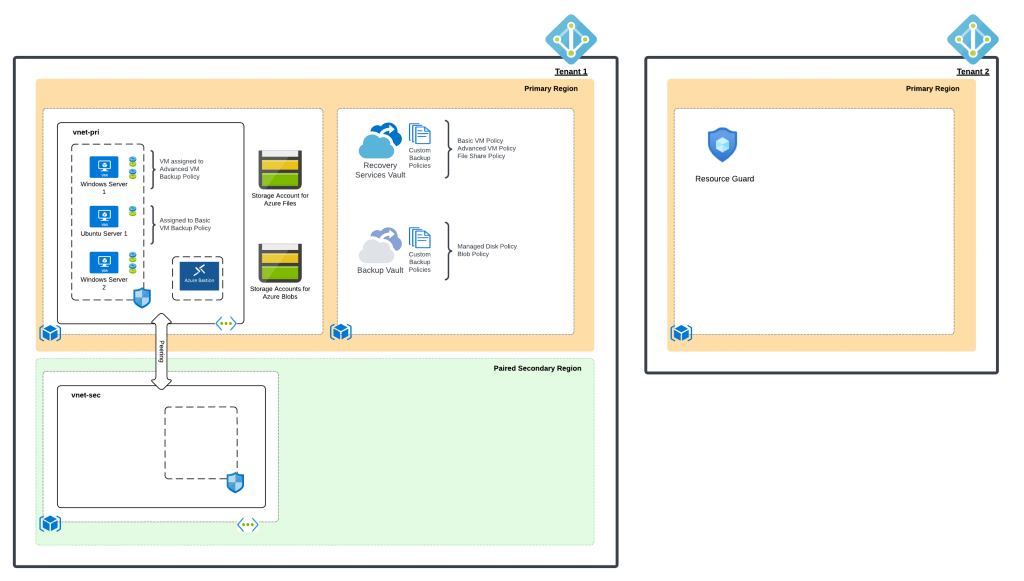
Welcome to part 2 of my series on Azure Backup and Resource Guard. In my first post, I gave some background on the value proposition Resource Guard provides. In this post I’ll be walking through how to configure it and demonstrating it in action. I’ll be using the lab pictured below which is based off the Azure Backup demo lab I have up on GitHub.
Lab used to demonstrate Resource Guard
For this demonstration, I used my jogcloud.com Azure AD tenant as the primary tenant where the Recovery Service Vaults will be stored. I have a small environment in my at home lab that is configured with a Windows Active Directory forest that is synchronized to that tenant. The geekintheweeds.com Azure AD tenant acted as the secondary tenant containing the Resource Guard. Homer Simpson will act as the owner of the Resource Guard (perhaps he is someone in Information Security) in the geekintheweeds.com tenant and Maggie Simpson will own the subscription containing the workload and Recovery Services Vault (emulating a typical application owner) in the jogcloud.com tenant.
Since both users are sourced from my on-premises Windows Active Directory forest and synchronized to jogcloud.com, I used Azure AD’s B2B feature to invite Homer Simpson into the geekintheweeds.com tenant. Once added through the B2B process, I setup an RBAC assignment granting Homer Simpson Owner of the subscription containing the Resource Guard.
Role Assignment in geekintheweeds.com tenant
Next up I went to create the Resource Guard in the GIW tenant and received the error below when attempting to create the Resource Guard resource in the GIW Tenant.
Error creating Resource Guard
The error message was pretty useless (not atypical of Azure errors). In this case, this error is due to the Microsoft.DataProtection resource provider not being registered in this subscription. Once registering the resource provider in question, the Resource Guard was provisioned without issue. One thing to note is that while the Resource Guard can exist within a different resource group, subscription, or tenant, it must be in the same region as the Recovery Services Vault it is protecting.
Once the Resource Guard resource was provisioned, I needed to give Maggie Simpson appropriate access over the Recovery Services Vault in the jogcloud.com tenant. For that, I provisioned a role assignment for the Contributor role on the subscription to the System Operators group synchronized from on-premises that Maggie is a member of.
Role Assignment in jogcloud.com tenant
Navigating to the Recovery Services Vault, Maggie Simpson is capable of modifying the soft delete feature (note it’s disabled for the purposes of this lab so the resources can be easily removed).
Prior to Resource Guard, Maggie Simpson can modify Soft Delete
Switching over to Homer Simpson and logging into the jogcloud.com tenant, I attached the Resource Guard to the Recovery Services Vault. The interface allowed me to select the tenant (directory) and the Resource Guard resource.
Enabling Resource Guard
I had configured the Resource Guard to protect all the operations it was able to. This is confirmed with the confirmation in the screenshot below.
Resource Guard configured to protect sensitive operations
Once the Resource Guard is enabled, navigating back to the Security Settings of the Recovery Services Vault displays a message that Resource Guard is now enabled.
Switching back to Maggie Simpson, I then attempted to modify a backup policy which is considered a sensitive operation and is restricted via the association to the Resource Guard. As expected, Maggie Simpson cannot make the modifications to the Recovery Services Vault without authenticating to the GIW tenant and being authorized on the Resource Guard.
Maggie Simpson blocked from using Resource Guard
Success! Here we demonstrated how we can restrict sensitive operations on an Azure Backup Vault even when a user has a high level of permissions on the vault itself. Resource Guard provides a great security mechanism to establish the blast radius that works best for your organization. I could even add Azure AD PIM to the mix in the support just-in-time access of the Resource Guard. The support for cross-tenant specifically is very unique because there are very few (if any) other Azure resources that allow you to leverage a cross-tenant security boundary.
If you’re using Azure Backup, you should be using Resource Guard as an additional security control to add to the controls you are enforcing with Azure RBAC and Azure Policy. With the introduction into preview of the immutable vaults, Microsoft is providing a variety of tools to take a defense-in-depth approach using the technical features that make the most sense to the needs of your organization. WIth that bit of sales speak, I’m out for the weekend.
I recently was asked to talk about Azure Backup with a customer. Whenever I’m asked about a service my order of operations is to read through the public documentation, lab it out, talk to peers about it, and then put together key findings, best practices, and a deployable lab. I’ve published the package I put together for Azure Backup on GitHub.
When doing my research into Azure Backup, I came across an interesting limitation. The Recovery Services Vaults (RSVs), which orchestrate and manage storage of the Virtual Machine (VM) backup, must be created in the same subscription as the VMs being backed up. This surprised me, because it puts the resource being backed up and the backup itself within the same authorization boundary.
If you’ve done any work in AWS, you know best practice is to store the backups of the EC2 instances in a separate AWS account to ensure you aren’t stacking both the resources and backup in the same security boundary. The Code Spaces hack is a great example of what happens when you don’t do this. In the Azure scenario, I’m forced to take the risk of an attacker gaining Owner-level permissions of the subscription and locking/destroying both my resource and backup creating quite nasty ransomware scenario. What the heck Microsoft?
Thankfully, in 2021 Microsoft introduced a really creative feature to address this risk in the form of Resource Guard. A Resource Guard is an Azure resource that can be created in the same subscription, a different subscription in the same Azure AD tenant, or even a subscription in a different Azure AD tenant! When associated to an RSV, a user looking to make risky modifications to it (such as removing soft delete) must have permissions on BOTH the Resource Guard and the RSV. This means it can support separate authorization boundaries at the subscription level or even completely separate identity and authentication boundaries at the tenant.
Resource Guard isn’t something I often hear discussed by Microsoft folks when explaining Azure Backup to customers. Given what I’ve explained above, it should become quite obvious this is a critical feature to incorporate into your design if you plan on using Azure Backup.
In the next post in this short series, I’ll walk through a demonstration of the feature in action using the lab in this repository with the addition of a second Azure AD tenant as pictured in the image below. See you next post!
Update: 5/7/2024 – This post focuses on hub and spoke architectures. You can reference this post if you’re using Azure VWAN.
Hello folks! It’s been a busy past few months. I’ve been neck deep in summer activities, customer work, and building some learning labs for the wider Azure community. I finally had some time today to dig into the NSG and improved routing features for Private Endpoints that finally hit GA (general availability) last month. While I had written about the routing changes while the features were in public preview, I wanted to do a bit more digging now that it is officially GA. In this post I’ll take a closer look at the routing changes and try to clear up some of the confusion I’ve come across about what this feature actually does
If you work for a company using Azure, likely you’ve come across Private Endpoints. I’ve written extensively about the feature over the course of the past few years covering some of the quirks that are introduced using it at scale in an enterprise. I’d encourage you to review some of those other posts if you’re unfamiliar with Private Endpoints or you’re interested in knowing the challenges that drove feature changes such as the NSG and improved routing features.
At the most basic level, Private Endpoints are a way to control network access to instances of PaaS (platform-as-a-service) services you consume in Microsoft Azure (they can also be used for PrivateLink Services you build yourself). Like most public clouds, every instance of a PaaS service in Azure is by default available over a public IP. While there are some basic controls layer 3 controls, such as IP restrictions offered for Azure App Services or the basic firewall that comes with Azure Storage, the service is only accessible directly via its public IP address. From an operations perspective, this can lead to inconsistencies with performance when users access the services behind Private Endpoints since the access is over an Internet connection. On the security side of the fence, it can make requirements to inspect and mediate the traffic with full featured security appliances problematic. There can even be a risk of data exfiltration if you are forced to allow access to the Internet for an entire service (such as *.blog.windows.net). Additionally, you may have internal policies driven by regulation that restrict sensitive data to being accessible only within your more heavily controlled private network.
PaaS with no Private Endpoint
Private Endpoints help solve the issues above by creating a network endpoint (virtual network interface) for the instance of your PaaS service inside of your Azure VNet (virtual network). This can help provide consistent performance when accessing the application because the traffic can now flow over an ExpressRoute Private Peering versus the user’s Internet connection. Now that traffic is flowing through your private network, you can direct that traffic to security appliances such as a Palo Alto to centrally mediate, log, and optionally inspect traffic up to and including at layer 7. Each endpoint is also for a specific instance of a service, which can mitigate the risk of data exfiltration since you could block all access to a specific Azure PaaS service if accessed through your Internet connection.
PaaS with Private Endpoint
While this was possible prior to the new routing improvements that went into GA in August, it was challenging to manage at scale. I cover the challenge in detail in this post, but the general gist of it is the Azure networking fabric creates a /32 system route in each subnet within the virtual network where the Private Endpoint is placed as well as any directly peered VNets. If you’re familiar with the basics of Azure routing you’ll understand how this could be problematic in the situation where the traffic needs to be routed through a security appliance for mediation, logging, or inspection. To get around this problem customers had to create /32 UDRs (user-defined route) to override this system route. In a hub and spoke architecture with enough Private Endpoints, this can hit the limit of routes allowed on a route table.
An example of an architecture that historically solved for this is shown below. If you have user on-premises (A) trying to get to a Private Endpoint in the spoke (H) through the Application Gateway (L) and you have a requirement to inspect that traffic via a security appliance (F, E), you need to create a /32 route on the Application Gateway’s subnet to direct the traffic back to the security appliance. If that traffic is instead for some other type of service that isn’t fronted by an App Gateway (such as Log Analytics Workspace or Azure SQL instance), those UDRs need to be placed on the route table of the Virtual Network Gateway (B). The latter scenario is where scale and SNAT (see my other post for detail on this) can quickly become a problem.
Common workaround for inspection of Private Endpoint traffic
To demonstrate the feature, I’m going to use my basic hub and spoke lab with the addition of an App Service running a very basic Python Flask application I wrote to show header and IP information from a web request. I’ve additionally setup a S2S VPN connection with a pfSense appliance I have running at home which is exchanging routes via BGP with the Virtual Network Gateway. The resulting lab looks like the below.
Lab environment
Since Microsoft still has no simple way to enumerate effective routes without a VM’s NIC being in the subnet, and I wanted to see the system routes that the Virtual Network Gateway was getting (az network vnet-gateway list-learned-routes will not do this for you), I created a new subnet and plopped a VM into it. Looking at the route table, the /32 route for the Private Endpoint was present.
Private Endpoint /32 route
Since this was temporary and I didn’t want to mess with DNS in my on-premises lab, I created a host file entry on the on-premises machine for the App Service’s FQDN pointing to the Private Endpoint IP address. I then accessed the service from a web browser on that machine. The contents of the web request show the IP address of my machine as expected because my traffic is entering the Azure networking plane via my S2S VPN and going immediately to the Private Endpoint for the App Service.
Request without new Private Endpoint features turned on
As I covered earlier, prior to these new features being introduced, to get this traffic going through my Azure Firewall instance I would have had to create /32 UDR on the Virtual Network Gateway’s route table and I would have had to SNAT at the firewall to ensure traffic symmetry (the SNAT component is covered in a prior post). The new feature lifts the requirement for the /32 route, but in a very interesting way.
The golden rule for networking has long been the most specific route is the preferred route. For example, in Azure the /32 system route for the Private Endpoint will the preferred route even if you put in a static route for the subnet’s CIDR block (/24 for example). The new routing feature for Private Endpoints does not follow this rule as we’ll see.
Support for NSGs and routing improvements for Private Endpoints is disabled by default. There is a property of each subnet in a VNet called privateEndpointNetworkPolicies which is set to disabled by default. Swapping this property from disabled to enabled kicks off the new features. One thing to note is you only have to enable this on the subnet containing the Private Endpoint.
In my lab environment I swapped the property for the snet-app subnet in the workload VNet. Looking back at the route table for the VM in the transit virtual network, we now see that the /32 route has been made invalid. The /16 route pointing all traffic to the workload VNet to the Azure Firewall is now the route the traffic will take, which allows me to mediate and optionally inspect the traffic.
Route table after privateEndpointNetworkPolicies property enabled on Private Endpoint subnet
Refreshing the web page from the on-premises VM now shows a source IP of 10.0.2.5 which is one of the IPs included in the Azure Firewall subnet. Take note that I have an application rule in place in Azure Firewall that matches this traffic. When using an application rule, it takes advantage of the transparent proxy functionality of Azure Firewall and automatically SNATs the traffic. If I had a network rule in place, I’d have to ensure Azure Firewall is SNATing my traffic (which it won’t do by default for RFC1918 traffic). While some services (Azure Storage being one of them) will work without SNAT with Private Endpoints, it’s best practice to SNAT since all other services require it. The requirement will likely be addressed in a future release.
Request with new routing features enabled
While the support for NSGs for Private Endpoints is awesome, the routing improvements are a feature that shouldn’t be overlooked. Let me summarize the key takeaways:
Routing improvements (docs call it UDR support which I think is a poor and confusing description) for Private Endpoints are officially general available.
SNAT is still required and best practice for traffic symmetry to ensure return traffic from Private Endpoints takes the same route back to the user.
The privateEndpointNetworkPolicies property only needs to be set on the subnet containing the Private Endpoints. The routing improvements will then be active for those Private Endpoints for any route table assigned to a subnet within the Private Endpoint’s VNet or any directly peered VNets.
Even though the /32 route is still there, it is now invalidated by a less specific UDR when this setting is set on a Private Endpoints subnet. You could create a UDR for the subnet CIDR containing the Private Endpoints or the entire VNet as I did in this lab. Remember this an exception to the route specificity rule.
Well folks, that sums up this post. Hopefully got some value out of it!
Earlier this week I was messing around with Kubernetes SSHing into the nodes and I ran into an interesting quirk of NSGs (Network Security Groups). I noticed that traffic I did not expect to be allowed through the NSG was making it through. A bit of digging let me down the path of a documented, but not well known, behavior of the VirtualNetwork service tag when used in NSG security rules. Today I’m going to walk through that behavior, why you should care, and what you can do to avoid being surprised like I was.
NSGs are layer fourstateful firewalls that operate at the SDN (software-defined network). They serve a similar purpose and function in much the same way as AWS Security Groups. NSGs are used for microsegmentation within and across Virtual Networks typically supplementing the centralized control that is provided by a security appliance such as Azure Firewall or a Palo Alto firewall. They are associated to a subnet (best practice) or NIC (network interface) (few use cases for this). Each contains a collection of security rules, which includes default rules and user-defined rules. NSG security rules are processed by priority and are matched based on a 5-tuple.
As described in the previous link, service tags can be used within NSG security rules to simplify access to Azure resources. Service tags contain a summarized list of IPs that is managed by Microsoft. This makes life far easier, because whitelisting the IPs to something like Azure Storage Rules would be a nightmarish task that would require customer-created automation to keep up to date as IPs are added or removed to the underlining service. The benefit of service tags does come with a consideration as we’ll see in this post.
Each subnet or NIC can have one NSG applied to it, but the NSG can be applied to multiple subnets or NICs. In the instance of NSGs being applied at both the subnet and NIC, the processing for inbound traffic is detailed here and for outbound here.
Now that you know the basics of NSGs, let me talk a bit about the lab. For this lab I used my simple hub and spoke lab with a few modifications. I have added an Ubuntu VM running in the application subnet (snet-app) in the workload spoke virtual network. I’ve also temporarily removed the UDR from the custom route table on the application subnet. The NSG applied to the spoke contains only the default NSG rules. The lab architecture can be seen below.
Lab environment
Reviewing the NSG applied to the application subnet, the three default inbound rules are present as expected. The rule I’m going to look more deeply at is the AllowVnetInBound rule highlighted below. Specifically, I’m going to show you how to look at the IPs behind a service tag.
Default Inbound NSG Security Rules
To see the IPs associated with a service tag, I’m going to use the Effective security rules tool in Azure’s Network Watcher. If you’re unfamiliar with Network Watcher, you’re missing out. It contains a plethora of useful tools to help diagnose network connectivity. The Effective security rules tool looks at the NSGs applied to a NIC at both the subnet and NIC level to provide you with a holistic view of the what traffic is allowed and combined between NSGs applied at each level.
Effective security rules tool in Network Watcher
One of the lesser known features of the tool is it gives you the ability to look at the IPs included within a service tag for a specific NSG security rule. In the image below you will see that the IPs included in the VirtualNetwork service tag are the workload virtual network IP range (10.2.0.0/16), the peered transit virtual network IP range (10.0.0.0/16), and the Azure “magic IP” 168.63.129.16. This is likely what you expected to see in the VirtualNetwork tag.
VirtualNetwork service tag contents without UDR
Remember when I said I removed the UDR for the default route from the custom route table applied to the application subnet? I then added that route back in, pointed it to the Azure Firewall, waited about 2 minutes, then re-ran the Effective security rules tool.
VirtualNetwork service tag contents with UDR of default route
My first reaction to seeing all IP addresses now allowed through the VirtualNetwork tag was pretty much the Scanners head explosion GIF (classic if you haven’t seen it). It turns out this behavior is documented. The VirtualNetwork service tag has the following explanation:
The virtual network address space (all IP address ranges defined for the virtual network), all connected on-premises address spaces, peered virtual networks, virtual networks connected to a virtual network gateway, the virtual IP address of the host, and address prefixes used on user-defined routes. This tag might also contain default routes.
The part of that excerpt you need to care about is the piece about it includes the address prefixes on user-defined routes. This means that the prefixes in the UDRs you place on a custom route table applied to the subnet are added to the VirtualNetwork service tag in the NSG security rules used by the NSGs applied to your resource. I’m not sure why this behavior was implemented, but it can impact separation of duties where you’d have a networking team managing the routing within route tables and the security team managing which traffic is allowed in or out with NSGs. If someone has control over the routing tables, they can influence the VirtualNetwork service tag prefixes, which will influence the behavior of the default NSG security rules and others using that tag.
If you’re like me, your first level of panic was around the risk of this allowing traffic from the public Internet inbound to the resource if the resource had a public IP. You can rest easy in that my testing showed this is not possible even with an additional UDR in place to assure symmetric flow of traffic to the Internet endpoint coming in directly via the public IP. It’s likely Microsoft is doing some type of filtering at the SDN layer excluding traffic identified as being sourced from the Internet from being included in this security rule.
It gets more interesting when you use the IP Flow Verify tool in Network Watcher. Here I picked a random public IP and tested an inbound flow. The tool reports the flow as being allowed by the default AllowVnetInBound rule. Take note of this behavior because it could lead to confusion with your Information Security team or third-party auditors.
IP Flow Verify showing flow is allowed
The second level of panic I had was that this rule would allow any endpoint that has connectivity to my Virtual Network (such as other Virtual Networks attached as spokes to the hub Virtual Network) full connectivity to the endpoints behind the NSG. This concern is actually legitimate and was the reason I originally went down the rabbit hole. Traffic from a VM in the Shared Services Virtual Network is allowed full network connectivity the VM in the application subnet since the Virtual Network service tag includes the all IPv4 addresses (note this traffic was allowed through the Azure Firewall).
So why should you care about any of this? You should care because the programmed behavior of adding prefixes from UDRs to the VirtualNetwork service tag means those with control over the custom route tables (typically the networking team) have the ability to affect which traffic is allowed through an NSG if any NSG security rules use the VirtualNetwork service tag. From a separation of duties perspective, this is very far from optimal. Additionally, since most hub and spoke architectures use a UDR with a default route of 0.0.0.0/0, unless you have a user-defined deny security rule in place, you are affected by this. Lastly, it goes to show that tools such as IP Flow Verify which work on evaluating the SDN rule set can produce confusing results.
There are some great ways to mitigate this risk thankfully. You could use Azure Policy to audit, deny, or remediate NSGs that are deployed without a default deny option. There are some great examples of remediation in the community GitHub. Funneling workload-to-workload and user-to-workload traffic through a security appliance such as Azure Firewall running in the transit Virtual Network is another great risk mitigator. Lastly, tightly controlling access to your route tables and limiting use of the VirtualNetwork service tags are other options.
Well folks, that wraps up this post. Hopefully the information was useful and you can leverage some of it to more tightly secure your Azure environment.