Microsoft Foundry – APIM and Model Gateway Connections Part 2

Microsoft Foundry – APIM and Model Gateway Connections Part 2

Hello again! Today I’m going to continue my series on Microsoft Foundry’s new support for the BYO AI Gateway. In my past few posts I’ve walked through the evolution of Foundry and covered at a high level what an AI Gateway is and the problem this feature solves. In this post we’re gonna get down and dirty with the technical details on setting this up. Grab your coffee and put on your thinking music (for me that is some Blink and Third Eye Blind!).

Let’s get to it!

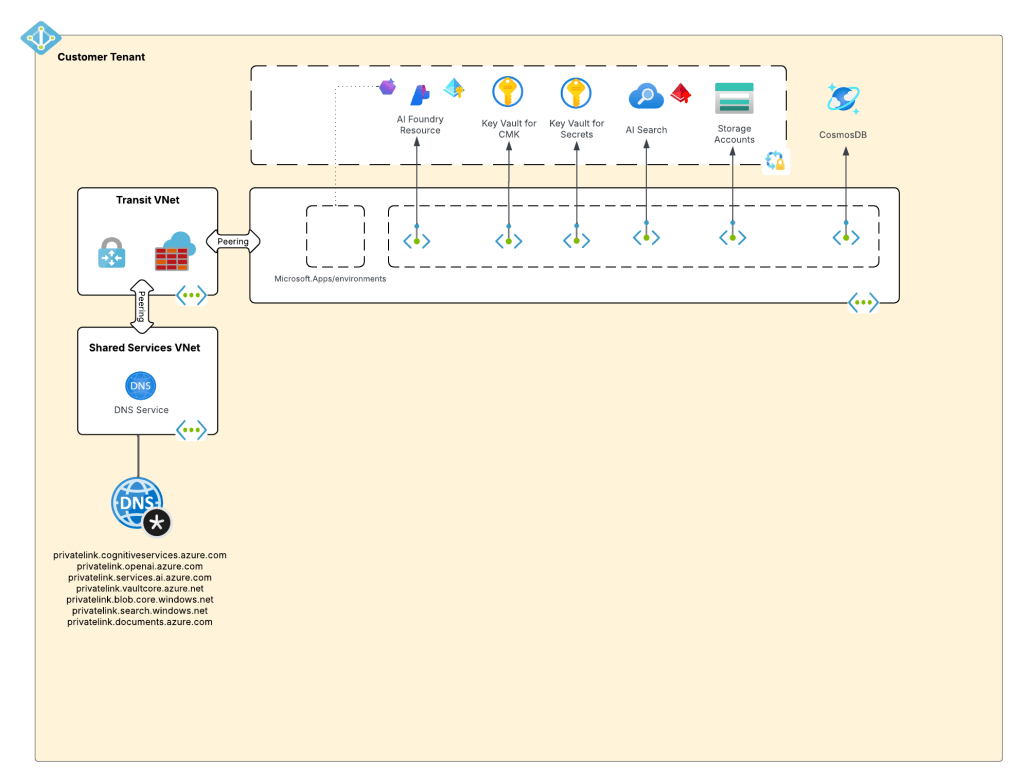
Current State Architecture

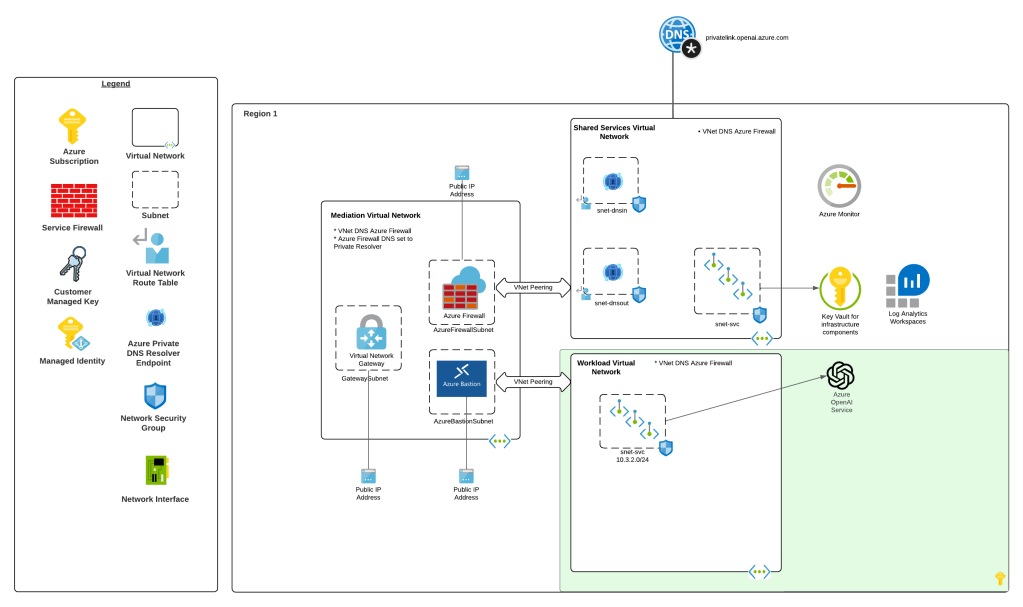
My customer base is primarily in the regulated industry so most of my customers are still at the experimentation state with the Foundry Agent Service. Given these customers have strict security requirements they are largely using the agent service with the standard agent configuration. In this configuration the outbound traffic (subsets of it, but that is a much larger conversation) can be tunneled through the customer virtual network for centralized logging, mediation, and facilitating access to private resources (again, with limitations today) through what the product group calls VNet injection but I’d say is more closely described as VNet integration via a delegated subnet. Threads (conversations in v2 agents) and agent metadata are stored in a Cosmos DB, vector stores created by an agent from tools such as the File Search tool are stored in AI Search, and files uploaded to the Foundry resource are stored in a Storage Account. These resources are all provisioned by the customer into the customer subscription and fully managed by the customer (RBAC, encryption, HA settings, etc). Private Endpoints for each resource are created within the customer’s virtual network and made accessible from the agent delegated subnet. The whole environment looks similar to what you see below.

Foundry Agent Service – Standard Agent Configuration

As I covered in my last post, in a generally available (aka fully supported and is recommended for production) agents can only consume models deployed to the Foundry account the agents exist in. This creates an issue for customers wanting to inject the governance, visibility, and operational improvements an AI Gateway can provide when it sits between the agent and the model. For now, customers are working around doing this using third-party agents. Downfall of that is these “external” agents live on compute customers have to manage and these agents can’t access many of the tools available to Foundry-native agents. This is the problem the BYO AI Gateway feature is attempting to fix.

No BYO Gateway vs BYO Gateway

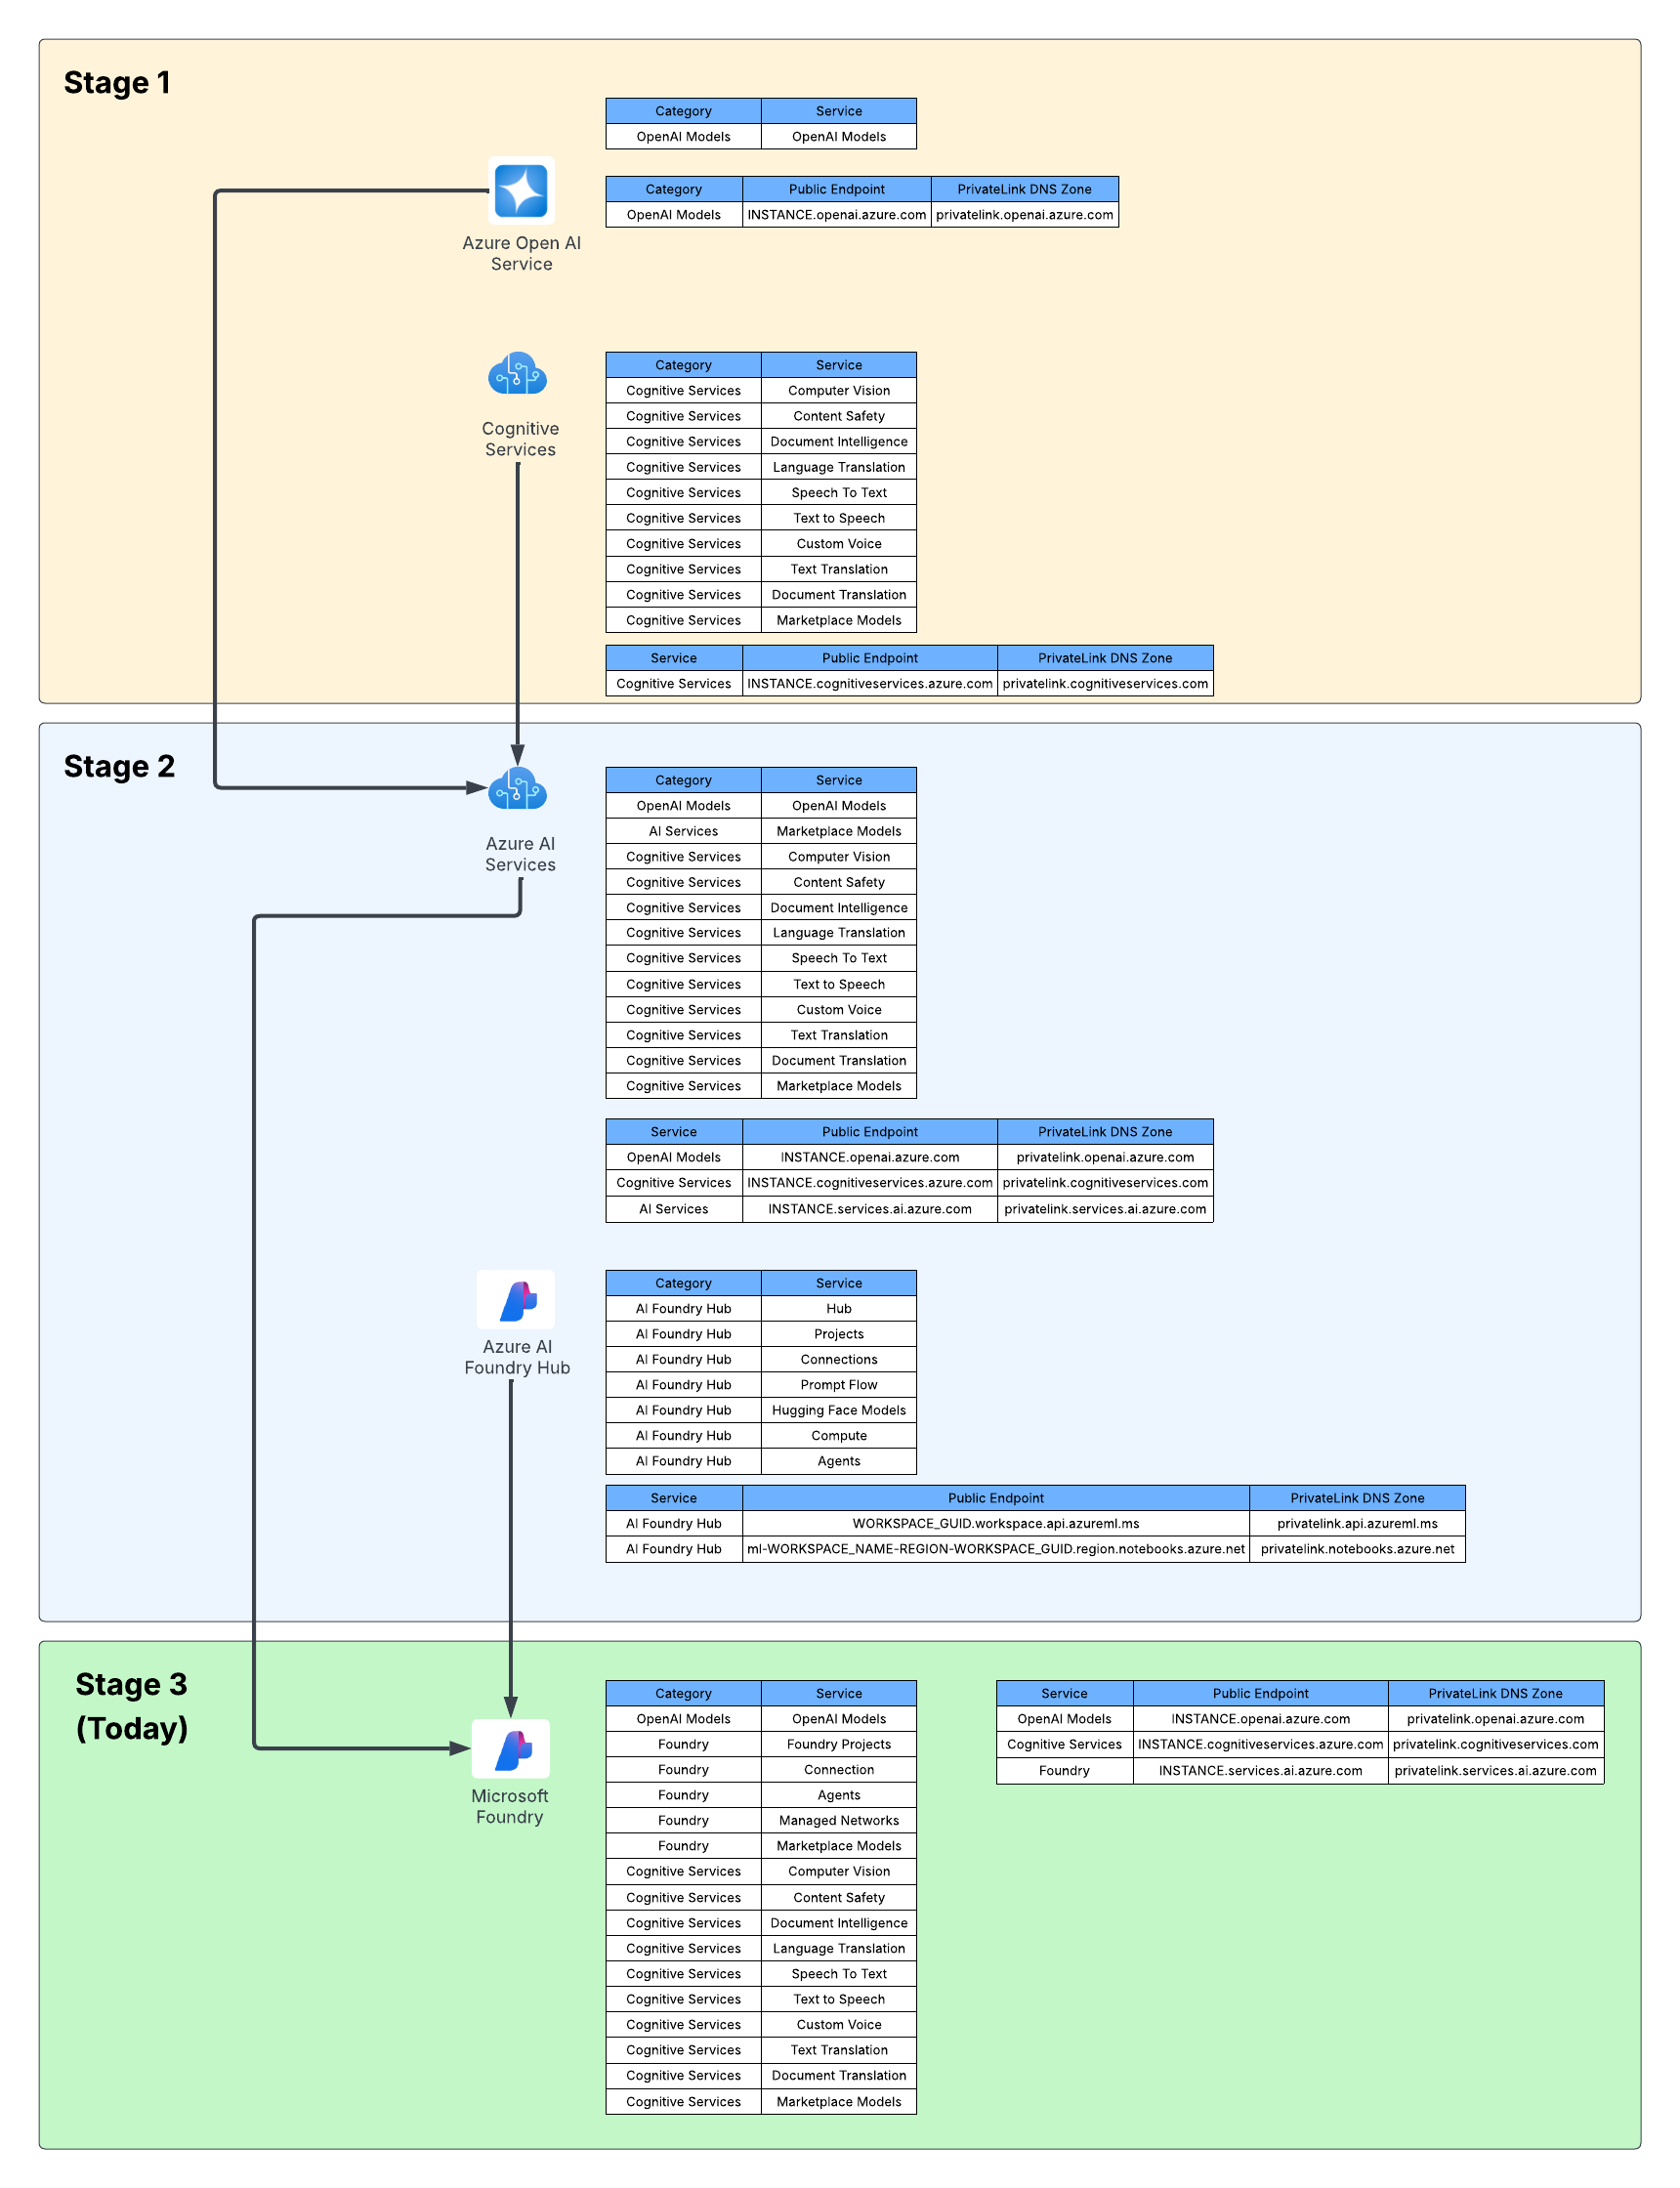
Foundry resource architecture

Here is where the new connection type introduced in Foundry comes to the rescue. Before I dive into the details of that, I think it’s helpful to level set a bit on the resource hierarchy within Foundry. At the top is the top-level Azure resource referred to as the Foundry service which under the hood is a Cognitive Services account. The relevant resources for this discussion beneath that are projects, deployments, and connections. Projects are containers connections (at the management plane) for agents (at the data plane), deployments for models which are made available to all projects within the account, and connections which can also be created at the account level and shared across all projects.

Relevant resource hierarchy

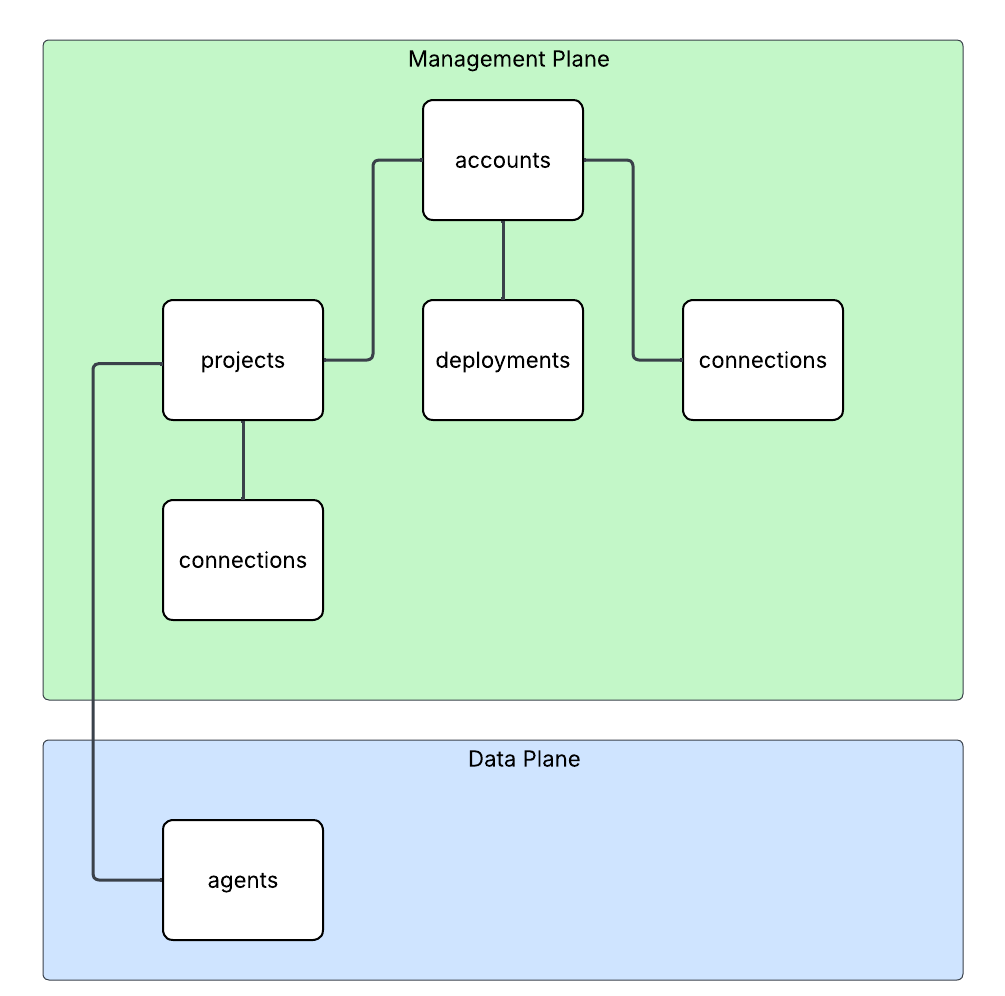
For the purposes of this discussion, I’m going to focus on the connection objects. Connection objects can be created at the account level and project level. In the standard agent configuration, you’ll create a number of different connections out of the gates including connections to Cosmos, AI Search, and Azure Storage. Additional common connections could be to an App Insights instance for tracing or a Grounding With Bing Search resource. Connection objects will contain some type of pointer, like a URI and a credential. That credential is usually API Key, some Entra ID-based authentication mechanism, or general OAuth.

Connections are created at the account level when the Foundry account itself needs to access them. This could be for the usage of Content Understanding, to a Key Vault for storing connection secrets (API keys) in a customer subscription, an an App Insights instance used for tracing. From what I’ve observed, you will create connections at the account level if they need to be shared across all projects OR they’re used by the Foundry resource in general vs some type of project construct. These connections are also created at the project level. When you provision a standard agent for example, you’ll create connection objects to the Cosmos DB, Storage Account, and AI Search resources mentioned above. The new category of connections for this post will be created at the project level.

APIM and Model Gateway Connections

The BYO AI Gateway feature uses a new type of connection category of ApiManagement and ModelGateway. These objects are the glue that allow the Foundry agents to funnel requests for models through the AI Gateway the connections point to. When we’re connecting to an APIM instance, you should ideally use the ApiManagement category and when you’re connecting to a third-party category you’ll use the ModelGateway category.

As of the date of this blog post, these connection objects have the following schema (relevant properties to this discussion only):

name: The name of the connection (needs to be less than 60 characters in my testing)
properties: {
category: ApiManagement or ModelGateway
target: The URI you want the agent to connect to
authType: For ApiManagement this can be ApiKey or ProjectManagedIdentity
credentials: This will be populated with the value of the API key if using that authType
isSharedToAll: true or false if you want this shared across all projects
# ApiManagement category with static models
metadata: {
deploymentInPath: true or false
inferenceAPIVersion: API version used for inferencing (not used if using OpenAI v1 API)
# Models discussed in detail below
models: "[{\"name\":\"gpt-4o\",\"properties\":{\"model\":{\"format\":\"OpenAI\",\"name\":\"gpt-4o\",\"version\":\"2024-08-06\"}}}]"
}
# ApiManagement category with dynamic discovery
metadata: {
deploymentAPIVersion: ARM API version for CognitiveServices/accounts/deployments API calls
deploymentInPath: true or false
inferenceAPIVersion: API version used for inferencing (not used if using OpenAI v1 API)
}
# ModelGateway category with static models
metadata: {
deploymentInPath: true or false
inferenceAPIVersion: API version used for inferencing (not used if using OpenAI v1 API)
# Models discussed in detail below
models: "[{\"name\":\"gpt-4o\",\"properties\":{\"model\":{\"format\":\"OpenAI\",\"name\":\"gpt-4o\",\"version\":\"2024-08-06\"}}}]"
}
# ModelGateway category with dynamic models
metadata: {
deploymentInPath: true or false
inferenceAPIVersion: API version used for inferencing (not used if using OpenAI v1 API)
deploymentAPIVersion: ARM API version for CognitiveServices/accounts/deployments API calls
modelDiscovery: "{\"deploymentProvider\":\"AzureOpenAI\",\"getModelEndpoint\":\"/deployments/{deploymentName}\",\"listModelsEndpoint\":\"/deployments\"}"
}

I’ll walk through each of these properties in as much detail as I’ve been able to glean from them with my testing.

The category property is self-explanatory. You either set to this to ApiManagement (if using APIM) or Model Gateway (if using a third-party AI Gateway like a Kong or LiteLLM).

The target property is the URI you want the agent to try to connect to. As an example, if I create an API on my APIM instance for the v1 OpenAPI named openai-v1 my target would look like “https://myapim.azure-api.net/openai-v1/v1”. As of the date of this blog post, you MUST use the azure-api-net FQDN for the APIM. If you try to do a custom domain you’ll get an error back telling you that it’s not supported. I got a request into the product group to lift this limitation. I’ll update this if that is done. For third-party model gateway, the URI would be similar.

The authType property is going to be either ApiKey or ProjectManagedIdentity for an APIM connection. ProjectManagedIdentity will authenticate to the upstream APIM using the agent’s project’s Entra ID managed identity. When using ProjectManagedIdentity you must also specify the audience property and set it to cognitive services.azure.com if connecting to a backend Foundry resource hosting models. Today, it doesn’t seem possible to pass the agent’s Entra ID agent identity that I’ve seen. For a model gateway connection this will either be ApiKey or OAuth. Details on the OAuth setup can be found in the samples GitHub (I haven’t mucked with it yet). If you’re using the authType of ApiKey you additional need to pass the credentials property which includes a property of key with the API key similar to what you see below.

authType: ApiKey
credentials = {
key = MYAPIKEY
}

I haven’t messed extensively with the isSharedToAll property as of yet. For my use case I set this to false so each project got its own connection object. You may be able to create this object at the account level and set the isSharedToAll property, but I haven’t tested that yet. If you have, def let me know if that works.

Ok, now on the property that can bring the most pain. Here we have the metadata property. This property is going to the main guts that makes this whole thing work. A few considerations, if doing this with Terraform or REST (can’t speak to Bicep or ARM), each of the properties I’m going to cover are CASE SENSITIVE. If you do the wrong casing, your connection object will not work. When connecting to an APIM or model gateway your can have Foundry either enumerate the models available (called dynamic discovery) or you can provide the exact models you want to expose (called static models).

Let’s first cover static models. Here is an example of me creating a connection to an APIM instance with static models using the authType or ProjectManagedIdentity. One thing to note is in my backend object in my APIM I’m appending /v1 to the backend path vs doing it in this connection object.

{
"id": "/subscriptions/X/resourceGroups/X/providers/Microsoft.CognitiveServices/accounts/X/projects/sampleproject1/connections/conn1apimgwstaticopenai-v1",
"name": "conn1apimgwstaticopenai-v1",
"properties": {
"audience": "https://cognitiveservices.azure.com",
"authType": "ProjectManagedIdentity",
"category": "ApiManagement",
"isSharedToAll": false,
"metadata": {
"deploymentInPath": "false",
"inferenceAPIVersion": null,
"models": "[{\"name\":\"gpt-4o\",\"properties\":{\"model\":{\"format\":\"OpenAI\",\"name\":\"gpt-4o\",\"version\":\"2024-08-06\"}}}]"
},
"target": "https://X.azure-api.net/openai-v1",
}

Since I’m using the v1 Azure OpenAI API, I don’t need to specify an inferenceAPIVersion. If I was using the classic API I’d need to specify the version (such as 2025-04-01-preview). Notice also I have set deploymentInPath to false. When set to true the connection will add the /deployments/deployment_name to the path. For the v1 API this isn’t required. Finally you got the models property. With a static model setup I list out the models I’m exposing to the connection. If you’re using Terraform, you MUST jsonencode the models property. If you don’t, it will not work. Static models is pretty helpful if you want to strictly control exactly what models the project is getting access to.

Let’s now switch over to dynamic discovery. Dynamic discovery requires you define a few additional operations inside of your API. The details can be found in this GitHub repo, but the basics of is you define an operation for a GET on a specific model and a LIST to find all the models available. These operations are management plane operations at the ARM API to retrieve deployment information. Here is an example of a setup with dynamic discovery using an APIM connection.

{
"id": "/subscriptions/X/resourceGroups/X/providers/Microsoft.CognitiveServices/accounts/X/projects/sampleproject1/connections/conn1apimgwdynamicopenai-v1",
"location": null,
"name": "conn1apimgwdynamicopenai-v1",
"properties": {
"audience": "https://cognitiveservices.azure.com",
"authType": "ProjectManagedIdentity",
"category": "ApiManagement",
"group": "AzureAI",
"isSharedToAll": false,
"metadata": {
"deploymentAPIVersion": "2024-10-01",
"deploymentInPath": "false",
"inferenceAPIVersion": null
},
"target": "https://X.azure-api.net/openai-v1",
},
"type": "Microsoft.CognitiveServices/accounts/projects/connections"
}

When doing the dynamic discovery, you’ll see the deploymentAPIVersion property set to the API version for the GET and LIST deployment operations of the ARM REST API. I added these operations into the API as after I imported the v1 OpenAI spec. You can see an example in Terraform I put together in my lab repo. Dynamic discovery is a great solution when you want to the developer to have access to any new deployments you may push to the Foundry resources.

I’m not going to run through the ModelGateway connection categories because they will largely emulate what you see above with some minor differences. The official Foundry samples GitHub repo has the gory details. I also have examples in Terraform available in my own repo (if you dare subject yourself to reading my code).

Ok, so now you understand the basics of setting up the connection and what you need to do on the APIM side. For more details on setting up APIM you can reference this official repo.

Summing It Up

Ok, so you now you understand the basic connection object, how to set it up, and how it works. I’m going to cut it here and continue in another post where I’ll dig into the dirty details of how it looks to use this because I don’t want to overload your brain (and mine) with a super long post.

Before I jet I will want to provide some critical resources:

  1. My AMAZING peer Piotr Karpala has put together a repository with examples of this pattern (and some 3rd-party integrations) with Bicep. The stuff in there is gold. He was also my late night buddy helping me work through the quirks of this integration late at night. Couldn’t have gotten it done without him (or at least would have broken many keyboards).
  2. The Product Group’s official samples and explanations of the setup are located here. I’d highly recommending referencing them because they will always have more up to date instructions than my blog.
  3. I’ve put together some Terraform samples for my own purposes which are you welcome to reference, loot for your own means, and laugh at my pathetic coding ability. Check out this one for the Foundry portion and this one for the APIM portion.

And here are your tips for this post:

  1. RTFM. Seriously, read the official documentation. Today, this integration is challenging to put in place. If you try to lone wolf it, let me know how many keyboards end up being thrown through your window.
  2. If you’re coding in Terraform or making REST calls to create these connections, remember CASE SENSITIVITY matters. If you do wrong case sensitivity, the resource will still create but it won’t work. You’ll get very frustrated trying to troubleshoot it.
  3. If you’re coding in Terraform don’t forget to use the jsonencode function on the models property. If you skip that, the resource will create but shit will not work.
  4. This is only supported for prompt agents today.
  5. Don’t forget this is public preview. So test it, but expect things to change and don’t throw this into production.

In the next post I’ll walk through how you can test the integration, some of the quirks and considerations for identity and authentication, and some of the neat APIM policy you can craft given some of the new information that is sent in the request.

See you next post!

Microsoft Foundry – The Evolution (Revisited)

Microsoft Foundry – The Evolution (Revisited)

Hi folks! In the past I did a series on the Azure OpenAI Service and Microsoft Foundry Hubs (FKA AI Foundry Hubs FKA AI Studio). Instead of going through and updating all those posts and losing the historical content and context (I don’t know about you, but I love have the historical context of a service) I’m instead going to preserve it as is and spin up a new series on the latest iteration of Microsoft Foundry. I’ll likely keep much of the general framework of the older series because it seemed to work. One additional piece I’ll be included in this series is some of the quirks of the service I’ve run into to potentially save you pain from having to troubleshoot it. For this first post, I’m going to start this off explaining how the service has involved. As always, my persona focus here is my fellow folks in the central IT and infrastructure space.

The history

Way back in 2023 the hype behind generative AI really started go insane. Microsoft managed to negotiate rights to host OpenAI’s models in Azure and introduced the Azure OpenAI Service. The demand across customers was insane where every business unit (BU) wanted it yesterday. Microsoft initially offered the service within the Cognitive Services framework under the Cognitive Services resource provider. This mean it inherited many of the controls native to Cognitive Services which included Private Endpoints, a limited set of outbound controls, support for API key and Entra ID authentication, and support for Azure RBAC for authorization. Getting the deployed was pretty straightforward with the hold-ups to deployment being more concerns about LLM security in general. Deployment typically looked like the architecture below.

Azure OpenAI Service

As folks started to build their AI applications, they tapped into other services under the Cognitive Services umbrella like Content Safety, Speech-to-Text, and the like. These services fit in nicely as they also fell under the Cognitive Services umbrella and had a similar architecture as the above, requiring deployment of the resource and the typical private endpoint and authentication/authorization (authN/authZ) configuration.

I like to think of this as stage 1 of the Microsoft’s AI offerings.

Microsoft then wanted to offer more models, including models they have built such and Phi and third-party models such as Mistral. This drove them to create a new resource called an AI Service resource. This resource fell under the Cognitive Services resource provider, and again inherited similar architectures as above. Beyond hosting third-party models, it also included and endpoint to consume OpenAI models and some of the pool of Cognitive Services. This is where we begin to see the collapse of Microsoft’s AI Services under a single top-level resource.

What about building AI apps though? This is where Foundry Hubs (FKA AI Studio) were introduced. The intent of Foundry Hubs were to be the one stop shop for developers to create their AI Apps. Here developers could experiment with LLMs using the playgrounds, build AI apps with Prompt Flow, build agents, or deploy 3rd party LLMs for Hugging Face. Foundry Hubs were a light overlay on top of the Azure Machine Learning (AML) service utilizing a new feature of AML built specifically for Foundry called AML Hubs. Foundry Hubs inherited a number of capabilities of AML such as its managed compute (to host 3rd party models and run prompt flows) and its managed virtual network (to host the managed compute).

Microsoft Foundry Hubs

While this worked, anyone who has built a secure AML deployment knows that shit ain’t easy. Getting the service working requires extensive knowledge of how its identity and networking configuration. This was a pain point for many customers in my experience. Many struggled to get it up and running due to the complexity.

Example of complexity of Microsoft Foundry IAM model

I think of the combination of AI Services and Microsoft Foundry Hubs as stage 2 of Microsoft’s journey.

Ok, shit was complicated, I ain’t gonna lie. Given this complexity and feedback from the customers, Microsoft got ambitious and decided to further consolidate and simplify. This introduced the concept of a new top-level resource called Microsoft Foundry Accounts. In public documentation and conversation this may be referred to as Foundry Projects or Foundry Resources. Since this is my blog I’m going to use my term which is Microsoft Foundry Accounts. With Microsoft Foundry accounts, Microsoft collapsed the AI Services and Foundry Hubs into a single top level resource. Not only did they consolidate these two resources, they also shifted Foundry Hubs from the Azure Machine Learning resource provider into the Cognitive Services resource provider. This move consolidated the Cognitive Services resource provider as the “AI” resource provider in my brain. It resulted in a new architecture which often looks something like the below.

Microsoft Foundry Accounts common architecture

This is what I like to refer to as stage 3, which is the current stage we are in with Microsoft’s AI offerings. We will continue to see this stage evolve which more features build and integrated into the Microsoft Foundry Account. I wouldn’t be surprised at all to see other services collapse into it as just another endpoint to a the singular resource.

Why do you care?

You might be asking, “Matt, why the hell do I care about this?” The reason you should care is because there are many customers who jumped into these products at different stages. I run across a ton of customers still playing in Foundry Hubs with only a vague understanding that Foundry Hubs are an earlier stage and they should begin transitioning to stage 3. This evolution is also helpful to understand because it gives an idea of the direction Microsoft is taking its generative AI services, which is key to how you should be planning you future of these services within Azure.

I’ll dive into far more detail in future posts about stage 3. I’ll share some of my learnings (and my many pains), some reference architectures that I’ve seen work, how I’ve seen customers successfully secure and scale usage of Foundry Accounts.

For now, I leave you with this evolution diagram I like to share with customers. For me, it really helps land the stages and the evolution, what is old and what is new, and what services I need to think about focusing on and which I should think about migrating off of.

Foundry evolution

Well folks, that wraps it up. Your takeaways today are:

  1. Assess which stage your implementation of generative AI is right now in Azure.
  2. Begin plans to migrate to stage 3 if you haven’t already. Know that there will be gaps in functionality with Foundry Hubs and Foundry Accounts. A good example is no more prompt flow. There are others, but many will eventually land in Foundry project.

See you next post!

DNS in Microsoft Azure – DNS Security Policies

This is part of my series on DNS in Microsoft Azure.

Hi there folks! After a busy July packed with a vacation and an insane amount of work , I’m back with a new post. Today I’m going to cover a new feature that has been years coming. Yes folks, DNS query logging is now native to the platform with the introduction of DNS Security Policies into GA (generally available) last month. No longer will you have to solution around this long painful gap. In this post I’ll walk through what this new resource is, what it can do (beyond DNS query logging), cover the use cases I’ve tested with it, show you some samples of the logs, and finally cover some potential designs to incorporate it. Let’s dive in!

A long time coming

If you’ve ever spent time troubleshooting a connection error or trying to detect, block, and analyze malware you are likely familiar with the value of DNS query logs. The former makes it a must for day-to-day operations and the latter a critical piece of data for information security. Historically, it’s been a pain to gather this in Microsoft Azure. The wire server (magic IP, 168 address, whatever your favorite nickname) that is made available within a virtual network to use Azure’s built-in DNS resolution service has lacked the capability to capture DNS queries. This mean queries from compute within your virtual network that were resolving to Azure Private DNS zones or a public DNS zone via Azure-provided DNS weren’t captured. Even the introduction of the Azure Private Resolver didn’t address this gap. This lead to customers with requirements to capture DNS query logs having to get fancy.

The most common pattern customers used to address this gap was to introduce a third-party DNS service like an Infoblox, Bluecat, BIND server, or even Windows DNS Server that all compute running within Azure would use for resolution. While customers were able to use this pattern to get the logs, it meant more virtual machines, more costs, more overhead, and it was typically too expensive to implement for workloads that may require complete isolation and didn’t fit into a typical hub and spoke pattern.

Example design for BYODNS for query logging

When the Azure Private Resolver service got introduced along with DNS Forwarding Rule Sets, customers using Azure Firewall had the option of ditching the third-party DNS service and using Azure Firewall’s DNS proxy service which included DNS query logging (kind odd it went there first, right?). This was another common pattern I saw pop up in that Azure Firewall customer base.

Example design using Azure Firewall for DNS query logging and Azure Private DNS Resolver

Beyond whatever other creative ways customers were addressing this gap, it was a gap and it was costing customers extra money. In comes DNS Security Policies to save the day.

DNS Security Policies Components

DNS Security Policies provide 2 core functions today:

  1. DNS query filtering
  2. DNS query logging

Before I dive into those features in depth, I’m a fan of looking at the resource as a whole from the API layer to get an idea of the components, their purpose, and their relationships.

DNS Security Policies and related resources

DNS Security Policies fall under the Microsoft.Network resource provider and are regional resources. The simplest way to understand a resource provider is to think of a namespace in traditional programming. Within a namespace there are resource types (think classes) with specific resource operations. Within the Microsoft.Network resource provider, the three direct children resources that are key.

You’ll notice the Microsoft Learn documentation uses different terminology from what the API uses for some of the resources. To keep things simple, I’ll be using the Microsoft Learn documentation. Here is a quick cheat sheet:

  • DNS Resolver Policies -> DNS Security Policy
  • DNS Security Rules -> DNS Traffic Rules
  • DNS Resolver Domain Lists -> Domain Lists

Each DNS Security Policy has two children resources: DNS Traffic Rules and Virtual Network Links. DNS traffic rules are the guts of your logic for the DNS Security Policy. Each policy can have up to 10 rules (as of August 2025). Each rule consists of a priority (100 – 65000), action (block, allow, alert), and related domain list (I’ll cover these in a few). You can create multiple rules and order them in priority similar to the screenshot below.

DNS Traffic Rules example

Based on the above logic, when the DNS Security Policy triggers a rule based on the domain matching the associated domain list. If the domain being requested is in the list associated with the priority 100 rule, the query is blocked. If not, it’s then processed by the alert rule (which seems to do nothing in my experience as I’ll cover later). Finally, it will hit the last rule which will allow it through but log it.

As I covered above, each rule is associate with one or more domain list. Domain lists are sibling resources to DNS Security Policies. By being a sibling vs a child, they can be re-used across multiple DNS Security Policies (and whatever other use Microsoft comes up with). This allows you to define your domain lists centrally and re-use them across multiple rule sets if, for example, you wanted to maintain your domains lists consistently across environments (test/qa/prod/etc). Domain lists are pretty simple resources consisting of a domain name or wildcard (denoted by a period). It’s important to understand how the domains will be processed. For example (I’m going to steal this direct from the docs), if you allow contoso.com at rule 100 but block bad.contoso.com at rule 110 the query to bad.contoso.com will be allowed because it falls under contoso.com which was allowed by a higher priority rule.

Example of a domain list

The virtual network link resource is the other child of the DNS Security Policy. This functions similar to the virtual network links with Private DNS Zones as it associates the DNS Security Policy to a virtual network where it will process queries sent through the wire server (Azure-provided DNS). Each virtual network can be linked to one DNS Security Policy but each DNS Security Policy can be linked multiple virtual networks allowing you to use them for those virtual networks connected in a hub and spoke like architecture with centralized DNS as well as those virtual networks that may require complete network isolation.

Example of DNS Security Policy virtual network links

DNS Security Policies support diagnostic logging. This allows you to send each query captured by the policy to storage, event hub, or a log analytics workspace. If using a log analytics workspace, the logs are written to a table named DNSQueryLogs. Log entries will look like the below. You’ll get the key pieces of information such as source IP address of the query and the action taken on it. Here you’ll see the query was denied which is indicated by the ResolverPolicyRuleAction. The values here will be “Deny” for blocks, “None” for alerts, and “Allow” for anything allowed.

Example of DNS Query Logs log entry

When the query is denied, instead of getting back an NXDomain, the machine making the query receives back a CNAME of blockpolicy.azuredns.invalid indicating the query has been blocked by DNS Security Policy. This is much better behavior than a NXDomain because now we know what the culprit for the failed DNS query is.

Example of DNS query being denied by DNS Security Policy

To visualize how the allow and deny works, I threw together two quick and dirty visual representations.

Example of how Allow and Block DNS Traffic Rules work

Scenarios you may be wondering about

Like many of you, I’m curious to see what does work and doesn’t work. I went through and tested a variety of scenarios. Here are a few below and my results when using these policies:

  • Machine using an external DNS server and is not using wire server (magic IP, 168 address, etc)
    • Query is not logged by DNS Security Policies
  • Machine using its wire server in its virtual network
    • Query is captured
  • Machine using Private DNS Resolver in the same virtual network
    • Query is captured
  • Machine using a DNS Proxy which sits in front of the Private DNS Resolver
    • Query is captured
  • Machine queries an A record or PTR record
    • Query is captured
  • Machine queries AAAA record
    • Query is captured
  • Machine queries using TCP-based query instead of UDP-based query
    • Query is captured
  • PaaS Services tested successfully
    • Azure Bastion
    • Azure Firewall

How might you use this?

So now you better understand how the service works and what it does. I’ll now tell you how I’d use it. I’m sure folks smarter than me will come out with more effective ways, but here is how I’m envisioning it now.

Based on the testing I’ve done (and testing done by one of my wonderful peers Chris Jasset) the DNS Security Policies seem to take effect at the wire server. This means you’ll want to link the policies to the virtual networks where DNS packets are directed to the wire server. In a centralized DNS design such as below, this would be linked to the virtual network containing the Azure Private DNS Resolver or 3rd-party DNS solution. You would need one DNS Security Policy per region give they are regional in nature.

Sample design for centralized DNS resolution

If you’re using a distributed DNS model, or have isolated virtual networks, your design would look something more like below. Here the DNS Security Policies are linked to each virtual network to ensure the packet is captured at the wire server of the virtual network where the query originates.

Sample design for distributed DNS Security Policy

As for domain lists, I think most organizations will likely have three separate domain lists. One for block, one for alert (again I don’t find this super useful as of now), and one for allow. These domain lists could be established in a production subscription and shared across lower environments to ensure consistency of blocked domains across environments.

Summing it up

There are a few big takeaways for you this post:

  • It’s time to revisit how you’re capturing DNS query logs. If your only reason for implementing a third-party DNS service was DNS query logging, you may want to revisit that to see to see if this new solution is more cost effective.
  • Just like Azure Private DNS, don’t forget to link your policy to the right virtual network. Whatever virtual network you’re sending DNS queries to the wire server is where these should be linked.
  • DNS query logs are very chatty. You may want to look at ways of optimizing what you capture (if you’re sending it to a third-party logging solution) of how much you retain (if you’re keeping it in a Log Analytics Workspace). This is especially true if you use a wildcard in the allow to capture everything. PaaS especially is very chatty. If you aren’t careful about this, you’ll owe Microsoft a big fat check by the end of that first month.

Lastly, I threw together some samples of the creation of these resources in Terraform if you’re curious. You can find the code here.

Well folks, hopefully you learned something new today. Thanks as always for taking the time to read the content!


AI Foundry – Credential vs Identity Data Stores

This is a part of my series on AI Foundry:

Hello again folks. Today, I’m going to continue my series on AI Foundry. I’ve been scratching my head on how best to tackle this series, because the service consists of so many foundational services plumbed together into a larger solution so there is a lot to talk about. The product can be complicated when implementing it with all the security bells and whistles. Getting it right requires a solid baseline understanding of the foundational components security capabilities (such as Azure Storage, Azure Key Vault, etc) and how these components work together for the purposes of AI Foundry.

The many components of an AI Foundry deployment

For the purposes of this post, I’m going to focus in on Azure Storage, specifically the storage account associated with the AI Foundry Hub. I will refer to this storage account as the default storage account. As I covered in my first post, AI Foundry is built on top of Azure Machine Learning. Like Azure Machine Learning, AI Foundry uses the default storage account to store artifacts created by the AI Foundry hub and projects. This includes files for the Prompt Flows you create, files used by the compute provisioned in the managed virtual network, and other artifacts related to the functionality of the product. This storage account is shared across the AI Foundry hub and all projects created within it.

The default storage account is critical to the functionality and if you muck up the identity or networking configuration, the product simply won’t work. The errors you’ll receive won’t always indicate an obvious problem with your storage account configuration. To help you avoid mucking up the identity portion, I’m going to use this post to explain your options for identity integration with the default storage account.

AI Foundry uses workspace connection resources to connect to external resources outside of the workspace. This includes the default storage account, AOAI (Azure OpenAI Service) or AI Service instance, and the like. When you create a connection in AI Foundry, you configure how the workspace should authenticate to the resource (determined by the authType property of the connection) when called by a user. This will most commonly be either Entra ID or an API key. In the example below, you see I have a connection object for an AI Search instance set to use Entra authentication by configuring the authType to AAD.

 {
      "id": "/subscriptions/XXXXXXXX-XXXX-XXXX-XXXX-XXXXXXXXXXXX/resourceGroups/rgaifeus296/providers/Microsoft.MachineLearningServices/workspaces/aifhaifoundryeus296/connections/connaisaifoundryeus296",
      "location": null,
      "name": "connmysearchservice",
      "properties": {
        "authType": "AAD",
        "category": "CognitiveSearch",
        "createdByWorkspaceArmId": "/subscriptions/XXXXXXXX-XXXX-XXXX-XXXX-XXXXXXXXXXXX/resourceGroups/rgaifeus296/providers/Microsoft.MachineLearningServices/workspaces/aifhaifoundryeus296",
        "error": "Network Service does not have permission to check resource /subscriptions/XXXXXXXX-XXXX-XXXX-XXXX-XXXXXXXXXXXX/resourceGroups/rgaifeus296/providers/Microsoft.Search/searchServices/aisaifoundryeus296 details. Please consider grant Azure Machine Learning (appId: 0736f41a-0425-4b46-bdb5-1563eff02385) read or contributor access to connected resource.",
        "expiryTime": null,
        "group": "AzureAI",
        "isSharedToAll": true,
        "metadata": {
          "ApiType": "Azure",
          "ApiVersion": "2024-05-01-preview",
          "DeploymentApiVersion": "2023-11-01",
          "ResourceId": "/subscriptions/XXXXXXXX-XXXX-XXXX-XXXX-XXXXXXXXXXXX/resourceGroups/rgaifeus296/providers/Microsoft.Search/searchServices/mysearchservice"
        },
        "peRequirement": "NotApplicable",
        "peStatus": "NotApplicable",
        "sharedUserList": [],
        "target": "https://mysearchservice.search.windows.net",
        "useWorkspaceManagedIdentity": false
      },
      "systemData": {
        "createdAt": "2025-01-12T23:19:01.8005674Z",
        "createdBy": "d34d51b2-34b4-45d9-b6a8-cc5422eb400a",
        "createdByType": "Application",
        "lastModifiedAt": "2025-01-12T23:19:01.8005674Z",
        "lastModifiedBy": "d34d51b2-34b4-45d9-b6a8-cc5422eb400a",
        "lastModifiedByType": "Application"
      },
      "tags": null,
      "type": "Microsoft.MachineLearningServices/workspaces/connections"
    }

Creating this connection allows me to use the AI Search instance within the AI Foundry hub and projects such as using it within the ChatPlayground Chat With Your Data feature. When the connection object is called, an Entra ID identity will be used. This could be the user’s identity, it could a project’s managed identity, or it could even be a managed-online endpoint’s managed identity. In all cases, the identity will be an Entra ID identity that can be authenticated to the tenant and the actions it is authorized to do are determined by its Azure RBAC assignments. It’s critical to understand that if you choose Entra ID-based authentication, you need to have proper permissions in place.

When a new AI Foundry hub is created, it will either create new storage account or integrate with an existing storage account to be used as the default storage account. During setup via the Portal, in the identity section you’ll see the option to choose credential-based or identity-based authentication when connecting to the default storage account. By default, credential-based access will be used. If you are provisioning via Terraform (which as of right now will require you to use the AzApi resource provider) you would set the properties.systemDatastoresAuthMode property to either accesskey or identity. As of the date of this blog, this property still is not documented in the REST API documentation that I could find, however, it will work when referencing it with API version Microsoft.MachineLearningServices/workspaces@2024-10-01-preview.

Credential or Identity-based access

So why would you choose identity-based access if you have to additionally provision the relevant security principals with access via RBAC? Before I answer that, let me do a quick recap on authorization in Azure. As I cover in my series on Azure authorization, services like storage have both a management plane and data plane. While the management plane is always Entra ID-based authentication and Azure RBAC, the data plane for most services (storage included) can use either Entra ID/Azure RBAC or API keys (via Storage Access Keys and SAS tokens). Usage of any type of static key typically grants the security principal using the key complete access to the data plane. Additionally, determining who is using the key at any given time is mostly impossible. For that reason, choosing to use Entra ID/Azure RBAC should be your preference wherever possible. Entra ID will give your traceability back to the security principal that touched the resource and Azure RBAC will give you the ability to assign granular permissions across the data plane.

Management plane versus data plane

If you instead select credential-based authentication a few things happen. When the new AI Foundry hub is created the connections made to the default storage account will be configured to use a SAS token. Any security principal with read access to the workspace can use that connection information for the storage account from within an AI Foundry project to connect to the storage account using those credentials. This means no audibility about what user is doing what with the storage account. This goes for any connection you share across projects that use an API key. Not good.

Default storage account configured to use credential-based authentication

It’s worth understanding the Key Vault resource used by AI Foundry in this scenario. When selecting credential-based authentication for the default storage account, the storage access keys for the storage account are stored in the Key Vault. Both the AI Foundry hub and projects under the hub are granted access to the secrets via Key Vault access policies. Yuck and yuck. Users do not get access to the Key Vault itself. Foundry simply enables them to exercise the use of the credential via permissions over teh connection object within the Foundry hub or project. When using identity-based authentication and Entra ID for your connections, the Azure Key Vault will be used minimally (such as being used if you deploy a model from the model catalog to managed online endpoint and select key-based authentication) to none.

Hopefully at this point I’ve sold you on the benefits of using the identity-based authentication to the default storage account (and Entra ID for connected resources). As a quick recap, if you care about least privilege and audibility, you’ll choose identity-based authentication. The main consideration of choosing identity-based authentication for the default storage account is that you need to get Azure RBAC right or else shit will break. Oh yes will it break.

If you configure your AI Foundry instance with a SMI (system-assigned managed identity) for the hub and projects, the required permissions on the default storage account will be granted for these identities. This includes:

  • Hub identity
    • Storage Blob Data Contributor
    • Storage File Data Privileged Contributor
  • Project identity
    • Storage Account Contributor
    • Storage Blob Data Contributor
    • Storage File Data Privileged Contributor
    • Storage Table Data Contributor

If you’re nosy like I am, you’ll notice the Azure RBAC assignments for both identities for the hub and project have an ABAC condition attached (yes an actual use case!). I plan on covering ABAC conditions in depth in my authorization series, but essentially they are a way of scoping the access to an attribute of the security principal, resource, or session. Within AI Foundry, they are used to limit the managed identities to accessing the blob containers specific to their underlining AML workspace. This helps to prevent the managed identity of one project from accessing artifacts produced by another project. For example, here are the conditions associated with my hub’s managed identity:

(
 (
  !(ActionMatches{'Microsoft.Storage/storageAccounts/blobServices/containers/blobs/delete'})
  AND
  !(ActionMatches{'Microsoft.Storage/storageAccounts/blobServices/containers/blobs/read'})
  AND
  !(ActionMatches{'Microsoft.Storage/storageAccounts/blobServices/containers/blobs/write'})
  AND
  !(ActionMatches{'Microsoft.Storage/storageAccounts/blobServices/containers/blobs/move/action'})
  AND
  !(ActionMatches{'Microsoft.Storage/storageAccounts/blobServices/containers/blobs/add/action'})
 )
 OR 
 (
  @Resource[Microsoft.Storage/storageAccounts/blobServices/containers:name] StringStartsWithIgnoreCase '67b8ddaa-f77e-4d12-b9ca-440326274da9'
 )
)

If you opt to use a UMI (user-assigned managed identity) for the AI Foundry hub you’ll need to manually grant these permissions to the UMI prior to provisioning the hub. You should try to include these conditions.

As I mentioned earlier, there are three primary sets of identities that hit the resources for an AI Foundry. These include the hub/project identity, user identity, and compute identities. If you opt to use identity-based authentication to the storage account, you will need to ensure you grant your users appropriate permissions on the storage account. When a user does something like create a prompt flow, the user’s identity context is used to access the file endpoint in the storage account to create a file share that will contain prompt flows they create.

This typically includes:

  • Storage Blob Data Contributor
  • Storage File Data Privileged Contributor

If you’re spinning up a managed-online endpoint, you will need to grant that managed identity (if using an UMI, these are automatically added if using an SMI):

  • Storage Blob Data Reader
  • Storage Blob Data Contributor

The last thing I want to mention is specific to if you creating Private Endpoints for your default storage account (which for a secure AI Foundry, you should be). Ensure you grant each AI Foundry project managed identity Reader over the private endpoints (both file and blob) for the default storage account. This is required when previewing data from the AI Foundry Portal for use cases like uploading data for fine-tuning a model. I’m not sure where this requirement comes from, but if you don’t include it, your users will run into weird permission errors when attempting to upload data to the default storage account from within AI Foundry.

Let’s sum things up:

  • The default storage account configuration is critical to successful use of the product. Muck up authorization and prepared for pain.
  • Use identity-based authentication for connectivity to the default storage account. This will ensure auditability for who accesses what.
  • Use Entra ID authentication for your AI Foundry connections wherever possible. This will give you auditability and the ability to scope permissions via Azure RBAC.
  • If you using identity-based authentication, ensure you put in place the right permissions for the hub/project (done automatically if using SMI), user, and compute identities.
  • If you’re having trouble with users uploading data for fine-tuning via AI Foundry, your project is probably missing the read permissions over the default storage account private endpoints.
  • If you’re having trouble provisioning a managed online endpoint that is using an UMI, you are probably missing permissions on the default storage account.

That wraps up this post. Thanks folks!