")
Hi folks! In the past I did a series on the Azure OpenAI Service and Microsoft Foundry Hubs (FKA AI Foundry Hubs FKA AI Studio). Instead of going through and updating all those posts and losing the historical content and context (I don’t know about you, but I love have the historical context of a service) I’m instead going to preserve it as is and spin up a new series on the latest iteration of Microsoft Foundry. I’ll likely keep much of the general framework of the older series because it seemed to work. One additional piece I’ll be included in this series is some of the quirks of the service I’ve run into to potentially save you pain from having to troubleshoot it. For this first post, I’m going to start this off explaining how the service has involved. As always, my persona focus here is my fellow folks in the central IT and infrastructure space.
The history
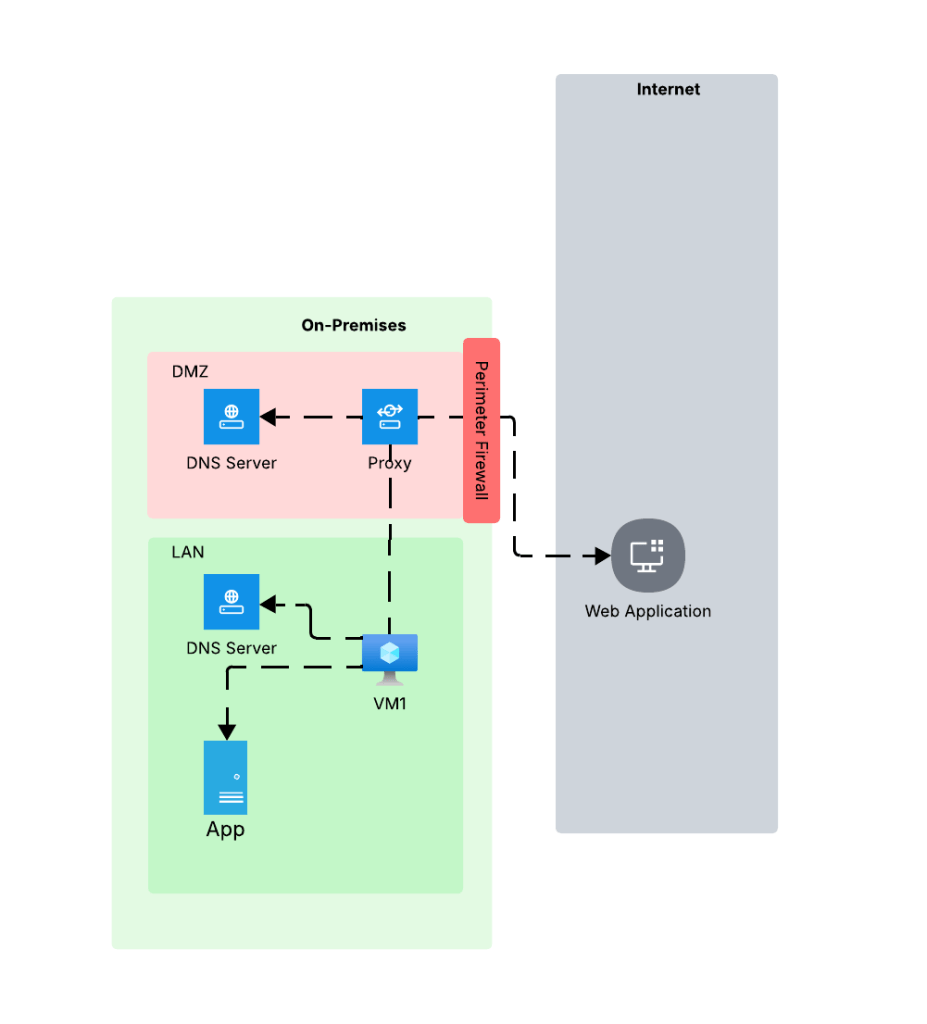
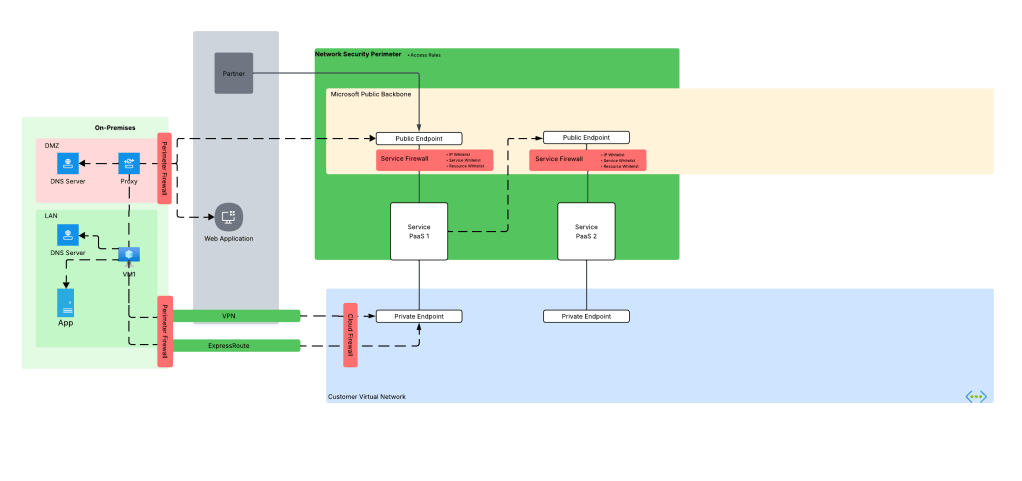
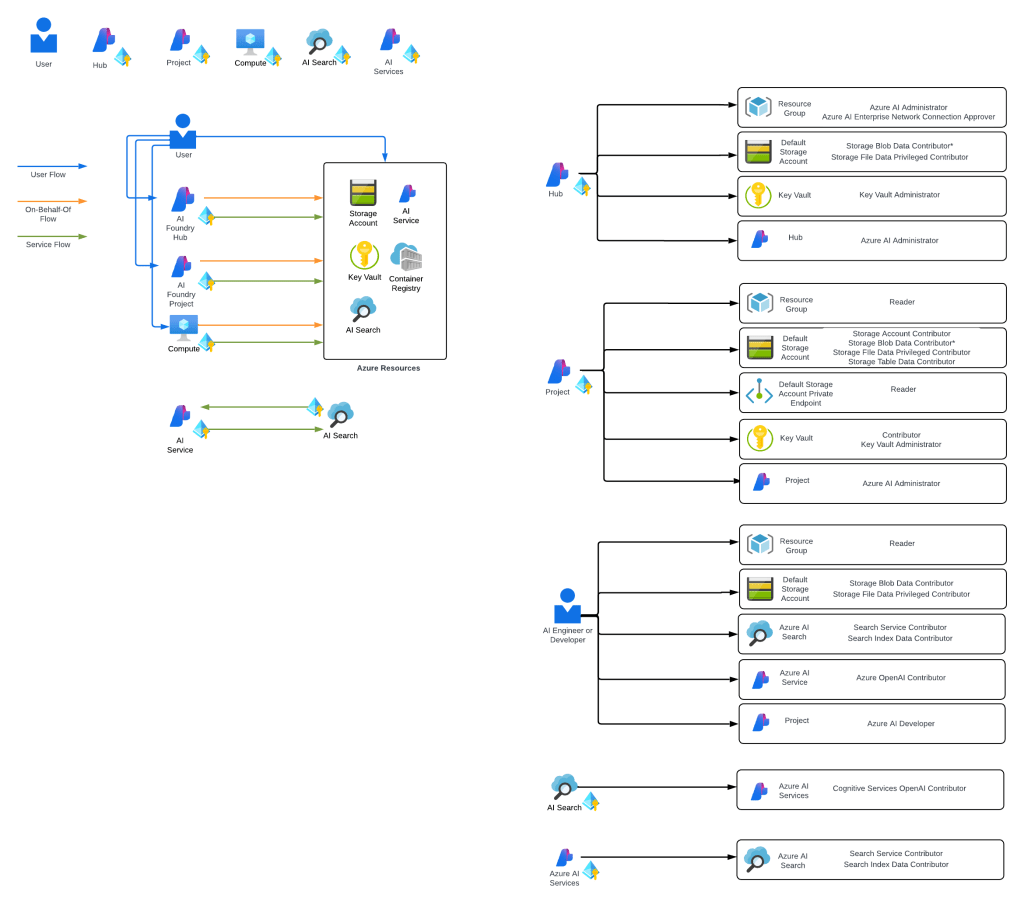
Way back in 2023 the hype behind generative AI really started go insane. Microsoft managed to negotiate rights to host OpenAI’s models in Azure and introduced the Azure OpenAI Service. The demand across customers was insane where every business unit (BU) wanted it yesterday. Microsoft initially offered the service within the Cognitive Services framework under the Cognitive Services resource provider. This mean it inherited many of the controls native to Cognitive Services which included Private Endpoints, a limited set of outbound controls, support for API key and Entra ID authentication, and support for Azure RBAC for authorization. Getting the deployed was pretty straightforward with the hold-ups to deployment being more concerns about LLM security in general. Deployment typically looked like the architecture below.
As folks started to build their AI applications, they tapped into other services under the Cognitive Services umbrella like Content Safety, Speech-to-Text, and the like. These services fit in nicely as they also fell under the Cognitive Services umbrella and had a similar architecture as the above, requiring deployment of the resource and the typical private endpoint and authentication/authorization (authN/authZ) configuration.
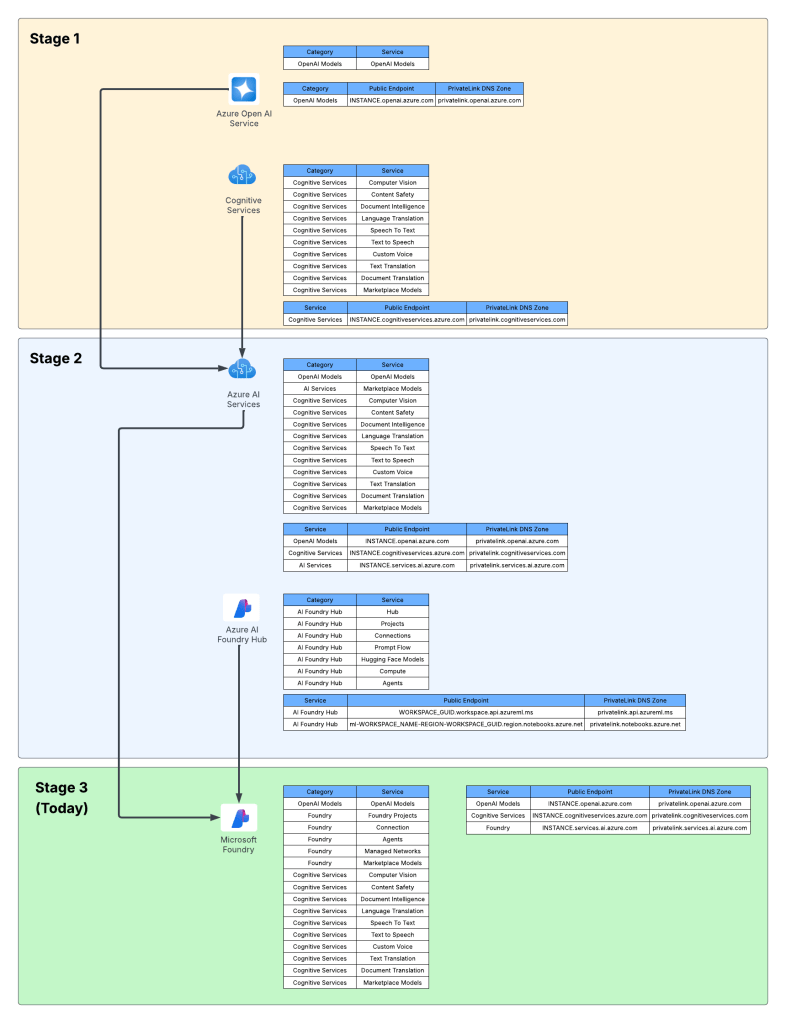
I like to think of this as stage 1 of the Microsoft’s AI offerings.
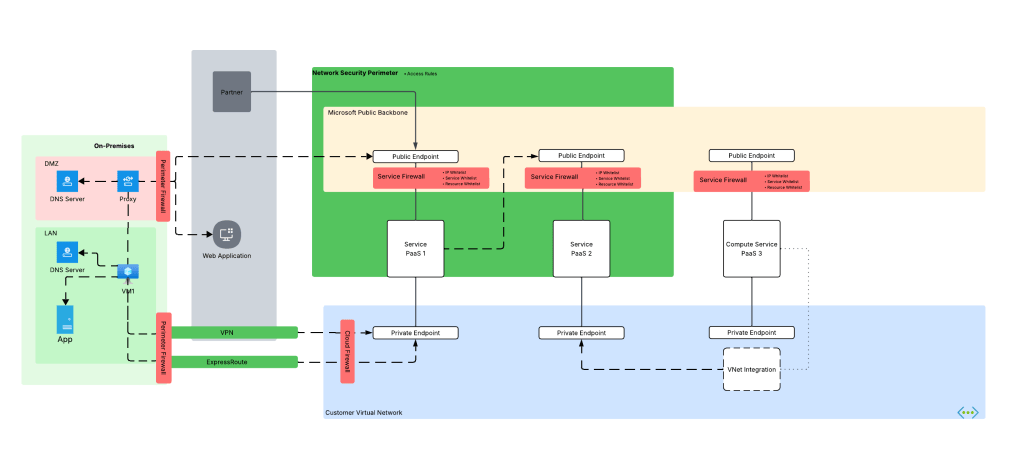
Microsoft then wanted to offer more models, including models they have built such and Phi and third-party models such as Mistral. This drove them to create a new resource called an AI Service resource. This resource fell under the Cognitive Services resource provider, and again inherited similar architectures as above. Beyond hosting third-party models, it also included and endpoint to consume OpenAI models and some of the pool of Cognitive Services. This is where we begin to see the collapse of Microsoft’s AI Services under a single top-level resource.
What about building AI apps though? This is where Foundry Hubs (FKA AI Studio) were introduced. The intent of Foundry Hubs were to be the one stop shop for developers to create their AI Apps. Here developers could experiment with LLMs using the playgrounds, build AI apps with Prompt Flow, build agents, or deploy 3rd party LLMs for Hugging Face. Foundry Hubs were a light overlay on top of the Azure Machine Learning (AML) service utilizing a new feature of AML built specifically for Foundry called AML Hubs. Foundry Hubs inherited a number of capabilities of AML such as its managed compute (to host 3rd party models and run prompt flows) and its managed virtual network (to host the managed compute).
While this worked, anyone who has built a secure AML deployment knows that shit ain’t easy. Getting the service working requires extensive knowledge of how its identity and networking configuration. This was a pain point for many customers in my experience. Many struggled to get it up and running due to the complexity.
I think of the combination of AI Services and Microsoft Foundry Hubs as stage 2 of Microsoft’s journey.
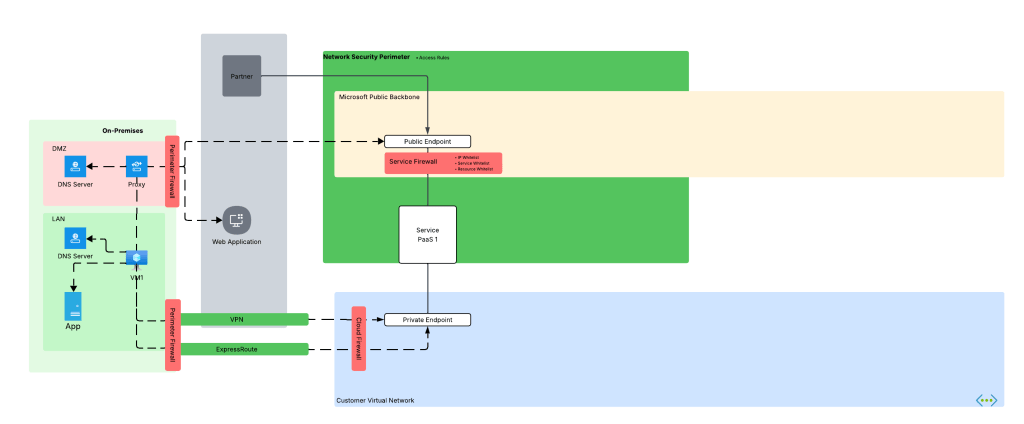
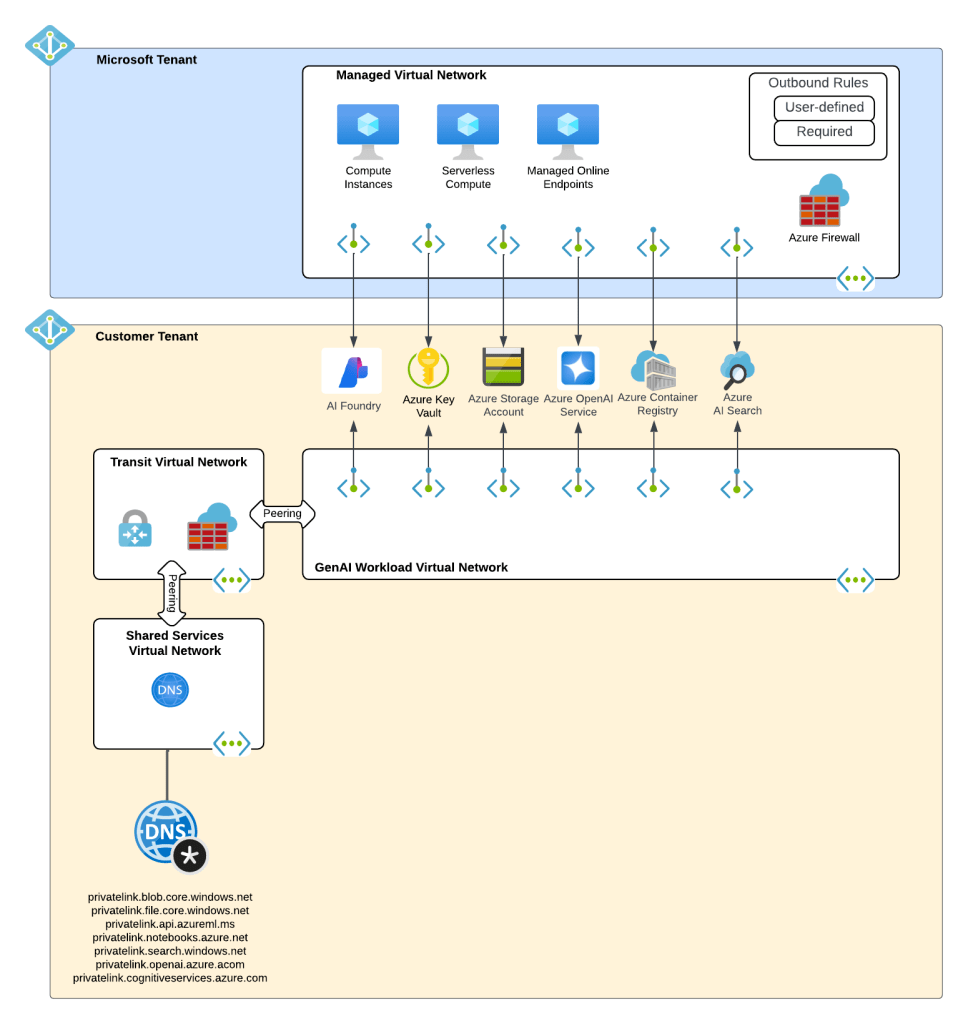
Ok, shit was complicated, I ain’t gonna lie. Given this complexity and feedback from the customers, Microsoft got ambitious and decided to further consolidate and simplify. This introduced the concept of a new top-level resource called Microsoft Foundry Accounts. In public documentation and conversation this may be referred to as Foundry Projects or Foundry Resources. Since this is my blog I’m going to use my term which is Microsoft Foundry Accounts. With Microsoft Foundry accounts, Microsoft collapsed the AI Services and Foundry Hubs into a single top level resource. Not only did they consolidate these two resources, they also shifted Foundry Hubs from the Azure Machine Learning resource provider into the Cognitive Services resource provider. This move consolidated the Cognitive Services resource provider as the “AI” resource provider in my brain. It resulted in a new architecture which often looks something like the below.
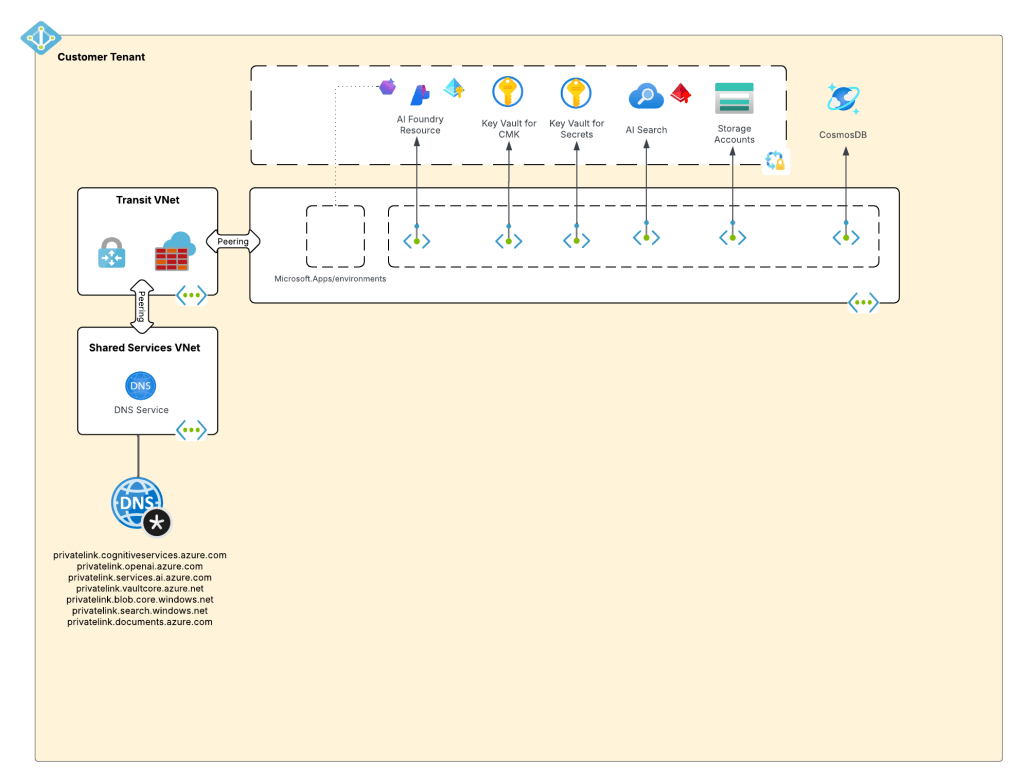
This is what I like to refer to as stage 3, which is the current stage we are in with Microsoft’s AI offerings. We will continue to see this stage evolve which more features build and integrated into the Microsoft Foundry Account. I wouldn’t be surprised at all to see other services collapse into it as just another endpoint to a the singular resource.
Why do you care?
You might be asking, “Matt, why the hell do I care about this?” The reason you should care is because there are many customers who jumped into these products at different stages. I run across a ton of customers still playing in Foundry Hubs with only a vague understanding that Foundry Hubs are an earlier stage and they should begin transitioning to stage 3. This evolution is also helpful to understand because it gives an idea of the direction Microsoft is taking its generative AI services, which is key to how you should be planning you future of these services within Azure.
I’ll dive into far more detail in future posts about stage 3. I’ll share some of my learnings (and my many pains), some reference architectures that I’ve seen work, how I’ve seen customers successfully secure and scale usage of Foundry Accounts.
For now, I leave you with this evolution diagram I like to share with customers. For me, it really helps land the stages and the evolution, what is old and what is new, and what services I need to think about focusing on and which I should think about migrating off of.
Well folks, that wraps it up. Your takeaways today are:
- Assess which stage your implementation of generative AI is right now in Azure.
- Begin plans to migrate to stage 3 if you haven’t already. Know that there will be gaps in functionality with Foundry Hubs and Foundry Accounts. A good example is no more prompt flow. There are others, but many will eventually land in Foundry project.
See you next post!