This is part of my series on Azure Authorization.
- Azure Authorization – The Basics
- Azure Authorization – Azure RBAC Basics
- Azure Authorization – actions and notActions
- Azure Authorization – Resource Locks and Azure Policy denyActions
- Azure Authorization – Azure RBAC Delegation
- Azure Authorization – Azure ABAC (Attribute-based Access Control)
Welcome back! Today I have another post in my series on Azure Authorization. In my last post I covered how permissions listed in notActions and notDataActions in an Azure RBAC Role Definition is not an explicit deny but rather a subtraction from the permissions listed in the definition in the action and nonActions section. In this post I’m going two features which help to address that gap: Resource Locks and the Azure Policy denyActions feature.
Resource Locks
Let’s start with Resource Locks. Resource Locks can be used to protect important resources from actions that could delete the resource or actions that could modify the resource. They are an Azure Resource that are administered through the Microsoft.Authorization resource provider (specifically Microsoft.Authorization/locks) and come in two forms which include delete (CanNotDelete) and modification locks (ReadOnly). Resource locks can be applied at the subscription scope, resource group scope, and resource scope. Resource locks applied at a higher scope are inherited down.
Resource locks are a wonderful defense-in-depth control because they are another authorization control in addition to Azure RBAC. A common use case might be to place a read only resource lock on an Azure Subscription which is used to house ExpressRoutes resources since once setup, ExpressRoute Circuits are relatively static from a configuration perspective. This could help mitigate the risk of an authorized user or CI/CD pipeline identity, who may have the Azure RBAC Owner or Contributor over the subscription, from mucking up the configuration purposefully or by accident and causing broad issues for your Azure landscape.

Resource locks do have a number of considerations that you should be aware of before you go throwing them everywhere. One of the main considerations is that they can be removed by anyone with access to Microsoft.Authorization/*, which will include built-in Azure RBAC roles such as Owner and User Access Administrator. It’s common practice for organizations to grant the identity (service principal or managed identity) used by a CI/CD pipeline the Owner role in order for that role to create role assignments required for the services it is deploying (you can work around this with delegation which I will cover in my next post!). This means that anyone with sufficient permissions on the pipeline could theoretically pass some code that removes the lock.
Another consideration is resource locks only affect management plane operations (if you’re unfamiliar with this concept check out my first post on authorization). Using a Storage Account as an example, a ReadOnly lock would prevent someone from modifying the CMK used to encrypt a storage account, but it wouldn’t stop a user with sufficient permissions at the data plane from deleting a container or blob. Before applying a ReadOnly resource lock, make sure you understand some of the ramifications of blocking management plane operations. Using an App Service as an example, a ReadOnly lock would prevent you from scaling that App Service up or down.
I’m a big fan of using resource locks for mission critical pieces of infrastructure such as ExpressRoute. Outside of that you’ll want to evaluate the considerations I’ve listed above in the public documentation. If your primary goal is to prevent delete operations, then you may be better off with using the next feature, Azure Policy deny Actions.
Azure Policy denyActions
Azure Policy is Azure’s primary governance tool. For those of you coming from AWS, think of Azure Policy as if AWS IAM Policy conditions had a baby with AWS Config. I like to think of it as a way to enforce the way a resource needs to look, and if the resource doesn’t look that way, you can block the action altogether, log that it’s not compliance, or remediate it.
It’s important to understand that Azure Policy sits in line with the ARM (Azure Resource Manager) API allowing it to prevent or remediate the resource creation or modification before it ever gets processed by the API. This is bonus vs having to remediate it after the fact with something like AWS Config.

In addition to the functionality above, Microsoft has added a bit of authorization logic in to Azure Policy with effect of denyAction (yes it was a bit confusing to me why authorization to do something was introduced, but you know what, it can come in handy!). As of the date of this blog, the only action that can be denied is the DELETE action. While this may seem limited, it’s an awesome improvement and addresses some of the gaps in resource locks.
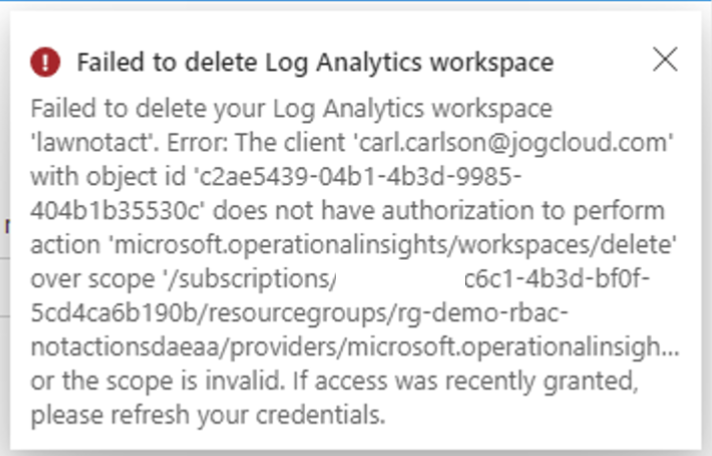
First, you can use the power of the Azure Policy language to filter to a specific resource type type with a specific set of tags. This allows you to apply these rules at scale. Use case here might be I want to deny the delete action on all Log Analytics Workspaces across my entire Azure estate. Second, the policy could be assigned a management group scope. By assigning the policy at the management group scope I can prevent deletions of these resources even by a user or service principal that might hold the Owner role of the subscription. This helps me mitigate the risk present with resource locks when a CI/CD pipeline has been given the Owner role over a subscription.
An example policy could look like something below. This policy would prevent any Log Analytics Workspaces tagged with a tag named rbac with a value equal to prod from being deleted.
$policy_id=(New-AzPolicyDefinition -Name $policy_name `
    -Description "This is a policy used for RBAC demonstration that blocks the deletion of Log Analytics Workspaces tagged with a key of rbac and a value of prod" `
    -ManagementGroupName $management_group_name `
    -Mode Indexed `
    -Policy '{
            "if": {
                "allOf": [
                    {
                        "field": "type",
                        "equals": "Microsoft.OperationalInsights/workspaces"
                    },
                    {
                        "field": "tags.rbac",
                        "equals": "prod"
                    }
                ]
            },
            "then": {
                "effect": "denyAction",
                "details": {
                    "actionNames": [
                        "delete"
                    ],
                    "cascadeBehaviors": {
                        "resourceGroup": "deny"
                    }
                }
            }
        }')
    ```
Just like resource locks, Azure Policy denyActions have some considerations you should be aware of. These include limitations such as it not preventing deletion of the resources when the subscription is deleted. Full limitations can be found here.
Conclusion
What I want you to take away from this post is that there are other tools beyond Azure RBAC that can help you secure your Azure resources. It’s important to practice a defense-in-depth approach and utilize each tool where it makes sense. Some general guidance would be the following:
- Use resource locks when you want to prevent modification and Azure Policy denyActions when you want to prevent deletion. This will allow you to do it at scale and mitigate the Owner risk.
- Be careful where you use ReadOnly resource locks. Blocking management plane actions even when the user has the appropriate permission can be super helpful, but it can also bite you in weird ways. Pay attention to the limitations in the documentation.
- If you know the defined state of a resource needs to look like, and you’re going to deploy it that way, look at using Azure Policy with the deny effect instead of a ReadOnly resource lock. This way can enforce that configuration in code and mitigate the Owner risk.
So this is all well and good, but neither of these features allow you to pick the SPECIFIC actions you want to deny. In an upcoming post I’ll cover the feature that is kind there, but not really, to address that ask.