Welcome back my fellow geeks!
In this series I’m walking through my experience putting together some code to integrate with the Microsoft Graph API (Application Programming Interface). In the last post I covered the logic behind this pet project and the tools I used to get it done. In this post I’ll be walking through the code and covering what’s happening behind the scenes.
The project consists of three files. The awsintegration.py file contains functions for the integration with AWS Systems Manager Parameter Store and Amazon S3 using the Python boto3 SDK (Software Development Kit). Graphapi.py contains two functions. One function uses Microsoft’s Azure Active Directory Library for Python (ADAL) and the other function uses Python’s Requests library to make calls to the MS Graph API. Finally, the main.py file contains the code that brings everything together. There are a few trends you’ll notice with all of the code. First off it’s very simple since I’m a long way from being able to do any fancy tricks and the other is I tried to stay away from using too many third-party modules.
Let’s first dig into the awsintegration.py module. In the first few lines above I import the required modules which include AWS’s Boto3 library.
import json
import boto3
import logging
Python has a stellar standard logging module that makes logging to a centralized location across a package a breeze. The line below configures modules called by the main package to inherit the logging configuration from the main package. This way I was able to direct anything I wanted to log to the same log file.
log = logging.getLogger(__name__)
This next function uses Boto3 to call AWS Systems Manager Parameter Store to retrieve a secure string. Be aware that if you’re using Parameter Store to store secure strings the security principal you’re using to make the call (in my case an IAM User via Cloud9) needs to have appropriate permissions to Parameter Store and the KMS CMK. Notice I added a line here to log the call for the parameter to help debug any failures. Using the parameter store with Boto3 is covered in detail here.
def get_parametersParameterStore(parameterName,region):
    log.info('Request %s from Parameter Store',parameterName)
    client = boto3.client('ssm', region_name=region)
    response = client.get_parameter(
        Name=parameterName,
        WithDecryption=True
    )
    return response['Parameter']['Value']
The last function in this module again uses Boto3 to upload the file to an Amazon S3 bucket with a specific prefix. Using S3 is covered in detail here.
def put_s3(bucket,prefix,region,filename):
    s3 = boto3.client('s3', region_name=region)
    s3.upload_file(filename,bucket,prefix + "/" + filename)
Next up is the graphapi.py module. In the first few lines I again import the necessary modules as well as the AuthenticationContext module from ADAL. This module contains the AuthenticationContext class which is going to get the OAuth 2.0 access token needed to authenticate to the MS Graph API.
import json
import requests
import logging
from adal import AuthenticationContext

log = logging.getLogger(__name__)
In the function below an instance of the AuthenticationContext class is created and the acquire_token_with_client_credentials method is called. It uses the OAuth 2.0 Client Credentials grant type which allows the script to access the MS Graph API without requiring a user context. I’ve already gone ahead and provisioned and authorized the script with an identity in Azure AD and granted it the appropriate access scopes.
Behind the scenes Azure AD (authorization server in OAuth-speak) is contacted and the script (client in OAuth-speak) passes a unique client id and client secret. The client id and client secret are used to authenticate the application to Azure AD which then looks within its directory to determine what resources the application is authorized to access (scope in OAuth-speak). An access token is then returned from Azure AD which will be used in the next step.
def obtain_accesstoken(tenantname,clientid,clientsecret,resource):
    auth_context = AuthenticationContext('https://login.microsoftonline.com/' +
        tenantname)
    token = auth_context.acquire_token_with_client_credentials(
        resource=resource,client_id=clientid,
        client_secret=clientsecret)
    return token
A properly formatted header is created and the access token is included. The function checks to see if the q_param parameter has a value and it if does it passes it as a dictionary object to the Python Requests library which includes the key values as query strings. The request is then made to the appropriate endpoint. If the response code is anything but 200 an exception is raised, written to the log, and the script terminates. Assuming a 200 is received the Python JSON library is used to parse the response. The JSON content is searched for an attribute of @odata.nextLink which indicates the results have been paged. The function handles it by looping until there are no longer any paged results. It additionally combines the paged results into a single JSON array to make it easier to work with moving forward.
def makeapirequest(endpoint,token,q_param=None):

    headers = {'Content-Type':'application/json', \
    'Authorization':'Bearer {0}'.format(token['accessToken'])}

    log.info('Making request to %s...',endpoint)

    if q_param != None:
        response = requests.get(endpoint,headers=headers,params=q_param)
        print(response.url)
    else:
        response = requests.get(endpoint,headers=headers)
    if response.status_code == 200:
        json_data = json.loads(response.text)

        if '@odata.nextLink' in json_data.keys():
            log.info('Paged result returned...')
            record = makeapirequest(json_data['@odata.nextLink'],token)
            entries = len(record['value'])
            count = 0
            while count < entries:
                json_data['value'].append(record['value'][count])
                count += 1
        return(json_data)
    else:
        raise Exception('Request failed with ',response.status_code,' - ',
            response.text)
Lastly there is main.py which stitches the script together. The first section adds the modules we’ve already covered in addition to the argparse library which is used to handle arguments added to the execution of the script.
import json
import requests
import logging
import time
import graphapi
import awsintegration
from argparse import ArgumentParser
A simple configuration for the logging module is setup instructing it to write to the msapiquery.log using a level of INFO and applies a standard format.
logging.basicConfig(filename='msapiquery.log', level=logging.INFO, format='%(asctime)s - %(name)s - %(levelname)s - %(message)s')
logger = logging.getLogger(__name__)
This chunk of code creates an instance of the ArgumentParser class and configures two arguments. The sourcefile argument is used to designate the JSON parameters file which contains all the necessary information.
The parameters file is then opened and processed. Note that the S3 parameters are only pulled in if the –s3 switch was used.
parser = ArgumentParser()
parser.add_argument('sourcefile', type=str, help='JSON file with parameters')
parser.add_argument('--s3', help='Write results to S3 bucket',action='store_true')
args = parser.parse_args()

try:
    with open(args.sourcefile) as json_data:
        d = json.load(json_data)
        tenantname = d['parameters']['tenantname']
        resource = d['parameters']['resource']
        endpoint = d['parameters']['endpoint']
        filename = d['parameters']['filename']
        aws_region = d['parameters']['aws_region']
        q_param = d['parameters']['q_param']
        clientid_param = d['parameters']['clientid_param']
        clientsecret_param = d['parameters']['clientsecret_param']
        if args.s3:
            bucket = d['parameters']['bucket']
            prefix = d['parameters']['prefix']
Next up the get_parametersParameterStore function from the awsintegration module is executed twice. Once to get the client id and once to get the client secret. Note that the get_parameters method for Boto3 Systems Manager client could have been used to get both of the parameters in a single call, but I didn’t go that route.
    logging.info('Attempting to contact Parameter Store...')
    clientid = awsintegration.get_parametersParameterStore(clientid_param,aws_region)
    clientsecret = awsintegration.get_parametersParameterStore(clientsecret_param,aws_region)
In these next four lines the access token is obtained by calling the obtain_accesstoken function and the request to the MS Graph API is made using the makeapirequest function.
    logging.info('Attempting to obtain an access token...')
    token = graphapi.obtain_accesstoken(tenantname,clientid,clientsecret,resource)

    logging.info('Attempting to query %s ...',endpoint)
    data = graphapi.makeapirequest(endpoint,token,q_param)
This section creates a string representing the current day, month, and year and prepends the filename that was supplied in the parameters file. The file is then opened using the with statement. If you’re familiar with the using statement from C# the with statement is similar in that it ensures resources are cleaned up after being used.
Before the data is written to file, I remove the @odata.nextLink key if it’s present. This is totally optional and just something I did to pretty up the results. The data is then written to the file as raw text by using the Python JSON encoder/decoder.
    logging.info('Attempting to write results to a file...')
    timestr = time.strftime("%Y-%m-%d")
    filename = timestr + '-' + filename
    with open(filename,'w') as f:

        ## If the data was paged remove the @odata.nextLink key
        ## to clean up the data before writing it to a file

        if '@odata.nextLink' in data.keys():
            del data['@odata.nextLink']
        f.write(json.dumps(data))
Finally, if the s3 argument was passed when the script was run, the put_s3 method from the awsintegration module is run and the file is uploaded to S3.
    logging.info('Attempting to write results to %s S3 bucket...',bucket)
    if args.s3:
        awsintegration.put_s3(bucket,prefix,aws_region,filename)
Exceptions thrown anywhere in the script are captured here written to the log file. I played around a lot with a few different ways of handling exceptions and everything was so interdependent that if there was a failure it was best for the script to stop altogether and inform the user. Naftali Harris has an amazing blog that walks through the many different ways of handling exceptions in Python and the various advantages and disadvantages. It’s a great read.
except Exception as e:
    logging.error('Exception thrown: %s',e)
    print('Error running script.  Review the log file for more details')
So that’s what the code is. Let’s take a quick look at the parameters file below. It’s very straight forward. Keep in mind both the bucket and prefix parameters are only required when using the –s3 option. Here are some details on the other options:
- The tenantname attribute is the DNS name of the Azure AD tenant being queries.
- The resource attribute specifies the resource the access token will be used for. If you’re going to be hitting the MS Graph API, more than likely it will be https://graph.microsoft.com
- The endpoint attribute specifies the endpoint the request is being made to including any query strings you plan on using
- The clientid_param and clientsecret_param attributes are the AWS Systems Manager Parameter Store parameter names that hold the client id and client secret the script was provisioned from Azure AD
- The q_param attribute is an array of key value pairs intended to story OData query strings
- The aws_region attribute is the region the S3 bucket and parameter store data is stored in
- The filename attribute is the name you want to set for the file the script will produce
{
    "parameters":{
        "tenantname": "mytenant.com",
        "resource": "https://graph.microsoft.com",
        "endpoint": "https://graph.microsoft.com/beta/auditLogs/signIns",
        "clientid_param":"myclient_id",
        "clientsecret_param":"myclient_secret",
        "q_param":{"$filter":"createdDateTime gt 2019-01-09"},
        "aws_region":"us-east-1",
        "filename":"sign_in_logs.json",
        "bucket":"mybucket",
        "prefix":"myprefix"
    }
}
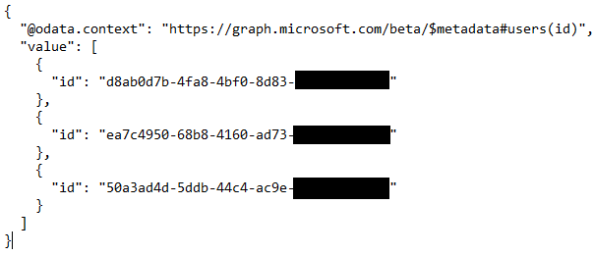
Now that the script has been covered, let’s see it action. First I’m going to demonstrate how it handles paging by querying the MS Graph API endpoint to list out the users in the directory. I’m going to append the $select query parameter and set it to return just the user’s id to make the output more simple and set the $top query parameter to one to limit the results to one user per page. The endpoint looks like this https://graph.microsoft.com/beta/users?$top=1&select=id.
I’ll be running the script from an instance of Cloud9. The IAM user I’m using with AWS has appropriate permissions to the S3 bucket, KMS CMK, and parameters in the parameter store. I’ve set each of the parameters in the parameters file to the appropriate values for the environment I’ve configured. I’ll additionally be using the –s3 option.

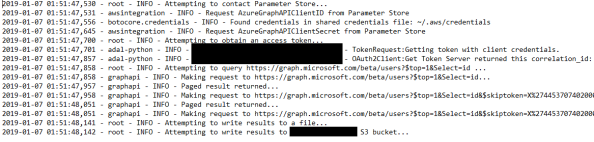
Once the script is complete it’s time to look at the log file that was created. As seen below each step in the script to aid with debugging if something were to fail. The log also indicates the results were paged.
The output is nicely formatted JSON that could be further transformed or fed into something like Amazon Athena for further analysis (future post maybe?).
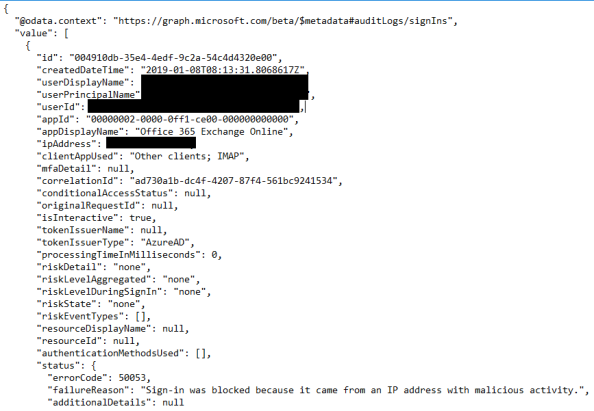
Cool right? My original use case was sign-in logs so let’s take a glance that. Here I’m going to use an endpoint of https://graph.microsoft.com/beta/auditLogs/signIns with a OData filter option of createdDateTime gt 2019-01-08 which will limit the data returned to today’s sign-ins.
In the logs we see the script was successfully executed and included the filter specified.

The output is the raw JSON of the sign-ins over the past 24 hours. For your entertainment purposes I’ve included one of the malicious sign-ins that was captured. I SO can’t wait to examine this stuff in a BI tool.
Well that’s it folks. It may be ugly, but it works! This was a fun activity to undertake as a first stab at making something useful in Python. I especially enjoyed the lack of documentation available on this integration. It really made me dive deep and learn things I probably wouldn’t have if there were a billion of examples out there.
I’ve pushed the code to Github so feel free to muck around with it to your hearts content.

This is awesome. Thank you for your work.
LikeLike
Glad you’re finding any of it useful Vladimir. If you manage to improve it or do anything interesting with it, definitely let me know. I’d love to see it!
LikeLike