
Hi everyone,
I hope all of you had an enjoyable holiday. I spent my week off from work spending time with the family and catching up on some reading. One area I decided to spend some time reading up on is Microsoft’s Cloud App Security. For those unfamiliar with the solution, it’s Microsoft’s entry into the cloud access security broker (CASB) (or Cloud Security Gateway (CSG) if you’re a Forrester reader) market. If you haven’t heard of “CASB” or “CSG”, don’t worry too much. While the terminology is new, many of the collection of technologies encompassing a typical CASB or CSG are not new, simply used together in new and creative ways. For a quick intro, take a read through this article and follow up with some Forrester and Gartner research for a deeper dive.
Since I haven’t had much experience with a product specifically marketing itself as a CASB, I thought it would be a great opportunity to play around with Microsoft’s solution. A good first step for any organization to grasp the value of a CASB is to explore what’s happening within the organization outside the view of IT, or as the marketers love to call it, shadow IT. The ease of consuming cloud technologies such as software as a service (SaaS) applications has been both a blessing and a curse. The new technology has been wonderful in cutting IT costs, bringing the technology closer to the business, providing for shorter time to market for new features, and providing simpler integration paths for different applications and services. On the negative side, the ease of use of these solutions means an average employee is using far more of them than is officially sanctioned by IT. This can lead to issues like loss of critical data, non-compliance with policy, or multiple business groups within an organization subscribing to the same service resulting in redundant licensing costs.
Wouldn’t it be great to get visibility into that shadow IT? Since a majority of cloud solutions work over standard HTTP(S) the services are readily accessible to the user without the user having to request additional ports be opened on the firewall. This means it’s much more challenging to track who is using what and what they’re doing with those services. Many organizations attempt to control these types of solutions with a traditional forward web proxy. However, too much focus is put on blocking the “bad” sites instead of analyzing the overall patterns of usage of services. Microsoft’s Azure AD Cloud Discovery is a feature of Azure Active Directory that can be used in conjunction with Cloud App Security’s catalog of app to provide visibility into what’s being accessed as well as providing information as to the risks the services being accessed present to the organization.
To simulate a typical medium to large organization and get some good testing done with Cloud App Discovery, I’m going to add a forward web proxy to my home lab. As I’ve mentioned in previous blog entries I have a small form factor computer running pfsense which I use as my lab networking security appliance. Out of the box, it supports a base install of Squid which can be added and configured to act as a forward web proxy with minimal effort. It gets a bit more challenging when you want to add authentication to the proxy because the built-in options for the pfsense implementation are limited to local, LDAP, and RADIUS authentication. I want authentication so I can identify users connecting to the proxy and associate the web connections with specific users but I want to use Kerberos so I get that seamless single sign on experience.
Like many open source products, the documentation on how to setup Squid running on pfsense and using Kerberos authentication is pretty terrible. Searching the all-powerful Google presents lots of forum posts with people asking how to do it, pieces of answers that don’t make much sense, and some Wikis on how to configure Squid to use Kerberos on a standard server. Given the lack of good documentation, I thought it would be fun to work my way through it and compile a walkthrough. I’m issuing the standard disclaimer that this is intended for lab purposes only. If you’re trying to deploy pfsense and Squid in a production environment, do more reading and spend time doing it safely and securely.
I won’t be covering the basic setup of pfsense as there are plenty of guides out there and the process is simple for anyone with any experience in the network appliance realm. For this demonstration I’ll be running a box with pfsense 2.4.2 installed.
On to the walkthrough!
The first step in the process is to add the Squid package through the pfsense package manager UI.
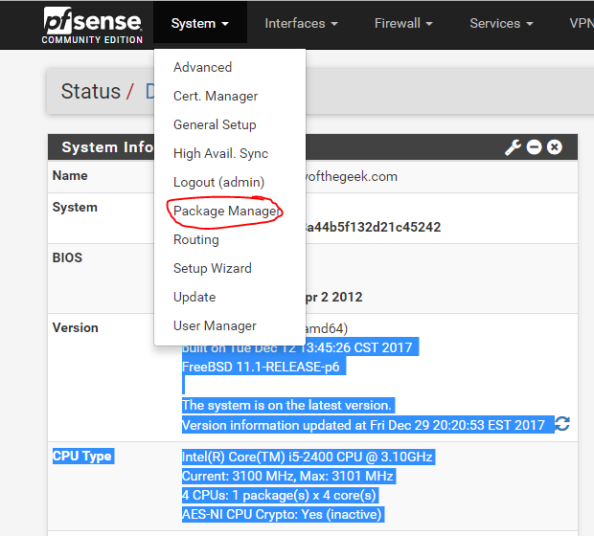
On the Package Manager screen, select the Available Packages section and install the Squid package. After the installation is complete, you’ll see Squid shown in the Installed Packages section.
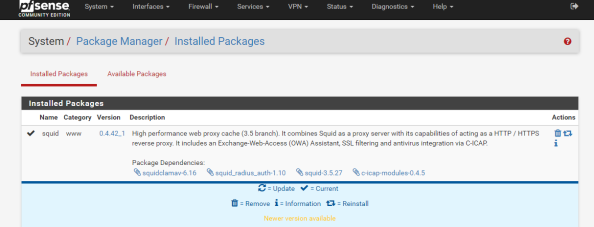
Notice the package installed is a branch of the 3.5 release while the latest release available directly via Squid is 4.0. It’s always fun to have the latest and greatest, but pfsense is an all-in-one solution so it comes with some sacrifices. Let’s get some of the basic configuration settings done with. Go to the Services menu, select the Squid Proxy Server menu item, and go the General section. First up choose the interface you want Squid to be available for and specify a port for it to listen on.
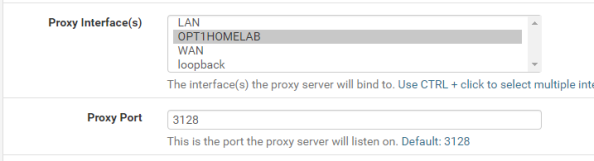
Now check off the Allow Users on Interface unless you have a reason to limit it to certain subnets attached to the interface. Additionally I’d recommend checking the Resolve DNS IPv4 First option. I banged my head against the wall with a ton of issues with Squid when I turned on authentication and this option wasn’t set. You can thank me for saving you hours of Google and trying other options.

Setup basic logging with the settings below.
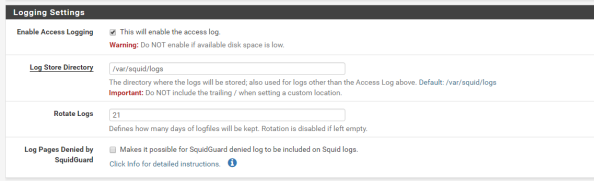
Basic settings are complete and it’s a good time to test the proxy from a client machine to verify its base functionality. You can do this by directing one of your client machines to use the proxy and attempting to access a website.
After you have verified functionality you’ll need to add support for SSH to the pfsense box since we’ll need to make some changes via the command shell. For that you’ll want to navigate the System menu, select the Advanced menu item, and go to the Admin Access section. Scroll down from there to the Secure Shell section and click the checkbox for Enable Secure Shell and set a the SSH port to the port of your choice. I chose 50,000.

The Secure Shell Server is active, but the firewall blocks access to it across all interfaces by default. You now need to create the appropriate firewall rule to allow access from devices behind the interface you wish to use to SSH to the box. For me this is the interface that my lab devices connect to. For this you’ll select Firewall from the top menu, select the Rules menu item, and select the appropriate interface from the menu items. Once there, click the Add button to create a firewall rule allowing devices within the subnet to hit the router interface over the port you configured earlier as seen below. The SSH listener will now be running and will be accessible from the designated interface.

Now you must configure DNS such that the pfsense box can resolve the Active Directory DNS namespace to perform Kerberos related activities. You can go the easy route and make the Active Directory domain controller the primary DNS server for pfsense via the GUI. However, I use pfsense as the primary DNS resolver for the lab environment and forward queries to Google’s DNS servers at 8.8.8.8.
In order to continue using with my preferred configuration, I needed to take a few additional steps. First I needed to add a Domain Override to the DNS Resolver service on pfsense to ensure it doesn’t pass the query along to the external DNS server. I did this by selecting Services from the main menu, selecting the DNS Resolver menu item, and going to the General Settings section. I then scrolled down to the Domain Overrides section and added the appropriate override for my Active Directory DNS namespace as seen below. Take note that you can’t go modifying the resolv.conf as you would in a normal Linux distro since pfsense will scrub any changes you make to the file each time it restarts its services. Get used to this behavior, we’re going to see it a number of times through this blog entry and we’ll have to learn to work around that limitation (feature?).

Next up you’ll want to verify name resolution is working as intended and it can be tested by running a query from the pfsense box. Go to the Diagnostics on the main menu, select the DNS Lookup item, and type in the hostname representing the Active Directory DNS namespace. It should resolve to the entries representing domain controllers in your Active Directory domain. Successful testing makes the DNS configuration complete.

On to the guts of the configuration. Pfsense comes with the krb5 package installed so all you need to do is configure it. For that you are going to need to access the command shell. Open up your favorite SSH client and connect to the pfsense box as an administrative user. Upon successful login you’ll see the menu below.
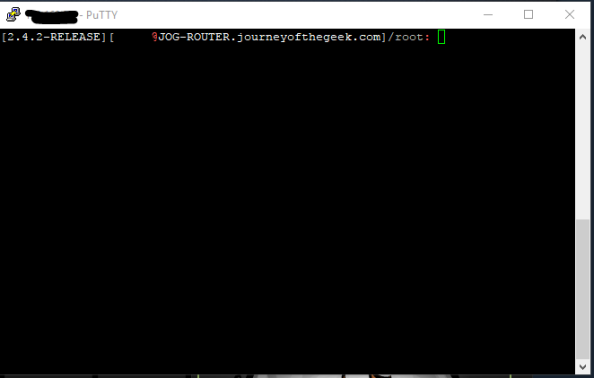
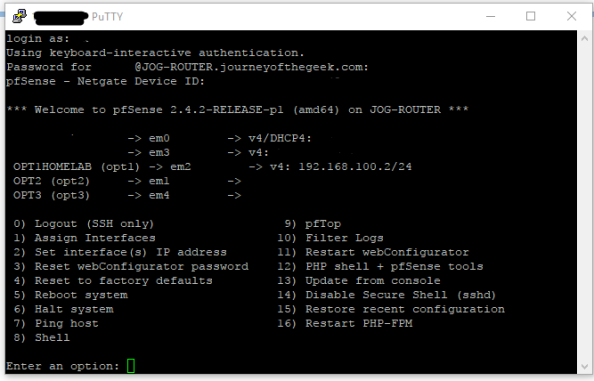 You want to hit the command shell so choose option 8 and you will be dropped into the shell.
The first step is to configure the krb5 package to integrate with the Active Directory domain. For that you’ll need to create a krb5.conf file. Create a new a krb5.conf file in the /etc/ directory and populate it with the appropriate information. I’ve included the content of my krb5.conf file as an example.
[libdefaults]

default_realm = JOURNEYOFTHEGEEK.LOCAL

dns_lookup_realm = false

dns_lookup_kdc = true

default_tgs_enctypes = aes128-cts-hmac-sha1-96

default_tkt_enctypes = aes128-cts-hmac-sha1-96

permitted_enctypes = aes128-cts-hmac-sha1-96
[realms]

JOURNEYOFTHEGEEK.LOCAL = {

kdc = jog-dc.journeyofthegeek.local

}
[domain_realm]

.journeyofthegeek.local = JOURNEYOFTHEGEEK.LOCAL

journeyofthegeek.local = JOURNEYOFTHEGEEK.LOCAL
[logging]

kdc = FILE:/var/log/kdc.log

Default = FILE:/var/log/krb5lib.log
Check out the MIT documentation on the options available to you in the krb5.conf. I made the choice to limit the encryption algorithms to AES128 for simplicity purposes, feel free to use something else if you wish. Once the settings are populated the file can be saved.
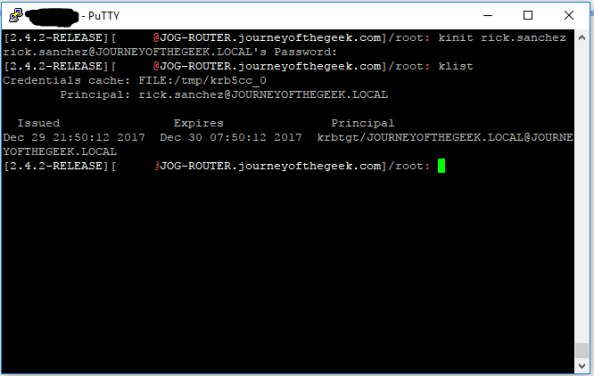
It’s time to test the Kerberos configuration. You do that by using running kinit and authenticating as a valid user in the Active Directory domain. If the configuration is correct klist will display the a valid Kerberos ticket granting ticket (TGT) for the user.
The system is now configured to interact with the Active Directory domain using Kerberos. You now need to create a security principal in Active Directory to represent the Squid service. Create a new user in Active Directory and name it whatever you wish, I used svc_squid for this lab. Since I chose to use AES128, I had to select the account control option on the user account in Active Directory Users and Computers (ADUC) that the service supported AES128. You can ignore that step if you chose not to force an encryption level. Now a service principal name (SPN) for the service is needed to identify the service when a user attempts to authenticate to it. For that you’ll need to open an elevated command prompt and use the setspn command.

Wonderful you have a security principal created and it includes the appropriate identifier. You now need to create a keytab that the service can use to authenticate to Active Directory. In comes ktpass. From the same elevated command prompt run the command as seen below.

Pay attention to case sensitivity because it matters when we’re talking MIT Kerberos, which is Kerberos implementation pfsense is using. The link I included above will explain the options. I set the crypto option to AES128 to ensure the keytab aligns with the other options I’ve configured around encryption.
Next up you need to transfer the keytab to the pfsense box. I used WinSCP to transfer the keytab to the pfsense box to the /usr/local/etc/squid/ directory. The keytab is on the pfsense box but you need to tell Squid where the keytab is. In a typical Squid implementation you’d define variable in the Squid startup script which would be consumed by the authentication helper. However, this is another case where pfsense will overwrite any changes you make to the startup script.
In addition to being unable to modify the startup script to set, pfsense also overwrites any changes you make directly to the squid.conf file. To get around this you’ll need to add the configuration options to the config file through the pfsense GUI. From within the GUI go to the Services section of the main menu, select the Squid Proxy Server menu item, go to the General section, scroll down and hit the Advanced Options button and scroll to the Advanced Features section. In the Custom Options (Before Auth) field, you’ll want to add the lines below.
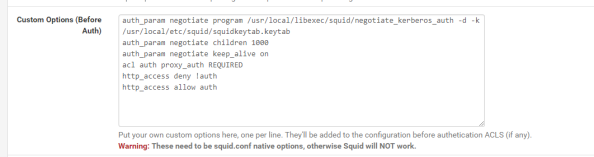
The first four lines I’ve added here are called directives in Squid. The first directive instructs Squid to use the negotiate_kerberos_auth authentication helper. The options I’ve added to the helper set a few different configuration options for the helper. The -k option allows me to direct Squid to the keytab file I added to the server which I couldn’t do with a variable in the startup script. The -d option writes debug information for the helper to Squid cache.log and the -t option shuts off the replay cache for MIT Kerberos. The second directive sets the child authentication processes to 1,000. You’ll want to do some research on this directive if you’re moving this into a production environment. I simply choose 1000 so I wouldn’t run any risk of getting my authentication requests queued for the purposes of this lab. The third directive is set to on by default and should only be set to off if you run into issues with PUT/POST requests.
The fourth directive starts enforcing access controls within Squid. Access controls within Squid are a bit weird. The Squid wiki does a decent job of explaining how they work. The short of what I’ve done in the fourth directive is create an access list called auth which will contain all users who successfully authenticate against Squid. The next line denies users access to the http_access list if the user doesn’t below to the auth access line (blocking non-authenticated users). The final line allows users who are in the auth list into the http_access list (allows authenticated users).
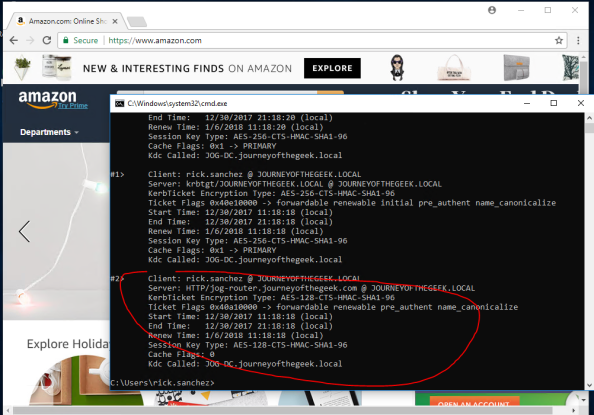
With that last amount of configuration, you’ve gotten pfsense and Squid configured for Kerberos authentication. I’ll quickly demonstrate the what a successful implementation looks like. For that I’m going to bounce over to a Windows 10 domain-joined machine with Chrome installed and configured to use the proxy server. Navigating to Amazon displays the webpage with no authentication prompts and running a klist from a command prompt shows I have a Kerberos ticket for the proxy.
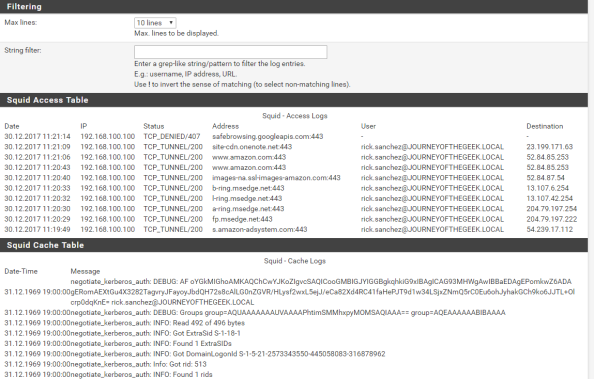
Going back into the pfsense GUI, going to the Services menu, selecting the Squid Proxy Server menu item and navigating to the Real Time section shows the access log displaying Rick Sanchez accessing Amazon and successful consumption of the Kerberos ticket in the Cache Log section.
In a future post I’ll dig a bit deeper into Azure AD Cloud Discovery and setup automatic forwarding of logs using the Microsoft collector.
Have a happy New Year!

Hi, I have configured squid, but I am not getting authenticated via kerberos. And there two type of logs
ipcCreate: /usr/local/libexec/squid/: (13) Permission denied
Warning: negotiateauthenticator #Hlpr xxxx exited
But i can`t find what permissions I have to give to /usr/local/libexec/squid/, for now owners are root:wheel and permissions are -r-xr-xr-x.
Thank you for great post!
LikeLike
Hi Hamzat,
Have you tried packet capture on your kerberos server?
I found logs on the pfsense will just tell you it failed but on our Windows box using Wireshark and filtering for UDP/TCP port 88 really helped to see the requests coming into it and the responses it was giving back. Hence I managed to figure out my scenario wasn’t negotiating properly and had to adjust the crypto and enctypes options, I was also seeing the “Warning: negotiateauthenticator #Hlpr xxxx exited” error and it’s, erm, far from useful.
QB.
LikeLike
Hi quiteBored, i previous gave up but wanted to try again but currently having issue with the first part i keep getting unable to reach any KDC in realm, trying to test it on my test environment
[libdefaults]
default_realm = TEST.LOCAL
dns_lookup_realm = false
dns_lookup_kdc = true
default_tgs_enctypes = aes128-cts-hmac-sha1-96
default_tkt_enctypes = aes128-cts-hmac-sha1-96
permitted_enctypes = aes128-cts-hmac-sha1-96
[realms]
TEST.LOCAL = {
kdc = zentyal.test.local
}
[domain_realm]
.test.local = TEST.LOCAL
test.local = TEST.LOCAL
[logging]
kdc = FILE:/var/log/kdc.log
Default = FILE:/var/log/krb5lib.log
LikeLike
Hi Farzad,
Your krb5.conf looks fine, I removed the enctypes lines due to my own negotiation issues and added reference to my keytab file but you’re not getting that far due to name resolution issue it seems. Is your pfsense acting as the DNS server in your test lab?
Our DC in our live network doesn’t use our pfsense for public lookups but it is the local DNS on our network for workstations since it’s a domain controller for the AD environment. Our pfsense doesn’t use the local DNS and points directly to google servers for its own lookups because we use DNSBL in the firewall.
For it to resolve the local domain and the kdc I used the “DNS Resolver” as described by mattfeltonma in his article here, I went a step further and added host overrides too so it could just resolve the kdc name direct to an IP address and cut out some of the delay.
Hope this helps.
QB.
LikeLiked by 1 person
Hi QB thank you so much for the reply, just fixed the DNS issue it was pfsense, so you recommend to remove these lines? Currently were using zentyal 6.2 for our AD
default_tgs_enctypes = aes128-cts-hmac-sha1-96
default_tkt_enctypes = aes128-cts-hmac-sha1-96
permitted_enctypes = aes128-cts-hmac-sha1-96
LikeLike
Hi Farzad,
If you know what the zentylal 6.2 supports you can alter or tweak them accordingly, I wouldn’t remove them unless you need to because you can’t get it to negotiate a ticket, the keytab file is also important here as it’s part of the negotiation process.
In my case I should have been ok using the settings mattfeltonma uses in the article for the crypto in the keytab file and the requirements of default and permitted enctypes in the krb5.conf. Our server is supposed to support that encryption but it kept failing so I had to drop the default/required from krb5 and change the keytab to negotiate all, turns out ours preferred to negotiate RC4 which isn’t the best cypher but we have a pretty well locked down environment including some older workstations.
I’m still butting my head against a wall on that one, originally using klist on the pfsense consistently showed I had been issued a valid ticket but when it came to actual proxy auth done by a browser the negotiation for a ticket kept failing.
You’ll have to keep that in mind moving forward, glad I could help on the first step though.
Thanks,
QB.
LikeLike
Hi QB thank you again for the quick reply, so these were the steps i took ( not sure if my previous post was posted prob because it was to long so reposting again)
on pfsense created the krb5.conf
https://pastebin.com/BNR2trmH
then on pfsense ran the following and got this
https://pastebin.com/7KX78p6B
so far so good,
then on a windows server which is already conected to the domain i ran the following (i ran it twice which shows the error double spn)
https://pastebin.com/NrnAX0Cg
Duplicate SPN found, aborting operation!
then ran this command
https://pastebin.com/eLdqai5G
then on squid on Custom Options (Before Auth) added this part then restarted squid
https://pastebin.com/Tuk4WzH0
then i check the squid logs i get this which keeps showing the popup box
https://pastebin.com/DKPae01g
My question is that i see that you put LDAP Internet_Access group howcome not on squidguard better?
With your setup were you able to configure squidguard?
Thank you again
LikeLike
Hi QB it seems that the previous post did not show up so im reposting
this is my krb5.conf
https://pastebin.com/BNR2trmH
then verified with psense
https://pastebin.com/7KX78p6B
so far so good
on the windows server ran this comands
https://pastebin.com/NrnAX0Cg
thn this
https://pastebin.com/eLdqai5G
The squid Custom Options (Before Auth) after that restarted the service
https://pastebin.com/Tuk4WzH0
then verified the logs but got this issue
https://pastebin.com/DKPae01g
LikeLike
Hi QB it seems that the previous post did not show up so im reposting
this is my krb5.conf
https://pastebin.com/BNR2trmH
then verified with psense
https://pastebin.com/7KX78p6B
so far so god
on the windows server ran this comands
https://pastebin.com/NrnAX0Cg
thn this
https://pastebin.com/eLdqai5G
The squid Custom Options (Before Auth) after that restarted the service
https://pastebin.com/Tuk4WzH0
then verified the logs but got this issue
https://pastebin.com/DKPae01g
LikeLike
HI QB thank you again finally got it working, on my test environment but not sure this part external_acl_type kerberos_group ttl=60 negative what does this mean?
LikeLike
Hi Farzad,
That’s great.
I was working with purely allowing AD users Internet access based on them being part of an AD group called “Internet_Access” using the AD server, kerberos and using an LDAP query with no other prompts or authentication for the user. My scenario required a seamless authentication process with no chance for the user to ask someone with Internet access to provide their credentials into a prompt, thus bypassing the lockdown. This uses the “external_acl_type” to define the authentication is from an external lookup and establish the local group variable for squid to work with.
The “ttl=60” gives squid proxy a 60 second cache of a positive verification for the kerberos ticket, I had to test settings quickly as I added and removed a test account group membership, so I set it to 60 seconds but normally it would be longer, like 3600 for an hour. This caches the successful result only.
The “negative_ttl=60” covers the other side of caching a lookup, it’s for failed credentials. So with this the success gets rechecked every 60 seconds because of the time to live, but if it failed first then the negative_ttl is in force and will over-ride an updated success, it’s best to set them both and make them the same.
Here’s a link to some squid settings and definitions when using the “external_acl_type”:
http://www.squid-cache.org/Versions/v3/3.5/cfgman/external_acl_type.html
Thanks,
QB.
LikeLiked by 1 person
Hi QB
Thank you so much for the reply, currently this is my squid config, in which part would you recommend to add so i avoid those future popups? currently its working on my test env but on production is around 200 or more computers
auth_param negotiate program /usr/local/libexec/squid/negotiate_kerberos_auth -r -d -k /usr/local/etc/squid/squidproxy.keytab
auth_param negotiate children 1000
auth_param negotiate keep_alive on
acl auth proxy_auth REQUIRED
http_access deny !auth
http_access allow auth
Thank you
LikeLike
Hi Farzad,
I’m assuming you have it prompting once, accepting creds and then prompting later when the ttl expires or are you simulating my settings where it’s supposed to just do a group lookup and never prompt?
If it’s the case of allowing a prompt, getting through that and limiting the repeat prompts maybe try changing the ttl to something higher, 18,000 would be 5 hours for example but this comes down to your own requirements on security restrictions and user experience. Production environment is always a balancing act when it comes to imposing systems that interrupt a users workflow before IT become the “bad guys”.
My environment is literally just the machine passing the logged on user, if Squid finds the group membership present with an LDAP lookup then it lets them through, otherwise everything is denied. My advanced Squid settings here:
external_acl_type kerberos_group ttl=60 negative_ttl=60 %LOGIN /usr/local/libexec/squid/ext_kerberos_ldap_group_acl -a -g Internet_Access -l ldap://SERVERNAME.DOMAIN.LOCAL -u squid_svc -p BLANKED-OUT -D DOMAIN.LOCAL
acl GroupProxy external kerberos_group
http_access allow GroupProxy
http_access deny all
This does the LDAP query using “external_acl_type” and returns the result to a variable called “kerberos_group”, this is then used by Squid to set up the “GroupProxy” acl and then lets it through with the http_access allow rule.
I found the “http_access deny !auth” setting caused a repeated proxy prompt regardless of the LDAP result so I dropped it, rules are applied in order of precedence and I had a simple objective so if they pass the group membership lookup they are let through with no prompt, if they are not in that group or the traffic isn’t from something that can present a username then it’s blocked, outright.
Note Squid evaluates all the http_access rules in order until it finds one that matches and then ignores the rest.
One thing I did experience that was not pfSense, Kerberos or Squid related and completely threw a curve ball was my squid_svc account didn’t entirely have read rights on all user accounts in the AD domain! so in my testing some users acted correctly with allow/block rules and others that were in the group and should have been allowed simply got continual prompts for creds because the squid_svc account couldn’t access their account properties for the lookup. I corrected that by assigning it as a delegate on the AD domain granting read access to all.
Thanks,
QB.
LikeLike
Hi QB thank you so much for the reply, sorry for the late reply, im not getting alerted when it gets replied, currently i still have it on my test server so far so good,
next week im going to put in production around 300 computers to see what happens ill post back how it goes
Thank you so much
LikeLike
Hi Farzad,
Doesn’t look like your latest repeat post has appeared either, hopefully
you get this response though.
I’ve looked though the screen clippings, all looks good apart from the
setspn command and obviously the final debug log.
If you carefully review Matt\’s article he uses svc_squid for the user
account all the way through, you use squid which isn’t a problem but
when you create the Service Principal Name using setspn on the Windows
box you use “administrator”. Everything else from keytab file to the
LDAP query uses squid but the SPN itself isn’t added properly.
Look closely at Matt’s screen clipping of using setspn, it has to use

the same username you\’re using for everything else and if you\’re
creating the SPN correctly it should report “Registering
ServicePrincipalNames for…”, it’s about 5 images from the bottom of
the post but I’ve linked it here:
Start with setspn using the “squid” username you’ve used for everything
else and make sure you\’re using an “elevated command prompt” which might
be why it didn’t report registering anything, only checking (right
click, the “run as administrator”).
Let us know,
QB.
LikeLike
Sorry for the delay on the comments posting. They got caught in the spam filter. You should be good now Farzad!
QB, thanks so much for helping folks and lending your knowledge!
LikeLiked by 1 person
Hi Matt,
Earlier when I tried replying by email because I though there was a site issue I received an NDR bounce back, hence copying my reply on the site directly.
It said “We ran into a problem with your recent comment reply by email:” and at the bottom
“It could be one of two issues:
– You’re replying from a different email address than the one your subscription was sent to.
– Your email address isn’t associated with a WordPress.com user that has permission to view this site.
You’ll need to reply from the proper email account or comment directly on the post:”
Suffice to say that wasn’t the case, not sure if this is another problem on top of the spam filter.
Thanks again for your original article.
QB.
LikeLike
Hi Farzad,
I just got the email alerts from your previous posts, you asked “My question is that i see that you put LDAP Internet_Access group how come not on squidguard better?” which I didn’t see in your repeat post.
SquidGuard is a pointless waste of your time here, it’s far simpler to bundle everything you need into the advanced Squid config and manage it from there. We’re doing a simple LDAP query for group membership using an external source AD domain, do query – get answer – use answer.
Thanks to Matt for kicking the spam filter.
QB.
LikeLike
Hi everyone,
Sorry if my question sounds silly but I’m trying to make squid and kerberos work together… It says everywhere that it’s impossible to have an auth with squid in transparent/intercept mode BUT pfSense sounds like it makes it work, why ?
In which file and where in this file the command in “Custom options (Before auth)” are going ?
Thanks and have a nice day !
N.
LikeLike
It great tutorial, only one that worked for me 🙂
I have one question (issue) and I hope that you can help me.
Kerberos authentication works perfectly fine when the PC is connected to Domain and the user is authenticated.
auth_param negotiate program /usr/local/libexec/squid/negotiate_kerberos_auth -r -d -k /usr/local/etc/squid/squidproxy.keytab
What I try to achieve is to authenticate the user with his AD credentials when the PC is not on DOMAIN.
auth_param basic program /usr/lib/squid/squid_ldap_auth -v 3 -b “dc=yourcompany,dc=com” -D uid=some-user,ou=People,dc=yourcompany,dc=com -w password -f uid=%s ldap.yourcompany.com
I can do that with LDAP, but only if I disable (in config) Kerberos on Squid.
Somehow Kerberos and LDAP config don’t work together.
Error that I getting in the log is :
LDAP ERROR: Negotiate Authentication validating user. Result: {result=BH, notes={message: received type 1 NTLM token; }}
On the other side, Kerberos is working fine.
I would really like to have your input on it
Regards
LikeLike
Hi there. From the detail in your post and the error, it looks like you are trying to do an LDAP authentication but the Negotiate (Kerberos first NTLM after) authentication plug in is being used.
If you want to authenticate the user with LDAP that would like use an LDAP authentication plugin.
If the user’s machine isn’t joined to the AD domain, you wouldn’t be able to use Kerberos to authenticate the user. At that point it would fail back to using NTLM.
To do what you are trying to do, you’d likely need to see if Squid supports the S4U2Self/S4U2Proxy Kerberos protocol extension. It delegates the authentication of a user to another user (non-human). Common use case would be to let a service authenticate a user via a certificate and then perform protocol transitioning to Kerberos creating an SSO experience.
LikeLike
When I paste the following code, authentication via Kerberos works, but the proxy service stops working and does not start until I delete the inserted command lines.
Can anyone help?
auth_param negotiate program /usr/local/libexec/squid/negotiate_kerberos_auth -d -k
/usr/local/etc/squid/squidproxy.keytab
auth_param negotiate children 1000
auth_param negotiate keep_alive on
acl auth proxy_auth REQUIRED
http_access deny !auth
http_access allow auth
LikeLike