
Update: In November 2019 AWS introduced support for integration between Azure AD and AWS SSO. The integration offers a ton more features, including out of the box support for multiple AWS accounts. I highly recommend you go that route if you’re looking to integrate the two platforms. Check out my series on the new integration here.
We’ve reached the end of the road for my series on integrating Azure Active Directory (Azure AD) and Amazon Web Services (AWS) for single sign-on and role management. In part 1 I walked through the many reasons the integration is worth looking at if your organization is consuming both clouds. In part 2 I described the lab I used to for this series, described the different way application identities (service accounts for those of you in the Microsoft space) are handled in Active Directory Domain Services versus Azure AD, and walked through what a typical application identity looks like in Azure AD. In part 3 I walked through a portion of the configuration steps, did a deep dive into the Azure AD and AWS federation metadata, examined a SAML assertion, and configured the AWS end of the federated trust through the AWS Management Console. This included creation of an identity provider representing the Azure AD tenant and creation of a new IAM role for users within the Azure AD tenant to assert.
In this final post I’ll cover the remainder of the configuration, describe the “provisioning” capabilities of Azure AD in this integration, and pointing out some of the issues with the recommended steps in the Microsoft tutorial.
Before I continue with the configuration, let me cover what I’ve done so far.
- Part 2
- Added the AWS application from the Azure AD Application Gallery through the Azure Portal.
- Part 3
- Assigned an Azure Active Directory user to the application through the Azure Portal.
- Configured the Azure AD to pass the Role and RoleSessionName claims through the Azure Portal.
- Created the SAML identity provider representing Azure AD in the AWS Management Console.
- Created an AWS IAM Role and associated it with the identity provider representing Azure AD in the AWS Management Console.
At this point JoG users can assert their identity to their heart’s content but we don’t have a list of what AWS IAM roles stored in Azure AD for our users to assert. So how do we assert a role from Azure AD if the listing of the roles exists in AWS? The wonderful concept of application programmatic interfaces (APIs) swoops in and saves the day. Don’t get me wrong, if you hate yourself you can certainly provision them manually by modifying the application manifest file every time a new role is created or deleted. However, there is an easier route of having Azure AD pick up those roles directly from AWS on an automated schedule. How does this work? Well nothing works better than demonstrating how the roles can be queried from the AWS API.
The AWS SDK for .NET makes querying the API incredibly easy. We’re not stuck worrying about assembling the request and signing it. As you can see below the script is six lines of code in PowerShell.

The result is a listing of the roles configured in AWS which includes the AzureADEC2Admins role I created earlier. This example demonstrates the power a robust API brings to the table when integrating cloud services.

When Microsoft speaks of provisioning in regards to the AWS integration, they are talking about provisioning the roles defined in AWS to the the application manifest file in Azure AD. This provides us with the ability to assign the roles from within the Azure Portal as we’ll see later. This differs from many of the Azure AD integrations I’ve observed in the past where it will provision a record for the user into the software as a service (SaaS) offering. Below is a simple diagram of the provisioning process.
To do support provisioning we need to navigate to the AWS Management Console, open the Services Menu, and select IAM. We then select Users and hit the Add User button. I named the user AzureAD, gave it programmatic access type, and attached the IAMReadOnlyAccess policy. AWS then presented me with the access key ID and secret access key I’ll need to provide to Azure AD. Yes, we are going to follow security best practices and provide the account with the minimum rights and permissions it needs to provide the functionality. The Microsoft tutorial instructs you to generate the credentials under the context of the AWS administrator effectively giving the application full rights to the AWS account. No Microsoft, just no.
I next bounce back to the Azure portal and to the AWS application configuration. From here I select the Provisioning option, switch the drop-down box to Automatic, and plug the access key ID into the clientsecret field and the secret access key into the secret token field. A quick test connection shows success and I then save the configuration. Note that you must first save the configuration before you can turn on the synchronization.
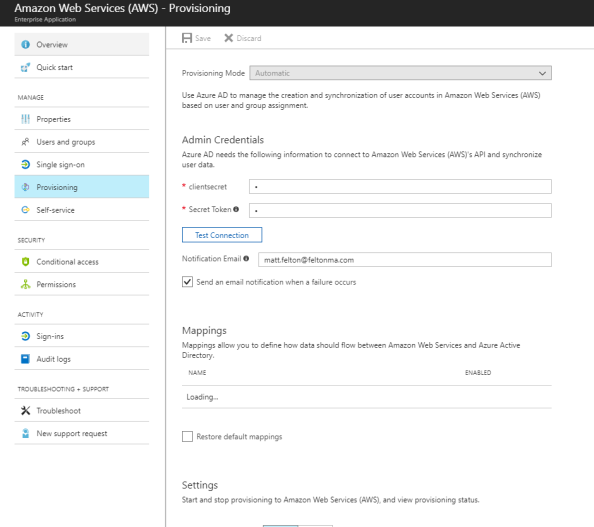
After the screen refreshes I move down to the Settings section and turn the Provisioning Status to On and set the Scope to Sync only assigned users and groups (kind of a moot point for this, but oh well). I then Save the configuration once again and give it about 10 minutes to pull down the roles.
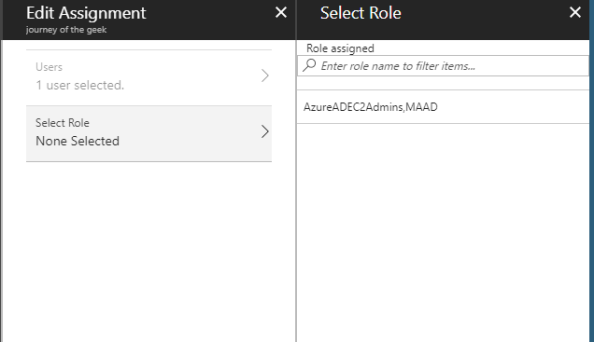
I then navigate back to the Users and Groups section and edit the Rick Sanchez assignment. Hitting the role option now shows me the AzureADEC2Admins role I configured in AWS IAM.
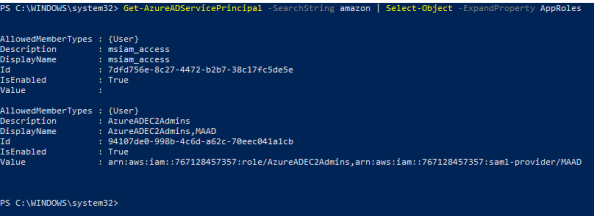
Let’s take another look at the service principle representing the AWS application in PowerShell. Using the Azure AD PowerShell cmdlets I referenced in entry 2 we connect to Azure AD and run the cmdlet Get-AzureADServicePrincipal which when run shows the manifest has been updated to include the newly synchronized application role.
We’ve configured the SAML trust on both ends, defined the necessary attributes, setup synchronization, and assigned Rick Sanchez an IAM role. In a moment we’ll demonstrate all of the pieces coming together.
Before I wrap it up, I want to quickly mention a few issues I ran into with this integration that seemed to resolve themselves without any intervention.
- Up to a few nights ago I was unable to get the Provisioning piece working. I’m not putting it past user error (this is me we’re talking about) but I tried numerous times and failed but was successful a few nights ago. I also noticed from some recent comments in the Microsoft tutorial people complaining of similar errors. Maybe something broke for a bit?
- The value of the audience attribute in the audienceRestriction section of the SAML assertion generated by Azure AD doesn’t match the identifier within the AWS federation metadata. Azure AD inserts some garbage looking audience value by default which was causing the assertions to be rejected by AWS. After setting the identifier to the value of urn:amazon:webservices as referenced in the AWS federation metadata the assertion was consumed without issue. I saw similar complaints in the Microsoft tutorial so I’m fairly confident this wasn’t just my issue.The story gets a bit stranger. I wanted to demonstrate the behavior for this series by removing the identifier I had previously added. Oddly enough the assertion was consumed without issue by AWS. I verified using Fiddler that the audience value was populated with that garbage entry. Either way, I would err on the side of caution and would recommend populating the identifier with the entry referenced in the AWS metadata as seen below.

The last thing I want to point out is the Microsoft tutorial states that you are required to create the users in AWS prior to asserting their identity. This is inaccurate as AWS does not require a user record to be pre-created in AWS. This is different from a majority (if not all) of the SaaS integrations I’ve done in the past so this surprised me as well. Either way, it’s not required which is a nice benefit if you’ve ever had to deal with the challenging of managing the identify lifecycle across cloud offerings.
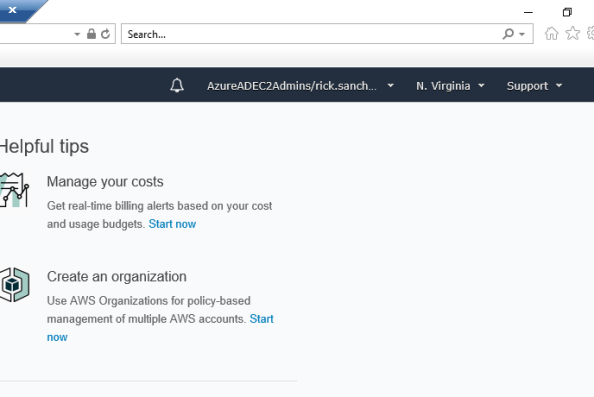
Let’s wrap up this series by having Rick Sanchez log into the AWS Management Console and shutdown an EC2 instance. Here I have logged into the Windows 10 machine named CLIENT running in Azure. We navigate to https://myapps.microsoft.com and log into Azure AD as Rick Sanchez. We then hit the Amazon Web Services icon and are seamless logged into the AWS Management Console.
Examining the assertion in Fiddler shows the Role and RoleSessionName claims in the assertion.
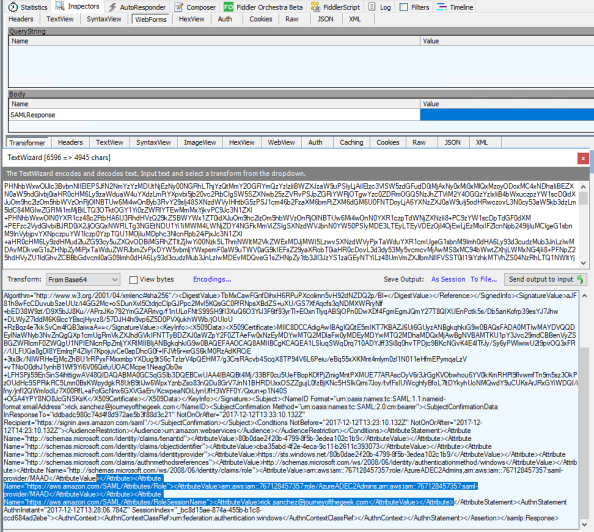
Navigating to the EC2 Dashboard displays the instance I prepared earlier using my primary account. Rick has full rights over administration of the instance for activities such as starting and starting the instance. After successfully terminating the instance I log into the AWS Management Console as my primary AWS account and go to CloudTrail and see the log entries recording the activities of Rick Sanchez.

With that let’s cover some key pieces of information to draw from the series.
- The Azure AD and AWS integration differs from most SaaS integrations I’ve done when it comes to user provisioning. Most of the time a user record must exist prior to the user authenticating. There are a growing number of SaaS providers provisioning upon successful authentication as provisioning challenges grow to further consumption of cloud services, but they are still few and far between. AWS does a solid job with eliminating the pain of pre-provisioning users.
- The concept of associating roles with specific identity providers is really neat on Amazon’s part. It allows the customer to manage permissions and associate those permissions with roles in AWS, but delegate the right on a per identity provider basis to assert a specific set of roles.
- Microsoft’s definition of provisioning in this integration is pulling a listing of roles from AWS and making them configurable in the Azure Portal.
- The AWS API is solid and quite easy to leverage when using the AWS SDKs. I would like to see AWS switch from what seems to be proprietary method of application access to OAuth to become more aligned with the rest of the industry.
- Don’t trust vendors to make everything point and click. Take the time to understand what’s going on in the background. In a SAML integration such as this, a quick review of the metadata can save you a lot of headaches when troubleshooting issues.
I learned a ton about AWS over these past few weeks and also got some good deep dive time into Azure AD which I haven’t had time for in a while. Hopefully you found this series valuable and learned a thing or two yourself.
In my next series I plan on writing a simple application to consume the Cognito service offered by AWS. For those of you more familiar with the Microsoft side of the fence, it’s similar to Azure AD B2C but with some unique features Microsoft hasn’t put in place yet making a great option to solve those B2C identity woes.
Thanks and have a wonderful holiday!
Hi there, thanks for the great tutorial.
I somewhere read that you can only add 1 instance of an AWS App to an Azure AD tenant.
We are currently trying to bring many divisions and subsidiaries of my Customer in one Office 365 / AAD tenant, but they might want to use AWS Apps independently. Would this something we need to consider?
Thanks,
Franck
LikeLike
Hi Franck. I’m glad you found the blog helpful.
Your use case is really interesting. If I’m reading it right, you are centralizing identity for multiple entities to a single Azure AD tenant, but each entity may have its own AWS account that users from the entity need to access. Hopefully I have that right.
I’ve never tried adding multiple instances of the AWS app to Azure, so I’m not sure if that is a true limitation. I could see the potential for the limitation if Azure AD is creating a fixed security principal in the tenant. The security principals are unique such that you couldn’t duplicate them, hence only one instance per tenant from the app gallery.
Now as to how you solution around it, it really depends on your requirements for the provisioning (AWS IAM role sync). You could always provision one instance of the AWS app via the Azure gallery and then add other AWS accounts as generic SAML apps and use Azure purely as an IdP. Downfall is you’ll need to manually update those roles or get creative and write some type of sync script yourself. Either way, it’s pain.
I would recommend first validating that limitation. If it’s a true limitation and you have a good use case, reach out to Microsoft and see if they are willing to address it. Your use case doesn’t sound unique to me, so I have to imagine there are others out there asking for the same thing.
Let me know if you validate that limitation, I’m curious now.
LikeLike
Thanks Matt(?),
your description of the scenario is spot on.
This is the answer from an Azure AD Program Manager from July 2017 that I found:
“It’s not possible to add a second instance of AWS. AWS uses a fix Identifier for all apps (https://signin.aws.amazon.com/saml). The customer needs a different identifier to onboard a second instance of an app.”
I am just not yet sure if he means a second instance from any AWS app or of the same AWS app.
This would mean the limitation is on the AWS site.
Regards,
Franck
LikeLike
Ahh his response is interesting.
So the MS resource you spoke to is correct in that the identifier for a SAML relying party (or EntityID in SAML) has a uniqueness requirement per the Oasis standard (http://docs.oasis-open.org/security/saml/v2.0/saml-metadata-2.0-os.pdf). The standard stats the EntityID must be unique within an implementation (think of implementation as a collection of relying parties registered with an identity provider). The uniqueness is often enforced by and IdP by enforcing referential integrity on the field in the database of relying parties.
The part I disagree with the PM on is his reference to the identifier. The URI he mentions is not the unique identifier AWS uses. If you reference my third entry in the series, I examine AWS SAML metadata and we see that the EntityID is actually urn:amazon:webservices. The EntityID is typically included in the AudienceRestriction attribute in the SAML response. I don’t believe AWS verifies the AudienceRestriction based upon the behavior I observed when I tested the solution.
The URI the PM references is actually the assertion consumer URI. It tells the IdP where to direct the user agent (web browser) after the user successfully authenticates to the IdP. It’s value is typically included in the recipient attribute in the SAML response for the reasons I outline in part 3. I’m not familiar with a uniqueness requirement for assertion consumer URI (not to say there isn’t one I’m unfamiliar with).
If I’m right in AWS isn’t validating the AudienceRestriction attribute, you could theoretically modify the entity ID in Azure AD as I did in part 3 to something random. In that way, you could create multiple entities representing different AWS accounts each with the unique entity configured in the Azure Portal.
Unless MS is enforcing uniqueness beyond EntityID for other aspects of the application, the solution “should” work. Now even it works, it doesn’t mean MS supports it. 🙂
If you have a lab environment you could test this theory in, I’d love to hear your results. If I have a chance this weekend, I’ll try it myself because I’m now curious. 🙂
LikeLike
Hi Matt,
Thank you for this walk through. I’m having same problem. Not able to add more than 1 AWS account in Azure AD. Just curious if you ever had a chance to go through your test and weather or not it worked.
Thanks,
Suraj
LikeLike
Hi Suraj,
I believe there is a way. I need to wrap up my series on Azure AD Password Protection when I get back from vacation in a week. Once I do that I’ll do a few posts on how to handle multiple AWS accounts with Azure AD. Stay tuned!
LikeLike
Hi, great tutorial, thank you but what if i need to assign more than one role to the user ? I can not aassign more than 1 role to a user from AAD
LikeLike
Hi Ozzy. You’re running into one of the many interesting limitations of the Azure AD AWS App. AWS has a unique manner of handling identity which differs from most vendors. MS is still trying to tackle that uniqueness but isn’t there yet.
Both AWS and Microsoft have ways of addressing the multiple account and multiple roles scenarios. I don’t have a preference for one or the other, at the end of the day both involve modification of the application manifest through calls to the API.
Check out both of the options and see which one works best for you.
LikeLike
Thank you for providing this post, you covered a great deal of what is out there on the internet from both vendors in an easy-to-follow set of posts.
Do you have any insight as to why AWS does not offer an SP-initiated form of Single Sign-On the way AAD does? This method is extremely beneficial in AAD as it allows your users to go to the main portal and get redirected based upon the credentials supplied (it even allows for redirects to 3rd party IdP services). I find the lack of SP-initiated SSO very limiting in AWS and presents a challenge in our organization for hybrid cloud configurations using both cloud providers with our on-premises environment.
LikeLike
Hi John. Check out AWS SSO. It looks to be the beginning of AWS’s own IDaaS. It’s not close to the level of maturity as AAD, but it does support SAML and can act as an IdP. I haven’t used it extensively enough to know if supports both IdP and SP-initiated flows, but it would definitely be worth a look for you.
LikeLike
Hello,
Great blogg!
Im in the process of activate aws SSO with source identifier Azure AD. I have several allready in production aws account with are in consilidated billing right now. I have activated “All features” to preper for SSO.
This seems to be like heaven to be able to manage and handle access and accounts from one place so i really hope this will turn out great.
In every article or blogg i find it doesnt really say what will happen with my allready inplace IAM users if i change the source identifier. Do you know, can my “old” IAM users live side-by-side with the new synced “roles based” users from azure ad?
Thanks in advance.
Robert
LikeLike
Hi Robert. I want to preface my response with the warning that I haven’t tested this scenario and you really should test it first with an AWS account you don’t care about.
With that said, enabling AWS SSO and Azure AD within an AWS Organization shouldn’t affect the existing IAM Users you may have provisioned within your AWS Accounts. At the conceptual level, each AWS Account has its own directory. In this directory you provision your IAM Users, Group, Roles, and Identity Providers.
AWS SSO enters the pictures and acts almost like an identity management tool (SailPoint, MIM, whatever) provisioning new IAM Roles into AWS Accounts within an AWS Organization to support authentication and authorization from AWS SSO which is also acting as a directory and source of authority.
AWS SSO does not manage the lifecycle of IAM Users within the AWS Accounts of the AWS Organization (that I’ve ever seen), and is only concerned with provisioning IAM Roles into those accounts, so thus existing IAM Users should not be affected.
Again, you’ll want to do some testing or open a support case with AWS to get an official answer. The one outlining scenario I’d test if I were you would be the scenario where there is an existing IAM Role with the same name of the IAM Role you’re propagating via AWS SSO. If you have a policy attached to that role allowing an IAM User (say a non-human) from another AWS Account to assume it, that policy could get overwritten.
So in short, I don’t believe there will be an issue but you really should test and validate with AWS support.
LikeLike